
When you’re trying to tweak settings or install a new program on Windows 10, you might hit a roadblock because you need administrator permissions. This can be frustrating, but fear not! You can fix this by accessing the right settings in the Control Panel and updating user account controls. With a few simple steps, you can regain control and carry out your tasks without a hitch.
The following steps will guide you through the process of fixing administrator permissions on Windows 10, which will allow you to make changes to system settings and install programs without any issues.
Step 1: Open Control Panel
Begin by clicking the Start button and typing “Control Panel” into the search bar. Select it from the list.
In the Control Panel, you can access various system settings. By searching for it in the Start menu, you ensure you’re going to the right place to adjust user permissions.
Step 2: Navigate to User Accounts
Once in Control Panel, click on “User Accounts.”
This section holds all the information related to user accounts. Whether you want to add a new user or change existing permissions, this is your hub.
Step 3: Change Account Type
Click on “Manage another account,” then select the account you want to modify. Choose “Change the account type.”
Here, you can switch the account type from standard to administrator. This change affects what the user can do on the computer, allowing them to modify system settings and install software.
Step 4: Set as Administrator
Select “Administrator” and click “Change Account Type” to apply the changes.
Setting the account as an administrator gives it the necessary permissions to make changes to the system, such as installing programs or changing settings, which require admin access.
Step 5: Confirm Changes
Restart your computer to ensure the changes take effect properly.
A restart will refresh the system and apply any changes you’ve made, ensuring your user account now has the proper permissions.
Once you complete these steps, your chosen account will have administrator privileges. This means you can now adjust system settings, install software, and perform other tasks that require higher privileges without any interruptions.
Tips for Fixing Administrator Permission Windows 10
- Always ensure your main account has administrator privileges for easy access to settings.
- Keep your user account secure with a strong password to prevent unauthorized changes.
- Remember to revert administrator settings for temporary users after they complete their tasks.
- Regularly update your system to prevent security vulnerabilities that could affect user permissions.
- Use the “Run as Administrator” option for specific apps if you’re temporarily needing admin rights.
Frequently Asked Questions
How do I know if my account has administrator rights?
Go to Control Panel > User Accounts, and check your account type. If it says “Administrator,” then you have admin rights.
Can I change administrator settings without restarting my computer?
While changes usually require a restart, some updates might apply instantly. However, a restart ensures all changes are applied correctly.
Why can’t I change my account to administrator?
You need to have another account with administrator rights to make this change. Otherwise, you’ll need to contact someone who does.
Is it safe to always use an administrator account?
Using an admin account can pose security risks if you’re not careful with downloads or attachments. Consider using a standard account for daily activities.
What if I accidentally deleted my administrator account?
If you’ve lost access to an administrator account, try using system restore or booting into safe mode to recover it.
Summary
- Open Control Panel.
- Navigate to User Accounts.
- Change Account Type.
- Set as Administrator.
- Confirm Changes.
Conclusion
Fixing administrator permission issues on Windows 10 doesn’t have to be a headache. With the right steps and a bit of know-how, you can take back control of your computer and make the necessary changes without any hassle. Remember, while having administrator privileges can open up more possibilities on your computer, it also requires a higher sense of responsibility. After all, with great power comes great responsibility—especially in the digital world.
If you’re encountering repeated permission errors, it might be worth exploring further to ensure there aren’t deeper system issues at play. For ongoing computer concerns, consider consulting forums or reaching out to tech support. Always keep your system and its security features up-to-date. In the event you need more guidance, there’s a plethora of online resources and communities where seasoned tech enthusiasts are ready to help. So, go ahead, fix those permissions, and get back to using your PC just how you like it.
Matt Jacobs has been working as an IT consultant for small businesses since receiving his Master’s degree in 2003. While he still does some consulting work, his primary focus now is on creating technology support content for SupportYourTech.com.
His work can be found on many websites and focuses on topics such as Microsoft Office, Apple devices, Android devices, Photoshop, and more.
File permission errors on Windows 10/11 can be frustrating, especially when you need to access or modify critical files. These errors occur when your system restricts access due to incorrect permissions, ownership issues, or security policies. We will walk you through effective troubleshooting methods to resolve file permission errors.
Common Causes of File Permission Errors
- Incorrect File Ownership: The user attempting to access the file is not the owner.
- Lack of Administrator Privileges: Certain files require elevated permissions.
- Corrupt File System: Errors in the file system can lead to permission issues.
- Group Policy Restrictions: Specific organizational policies may block access.
Troubleshooting File Permission Errors
Verify File Ownership
Ownership of a file determines who can access or modify it. If you’re not the file owner, you might encounter permission errors.
Steps to Check and Change File Ownership:
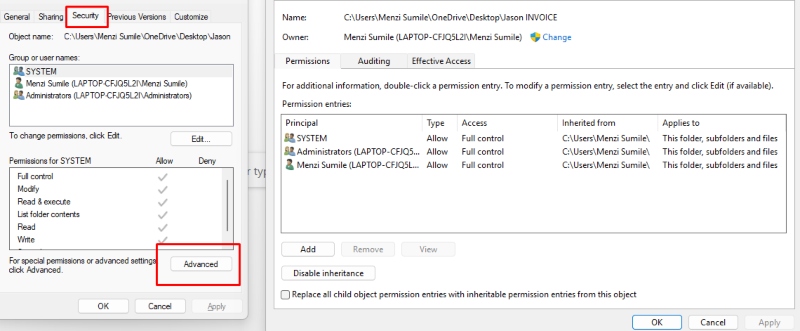
- Right-click on the problematic file and select Properties.
- Navigate to the Security tab and click Advanced.
- Look for the Owner section at the top. If your account is not listed, click Change.
- Enter your username in the box and click Check Names to validate.
- Click OK and then select Apply to save changes.
Adjust File Permissions
Sometimes, incorrect permissions can restrict access. Ensuring your account has complete control over the file can resolve the error.
Steps to Adjust File Permissions:
- Right-click the file and select Properties.
- Go to the Security tab and click Edit.
- Select your user account and check the Full Control box.
- Click Apply and OK to save your changes.
Run as Administrator
Specific files or applications require administrative privileges to access. Running these with elevated permissions may resolve the issue.
Steps to Run a File as Administrator:
- Right-click on the file or application.
- Select Run as Administrator from the context menu.
- If prompted, enter the administrator credentials.
Use the Command Prompt to Reset Permissions
The Command Prompt can be used to reset file permissions using specific commands. This method is beneficial for system-level files.
Steps to Reset Permissions Using Command Prompt:
- Press Windows + S, type cmd, and select Run as Administrator.
- Use the following command to reset permissions: icacls “file_path”/reset
- Replace file_path with the actual path of the file.
- Press Enter to check if the issue is resolved.
Check for Group Policy Restrictions
Group policies may restrict file access, especially in corporate environments. Adjusting these settings can resolve such issues.
Steps to Modify Group Policy Settings:
- Press Windows + R, type gpedit.msc, and hit Enter or OK.
- Navigate to User Configuration > Administrative Templates > System.
- Look for settings related to file restrictions and modify them as needed.
Repair Corrupted Files
File corruption can lead to permission errors. Running a system repair tool like SFC (System File Checker) can fix these issues.
Steps to Use System File Checker:
- Open Command Prompt as an Administrator.
- Type the following command and press Enter: sfc /scannow
- Wait for the process to complete and restart your system.
Protecting your system becomes paramount if your files remain corrupted despite extensive troubleshooting or if you still encounter file permission errors and suspect a malware or virus infection.
Investing in robust third-party software for comprehensive virus and malware defense is essential.
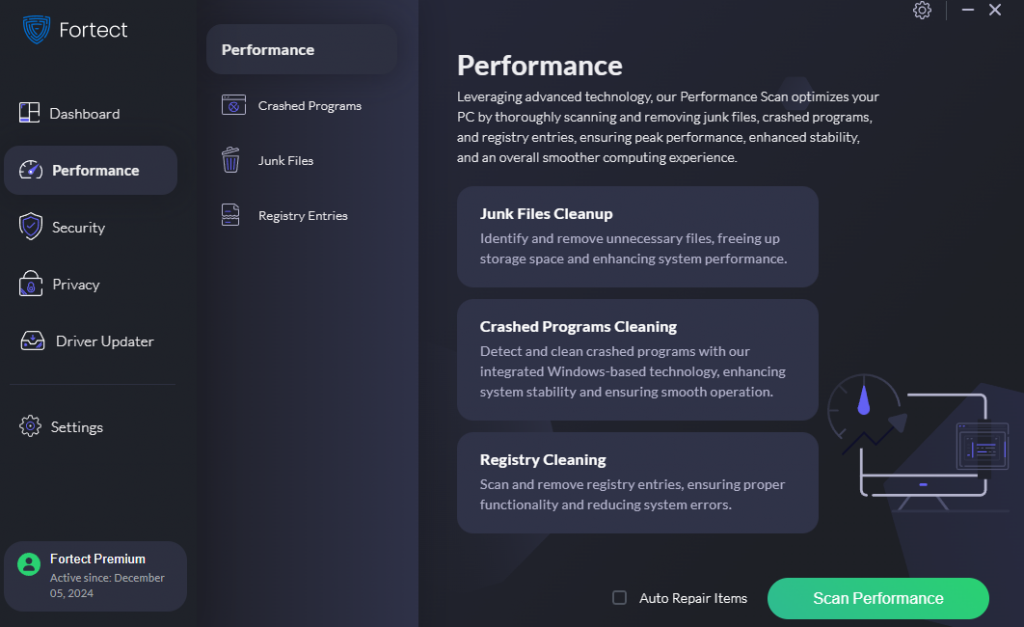
A tool like Fortect can make a significant difference. It automatically scans your PC, identifies corrupted files, and repairs them, ensuring your system stays secure and operates at peak performance.
Download and install Fortect now.
Enable Built-in Administrator Account
The built-in Administrator account in Windows has unrestricted access and can help resolve stubborn permission errors.
Steps to Enable the Administrator Account:
- Open Command Prompt as an Administrator.
- Enter the following command: net user administrator /active:yes
- Log in with the Administrator account and try accessing the file.
- To deactivate the account later, use the command: net user administrator /active:no
Preventing Future File Permission Errors
- Regular Backups: Keep backups to avoid losing access to important files.
- User Account Management: Ensure user accounts have the correct permissions.
- Monitor Third-Party Software: Configure antivirus and security software appropriately.
- System Updates: Keep your system updated to avoid bugs that cause permission errors.
Following these troubleshooting steps, you can effectively resolve file permission errors on Windows 10/11 and regain access to your files.
Are you struggling with administrator permissions in Windows 10? Are you unable to access certain files, install software, or make system changes due to permission issues? Don’t worry, you’re not alone. Many Windows 10 users face this problem, and it can be frustrating. In this article, we’ll take you through a comprehensive guide on how to fix administrator permissions in Windows 10.
Before we dive into the solutions, it’s essential to understand how administrator permissions work in Windows 10. Administrator permissions are a set of rights that allow users to make changes to the system, install software, and access restricted files. By default, the administrator account is the built-in Administrator account, which has full control over the system.
However, sometimes, administrator permissions can get corrupted or changed, leading to issues with accessing files, installing software, or making system changes. This can happen due to various reasons, such as:
- Corrupted system files: System files can become corrupted due to malware, viruses, or disk errors, leading to permission issues.
- Incorrect user account settings: If the user account settings are not configured correctly, it can lead to permission issues.
- Group Policy changes: Changes to Group Policy settings can affect administrator permissions.
- Third-party software conflicts: Conflicts with third-party software can also cause permission issues.
Method 1: Enable the Built-in Administrator Account
One of the simplest ways to fix administrator permissions is to enable the built-in Administrator account. This account has full control over the system and can be used to reset administrator permissions. Here’s how to enable the built-in Administrator account:
Using the Command Prompt
- Press the Windows key + X and select Command Prompt (Admin).
- Type the following command and press Enter:
net user administrator /active:yes - The built-in Administrator account should now be enabled.
Using the Local Users and Groups Manager
- Press the Windows key + R and type
lusrmgr.mscin the Run dialog box. - Click OK to open the Local Users and Groups Manager.
- In the left pane, click on Users.
- In the right pane, right-click on the Administrator account and select Properties.
- Check the box next to “Account is disabled” to enable the account.
Method 2: Reset Administrator Permissions using the Command Prompt
If enabling the built-in Administrator account doesn’t work, you can try resetting administrator permissions using the Command Prompt. Here’s how:
Resetting Administrator Permissions
- Press the Windows key + X and select Command Prompt (Admin).
- Type the following command and press Enter:
icacls * /reset /t - This command will reset the administrator permissions for all files and folders on the system.
Resetting Administrator Permissions for a Specific Folder
- Press the Windows key + X and select Command Prompt (Admin).
- Type the following command and press Enter:
icacls "C:\Folder\Path" /reset /t - Replace “C:\Folder\Path” with the path to the folder for which you want to reset administrator permissions.
Method 3: Use the Windows 10 Built-in Troubleshooter
Windows 10 has a built-in troubleshooter that can help fix administrator permission issues. Here’s how to use it:
Running the Troubleshooter
- Press the Windows key + S and type “troubleshooter” in the Search bar.
- Click on “Troubleshoot” in the search results.
- Click on “Additional troubleshooters” in the left pane.
- Click on “System and Security” and then click on “System Administrator”.
- Follow the prompts to run the troubleshooter.
Method 4: Use the System File Checker (SFC) Tool
The System File Checker (SFC) tool can help fix corrupted system files that may be causing administrator permission issues. Here’s how to use it:
Running the SFC Tool
- Press the Windows key + X and select Command Prompt (Admin).
- Type the following command and press Enter:
sfc /scannow - The SFC tool will scan the system for corrupted files and replace them if necessary.
Method 5: Perform a System Restore
If none of the above methods work, you can try performing a System Restore to a point when the administrator permissions were working correctly. Here’s how:
Performing a System Restore
- Press the Windows key + S and type “system restore” in the Search bar.
- Click on “Create a restore point” in the search results.
- Click on “System Restore” in the left pane.
- Click on “Next” and select a restore point from the list.
- Follow the prompts to complete the System Restore process.
Conclusion
Fixing administrator permissions in Windows 10 can be a challenging task, but it’s not impossible. By following the methods outlined in this article, you should be able to regain control over your system and fix administrator permission issues. Remember to always be cautious when making changes to system settings and files, and make sure to back up your data regularly to avoid any potential losses.
| Method | Description |
|---|---|
| Enable the Built-in Administrator Account | Enables the built-in Administrator account, which has full control over the system. |
| Reset Administrator Permissions using the Command Prompt | Resets administrator permissions for all files and folders on the system or for a specific folder. |
| Use the Windows 10 Built-in Troubleshooter | Runs a troubleshooter to fix administrator permission issues. |
| Use the System File Checker (SFC) Tool | Scans the system for corrupted files and replaces them if necessary. |
| Perform a System Restore | Restores the system to a point when the administrator permissions were working correctly. |
By following these methods, you should be able to fix administrator permissions in Windows 10 and regain control over your system.
What are administrator permissions in Windows 10?
Administrator permissions in Windows 10 refer to the level of access and control a user has over the operating system and its settings. Administrators have the ability to make changes to system settings, install and uninstall software, and manage user accounts. They also have the ability to access and modify system files and folders, which can be useful for troubleshooting and maintenance.
Having administrator permissions is essential for performing tasks that require elevated privileges, such as installing drivers, updating the operating system, and configuring system settings. However, it’s also important to note that administrator permissions can be a security risk if not managed properly, as they can be used to install malware or make unauthorized changes to the system.
Why do I need to fix administrator permissions in Windows 10?
You may need to fix administrator permissions in Windows 10 if you’re experiencing issues with accessing certain system settings or performing tasks that require elevated privileges. This can happen if your administrator account has been compromised or if you’ve accidentally changed the permissions settings. Additionally, if you’re using a shared computer, you may need to fix administrator permissions to ensure that other users don’t have access to sensitive system settings.
Fixing administrator permissions can also help to resolve issues with software installation and updates, as well as problems with system configuration and troubleshooting. By regaining control over administrator permissions, you can ensure that your system is secure and functioning properly.
How do I know if I have administrator permissions in Windows 10?
To check if you have administrator permissions in Windows 10, you can follow a few simple steps. First, click on the Start button and select the Settings app. Then, click on the “Accounts” option and select “Your email and accounts.” If you see the option to “Manage my Microsoft account,” you likely have administrator permissions.
Alternatively, you can also check the Control Panel to see if you have administrator permissions. To do this, click on the Start button and select the Control Panel. Then, click on the “User Accounts” option and select “Manage another account.” If you see a list of user accounts and the option to “Change account type,” you likely have administrator permissions.
What are the common issues with administrator permissions in Windows 10?
There are several common issues that can occur with administrator permissions in Windows 10. One of the most common issues is the inability to access certain system settings or perform tasks that require elevated privileges. This can happen if your administrator account has been compromised or if you’ve accidentally changed the permissions settings.
Another common issue is the inability to install or update software, which can be caused by a lack of administrator permissions. Additionally, issues with system configuration and troubleshooting can also occur if administrator permissions are not set up correctly. In some cases, users may also experience issues with accessing certain files or folders, which can be caused by incorrect permissions settings.
How do I fix administrator permissions in Windows 10?
To fix administrator permissions in Windows 10, you’ll need to follow a series of steps to regain control over your system settings and user accounts. The first step is to check the User Account Control (UAC) settings to ensure that they are set to the correct level. You can do this by clicking on the Start button and selecting the Control Panel. Then, click on the “User Accounts” option and select “Change User Account Control settings.”
Once you’ve checked the UAC settings, you’ll need to check the permissions settings for your user account. To do this, click on the Start button and select the File Explorer. Then, navigate to the folder or file that you’re having trouble accessing and right-click on it. Select the “Properties” option and then click on the “Security” tab. From here, you can check the permissions settings and make any necessary changes.
Can I fix administrator permissions in Windows 10 without reinstalling the operating system?
Yes, it is possible to fix administrator permissions in Windows 10 without reinstalling the operating system. In most cases, you can resolve issues with administrator permissions by making changes to the User Account Control (UAC) settings and the permissions settings for your user account.
However, in some cases, you may need to use more advanced troubleshooting techniques, such as using the built-in Administrator account or performing a System Restore. Additionally, if you’re experiencing issues with malware or viruses, you may need to run a virus scan or use a malware removal tool to resolve the issue.
How can I prevent issues with administrator permissions in Windows 10 in the future?
To prevent issues with administrator permissions in Windows 10 in the future, it’s essential to manage your user accounts and permissions settings carefully. This includes setting up strong passwords and ensuring that each user account has the correct level of access and control.
Additionally, you should also keep your operating system and software up to date, as newer versions often include security patches and bug fixes that can help to prevent issues with administrator permissions. You should also be cautious when installing software and avoid installing programs from untrusted sources, as these can potentially compromise your system security.
Нередко пользователи Windows 10 сталкиваются с необходимостью в изменении состояния службы. Процесс не всегда проходит гладко, и нередко возникает ошибка «Отказано в доступе». Обычно она связана с программным сбоем, но есть и другие причины. О них и способах решения проблемы мы расскажем в данном материале.
Неполадка сообщает, что у пользователя нет прав на просмотр конкретного файла или приложения. Главной задачей является обход данного ограничения или его деактивация. Рассмотрим способы, позволяющие это сделать.
Запуск программы от имени администратора
Первый вариант — возвращение прав суперпользователя посредством использования полномочий администратора.
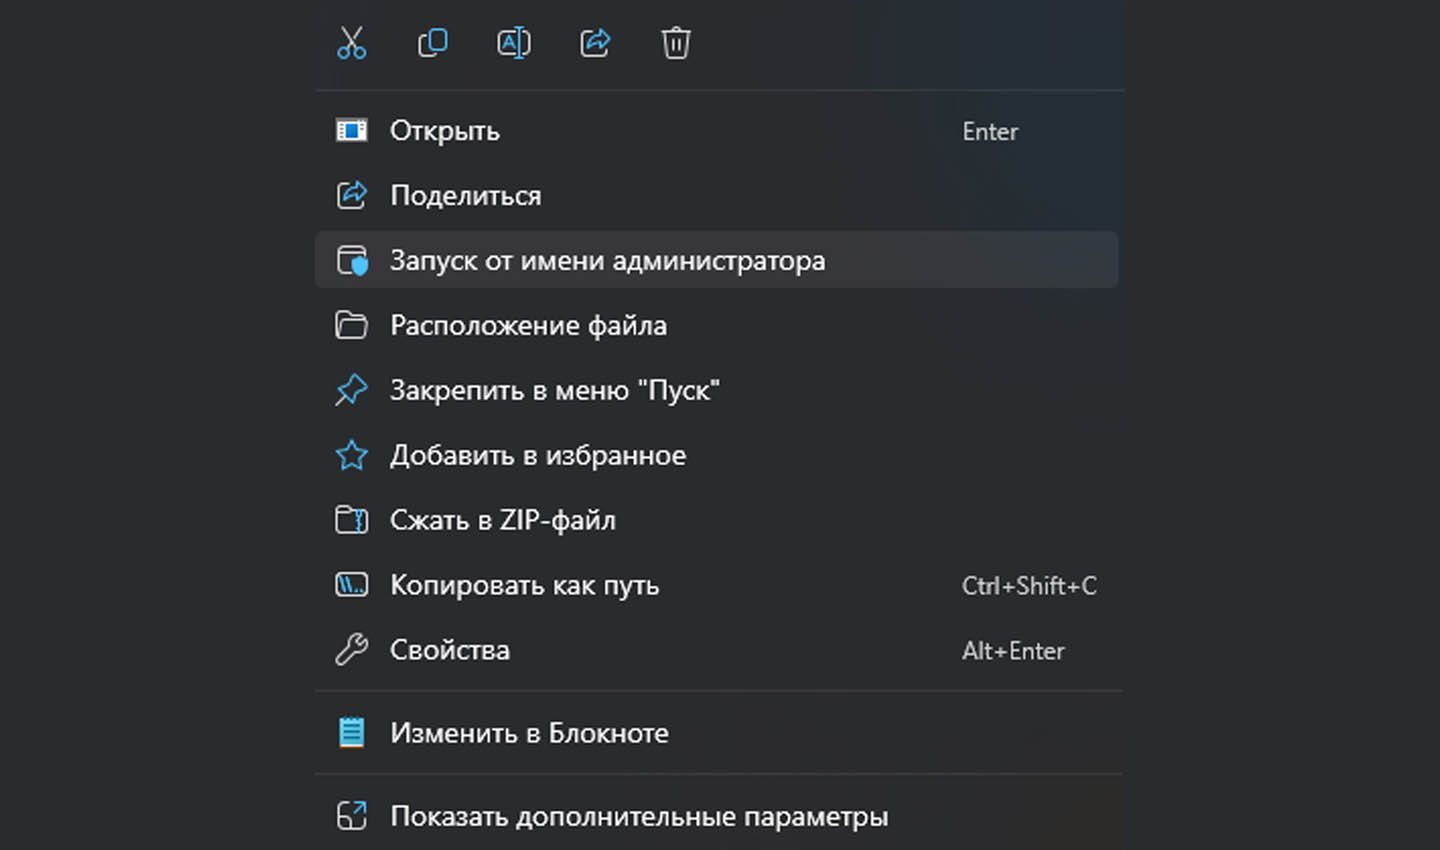
Источник скриншота: CQ / Запуск от имени администратора
Делается это так:
- Ищем нужный файл или программу через любой файловый менеджер. Лучшее решение — проводник.
- Нажатием правой клавиши мыши (ПКМ) открываем перечень доступных действий.
- Из списка выбираем пункт «Запуск от имени администратора».
Открытие доступа к папкам для всех профилей
Если на компьютере несколько учеток, необходимо предоставить им равные права для использования хранящейся информации.
Источник скриншота: CQ / Профили Windows
Делается это следующим образом:
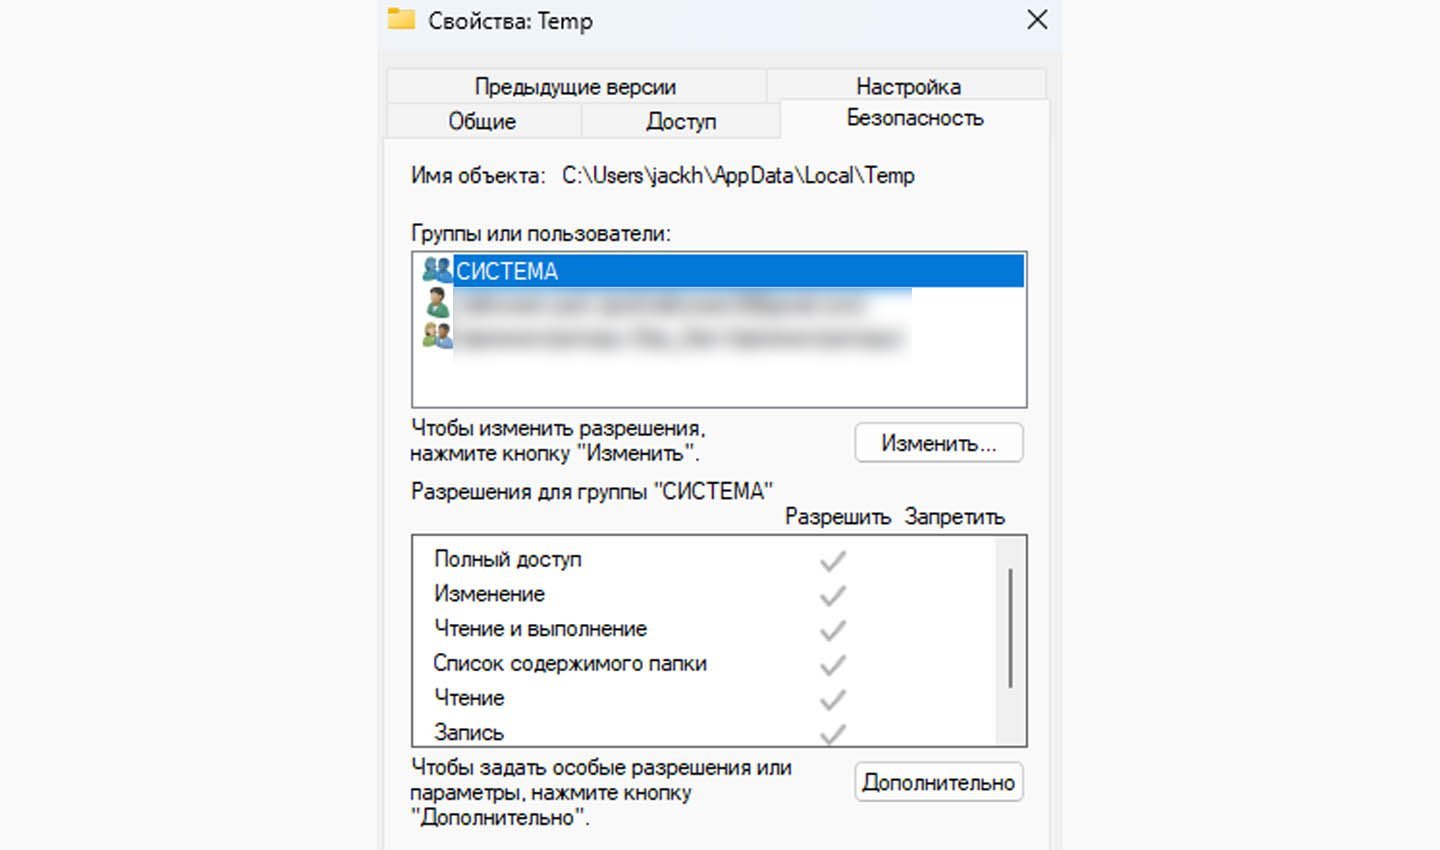
- Откройте командное окно, вызвав его комбинацией клавиш «Win + R».
- Введите в строку команду: «%USERPROFILE°/o\AppData\Local\» (без кавычек).
- Отыщите каталог под названием Temp, щелкните по нему ПКМ для открытия меню.
- Выберите раздел «Свойства», далее перейдите в «Безопасность».
- Нажмите кнопку «Добавить», расположенную под графой «Группы или пользователи».
- В окне ввода имени напишите «Все», нажмите «Проверить имена».
- Если система не отыщет имя, то вновь нажмите на окно ввода имени и напишите «All».
- В блоке ниже «Разрешения для группы» проставьте галочки в столбце «Разрешить».
- Нажмите «Применить», после «ОК», перезагрузите устройство.
Использование командной строки
Иногда ошибка возникает из-за сбоев в работе служб Windows.
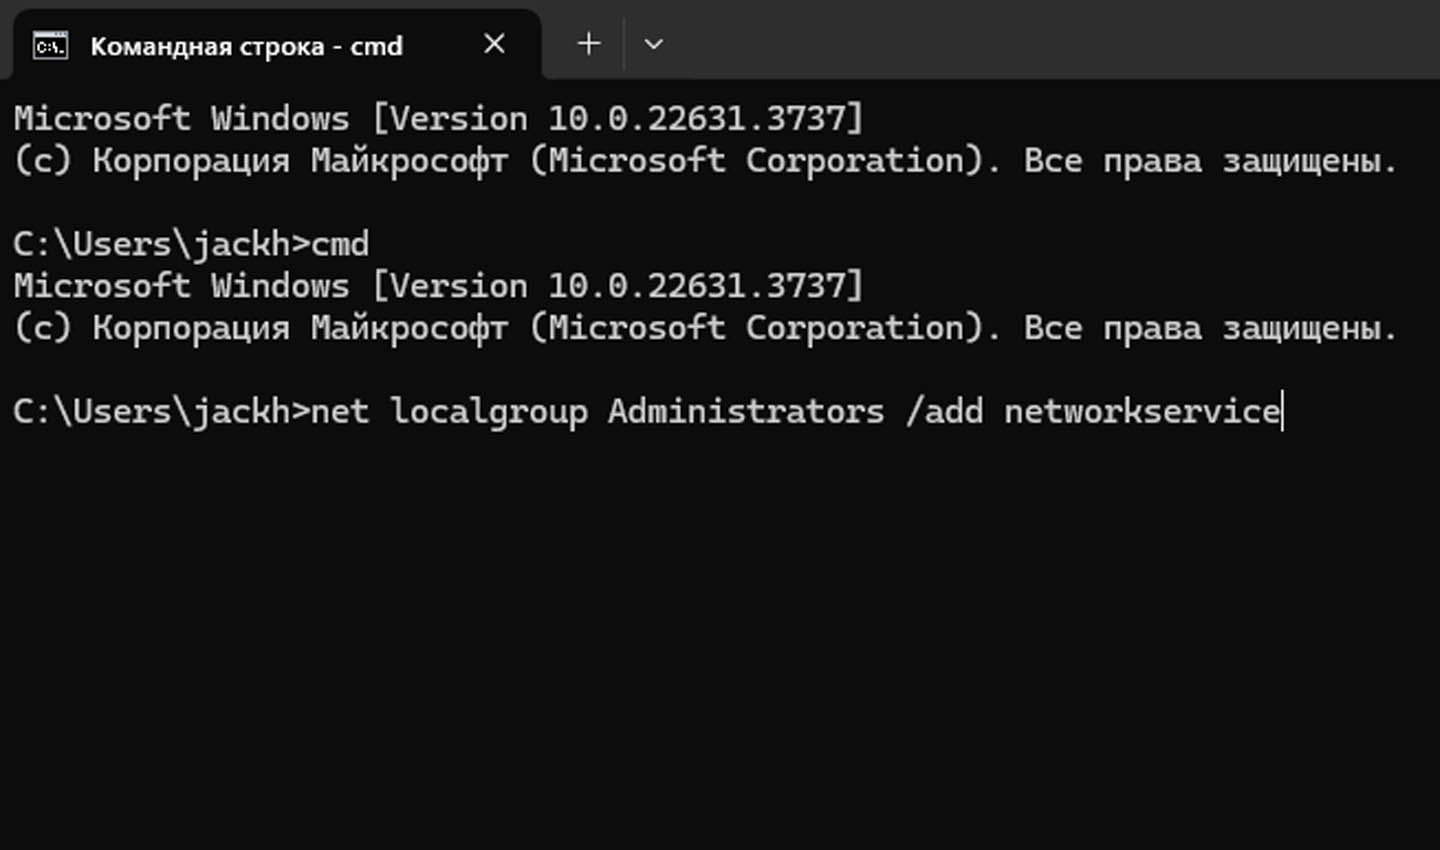
Источник скриншота: CQ / Использование командной строки
В таких ситуациях действуем следующим образом:
- Откройте кнопку «Пуск», наберите в поиске «Командная строка».
- Щелкните ПКМ на приложении cmd.exe. Перед вами появится контекстное меню.
- Выберите из списка пункт «Запуск от имени администратора».
- В открывшемся черном окне напечатайте следующее: «net localgroup Administrators /add networkservice» (без кавычек). Нажмите «Enter». Дождитесь надпись «Команда выполнена успешно».
- В появившейся строке ввода напишите следующую команду: net localgroup Administrators /add localservice». Нажмите «Enter». Дождитесь надписи о выполнении и закройте командную строку.
- Перезагрузите устройство. Если проблема решена, доступ к папкам восстановится.
Использование системной учетной записи
Во всех «десятках» есть встроенная учетка, называющаяся «LOCAL SERVER». Это системный аккаунт, отвечающий за определенные функции, в том числе и работу со службами. Если перечисленные ранее варианты не сработали, можно попробовать дать привилегии системной учетке. Для этого необходимо:
- Откройте «Этот компьютер». Отыщите «Локальный диск (С:)». Нажмите на него ПКМ и выберите пункт «Свойства».
- В открывшемся окне нажмите на раздел «Безопасность». Выберите «Изменить».
- Нажмите на кнопку «Добавить» под блоком «Группы и пользователи».
- В следующем окне выберите «Дополнительно».
- Отыщите необходимую учетную запись в списке. Выберите ее.
- После предоставьте ей полный доступ к системным операциям, проставив галочки в столбце «Разрешить».
- Последовательно нажмите «Применить», «ОК», перезагрузите устройство.
Проверка наличия вирусов
В редких случаях система отказывает в доступе из-за внешнего вмешательства — вредоносного ПО. Это вариант на случай, если все предыдущие способы не помогли. Сделать это можно так:
- Откройте «Пуск», введите в поиск «Защитник Windows».
- Перейдите в программу, запустите проверку. Дождитесь ее окончания.
Если будут обнаружены вредоносные ПО, удалите их, а после перезагрузите устройство.
Заглавное фото: freepik
Introduction
Windows 10 file permissions are a crucial aspect of maintaining the security and integrity of your system. However, many users have reported issues with file permissions not setting or functioning properly. This can lead to frustrating errors, such as the inability to write to certain files or folders. In this article, we will delve into the world of Windows 10 file permissions, exploring the causes of these issues and providing practical solutions to resolve them.
Understanding Windows 10 File Permissions
Before we dive into the problems and solutions, it’s essential to understand how Windows 10 file permissions work. File permissions determine who can access, read, write, or execute files and folders on your system. There are three primary types of permissions:
- Read: Allows users to view the contents of a file or folder.
- Write: Enables users to modify or delete files and folders.
- Execute: Grants users the ability to run executable files.
Windows 10 uses a hierarchical permission system, where permissions are inherited from the parent folder. This means that if a folder has read-only permissions, all files and subfolders within that folder will also have read-only permissions.
Causes of Windows 10 File Permissions Issues
There are several reasons why Windows 10 file permissions may not be setting or functioning properly. Some of the most common causes include:
- Incorrect permission settings: If the permission settings for a file or folder are not correctly configured, it can lead to issues with file access and modification.
- Inherited permissions: When permissions are inherited from a parent folder, it can cause conflicts and issues with file access.
- Group Policy Objects (GPOs): GPOs can override local permission settings, leading to issues with file access and modification.
- File system corruption: Corruption in the file system can cause issues with file permissions and access.
- Third-party software: Certain third-party software can interfere with Windows 10 file permissions, leading to issues with file access and modification.
Solutions to Windows 10 File Permissions Issues
Now that we’ve explored the causes of Windows 10 file permissions issues, let’s move on to the solutions. Here are some practical steps you can take to resolve file permissions issues:
1. Check Permission Settings
To check the permission settings for a file or folder, follow these steps:
- Right-click on the file or folder and select Properties.
- Click on the Security tab.
- Click on the Edit button.
- Review the permission settings to ensure they are correctly configured.
2. Inherit Permissions from Parent Folder
If you’re experiencing issues with inherited permissions, try inheriting permissions from the parent folder:
- Right-click on the file or folder and select Properties.
- Click on the Security tab.
- Click on the Advanced button.
- Click on the Change button next to Permissions.
- Select Inherit permissions from parent folder.
3. Override Group Policy Objects (GPOs)
If you’re experiencing issues with GPOs overriding local permission settings, try overriding the GPO:
- Open the Group Policy Editor (gpedit.msc).
- Navigate to the Computer Configuration > Administrative Templates > System > File System > File Permissions.
- Double-click on the Override Group Policy setting.
- Select Enabled and enter the desired permission settings.
4. Check for File System Corruption
If you suspect file system corruption, try running the chkdsk command:
- Open the Command Prompt as an administrator.
- Type chkdsk /f and press Enter.
- Follow the prompts to run the chkdsk command.
5. Disable Third-Party Software
If you suspect third-party software is interfering with Windows 10 file permissions, try disabling the software:
- Open the Task Manager (Ctrl + Shift + Esc).
- Click on the Details tab.
- Look for the software in question and right-click on it.
- Select Disable.
Preventing Windows 10 File Permissions Issues
While it’s impossible to completely prevent Windows 10 file permissions issues, there are several steps you can take to minimize the risk:
- Regularly back up your files: Ensure you have a recent backup of your files to prevent data loss in case of a permissions issue.
- Use a reliable antivirus program: Install a reputable antivirus program to protect your system from malware and other threats.
- Keep your system up to date: Regularly update your system to ensure you have the latest security patches and features.
- Use a file system repair tool: Consider using a file system repair tool, such as chkdsk, to regularly check for file system corruption.
Conclusion
Windows 10 file permissions are a critical aspect of maintaining the security and integrity of your system. However, issues with file permissions can lead to frustrating errors and data loss. By understanding the causes of these issues and following the practical solutions outlined in this article, you can resolve file permissions issues and prevent them from occurring in the future.
Additional Resources
For more information on Windows 10 file permissions, check out the following resources:
- Microsoft Support: Windows 10 file permissions troubleshooting
- Windows 10 documentation: File permissions
- TechNet: Windows 10 file permissions
Frequently Asked Questions
Q: What are the three primary types of permissions in Windows 10?
A: The three primary types of permissions are Read, Write, and Execute.
Q: How do I check the permission settings for a file or folder?
A: To check the permission settings for a file or folder, right-click on the file or folder and select Properties. Click on the Security tab and review the permission settings.
Q: How do I inherit permissions from a parent folder?
A: To inherit permissions from a parent folder, right-click on the file or folder and select Properties. Click on the Security tab and click on the Advanced button. Click on the Change button next to Permissions and select Inherit permissions from parent folder.
Q: What are the most common causes of Windows 10 file permissions issues?
A: The most common causes of Windows 10 file permissions issues include incorrect permission settings, inherited permissions, Group Policy Objects (GPOs), file system corruption, and third-party software interference.
Q: How do I check the permission settings for a file or folder?
A: To check the permission settings for a file or folder, right-click on the file or folder and select Properties. Click on the Security tab and review the permission settings.
Q: What are the three primary types of permissions in Windows 10?
A: The three primary types of permissions are Read, Write, and Execute.
Q: How do I inherit permissions from a parent folder?
A: To inherit permissions from a parent folder, right-click on the file or folder and select Properties. Click on the Security tab and click on the Advanced button. Click on the Change button next to Permissions and select Inherit permissions from parent folder.
Q: How do I override Group Policy Objects (GPOs)?
A: To override GPOs, open the Group Policy Editor (gpedit.msc) and navigate to the Computer Configuration > Administrative Templates > System > File System > File Permissions. Double-click on the Override Group Policy setting and select Enabled. Enter the desired permission settings.
Q: What is the difference between Read and Write permissions?
A: Read permissions allow users to view the contents of a file or folder, while Write permissions enable users to modify or delete files and folders.
Q: How do I check for file system corruption?
A: To check for file system corruption, open the Command Prompt as an administrator and type chkdsk /f. Follow the prompts to run the chkdsk command.
Q: What is the purpose of the chkdsk command?
A: The chkdsk command is used to check for file system corruption and repair any issues that are found.
Q: How do I disable third-party software that is interfering with Windows 10 file permissions?
A: To disable third-party software, open the Task Manager (Ctrl + Shift + Esc) and click on the Details tab. Look for the software in question and right-click on it. Select Disable.
Q: What are some best practices for preventing Windows 10 file permissions issues?
A: Some best practices for preventing Windows 10 file permissions issues include regularly backing up your files, using a reliable antivirus program, keeping your system up to date, and using a file system repair tool.
Q: What are some common symptoms of Windows 10 file permissions issues?
A: Common symptoms of Windows 10 file permissions issues include errors when trying to access or modify files, inability to write to certain files or folders, and file system corruption.
Q: How do I troubleshoot Windows 10 file permissions issues?
A: To troubleshoot Windows 10 file permissions issues, try checking the permission settings for the affected file or folder, checking inherited permissions, and checking for file system corruption.
Q: What are some resources for learning more about Windows 10 file permissions?
A: Some resources for learning more about Windows 10 file permissions include the Microsoft Support website, the Windows 10 documentation, and the TechNet website.
Q: Can I use a third-party tool to manage Windows 10 file permissions?
A: Yes, there are several third-party tools available that can help manage Windows 10 file permissions. However, be sure to research and review the tool’s features and functionality before using it.
Q: How do I reset Windows 10 file permissions to their default settings?
A: To reset Windows 10 file permissions to their default settings, open the Group Policy Editor (gpedit.msc) and navigate to the Computer Configuration > Administrative Templates > System > File System > File Permissions. Double-click on the Reset File Permissions setting and select Enabled. Follow the prompts to reset the file permissions.