
33
33 people found this article helpful
You can use a Windows command or third-party utilities
What to Know
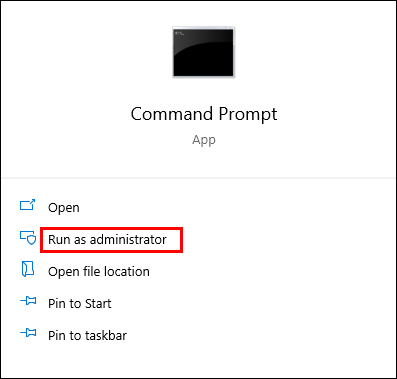
- Easiest: Open the Start menu > type command > right-click the Command Prompt app > Run as administrator.
- Type netstat -ab > press Enter > look for items in the «LISTENING» state.
- The alternative is to use a third-party app: We like TCPView, Nirsoft CurrPorts, and PortQry Command Line Port Scanner.
This article outlines how to check for open ports in Windows 10, which is necessary if an application cannot access the internet or you want to block an application.
How to Check If a Port Is Open With Netstat
The easiest way to check if a port is open on Windows 10 is by using the Netstat command. ‘Netstat’ is short for network statistics. It will show you what ports each internet protocol (like TCP, FTP, etc.) is currently using.
The command has many parameters, but the ones you’ll need to use to check if a port is open are (a), which provides the active ports, and (b), which will tell you the name of the processes using those ports.
-
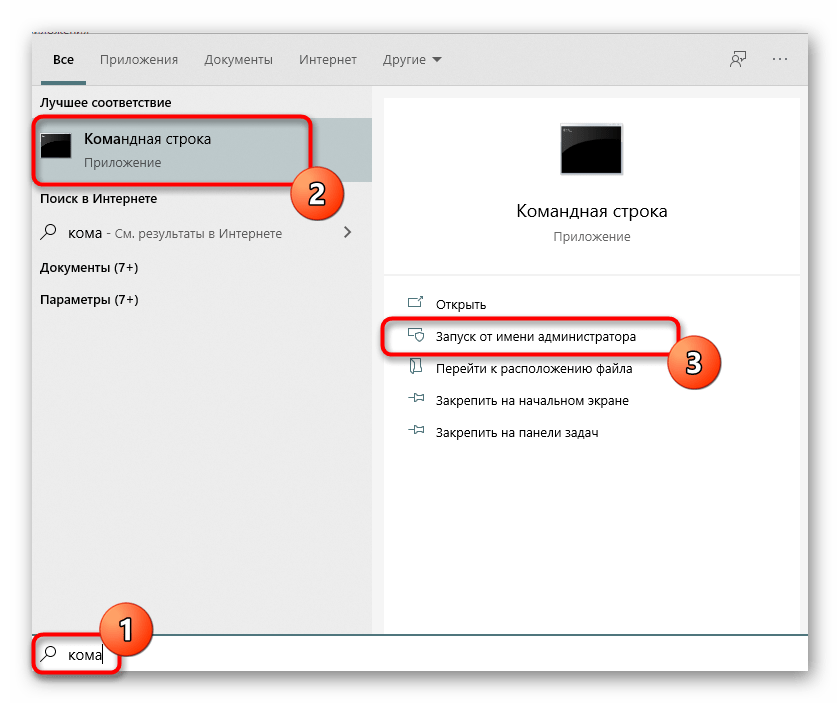
Select the Start menu and type «command.» Right-click on the Command Prompt app and select Run as administrator.
-
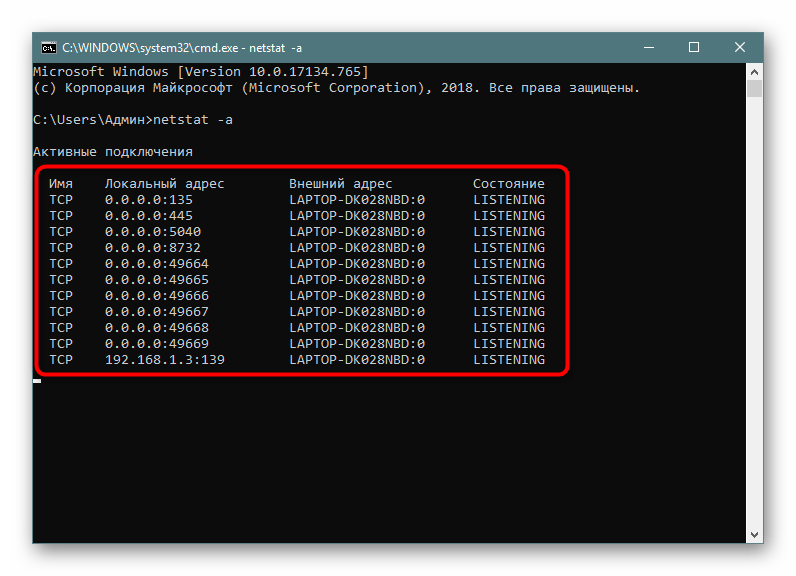
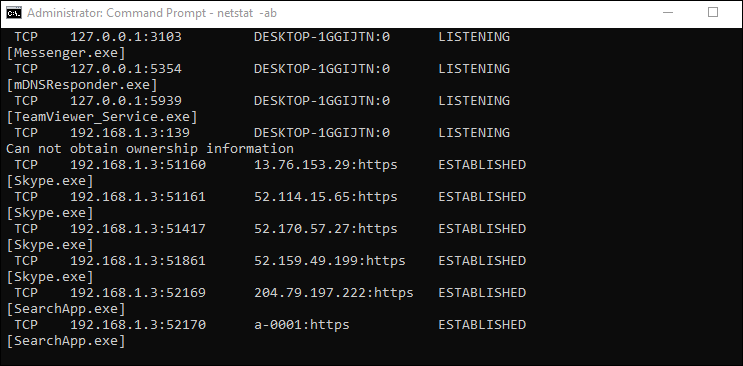
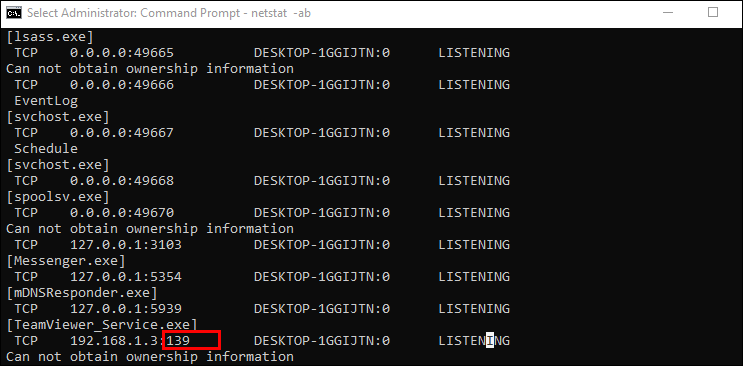
Type netstat -ab and press Enter. You’ll see a long list of results, depending on what’s currently connecting to the network. You’ll see a list of running processes. The open port numbers will be after the last colon on the local IP address (the one on the left).
-
Look for the items on the list with a state of «LISTENING.» These are the processes that are communicating via one of the currently opened ports.
-
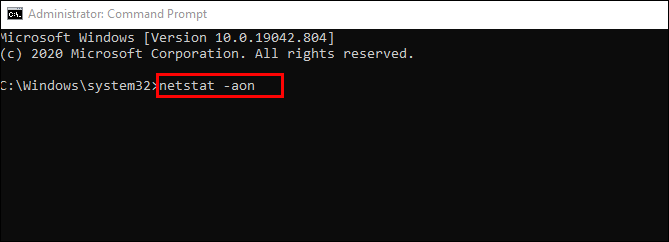
If you want to know the program’s name that has a specific port open, then type netstat -aon and press Enter. This command will show the protocol the app is using, the local and remote IP addresses, and most importantly, the PID of the application using that port (the number on the far right). Remember to look for the LISTENING status.
-
To find the application related to that PID, right-click the task manager and select Task Manager. Select the Details tab. Look in the PID field for the PID you noted from the command prompt screen.
How to Check If a Port Is Working Using Third-Party Apps
If you don’t want to use the command prompt to check for open ports, there are very easy-to-use third-party apps that can help.
TCPView
TCPView is a utility included in Microsoft Sysinternals that shows you a list of all running processes and their associated open ports. This app displays ports opening and closing and packet transfers, all in real-time.
Nirsoft CurrPorts
Nirsoft CurrPorts is another utility to see all ports currently being used by applications and services on your system. Just look for the local ports column to see which of your computer’s ports are active.
The list also includes ports that are being connected to on the remote end (the server out on the internet).
PortQry Command Line Port Scanner
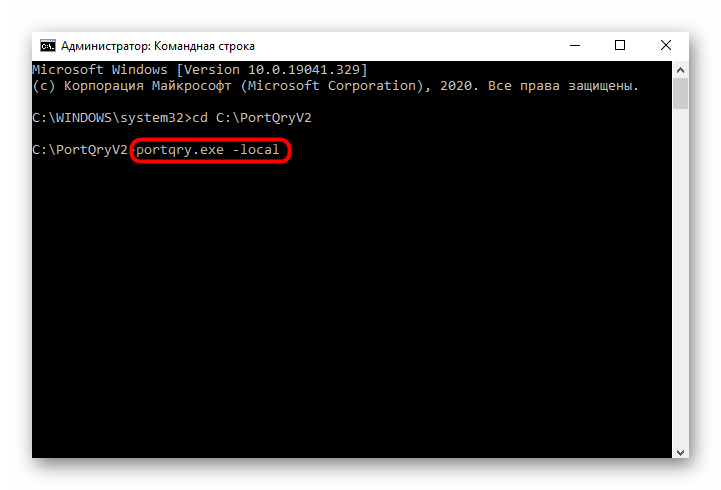
Install PortQry Command Line Port Scanner for another command-line utility dedicated to scanning your computer for open ports. Once you install it, open Command Prompt in administrator mode. PortQry automatically installs in the C:\PortQryV2 directory, so change the directory of your command prompt to that directory.
Type the command portqry.exe -local to see all open TCP and UDP ports for your machine. It’ll show you everything you can see with the NetStat command, plus port mappings and how many ports are in each state.
What Is a Port?
Applications running on your computer reach out and get information and data from servers elsewhere on the internet. These applications and the server know how to communicate based on their IP address and the port number.
Think of the IP address as a street address and the port number as the apartment number. If either the server or application attempts to communicate using any other port number, it won’t work. Every other door will be «locked» because other ports are closed.
Thanks for letting us know!
Get the Latest Tech News Delivered Every Day
Subscribe
Checking open TCP/IP ports on your Windows computer is crucial for managing network security and ensuring smooth connectivity. Certain apps and processes in Windows may face issues due to closed or misconfigured ports, often caused by firewalls or private IP addresses. This guide will walk you through step-by-step methods to check whether a TCP port is open or closed using built-in tools and third-party utilities.
Why You Should Check TCP/IP Ports?
Here are some common scenarios where checking ports is necessary:
- Troubleshooting connectivity issues for applications or services.
- Configuring firewalls to ensure necessary connections are allowed.
- Detecting suspicious activity that might indicate a security breach.
Methods to Check Open TCP/IP Ports
There are several ways to check open TCP/IP ports in Windows. Here are a few options:
Method 1. Using Telnet Client
Step 1: Check whether the telnet client feature is ON or not. In order to check, open the Turn Windows feature on or off settings from the search bar. OR press the ‘window’ key and type ‘windows’ features. Then press on “Turn Windows features on or off”.
-660.png)
A new prompt will be opened. Search for “Telnet Client” and check the box in front of ‘telnet Client’.

Step 2: Open the command prompt. Press the ‘windows’ key and type ‘cmd’. Press “Command Prompt”.
-660.png)
Step 3: On the command prompt, type the command “telnet + IP address or hostname + port number” and check the status of the provided TCP port.
-660.png)
Step 4: If only the blinking cursor is visible, then the port is open.
-660.png)
Step 5: If you get the message “connection failed” then the port is closed.
-660.png)
Method 2: Using built-in netstat command-line utility:
Step 1: Open the command prompt.
Step 2: Run the following command:
netstat -an

Method 3. Using TcpView
Another option is to use the TcpView utility from Microsoft’s Sysinternals suite of tools. This utility provides a more user-friendly interface for viewing active TCP/IP connections, along with additional information such as the process ID and process name for each connection. Steps to be followed:
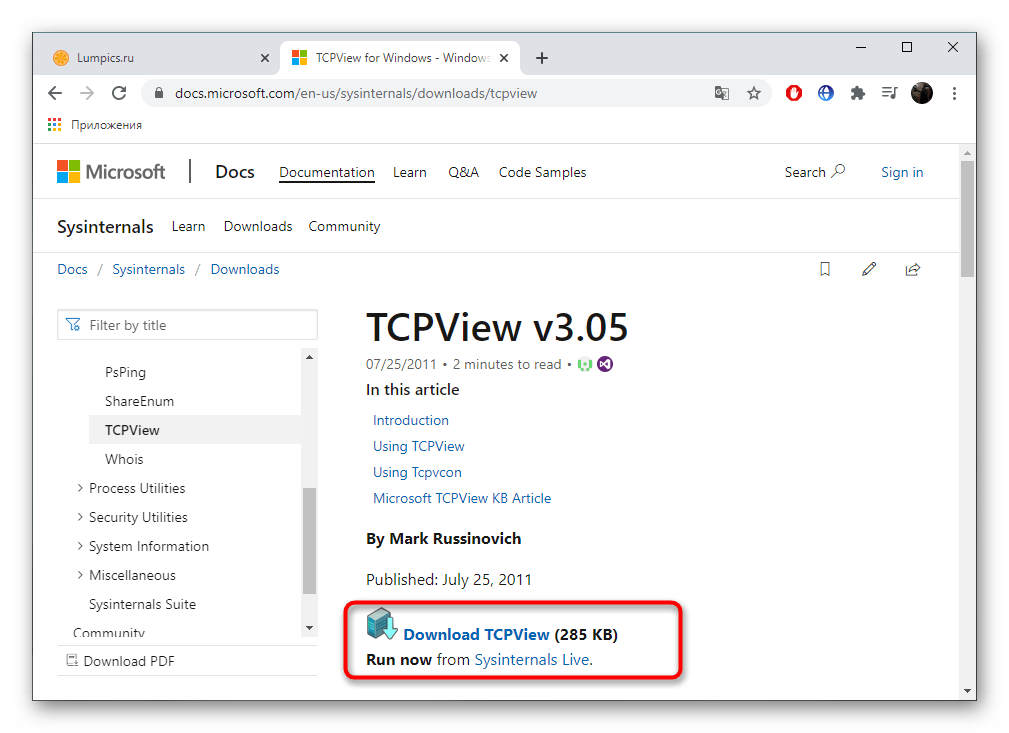
Step 1: Download the TcpView utility from the Microsoft Sysinternals website. You can find the download link on the TcpView page of the Sysinternals website.
-660.png)
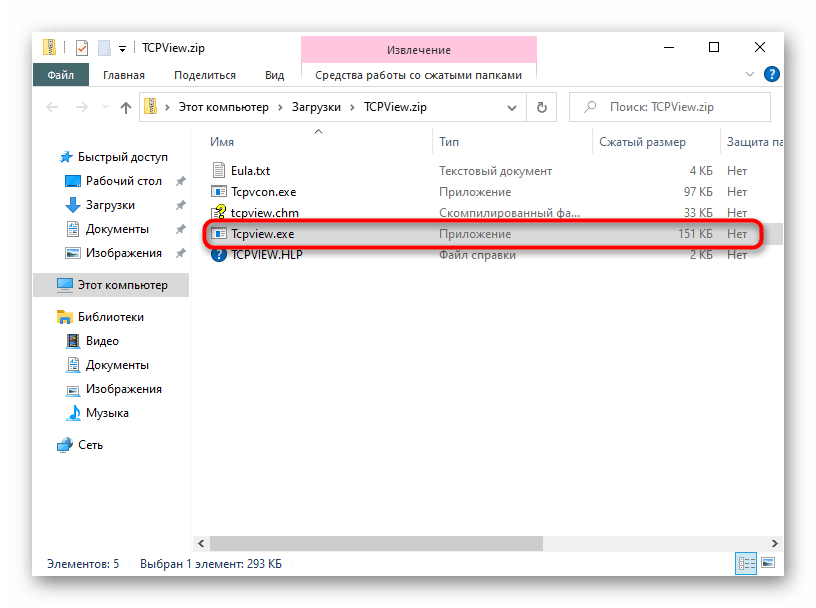
Step 2: Extract the downloaded file and run the TcpView.exe file to launch the TcpView utility. This will open the TcpView window, which shows a list of all active TCP/IP connections on your machine.

Step 3: Open the tcpview.exe (application).
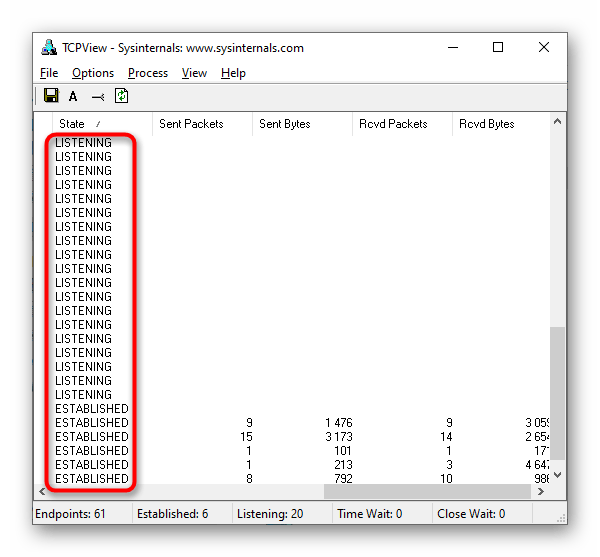
By default, TcpView will display the following columns in the list of connections:
Protocol: Shows the protocol being used for the connection (TCP or UDP)
Local Address: Shows the local address and port being used for the connection
Remote Address: Shows the remote address and port being connected to
State: Shows the current state of the connection (e.g. Established, Listen, etc.)
You can use the “Local Address” and “Remote Address” columns to see which ports are being used by which applications. For example, if you see a connection with a local address of “127.0.0.1:80”, this means that the local application is using port 80 for outgoing connections.
Method 4. Using Windows PowerShell
You can also use Windows PowerShell to check open TCP/IP ports. To do this, use the Get-NetTCPConnection cmdlet, which allows you to view a list of active TCP/IP connections and the local and remote addresses and ports being used. For example, you can run the following command to view a list of all active TCP/IP connections:
Get-NetTCPConnection |
Select-Object LocalAddress,
LocalPort, RemoteAddress, RemotePort

Method 5. Using Nmap
To install Nmap in the Windows command line, follow these steps:
Step 1: Download the latest version of Nmap from the Nmap website. You can find the download link on the Nmap download page:
https://nmap.org/download.html
Step 2: Extract the downloaded file to a location on your computer. This will create a new folder containing the Nmap files.
Step 3: Open a command prompt and navigate to the directory where you extracted the Nmap files. For example, if you extracted the files to the C:\nmap directory, you would run the following command:
cd C:\nmap
Step 4: Once you are in the Nmap directory, you can install Nmap by running the nmap.exe file. To do this, run the following command:
nmap.exe -V
This will display the version number of Nmap, indicating that it has been installed successfully.
Step 5: To use nmap to scan for open TCP/IP ports, run the “nmap -sT” command, followed by the IP address or hostname of the machine you want to scan.
nmap -sT localhost

This will scan the specified host or IP address and display the results. You can also use the -h option to view a list of available options and arguments for the nmap command. Overall, installing Nmap in the Windows command line is a straightforward process. You can download the latest version of Nmap from the Nmap website, extract the files, and then run the nmap.exe file to install it. Once it is installed, you can use the nmap command to scan hosts and IP addresses and view the results.
Common Issues That Close Ports
- Applications not functioning as expected.
- Misconfigured firewall rules blocking connections.
- IP addresses improperly set as private.
Troubleshooting Common Issues
Here are some common issues that may occur during opening TCP/IP Ports in Windows:
- Telnet Not Listed in Features: Ensure your system version supports Telnet or enable it via PowerShell.
- Firewall Blocking Ports: Temporarily disable the firewall to test port connectivity.
- Command Not Recognized: Verify tool installation and environment variables.
Conclusion
Checking open TCP/IP ports on your Windows computer is an important step for maintaining your system’s security and efficiency. By regularly monitoring these ports, you can identify any unwanted or suspicious connections that might put your computer at risk. Windows provides several simple tools, like Command Prompt and PowerShell, which make it easy to see which ports are open and what applications are using them. Taking the time to check your open ports helps ensure that your computer runs smoothly and stays protected from potential threats. Staying proactive about monitoring your network connections is a key part of keeping your digital environment safe and reliable.
In this tutorial, we will learn how to run the netstat command to check open ports in Windows Operating System. We will also look at command options and how to use the findstr command (similar to grep) to filter the netstat output.
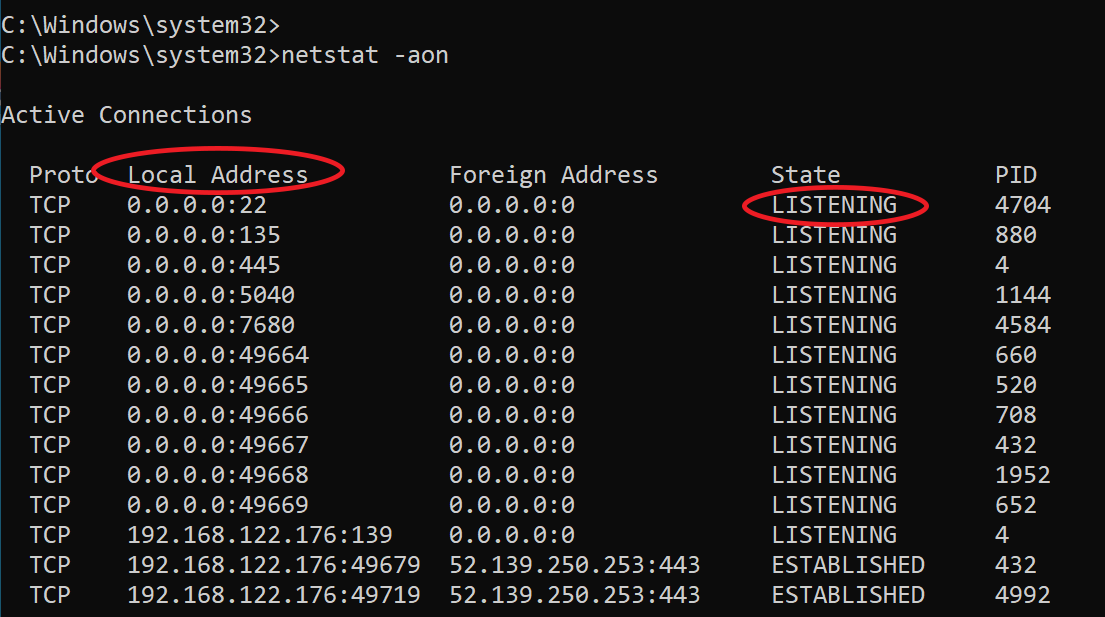
To check open ports, open a command prompt (or PowerShell) as administrator and run the netstat command as follows:
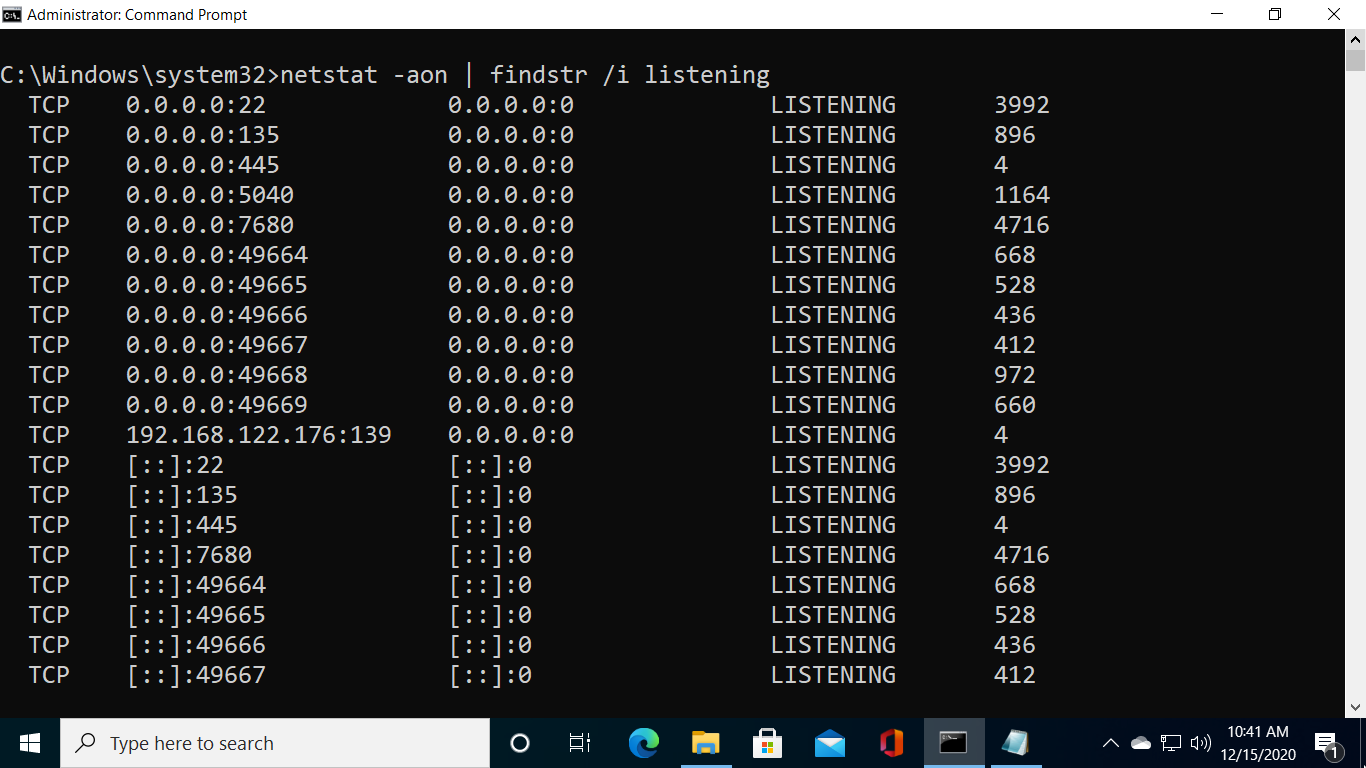
netstat -aonThe command displays lots of information. What you should pay attention to are Local Addresses that are in the LISTENING state.
As you can see in the previous screenshot, In my Windows 10 computer, port 22 (SSH) is open.
Administrators can run the following command to show opened ports only without all other details:
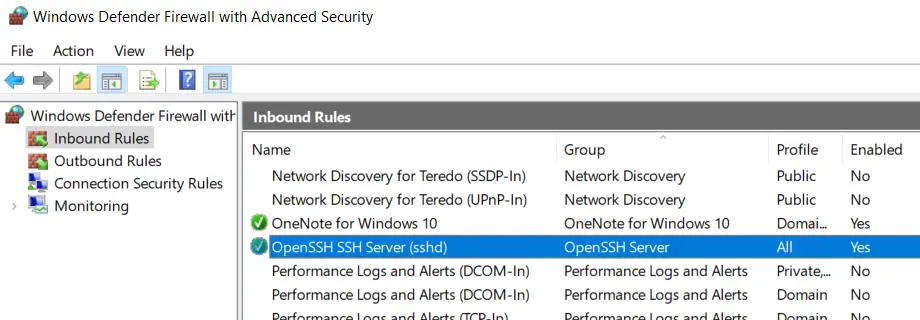
netstat -aon | findstr /i listeningOne important point is that the Windows Firewall may block a port even if it is in the listening state. In the Windows Defender Firewall with Advanced Security, there has to be a corresponding inbound firewall rule to match the listening port (Anything with a green checkmark is an open rule).
The Foreign Address column of the output shows the IP address and port of the computer/server at the remote end of the connection.
To check that the port is open from a remote computer, an administrator can run the telnet command from a remote computer against the IP address of the Windows computer.
For example, to check if port 22 is open, I will run the telnet command from a remote computer as follows:
telnet IP_ADDRESS 22Replace IP_ADDRESS with the actual IP Address of the Windows computer.

Filtering netstat using findstr
Administrators can use the findstr CMD command (which is similar to grep) to filter netstat command data based on string patterns.
For example, run the following command to check TCP connections in TIME_WAIT State.
netstat -a | findstr /i TIME_WAITThe /I option is for the case insensitive matching.

Command Options
Windows netstat command, without any command-line arguments, displays active TCP connections.
It also includes some useful command options to show network connections and ports in various forms, such as show connections and opened ports based on the protocol, find the process id of a connection/port, view network statics, and find the application that utilizes connections and ports.
| -a | displays all network connections and ports on which Windows is listening (include both IPv4 or IPv6 addresses). |
| -b | The output shows you which applications are using each active connection and ports (need administrative privileges). |
| -e | Displays network statistics, such as the Errors, the number of bytes, and packets sent and received. |
| -n | Displays addresses and ports in numerical format. |
| -f | When used, the output will contain Fully Qualified Domain Names (FQDNs) of IP addresses, if available. |
| -o | Displays an additional column that contains the Process ID (PID). |
| -p | Display data for a specific protocol (e.g., -p TCP). The Protocol can be one of the following: TCP, UDP, TCPv6, or UDPv6. If combined with the -s option, Protocol can be TCP, UDP, ICMP, IP, TCPv6, UDPv6, ICMPv6, or IPv6. |
| -r | Check Windows routing table. |
| -s | Displays detailed network statistics for each protocol (IPv4, IPv6, ICMPv4, ICMPv6, TCP, and UDP). |
| interval | Sets Time interval (in seconds) to automatically update the output. See examples to learn more. |
Examples: Using the netstat command
List all Active TCP connections:
netstatCheck open ports:
netstat -aon | findstr /i listeningOnly want to see information about TCP protocol:
netstat -a -p tcpShow network statistics:
netstat -sReal-time network monitoring — In the following example, we set a 5 second time interval to check active network connections in real-time. The number 5 causes the command to repeat every five seconds (Press CTRL+C to quit).
netstat -n 5If you need more information about the Windows netstat command, type netstat \? in the command prompt.
Все способы:
- Способ 1: Утилита netstat
- Способ 2: Брандмауэр Windows
- Способ 3: Онлайн-сервисы
- Способ 4: TCPView
- Способ 5: PortQry
- Способ 6: Веб-интерфейс маршрутизатора
- Вопросы и ответы: 0
Способ 1: Утилита netstat
netstat — стандартная утилита, входящая в состав операционной системы Windows 10. Она применяется для отображения сетевой информации, в том числе и позволяет посмотреть список открытых портов. Благодаря этому можно узнать состояние, тип порта, локальный и внешний адрес. Этот вариант приоритетный, поскольку не требует перехода на разные сайты и скачивания дополнительного программного обеспечения, а о принципах взаимодействия с этой командой читайте в статье по ссылке ниже. Там также описаны и доступные аргументы, которые рекомендуется использовать, чтобы показать только интересующие сведения.
Подробнее: Использование команды netstat для просмотра открытых портов
Способ 2: Брандмауэр Windows
Порты нужны определенным программам и службам для входящих подключений, поэтому они обязательно отслеживаются стандартным межсетевым экраном. Любое разрешение на открытие порта сохраняется в соответствующем списке, который можно использовать для выполнения поставленной задачи, что происходит так:
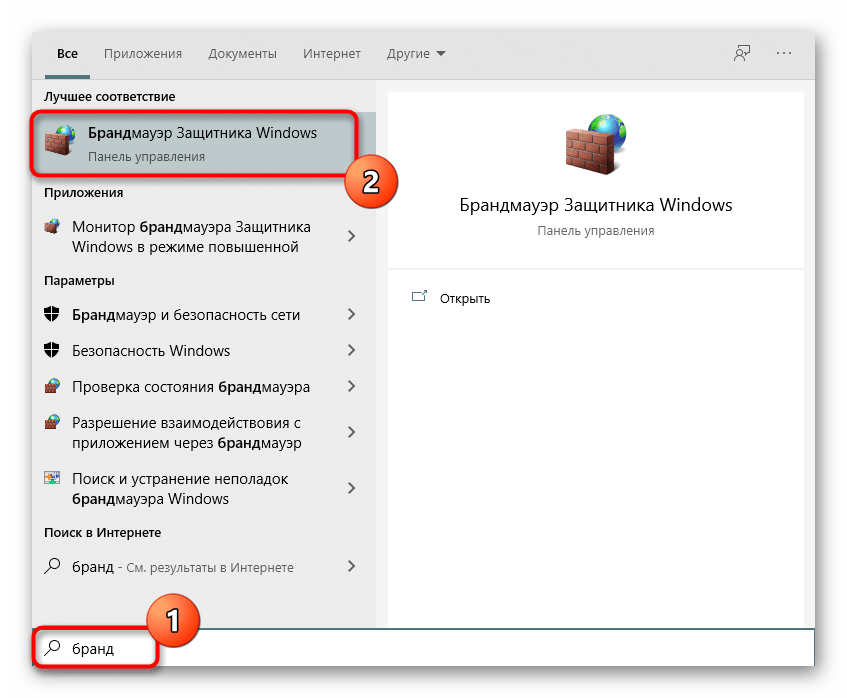
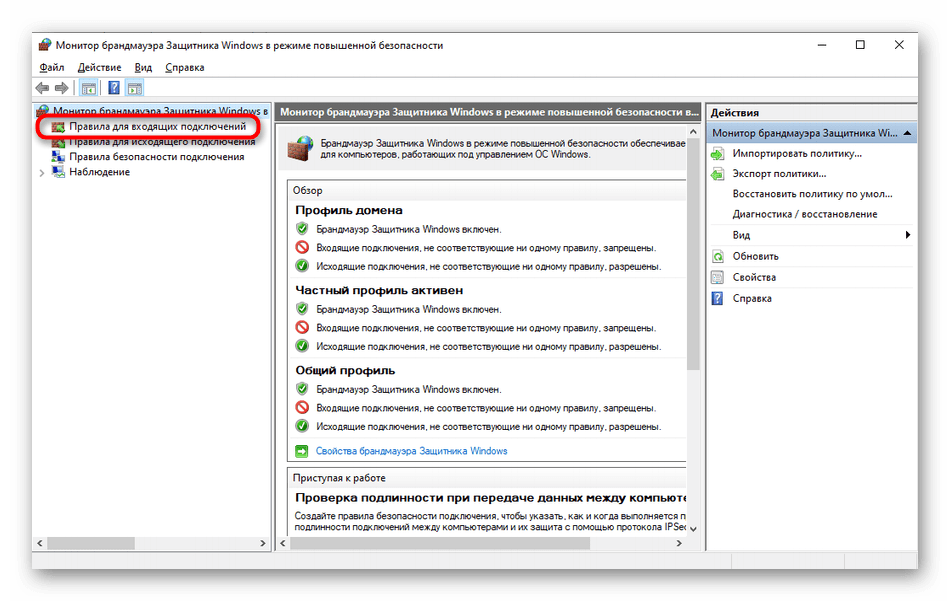
- Откройте «Пуск» и перейдите оттуда в меню брандмауэра.
- Через левую панель переместитесь к разделу «Дополнительные параметры».
- Откройте директорию «Правила для входящих подключений».
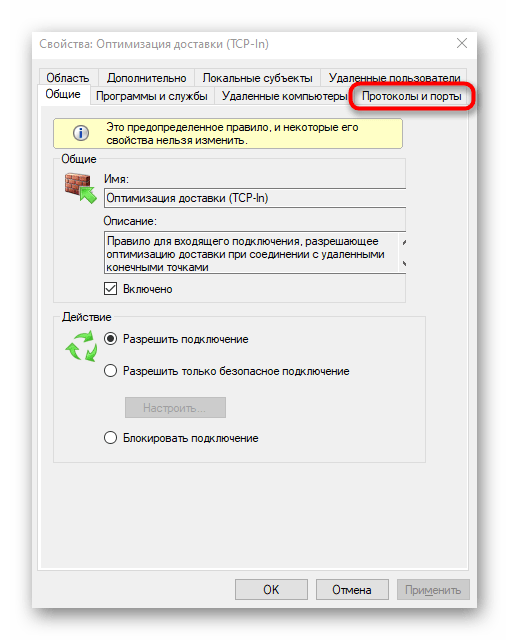
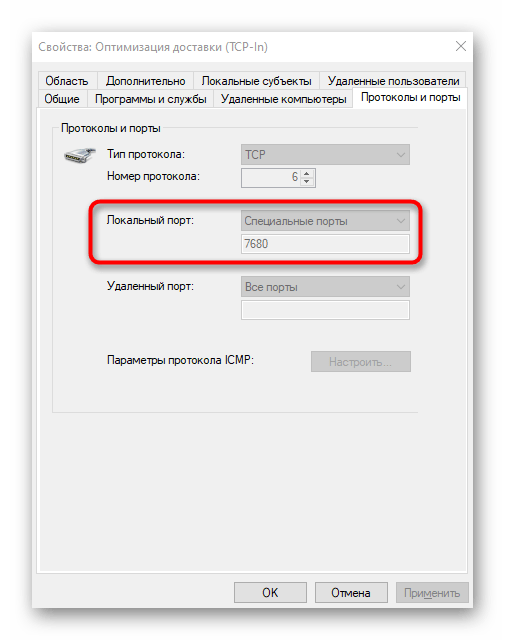
- Отыщите любое разрешающее подключение и кликните по нему дважды левой кнопкой мыши.
- Переместитесь на вкладку «Протоколы и порты».
- Теперь вы можете без проблем определить локальный порт.


Некоторые программы и службы могут использовать все предлагаемые порты, поэтому в этом меню вы не найдете конкретной привязки к протоколу. Тогда придется обращаться за помощью к одному из следующих методов.
Способ 3: Онлайн-сервисы
Онлайн-сервисы — очень популярный вариант определения открытых портов, поскольку многие пользователи не желают задействовать консоль, чтобы получить какую-либо информацию. На просторах интернета находится огромное количество подходящих сайтов, которые бесплатно выводят список прослушиваемых портов, а о трех самых популярных из них мы предлагаем прочесть далее.
Подробнее: Сканирование портов онлайн
Способ 4: TCPView
TCPView — небольшое программное обеспечение с графическим интерфейсом, которое было перекуплено компанией Microsoft и сейчас находится в свободном доступе на официальном сайте компании. По сути, это аналог рассмотренной выше команды, однако сведения показываются в более понятном виде, а наличие графического интерфейса является огромным плюсом TCPView.
Скачать TCPView с официального сайта
- Перейдите по ссылке выше и скачайте TCPView с официального сайта.
- Устанавливать программу не нужно, поэтому ее сразу же можно запустить из полученного архива.
- В меню TCPView просмотрите список активных процессов, а затем обратите внимание на перечень локальных портов. Это поможет узнать, какие программы в Windows 10 используют порты, а значит, они являются открытыми.
- Переместитесь вправо по таблице, чтобы посмотреть, в каком состоянии находится порт. Например, он может прослушиваться, находиться в ожидании или вовсе не использоваться.

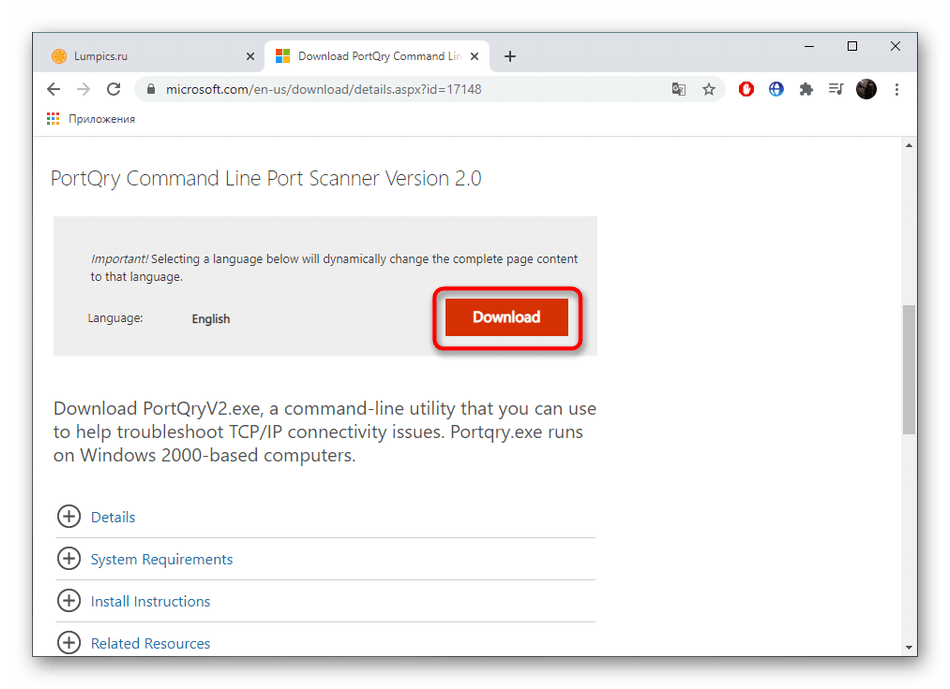
Способ 5: PortQry
PortQry — дополнительная консольная утилита от компании Microsoft, которая позволяет просмотреть открытые порты. Мы рекомендуем пользоваться ее в том случае, если команда netstat и другие варианты вам не подходят, но нужно путем ввода всего одной команды просмотреть список абсолютно всех открытых портов.
Скачать PortQry с официального сайта
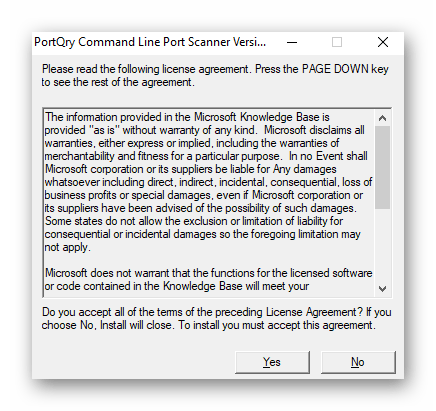
- Загрузка PortQry осуществляется с официального сайта компании Microsoft.
- По завершении загрузки остается только произвести инсталляцию, следуя отобразившимся на экране инструкциям. Не меняйте путь распаковки программы или при ознакомлении со следующими командами, описанными в инструкции, учитывайте новое расположение.
- Откройте «Командную строку» от имени администратора, например, через меню «Пуск».
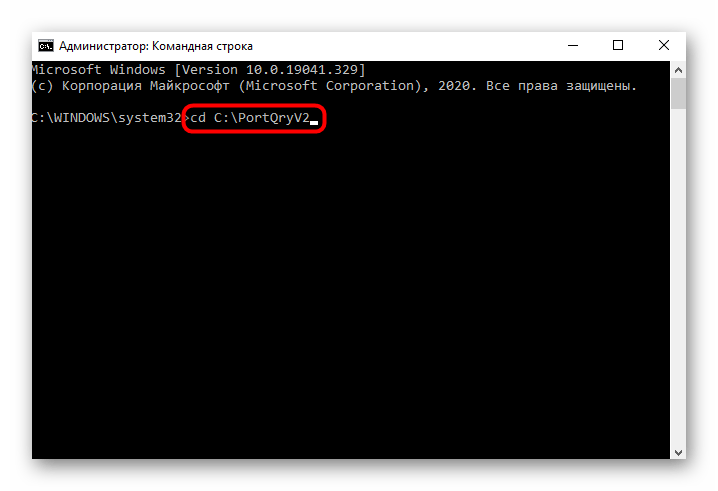
- Перейдите там по пути установки PortQry, чтобы оказаться в ее корне. Осуществляется это путем ввода команды
cd + полный путь к директории. - Остается только ввести команду
portqry.exe –localи активировать ее нажатием на Enter для просмотра списка открытых локальных портов. - Опускайтесь вниз, ориентируясь по строкам и столбцам для определения статуса порта, его номера и внешнего адреса.

Способ 6: Веб-интерфейс маршрутизатора
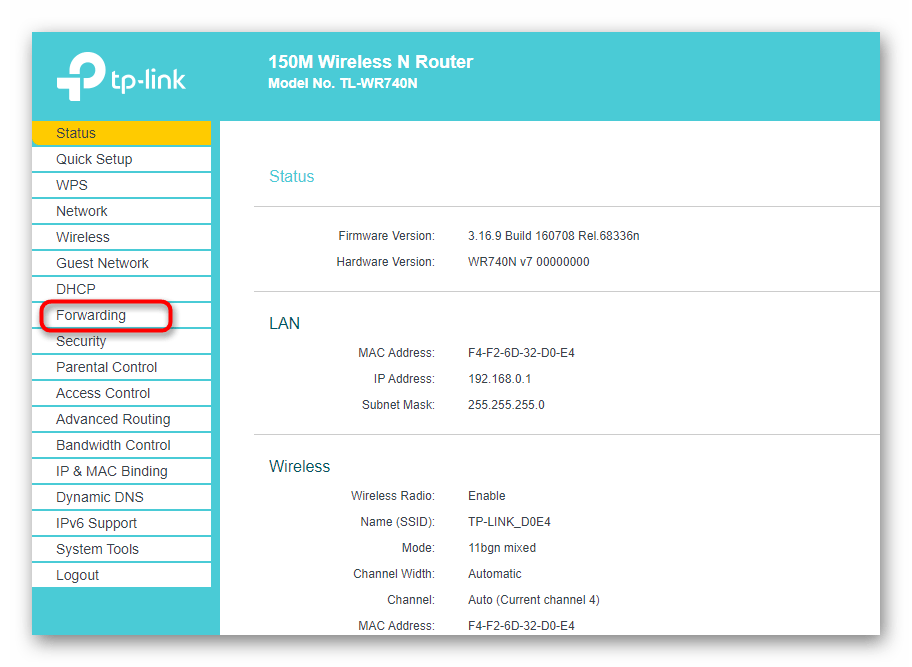
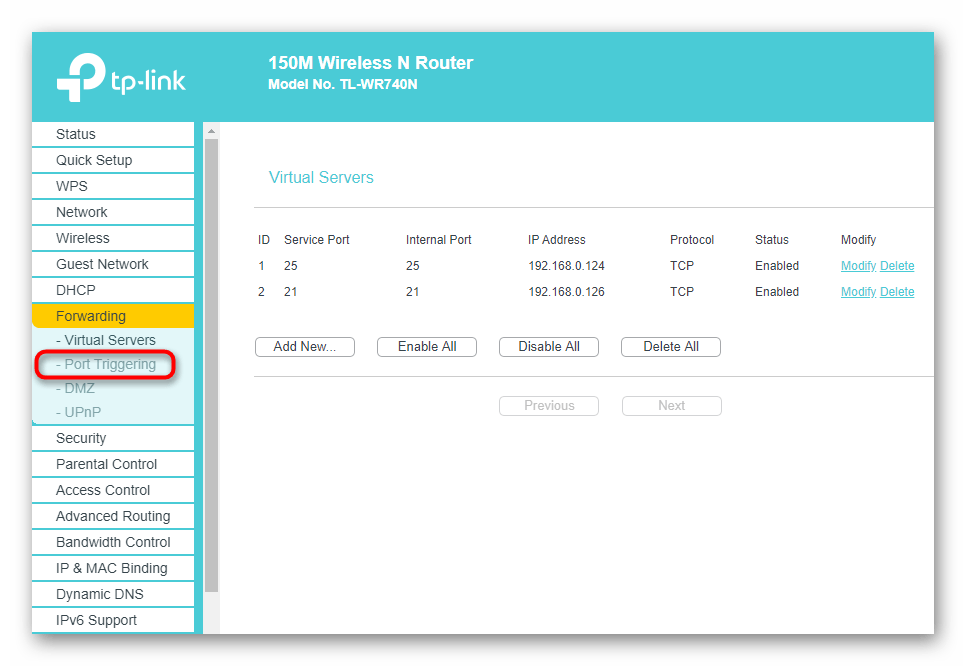
Последний метод просмотра открытых портов в Windows 10 — переход к отдельному меню в интернет-центре роутера. Однако там можно увидеть только те порты, которые были вручную или по умолчанию открыты именно через настройки маршрутизатора, а осуществляется это на примере устройства от TP-Link так:
- Выполните авторизацию в веб-интерфейсе маршрутизатора, следуя инструкциям из следующей статьи.
Подробнее: Вход в веб-интерфейс роутеров
- В меню перейдите к разделу «Forwarding».
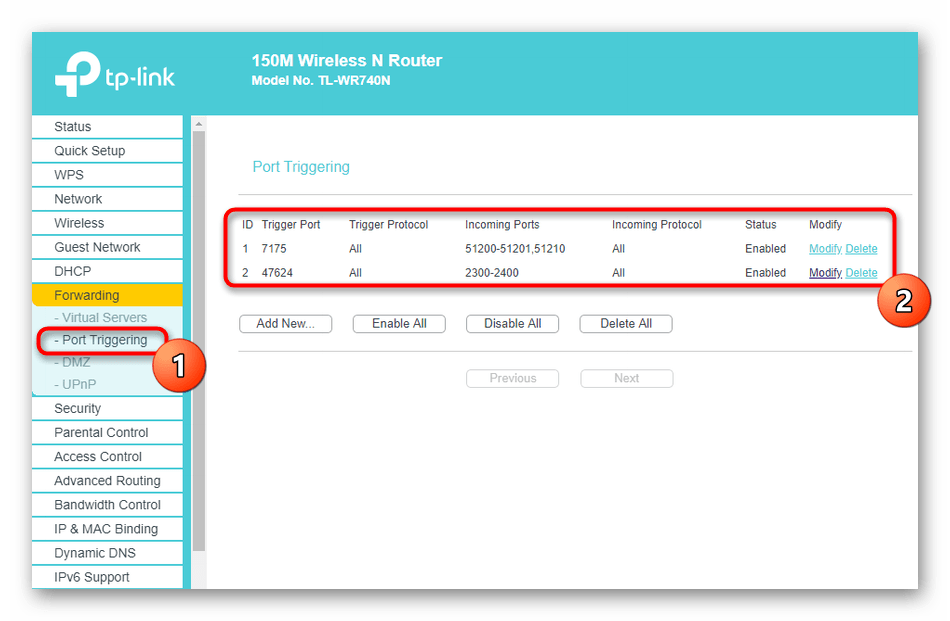
- Там вас интересует категория «Port Triggering».
- Ознакомьтесь со списком открытых портов, их адресами и статусом. По желанию любой из них можно закрыть, нажав всего по одной кнопке.
Если нужно открыть конкретный порт, который по каким-то причинам оказался закрыт, потребуется выполнить определенный алгоритм действий. Проще всего справиться с этой задачей, придерживаясь руководств по ссылкам далее.
Подробнее:
Открываем порты в брандмауэре Windows 10
Открываем порты на роутере
Наша группа в TelegramПолезные советы и помощь
Maybe you’re troubleshooting a network connectivity issue for a specific program and need to check whether its port access is open. What if you need to confirm that your NAS device can communicate with your Windows 10 PC? Whatever reason you need to look for open ports, this article provides detailed steps to check them on Windows 10 using several available tools, either built-in or free to download and use.
There are a couple of handy tools in Windows to scan open ports. You’ll see how to do so on NetStat, PortQry.exe, and NirSoft CurrPorts.
Using NetStat to Check for Open Ports in Windows 10
One of the simplest ways to check for open ports is to use NetStat.exe. You can find this tool in the System32 folder on Windows 10. With NetStat, you can see open ports or ports that a specific host uses.
Netstat is short for network statistics. It shows protocol statistics and the current TCP and IP network connections. The two commands needed to identify open ports in netstat -ab and netstat -aon.
Here’s an explanation of what each letter from the commands means.
- “a” displays all connections and listening ports.
- “b” shows all executables involved in creating each listening port.
- “o” provides the owning process ID related to each connection.
- “n” shows the addresses and port numbers as numerals.
Two commands are helpful, depending on your needs. The second option (netstat -aon) additionally provides a process ID you can later search for in the Task Manager.
Using ‘netstat -ab’ to Identify Open Ports
The first option you’ll use (netstat -ab) lists all active ports and the process that uses them.
- In the Cortana Search Bar, type the following:
cmdthen select Run as administrator.
- Now, type
netstat -ab, then press Enter.
- Wait for the results to load. Port names get listed next to each local IP address.

- Look for the port number you need; if it says LISTENING in the State column, it means your port is open.

Using ‘netstat -aon‘ to Identify Open Ports
The second option(netstat -aon) includes process IDs, which you’ll use to identify a task/application in the Task Manager. Some processes may be challenging to identify using netstat -ab, so netstat -aon gets used. As referenced above, “a” represents all connections and ports, “o” represents the owning process ID, and “n” represents the addresses and port numbers as numerals.
Using netstat -aon comes in handy when netstat -ab isn’t enough to identify what program has a specific port tied up. In that case, follow these steps:
- In the Cortana Search Bar, type “
cmd“ and choose “Run as administrator.”
- Once inside, type the following command without quotes:
netstat -aonthen press Enter.
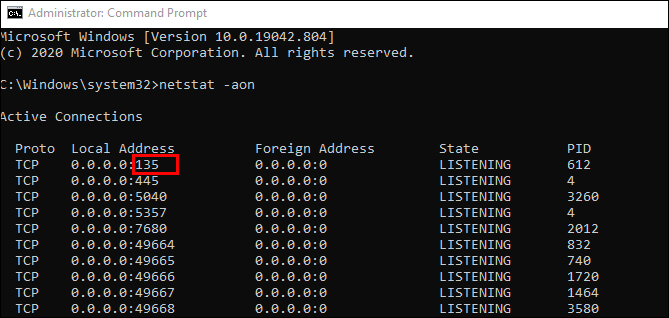
- You will now see five columns: Protocols, Local Address, Foreign Address, State, and PID (Process ID). In the Local Address, you have a port number. For example: 0.0.0.0:135. Here, 135 is the port number.

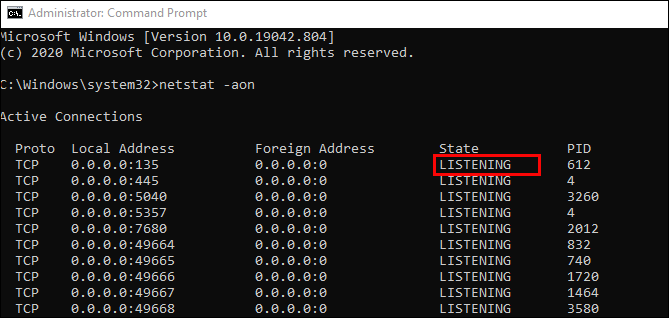
- In the “State” column, you will see whether a specific port appears opened. For opened ports, it will say LISTENING.
- To verify which app uses a particular port, find the PID (the number from the last column) for a specific port.

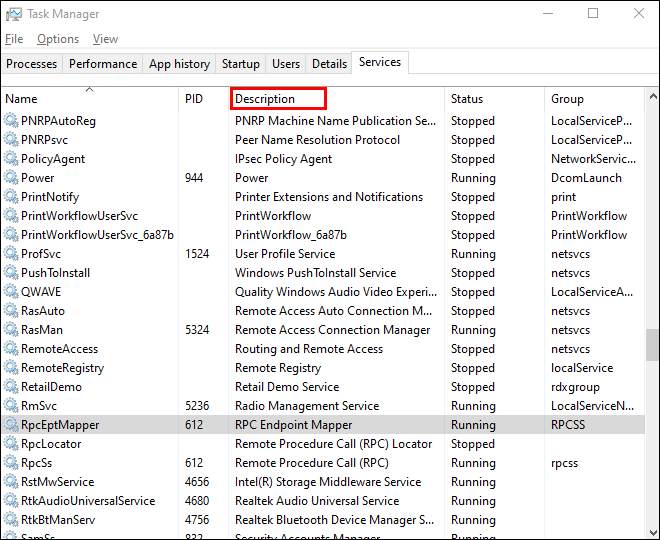
- Open the Task Manager by pressing Ctrl + Shift + Esc.
- Go to the Details or Services tab to see all processes on your Windows 10 system. Sort them by the PID column to find the PID for the port you’re trying to troubleshoot. You can see which app uses the port in the Description section.


Checking for Open Ports with NirSoft CurrPorts
If you find the Command Prompt solution too tricky, a simpler alternative is to use NirSoft CurrPorts. This tool displays your currently opened ports (TCP, IP, and UDP). You’ll also see information about a specific process, such as name, path, version info, etc.
This tool has been around for quite a while and is available for Windows 10. You can find the NirSoft Currports download link at the bottom of Nirsoft’s website.
Note: Ensure you download the correct version. They have 32-bit and 64-bit releases. The app is portable. Unzip the folder, then run the executable file.
Once you have CurrPorts running, perform the following steps:
- You’ll see a list of your computer processes. Sort them by Local Port to search through them more easily.

- Now, find and select the port you are troubleshooting.
- You can now see all the process details, such as Process Name, Process ID, State, etc.

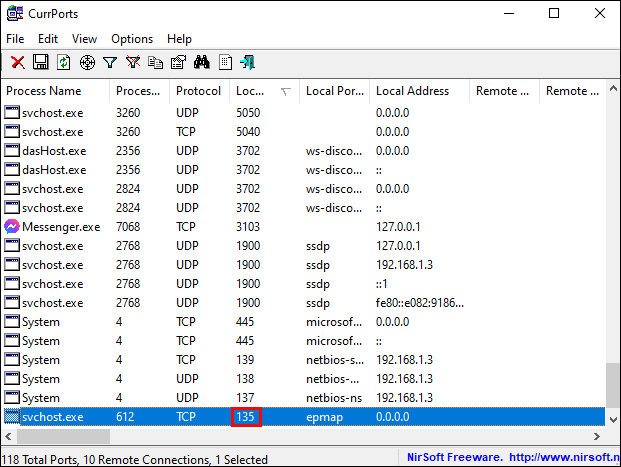
Another way is to double-click on a process to see its details in a single window.
Checking for Open Ports Using PortQry.exe
PortQry.exe is another handy tool that lets you scan open ports. You download PortQry (scroll down to see the download) and extract it to run it through the Command Prompt. You can also download PortQryUI, a Graphical User Interface (GUI) for PortQry (more on that below), as an add-on if you don’t want to use the command line.
With portqry.exe, you insert specific parameters that can be found in the executable’s folder.
How to Run PortQry.exe Using the Command Prompt
- Download PortQry, then unzip the files to your chosen location. The default is “C:\” but can be changed if desired.
- If in the default directory, type
cd c:\PortQryV2\in the Command Prompt to set the location of the executable file. - If in a custom directory, type
cd [drive letter]:\[folder1]\[folder2]\but replace all content in the square brackets with actual names. Include all folders needed. - Type
portqry.exe -localto launch it. This command displays the TCP and UDP ports the specified ‘localhost’ uses. - In addition to all the parameters NetStat displays, Portqry shows you several port mappings and the number of ports in each state.
- You can also check for open ports for a remote host. Run portqry.exe -n [hostname/IP] in the Command Prompt. Replace the hostname and IP sections with the remote host’s name and IP address. Add -e [port_number] to the command line to look for a specific port.
How to Run PortQry.exe using the UI Add-On
For those preferring to use a graphical interface instead of commands when using PortQry.exe, Microsoft offers an add-on named PortQryUI.
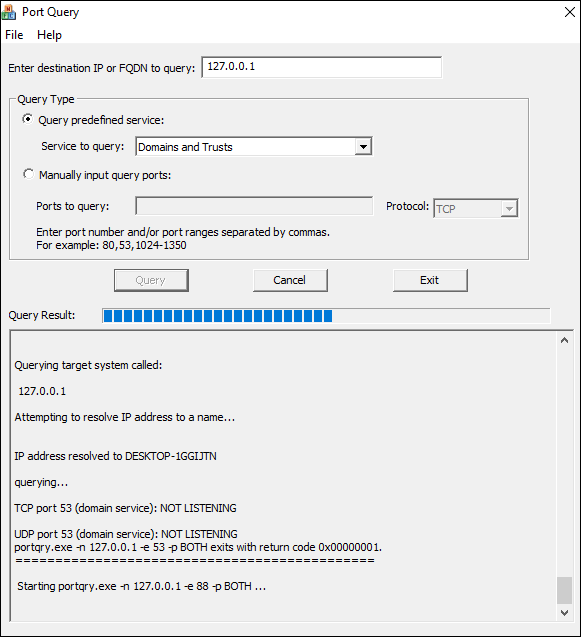
The PortQryUI add-on already includes the necessary version of PortQry, so you don’t need both downloads to use it.
- Download PortQryUI, then unzip the files to your chosen location. The default is “C:\” but can be changed if desired.
- Launch Windows Explorer, navigate to the PortQryUI.exe file location, then click it to launch the UI.
- To view TCP and UDP ports for the ‘localhost’ (your PC), leave the Destination IP as 127.0.0.1 so it passes through the network’s devices and configuration settings (network card, router’s config, etc.) and not just read from the local PC.
- To view all TCP and UDP ports, click on Manually input query ports, then type 1-65535 in the Ports to query section. Also, select TCP, UDP, or Both from the Protocol dropdown.
- To filter your TCP/UDP ports list, click Query predefined service, then choose which service to query. You can only select one at a time.
- You can also check a remote host by changing the FQDN or domain in the query box at the top.
- If you want to check a specific port, enter the number in Ports to query.
In closing, knowing how to check if a specific port is open is beneficial if you’re troubleshooting a program’s network connection or need a port for a particular game. Luckily, it’s not as challenging to do as it looks.
Out of all the options listed above, Netstat is recommended as it’s built into the OS and usually gives you all the details you need. There might be a few extra steps required compared to CurrPorts, but you don’t have to download anything, and there’s nothing to screw up.
How do I check if Port 3306 is open in Windows 10?
To verify if port 3306 is open, you can use NetStat, CurrPorts, or PortQry.
We recommend NetStat, as you won’t have to download new software. Run the Command Prompt as administrator. Type the following command: netstat -ab and hit Enter. Wait for the results to load. Port names will be listed next to the local IP address. Just look for port 3306. You can press Ctrl + F and type 3306 in the word box to search for it. If the port is open, it will show in the results as LISTENING.
To check if port 3306 is open via CurrPorts, just sort by Local Port, then find port 3306. If the port is available, it will show in the list.
To use PortQry.exe to find port 3306, use the Command Prompt. Type -e [3306], then press Enter.
What are Predefined Services in PortQueryUI?
Predefined Services offers details on a small handful of services such as Domains and Trusts, Networking, Exchange Servers, etc. The option queries all required ports for the specified services and displays them in the UI.
For those who don’t know where Predefined Services resides, it is directly under the Help tab and in the UI. Both serve different needs.
The Help tab option immediately displays all predefined services without testing any ports, providing a quick reference to each port name, value, and protocol used for each listed service.
The UI option lets you specify what service you want to view and see port statuses.