
Сетевой протокол SMB (Server Message Block) используется для предоставления совместного удаленного доступа к файлам, принтерам и другим устройствам через порт TCP 445. В этой статье мы рассмотрим: какие версии (диалекты) протокола SMB доступны в различных версиях Windows (и как они соотносятся с версиями samba в Linux); как определить версию SMB на вашем компьютере; и как включить/отключить клиент и сервер SMBv1, SMBv2 и SMBv3.
Содержание:
- Версии протокола SMB в Windows
- Как проверить поддерживаемые версии SMB в Windows?
- Вывести используемые версии SMB с помощью Get-SMBConnection
- Об опасности использования SMBv1
- Включение и отключение SMBv1, SMBv2 и SMBv3 в Windows
Версии протокола SMB в Windows
Есть несколько версии протокола SMB (диалектов), которые последовательно появлялись в новых версиях Windows:
Для реализации протокола SMB в Linux/Unix системах используется samba. В скобках мы указали в каких версиях samba поддерживается каждый диалект SMB.
- CIFS — Windows NT 4.0;
- SMB 1.0 — Windows 2000;
- SMB 2.0 — Windows Server 2008 и Windows Vista SP1 (поддерживается в Samba 3.6);
- SMB 2.1 — Windows Server 2008 R2 и Windows 7 (поддерживается в Samba 4.0);
- SMB 3.0 — Windows Server 2012 и Windows 8 (поддерживается в Samba 4.2);
- SMB 3.02 — Windows Server 2012 R2 и Windows 8. 1 (не поддерживается в Samba);
- SMB 3.1.1 – Windows Server 2016 и Windows 10 (не поддерживается в Samba).
Начиная с версии Samba 4.14, по умолчанию используется SMB2.1.
При сетевом взаимодействии по протоколу SMB между клиентом и сервером используется максимальная версия протокола, поддерживаемая одновременно и клиентом, и сервером.
Ниже представлена сводная таблица, по которой можно определить версию протокола SMB, которая выбирается при взаимодействии разных версий Windows:
| Операционная система | Win 10, Server 2016 | Windows 8.1, Server 2012 R2 |
Windows 8, Server 2012 |
Windows 7, Server 2008 R2 |
Windows Vista, Server 2008 |
Windows XP, Server 2003 и ниже |
| Windows 10 ,
Windows Server 2016 |
SMB 3.1.1 | SMB 3.02 | SMB 3.0 | SMB 2.1 | SMB 2.0 | SMB 1.0 |
| Windows 8.1 , Server 2012 R2 |
SMB 3.02 | SMB 3.02 | SMB 3.0 | SMB 2.1 | SMB 2.0 | SMB 1.0 |
| Windows 8 , Server 2012 |
SMB 3.0 | SMB 3.0 | SMB 3.0 | SMB 2.1 | SMB 2.0 | SMB 1.0 |
| Windows 7, Server 2008 R2 |
SMB 2.1 | SMB 2.1 | SMB 2.1 | SMB 2.1 | SMB 2.0 | SMB 1.0 |
| Windows Vista, Server 2008 |
SMB 2.0 | SMB 2.0 | SMB 2.0 | SMB 2.0 | SMB 2.0 | SMB 1.0 |
| Windows XP, 2003 и ниже | SMB 1.0 | SMB 1.0 | SMB 1.0 | SMB 1.0 | SMB 1.0 | SMB 1.0 |
К примеру, при подключении клиентского компьютера с Windows 8.1 к файловому серверу с Windows Server 2016 будет использоваться протокол SMB 3.0.2.
Согласно таблице Windows XP, Windows Server 2003 для доступа к общим файлам и папкам на сервере могут использовать только SMB 1.0, который в новых версиях Windows Server (2012 R2 / 2016) может быть отключен. Таким образом, если в вашей инфраструктуре одновременно используются компьютеры с Windows XP (снятой с поддержки), Windows Server 2003/R2 и сервера с Windows Server 2012 R2/2016/2019, устаревшие клиенты не смогут получить доступ к файлам и папкам на файловом сервере с новой ОС.
Если Windows Server 2016/2012 R2 с отключенным SMB v1.0 используется в качестве контроллера домена, значить клиенты на Windows XP/Server 2003 не смогут получить доступ к каталогам SYSVOL и NETLOGON на контроллерах домена и авторизоваться в AD.
На старых клиентах при попытке подключиться к ресурсу на файловом сервере с отключенным SMB v1 появляется ошибка:
The specified network name is no longer available
Как проверить поддерживаемые версии SMB в Windows?
Рассмотрим, как определить, какие версии протокола SMB поддерживаются на вашем компьютере Windows.
В Windows 10, 8.1 и Windows Server 2019/2016/2012R2 вы можете проверить состояние различных диалектов SMB протокола с помощью PowerShell:
Get-SmbServerConfiguration | select EnableSMB1Protocol,EnableSMB2Protocol

Данная команда вернула, что протокол SMB1 отключен (
EnableSMB1Protocol=False
), а протоколы SMB2 и SMB3 включены (
EnableSMB1Protocol=True
).
Обратите внимание, что протоколы SMBv3 и SMBv2 тесно связаны между собой. Нельзя отключить или включить отдельно SMBv3 или SMBv2. Они всегда включаются/отключаются только совместно, т.к. используют один стек.
В Windows 7, Vista, Windows Server 2008 R2/2008:
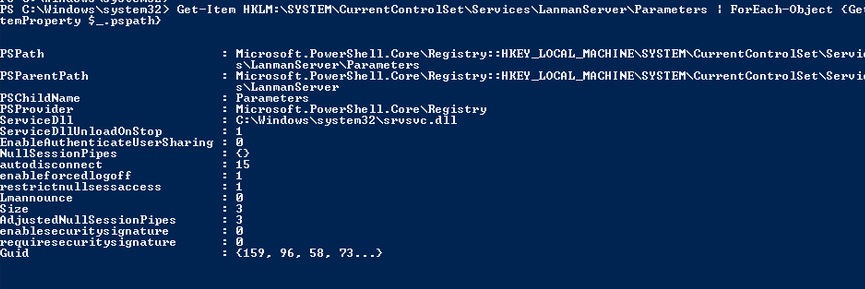
Get-Item HKLM:\SYSTEM\CurrentControlSet\Services\LanmanServer\Parameters | ForEach-Object {Get-ItemProperty $_.pspath}
Если в данной ветке реестра нет параметров с именами SMB1 или SMB2, значить протоколы SMB1 и SMB2 по умолчанию включены.
Также в этих версиях Windows вы можете проверить, какие диалекты SMB разрешено использовать в качестве клиентов с помощью команд:
sc.exe query mrxsmb10
SERVICE_NAME: mrxsmb10
TYPE : 2 FILE_SYSTEM_DRIVER
STATE : 4 RUNNING
(STOPPABLE, NOT_PAUSABLE, IGNORES_SHUTDOWN)
WIN32_EXIT_CODE : 0 (0x0)
SERVICE_EXIT_CODE : 0 (0x0)
CHECKPOINT : 0x0
WAIT_HINT : 0x0
sc.exe query mrxsmb20
SERVICE_NAME: mrxsmb20
TYPE : 2 FILE_SYSTEM_DRIVER
STATE : 4 RUNNING
(STOPPABLE, NOT_PAUSABLE, IGNORES_SHUTDOWN)
WIN32_EXIT_CODE : 0 (0x0)
SERVICE_EXIT_CODE : 0 (0x0)
CHECKPOINT : 0x0
WAIT_HINT : 0x0
В обоих случаях службы запущены (
STATE=4 Running
). Значит Windows может подключаться как к SMBv1, так и к SMBv2 серверам.
Вывести используемые версии SMB с помощью Get-SMBConnection
Как мы говорили раньше, компьютеры при взаимодействии по протоколу SMB используют максимальную версию, поддерживаемую как клиентом, так и сервером. Для определения версии SMB, используемой для доступа к удаленному компьютеру можно использовать командлет PowerShell
Get-SMBConnection
:
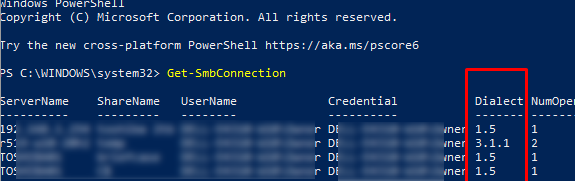
Версия SMB, используемая для подключения к удаленному серверу (ServerName) указана в столбце Dialect.
Можно вывести информацию о версиях SMB, используемых для доступа к конкретному серверу:
Get-SmbConnection -ServerName servername
Если нужно отобразить, используется ли SMB шифрование (появилось в SMB 3.0), выполните:
Get-SmbConnection | ft ServerName,ShareName,Dialect,Encrypted,UserName
В Linux вывести список SMB подключения и используемые диалекты в samba можно командой:
$ sudo smbstatus
Чтобы на стороне сервера вывести список используемых клиентами версий протокола SMB и количество клиентов, используемых ту или иную версию протокола SMB, выполните команду:
Get-SmbSession | Select-Object -ExpandProperty Dialect | Sort-Object -Unique

В нашем примере имеется 825 клиентов, подключенных к серверу с помощью SMB 2.1 (Windows 7/Windows Server 2008 R2) и 12 клиентов SMB 3.02.
С помощью PowerShell можно включить аудит версий SMB, используемых для подключения:
Set-SmbServerConfiguration –AuditSmb1Access $true
События подключения затем можно извлечь из журналов Event Viewer с помощью PowerShell:
Get-WinEvent -LogName Microsoft-Windows-SMBServer/Audit
Об опасности использования SMBv1
Последние несколько лет Microsoft из соображений безопасности планомерно отключает устаревший протокол SMB 1.0. Связано это с большим количеством критических уязвимостей в этом протоколе (вспомните историю с эпидемиями вирусов-шифровальщиков wannacrypt и petya, которые использовали уязвимость именно в протоколе SMBv1). Microsoft и другие IT компании настоятельно рекомендуют отказаться от его использования.
Однако отключение SMBv1 может вызвать проблемы с доступом к общий файлам и папкам на новых версиях Windows 10 (Windows Server 2016/2019) с устаревших версий клиентов (Windows XP, Server 2003), сторонних ОС (Mac OSX 10.8 Mountain Lion, Snow Leopard, Mavericks, старые версии Linux), различных старых NAS устройствах.
Если в вашей сети не осталось legacy устройств с поддержкой только SMBv1, обязательно отключайте эту версию диалекта в Windows.
В том случае, если в вашей сети остались клиенты с Windows XP, Windows Server 2003 или другие устройства, которые поддерживают только SMBv1, их нужно как можно скорее обновить или тщательно изолировать.
Включение и отключение SMBv1, SMBv2 и SMBv3 в Windows
Рассмотрим способы включения, отключения различных версий SMB в Windows. Мы рассматриваем отдельно включение клиента и сервера SMB (это разные компоненты).
Windows 10, 8.1, Windows Server 2019/2016/2012R2:
Отключить клиент и сервер SMBv1:
Disable-WindowsOptionalFeature -Online -FeatureName smb1protocol
Отключить только SMBv1 сервер:
Set-SmbServerConfiguration -EnableSMB1Protocol $false
Включить клиент и сервер SMBv1:
Enable-WindowsOptionalFeature -Online -FeatureName smb1protocol
Включить только SMBv1 сервер:
Set-SmbServerConfiguration -EnableSMB1Protocol $true
Отключить сервер SMBv2 и SMBv3:
Set-SmbServerConfiguration -EnableSMB2Protocol $false
Включить сервер SMBv2 и SMBv3:
Set-SmbServerConfiguration -EnableSMB2Protocol $true

Windows 7, Vista, Windows Server 2008 R2/2008:
Отключить SMBv1 сервер:
Set-ItemProperty -Path "HKLM:\SYSTEM\CurrentControlSet\Services\LanmanServer\Parameters" SMB1 -Type DWORD -Value 0 –Force

Включить SMBv1 сервер:
Set-ItemProperty -Path "HKLM:\SYSTEM\CurrentControlSet\Services\LanmanServer\Parameters" SMB1 -Type DWORD -Value 1 –Force
Отключить SMBv1 клиент:
sc.exe config lanmanworkstation depend= bowser/mrxsmb20/nsi
sc.exe config mrxsmb10 start= disabled
Включить SMBv1 клиент:
sc.exe config lanmanworkstation depend= bowser/mrxsmb10/mrxsmb20/nsi
sc.exe config mrxsmb10 start= auto
Отключить SMBv2 сервер:
Set-ItemProperty -Path "HKLM:\SYSTEM\CurrentControlSet\Services\LanmanServer\Parameters" SMB2 -Type DWORD -Value 0 -Force
Включить SMBv2 сервер
Set-ItemProperty -Path "HKLM:\SYSTEM\CurrentControlSet\Services\LanmanServer\Parameters" SMB2 -Type DWORD -Value 1 –Force
Отключить SMBv2 клиент:
sc.exe config lanmanworkstation depend= bowser/mrxsmb10/nsi
sc.exe config mrxsmb20 start= disabled
Включить SMBv2 клиент:
sc.exe config lanmanworkstation depend= bowser/mrxsmb10/mrxsmb20/nsi
sc.exe config mrxsmb20 start= auto
Для отключения сервера SMBv1 на всех компьютерах независимо от версии Windows можно распространить параметр реестра типа REG_DWORD с именем SMB1 и значением 0 (HKEY_LOCAL_MACHINE\SYSTEM\CurrentControlSet\Services\LanmanServer\Parameters)на через GPO.
Для отключения SMBv2 нужно в этой же ветке установить параметр SMB2=0.
Для отключения SMBv1 клиента нужно распространить такой параметр реестра:
- Key: HKEY_LOCAL_MACHINE\SYSTEM\CurrentControlSet\services\mrxsmb10
- Name: Start
- Type: REG_DWORD
- Value: 4
При отключении SMB 1.0/CIFS File Sharing Support в Windows вы можете столкнуться с ошибкой “0x80070035, не найден сетевой путь”, ошибкой при доступе к общим папкам, и проблемами обнаружения компьютеров в сетевом окружении. В этом случае вместо служба обозревателя компьютеров (Computer Browser) нужно использовать службы обнаружения (линк).
SMB2 and/or SMB3 protocols are enabled by default in Windows. If ever needed, here are the steps to disable SMB2 and SMB3 in Windows.
Recently, Microsoft has to issue an emergency patch to wormable vulnerability in the SMB3 protocol. Essentially, this vulnerability lets the attacker execute malicious code on the target machine and take control of it. Being a wormable vulnerability, it can spread to other systems on the local network. If you haven’t yet installed the KB4551762 update, I recommend you do so as soon as possible to avoid any unnecessary issues.
If you haven’t installed the update yet, you can try disabling SMB3 in Windows 10 as a precaution. Here’s how.
Things You Should Know Before Hand
As a general rule, you should not disable SMB2 or SMB3 protocols. However, if you are unable to install the security patch or to troubleshoot various issues, you can temporarily disable SMB3 or SMB2 protocol.
SMB3 protocol serves an important function in several different features in Windows 10, 8, and 7. For example, if you disable SMB3 in Windows 10, you might face problems with the following Windows functionality.
- Folder and file properties caching
- Durable handles
- message signing
- scalable file sharing
- Symbolic links
- Large MTU support
- Transparent failover
- Encryption
- SMB direct
- and more…
Simply put, only follow the below steps and disable SMB3 protocol if you know what you are doing and is absolutely necessary. If you are interested, here’s a great document from Microsoft on the overview of SMB3.
Steps to Disable SMB3 or SMB2 Protocol
Note: SMB2 and SMB3 are linked together. So, enabling or disabling SMB2 will do that same for SMB3.
To disable SMB 3, you can either use the PowerShell or Command Prompt. I will show both methods. Follow the one you are comfortable with.
via PowerShell (Recommended)
1. Open PowerShell as admin. You can do that by searching for “PowerShell” in the start menu and selecting the “Run as administrator” option from the right-click menu.
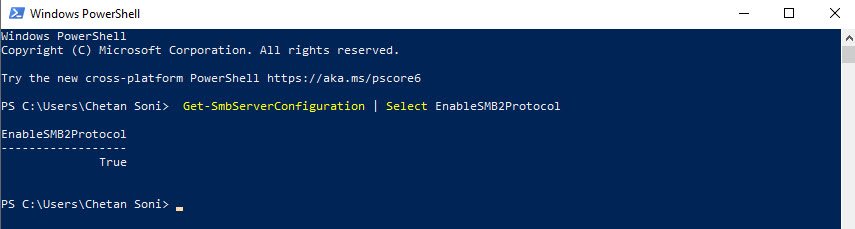
2. Next, verify that SMB3 is enabled by executing the below command. If the protocol is enabled, you should see “true” in the response.
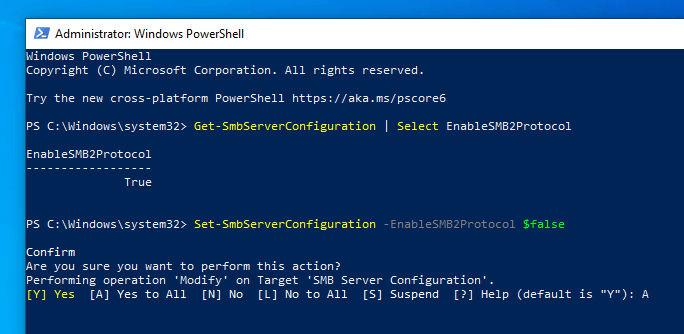
Get-SmbServerConfiguration | Select EnableSMB2Protocol

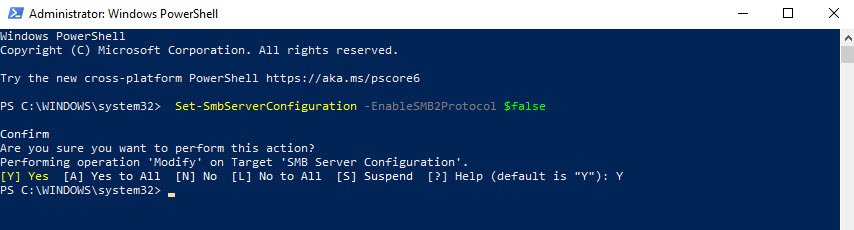
3. To disable SMB3, execute this command.
Set-SmbServerConfiguration -EnableSMB2Protocol $false
4. PowerShell will ask for your confirmation, type “Y” or “A” and press Enter to confirm.
5. Once disabled, you can verify it by executing the first command. If the protocol is disabled, you should see “false“.

6. Finally, reboot Windows to apply the changes.
To re-enable SMB3, you can use the below command.
Set-SmbServerConfiguration -EnableSMB2Protocol $true
via Command Prompt
As an alternative, you can also use the Command Prompt to disable SMB3. The only problem is that it is not that intuitive as the PowerShell method. But, it works nonetheless.
1. Search for “cmd” in the start menu, right-click on “Command Prompt” result and select “Run as administrator“.
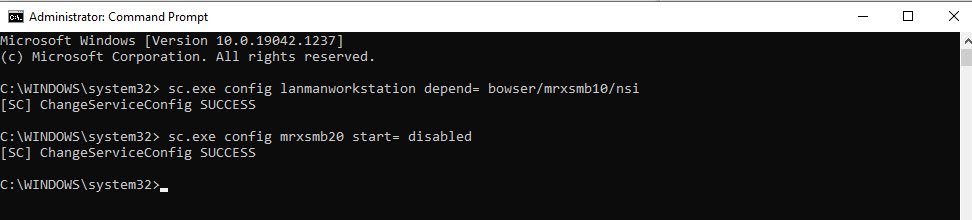
2. In the command prompt window, execute the below commands one of the other.
sc.exe config lanmanworkstation depend= bowser/mrxsmb10/nsi
next
sc.exe config mrxsmb20 start= disabled
3. Once that is done, reboot Windows to apply changes. After rebooting, the SMB3 protocol will be disabled.
To enable the SMB3 protocol again, open Command Prompt as admin execute the below commands one after the other.
sc.exe config lanmanworkstation depend= bowser/mrxsmb10/mrxsmb20/nsi
next
sc.exe config mrxsmb20 start= auto
Wrapping Up
As you can see, it is pretty easy to disable SMB3 and SMB2 protocols in Windows 10. Like said before, don’t disable the SMB3 protocol permanently. Do this for troubleshooting purposes and only if you know what you are doing and understand the consequences.
I hope that helps. If you are stuck or need some help, comment below and I will try to help as much as possible.
Все блогеры повторяют за документацией с официального сайта microsoft, где по поводу манипуляций с протоколами SMBv2 и SMBv3 указано буквально следующее:
S МБ версии 2/v3
Обнаружение:
Get-SmbServerConfiguration | Select EnableSMB2ProtocolОтключите:
Set-SmbServerConfiguration -EnableSMB2Protocol $falseВключите параметр
Set-SmbServerConfiguration -EnableSMB2Protocol $true
Сколько не пытался понять, что означает такая подача вроде «S МБ версии 2/v3» — так и не смог.
В нормальной самбе, которая не Windows, в конфигурации существует такая понятная опция:
[global]
     max protocol = SMB2
https://www.samba.org/samba/docs/current/man-html/…
секция server max protocol
Что значит S МБ версии 2/v3 у Microsoft, и как в Windows использовать только SMB2, без SMB1 и SMB3, для общих папок?
Либо может быть кто-нибудь может объяснить значение фразы «SMB3: The same as SMB2» из документации samba?
Если SMB3 — это то-же самое, что и SMB2, в таком случае для чего представлены раздельные значения c отсылками на версии Windows, в которой SMB2 и SMB3 это одно и тоже? Eсли логически SMB3 — это SMB2, то по той-же логике — SMB3 вообще не существует
What is SMB?
Server Message Block, or SMB, is an application-layer network protocol, developed primarily by Microsoft for general access to files, serial ports, and various communications between network nodes. It allows computer applications to read and write to files as well as service requests from server programs on the computer network.
The SMB2 and / or SMB3 protocols are enabled by default in Windows.
Note: SMB2 and SMB3 are linked to each other. So enabling or disabling SMB2 will result in the same thing for SMB3.
Follow 2 methods bellow to disable SMB3 in Windows 10
Disable SMB3 with PowerShell (recommended)
1. Open PowerShell with admin permission .
2. Verify that SMB3 is enabled by executing the command below. If the protocol is enabled, you will see “true” in the response.
Get-SmbServerConfiguration | Select EnableSMB2Protocol

3. To turn off SMB3, execute this command :
Set-SmbServerConfiguration -EnableSMB2Protocol $ false
4. PowerShell will ask for your confirmation, type Y or A and press Enter to confirm.
5. When disabled, you can verify it by executing the first command in Steps 2. If the protocol is disabled, you will see “false”.

6. Finally, restart your Windows to apply the changes.
To reactivate SMB3, you can use the command below.
Set-SmbServerConfiguration -EnableSMB2Protocol $trueDisable SMB3 with Command Prompt
You also can use the Command Prompt to disable SMB3.
1. Run Command Prompt with admin permission .
2. In the Command Prompt window, execute the following commands one after the other.
sc.exe config lanmanworkstation depend = bowser / mrxsmb10 / nsi
sc.exe config mrxsmb20 start = disabled
3. When done, restart your Windows to apply the changes. After reboot, the SMB3 protocol will be disabled.
To re-enable the SMB3 protocol, open the Command Prompt with admin permission and execute the following commands one after the other.
sc.exe config lanmanworkstation depend = bowser / mrxsmb10 / mrxsmb20 / nsi
sc.exe config mrxsmb20 start = auto

SMB (Server Message Block) is a network protocol used for file and printer sharing between computers. SMB allows for seamless file and resource sharing between computers and is commonly used on local area networks (LANs) and wide area networks (WANs).
SMB is used by various operating systems, including Windows, macOS, and Linux, to share resources such as files, printers, and serial ports. There have been several versions of SMB protocol over the years, with SMB3 being the latest and most widely used version, providing improved security, performance, and functionality compared to previous versions.
Note: SMB protocol has also been used as a vector for various cybersecurity threats, such as the WannaCry ransomware attack in 2017, so it’s important to ensure that SMB protocol is properly secured and configured on networks where it is used.
The SMB2/SMB3 protocols are enabled by default in Windows. To disable SMB3 protocol, you can either use PowerShell or Command Prompt.
1. Disable SMB3 Protocol using Windows PowerShell –
Step 1 – Open the Windows PowerShell as an administrator and run the following command:
Command: Get-SmbServerConfiguration | Select EnableSMB2Protocol
With above command, you can easily verify that SMB3 is enabled or not. If the protocol is enabled, you will see “true” in the response.
Step 2 – To turn off SMB3, execute the following command.
Command: Set-SmbServerConfiguration -EnableSMB2Protocol $false
Windows PowerShell will ask for your confirmation, type Y or A and press Enter to confirm.
When disabled, you can verify it by executing the first command. If the protocol is disabled, you will see “false”.

Step 3 – To reactivate SMB3, you can use the command below.
Command: Set-SmbServerConfiguration -EnableSMB2Protocol $true

2. Disable SMB3 Protocol using Windows Command Prompt –
You can also use the Command Prompt (CMD) to disable SMB3. The only problem is that it’s not as intuitive as the PowerShell method, but it works anyway.
Step 1 – Open CMD, and run the following commands:
Command: sc.exe config lanmanworkstation depend= bowser/mrxsmb10/nsi
Command: sc.exe config mrxsmb20 start= disabled
When done, restart Windows to apply the changes.
After reboot, the SMB3 protocol will be disabled. To re-enable the SMB3 protocol, open the Command Prompt with administrator rights and execute the following commands one after the other.
Command: sc.exe config lanmanworkstation depend= bowser/mrxsmb10/mrxsmb20/nsi
Command: sc.exe config mrxsmb20 start= auto
