
Способ 1: «Панель управления»
Через классическую «Панель управления» в Windows 10 можно отключить «Центр синхронизации» всего за несколько шагов:
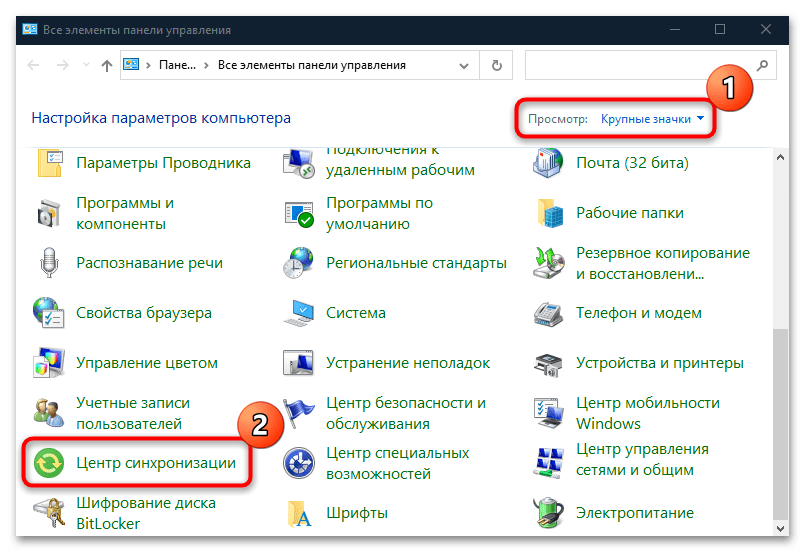
- Через системный поиск отыщите средство «Панель управления» и запустите его.
- Нажмите на выпадающее меню у строки «Просмотр» и для удобства установите «Крупные значки». Нажмите на раздел «Центр синхронизации».
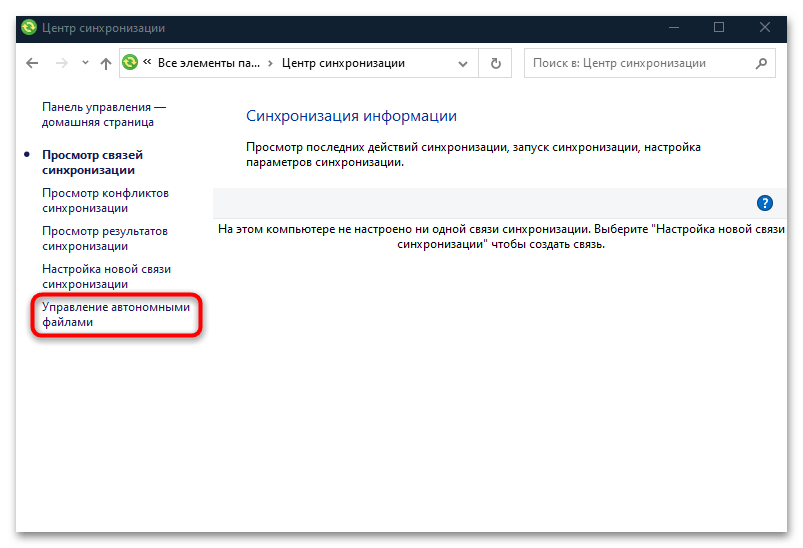
- В новом окне на панели слева кликните по строке «Управление автономными файлами».
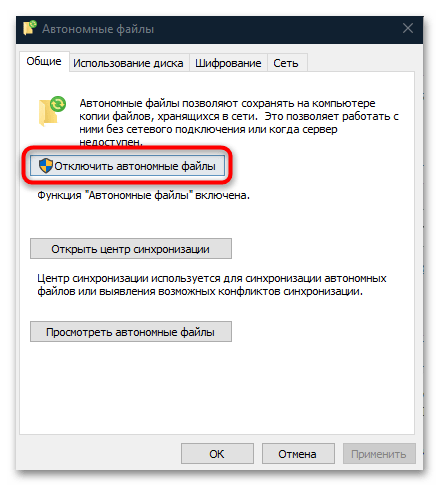
- Нажмите на кнопку «Отключить автономные файлы», затем подтвердите настройки, нажав на «ОК» внизу. Затем может быть предложено перезагрузить компьютер для вступления новых параметров в силу. Нажмите на «Да», чтобы осуществить это сразу.

После того как Windows запустится, «Центр синхронизации» перестанет работать в фоновом режиме, а автономная синхронизация файлов будет полностью отключена.
Этот способ больше подойдет для владельцев редакции Home, потому что следующий метод предполагает работу с «Редактором локальной групповой политики», которого нет в этой версии операционки.
Способ 2: «Редактор локальной групповой политики»
Как уже говорилось, работа с локальной групповой политикой доступна только в Windows 10 Pro и Enterprise. Если предыдущий метод вам не подошел, следуйте инструкции ниже:
- Нажмите на клавиши «Win + R», чтобы вызвать диалоговое окно «Выполнить», затем в строке «Открыть» выполните команду
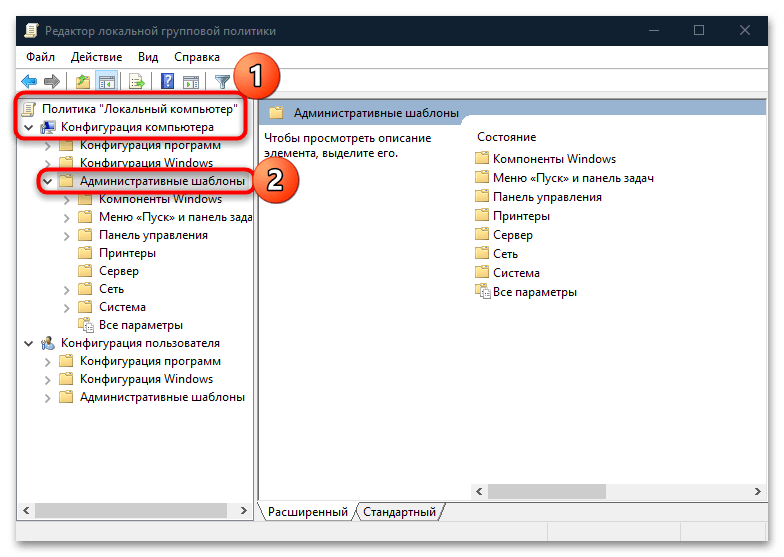
gpedit.msc, нажав на кнопку «ОК». - На панели слева в разделе «Политика «Локальный компьютер»» выберите «Конфигурация компьютера», затем — «Административные шаблоны».
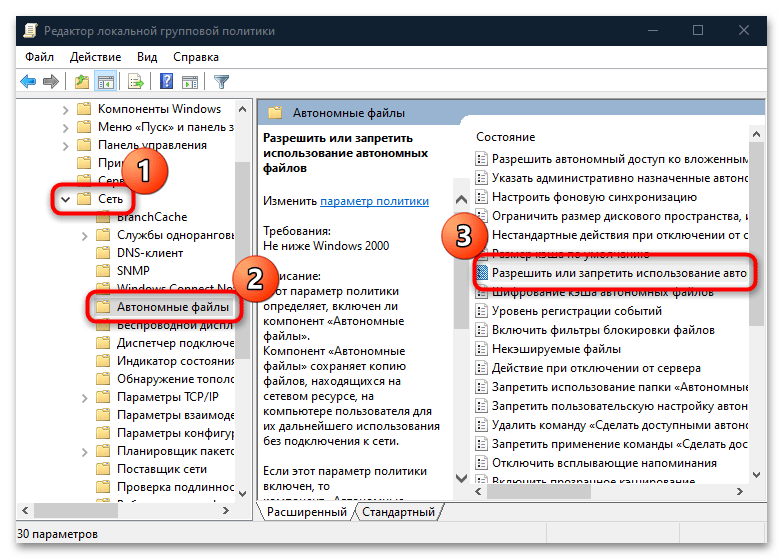
- В папке «Сеть» нажмите на «Автономные файлы», а в центральной части окна в списке найдите строку «Разрешить или запретить использование автономных файлов» и дважды кликните по ней левой кнопкой мыши.
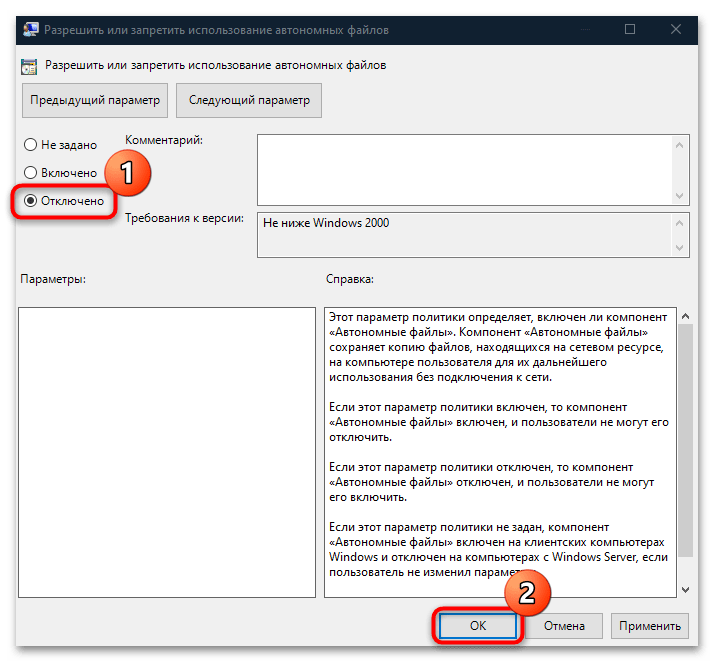
- Отметьте пункт «Отключено» в новом окне, затем примените и сохраните настройки.

После редактирования параметров локальной политики закройте редактор и перезагрузите Windows 10. В отличие от предыдущего способа, настройки применяются не к конкретной учетной записи, с которой осуществлялись изменения, а к системе в целом.
Активировать работоспособность «Центра синхронизации» можно аналогичным способом, но при этом нужно выбрать пункт «Не задано» или «Включено».
Наша группа в TelegramПолезные советы и помощь
Что такое синхронизация и как она работает
При включении компьютера запускается Центр синхронизации Windows. При работе синхронизация всегда выполняется в фоновом режиме для сохранения копий сетевых файлов и папок для последующего их использования в автономном режиме.
Эта функция полезна, если вам нужен доступ к сетевым файлам, даже если вы не подключены к сети. Центр синхронизации может нагружать память устройства, а при повсеместном распространении Интернета функция может быть не актуальной.
Если синхронизация более не нужна, ее можно отключить. Описанные методы могут работать только для определенных версий Windows.
Как отключить синхронизацию на Windows
Через панель управления
В Windows 10 можно отключить Центр синхронизации за несколько шагов:
-
Через системный поиск найдите Панель управления и запустите её.
-
Нажмите на выпадающее меню у строки «Просмотр» => Центр синхронизации.
-
В новом окне на панели слева кликните по строке Управление автономными файлами.
-
Нажмите на «Отключить автономные файлы», затем подтвердите настройки, нажав на «ОК» внизу. Перезагрузите компьютер.
Через редактор групповой политики
-
Нажмите на сочетание клавиш Win + R, чтобы вызвать диалоговое окно Выполнить. Потом в строке Открыть выполните команду
gpedit.msc, нажав на кнопку ОК. -
На панели слева в разделе Политика «Локальный компьютер» => Конфигурация компьютера => Административные шаблоны.
-
В папке Сеть нажмите на Автономные файлы, а в центральной части окна в списке найдите строку Разрешить или запретить использование автономных файлов и дважды кликните по ней.
-
Отметьте пункт Отключено в новом окне, затем примените и сохраните настройки.
-
После редактирования параметров локальной политики закройте редактор и перезагрузите систему.

Источник фото: freepik.com
Функция автономных (офлайн) файлов в Windows 10 позволяет сделать определенные сетевые папки или файлы доступными в автономном режиме, даже если ваш компьютер не подключен к корпоративной сети. В этой статье мы рассмотрим, как включить и настроить автономные файлы (Offline Files) в Windows 10/Windows Server 2016 вручную и с помощью групповых политик.
Автономные файлы доступны в экосистеме Windows довольно давно. Все что требуется от пользователя – включить Offline Files на компьютере и пометить определенные файлы или папки на сетевом ресурсе “всегда доступными в автономном режиме”. После этого Windows сохраняет указанные ресурсы в локальный кэш на диске и периодически обновляет его в фоновом режиме (раз в 2 часа — частоту синхронизации автономных файлов можно задать с помощью параметра GPO Configure Background Sync).
Содержание:
- Включить автономные файлы в Windows 10
- Включить Offline Files для сетевой папки на Windows Server
- Настройка автономный файлов с помощью групповых политик
Включить автономные файлы в Windows 10
В Windows 10 можно включить автономное файлы через классическую Панель управления.
- Откройте Центр синхронизации (Sync Center);

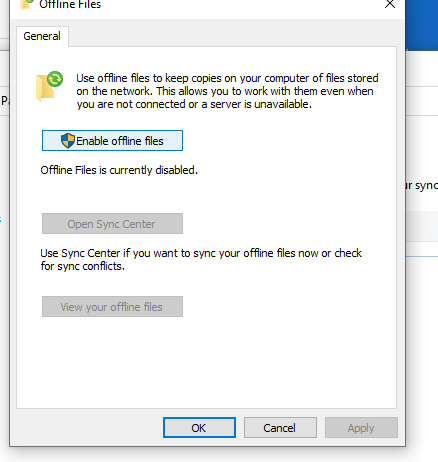
- В левой панели выберите “Управление автономными файлами” (Manage Offline Files);
- Нажмите на кнопку “Включить автономные файлы” (Enable Offline Files);
- Перезагрузите компьютер.
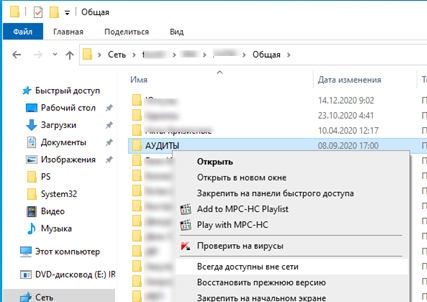
Теперь пользователю достаточно щелкнуть правой кнопкой мыши по файлу или папке в общей сетевой папке, который нужно сделать доступным автономном и выбрать пункт меню “Всегда доступно в автономном режиме” (Always available offline).
Windows начнет копировать указанные файлов в локальных кэш автономных файлов. По умолчанию размер кэша для автономных файлов в Windows составляет от 25% от емкости диска (в зависимости от версии Windows).
Теперь, если исходный файловый сервер недоступен, скорость сетевоегоподключения до него медленнее, чем заданное пороговое значение, эти файлы будут доступны для работы в автономном режиме через Центр синхронизации.
Все изменения, внесенные в автономные файлы, будут синхронизированы с сервером в следующий раз, когда компьютер подключится к сети.
Офлайн файлы сохраняются на клиентский компьютер в каталог
C:\Windows\CSC
и не доступны напрямую через File Explorer.
Включить Offline Files для сетевой папки на Windows Server
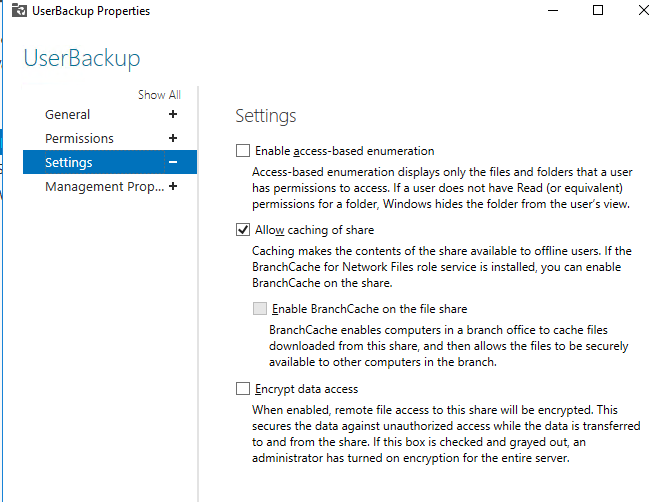
Чтобы пользователь мог помечать некоторые файлы доступными в автономном режиме, поддержка Offline Files должна быть включена в настройках сетевой папки.
В Windows Server 2016 запустите Server Manager и для роли File and Storage Services в свойствах общей сетевой папки включите опцию “Allow caching of share”.
Можно включить ручной режим кэширования для сетевой папки с помощью PowerShell (в этом режиме пользователи могут вручную выбрать папки и файлы, которые нужно сделать доступными офлайн):
Set-SMBShare -Name Docs -CachingMode Manual
Если сетевая папка находится на компьютере с десктопной редакцией Windows, нужно в свойствах общей сетевой папки включить опцию Caching -> Only the files and programs that users specify are available offline.

Настройка автономный файлов с помощью групповых политик
Если вы хотите включить службу автономных файлов на всех компьютерах в домене Active Directory, можно распространить на них следующие параметры реестра через GPO:
- HKEY_LOCAL_MACHINE\SYSTEM\CurrentControlSet\Services\CSC – тип DWORD Start = 1
- HKEY_LOCAL_MACHINE\SYSTEM\CurrentControlSet\Services\CscService
– тип DWORD Start = 2 - HKLM\Software\Policies\Microsoft\Windows\NetCache – тип DWORD Enabled=1
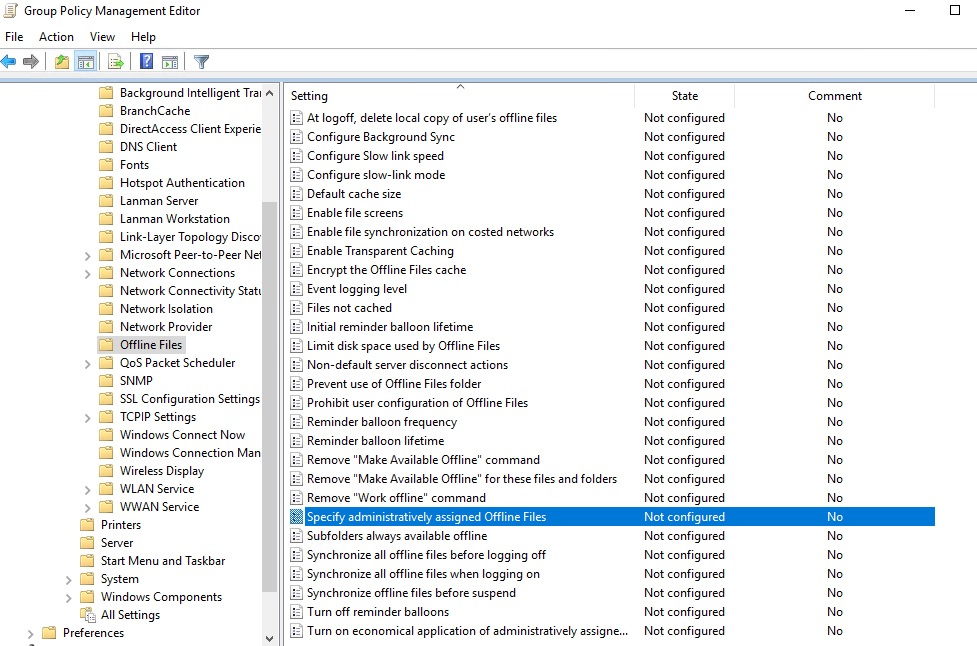
Либо можно использовать политику Allow or Disallow use of the Offline Files feature в разделе GPO Computer Configuration -> Policies -> Administrative Templates -> Network -> Offline Files. Здесь же можно настроить другие параметры Offline Folders:
- Configure Background Sync — включить фоновую синхронизацию и настроить интервалы синхронизации;
- Limit disk space used by Offline Files / Default Cache size – ограничить размер автономных файлов на диске;
- Specify administratively assigned Offline File – список сетевых ресурсов, которые автоматически должны быть синхронизированы на компьютеры пользователей и доступны в автономном режиме (можно указать UNC пути к любым сетевым папкам или личному каталогу пользователя \\Server1\Users$\%username%).
При анализе проблем работы с автономными файлами в Windows полезно исследовать события синхронизации в журнале Windows. Включите ведение лога синхронизации OfflineFiles:
wevtutil sl Microsoft-Windows-OfflineFiles/SyncLog /e:true /q
Затем, например, можно получить список успешно синхронизированных файлов за сутки с помощью такой PowerShell команды:
Get-WinEvent -oldest -filterhashtable @{ logname = "Microsoft-Windows-OfflineFiles/SyncLog"; starttime = (get-date).adddays(-1); id = 2005 } | select-object TimeCreated, @{ name = "Path"; expression = { ([xml]$_.toxml()).Event.UserData.SyncSuccessInfo.Path } }
Для очистки кэша автономных файлов нужно изменить параметра реестра Format Database и перезагрузить компьютер:
reg add HKEY_LOCAL_MACHINE\SYSTEM\CurrentControlSet\Services\Csc\Parameters /v FormatDatabase /t REG_DWORD /d 1 /f
shutdown –f –r –t 0
What is Sync Center? How to use Sync Center Windows 10? How to use Sync Center to sync files or folders? This post written by MiniTool shows you the answers. In addition, a Sync Center alternative – MiniTool ShadowMaker will be introduced.
What Is Sync Center?
Nowadays, data security is becoming more and more important, so more and more people choose to back up their files. To back up files, people can choose to create a backup image, save files to another location like an external hard drive, sync files to OneDrive or other locations, etc. To sync files, there is a built-in file sync program provided in Windows 10 and it is Sync Center.
Sync Center is a feature that was introduced in Windows Vista, and it has been supported in all modern versions of Windows. Sync Center is mainly used to copy network files and folders always in sync between the local computer and network servers, and to keep these files offline available on your computer, even when your server is slow, not connected or unavailable
With Sync Center, you are able to access a replica of the network files on your local computer even when the system is not linked to any network. That is to say, you can see all data made offline at anytime. Sync Center also allows you to maintain information accessible when syncing between your system & those files located in your network servers or cloud drives. By default, if the computer is not connected to the network drive, the network folder online is empty.
So, in this article, we will show you how to use Sync Center Windows 10.
How to Use Sync Center Windows 10?
In this part, we will show you how to access and use the Windows 10 Sync Center to manage offline files.
Now, here is the tutorial.
Open Sync Center Windows 10
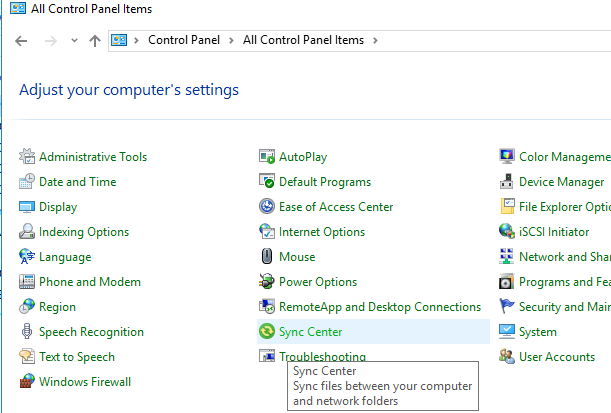
- Open Control Panel.
- Click Sync Center to continue.
- In the pop-up window, click Manage offline files from the left panel to continue.
- Then click Enable offline files to open Windows 10 Sync Center.
Then it may require you to reboot your computer to take the changes into effect. If not, do it manually.
If you want to sync folders Windows 10 or manage offline files on your local hard drive, the shared folder on a network server is required. So, here is the tutorial on how to create the shared folder on a network server.
Create a Shared Folder
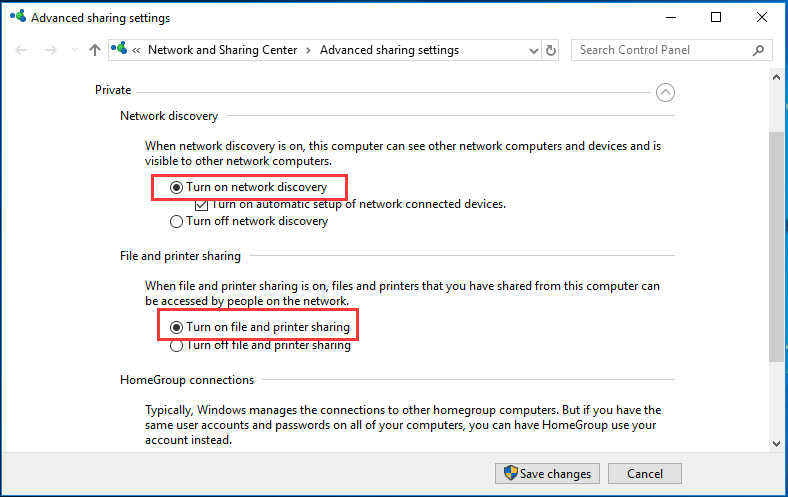
1. Go to Network and Sharing Center and click Sharing Options.
2. Check the three options: Turn on network discovery, Turn on file and printer sharing and Turn off password protected sharing.
3. Then click Save changes to continue.
Once all steps are finished, you can begin to create a shared folder on the network server.
4. Right-click the folder you want to share and choose Properties.
5. Switch to the Sharing tab and choose Share….
6. Add Everyone to share with and give it Read/Write control.
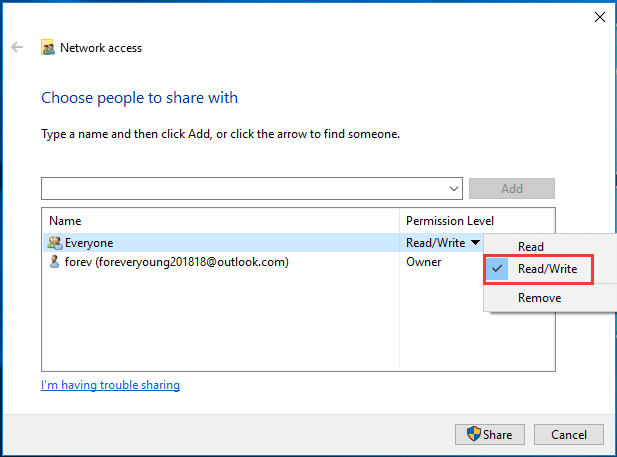
7. Then click the Share button to continue.
8. Then go back to the Sharing tab and choose Advanced Sharing to continue.
9. Next, check the option Share this folder.
10. At last, click Apply and OK to save the changes.
Once all steps are finished, you have created the shared folder on the network server.
To sync files from the network drive or sync files to it, you also need to know the IP address of the network server.
Get the IP Address of Network Server
Now, we will show you how to get the IP address of the network server.
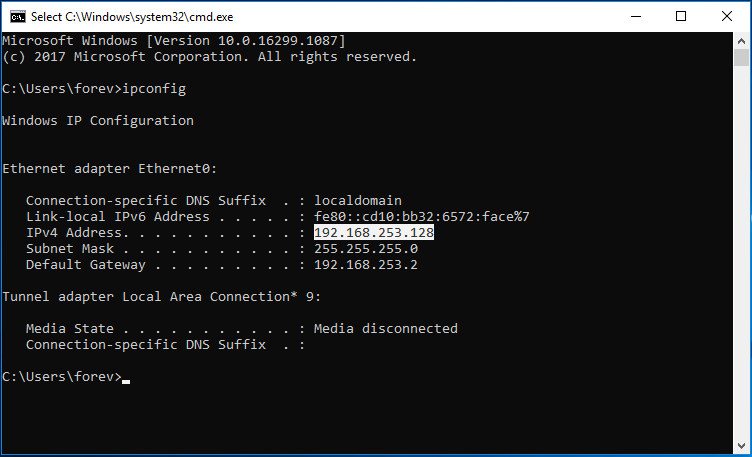
1. Open Command Prompt.
2. Type ipconfig in the command line window and hit Enter to continue.
3. Next, find your IPv4 address.
Sync the Network Drive to Local Computer
Now, we will show you how to sync the network drive to the local computer so as to manage your offline files.
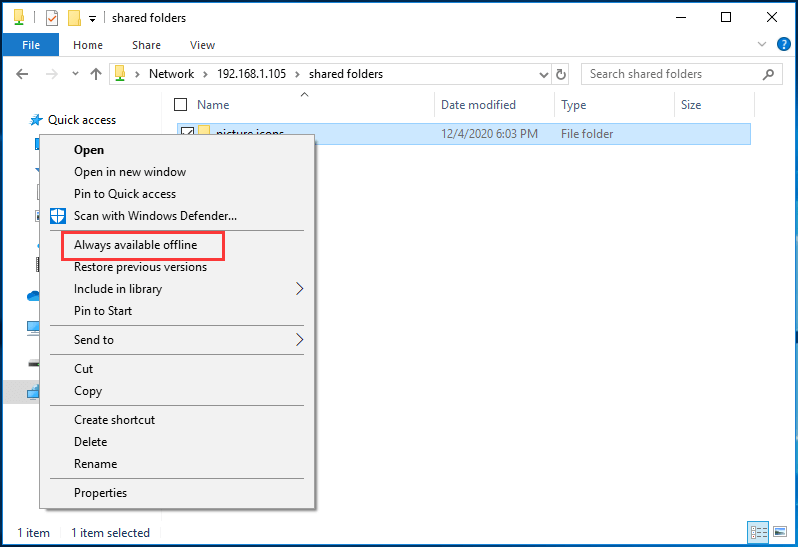
- Press the Windows key and R key together to open the Run dialog.
- Type \\ plus the IP address of the network server and click OK to continue.
- Then access the shared folder.
- Select the files or folders you want to access at the local computer, right-click it and choose Always available offline.
- Then wait for the process to be finished.
After that, you can access the files or folders on your local computer even though the network server is not connected. If you change either the source file or the synced files, both will keep the pace and display the same. After making it offline, you can edit it on your computer and then the source file will be synced.
How to Configure Files in Windows 10 Sync Center?
In this part, we will show you how to configure files in Windows 10 Sync Center.
How to Sync Schedule for Offline Files
In order to sync your files automatically, you can set scheduled sync for offline files.
Now, here is the tutorial.
1. Open Sync Center.
2. Right-click the offline task and choose Schedule for Offline Files.
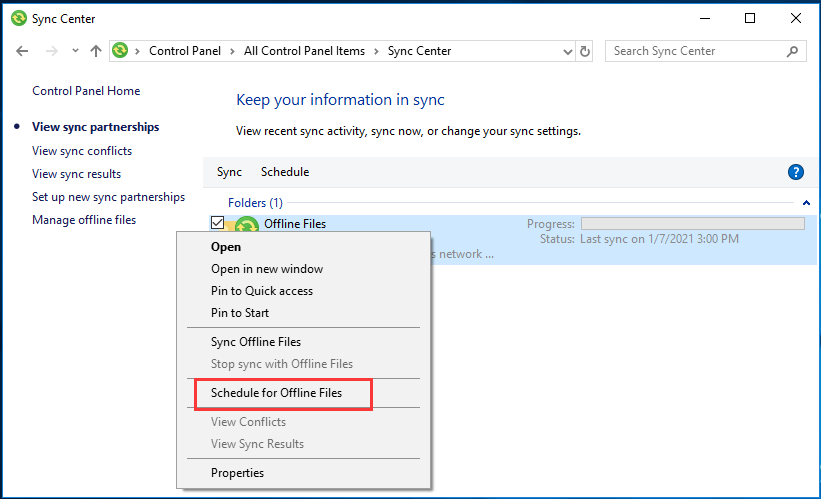
3. Next, choose which items you want to sync on this schedule and click Next.
4. Decide when you want this sync task to begin. You can choose At a scheduled time or When an event occurs. Here, we choose a scheduled time.
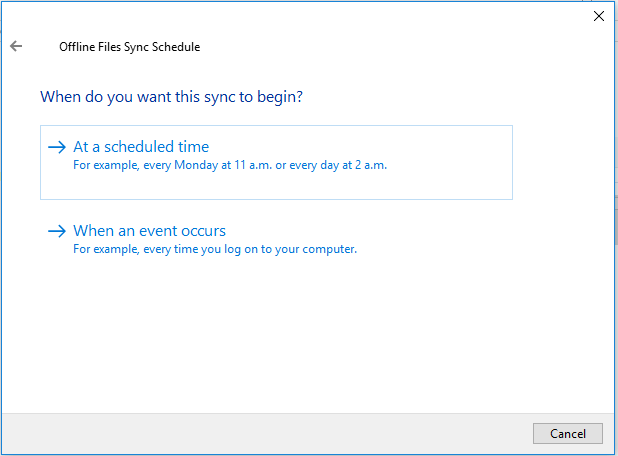
5. Then set the time and click Next.
6. Name the scheduled sync and click Save changes to continue.
After all steps are finished, you have set the scheduled sync and it will begin to sync your files regularly as long as you do not remove it.
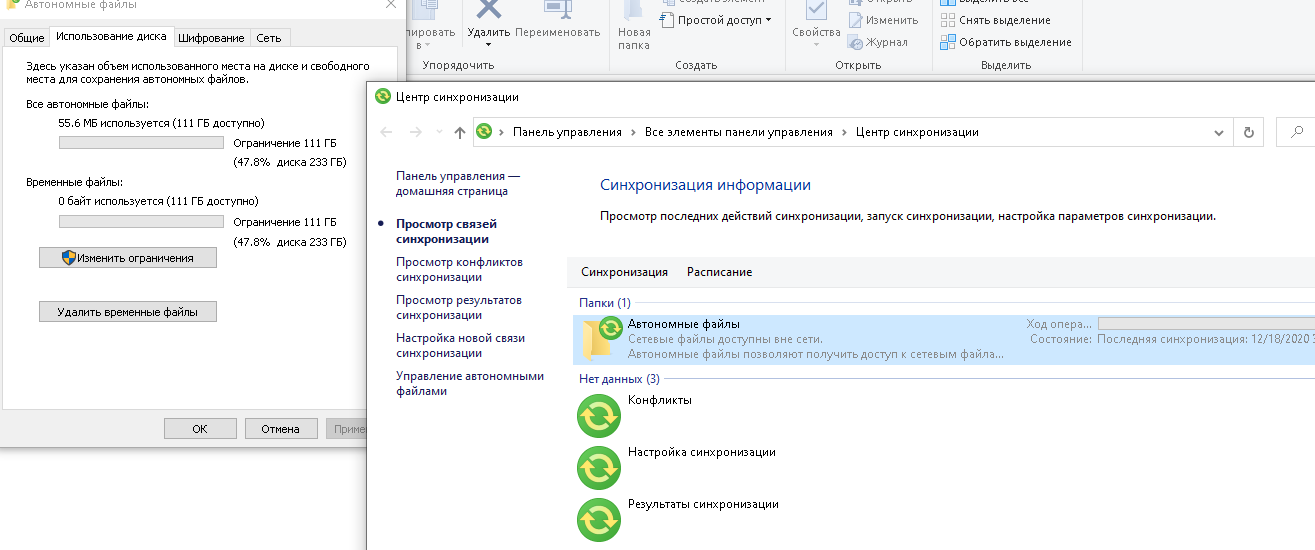
Change Windows Offline Files Disk Usage
The Disk Usage will show you the available disk space on your system as well as the disk space used for keeping the offline files. You can also modify it.
Now, here is the tutorial.
- Open Sync Center.
- Click Manage offline files on the left pane.
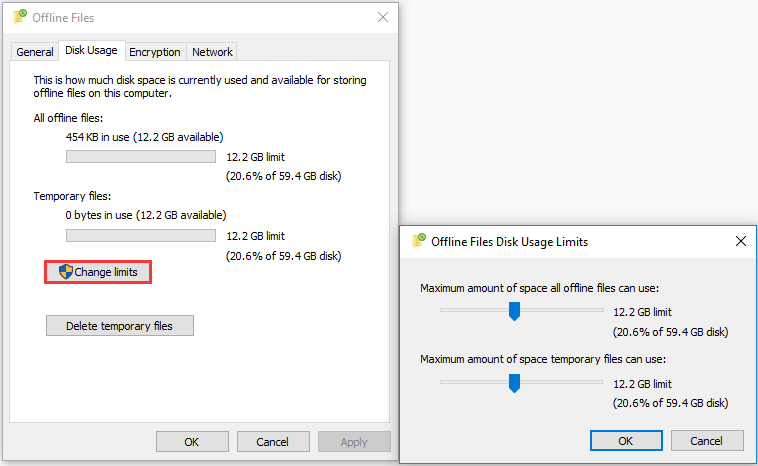
- In the pop-up window, switch to the Disk Usage tab.
- You can see the available storage space on your system, the used space for the offline files, and the disk space for the temporary files.
- You can also click Change limits to change it.
Encrypt Offline Files
In Windows 10 Sync Center, you can also encrypt it.
Now, here is the tutorial.
- Open Sync Center.
- Click Manage offline files.
- Go to the Encryption tab.
- Click the Encrypt button to continue.
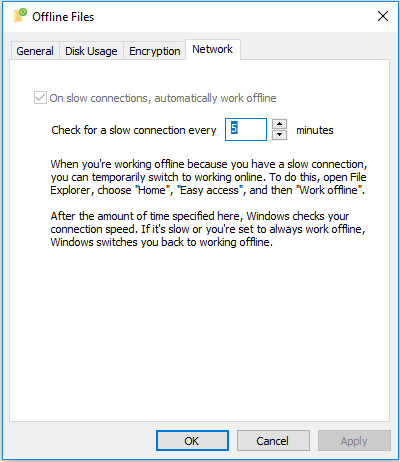
Configure Windows Offline Files Network Settings
You can set your preferred time to check for slow connectivity and once a slow connection occurs. Windows will start working offline automatically.
How to Disable Sync Center?
If you do not want to use Sync Center, you can choose to disable it. To do that, you can choose to end the mobysync.exe in the Task Manager. After that, it will be disabled.
To disable it, you can also choose to do that in Sync Center itself. Open Sync Center, click Manage offline files and click Disable offline links. After that, the Sync Center will be disabled.
The above content is all about the Sync Center and shows how to use Sync Center to sync files from the network server to the local hard drive and manage the offline files. However, if you want to sync files to the network drive, how can you do it?
In the following part, we will show you the Sync Center alternative – MiniTool ShadowMaker. It enables you to sync files from a local computer to the external hard drive, internal hard drive or network drive. So, keep on your reading to find more detailed information.
What is Sync Center? How to enable Sync Center? How to disable Sync Center? After reading this post, I knew all the answers. Click to Tweet
How to Sync Files to Network Drive?
MiniTool ShadowMaker is a piece of professional Windows 10 backup software and it is designed to back up the files, folders, disks, partitions and the operating system. It also comes with the Sync feature, ensuring the files are in two or more locations and kept in pace.
Now, we will show you how to use the Sync feature to sync files.
1. Download MiniTool ShadowMaker from the following button, install it and launch it.
MiniTool ShadowMaker TrialClick to Download100%Clean & Safe
2. Click Keep Trial.
3. Then you enter the main interface of MiniTool ShadowMaker, and go to the Sync page.
4. Click the SOURCE module to choose the files or folders you want to sync.
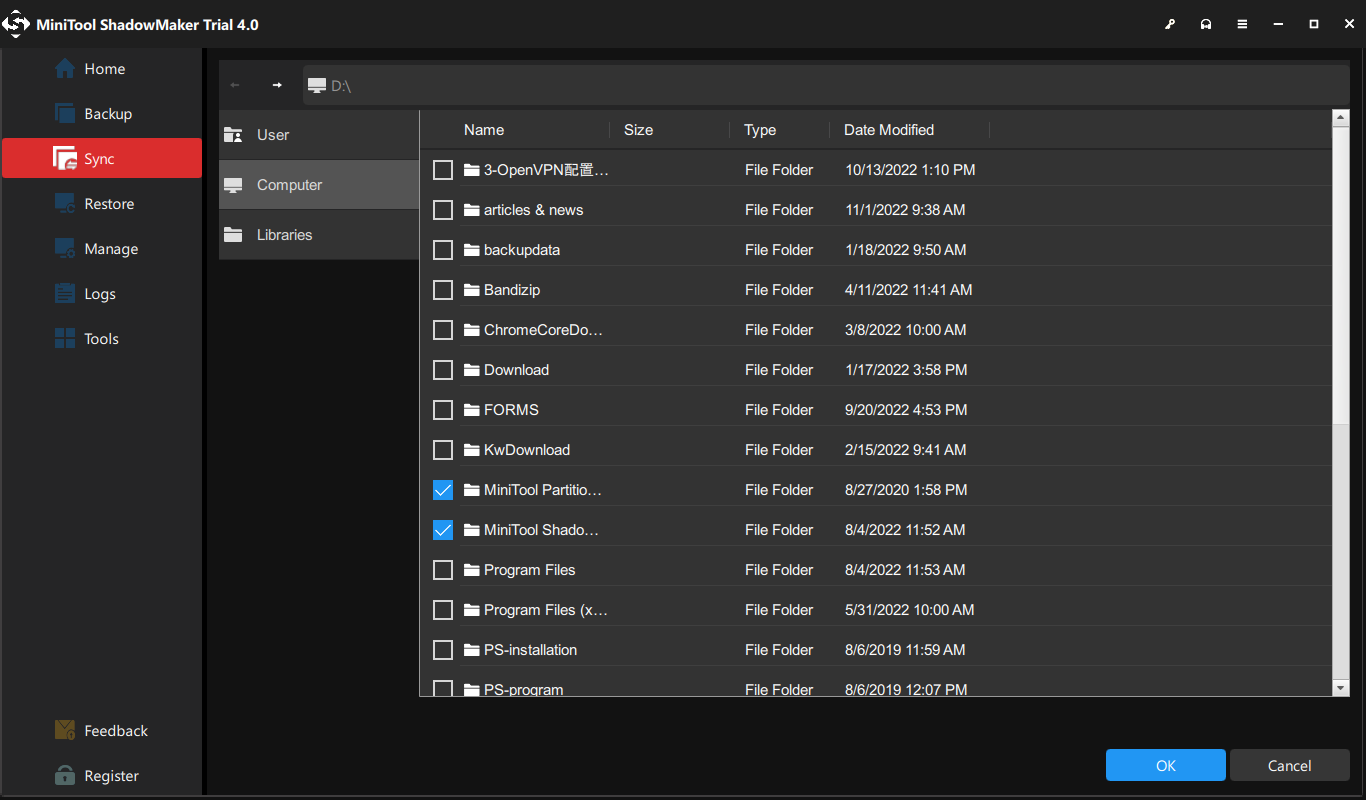
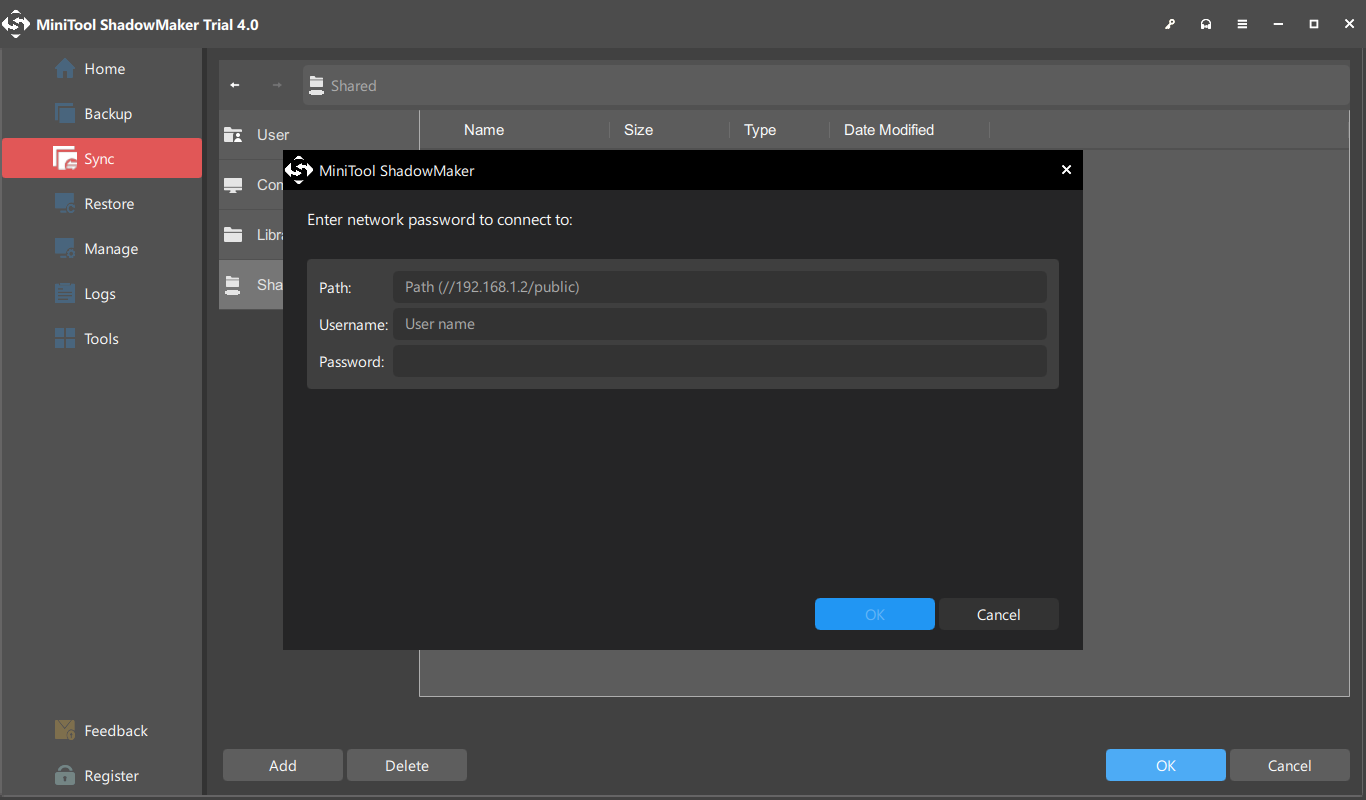
5. Then click the DESTINATION module to choose the target disk. If you want to sync them to the network drive, choose Shared.
6. Then click Add New and input the path, name and password of the internet server.
7. MiniTool ShadowMaker also enables you to set the automatic file. You can go to Options > Schedule Settings to do that.
8. After the sync source and destination are selected, click Sync Now to start syncing files to the network drive.
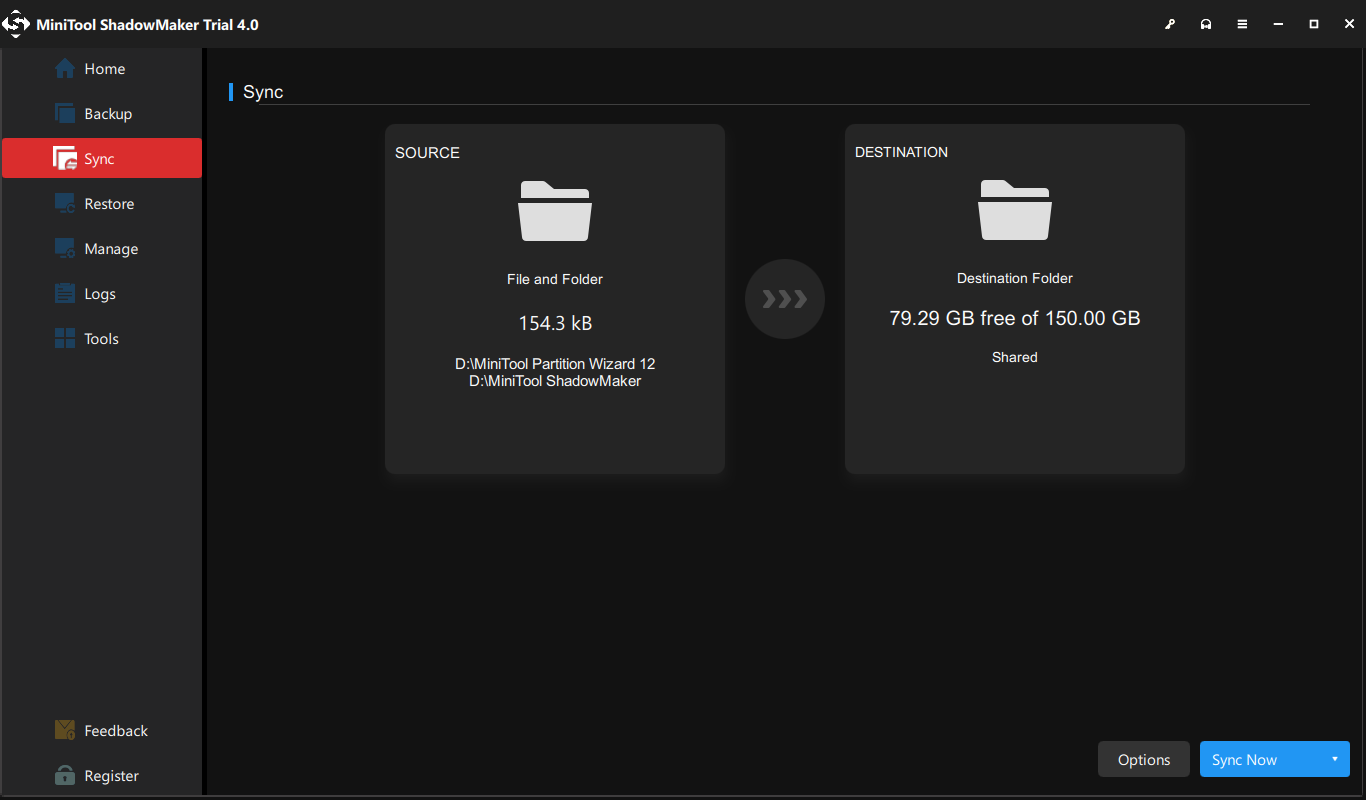
After all steps are finished, you have synced files from the local computer to the network drive. So, if you want to sync files, try MiniTool ShadowMaker.
Apart from the file backup and sync feature, MiniTool ShadowMaker also allows you to perform some recovery solutions. If your computer is crashed, you can restore it to a previous state with the system image created before.
In addition, MiniTool ShadowMaker is also a hard drive clone tool that helps you to clone OS from HDD to SSD without data loss.
Bottom Line
To sum up, this post shows what the Sync Center is and how to enable and disable Sync Center Windows 10. If you have any different ideas for Windows 10 Sync Center, you can share them in the comment zone.
If you have any problem with MiniTool ShadowMaker, please feel free to contact us via the email [email protected] and we will reply to you as soon as possible.
Sync Center FAQ
How Does Sync Center Work?
The Sync Center is a Windows 10 built-in tool that is used to sync files from the network server to the local computer. A prerequisite is that there are files on the network drive. You can manage offline files on your local drive even though the network server is not connected.
How do I turn off Sync Center?
To disable Sync Center, you can open Sync Center, click Manage offline files and choose Disable offline files.
Where is Sync Center?
The Sync Center is a Windows 10 built-in tool and you can open Control Panel to find it. If it is enabled, you can also access it in the system tray. If there is a sync conflict, you will see a yellow triangle with and an exclamation in front of the Sync Center icon.
Download Article
Disable internet connection sharing and file sharing on Windows
Download Article
- Turn Off File Sharing (Windows 10)
- Turn Off File Sharing (Windows 11)
- Turn Off Internet Connection Sharing (Windows 10 & 11)
- Turn Off Mobile Hotspot (Windows 10 & 11)
- Video
- Tips
|
|
|
|
|
This wikiHow guide will teach you how to stop sharing your files and/or network connection on your Windows PC. To turn off file sharing, you’ll just need to make a quick change in Network and Sharing Center (Windows 10) or Settings (Windows 11). It’s just as easy to turn off internet connection sharing, as well as disabling your mobile hotspot if you’re sharing your connection over Wi-Fi.
How to Disable Network Sharing on Windows
On Windows 11, go to Settings > Network & internet > Advanced network settings > Advanced sharing settings. Select your network, then toggle off “File and printer sharing.” On Windows 10, go to Control Panel > Network and Internet > Network and Sharing Center > Change advanced sharing settings.
-

To stop sharing files with other people on your network, you can disable file and printer sharing in Control Panel.[1]
To open Control Panel:- Press Windows key + S.
- Type control panel.
- Click Control Panel in the search results.
-

If you don’t see this option, click the menu at the top-right and select Category. You’ll see it then.[2]
Advertisement
-

[3]
-
It’s the third link from the top of the left column.
-

This ensures that you’re changing the sharing settings for your current connection. You’ll see “(current profile)” next to one of the following options:
- Private: This is for your private connections, such as when you’re on your home network.
- Guest or Public: When you’re connected to Wi-Fi in a public location, whether or not you have to enter a Wi-Fi password to log in.
- All Networks: Both public and private networks.
-
A dot will appear in its corresponding circle. This means the item is selected.[4]
- If you don’t want other devices to be able to see your Windows PC on the network at all, also select Turn off network discovery.[5]
- If you don’t want other devices to be able to see your Windows PC on the network at all, also select Turn off network discovery.[5]
-

It’s the button at the bottom of the screen. You have disabled file sharing for the current connection.[6]


Advertisement
-
You can do this quickly by pressing Windows key + I, or by clicking the Settings gear in your Start menu.
-
You’ll see this in the left panel.
-
It’s the last option in the right panel.
-
This option is in the «More settings» section below the list of network adapters.
-
The profile you’re using now will be selected by default. If you want to turn off network file sharing for the current connection, just skip to the next step. Otherwise, you can enable or disable file sharing for Private networks (such as on your home network), Public networks (at school or in a café), or All networks.
-

Once the switch turns gray or white, you’ll no longer be sharing files or your network printer with other devices on your network.
- If you don’t want other devices on the network to be able to see your PC, you can also click the switch next to «Network discovery» to disable it.[7]
- If you don’t want other devices on the network to be able to see your PC, you can also click the switch next to «Network discovery» to disable it.[7]


Advertisement
-
This method will teach you how to stop sharing your PC’s network connection with other users. To open Control Panel:
- Press Windows key + S.
- Type control panel.
- Click Control Panel in the search results.
- If you’re using Windows 11, you should only use this method if you’re sharing your internet connection using an ethernet cable. If you’re sharing your connection over Wi-Fi, see this method instead.
-

If you don’t see this option, click the menu at the top-right and select Category. You’ll see it then.
-

- You’ll see your current connection under the “View your active networks” header at the top of the main panel. Remember the name of the connection, as you’ll need it in a moment.
-
It’s the second link from the top of the left column. This opens a list of your saved network connections.
-
Look for the adapter name that matches the one you noted a moment ago. Right-click it, then select Properties.
-
It’s near the top of the dialog window.
-
Clicking the box once should remove the check mark.
- If the box was already empty, you don’t need to make any changes.
-
It’s at the bottom of the dialog window. Now that you’ve turned off connection sharing, nobody else on your network can connect to the internet through this computer’s connection.


Advertisement
-
You can do this quickly by pressing Windows key + I, or by clicking the Settings gear in your Start menu.
- If you created a W-Fi mobile hotspot to allow other devices to share your internet connection, use this method to turn off the hotspot.
-
It’s in the left panel on Windows 11. On Windows 10, click the icon in the main panel.[8]
-
If you’re using Windows 11, it’s in the right panel. On Windows 10, it’s on the left panel.
-
Once you turn off this switch, any devices sharing your internet connection will be disconnected.


Advertisement
Ask a Question
200 characters left
Include your email address to get a message when this question is answered.
Submit
Advertisement
Video
-
If you just want to stop sharing a specific file or folder, you can unshare it without turning off file sharing altogether. In File Explorer, right-click the file or folder, select Show more options (Windows 11 only) > Give access to > Remove access.[9]
Thanks for submitting a tip for review!
Advertisement
About This Article
Thanks to all authors for creating a page that has been read 187,032 times.