
The Find my Device option in Windows 10 is handy if your laptop, Xbox, etc., are stolen or misplaced. This feature can also allow you to control your device remotely. The feature works only if the location for the device is turned On. If your device is stolen, the thief may turn the location Off, and you won’t be able to trace the device. There is a way to ensure that no one except you can disable it so that your device is always traceable. This tutorial will address this and show you how to disable the find my device option in Windows 10 computers.
Disable Find my Device Option
There are two ways you can do this. You can use the Group Policy Editor or you can use the Registry Editor.
Disable Find my Device Using Policy Editor
If you have a Windows 10 Home, then you cannot use this method. Use the Registry Editor method instead. For users with Windows 10 Pro versions, the policy editor method applies.
- Open the Run box using the shortcut keys Win + R.
- Type gpedit.msc and press Enter.
- Click on Computer Configuration to expand the option.
- Go to Administrative Templates.
- Select Windows Components.
- Now select Find my Device.
- On the right pane, locate Turn On/Off Find my Device. Double-click on this option.
- Select Enabled.
- Click Apply and then press OK.
The ‘Change’ option in Find my Device settings will be disabled and no one will be able to modify the location settings. In case the Change button isn’t disabled, restart your computer. If you want to Enable the Change button again, follow all the above steps but in step 8, select Disabled or Not Configured option instead.
Registry Editor
Before using the Registry Editor always create a system restore point. This is incase anything goes wrong and you have a system backup. After creating the restore point, follow the steps below:
Step-1: Open the Run box using shortcut keys Win + R.
Step-2: Type regedit and press OK.
Step-3: You will be asked; do you want to allow this app to make changes to your device? Click Yes.
Step-4: Type the following path in the Registry Editor and press Enter:
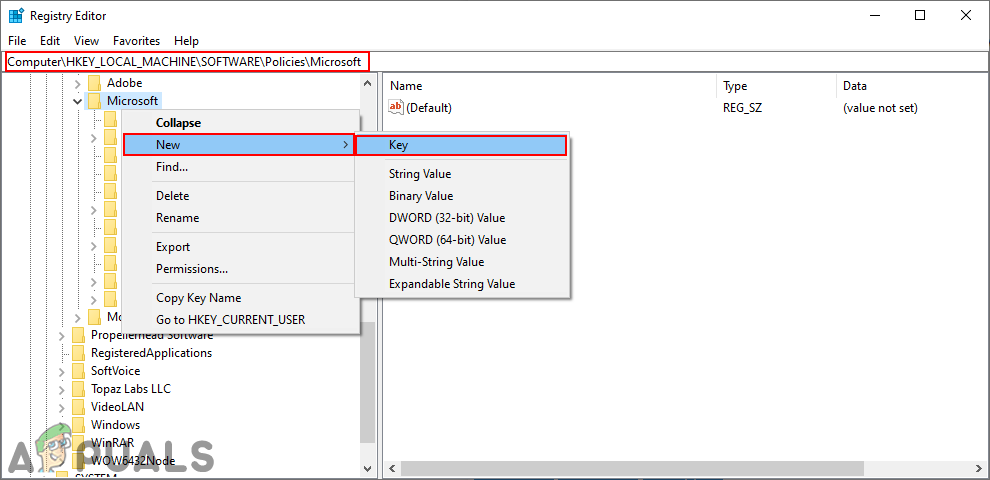
HKEY_LOCAL_MACHINE\SOFTWARE\Policies\Microsoft

Step-5: In the left pane under Microsoft if you see FindMyDevice, you can skip this step and step-6. If not, you have to create a key. Right-click on Microsoft and hover the cursor over New. Select Key.

Step-6: Rename this new key as FindMyDevice.
Step-7: Select this subkey.
Step-8: Right-click on the right pane and hover the cursor over New. Select DWORD (32-bit) Value.

Step-9: Name this AllowFindMyDevice.

Step-10: Double-click on this option.
Step-11: Enter 1 in Value data.

Step-12: Click OK.
This method will also disable the Change option in the Find my Device settings. If you want to enable the Change option again, follow the steps above and in step-11, add 0 (zero) in Value data.
Find my device in Windows is a feature that helps you locate your Windows 10 device. If the device is lost or stolen, this can help the users to locate their device. A Microsoft account and location are required for this feature to work. When users install a fresh Windows 10 on their system, they will get an option for enabling this feature for their computer. However, users can also enable or disable this feature after the installation. In this article, we will show you different methods through which you can enable or disable Find my device in Windows 10.

There are several methods in Windows 10 through which users can enable or disable the Find my device feature. Most common and default ones can be done through the Windows Settings app. The user just needs to navigate to settings and click on it to enable or disable it. Other methods are through the Local Group Policy Editor or through the Registry Editor. The location should be enabled on your system and you must be login into your Microsoft account to make this feature work.
Method 1: Enabling or Disabling ‘Find My Device’ through Windows Settings
Windows Settings app is a component of Microsoft Windows that can be used to modify the different types of settings for your computer. This is similar to the old control panel but much easier to access and use. You can enable the Find my device feature through Windows Settings in just a few steps.
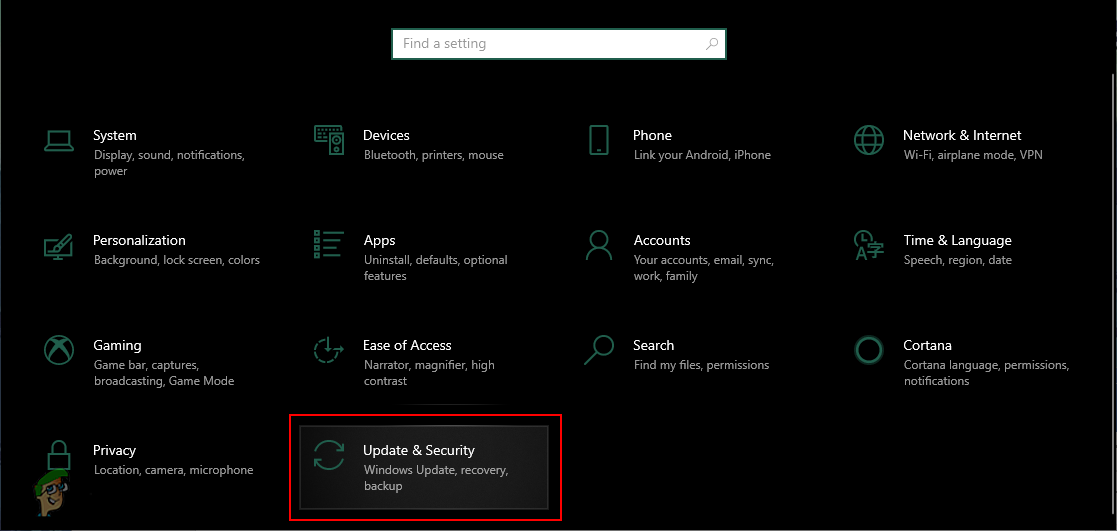
- Click on the Start button in the taskbar and click on the Settings icon. You can also just press Windows + I key to open the Settings.
- Click on the Update & Security settings.

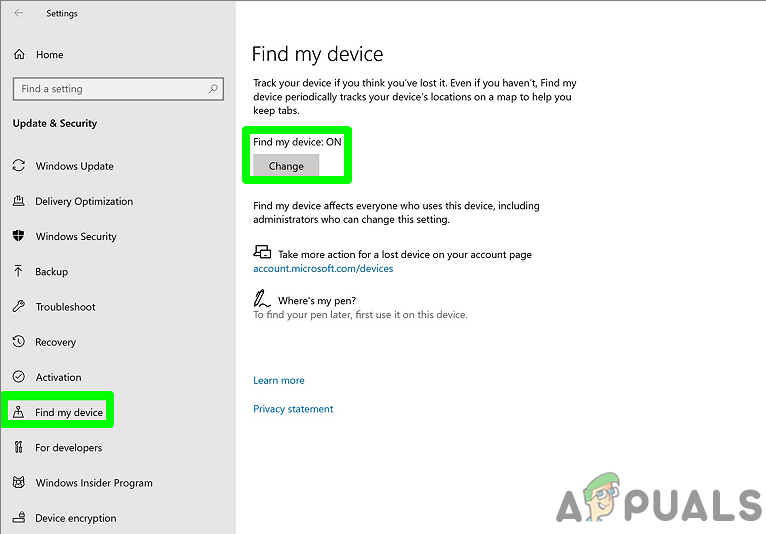
Opening Updates & Security settings - On the left pane, click on Find my device and then click on the Change button.
Note: If the change button is greyed out, then click on the Turn on the location setting. You must enable location and sign in to Microsoft Account before enabling the Find my device feature.
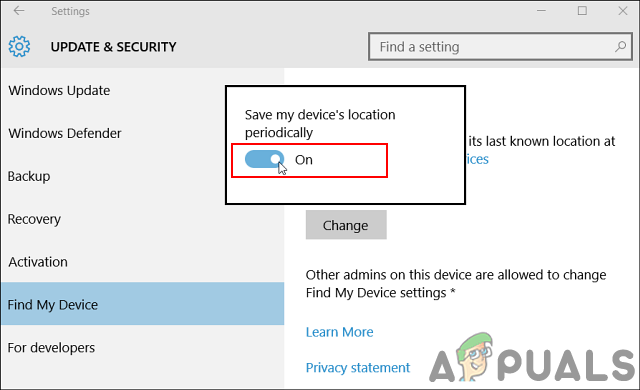
Clicking on the Change button for Find My Device - Change the toggle from Off to On. This will enable the Find my device on your system.

Enabling Find My Device - To disable the Find my device on your system, just switch the toggle back from On to Off.
Method 2: Enabling or Disabling ‘Find My Device’ through Local Group Policy Editor
The Local Group Policy Editor can be used to control the working environment of the computer. There is also a policy for this specific setting in the Local Group Policy Editor. It also provides additional information about what the policy is about.
If you’re using a Windows 10 Home Edition, then skip this method and try the Registry Editor method.
However, if you have the Local Group Policy Editor on your system, then follow the below steps:
- Hold the Windows key and press R to open a Run dialog. Now type “gpedit.msc” and press Enter to open the Local Group Policy Editor.
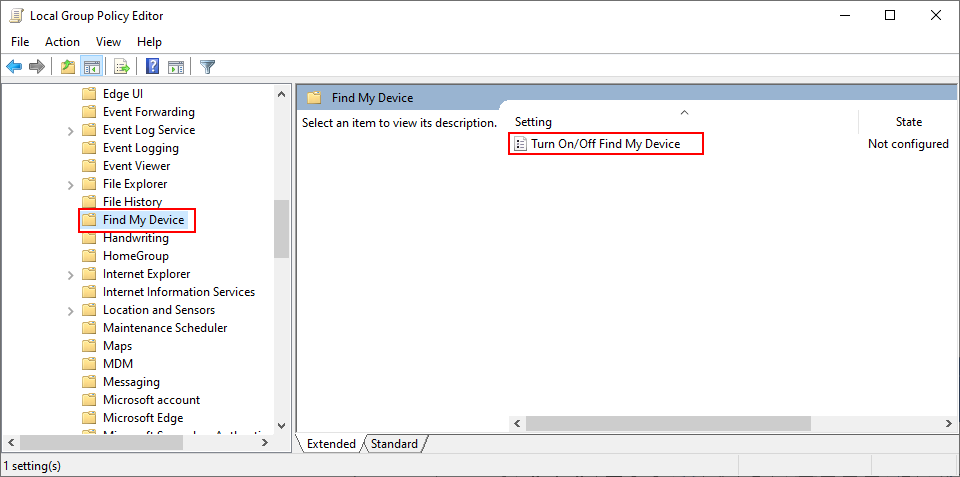
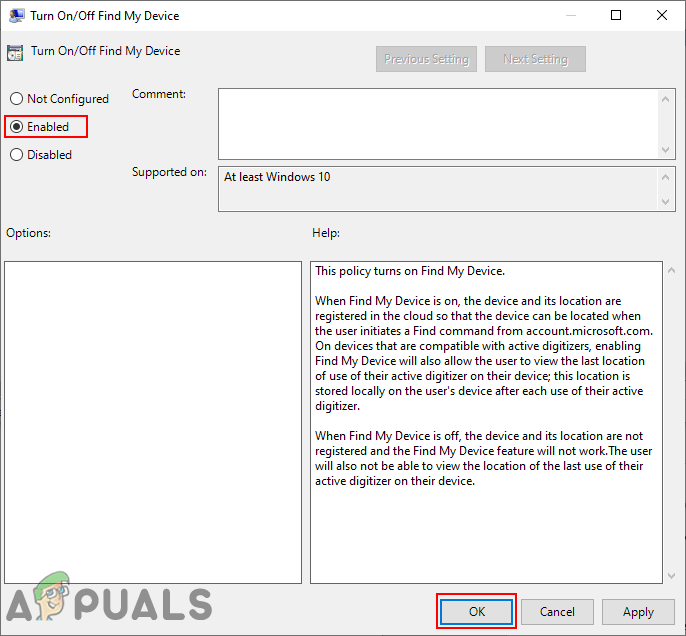
Opening Local Group Policy Editor - Navigate to the following policy in the Local Group Policy Editor:
Computer Configuration\Administrative Templates\Windows Components\Find My Device

Navigating to setting - Double-click on the setting named “Turn On/Off Find My Device“. Switch the toggle from Not Configured to Enabled. After changing the toggle, click on Apply/Ok to save the changes. This will enable the Find my device feature.

Enabling Find My Device - To disable the Find my device feature, change the toggle option from Not Configured to Disabled option.
Method 3: Enabling or Disabling ‘Find My Device’ through Registry Editor
The registry Editor method is an alternative to the Local Group Policy Editor method. The Registry Editor can be found in all versions of the Windows 10 operating system. However, some of the settings by default will not be available in the Registry Editor. Users need to create the key and values manually for that setting to make it work. Follow the below steps to try it out:
- Press the Windows and R keys together to open a Run dialog. Then type “regedit” and press the Enter key to open the Registry Editor. Choose the Yes option for UAC (User Account Control) prompt.
Opening the Registry Editor - Navigate to the following key in the Registry Editor:
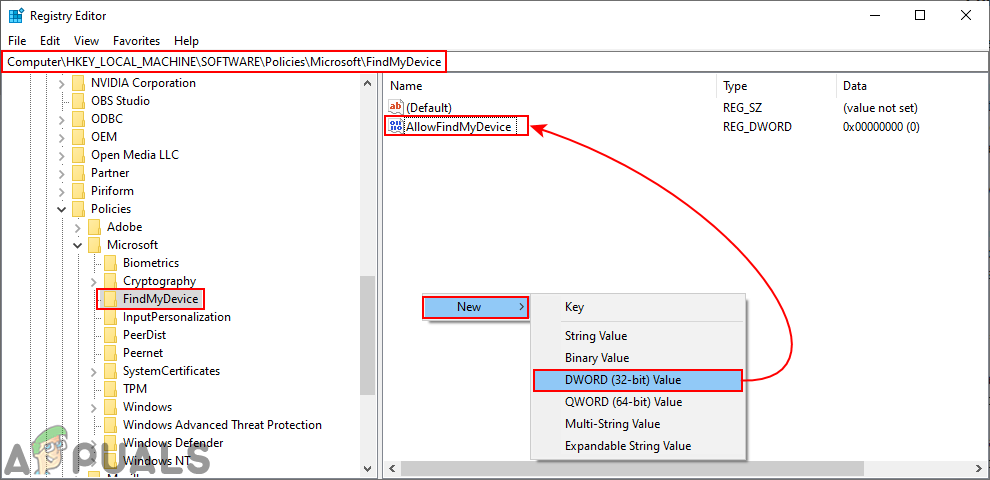
HKEY_LOCAL_MACHINE\SOFTWARE\Policies\Microsoft\FindMyDevice
- Create the missing “FindMyDevice” key by right-clicking on the Windows key and choosing the New > Key option.

Creating missing key - In the FindMyDevice key, right-click on the right pane and choose New > DWORD (32-bit) Value. Name the new value as “AllowFindMyDevice“.
Creating a new value - Double-click on the newly created value and set the value data to 1. This will enable the Find my device feature.
Note: Value data 1 is for enabling and value data 0 is for disabling.Enabling the value - To disable Find my device, just set the value data to 0 or delete the value.
Additional: Turn On or Off ‘Find My Device’ through Registry Editor
The Registry Editor method above may not work if your location is not enabled for the Find my device feature. This method will enable the location for the Find my device feature. Users can also create value for the location and then enable it. This method is only required if the location on your system is disabled.
- Press the Windows + R keys together to open a Run dialog. Type “regedit” and press Enter to open the Registry Editor. For UAC (User Account Control) prompt, choose the Yes option.
Opening the Registry Editor - In the Registry Editor, navigate to the following location:
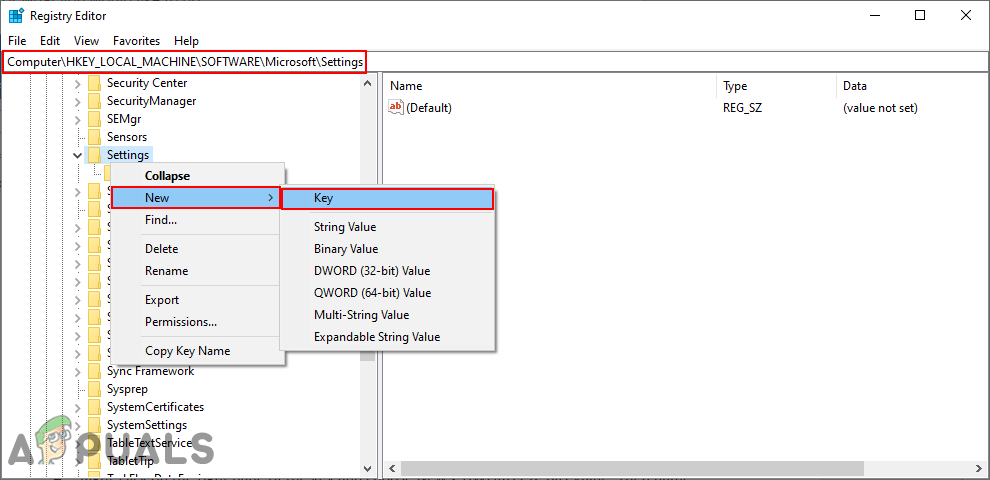
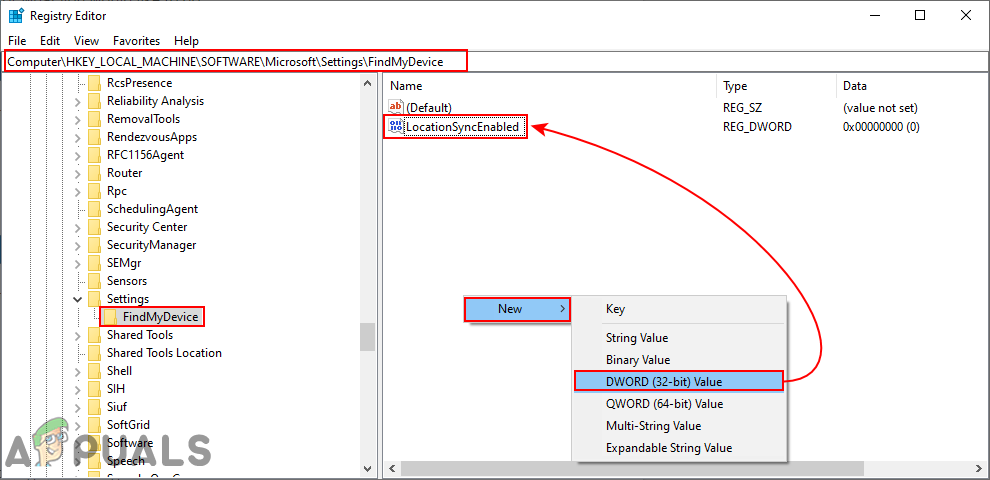
HKEY_LOCAL_MACHINE\SOFTWARE\Microsoft\Settings\FindMyDevice
- If the key is missing, then just create it by right-click and choosing New > Key. Name it as FindMyDevice.
Creating the missing key - Right-click on the right pane of the key and choose New > DWORD (32-bit) Value. Then name the value as LocationSyncEnabled.
Creating the new value - Double-click on it and set the value data to 1.
Note: 1 is for On and 0 is for Off option.Enabling value - This will enable the location for the Find my device feature.
Kevin Arrows
Kevin Arrows is a highly experienced and knowledgeable technology specialist with over a decade of industry experience. He holds a Microsoft Certified Technology Specialist (MCTS) certification and has a deep passion for staying up-to-date on the latest tech developments. Kevin has written extensively on a wide range of tech-related topics, showcasing his expertise and knowledge in areas such as software development, cybersecurity, and cloud computing. His contributions to the tech field have been widely recognized and respected by his peers, and he is highly regarded for his ability to explain complex technical concepts in a clear and concise manner.
Applies ToMicrosoft account Windows 10 Windows 11 Панель мониторинга учетной записи Майкрософт
Функция «Найти мое устройство» позволяет найти Windows 10 или Windows 11 устройства, если оно потеряно или украдено. Чтобы ею воспользоваться, войдите на устройство в качестве администратора с помощью учетной записи Майкрософт. Эта функция работает, если на вашем устройстве включено определение расположения, даже если другие пользователи на устройстве отключили параметры расположения для своих приложений. Когда вы попытаетесь определить местоположение устройства, пользователи устройства получат уведомление об этом в области уведомлений.
-
Эта функция работает с любым устройством с Windows, например с настольным компьютером, ноутбуком, устройством Surface или ручкой Surface. Прежде чем эту функцию можно будет использовать, ее необходимо включить.
-
Эту функцию нельзя использовать с рабочей или учебной учетной записью. Также она не работает с устройствами под управлением iOS, Android и консолями Xbox One. Вот что нужно сделать при краже консоли Xbox.
Включите функцию «Поиск устройства»
Во время настройки нового устройства можно включить или отключить функцию «Поиск устройства». Если вы выключили функцию во время настройки устройства и теперь хотите включить ее, убедитесь, что устройство с Windows подключено к Интернету, его батарея достаточно заряжена, чтобы устройство могло отправлять данные о своем местоположении, и что вы выполнили вход в устройство с помощью учетной записи Майкрософт.
-
На устройстве, которое вы хотите изменить:
-
Windows 11. Выберите Пуск > Параметры > Конфиденциальность & безопасность > Найти устройство.
-
Windows 10. Выберите Пуск > Параметры > Обновить & безопасность > Найти устройство.
-
Открытие параметров поиска устройства
Поиск устройства с Windows
-
Войдите в свою учетную запись на странице https://account.microsoft.com/devices.
-
Откройте вкладку Поиск устройства.
-
Выберите нужное устройство и нажмите Найти, чтобы открыть карту, на которой отображается его местоположение.
Примечание: Вы можете найти общее устройство, только если у вас есть учетная запись администратора на нем. На общем устройстве выберите Пуск > Параметры > Учетная запись > Ваши данные , чтобы узнать, являетесь ли вы администратором.
Блокировка устройства с Windows в удаленном режиме
-
Найдя устройство на карте, выберите пункт Заблокировать > Далее.
-
После блокировки устройства можно сбросить пароль для дополнительного уровня безопасности. Для получения дополнительной информации о работе с паролями см. раздел Изменение или сброс пароля для Windows.
Требуется дополнительная помощь?
Обратитесь в службу поддержки
Чтобы получить техническую поддержку, перейдите в раздел Обращение в службу поддержки Майкрософт, опишите проблему и выберите Техническая поддержка. Если вам по-прежнему нужна помощь, выберитеОбратитесь в службу поддержки, чтобы получить наилучший вариант поддержки.
Нужна дополнительная помощь?
Нужны дополнительные параметры?
Изучите преимущества подписки, просмотрите учебные курсы, узнайте, как защитить свое устройство и т. д.
FAQ
[Windows 11/10] Как включить/выключить сетевое обнаружение
Пожалуйста, перейдите к соответствующей инструкции, исходя из текущей операционной системы Windows на Вашем компьютере:
- Windows 11
- Windows 10
Windows 11
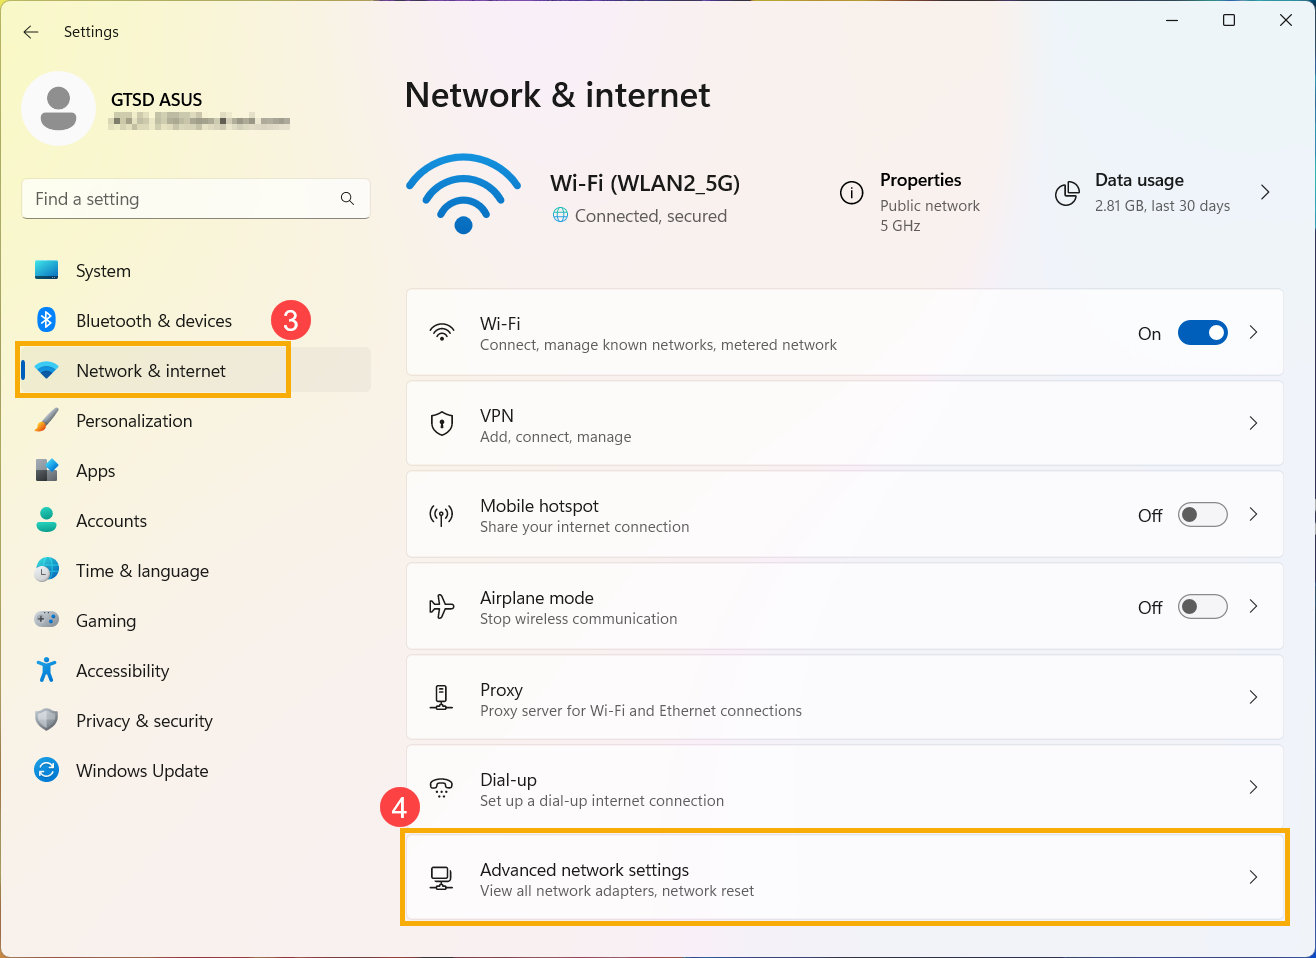
- Нажмите иконку [Пуск] на панели задач①, затем выберите [Параметры]②.

- Выберите [Сеть и Интернет]③, затем откройте [Расширенные настройки сети]④.
- В Дополнительных настройках выберите [Расширенные настройки общего доступа]⑤.
- Вы можете создать отдельный сетевой профиль для каждого используемого типа сети, чтобы включить или отключить функцию сетевого обнаружения.⑥.


Windows 10
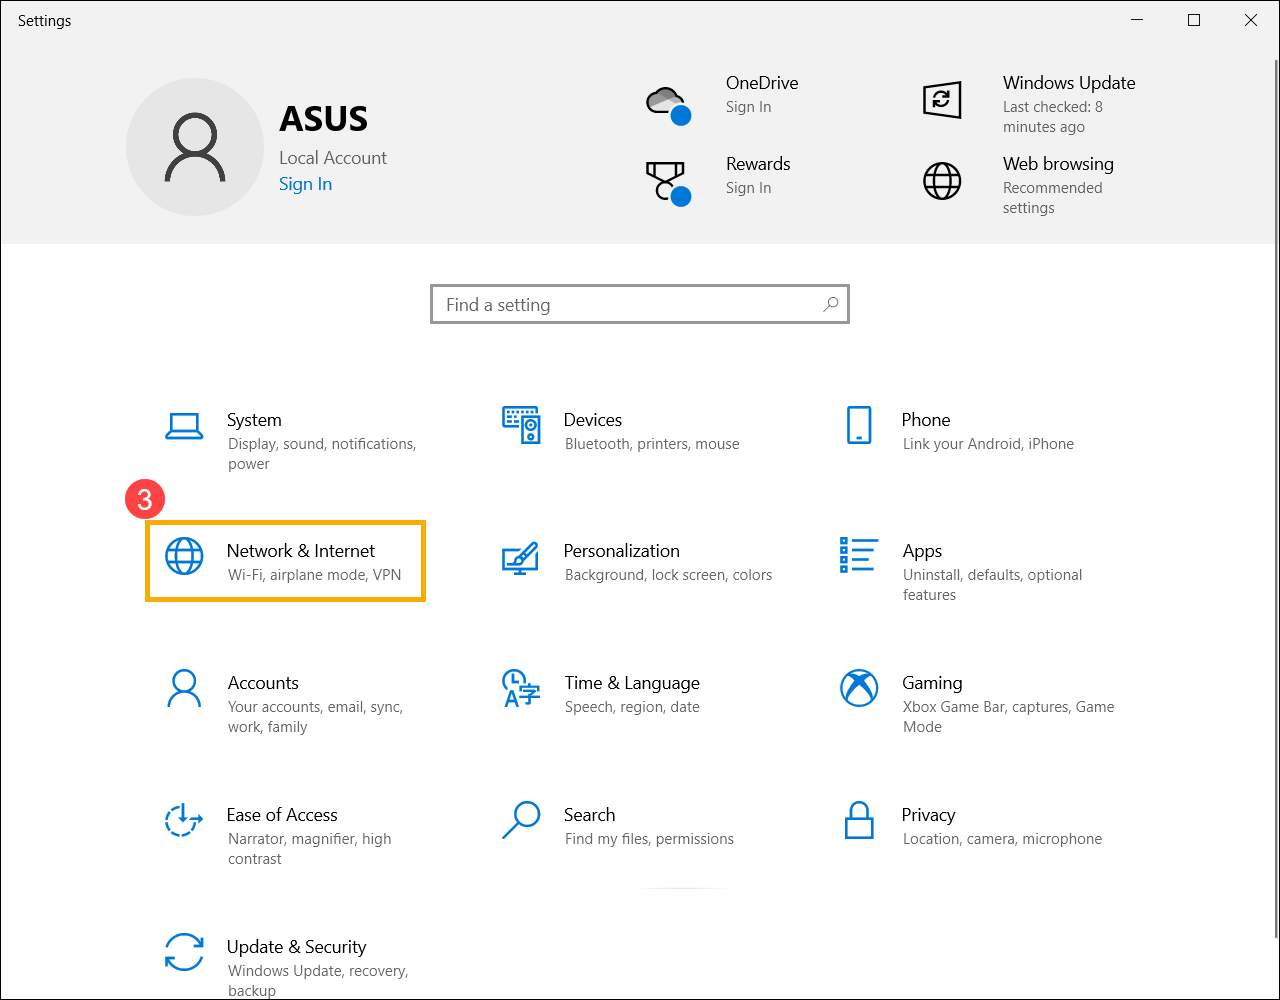
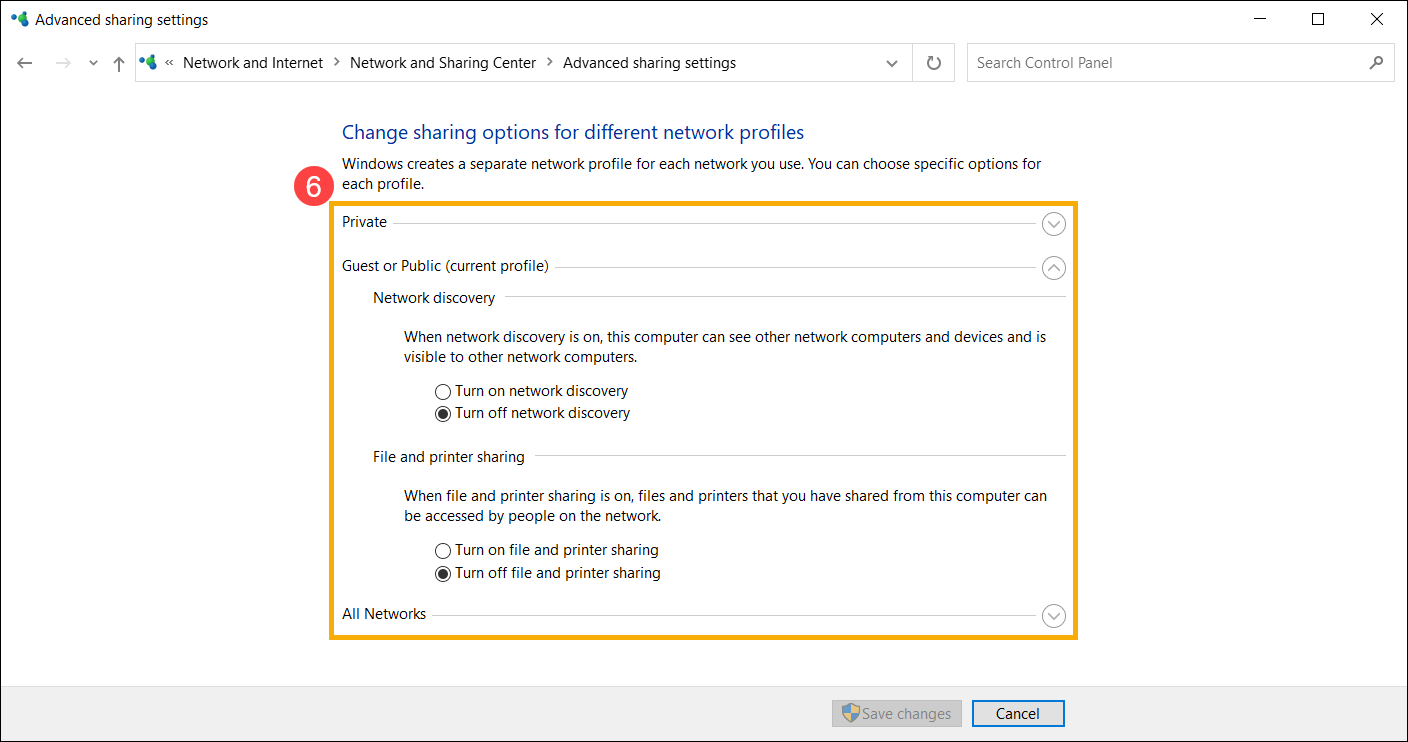
- Нажмите иконку [Пуск] на панели задач①,затем выберите [Параметры]②.
- Выберите [Сеть и Интернет]③.
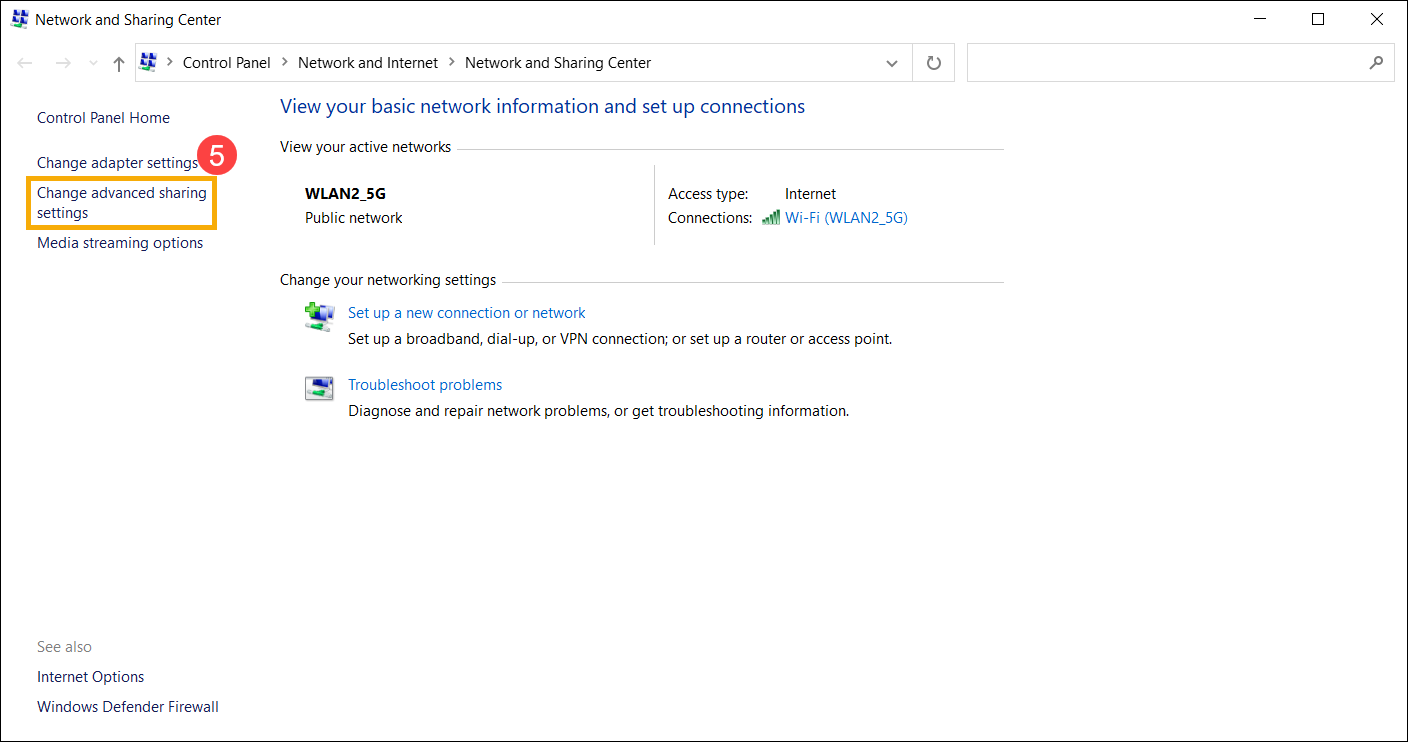
- В Дополнительных сетевых параметрах выберите [Центр управления сетями и общим доступом]④.
- Выберите [Изменить дополнительные параметры общего доступа]⑤.
- Вы можете создать отдельный сетевой профиль для каждого используемого типа сети, чтобы включить или отключить функцию сетевого обнаружения.⑥.


Эта информация была полезной?
Yes
No
- Приведенная выше информация может быть частично или полностью процитирована с внешних веб-сайтов или источников. Пожалуйста, обратитесь к информации на основе источника, который мы отметили. Пожалуйста, свяжитесь напрямую или спросите у источников, если есть какие-либо дополнительные вопросы, и обратите внимание, что ASUS не имеет отношения к данному контенту / услуге и не несет ответственности за него.
- Эта информация может не подходить для всех продуктов из той же категории / серии. Некоторые снимки экрана и операции могут отличаться от версий программного обеспечения.
- ASUS предоставляет вышеуказанную информацию только для справки. Если у вас есть какие-либо вопросы о содержании, пожалуйста, свяжитесь напрямую с поставщиком вышеуказанного продукта. Обратите внимание, что ASUS не несет ответственности за контент или услуги, предоставляемые вышеуказанным поставщиком продукта.
В этой статье показаны действия, с помощью которых можно включить или отключить сетевое обнаружение в операционной системе Windows 10.
Сетевое обнаружение — это параметр сети, который определяет, может ли компьютер находить другие компьютеры и устройства в сети и могут ли другие компьютеры в сети обнаруживать ваш компьютер.
По умолчанию при первом подключении к новой сети (проводной или беспроводной), мастер сетевого расположения предложит вам разрешить другим компьютерам и устройствам в этой сети обнаруживать ваш ПК.

В зависимости от выбранного сетевого расположения Windows автоматически назначит сети состояние обнаружения сети и откроет соответствующие порты Брандмауэра Windows для этого состояния.
В случае необходимости, можно включить или отключить сетевое обнаружение, при этом не изменяя сетевое расположение. Например для сетевого профиля «Частная сеть», по умолчанию ваш компьютер является обнаруживаемым и виден другим компьютерам в сети, но можно сделать свой компьютер невидимым для других устройств отключив сетевое обнаружение.
Сетевое обнаружение требует, чтобы службы указанные ниже, были включены, настроены на автоматический режим и запущены:
- DNS-клиент (DNS-Client — Dnscache)
- Хост поставщика функции обнаружения (Function Discovery Provider Host — fdPHost)
- Публикация ресурсов обнаружения функции (Function Discovery Resource Publication — FDResPub)
- Обнаружение SSDP (SSDP Discovery — SSDPSRV)
Содержание
- Управление через параметры общего доступа
- Управление через командную строку и Windows PowerShell
- Команды для английской локализации Windows
Управление через параметры общего доступа
Чтобы включить или отключить сетевое обнаружение, нажмите на панели задач кнопку Пуск и далее выберите Параметры или нажмите на клавиатуре сочетание клавиш + I.

В открывшемся окне «Параметры Windows» выберите Сеть и Интернет.

Затем на вкладке Состояние, в правой части окна в разделе «Дополнительные сетевые параметры» выберите Центр управления сетями и общим доступом.

В открывшемся окне «Дополнительные параметры общего доступа», разверните нужный профиль сети (по умолчанию будет открыт текущий профиль) для которого требуется включить или отключить сетевое обнаружение, установите переключатель в соответствующее положение и нажмите кнопку Сохранить изменения.

В профиле частной сети можно также включить или выключить автоматическую настройку подключенных к сети устройств, если включено обнаружение сети.

Управление через командную строку и Windows PowerShell
Данный способ позволяет включить или отключить сетевое обнаружение для всех сетевых профилей.
Команды для русскоязычной локализации Windows
Чтобы включить сетевое обнаружение для всех сетевых профилей, откройте командную строку или консоль Windows PowerShell от имени администратора и выполните следующую команду:
netsh advfirewall firewall set rule group=»Обнаружение сети» new enable=Yes

Чтобы отключить сетевое обнаружение для всех сетевых профилей, откройте командную строку или консоль Windows PowerShell от имени администратора и выполните следующую команду:
netsh advfirewall firewall set rule group=»Обнаружение сети» new enable=No

Команды для английской локализации Windows
Чтобы включить сетевое обнаружение для всех сетевых профилей, откройте командную строку или консоль Windows PowerShell от имени администратора и выполните следующую команду:
netsh advfirewall firewall set rule group=»Network Discovery» new enable=Yes

Чтобы отключить сетевое обнаружение для всех сетевых профилей, откройте командную строку или консоль Windows PowerShell от имени администратора и выполните следующую команду:
netsh advfirewall firewall set rule group=»Network Discovery» new enable=No
