
Updated May 2025: Stop error messages and fix your computer problem with this tool. Get it now at this link
- Download and install the software.
- It will scan your computer for problems.
- The tool will then fix the issues that were found.
Error 0x80010108 appears while downloading windows updates. This error occurs because of some issues with the registry or system file. We recommend that you run the System File Checker utility (SFC). Please follow the instructions carefully and do not restart your PC unless instructed to do so. If you still encounter problems, please let me know. Thank you.
Error Code 0x80010108 appears when Windows Update fails to install security updates. This error usually happens because there are too many files being downloaded at once. You might see this error while installing Microsoft Office 365 ProPlus, Windows 10 Anniversary Edition, Windows Server 2016 Essentials, Windows 8.1 Enterprise, Windows 7 Professional, Windows Vista Business, Windows XP Home or Windows XP Professional.
To resolve this problem, open the Start menu and type “cmd”. Then press Enter. In the Command Prompt window, type the following commands one by one and hit Enter after each command:
Method 1: Use the Windows Update Troubleshooter tool.
To resolve the error 0x80000003, run the Windows Update Troubleshoot tool. This troubleshooting tool helps identify software conflicts and outdated drivers. If you are unable to install the update due to errors, use this tool to fix those issues.
Method 2: Start Windows Update Service over again.
If you are experiencing problems with Windows 10 updates, you might try restarting the Windows Update service. If you’re having trouble installing updates, check to see whether there are pending updates. Click “Check now,” and then select “Download and install.” Once you’ve installed the updates, reboot your computer.
You can also use the following command prompt command to force a restart of the Windows Update service. Type the following into Command Prompt: net stop wuauserv / start wuaussvc / pause / nopause
The reason why I recommend doing this is because sometimes Windows Update gets stuck while updating something. By forcing a restart, it’ll clear up whatever update is taking longer than expected.
You can also perform a manual restart of the Windows Update Service by typing the following into Command Prompt. Type the following into the command prompt window: sc config winupdate start demand
To make sure that the service starts automatically again, type the following into the command line: sc config winupdate enable auto
Method 3: Re-register wups2.dll
This article will help you fix “The file ‘wups2.dll’ is missing.” error code 0x80070002. You’ll learn how to re-register wups2 dll without having to reinstall Windows.
If you’re getting the error “The file ‘wupd32.dll’ is missing,” it’s most likely because you’ve already installed WUPS 2.0 Service Pack 2. If you don’t know what WUPS 2.o SP2 is, read our previous post about it.
To register wups2.dl l follow these simple steps:
1. 2. Click Uninstall a program
3. Locate wups2.dll and select it.
4. Click Change/Remove
Method 4: Perform a Clean Boot
A clean boot will clear all existing settings and restore Windows to the original factory default configuration. This includes resetting the system clock, clearing out temporary files, and restoring the Registry to its original state. To perform a clean boot, follow these steps:
1. Restart your computer.
2. When prompted, press F8 repeatedly during startup. If you are unable to access the Advanced Options menu, hold down the Shift key while starting up.
3. Select Safe Mode from the list of options.
4. Click Continue to start Windows normally.
5. You will now see a screen prompting you to select either Repair Your Computer or Start Normally. Choose Start Normally.
6. Wait for the process to complete. Once it finishes, restart your computer normally.
7. Now, you can safely install the latest version of Windows 10.
Updated: May 2025
We highly recommend that you use this tool for your error. Furthermore, this tool detects and removes common computer errors, protects you from loss of files, malware, and hardware failures, and optimizes your device for maximum performance. This software will help you fix your PC problems and prevent others from happening again:
- Step 1 : Install PC Repair & Optimizer Tool (Windows 11, 10, 8, 7, XP, Vista).
- Step 2 : Click Start Scan to find out what issues are causing PC problems.
- Step 3 : Click on Repair All to correct all issues.
Method 5: Temporarily Disable Antivirus and Firewall
Sometimes the Antivirus program creates issues while installing or updating it. If you are facing such problems, try disabling the firewall temporarily. This method will allow you to install the update without any hindrance.
First you should check if there are any anti virus programs installed on your PC or Laptop. If you find any antivirus program installed, disable it temporarily. To do this, follow these steps:
1. Open Windows Explorer and go to C:\Windows\System32\drivers folder.
2. Right Click on the driver file named “avg_installer.exe”.
3. Select Properties.
4. Go to Compatibility tab.
Method 6: Repair Install Windows 10
If you are facing issues while updating Windows 10, then you might want to repair it. You can do this easily by following some simple steps. In case you are unable to perform a proper repair install, you can use the third option i.e. Method 5.
Step 1: Click on Troubleshoot
Step 2: Select Advanced options
Step 3: Choose the option “Repair your PC”
Step 4: Now follow the instructions given there
Step 5: Once done, restart your system and check whether the issue is resolved or not.
Fix Windows 10 Store error 0x80010108
Error code 0x8001010A appears when there’s an issue related to the Windows Store. This error usually happens when you’re trying to run an app from the store, but it can occur even while browsing the store. If you see this error, make sure that you’ve got the latest version of Microsoft Edge installed, because some older versions had issues with the Windows Store. You might also want to check out our guide on how to fix 0x80001001 error.
There are many ways to solve 0x80010108 error, including clearing the windows store cache. Turn off VPN will help you resolve this problem. There are many ways to resolve the 0x8010010a error, including turning off proxy and cleaning the dns cache. Another way to resolve the 80010109 error is to restart the computer. Cleaning up your system registry will also help you avoid third party applications interfering with the Windows Store. Finally, a clean boot will help you prevent third party apps from interfering with the Windows Store itself.
RECOMMENATION: Click here for help with Windows errors.
Frequently Asked Questions
What is the “Windows Update Error 0x80070490”?
This error code occurs when there is a problem with the Windows Update Service on one of the server computers. If you receive this error while trying to update Windows 10, it could mean that the computer needs to be restarted. You may want to check out our article titled How To Fix The Windows Update Error Code 0x80070490.
“Windows Update Error Code 0x80240011”: How do I fix it?
If you receive this error code while updating Windows 10, it could indicate that there is a problem with your Internet connection. In some cases, you might be able to solve this by unplugging your modem and plugging it back in again. However, if this doesn’t work, you’ll need to contact your ISP for help.
How do I repair my PC if I am unable to access my files?
You can use System Restore to restore your system settings to a previous date and time. Select the desired restore point and follow the instructions to complete the process.
If you face Error 0x80010108 while trying to update your Windows 10, you are at the right place as today we are going discuss how to resolve this error. Also, running Windows Update Troubleshooter will not help, but it’s worth a try, as in some cases it can fix the underlying issue. The main cause of this error seems to be Windows Update Service.

This error can be fixed by restarting Windows Update Service and then re-registering the wups2.dll. So without wasting any time let’s see how to actually Fix Windows Update Error 0x80010108 with the help of below-listed troubleshooting guide.

Table of Contents
Make sure to create a restore point just in case something goes wrong.
Method 1: Run Windows Update Troubleshooter
1. Open control panel and Search Troubleshoot in the search bar and click on Troubleshooting.
![Search Troubleshoot and click on Troubleshooting | [FIXED] Windows Update Error 0x80010108](https://techcult.com/wp-content/uploads/2017/07/Search-Troubleshoot-and-click-on-Troubleshooting.jpg)
2. Next, from the left window, pane select View all.
3. Then from the Troubleshoot computer problems list select Windows Update.
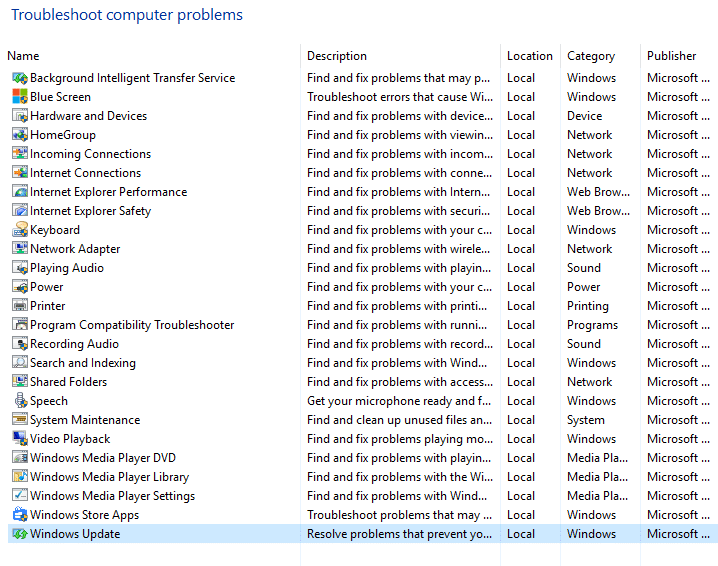
4. Follow on-screen instruction and let the Windows Update Troubleshoot run.
5. Restart your PC and see if you can fix Windows Update Error 0x80010108.
Method 2: Restart Windows Update Service
1. Press Windows Key + R then type services.msc and hit Enter.
2. Locate the following services:
Background Intelligent Transfer Service (BITS)
Cryptographic Service
Windows Update
MSI Installer
3. Right-click on each of them and then select Properties. Make sure their Startup type is set to Automatic.

4. Now if any of the above services are stopped, make sure to click on Start under Service Status.
5. Next, right-click on Windows Update service and select Restart.

6. Click Apply, followed by OK and then reboot your PC to save changes.
See if you can Fix Windows Update Error 0x80010108, if not then continue with the next method.
Method 3: Re-register wups2.dll
1. Open Command Prompt. The user can perform this step by searching for ‘cmd’ and then press Enter.
![Open Command Prompt. The user can perform this step by searching for ‘cmd’ and then press Enter | [FIXED] Windows Update Error 0x80010108](https://techcult.com/wp-content/uploads/2021/01/Open-Command-Prompt.-The-user-can-perform-this-step-by-searching-for-%E2%80%98cmd-and-then-press-Enter..jpg)
2. Type the following command into cmd and hit Enter:
regsvr32 wups2.dll /s

3. This would re-register wups2.dll. Reboot your PC to save changes.
Method 4: Perform a Clean Boot
Sometimes 3rd party software can conflict with Windows Update and therefore cause Windows Update Error 0x80010108. To fix this issue, you need to perform a clean boot in your PC and diagnose the issue step by step. Once your system starts in Clean Boot again try to update Windows and see if you can resolve the error code 0x80010108.

Method 5: Temporarily Disable Antivirus and Firewall
Sometimes the Antivirus program can cause an error. To verify this is not the case here; you need to disable your antivirus for a limited time so that you can check if the error still appears when the antivirus is off.
1. Right-click on the Antivirus Program icon from the system tray and select Disable.
2. Next, select the time frame for which the Antivirus will remain disabled.

Note: Choose the smallest amount of time possible, for example, 15 minutes or 30 minutes.
3. Once done, again try to connect to open Google Chrome and check if the error resolves or not.
4. Search for the control panel from the Start Menu search bar and click on it to open the Control Panel.
![Type Control Panel in the search bar and press enter | [FIXED] Windows Update Error 0x80010108](https://techcult.com/wp-content/uploads/2020/08/Type-Control-Panel-in-the-search-bar-and-press-enter.png)
5. Next, click on System and Security then click on Windows Firewall.

6. Now from the left window pane click on Turn Windows Firewall on or off.

7. Select Turn off Windows Firewall and restart your PC.

Again try to open Google Chrome and visit the web page, which was earlier showing an error. If the above method doesn’t work, please follow the same steps to turn on your Firewall again.
If the above method doesn’t work, please follow the same steps to turn on your Firewall again.
Method 6: Repair Install Windows 10
This method is the last resort because if nothing works out, then, this method will surely repair all problems with your PC. Repair Install using an in-place upgrade to repair issues with the system without deleting user data present on the system. So follow this article to see How to Repair Install Windows 10 Easily.
![choose what to keep windows 10 | [FIXED] Windows Update Error 0x80010108](https://techcult.com/wp-content/uploads/2017/02/choose-what-to-keep.png)
Recommended for you:
- No Internet Connection after updating to Windows 10 Creators Update
- 12 Ways To Make Google Chrome Faster
- Fix Windows Update Stuck or Frozen
- Fix The file or directory is corrupted and unreadable
That’s it you have successfully Fix Windows Update Error 0x80010108 but if you still have any queries regarding this guide then feel free to ask them in the comment’s section.
Windows Update Error 0x80010108 triggers when we check for new updates available.
As part of our Server Management Services, we assist our customers with several Windows related errors.
In this article, let us see how our Support Techs fix Windows update error 0x80010108.
Cause for Windows Update Error 0x80010108
Windows update is extremely important. If we miss it, the system tends to get slower and we start facing lags and errors while accessing the OS.
The error is related to the wups2.dll file in the Windows Update service.
However, there are a couple of methods our Support Engineers employ.
Solutions for Windows Update Error 0x80010108
Let us now focus on a few methods our Support Techs follow.
-
Start the Windows Update Service Again
- First, we go to the Start button and type Command Prompt. Right-click on the result and select Run as administrator to open Command Prompt with admin rights.
- Then, in the Command Prompt window, run the below two commands one by one and hit Enter after each command:
net stop wuauserv
net start wuauserv
This will restart the Windows Update service all over, so we try running the Windows Update again and check if it is working.
Still, showing the error? Here’s a lot more.
-
Re-register the wups2.dll file
- Go to the Start button on the desktop and type Powershell. Right-click on the result and select Run as administrator to open Windows Powershell in admin mode.
- In the Powershell window, run the below command hit Enter:
regsvr32 wups2.dll /s
This will re-register the wups2.dll file in the Windows Update service. Then, we restart the system and check for new updates.
-
Check date and time
Incorrect date and time can occur due to a broken motherboard battery, and if the error 0x80010108 occurs, we advise to check the time and date. If the date or time is wrong, we do the following:
- Click the clock in the bottom right corner. Choose Date and time settings.
- Turn Set time automatically option off and then turn it back on. This should automatically fix time and date.
-
Turn off proxy
Error 0x80010108 can occur if we are using a proxy, therefore we should turn it off. To do that, we follow these steps:
- Press Windows Key + S and enter internet options. Select Internet Options from the menu.
- Go to the Connections tab and click on LAN settings.
- When the settings window opens, uncheck Automatically detect settings and Use a proxy server for LAN options. Click OK to save changes.
-
Turn off VPN
VPN software is great if we want to protect privacy online or bypass certain limitations, but sometimes VPN software can cause Error 0x80010108.
To fix this problem, we recommend disabling VPN software on the system. If that does not work, we might have to remove all installed VPN clients and check if that fixes the problem.
-
Clean the DNS cache
In some cases, DNS can cause Error 0x80010108, and the fix is to clear the DNS cache. To do that, we follow these steps:
- Press Windows Key + X to open the Power User Menu and choose Command Prompt (Admin).
- When Command Prompt opens, enter
ipconfig /flushdnsand press Enter.
- Once done, close Command Prompt and check if the issue is resolved.
-
Perform a Clean Boot
Third-party applications and services can sometimes interfere with Windows services and cause various problems, therefore, we perform a Clean Boot.
To do that, we follow these steps:
- Press Windows Key + R and enter msconfig.
- When the System Configuration window opens, go to the Services tab and check to Hide all Microsoft services. After that click the Disable all button.
- Go to the Startup tab and click Open Task Manager.
- When Task Manager opens, select each Startup application, right-click it, and choose Disable. After disabling all applications close Task Manager and click Apply and OK in the System Configuration window.
- Restart the PC and check if the problem is resolved.
If the problem is fixed, it means that one of the third-party applications was causing it.
To find which application caused this problem, repeat the same steps, but be sure to enable applications and services one by one until we find the one that is causing this issue.
[Finding it hard to fix? We are available 24*7]
-
Perform the sfc scan
Error 0x80010108 might appear if the installation is corrupt, and in order to fix it, we need to run sfc scan. To do that, we follow these steps:
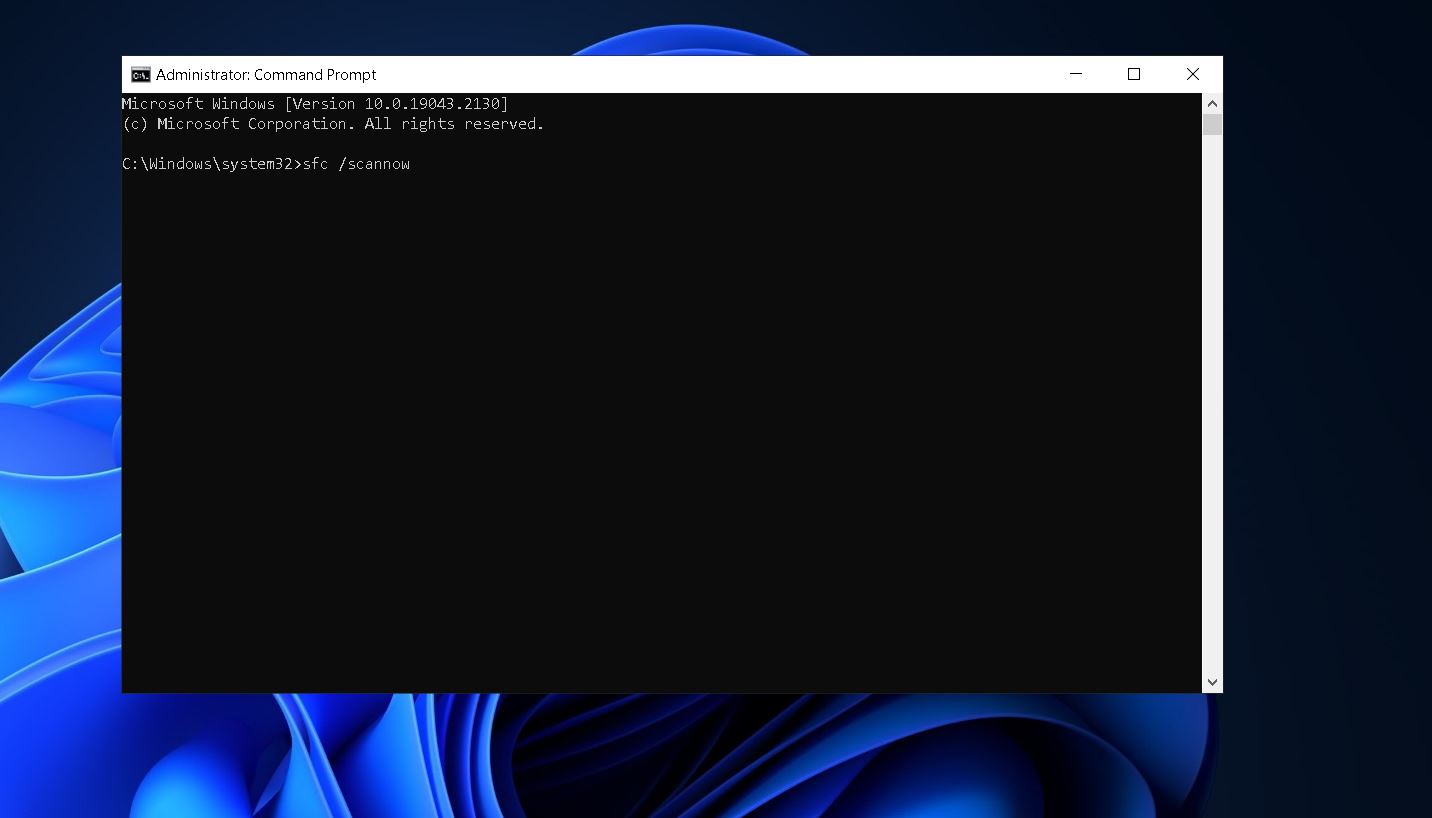
- Open Command Prompt as administrator.
- When Command Prompt opens, enter
sfc /scannowand press Enter.
- Wait for the process to complete.
-
Disable antivirus software
Sometimes third-party antivirus software can interfere with Windows services and cause all sorts of problems. Hence, we recommend trying disabling the antivirus tool.
Bear in mind that almost any antivirus software can cause this issue to appear, therefore be sure to disable all third-party antivirus tools that we have installed.
If disabling the antivirus does not help, we suggest temporarily uninstall it and see if that fixes the problem.
-
Uninstall latest Windows updates
There is also a possibility that some Windows Update actually disrupted the Store. If we suspect that might be the case, go on and delete the troublesome update.
Here is how we do that:
- Press Windows Key + I to open the Settings app.
- Once the Settings app opens, navigate to the Update & security section.
- Go to the Windows Update tab and click on Update history.
- Click on Uninstall updates.
- A list of installed updates will now appear. Select the problematic update that we want to remove and click the Uninstall button.
- After removing the update, restart the system.
-
Run DISM
And finally, if none of the previous solutions resolved the problem, let us re-deploy the system image using the DISM (Deployment Image Servicing and Management) tool.
Here’s how we do it:
- Right-click Start and open Command Prompt (Admin).
- Paste the following command and press Enter:
DISM /Online /Cleanup-Image /RestoreHealth - Wait until the scan is finished.
- Restart the system and try updating again.
[Still, facing the error? We’d be happy to help you fix.]
Conclusion
In short, updating Windows at the right time, as soon as the update is released is extremely important. Today, we saw various methods our Support Engineers employ in order to fix this error.
PREVENT YOUR SERVER FROM CRASHING!
Never again lose customers to poor server speed! Let us help you.
Our server experts will monitor & maintain your server 24/7 so that it remains lightning fast and secure.
GET STARTED
var google_conversion_label = «owonCMyG5nEQ0aD71QM»;
-
Home
-
News
- Fixed: Windows Update Error 0x80010108 on Windows 10
By Sonya |
Last Updated
What should you do if you encounter the error 0x80010108 when you try to update your Windows system? If you have no idea, then you should read this post carefully. MiniTool has listed multiple efficient solutions for you to fix it.
It is very common to meet different error codes when updating your Windows system, such as 0x80070663 and 0x80070003. In this post, you can find several methods to fix error code 0x80010108.
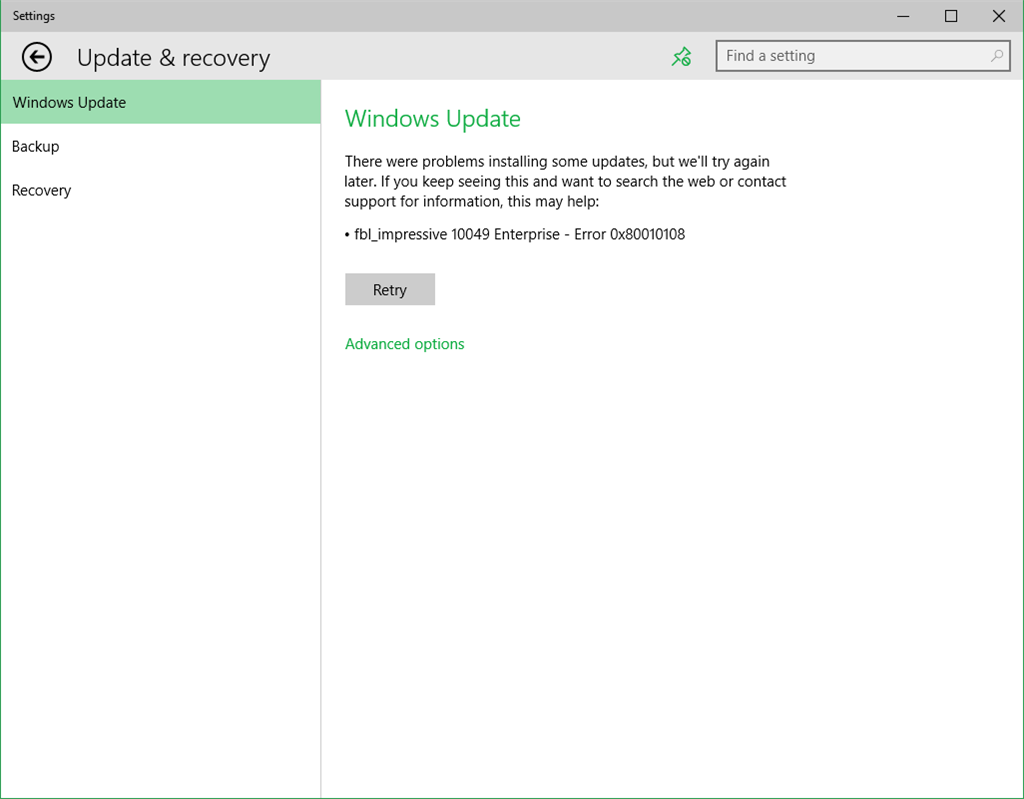
The error code 0x80010108 is often accompanied by the following error message:
There were problems installing some updates, but we’ll try again later. If you keep seeing this and want to search the web or contact support for information, this may help:
Feature Update to Windows 10 – Error 0x80010108
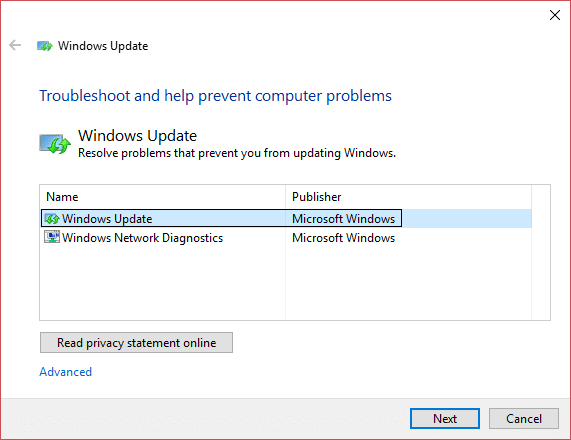
Method 1: Run Windows Update Troubleshooter
The easiest and quickest method to fix error code 0x80010108 is to run the Windows Update Troubleshooter. Windows Update Troubleshooter is a built-in feature that is designed to solve update problems.
Here is the tutorial to run Windows Update Troubleshooter:
Step 1: Press the Win + I keys at the same time to open the Settings. Click Update & Security.
Step 2: Navigate to the Troubleshoot tab, click Windows Update, and then click Run the troubleshooter.
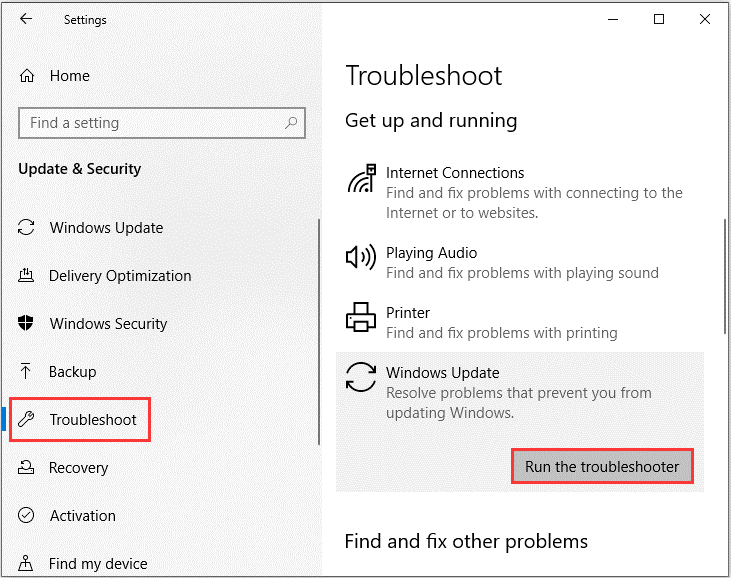
Step 3: Wait for the troubleshooting process to complete, then follow the on-screen instructions to solve the problem.
Step 4: Restart your computer to check if error 0x80010108 is fixed, if not, try the next method.
Related post: 8 Useful Fixes for an Error Occurred While Troubleshooting!
Method 2: Restart Windows Update Service
You could meet error code 0x80010108 when there is something wrong with the Windows Update service, therefore, you can try to restart the Windows Update service. Here is a quick guide:
Step 1: Type cmd in the Search box and then right-click Command Prompt to select Run as administrator.
Step 2: Run the following commands:
net start bits
net start wuauserv
net start CryptSvc
net start trustedinstaller
Step 3: Restart your PC to check if the error is gone.
Related post: Top 4 Solutions to Issue Failed to Connect to a Windows Service
Method 3: Re-register Wups2.dll
You can also try to re-register wups2.dll to get rid of error code 0x80010108. Follow the steps below to do that:
Step 1: Open Command Prompt as an administrator.
Step 2: Type regsvr32 wups2.dll /s in the window and then press Enter.
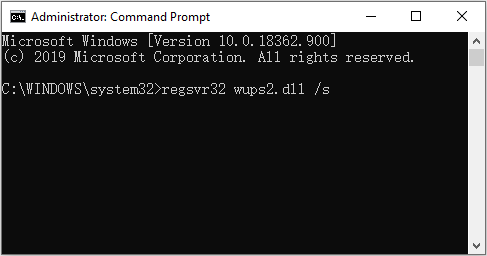
Step 3: Close Command Prompt and then reboot your computer to see if the error exists.
Method 4: Disable Your Antivirus Temporarily
The culprit of error code 0x80010108 could be your antivirus software. You should know that almost all antivirus software can cause this problem, so make sure to disable all third-party antivirus tools you have installed.
If disabling the antivirus software does not help, it is recommended to uninstall it temporarily to see if the problem can be solved. If you are worried about your safety, you should know that Windows 10 is pre-installed with Windows Defender, so your PC will not be completely defensive.
Related post: Windows Defender Blocked by Group Policy? Try These 6 Methods
Final Words
To sum up, this post has listed four useful methods to deal with error code 0x80010108: run the Windows Update Troubleshooter, restart Windows Update service, re-register wups2.dll and disable your antivirus temporarily.
If you have better solutions or have any confusion about the methods, leave a comment below and we’ll reply to you as soon.
About The Author
Position: Columnist
Author Sonya has been engaged in editing for a long time and likes to share useful methods to get rid of the common problems of Windows computers, such as Windows Update error. And she aims to help more people to protect their data. What’s more, she offers some useful ways to convert audio and video file formats. By the way, she likes to travel, watch movies and listen to music.
Did you recently tried applying a featured update on your computer, however, this fails on error 0x80010108? Well, in this post, we will outline the major causes that may cause this issue along with a few workarounds. One such reason that may evoke this error is the missing wups2.dll file.
While receiving this bug, you may get the following error message as well –
There were problems installing some updates, but we’ll try again later. If you keep seeing this and want to search the web or contact support for information, this may help: (Error 0x80010108).

To solve Windows 10 Update Error Code 0x80010108, go through the below list of suggestions sequentially –
- Disable Antivirus Program
- Re-register the wups2.dll file
- Run Windows Update Troubleshooter
- Run SFC and DISM Scans
- Flush DNS cache
- Reset Windows Update Components
- Update Windows 10 in Clean Boot State
1] Disable Antivirus Program
Running an antivirus program in the background may prevent Windows updates from occurring automatically. If this indeed is the case, you can fix this by simply disabling the security application. In case Windows Defender is your by-default antivirus, read how to disable this in-built program.
However, if you use any third-party program to curb viruses and malware, visit your manufacturer’s official sites to learn ways to disable the existing security application.
There is a good possibility that this method alone fixes the 0x80010108 error. If not, try out the next set of solutions discussed below –
2] Re-register the wups2.dll file
A few users reported receiving this error just because of a missing DLL file on their computers. Check if this is the case on your device as well or not. In case you too find a missing DLL file named “wups2.dll”, use the below steps to re-register this file –
- Open the Run dialog by pressing the Win + R shortcut.
- Type the following in the text field, and press OK.
regsvr32 wups2.dll /s
- After re-registering this file, do restart Windows to incorporate the above changes.
3] Run Windows Update Troubleshooter
Update troubleshooter is a great tool on Windows 10 PC that can look for possible reasons preventing new updates from applying on the device. Here’s how to troubleshoot for possible culprits on the computer –
- Go to
Settings (Win + I) > Update & Security. - Select Troubleshoot on the left column thereafter Additional troubleshooters on the right pane.
- Subsequently, click Windows Update and hit Run the troubleshooter.

- The system immediately starts looking for any issues on the computer. If there indeed lies any bug or error, this will prompt “
Apply this fix” option. - Hit this option and restart your PC.
- From the next logon, you may upgrade your device to its latest version.
If the troubleshooter doesn’t provide any solution or the 0x80010108 error is still there, try out the next workaround.
4] Run SFC & DISM Scans
This error may also occur if any core files have gone missing or become corrupt. To fix this, you may take help from the SFC scan. Here’s how to scan and repair damaged system files –
- Press Win + R.
- When the Run dialog comes into the display, type “cmd”, and press Ctrl+ Shift + Enter keys altogether.
- Next, type
sfc/scannownear the blinking cursor, and press Enter.

- Usually, this takes 15-20 minutes to scan and repair corrupt files.
- Once this is over, restart your computer.
Another great scan in Windows 10 is running the DISM codes. Executing DISM command lines will check for any errors inside the Windows Image and fix them (if it finds any). All you require is to follow these easy steps –
- Open Command Prompt having administrative privileges.
- On the elevated console, copy/paste this line, and press the Enter key.
DISM /Online /Cleanup-Image /RestoreHealth

- Wait for the scan to complete. Once finished, restart Windows to make the changes effective from the next logon.
5] Flush DNS Cache
Many a time, Windows 10 update process simply fails because of the existing DNS cache. In order to assume the normal update process, you must flush the DNS cache using the below steps –
- Press Win + S to launch the Search window, and type “cmd” in the search bar.
- Right-click on the top result and select the Run as administrator option.
- When the Windows console comes into the display, execute the below command –
ipconfig /flushdns
Now, that you have flushed the DNS cache, check network connectivity and Internet speed as well. This is because a lousy network may prevent Windows Update from connecting to its servers and thus resulting in update-related issues.
6] Reset Windows Update Components
Corrupted or obsolete Windows update components may also cause this bug on your device. In order to overcome this, you must reset all update-related folders and components. To do so, you need to tweak a few command lines on the Windows console –
- Launch Command Prompt having Admin rights.
- On the elevated window, execute the below codes one after another –
net stop bits
net stop wuauserv
net stop CryptSvc
net stop trustedinstaller
- After disabling the above components, it’s time to rename a few Windows 10 update folders. To do so, go to the below locations separately and rename the right-side folders –
C:\Windows – SoftwareDistribution to sd.old
C:\Windows\System32 – catroot2 to catroot2.old
- When you finish renaming the above two folders, re-activate the services that you have stopped earlier –
net start bits
net start wuauserv
net start CryptSvc
net start trustedinstaller
- Lastly, reboot your computer so that changes made come into effect.
7] Update Windows 10 in Clean Boot State
If none of the above workarounds help to resolve the error code 0x80010108, boot Windows 10 into the Clean Boot. This is basically a state where only system applications (which are required) run. Once you are inside this boot, go to the below path, and hit the Check for Updates button.
In case you are not able to get any updates automatically, read how to manually update Windows 10 OS on the computer.
I hope this tutorial helps to resolve the Windows 10 update error code 0x80010108. In case you have any queries or suggestions, let’s know in the comment section.