
Windows 10 was the fastest, freshest operating system when it was released and for many it’s still the best operating system for their needs, despite the arrival of Windows 11.
However, even the best operating systems may end up feeling sluggish. Bloatware, a fragmented hard drive, or an overload of system services, to name a few, can all lead to a degraded Windows 10 experience.
Fortunately, there are some steps you can take to speed up Windows 10 once more, none of which require in-depth system knowledge to tweak. This includes disabling Windows services, which can quickly improve the performance of the operating system, as well as a number of other tricks to try.
Ten steps you can take to speed up Windows 10
We have provided ten steps below that should give your Windows 10 operating system a boost, although we can’t guarantee that every step will work for every user. We have tried to cover simple steps that make use of the user-friendly menus offered by Windows, although there are a handful of steps that will require copying in strings of file text that can make things a bit more complicated.
We will cover the following steps in more detail:
- Windows 10 services to disable to speed up the OS
- Disabling startup programs
- Speeding up the Windows 10 Start menu
- Speeding up a slow Windows login
- Making Windows shut down faster
- Getting rid of bloatware in Windows 10
- Turning on Windows 10 fast-startup
- Cleaning up your Windows 10 disk
- Defragging the hard drive on Windows 10
- Migrating Windows to an SSD
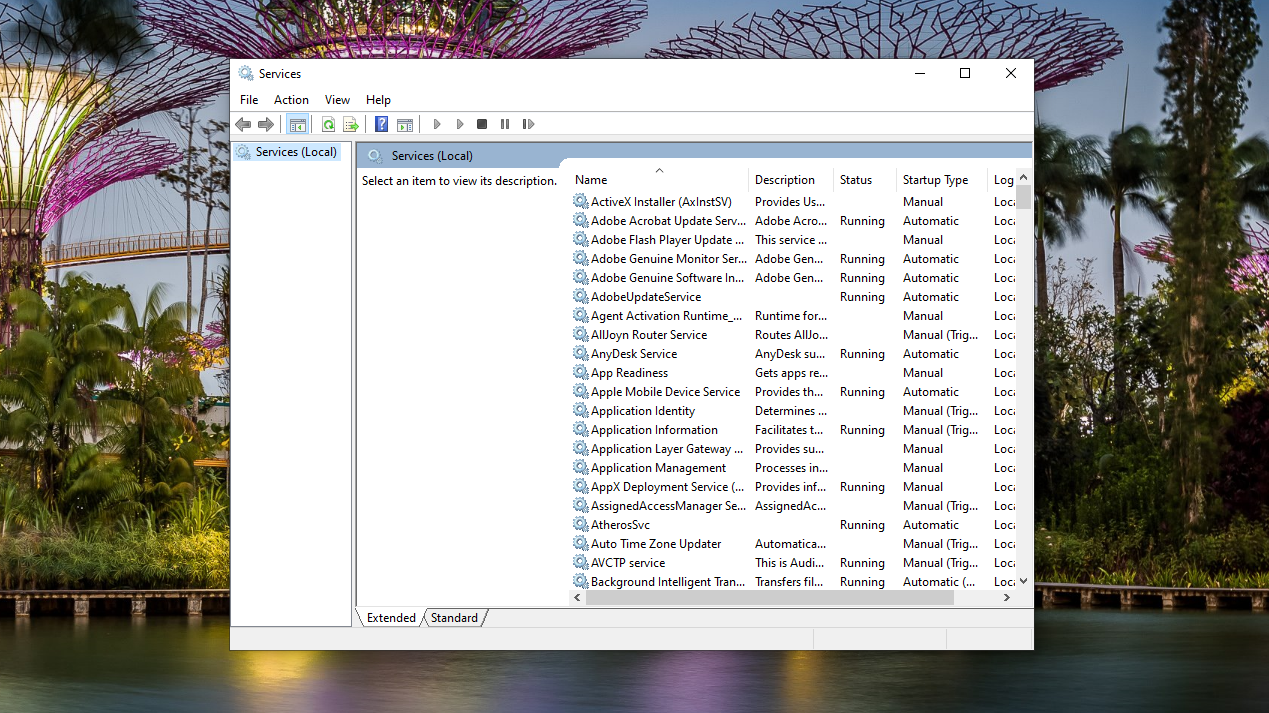
1. Windows 10 services to disable to speed up the OS
(Image: © IT Pro)
As with all versions of Windows, working in the background are services. While some of them are vital to smooth running, quite a few aren’t for day-to-day use. If you disable these services, you can speed up Windows 10.
To turn off services in windows:
- Click the Start Menu
- Type services.msc into the search field
- Open the Services app
- Find a service you want to disable, and double click
- Click stop
There are quite a few Windows 10 services to disable if you want to get the full effect, although how you use your system will influence your decision. Before you disable any Windows services, it’s important to consider carefully what each does and whether you will need them.
For example, the WLAN Autoconfig Windows service supports the normal operation of a wireless network card, and runs automatically on systems that rely on wireless connections, such as a laptop. However, if you know you won’t need to access the internet using a wireless connection, you can disable it using the steps above.
Sign up today and you will receive a free copy of our Future Focus 2025 report — the leading guidance on AI, cybersecurity and other IT challenges as per 700+ senior executives
You could also disable the Windows Mobile Hotspot service, for the same reasons.
Another service you might consider disabling is Indexing Service or Windows Search. These functions index your hard drive as a background task, which is meant to make it faster and easier to search your hard drive when you ultimately decide to do so. Although convenient, this constant activity on a hard drive can be taxing on older machines.
Other Windows 10 services to disable to speed up the OS:
Swipe to scroll horizontally
| AVCTP Service | can be disabled if you don’t use Bluetooth devices |
| Bluetooth Support Service | same as the above |
| Connected User Experiences and Telemetry | handles the feedback data sent to Microsoft, and can be safely disabled |
| Diagnostic Tracking Service | same as the above |
| Downloaded Maps Manager | can safely be disabled if you don’t use the Bing Maps app |
| Infrared Monitor Service | only needed if you use infrared devices to transfer data |
| Print Spooler | if you don’t use physical printers, you can safely disable this |
| Parental Control | obvious one to disable if you don’t share your PC with children |
| Windows Image Acquisition | handles physical scanning devices |
| Windows Camera Frame Server | can be disabled if you don’t use a webcam |
| Windows Insider Service | only needed if you are part of the Windows Insider Program |
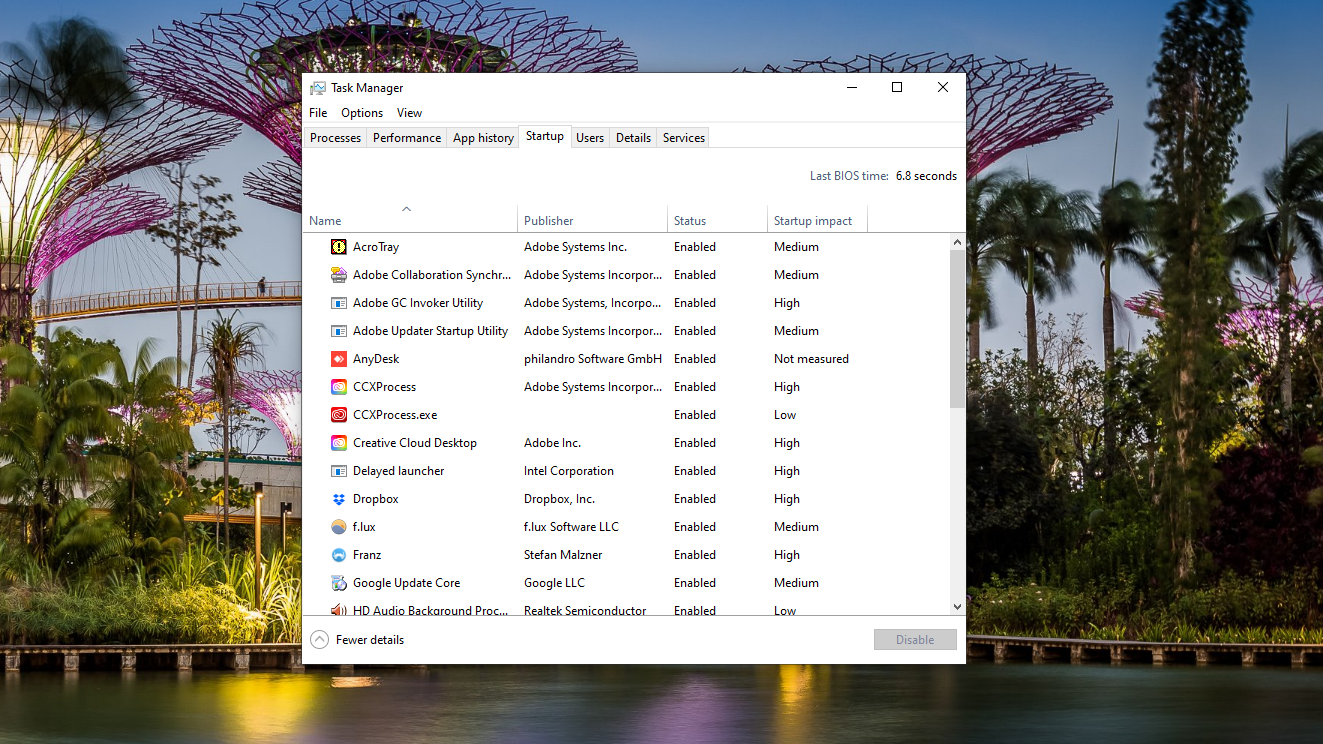
2. Disable startup programs in Windows 10
(Image: © IT Pro)
Virtually every version of Windows allows you to disable startup items, and Windows 10 is no exception. Stopping some programs from starting up will speed up the OS.
To find this option:
- Right click the Taskbar
- Click Task Manager
- Click ‘More Details’
- Click the Startup tab
- Find a program you don’t want to load at startup
- Right click and click Disable
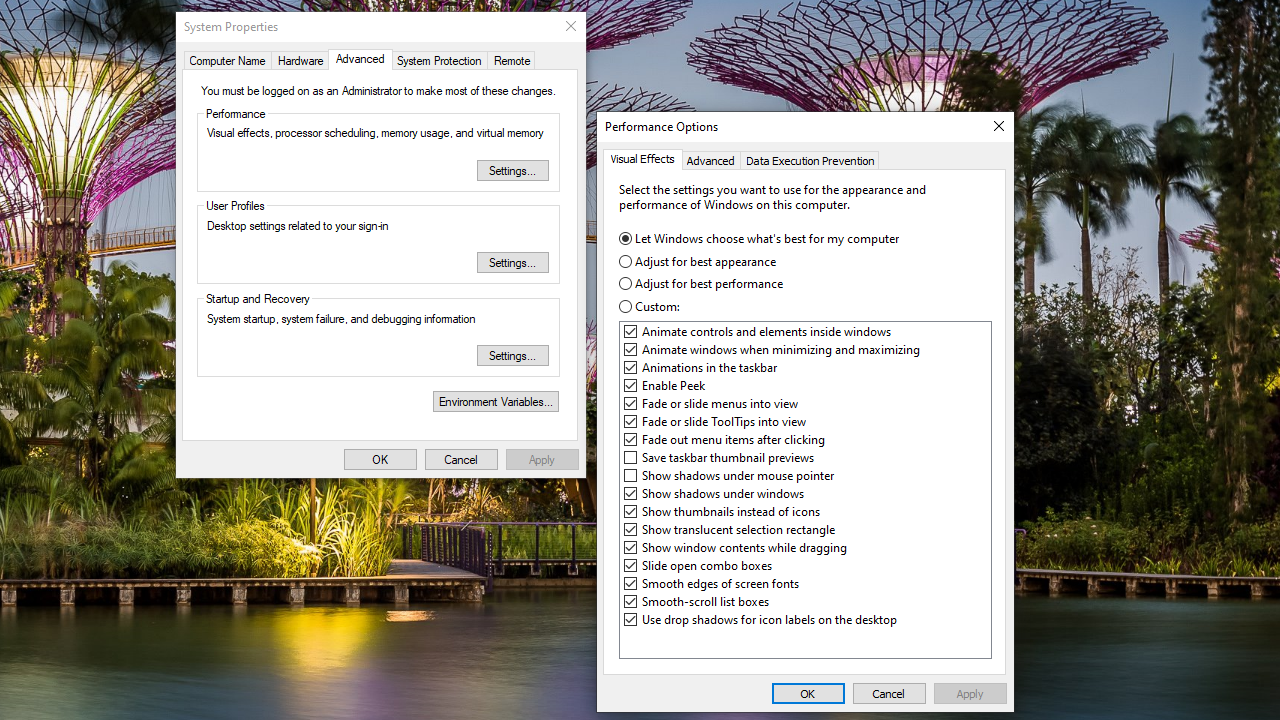
3. Make the Windows 10 Start menu and other windows zippier
(Image: © IT Pro)
Although Microsoft’s new snazzy Windows 10 Start Menu is a breath of fresh air compared to the older version, bringing it up to speed with the likes of Apple’s sleek interface, it can be a little slow to pop up if your machine isn’t brand spanking new. This is because it takes more processing power to make it appear and if your machine doesn’t have a newer chip, you might be waiting a few seconds for it to react.
However, it’s straightforward to shut down some of the animations to make them show up without the wait.
- Click the Start Menu
- Type sysdm.cpl and hit Enter
- Click the Advanced tab
- Under the Performance field, click Settings
- Untick the ‘Animate Windows when minimising and maximising’ option
- Click Apply
Not only should this add some speed to the Start menu opening, but also other windows that appear on your desktop. You can also disable all the visual effects throughout Windows 10 to speed up everything. Just click on the tick boxes to turn them off individually or choose the «Adjust for best performance» option to optimise the performance for your machine.
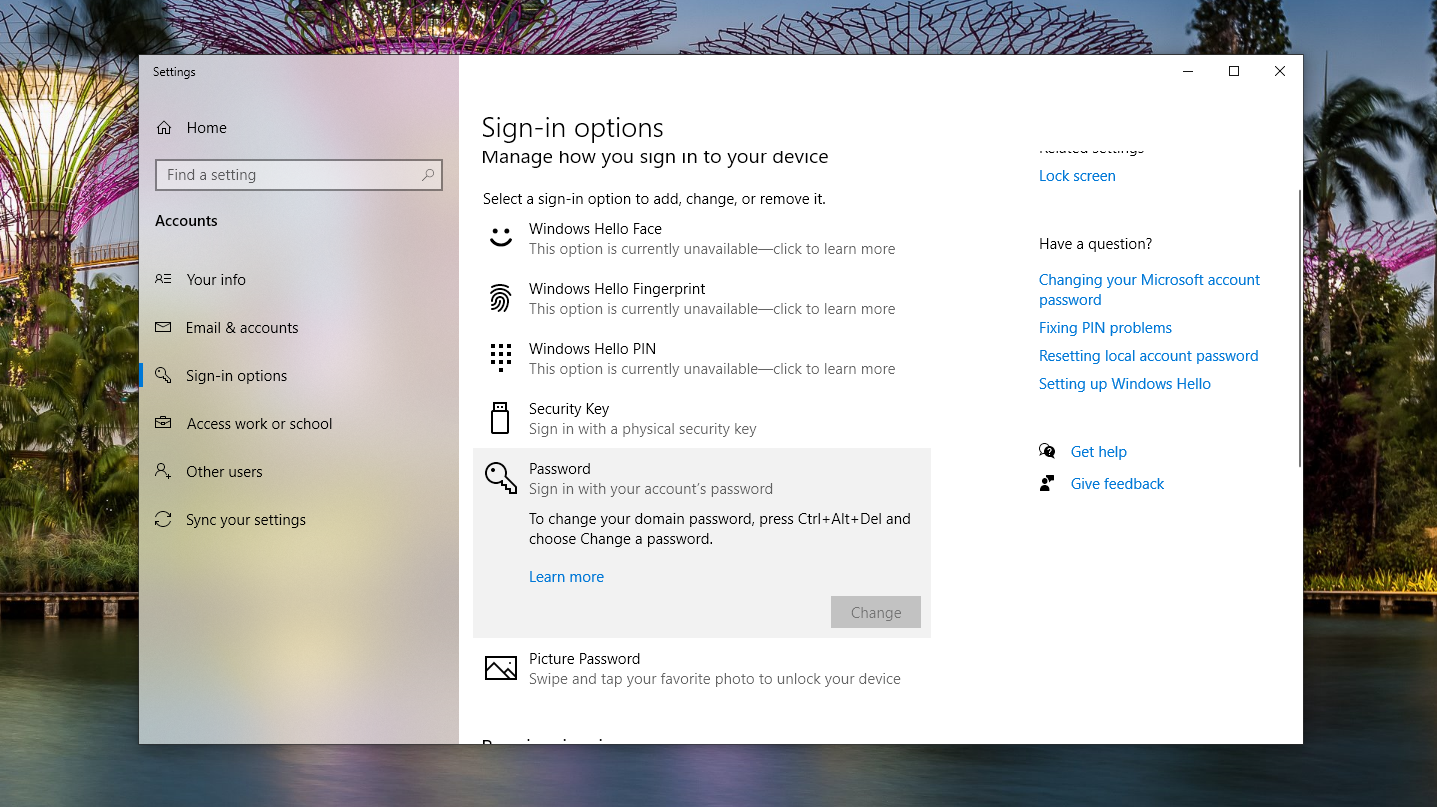
4. Make logging into Windows 10 quicker
(Image: © IT Pro)
We cannot stress the importance of security and, most of the time, a strong password or two-factor authentication are an absolute must. However, when your old laptop is already taking forever to start up, logging in can make the process even lengthier.
Although we wouldn’t normally advise it, you might want to consider skipping this process by disabling password authentication on your Windows 10 device, and replacing it with something quicker, such as facial recognition or a simple picture check.
To do this:
- Click the Start Menu
- Type Sign in options into the search field and hit Enter
- Click on the type of authentication check you want
- Click Setup / Add and follow the prompt
One way of interpreting this advice is to only apply it to stationary devices which never leave your home, such as a desktop PC. However, when it comes to tablets and laptops, you might want to skip this one.
5. Make shutting down Windows 10 faster
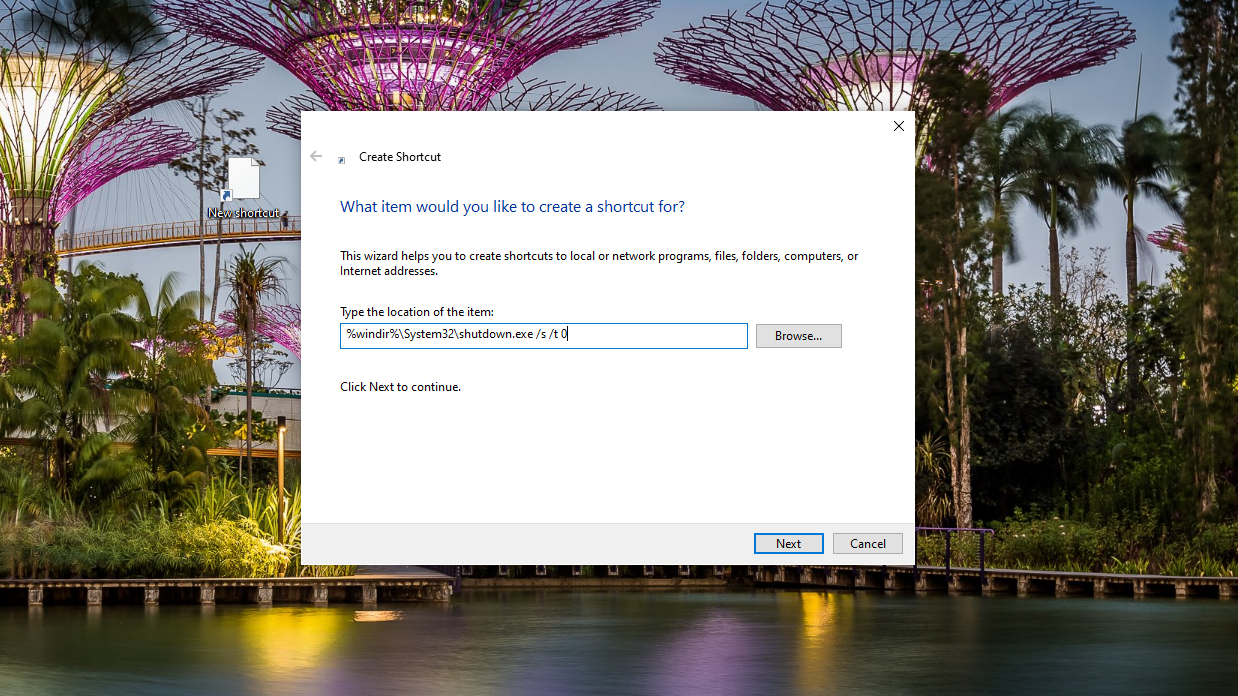
(Image: © IT Pro)
If you find the process of shutting down your system a tad laborious after a hard day’s work, there is a way to simplify it. To speed this up you can use a shortcut: Simply right click anywhere on a free part of the desktop then click New > Shortcut. In the Location field, type in the following.
- Right click an empty space on your Desktop
- Click New
- Click Shortcut
- Type %windir%\System32\shutdown.exe /s /t 0
- Click Next to finish
Now each time you click on that shortcut, your PC will immediately shut down. Be careful though, as this will happen without a confirmation check.
6. Remove bloatware in Windows 10
No one likes bloatware (except PC manufacturers) but it does mean your system is slightly cheaper as a result. These are programs such as disc burning software, backup tools from the manufacturer, or other utilities that you don’t necessarily need.
The good news is that you can, in most cases, remove these programs entirely from your system, freeing up a bit of hard drive space and potentially removing unwanted background processes.
- Click the Start Menu
- Type add or remove programs into the search bar and hit Enter
- Scroll through the list until you see a program you do not want (it’s worth double-checking each program online to make sure it can be safely removed)
- Click the three dots and click uninstall
There will be lots of services and apps in this list that can be ignored, but removing any pre-installed apps from recognisable brands are always a good place to start.
7. Turn on Windows 10 fast-startup
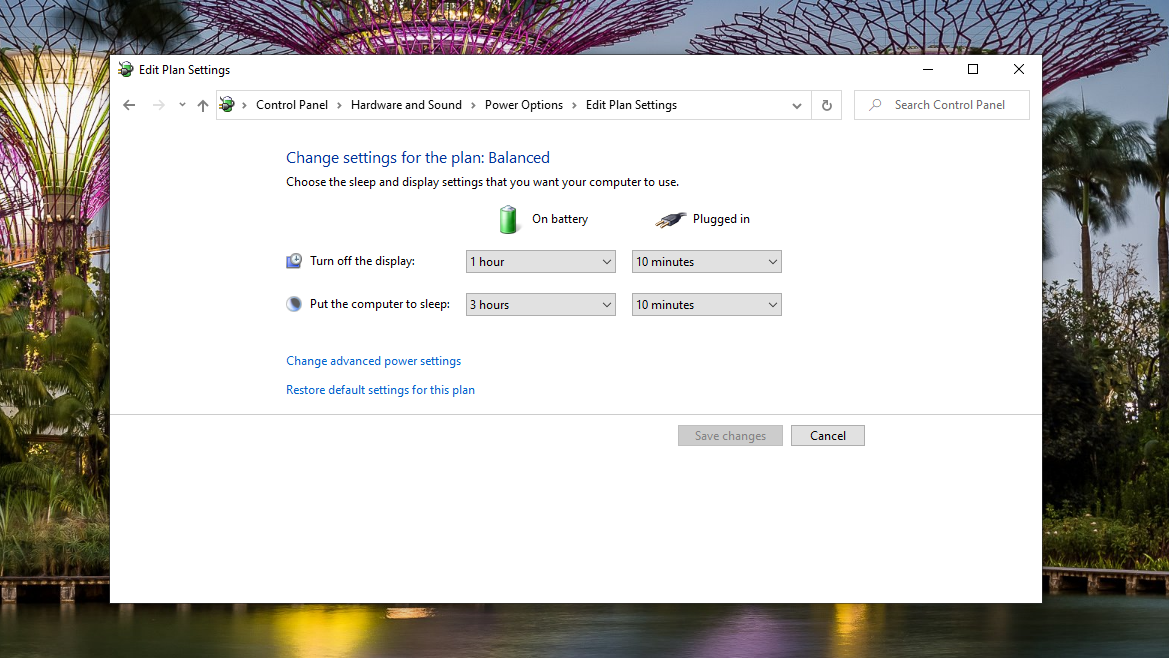
(Image: © IT Pro)
With Windows 10 there is a new «hybrid» startup mode that should cut down on bootup times. It does this by putting the PC into hibernation instead of fully shutting down.
To enable this:
- Click the Start Menu
- Type Control Panel into the search and hit Enter
- From here, click Hardware and Sound
- Under Power Options, click ‘Change what the power buttons do’
- Click ‘Change settings that are currently unavailable’
- Click the box next to ‘Turn on fast startup’
- Click Save Changes
8. Clean up your Windows 10 disk
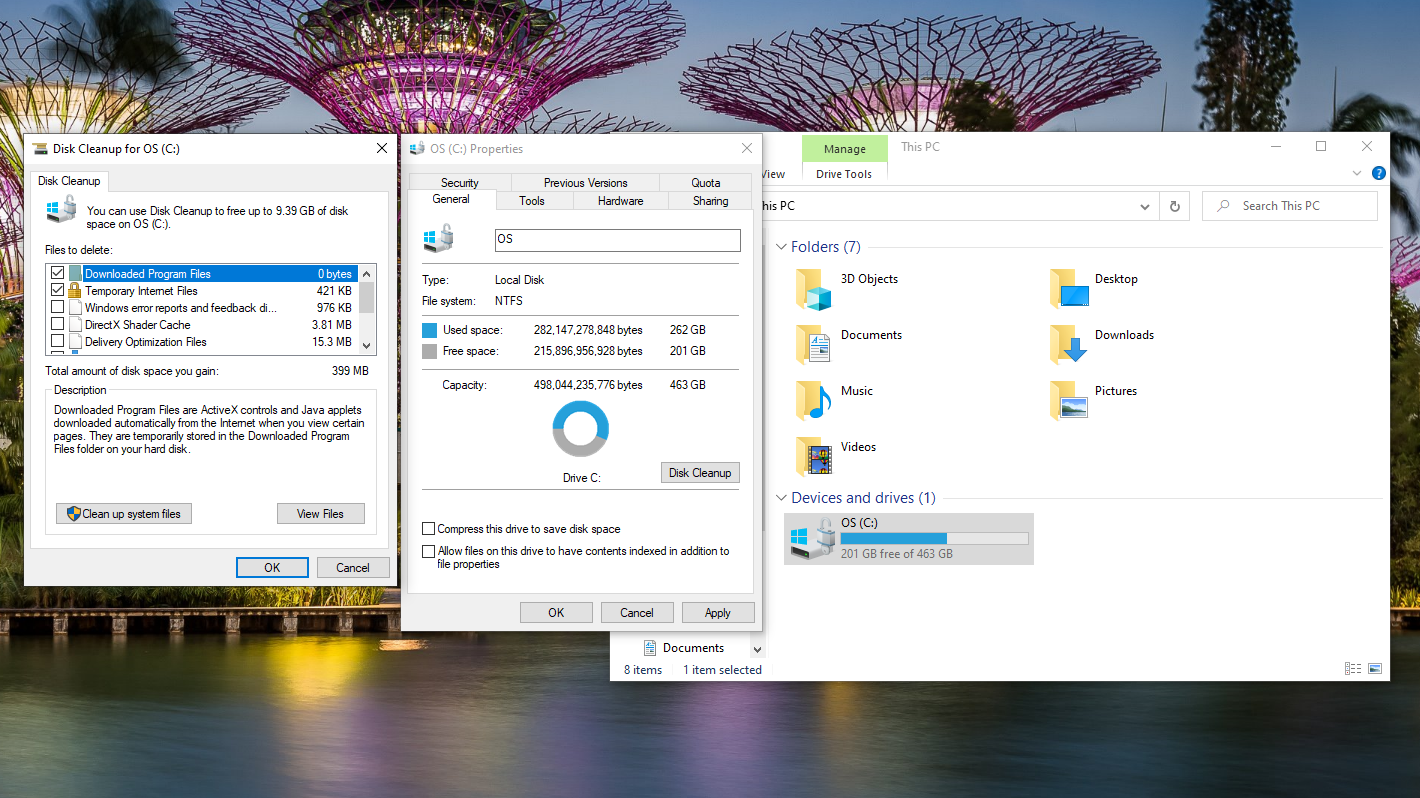
(Image: © IT Pro)
When you’re looking to get rid of files you don’t need, Windows 10 has a Disk Cleanup tool that is very useful to accomplish this. To locate this:
- Click the Start Menu
- Find and open the File Explorer
- Right click the Local Disk C:
- Click Properties
- Under the General tab, click the Disk Cleanup button
- Select ‘unnecessary files’
- Click Ok
If you are more of an experienced user, you can also choose to ‘Clean up system files’ to eliminate a greater quantity of files. Once you’ve done this, you can then proceed to defragment your hard drive on Windows 10.
9. Defragment the hard drive on Windows 10
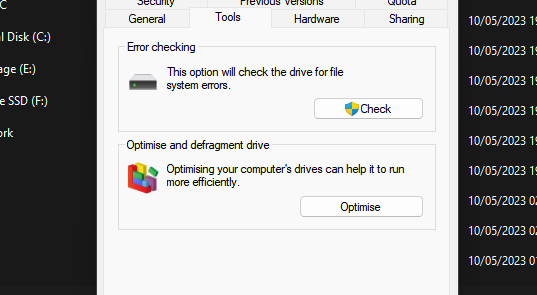
(Image: © ITPro)
One of the simplest ways to improve your computer’s speed is to defragment the hard drive. The process essentially brings together the different sections of your files into the smallest possible sequential area on your disk. Read/write heads are more rapid at completing requests since they have to travel smaller distances. To do this:
- Click the Start Menu
- Open the File Explorer
- Right click Local Disk C:
- Click Properties
- Under the Tools tab, click ‘Optimize and defragment drive’
- Follow the on-screen prompts
Regularly defragmenting is a great way of making sure your PC stays healthy, for users with physical HDDs. To carry this out on your hard drive, begin by clicking the Start button and selecting File Explorer. From here, right-click Local Disk C: and find Properties. You should see the Tools tab which, once you’ve entered it, you can click on ‘Optimize and Defragment Drive.’
Important note: This doesn’t apply to solid-state drives, only physical, platter-based ones. Fragmentation won’t really have an affect on performance of solid-state drives (SSDs), since they store data in a specific way.
10. Migrate Windows 10 to an SSD
Moving your operating system or your whole hard drive onto a brand-new SSD is considered to be the best, but most disruptive, way of improving your Windows 10 speed.
In the most basic terms, SSDs are like a standard USB stick, except they’re just larger and more sophisticated. SSDs don’t have any moving parts, in contrast to hard drives which possess a moving arm to read and write onto a physical disk.
It’s the norm for many PC users to have both a hard drive and SSD running at the same time, with the much faster hardware being the place where the operating system is running. Despite this, it’s fairly cost-effective to move the whole of your data, as well as your software, onto a SSD thanks to falling prices and larger SSD capacities on the market.
Most operating systems, including Windows 10, perform very well on a SSD, helping to reduce boot times and load times to seconds. It’s worth taking a look at the spec sheet if you’re purchasing a new PC or laptop, and make sure they come with a SSD installed.
Although the process is a little complicated, it’s worth knowing that Windows 10 is able to be migrated to a SSD on an existing system. Take a look at our guide on how to move Windows 10 from an HDD to an SSD, where you can learn tips on how to make sure your data isn’t lost in the process.
Table of contents
- Understanding Windows 10 Services
- Preparing to Optimize Windows 10
- Services to Consider Disabling
- Non-Essential Services
- Conditional Services
- How to Disable Windows Services
- Tips on Managing Service Startup Types
- Monitoring System Performance
- Using Task Manager for Immediate Impact Assessment
- Leveraging Resource Monitor for In-Depth Analysis
- Observing Long-Term Performance with Performance Monitor
- What if There Are Issues After You’ve Disabled Some Windows Services
- Conclusion
- FAQ
Imagine a sleek, streamlined system unburdened by pesky, unnecessary services that quietly hog your resources. It’s time to say goodbye to frustratingly slow boot times and sluggish performance. By smartly trimming the fat off your OS, you’re not just freeing up valuable system resources; you’re unlocking a world of responsiveness and efficiency. Let’s dive into how you can turn your system into a lean, mean, performance machine.
Understanding Windows 10 Services
Windows 10 services are like backstage workers of your PC, quietly managing everything from security to updates. But not all are essential for everyday use. While some are vital for your system’s health and security, others can be paused to boost performance, especially on PCs with limited resources.
Understanding which services are crucial and which are optional is key to turning your Windows 10 into a sleek, efficient machine. It’s like custom-tuning your car for better performance – a little tweak here and there can make a world of difference, especially if you’re into gaming or creative work.
Preparing to Optimize Windows 10
Before tweaking your Windows 10 for better performance, it’s wise to set up a system restore point . Think of it as your safety net, ensuring you can revert back to the current state if changes cause any issues. This step is vital for protecting your system against potential instability or loss of functionality. To start optimizing, you’ll need to access the services menu:
Simply press Windows key + R, type services.msc, and hit enter.
This action opens the control center where all your system services are listed, showing which ones are active and which ones are not.
Identifying which services to disable requires a bit of research. Start by understanding each service’s role. Essential services like “Windows Update” and “Windows Defender Firewall” should typically be left alone for your system’s security and stability. On the other hand, services like “Print Spooler” (if you don’t print) or “Bluetooth Support Service” (if you don’t use Bluetooth) can often be disabled without much impact.
Also Read:Ultimate Guide: How to Manually Check and Install Windows Updates
Proceed with caution, disabling services one at a time, and monitor your system for any adverse effects. This careful, informed approach allows you to enhance your Windows 10 performance while maintaining essential functionality.
Services to Consider Disabling
Non-Essential Services
There are several non-essential services that you can consider disabling to boost system performance . These services, while useful in certain scenarios, are generally not critical for the basic functioning of your system. Print Spooler: This service manages all printing jobs and is only necessary if you use a printer. If you don’t have a printer connected, disabling this service can free up resources. Bluetooth Support Service: Essential only if you connect Bluetooth devices to your computer. If you don’t use Bluetooth, disabling this service won’t impact your system’s core functionality.
Also Read: [FIXED] Bluetooth Disappeared on Windows 10
Remote Registry: This allows external users to make changes to your registry. For most users, especially those concerned with security, disabling this service is a safe choice.
Also Read:Auslogics Registry Cleaner: The Best Tool to Optimize Your Windows Registry
Fax: Relevant only if you need to send or receive faxes through your computer. Disabling this service can be a straightforward way to save resources if you never use fax. Windows Insider Service
: If you’re not participating in the Windows Insider Program for early updates, turning this one off is a simple way to streamline your system.
Each of these services can be disabled without majorly impacting the fundamental operations of your system. However, it’s important to understand what each service does, ensuring that it’s not something you rely on for your daily computer use.
Further Reading:How to Stop Apps from Running in the Background on Windows 10 PC?
Conditional Services
Certain Windows 10 services can be disabled based on your specific use case. These are conditional services, where the decision to disable them depends on how you use your computer. Workstation: This one is necessary for network file sharing and printer sharing. If your computer is not part of a network where these features are used, you can safely disable this service. Secondary Logon: Allows non-administrator accounts to perform administrative tasks. If you’re a sole user of your PC with an administrator account, disabling this won’t affect you. Windows Search: While it speeds up the search process for files and content, it can be resource-intensive. If you don’t rely heavily on Windows’ search functionality, consider disabling it for better performance. Windows Error Reporting Service: This service allows errors to be reported to Microsoft. If you prefer handling errors locally or don’t want to send reports, you can turn this off. Superfetch (SysMain): It preloads frequently used applications into memory. While it can speed up app launching, it can be heavy on system resources. Disabling it can be beneficial, especially on systems with lower RAM. Remember, the goal is to tailor your Windows 10 to your needs. By carefully assessing and adjusting these services, you can create a more efficient, personalized computing environment. Just make sure to proceed cautiously, understanding the role of each service before deciding to disable it.
How to Disable Windows Services
Disabling services is not overly complicated, but it’s important to follow a step-by-step approach to ensure you do it correctly and safely. Accessing the Services Menu: To begin with, you need to open the Services menu. Press Windows key + R to open the Run dialog box. Type services.msc and hit Enter. This action will launch the Services application, where you can view a list of all the services, along with their descriptions and status. Locating the Service to Disable: In the Services window, scroll through the list to find the service you wish to disable. You can click on the name column to sort services alphabetically, making it easier to find what you’re looking for. Opening Service Properties: Once you’ve found the service, right-click on it and select Properties. This will open a new window that provides detailed information about the service, including its current status and startup type. Disabling the Service: In the Properties window, look for the Startup type dropdown menu. Click on it and select Disabled. Then, click the Stop button to halt the service immediately if it’s currently running. Finally, click OK or Apply to save your changes. Restarting Your Computer: After disabling the service, it’s a good practice to restart your computer. This ensures that changes are correctly applied, and you can check if your system’s performance has improved.
Tips on Managing Service Startup Types
When you’re in the Services menu, you’ll notice three primary startup types for each service: Automatic, Manual, and Disabled. Understanding these options is key to effective service management. Automatic: Services set to automatic start up as soon as your computer boots up. These are typically crucial services that your system needs to function properly. Be cautious about setting non-essential services to automatic, as they can consume system resources unnecessarily. Manual: When a service is set to manual, it won’t start until it’s needed. Manual can be a good option for services you use occasionally but not every time you use your PC. It’s a balance between availability and resource management. Disabled: This option prevents the service from starting up at all, even if another service or application requests it. Use this for services you are certain you don’t need. Disabling non-essential services can free up resources, but be careful not to disable services crucial for your system’s stability and security. Remember, each service you disable should be a considered decision based on your understanding of its function and your usage requirements. When in doubt, research the service online or consult tech forums before proceeding.
Monitoring System Performance
After tweaking your Windows 10 by disabling certain services, it’s essential to monitor the system’s performance to ensure that these changes positively impact your PC. Understanding how to effectively monitor and assess the impact of these adjustments is key to maintaining a smooth and efficient computing experience. And if you are looking into insights on your PC performance, consider using Auslogics BoostSpeed . This handy software will help you speed up your PC and optimize running processes for the best possible performance.
Download Auslogics BoostSpeed
Your one-stop PC maintenance and optimization tool, this program will clean, speed up, repair and tweak your system to ensure maximum speed and efficiency.
Using Task Manager for Immediate Impact Assessment
The Task Manager is your first go-to tool for an immediate look at how your system is performing post-adjustment. Access it by pressing Ctrl + Shift + Esc. Under the “Performance” tab, you can see real-time data on CPU, memory, disk, and network usage. If you notice significant improvements in resource utilization (like lower CPU or memory usage) after disabling certain services, it’s a good indication that your changes are beneficial.
Leveraging Resource Monitor for In-Depth Analysis
For a more detailed analysis, Resource Monitor is an excellent tool. You can access it through the Task Manager under the “Performance” tab by clicking on “Open Resource Monitor.” This tool provides comprehensive information about which processes are using the most resources. After disabling services, check if there’s a decrease in resource usage by the previously high-consuming services.
Observing Long-Term Performance with Performance Monitor
For long-term tracking, Windows Performance Monitor is an invaluable tool. You can find it by searching for “Performance Monitor” in the Start menu. It allows you to set up logs to record various aspects of system performance over time. This can be particularly useful for identifying trends and understanding the long-term impact of the disabled services.
What if There Are Issues After You’ve Disabled Some Windows Services
Disabling services can sometimes lead to unexpected problems. If you encounter issues after making changes, there are a few steps you can take to resolve them: Re-Enabling Services: If you suspect that a recent change is causing problems, the first step is to re-enable the service. Go back to the Services menu, find the service you disabled, and change its startup type to “Manual” or “Automatic,” then start the service. Check if this resolves your issue. Using System Restore: If re-enabling services doesn’t fix the problem, or if you’re facing significant issues like system instability, you can use the system restore point you created before making changes. This will revert your system back to its state before the changes were made. Seeking Help Online: Sometimes, you might face a unique problem that requires more specific advice. In such cases, turning to online forums, tech support communities, or even Microsoft’s own support can provide you with solutions tailored to your issue. By carefully monitoring system performance and being prepared to troubleshoot, you can ensure that your efforts to optimize your Windows 10 system are successful and sustainable in the long run.
Further Reading:Quick Tips: How to Disable Startup Programs in Windows 10
Conclusion
Optimizing Windows 10 services is crucial for enhancing your computer’s performance, requiring a balance between disabling non-essential services and maintaining system stability. This process is not only about immediate performance gains but also about understanding and managing your system more effectively. As technology evolves, so should your approach to system optimization. Using performance boosting tools like tools like Auslogics BoostSpeed, along with staying informed and adaptable, will ensure your experience remains efficient and tailored to your needs.
FAQ
Windows 10 services are background processes that typically run without user intervention, handling everything from system operations to hardware management. They’re important because they ensure the smooth functioning of the operating system and can impact overall performance and stability.
To identify safe-to-disable services, research each service to understand its function. Services not critical for system stability or security, and those not used (like “Print Spooler” if you don’t have a printer) can often be safely disabled. Consulting online resources or guides specific to Windows 10 services can also be helpful.
Yes, disabling certain non-essential services can improve your computer’s speed. This is because disabling these services frees up system resources, reducing the workload on your processor and memory, which can lead to improved performance, especially in systems with limited resources.
The risks include potential system instability, loss of functionality, and security vulnerabilities. Disabling essential services can cause critical features to stop working or expose your system to security threats. It’s important to understand the purpose of each service before disabling it.
Are you looking for a handy optimizer that can tweak the services on Windows 10 and increase the performance of your PC? Gaming users often need this type of utility as they use the maximum of the system resources. You can find Windows 10 Services Optimizer very useful on Github to fulfill your requirement. Furthermore, this helps you to Speed up your system and network performance, disable Windows telemetry, solve common registry problems and a lot more.
Optimizer is a portable tool that helps you to restore your privacy and enhance your security. Depending on your edition of Windows, this will also let you perform some specific tweaks. You can see our another post in this regard – How to Optimize Windows 10 Performance to Get Ultra-Fast Speed
Let’s see how you can use the tool –
Windows 10 Services Optimizer
Here is how to download and use Windows 10 Services Optimizer –
Step-1: Go to this page and get the tool on your PC.
Step-2: You don’t need to install it, just double click on Optimizer-4.8.exe and select Yes on UAC dialog. This is the latest version of the utility.
Step-3: In the Universal tab, click on Enable Performance Tweaks.
Step-4: Then select Enable & Restart.
This will tweak Windows 10 services in order to improve performance. Unnecessarily running service is the biggest hindrance in the speed of your system. The utility recognizes them and disables on its own. The app is successful to disable Windows telemetry to keep your privacy intact. If you like you can turn off Cortana from the interface of this tool. However this is is not a better option but the app allows to Disable Windows 10 automatic updates. You are able to uninstall UWP Apps from the UI. In addition, the tool helps to Block Skype ads, Edit hosts file, Remove unwanted programs running at startup, Define custom commands for run dialog, etc.
So we recommend to use Windows 10 Services Optimizer after you install this OS version on your PC.
Прежде чем отключать службы в Windows 10 вручную или с помощью программ, ознакомьтесь с нашим материалом о том, какие из них можно деактивировать без вреда работы системы.
Подробнее: Отключение ненужных и неиспользуемых служб в Windows 10
Также отметим, что программ, выполняющих задачу в автоматическом режиме, не существует: решение о деактивации каждой пользователю все равно придется принимать самостоятельно.
Easy Service Optimizer
Первое бесплатное решение, с помощью которого можно отключить ненужные службы в Windows 10, – это Easy Service Optimizer. Оно переведено на русский язык и не требует установки, достаточно скачать и запустить утилиту, после чего можно сразу приступать к настройкам. Помимо деактивации, здесь предусмотрена возможность включить неработающие либо восстановить существующие службы. Также напрямую можно создать REG-файлы.
Поскольку бездумное отключение системных служб может привести к проблемам в работе операционки, в приложении предусмотрена кнопка для быстрого отката изменений. Отключить любой элемент просто: достаточно выделить ненужную службу и кликнуть на кнопку «Остановить выбранную службу» на верхней панели инструментов.
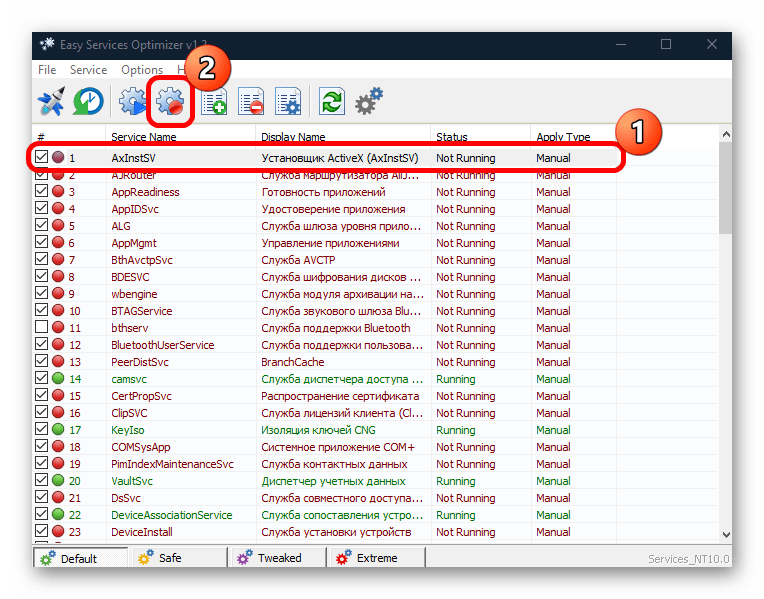
Также есть возможность деактивировать сразу несколько элементов одним щелчком мыши, выделив их зажатием клавиши «Ctrl». Если вы знаете названия службы, то через программу ее можно добавить в работу системы, а также настроить тип запуска или добавить описание. Все элементы помечаются цветами: зеленый означает, что она активна, красный – выключена, а серый – не существует.
Скачать Easy Service Optimizer
WinServices
Еще одна простая, но функциональная программа, — это WinServices, с помощью которой можно управлять службами операционной системы Windows 10. Она позволяет не только остановить ненужные элементы, но создать новые, сохранить или перезапустить их работу. Несмотря на англоязычный интерфейс, разобраться с функциональными возможностями несложно.
После запуска приложения отобразится окно со списком всех основных служб и инструментами для их управления. Отключить можно любой элемент, найдя его в списке, вызвав контекстное меню и из появившегося окошка выбрав пункт «Stop Service».
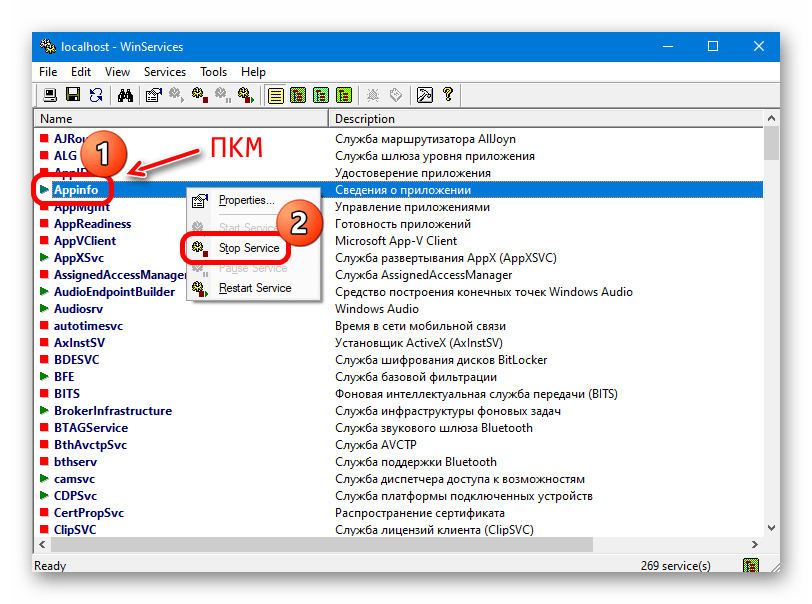
Приложение поддерживает отображение свойств служб: достаточно выделить интересующую и на верхней панели инструментов нажать на кнопку «Properties». В результате отобразится новое окно, где на вкладке «Configuration» будет доступна информация о расположении службы, ее описание, тип запуска и другие сведения.
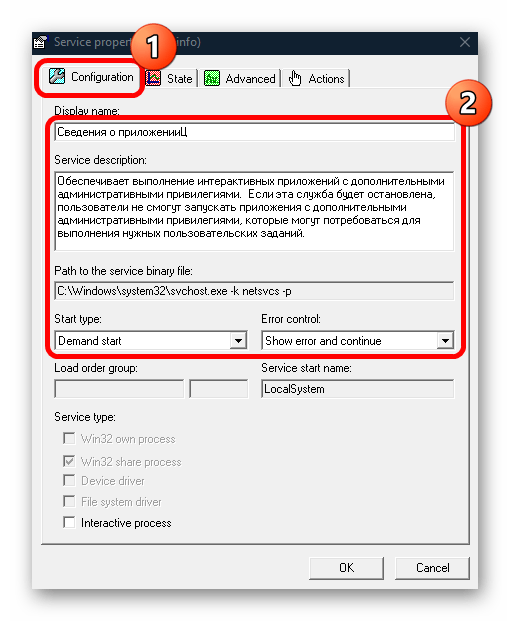
Вы можете изменить некоторые свойства службы (за это отвечает вкладка «Actions»), например ее название, или деактивировать опцию отправки информации о текущем состоянии элемента. Вдобавок ко всему, в WinServices предусмотрена возможность выбора стилей отображения списка служб, что подойдет для более опытных пользователей. Кроме того, она мониторит состояние элементов в режиме реального времени и отправляет сведения об этом пользователю. Распространяется на бесплатной основе.
Скачать WinServices
FireDaemon Pro
Приложение предназначено для удобного управления службами Windows 10: отключения, включения, перезапуска, удаления и других действий. Оно позволяет запускать любой скрипт и приложение Win32, например BAT, Python, Java, в качестве службы ОС. Преимуществом FireDaemon Pro является функция сбора статистических данных и записи их в файл LOG на локальный диск для последующего просмотра. Помимо этого, приложение не требовательно к ресурсам системы, а также способно управлять приоритетом подпроцессов.
После установки и запуска отобразится список всех служб Windows 10. Выделите тот объект, который нужно отключить, затем нажмите на кнопку вверху в виде квадрата – «Stop». Как видно, деактивация элементов происходит в несколько кликов.
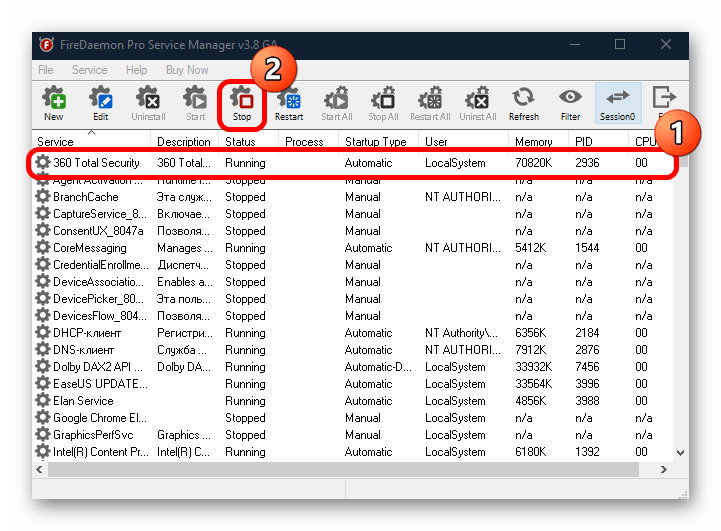
У приложения есть один, пожалуй, существенный недостаток: в ней не предусмотрено инструментов для редактирования служб. Кроме того, она на английском языке и распространяется на условно-бесплатной основе, но предусмотрен пробный период на 30 дней, в течение которого есть возможность ознакомиться со всеми предложенными функциями.
Скачать FireDaemon Pro
ServiWin
Еще одна бесплатная и простая программа – ServiWin, позволяющая управлять службами Windows 10, сохранять их, перезапускать, создавать отчет в формате HTML, запускать элемент в «Редакторе реестра». Поддерживается работа с 32- и 64-битными системами. Программное обеспечение портативное, то есть достаточно скачать и запустить его – установка не требуется.
После запуска ServiWin отобразится перечень всех служб «десятки», как активных, так и отключенных. Отключить любой элемент можно в несколько кликов: выделите его и щелкните по кнопке остановки в виде красной лампочки на верхней панели с инструментами.

Чтобы посмотреть более подробную информацию о службе, нажмите на кнопку «Properties». В новом окне можете изучить сведения о местоположении, типе запуска, имени разработчика, а также описание. К недостаткам относится англоязычный интерфейс и отсутствие возможности изменить тип запуска из интерфейса утилиты.
Скачать ServiWin
Ashampoo WinOptimizer
Ashampoo WinOptimizer — профессиональный инструмент для работы с различными службами Windows 10. Он представляет собой комплексное решение, позволяющее оптимизировать систему и улучшить ее быстродействие и защиту. С помощью встроенных средств пользователь может быстро очистить «десятку» от мусорных и временных файлов, создать точку восстановления системы, планировать задачи, устранить неисправность в системном реестре и многое другое.
Программа условно-бесплатная, но при этом у нее интерфейс на русском языке, что позволит быстро разобраться в функциях и возможностях. Отключение служб в Ashampoo WinOptimizer происходит через вкладку «Все модули» > блок «Производительность» > функция «Управление службами Windows». После перехода по этому пути отобразится полный список со всеми службами операционной системы. Элементы можно отсортировать по различным параметрам. Чтобы включить отображение всех элементов, выберите нужный вариант в выпадающем меню «Вид». Для деактивации любой службы кликните по ней правой кнопкой мыши и выберите пункт «Остановить службу».
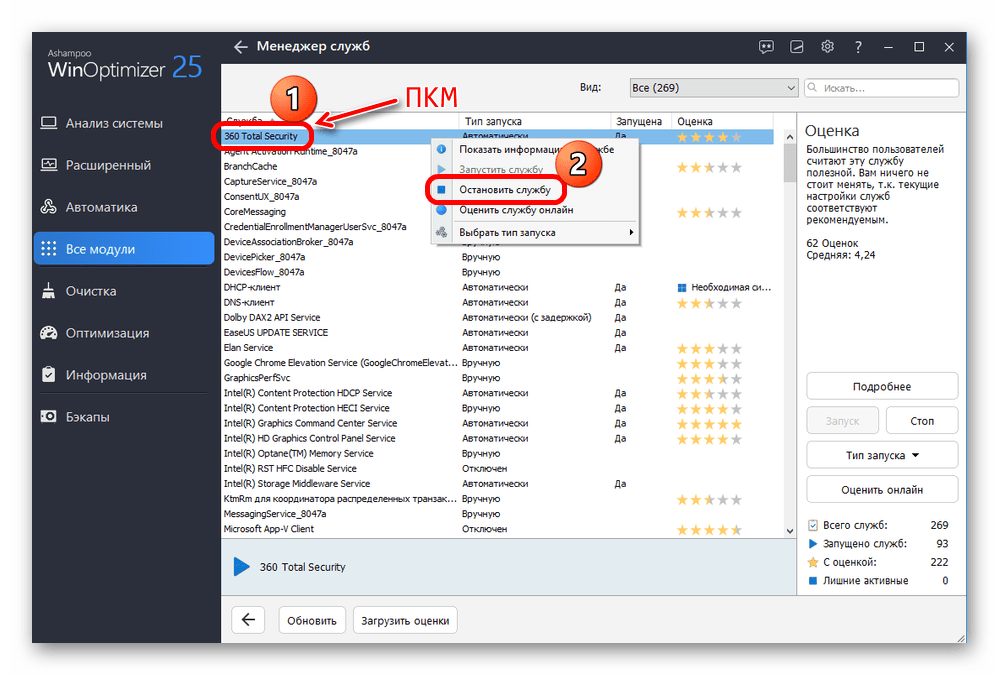
При выборе службы справа отобразится дополнительная панель с ее некоторыми свойствами и инструментами управления. Отсюда также можно остановить или отключить службу, а также выбрать тип запуска или оценить ее эффективность онлайн.
Наша группа в TelegramПолезные советы и помощь
Easy service optimizer — небольшая простенькая утилита для удобного управления всеми службами операционной системы Windows. Программа портативна и не требует установки: сразу после скачивания можно приступать к работе с ней.
Приложением сканируется операционка и выводится список всех активных и не запущенных служб. Прямо здесь же Вы можете включать нужные и отключать ненужные элементы, удалить некоторые записи вообще, добавлять свои и т.д. Конечно, бездумное применение (или наоборот нейтрализация) служб Windows может привести к сбоям в работе ПК и угрожать безопасности. Поэтому для работы с Easy service optimizer требуется некоторое знание процессов операционки. Однако если у Вас эти знания есть, то можно оптимизировать загрузку ОС, улучшить производительность имеющейся конфигурации и настроить работу ПК как говорится «под себя».
Easy service optimizer позволяет использовать службы, начиная от версии Services_NT5.1 и заканчивая Services_NT10.0. Удобно, что если те или иные действия со службами привели к нежелательным результатам, то есть кнопка быстрого отката изменений.
В целом, Easy service optimizer весьма неплохая программа для работы со службами Windows, которую по достоинству оценят те пользователи, которые так или иначе связаны с необходимостью управления ими, предлагая для этого удобный интерфейс и расширенные возможности.
ТОП-сегодня раздела «Настройка, оптимизация»
CCleaner 6.35.11488
CCleaner — популярное приложение для оптимизации ПК, чистки реестра и удаления различного…
MSI Afterburner 4.6.5
MSI Afterburner — настоящая находка для истинного оверклокера, с помощью которой можно…
Process Hacker 2.39.124
Process Hacker — мощное приложение для полного контроля над задачами, процессами и службами, с…
Mem Reduct 3.5
Mem Reduct — небольшая портативная утилита, которая позволяет высвободить до 25% используемой…
CCleaner Portable 6.35.11488
CCleaner Portable — портативная (переносная, не требующая инсталляции на компьютер) версия утилиты CCleaner для чистки системного мусора…
Отзывы о программе Easy service optimizer
Никита про Easy service optimizer 1.2 [10-11-2024]
Программа поставила «службе автонастройки wlan» параметр запуска «вручную», хотя этой службы, даже не было в списке программы. Пол часа траблшутил, почему у меня отвалился вайфай. Остается только гадать, что еще пострадало. Не рекоммендую ни под каким соусом
| | Ответить
454 про Easy service optimizer 1.2 [31-08-2024]
Никому ее не советую, не рискуйте, от нее потом синий экран смерти выскочит (даже если безопасный режим в программе)
| | Ответить
укуук про Easy service optimizer 1.2 [18-08-2024]
Не надо людей разводить этим го…ном, у меня после этой программы экран синий выскочил, и не раз уже было.даже если безопасно отключаешь.Не советую.
| | Ответить
Ди про Easy service optimizer 1.2 [04-01-2022]
Отлично! Спасибо за программу.
11 | 11 | Ответить
Vлаrtаs про Easy service optimizer 1.2 [28-03-2021]
Программа очень хорошая всем советую! Увеличит производительность и быстродействие вашего ПК! +полностью бесплатная
+не требует установки только запуск
+разные режимы отключения служб:Оптимально,Производительность,Экстрим! Так же можно вернуть настройки ^По умолчанию^
+Русский и понятный интерфейс
Минусов не обнаружил так как их нету! Если у вас вдруг что то не работает например ^Подключение к микрофону^ то нужно найти этот раздел и включить его! Если понравился, отзыв оцените его стрелочкой вверх! Если нет:( то напишите причину и вопрос и я отвечу если буду онлайн ! Спасибо за внимание !
26 | 12 | Ответить