
После установки системы, переноса Windows на другой диск или подключения нового накопителя пользователи могут обнаружить, что твердотельный накопитель (SSD) отображается как жесткий диск (HDD) в окне «Оптимизация дисков» или заметить, что система определяет диск неправильно в других расположениях.
В этой инструкции о том, как Windows 11 и 10 определяют, какой тип накопителя подключён и как исправить ситуацию, если определенный системой тип носителя не соответствует реальному.
Оценка производительности диска
Для определения типа накопителя Windows выполняет оценку скорости обмена данными с ним и, если скорость превышает пороговое значение, устанавливает тип носителя «Твердотельный накопитель», иначе — «Жесткий диск».
В случае, если оценка не производилась (обычно она выполняется в фоновом режиме и сразу после установки системы), по какой-то причине её результаты оказались не соответствующими фактическим показателям диска, либо оценка была произведена на другом диске (например, система была установлена на HDD, после чего без переустановки перенесена на SSD), определяемый тип накопителя может быть неверным.
Для того, чтобы исправить ситуацию в большинстве случаев достаточно вручную запустить оценку производительности нужного диска, для этого:
- Запустите командную строку от имени администратора: для этого можно начать набирать «Командная строка» в поиске на панели задач, а когда результат найдётся — нажать «Запуск от имени администратора».
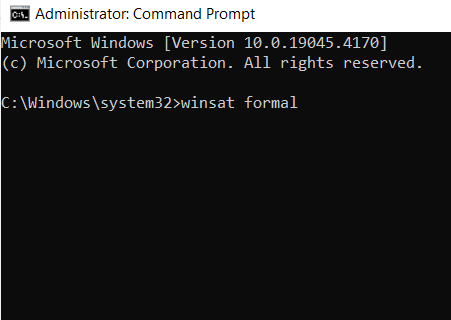
- Введите команду
winsat disk -drive X
заменив букву X на букву нужного диска и нажмите Enter.
- Дождитесь завершения оценки производительности диска и закройте командную строку.

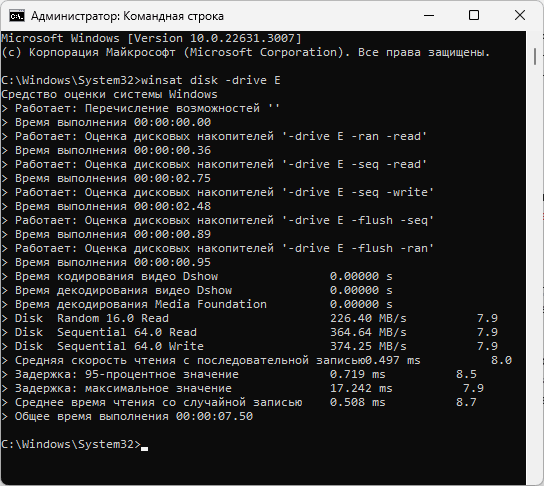
В результате с большой вероятностью тип диска будет исправлен на нужный. Посмотреть тип накопителя можно в Диспетчере задач на вкладке «Производительность» либо в окне «Оптимизация дисков», зайти которое можно через свойства диска (правый клик по диску в Проводнике и выбор нужного пункта меню) — вкладка «Сервис» — «Оптимизировать».
Данные в окне «Оптимизация дисков» рекомендую считать приоритетными, поскольку именно они определяют то, как Windows будет работать с оптимизацией вашего диска: например, будет ли использоваться команда TRIM.

Дополнительные варианты той же команды, если предыдущий вариант не сработал:
-
winsat diskformal
(оценка производительности дисков системы)
-
winsat formal -restart clean
(полный перезапуск оценки производительности системы, включая оценку производительности дисков, подробнее: Оценка производительности Windows 11, подойдет и для Windows 10)
Дополнительные варианты решения
Описанный выше способ срабатывает в большинстве случаев, но не всегда. Если ваш диск всё также определяется неправильно, ниже — дополнительные варианты решения и информация, которая может быть полезной:
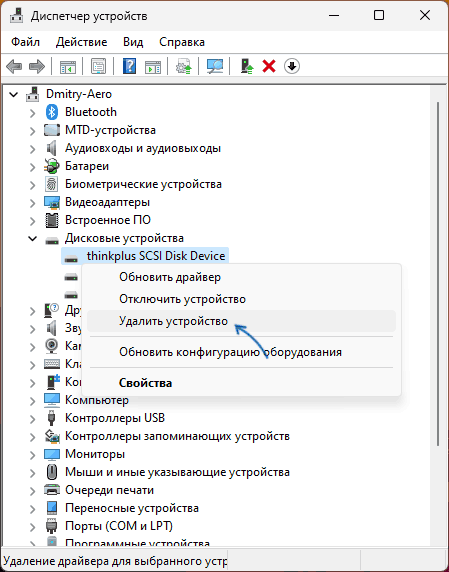
- Если это не системный диск, попробуйте удалить его в диспетчере устройств, после чего перезагрузить компьютер — диск должен будет определиться автоматически. Если этого не произошло, и он не появился в диспетчере устройств, используйте пункт меню «Действие» — «Обновить конфигурацию оборудования».

- Попробуйте переустановить драйверы чипсета, а при наличии — драйверы SATA, скачав их с официального сайта производителя материнской платы (для ПК) или ноутбука, именно для вашей модели устройства. Даже если драйверы представлены лишь для предыдущих версий Windows они, вероятно, успешно установятся. После установки перезапустите оценку производительности дисков.
- Проблема может возникать, если режим работы дисков установлен в RAID, iRST, а не AHCI в БИОС/UEFI.
- Если локальный SATA SSD или HDD отображается неправильно, при этом, в некоторых случаях — как съемный диск, может помочь одно из: отключение функции горячей замены дисков в БИОС/UEFI (Подробнее в статье: Локальный диск отображается как съемный — что делать?), подключение диска к другой группе SATA-разъемов на материнской плате или, в случае если диск подключен не напрямую кабелем SATA — прямое подключение.
- При использовании внешних дисков SSD или дисков в оптибей они не всегда отображаются как твердотельный накопитель даже если оценка производительности показывает подходящие результаты. Проблема часто вызвана тем, что контроллер внешнего бокса для диска подкачается как SCSI-устройство, но не поддерживает трансляцию команд SCSI UNMAP в ATA TRIM
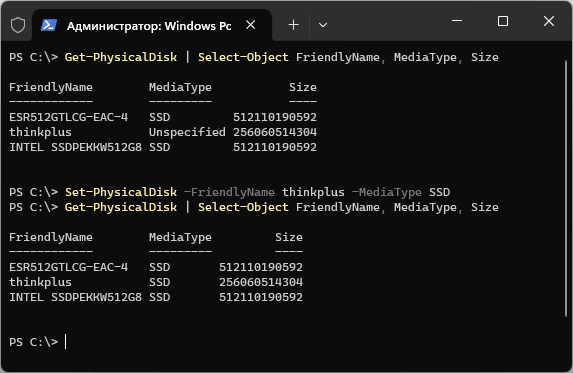
- Windows PowerShell позволяет изменить тип накопителя, но работает это только для накопителей в дисковых пространствах. Пример команд:
Get-PhysicalDisk | Select-Object FriendlyName, MediaType, Size
Set-PhysicalDisk -FriendlyName Имя_диска -MediaType SSD

- Если операционная система «видит» ваш системный SSD как USB накопитель, проверьте наличие параметра с именем PortableOperatingSystem в разделе реестра
HKEY_LOCAL_MACHINE\SYSTEM\CurrentControlSet\Control
при наличии — удалите его и перезагрузите компьютер.
В случае, если у вас остались вопросы по теме материала, вы можете задать их в комментариях ниже, подробно описав ситуацию с накопителями в вашем случае. Возможно, решение найдётся.
Windows 10 Optimize Drive shows SSD as HDD? While Windows 10’s Optimize Drives feature automatically recognizes various storage devices, It may accidentally recognize your SSD as an HDD. Given the differences between an SSD and an HDD, it could result in several more issues over time.
Why Windows Optimize Drives Lists SSD as HDD?
The Optimize drive would mistakenly list SSD as HDD due to several reasons:
Driver issues: Outdated and corrupt storage drivers can cause issues in recognizing the SSD.
Incorrect System Configuration: The BIOS or SATA controller may not be configured correctly to recognize the SSD drives, resulting in reading SSD as HDD.
RAID Configurations: When SSD is part of the RAID array Windows may fail to detect the individual characteristics of SSD, hence result them as HDD.
Benchmarks: Windows occasionally rely on benchmark results, If you didn’t run a benchmark test after upgrading from HDD to SSD, windows might see the drive type as HDD instead of SSD.
Now that you know what is causing these issues, let us jump to fixing them and get the SSD drive recognized.
3 Solutions to Fix Windows 10 “Optimize Drives” showing “Solid state drive” as “Hard disk drive”
Before you proceed make sure you disable the scheduled optimizations to prevent defragging attempts on your SSD. SSDs and HDDs are built differently and defragging an SSD as an HDD (and vice versa) is going to cause more issues down the road.
Disabling Scheduled Defragging of your SSD as an HDD
- Open Device Manager.
- Select the storage drive and click on Change Settings below.

- Uncheck the Run on a Schedule option.

Also Read: Fix Windows lists SSD as HDD
Fix 1: Update the drivers
Keeping the drivers updated will help in fixing bugs and incompatibility, try updating them for better drive detection and optimization.
Check for Windows updates, if there are any new updates download and install them to update the storage drivers automatically.
You can also do it manually:
- Open Device Manager and expand Disk drives option.
- Right-click on the SSD listed as HDD by the Windows and select Update driver.
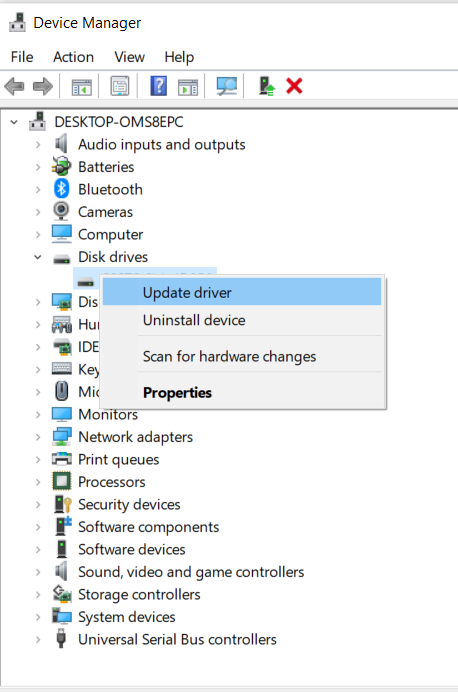
- On the Update Window click on Search automatically for drivers.
Once the Updating is completed, restart the system and see if the SSD is being recognized by the computer.
Fix 2: Disable RAID Acceleration
If your SSD is in a RAID setup, consider disabling the acceleration can simplify the drive visibility and make it visible on the optimize feature in Windows.
Make use of the Intel Optane Memory and Storage Management application from the Microsoft Store to do this an easier way.
- Open the application and click on the Intel® Optane™ Memory tab on left
- Click on Disable.
- Confirm the choice by clicking on Disable.
This will initiate the acceleration disabling process, once the process is completed click on Restart.
Fix 3: Run a Benchmark Test
Re-evaluating the drives by running a benchmark test can help in providing the drive performance information and characteristics of the SSD to Windows to recognize it correctly.
You can choose to do it using any reliable third-party tools, You can use the Command prompt to run a benchmark test. Here is how you do it, Keep the device connected to a power source and follow the steps below.
- Open Command prompt as Administrator.
- Type: winsat formal (Windows System Assessment Test) and press Enter
Once the scan is completed, restart the computer and verify if the SSD shows up as a hard disk on the optimize drives feature.
In case Troubleshooting didn’t resolve the issue, try Optimizing the SSD manually to maintain a faster performance. Continue reading the next section to know more about it.
Ways of Optimizing SSD Performance on Windows 10
Follow these suggestions to extract optimal SSD performance and fast load speeds:
Maintain free space: Have sufficient free space on your SSD to reduce write operations, which helps in better performance and extending lifespan.
Disable unnecessary startup programs: Disable the programs that autostart while booting via the task manager.
Enable Write caching: Turn on the write caching on your device to speed up the writing. It also has a risk of data loss or corruption in SSD in case of a power outage.
Also Read: Fix External Hard Drive Shows Up as Local Disk
Conclusion:
While Windows 10 may list your SSD as HDD on the optimized drive, I hope that you were able to resolve your issue using the solutions provided in this article. It is hard to pinpoint the cause, but giving all the above solutions a chance will help maximize the chances of success through trial and error. If you have any feedback or queries that you would like to ask, feel free to reach out!
It seems that the weird and strange issues always find their way into my system builds. Recently, a Windows Server build was recognizing my SSD drive as a standard hard disk drive. For some, this may not be an issue as the read/write performance is still there. However, for those that dig a little deeper, Windows will try to use the standard “Optimize” for the drive on a regular basis, something you should not do to an SSD.
After trying all the standard remedies, drivers, reboots, updates, etc, the problem simply would not correct itself. It had become so frustrating that I had even considered wiping the system and starting fresh. This, unfortunately, would result in the destruction of TONS of work and effort. Well, it turns out that the fix was an easy one; a simple command in powershell (or command prompt).
- Open Windows Powershell (or command prompt)
- type: winsat diskformal
Winsat is Windows System Assessment tool, and it is used to benchmark various components. Some of you may remember the Windows Vista and Windows 7 Windows Experience Index, this is the tool (or a version of it).
Further Winsat commands
COMMAND LINE USAGE :
WINSAT <assessment_name> [switches]
It’s necessary to supply an assessment name. In contrast, switches are optional.
Valid assessment names already seen in Vista include:
- formal run the full set of assessments
- dwm Run the Desktop Windows Manager assessment – Re-assess the systems graphics capabilities and restart the Desktop Window Manager.
- cpu Run the CPU assessment.
- mem Run the system memory assessment.
- d3d Run the d3d assessment (Note that the d3d assessment no longer runs the workload.
- For backward compatibility, pre-determined scores and metrics are reported.)
- disk Run the storage assessment
- media Run the media assessment
- mfmedia Run the Media Foundation based assessment features Run just the features assessment
- – Enumerates the system’s features.
- – It’s best used with the -xml <filename> switch to save the data.
- – The ‘eef’switch can be used to enumerate extra features such as optical disks, memory modules, and other items.
PRE-POPULATION:
The new command-line options for pre-populating WinSAT assessment results are :
- Winsat prepop [-datastore ] [ -graphics | -cpu | -mem | -disk | -dwm ]
- This generates WinSAT xml files whose filenames contain “prepop”. For example : 0008-09-26 14.48.28.542 Cpu.Assessment (Prepop).WinSAT.xml
- The filename pattern is : %IdentifierDerivedFromDate% %Component%.Assessment(Prepop).WinSAT.xml
The datastore directory option specifies an alternative target location for generated xml files. If no location is specified, everything is pre-populated to %WINDIR%\performance\winsat\datastore.
To generate a full set of result xml files, use “winsat prepop“.
It is also possible to pre-populate results for a subsystem, such as CPU, subject to the following dependencies:
- The CPU assessment has a secondary dependency on the Memory assessment
- The Memory assessment has a secondary dependency on the CPU assessment
- The Graphics assessment has a secondary dependency on both CPU and Memory assessments
- The DWM assessment can run standalone
- The Disk assessment can run standalone
If the assessment for a secondary dependency is not present, WinSAT will run the secondary assessment along with the requested primary assessment.
For example, “winsat prepop -cpu” will run both the CPU and the Memory test,
if the xml file for the Memory test is not present.
OTHER NEW Win7 ASSESSMENT OPTIONS :
- dwmformal Run Desktop Windows Manager assessment to generate the WinSAT Graphics score
- cpuformal Run CPU assessment to generate the WinSAT Processor score
- memformal Run Memory assessment to generate the WinSAT Memory (RAM) score
- graphicsformal Run Graphics assessment to generate the WinSAT Gaming Graphics score
- diskformal Run Disk assessment to generate the WinSAT Primary Hard Disk score
All formal assessments will save the data (xml files) in %WINDIR%\performance\winsat\datastore.
If a system has been prepopulated (using files generated by the “winsat prepop” option),
it is not necessary to run formal assessments.
SUB-ASSESSMENTS:
While investigating results, it may be convenient to look at individual assessments. Options for running Gaming Graphics sub-assessments include:
- Winsat graphicsformal3d
- Winsat graphicsformalmedia
DX9 Variations:
- winsat d3d -dx9
- winsat d3d -batch
- winsat d3d -alpha
- winsat d3d -tex
- winsat d3d -alu
DWM/DX10 variations:
- winsat d3d -dx10
- winsat d3d -dx10 -alpha
- winsat d3d -dx10 -tex
- winsat d3d -dx10 -alu
- winsat d3d -dx10 -batch
- winsat d3d -dx10 -geomf4
- winsat d3d -dx10 -geomf27
- winsat d3d -dx10 -geomv8
- winsat d3d -dx10 -gemov32
- winsat d3d -dx10 -cbuffer
OPTIONS FOR FORMAL ASSESSMENTS FOR SUBSEQUENT RUNS ON THE SAME MACHINE:
The default behavior for “WinSAT formal” when a complete set of winsat formal files is present and a second “winsat formal” run is requested is to
- Run incrementally if component change implies that an assessment needs to be re-run, e.g. if a video card were updated
- If no component updates were detected, re-run all assessments.
The restart option enables behavior other than the default. The syntax is :
- Winsat formal -restart [clean|never]
- Winsat formal -restart Reruns all assessments.
- Winsat formal -restart never Attempts to run incrementally.
- Winsat formal -restart clean Reruns all assessments and provides the same functionality as “forgethistory”.
- Winsat forgethistory Choosing to forgethistory will rate a machine as if for the first time.
OTHER COMMAND LINE OPTIONS :
- -v Enables verbose output
- -xml Saves the XML output to ‘filename’
<command> -log <fn> Generates a log file associated with the specified command, such as disk
The -log switch can be used with any WinSAT command.
- viewlog -i Dumps the results of a log file .
- viewevents Used to view relevant winsat events in the event log. (This launches the event log)
- query Can be used to query the current datastore.
-
Home
-
News
- 3 Ways to Troubleshoot SSD Recognized as HDD on Windows 11/10
By Sandy |
Last Updated
You may panic when you find that your SSD recognized as HDD in Disk Management. Fret not; it is a common issue and has no effect on your computer or data. In this post from MiniTool, you can learn several feasible and effective methods to fix this vexing issue.
SSD recognized as HDD is generally regarded as a minor issue, primarily presenting itself as a visual bug within the operating system’s interface. This misrepresentation does not typically impact the performance or functionality of the SSD, as the drive still operates at its intended speed and capacity.
However, it can confuse users who rely on accurate drive identification for tasks such as performance monitoring or hardware diagnostics. Here’s a true example from the tomshardware.com forums.
“Hi, I installed an SSD in pc, but it’s showing up on the defragment program as a hard drive. How do I change it so it knows it’s an SSD? I’ve tried different codes in the command, but it’s not working…”forums.tomshardware.com
If you find yourself in such a situation, you may wonder: Why SSD showing up as HDD issue occur? How to fix the problem? Keep reading to get more detailed information.
Why is SSD Recognized as HDD?
There are several possible reasons for PC to incorrectly identify SSDs as HDDs:
- Compatibility issues: The SSD may not be fully optimized or compatible with the motherboard’s BIOS, leading to misidentification.
- Incorrect system setup: The BIOS or SATA controller settings may not be properly configured to detect SSDs, which could result in reading the SSD as an HDD.
- Improperly connected port: If the SSD is connected to a legacy port or if the computer’s settings prioritize HDD modes, this can result in an incorrect reading.
- Driver problems: Outdated or corrupt storage drivers can lead to difficulties in recognizing SSDs.
- Benchmark results: Windows sometimes relies on benchmark data; if you haven’t executed a benchmark test after switching from an HDD to an SSD, it could misidentify the drive type as HDD rather than SSD.
- RAID setups: When an SSD is included in a RAID configuration, Windows may struggle to identify its unique characteristics, causing it to be recognized as an HDD instead.
Now that you’re aware of the causes behind the issue, let’s move on to resolving the SSD recognized as HDD and ensuring the SSD is recognized correctly.
How to Fix SSD Recognized as HDD
Before proceeding with any specific fixes, you are highly recommended to back up your data on your SSD to protect your important data. MiniTool is preferred. MiniTool ShadowMaker, a highly regarded and multifunctional PC backup tool, has been available to users for multiple years. In addition to back up SSD, it includes a cloning feature that allows for HDD to SSD cloning and enables users to clone an SSD to a larger SSD or HDD.
MiniTool ShadowMaker TrialClick to Download100%Clean & Safe
Solution 1. Update the Driver
Using outdated drivers can negatively impact the performance of an SSD; updating them may enhance SSD interactions, enable the optimal trim commands for your drive, and fix the SSD recognized as HDD issue. Follow the step-by-step instructions to update your SSD:
Step 1. Connect your SSD to your computer. Press Win + X to open the Power User menu and select Device Manager from the list.
Step 2. In the following window, expand the Disk drives option.
Step 3. Right-click your SSD showing up as HDD and choose Update driver.
Step 4. Next, select Search automatically for drivers.
Step 5. Follow the on-screen instructions to complete the update. After updating, check if the issue is gone.
Solution2. Run winsat Command
Reassessing the drives by executing a benchmark test can assist in delivering the performance details and attributes of the SSD for accurate recognition by Windows. To perform a benchmark, here, we introduce a method ‑‑ to run winsat command. Follow the steps below to learn how to do it:
Step 1. Press Win + S to launch the Windows Search bar, type cmd in the box. From the result list, find Command Prompt, and select Run as administrator.
Step 2. In the pop-up UAC window, click the Yes button.
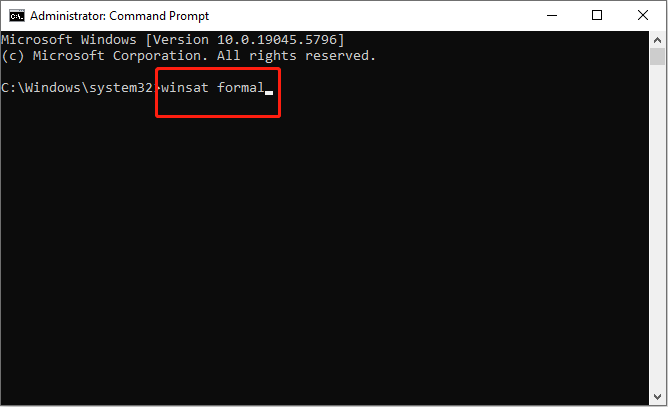
Step 3. Type winsat formal and press Enter.
Step 4. After the scan is finished, reboot the computer and check if the SSD recognized as HDD issue is resolved.
Solution 3. Reset BIOS
Improperly configured BIOS settings can lead to Windows having difficulty detecting and properly recognizing the SSD. To resolve the SSD recognized as HDD issue, resetting the BIOS to its factory default settings can be a highly effective solution. This process can help ensure that the drive interfaces correctly with the operating system, allowing Windows to identify and interact with the SSD without issues.
Final Words
Encountering the SSD recognized as HDD issue on PC? After reading this post, you must know how to fix it. Hope everything is good for you.
About The Author
Position: Columnist
Sandy became an English editor after graduation. She is devoted to finding effective solutions for diverse IT problems and provides articles on data recovery, data backup, and computer partitions and drives. In her spare time, she likes listening to music and playing games.
SSD отображается в Defragger как HDD
Windows определяет тип накопителя на основе результатов тестирования. Соответственно, вам поможет WinSAT.exe, она же Windows System Assessment Tool.
Для начала проверьте не работают ли у вас какие-то утилиты, которые либо на лету, либо постоянно что-то «оптимизируют». Если они есть, то отключите, либо удалите их.
Синтаксис WinSAT описан достаточно лаконично, так что может потребоваться несколько попыток. Запустите cmd от администратора и начните с команды winsat disk -drive d. Если после неё ситуация не изменится, таким же образом запустите winsat diskformal. Если и это не поможет, сделайте полную переоценку: winsat formal
Также на всякий случай хорошо бы убедиться, что у вас нет ухищрений с кэшированием от производителя ноутбука наподобие установки маленького ССД на 32 ГБ, а также, что в BIOS настройки выставлены корректно.
В случае сомнений относительно оценки Виндоус, можете сделать тест скорости SSD самостоятельно, например, в Р.тестере.
Если и после этого Defraggler будет определять диск некорректно, то скорее всего, его надо сносить — это уже, видимо, баг программы, который должен исправляться разработчиками.
задана задача на автоматическую дефрагментацию (отключить я её не могу т.к. дефрагер не позволяет залезть в соответствующую менюшку, интегрируясь в систему)
В «Optimize Drives» есть секция «Scheduled optimization», там указана Frequency и есть кнопка «Change settings». Как оно у вас — угадать не могу, т.к. Дефрагглер у меня не установлен.