
Для работы проектов iXBT.com нужны файлы cookie и сервисы аналитики.
Продолжая посещать сайты проектов вы соглашаетесь с нашей
Политикой в отношении файлов cookie
Продолжаем нашу серию материалов, посвящённых тонкой настройке и оптимизации Windows. Ранее мы с вами уже рассмотрели способ, как стать быстрее всех в соревновательных играх, существенно уменьшив задержку ввода. В этом же небольшом материале вы узнаете, как значительно уменьшить задержку вывода звука в Windows 10/11.
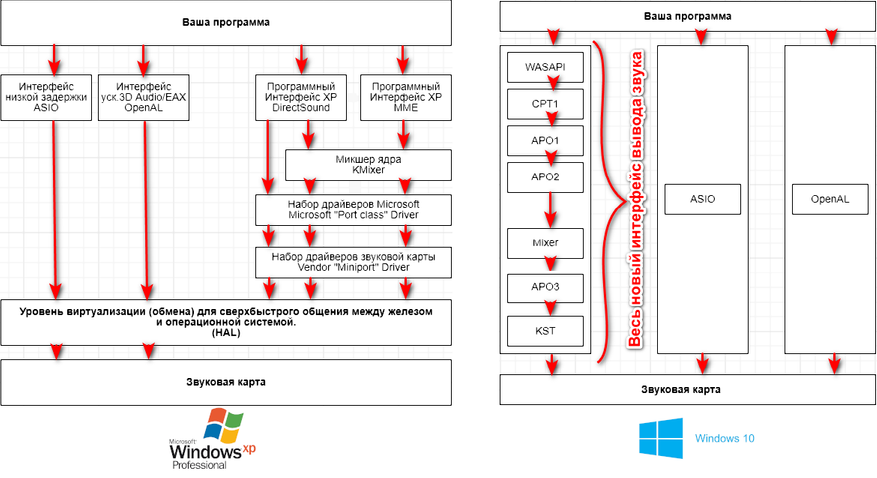
Операционные системы корпорации Microsoft никогда не могли похвастаться качественным и быстрым выводом звука из-за своей запутанной и сложной системы программных прослоек, которые вынужден был проходить звук с момента своего синтеза до конечного устройства вывода. Особенно ситуация усугубилась с выходом Windows Vista и последующим закатом эпохи дискретных звуковых карт. Такое положение дел привело к различным проблемам в играх, когда звук не поспевал за губами или действиями NPC.
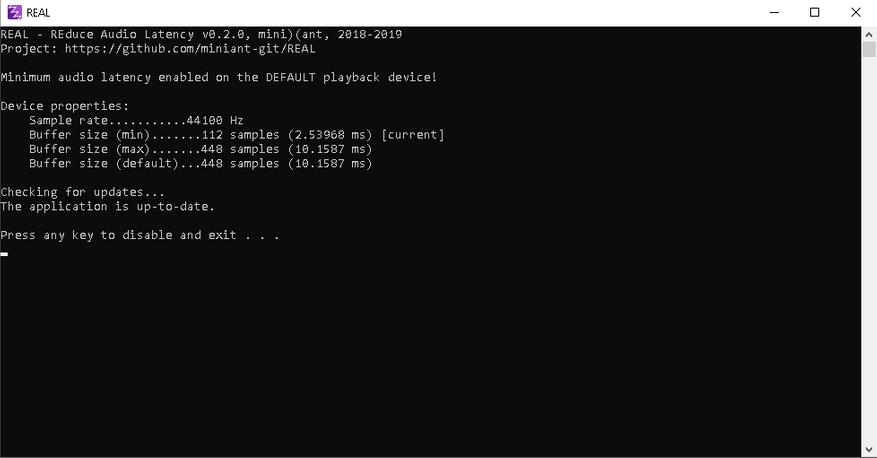
Для того чтобы побороть проблему с задержками вывода звука в Windows 10/11 или попросту стать быстрее всех в соревновательных играх, не нужно быть программистом. Достаточно уменьшить размер буфера звуковой карты, воспользовавшись известной среди музыкантов бесплатной программой REAL.
1. Скачиваем программу с GitHub.
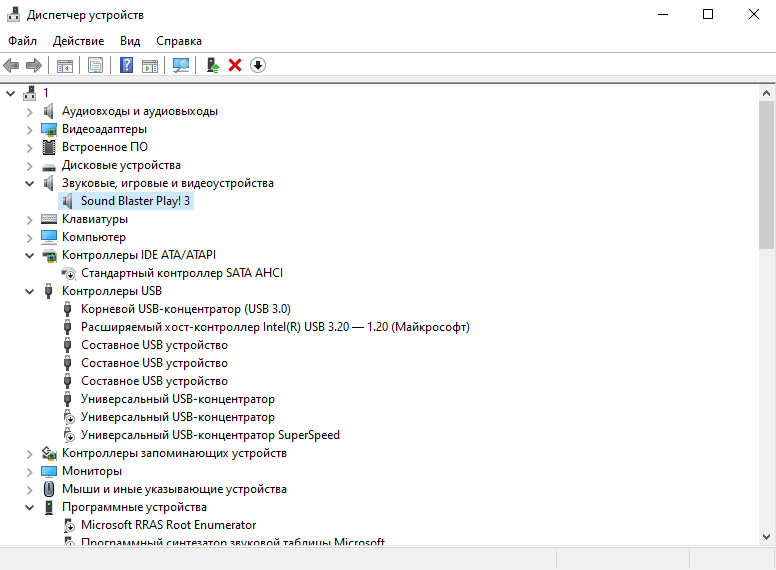
2. Нажимаем Win+R и вводим команду devmgmt.msc.
3. В появившемся окне находим устройство вывода звука.
4. Удаляем драйвер производителя звуковой карты и переводим её работу на встроенный драйвер Windows (High Definition Audio Device).
4. Запускаем от имени администратора файл REAL.exe. Если всё прошло успешно, то перед вашим взором появится окно программы, а размер буфера звуковой карты значительно уменьшится.
5. В принципе, на этом всё! Сворачиваем окно программы и забываем о её существовании.
Способ не универсален, является костылём и может не работать на большинстве современных USB-наушников, так как в основном предназначен для встроенных решений и дискретных звуковых карт. Тем не менее он всё ещё полезен, когда требуется уменьшить значение буфера, а программное обеспечение звуковой карты не обладает необходимой опцией. Уважайте свободу, используйте только проверенное ПО и ни в коем случае не предавайте себя! С вами был Павел. Ещё увидимся!
О, как же это раздражает. Мы встречаемся с этой проблемой как на разных сайтах, предлагающих онлайн просмотр фильмов и сериалов, так и при воспроизведении медиафайлов, хранящихся на компьютере. Инстинкт подсказывает нам, что если поставить видео на паузу и через пару секунд включить его снова – проблема исчезнет. И в некоторых случаях это действительно помогает. Но если нет, то скоро вы узнаете почему звук отстает от видео и как это исправить.

Существует целый ряд причин, приводящий к проблемам, когда звук опережает видео:
- высокая нагрузка на аппаратную часть (прежде всего процессор и жесткий диск);
- устаревшая версия браузера и флеш плеера (при онлайн просмотре);
- повреждение видеодрайвера;
- заражение компьютера вирусами;
- устаревшая версия стационарного плеера;
- отсутствие или старая версия кодеков;
- повреждение исходного видеофайла.
Рассинхронизация звука и видео: как исправить
Способы устранения ошибки не вызывают особых трудностей даже у неопытных пользователей, но вот на эффективность этих методов нельзя дать никаких гарантий. Каждая ситуация в своем роде уникальна и общие инструкции могут не подойти для решения именно вашей проблемы. Сейчас мы рассмотрим общие рекомендации, с помощью которых синхронизация видео и звука была успешно восстановлена у многих пользователей.
Битый файл
Если на сайте или компьютере только в одной видеозаписи аудио и картинка рассинхронизированы, в то время как остальные фильмы и клипы воспроизводятся корректно (включая онлайн ролики), можно говорить о повреждении файла. В этом случае рекомендуется просто скачать альтернативную версию с другого источника или установить приложение Avidemux. В программе путем нажатия клавиш Ctrl+O можно задать смещение аудиопотока на нужный интервал.

Обновление браузера и Flash Player
Если проблема наблюдается на многих сайтах во время онлайн просмотра, стоит установить последнюю версию интернет обозревателя и Flash Player. Проверьте соответствие аудиопотока после распаковки ПО и перезагрузки компьютера.
Переустановка драйвера
Устаревшие или поврежденные цифровые подписи устройств также влияют на качество воспроизведения видео. Для исправления проблемы нужно:
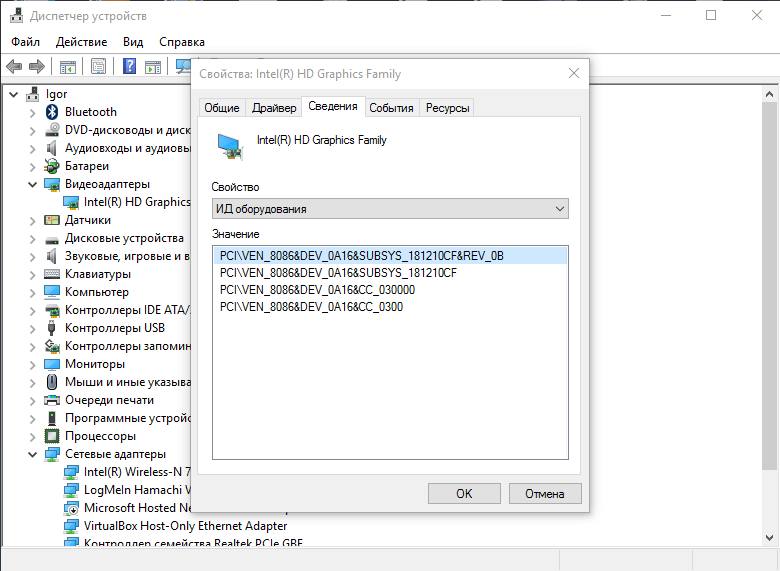
- Перейти в «Этот компьютер» – «Свойства системы» – «Диспетчер устройств».
- Найти видеоадаптер, открыть «Свойства» и нажать «Удалить».
- Загрузить актуальный драйвер для устройства. Если неизвестна модель, посмотрите цифровую подпись (ID). Для этого перейдите во вкладку «Сведения» и в выпадающем списке выберите «ИД оборудования».

- Установите драйвер, следуя подсказкам установщика.
- Перезагрузите компьютер.
Устаревший проигрыватель и кодеки
Некоторые старые плееры и кодеки могут не справляться с современными файлами и давать сбой. Поэтому рекомендуется установить последнюю версию любимого проигрывателя и скачать актуальные кодеки.

Нагрузка на процессор и HDD
Бывает, что проблемы рассинхронизации звука и видео происходят параллельно с подтормаживанием системы. В данном случае нужно:
- Открыть «Диспетчер задач» путем зажатия клавиш Ctrl+Shift+Esc.

- Перейти во вкладку «Производительность» и оценить показатели. Если ЦП или Диск имеют загруженность более 90%, перейти во вкладку «Процессы» и отсортировать список по столбцу «Память».
- Принудительно завершить самые тяжелые процессы.
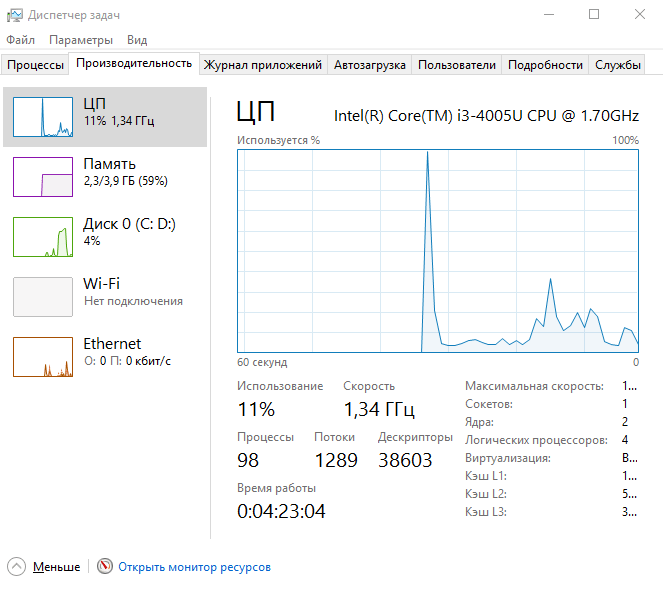
Внимание! При аварийном закрытии программ возможна потеря данных! Не забудьте перед завершением процесса сохранить информацию.
Если же с показателями все в порядке, то:
- Перейдите в «Этот компьютер» – «Свойства системы» – «Диспетчер устройств».
- В категории «Дисковые устройства» найдите имя вашего HDD и дважды кликните ЛКМ.
- Перейдите во вкладку «Политика» и поставьте галку «Включить повышенную производительность».
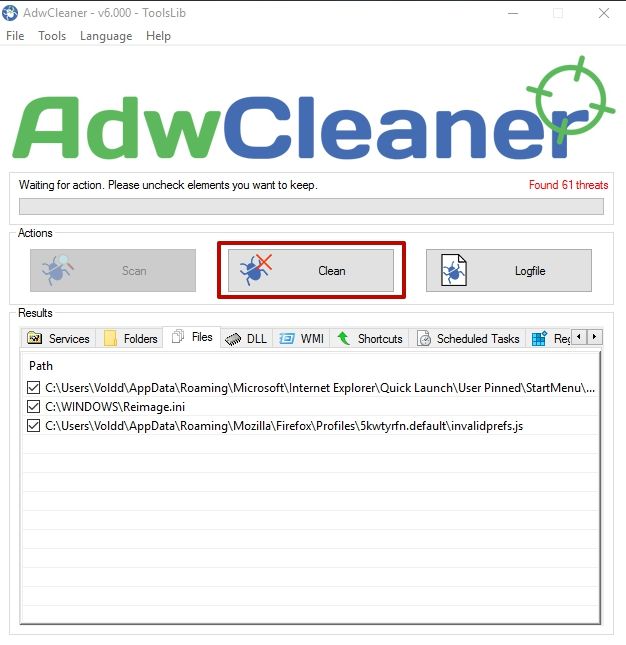
Заражение вирусами
Последняя причина «заторможенности» видео обоснована возможным заражением компьютера вирусом. Для диагностики устройства нужно:
- Установить следующие программы AdwCleaner и Dr.Web CureIt!.
- Запустить AdwCleaner, нажать кнопку «Сканировать» и после завершения операции выбрать «Очистка».

- Открыть Dr.Web CureIt!, выполнить глубокое сканирование и следовать подсказкам антивируса.
- Перезагрузить устройство.
На этом все известные мне способы исправления отставания звука от видео закончились. Надеюсь, один из методов решил вашу проблему. При наличии иного пути восстановления синхронизации между аудио и картинкой – прошу поделиться способом в комментариях. Удачи!

Updated May 2025: Stop these error messages and fix common problems with this tool. Get it now at this link
- Download and install the software.
- It will scan your computer for problems.
- The tool will then fix the issues that were found.
Have you ever noticed that the video you’re watching is on a completely different track than your audio? There can be many reasons why your audio is out of sync on Windows 10. In this blog, we’ll take a cumulative look at a few ways to effortlessly solve Windows 10 audio latency issues and sync audio to the video you’re watching.
If you’re experiencing delayed, laggy or delayed audio in Windows 10, here’s the cause and steps you can take to solve the problem.
So you’re playing a great movie to enjoy during the day, but you find that the audio comes out a few seconds later than the video. Such an out-of-sync problem is quite annoying, but it can actually be solved in a few simple steps. Here we’ve collected 5 proven solutions to the problem of delayed audio in Windows 7, 8, and 10.
Windows 10 has always had and managed low latency without getting too technical, but it should never be noticeable. With the release of Windows 10, Microsoft now allows your audio driver to detect low latency.
If an application requires the use of small buffers, the sound engine will start transmitting audio using a certain buffer size. In this case, all applications using the same terminal (device) and mode (exclusive or shared) will automatically switch to this small buffer size.
Table of Contents:
What are the Windows 10 sound problems?
There are several symptoms, but the most common and annoying sound problems that can be solved with this guide are
- After a period of silence, the sound starts playing for one or two seconds. A good example is the UAC prompt in Windows 10, where a message box may appear, but the accompanying ringing tone will not sound for a full second. This is easy to check by clicking on the audio icon in the taskbar and changing the volume: if the audio prompt indicating the volume level reaches you for more than 100 ms, you’re probably experiencing this problem.
- The decay of the first ~ half of the second sound after a period of silence.
- Audio and video are out of sync in the app or video clip.
Delayed audio and Windows 10
Before we go any further, let’s understand the reason for the delay. According to Microsoft, a slight delay in Windows 10 is common, but it should not be noticeable. Before Windows 10, the sound engine latency was ~12 ms~6 ms, now it is reduced to 1.3 ms for all applications.
Before Windows 10, this buffer was always set to ~10ms. Starting with Windows 10, the buffer size is set by the sound driver. Bingo! So it’s not just Windows 10’s responsibility, but the driver’s as well.
The good news is that Microsoft also says that if an application needs to use small buffers, it needs to use the new AudioGraph settings or the WASAPI IAudioClient3 interface. However, if the application changes this, it applies to all applications.
Diagnosing the Windows 10 audio problems and delays

The aforementioned Windows 10 audio glitches and delays are entirely driver-related. Unfortunately, bad drivers have long been the bane of Windows audio devices, and while we’ve finally reached the point where most PCs and laptops stream audio directly without having to install third-party drivers, these WHQL-certified audio drivers often still get up to scratch and cause significant problems.
In this particular case, these audio problems can be attributed to a new feature in Windows 10 called “hardware audio acceleration.” While hardware-accelerated audio and video can in principle lead to much better performance than software-accelerated audio/video playback, if not perfectly implemented, it can lead to serious problems and side effects. In this case, enabling hardware audio acceleration in Windows 10 leads to delays and lags when setting up hardware acceleration and running hardware audio acceleration.
Troubleshooting sound problems and delays in Windows 10
Updated: May 2025
This tool is highly recommended to help you fix your error. Plus, this tool offers protection against file loss, malware, and hardware failures, and optimizes your device for maximum performance. If you already have a problem with your computer, this software can help you fix it and prevent other problems from recurring:
- Step 1 : Install the PC Repair and Optimizer Tool. (Windows 10, 8, 7, XP, Vista).
- Step 2 : Click Start Scan to determine what problems you are experiencing with your computer.
- Step 3 : Click Repair Allto resolve all problems.
Solution 1
Fixing audio playback problems and delays in Windows 10 is actually quite simple after diagnosing the problem. First, right-click on the audio icon in the taskbar and select “Play Devices”:


Double-click on the primary audio device to open the “Speaker/Headset Properties” dialog box, and click the “Advanced” tab:

At the bottom of this dialog box, find the option “Allow hardware audio acceleration with this device” and uncheck it. By default, this option is enabled, which leads to the problems described above. Uncheck this option and click “OK” to save the changes.
The effects should be immediately noticeable. You can repeat the tests described above in the “Problem Description” section to see if the audio delay has been reduced.
Solution 2
Let’s start with built-in audio diagnostics. Windows 10 comes with a number of special troubleshooting packages, and one of them deals with audio problems. These include playback problems that many users have experienced, such as distorted sound, delayed sound, or even no sound at all.
Once this is done, the troubleshooter should either fix the problem or at least show the cause of the delayed sound.
Here’s how to troubleshoot audio playback problems in Windows 10 :
- Right-click Start and open Settings.
- Select Update and security.
- In the left pane, select Troubleshooting.
- Expand Audio Playback Troubleshooting and click Run Troubleshooting.
Solution 3
Most sound problems start with a bad set of drivers. And because there are so many possible combinations, we can’t say exactly what the problem is. Some users solve problems by reinstalling the driver.
Others remove the built-in Realtek sound driver completely and stick with the generic Windows driver (High Definition Audio Device). Finally, a third group uses a manual approach to install the official Realtek driver. We recommend trying all three and looking for improvements.
If you’re using USB headphones, you should also make sure you’re downloading the correct driver. The generic driver provided by Windows will not work in most cases.
To reinstall the Realtek/Intel driver :
- Right-click Start and open Device Manager.
- Expand the “Sound, video and game controllers” section.
- Right-click the Realtek/Intel audio driver and uninstall it.
- Restart your computer and the driver should install automatically.
Solution 4
There are a dozen built-in options that allow you to customize the sound control. To solve the sound delay problem, we first disable two of these options. These are exclusive control and exclusive application priority.
After disabling them, some users have noticed improvements. Exceptional Application Priority audio over system settings, while Exceptional Application Priority reduces the sound delay for different applications. For some reason, both seem to cause sound delays for some users.
Here’s what you need to do:
- Right-click the Sounds icon in the notification area and open Sounds.
- Select the Playback tab.
- Right-click the default playback device and open Properties.
- Click the Advanced tab.
- In exclusive mode, clear the two checkboxes “Allow apps to take exclusive control of this device” and “Give priority to apps in exclusive mode.
- Save your changes and exit.
Solution 5
If you recently made changes to the default playback device (speakers or headphones), try resetting it to the default settings. If you’re not sure what you changed, restoring all values to the factory defaults should help. If you’re still having problems after that, continue with the following steps.
In the meantime, here’s how to reset your playback device to factory defaults:
- Right-click the Sounds icon in the notification area and open the Sounds section.
- Select the Playback tab.
- Right-click the default playback device and open Properties.
- In the Extensions and Advanced tabs, click Restore Defaults.
- Save your changes.
Solution 6
In the previous step, we explained how to restore the default settings. However, there are still a few things you can change to reduce or even completely correct audio delays or latencies. The two remaining options in the audio settings to consider are Audio Format and Extensions. The first option, Standard Audio Format, can work with too high a sampling rate. The second option, Extensions, should be turned off completely.
Here’s how you should proceed:
- Right-click the Sounds icon in the notification area and open the Sounds tab, then the Playback tab, right-click the default device, and open Properties.
- On the Extensions tab, check the Disable all extensions checkbox.
- Now in the Extensions tab change the current default audio format to CD or DVD quality. The bitrate values can be found in the context menu.
- Save your changes and restart your computer.
Solution 7
If the previous system changes did not help you, we will now move on to the UEFI/BIOS settings. There are two more options that need to be disabled to fix the sound offset. Both options are almost unavailable in the settings, but if there is no ErP, it is usually HPET and vice versa.
Just boot into the BIOS and disable ErP/HPET and hopefully, the sound offset will no longer interfere with playback. If you don’t know how to boot into the BIOS on Windows 10, follow these steps:
- Press Windows + I to open settings.
- Select Update and security.
- In the left pane, select Restore.
- In the Advanced Boot section, click Restart Now.
- Select Troubleshooting.
- Select Advanced Options.
- Select UEFI Firmware Settings and click Restart.
- After that, disable ErP or HPET and save your changes.
- Exit and reboot the computer.
Solution 8
Another possible reason for the delayed sound in Windows 10 is a set of extra power-saving options that are activated by using power-saving mode or even balance mode. What we want to do is to go to a highly efficient plan and stick to it.
That way, no power-saving options will affect audio playback. This is especially true for laptops, but you can do it for desktops as well.
Here’s how to switch to the power-saving mode in Windows 10 :
- Right-click the battery icon and open the power options.
- Select the best plan from the list.
- If it is not available, click the Create Power Plan link in the left pane.
- Select High Power and name the plan.
- Click Next, select Preferred Options, and then click Create.
- Set it as the default plan and check for changes.
APPROVED: To fix Windows errors, click here.
Frequently Asked Questions
To reduce audio interface delays
- Reduce the buffer size. The smaller the buffer size, the lower the delay.
- Increase the sampling rate.
- Turn off the audio input device.
- Use the ASIO audio drivers in Windows.
- Use a dedicated audio interface with native drivers.
- Do not use Bluetooth devices or broadcast audio systems.
The easiest way to solve the HDMI lag problem is to turn up the TV/monitor volume so that it is slightly louder than on the AV receiver. Turn off the rear and side speakers, then run a video program with lots of dialog and little music or sound effects.
The main cause of out-of-sync or delayed audio when playing videos under Windows is the audio system driver software. In the dialog box that appears, click the Drivers tab and select Update Driver. 4. 4. Select the «Search for driver software on your computer» option.
How do I fix Bluetooth speaker lag in Windows 10?
- Connect your Bluetooth audio device to your computer.
- Troubleshoot audio playback problems in Windows.
- Update the Bluetooth driver.
- Choose the correct default audio playback device.
- Restarting the Windows Audio service.
Ever experienced that the video you are playing is on a completely different track than your audio? Now, the reasons for audio going out of sync in Windows 10 could be many. In this blog, we will cumulatively look at some effortless ways using which you can resolve Windows 10 audio delay issues and get audio in sync with the video that is playing.
Ways To Fix Audio Lag In Windows 10
1. Disable Exclusive Applications Priority And Exclusive Control

If you notice an audio lag in Windows 10, you can try disabling Exclusive control and Exclusive Applications Priority. After having disabled this setting, many users have reported fixing issues such as audio lag and sound delay in Windows 10. The steps for the same are mentioned below –
- Type adjust the volume in the search bar next to the Windows icon. The moment you will do that, on the right-hand side sound settings under related settings will appear. Click on it.
- When the Sound settings open, click on Device properties
- Under Related Settings, click on Additional device properties
- Click on the Advanced tab, under Speaker Properties and disable both the options under Exclusive mode
- Click on OK and Apply
2. Check For Corrupt Or Outdated Drivers
Just like in many other cases, a corrupt or outdated audio driver can lead to a sound delay in Windows 10. We can tackle this in two ways manually and with the help of a driver updater software.
Manually Updating Audio Driver in Windows 10
- Open Device Manager by pressing Windows + X keys and click on Device Manager
- Locate Sound, video and game controllers
- Locate your device, right-click on it and then click on Properties
- Under the Driver tab, you can try to Disable Device or Update Driver. Either of the two should work
Note: Should something go wrong, you can rollback to the previously installed driver by clicking on the Roll Back Driver option.
Also Read: Step By Step Guide To Rollback NVIDIA Driver on Windows 10
Now, the chances of making errors can be high when you choose to update audio drivers in Windows 10 manually. So, you can move on to a safer option which is –
Use Driver Updater Software To Update Audio Driver
There are several excellent driver updater software out there. So, let’s take an example of Advanced Driver Updater from Systweak. At the outset, it scans your PC for outdated drivers and helps you install and update drivers, all in a matter of a few clicks.
Here Is How Advanced Driver Updater Works –
- As you click on Start Scan Now button, Advanced Driver Updater scans your PC for outdated driver

- It then lists out all the outdated drivers with an option to Update driver
- After you click on Update Driver, it downloads updated drivers

- And voila! You are done!


You can even choose to backup and restore drivers. This option can be a life savior should something go wrong and where we need to revert the changes.
3. Run Audio Troubleshooter in Windows 10

The first course of action that you can take to fix Windows 10 audio lag is to use the inbuilt sound troubleshooter. Amongst various other sound issues such as the absence of system sound and sound distortion, the audio troubleshooter may also resolve the Windows 10 audio delay. Here are the steps for the same –
- Open Windows Settings by pressing Windows key + X and then clicking on Settings
- Select Update & Security
- From the left pane choose Troubleshoot
- Under Get up and running click on Playing Audio and then click on Run the troubleshooter under it
This might or might not be the ultimate resolve. But, at least it will tell you the exact reason why there is an audio delay in Windows 10. Here’s what you can do to improve your PC’s sound performance.
Also Read: How To Solve No Sound Problem In Windows 10
4. Disable All Enhancements

This solution can especially work out if you are facing video and audio out of sync in Windows 10. To disable all enhancements –
- Type Control Panel in the search bar next to the Windows icon
- Click on hardware and sound or simply sound
- Select your audio device; here, mine is Conexant SmartAudioHD. Right-click on it and go to the properties
- Go to the Enhancements tab
- Select Disable all sound effects and enhancements
- Click on Apply and then Okay
Here We Wrap Up
Apart from the aforementioned ways, there could be several other ways to resolve audio lag in Windows 10 audio lag. But, what we can assure you is that these are some of the simple ways that even a beginner user can apply. Do let us know in the comments section below which of the above ways helped you fix sound delay issues in Windows 10. For more such troubleshooting content, keep reading We The Geek and Follow us on social media – Facebook, Instagram and YouTube.
Download Windows Speedup Tool to fix errors and make PC run faster
Almost every action in Windows 11/10 is followed by a sound, especially on laptops. Now, what if you are experiencing a noticeable delay in that sound? I am not talking about a delay of a minute, but noticeable which could be 1-2 seconds. If that’s the case, in this post, we will offer a solution that can fix sound delays on a Windows 10 PC.
Sound Delay and Windows 11/10
Before we go ahead, let’s understand the reason behind the delay. According to Microsoft Low Latency delay is a routine in Windows 11/10, but it should not be noticeable. Before Windows 11/10, the latency of the Audio Engine was equal to ~12ms-~6ms, which is now reduced to 1.3ms for all applications.
Before Windows 11/10, this buffer was always set to ~10ms. Starting with Windows 11/10, the buffer size is defined by the audio driver. Bingo! So it’s not just Windows responsible, but it is also the driver.
The good news is that Microsoft also says that If an application needs to use small buffers, then it needs to use the new AudioGraph settings or the WASAPI IAudioClient3 interface, to do so. However, if one application changes it, it will be applicable to all the apps. More on the official page.
Somebody reported this in our TWC forum as well, and when we researched a bit, it ultimately led me to an application that works in the background to reduce the latency.
The application is called REal or REduce Audio Latency. It is available on GitHub – but needs some skill to install it. It will work well with the High Definition Audio Device offered by Microsoft. To use it, you will have to:
- Run it directly from the Command prompt.
- Install HDAudio driver and run it.
1] Run REal or REduce Audio Latency from Command prompt

Once you download the application, open the location in the Command prompt. Type Real.exe –tray. This will keep the application running in the background. It will enable minimum auto latency enabled on the default playback device.
2] Install HDAudio driver and run it

- Use Win +X and then click on the Device Manager.
- Under Sound, video and game controllers, right-click and select Update Driver.
- Next, Browse my computer for driver software -> Let me pick from a list of available drivers on my computer.
- Select High Definition Audio Device and click Next.
- If a window titled “Update Driver warning” appears, click Yes.
- Select Close.
- If asked to reboot the system, select Yes to reboot.
You should know that the new driver might reset your volume to uncomfortably high levels.
You can download this tool from the GitHub page. The project was updated on April 14th, 2019.
Related read: Troubleshoot Windows Sound and Audio problems.
Anand Khanse is the Admin of TheWindowsClub.com, a 10-year Microsoft MVP (2006-16) & a Windows Insider MVP (2016-2022). Please read the entire post & the comments first, create a System Restore Point before making any changes to your system & be careful about any 3rd-party offers while installing freeware.