
Sync files with OneDrive in Windows
Applies ToOneDrive for Business SharePoint Server Subscription Edition SharePoint Server 2019 SharePoint in Microsoft 365 Microsoft365.com Microsoft 365 admin Office 365 operated by 21Vianet Office 365 operated by 21Vianet — Admin OneDrive (work or school) OneDrive (home or personal) OneDrive (work or school) operated by 21Vianet OneDrive for Windows SharePoint admin center SharePoint in Microsoft 365 Small Business SharePoint operated by 21Vianet
Important: Beginning January 1, 2022, we are ending support for selected OneDrive desktop apps running on Windows 7, 8, and 8.1. Learn more.
With OneDrive, you can sync files between your computer and the cloud, so you can get to your files from anywhere — your computer, your mobile device, and even through the OneDrive website at OneDrive.com. If you add, change, or delete a file or folder in your OneDrive folder, the file or folder is added, changed, or deleted on the OneDrive website and vice versa. You can work with your synced files directly in File Explorer and access your files even when you’re offline. Whenever you’re online, any changes that you or others make will sync automatically.
This article describes how to download the OneDrive sync app and sign in with your personal account, or work or school account, to get started syncing. If you use Microsoft 365 Apps for business, you can also sync files from your SharePoint sites. If you’re not using Microsoft 365 Apps for business, see Sync SharePoint files with the OneDrive for Business sync app (Groove.exe).
-
Install and set up
-
Key points in OneDrive Setup
-
See and manage your OneDrive files
Install and set up
-
If you’re using Windows 10 or 11, your computer already has the OneDrive app installed — skip to step 2.
If you don’t have Windows 10, 11, or Office 2016, install the Windows version of the new OneDrive sync app.
-
Start OneDrive Setup.
-
If you have no accounts signed in to OneDrive
-
If you already have an account signed in to OneDrive
-
If you have no accounts signed in to OneDrive
If you don’t have an account signed in to OneDrive, use these instructions to start OneDrive.
-
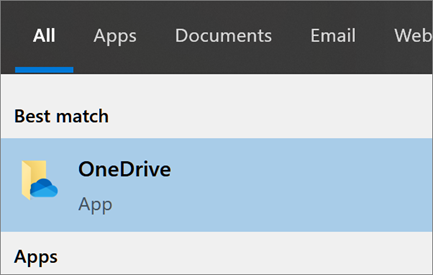
Select the Start button, search for “OneDrive”, and then open it:
-
In Windows 10 or 11, select OneDrive.

-
-
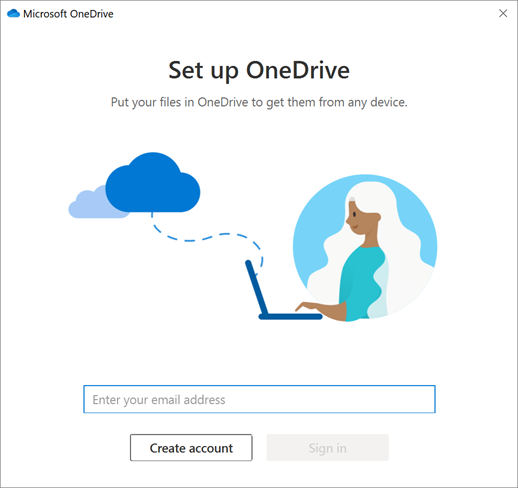
When OneDrive Setup starts, enter your personal account, or your work or school account, and select Sign in.

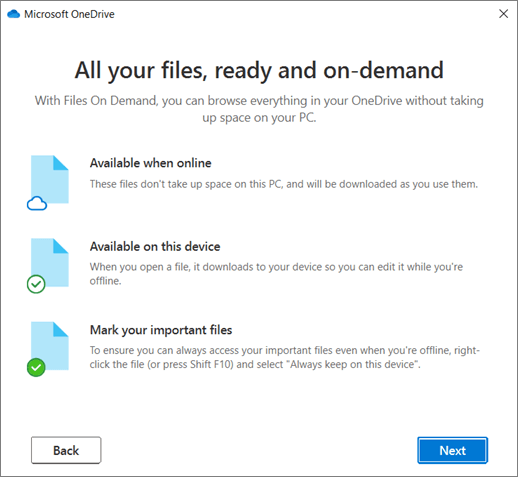
Key points in OneDrive Setup
There are two screens in OneDrive Setup that are helpful to watch for:
-
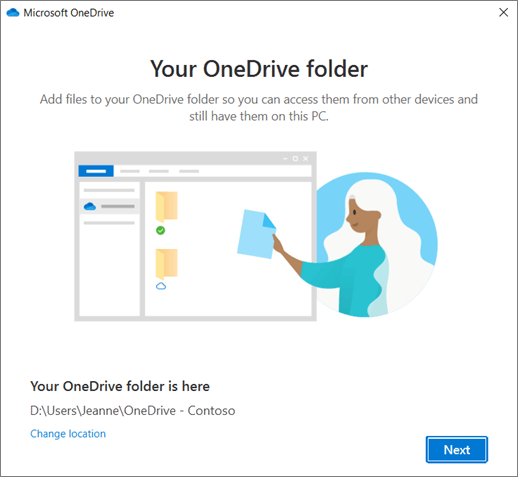
On the This is your OneDrive folder screen, select Next to accept the default folder location for your OneDrive files. If you want to change the folder location, select Change location — this is the best time to make this change.
-
On the All your files, ready and on-demand screen, you’ll see how files are marked to show them as online-only, locally available, or always available. Files On-Demand helps you access all your files in OneDrive without having to download all of them and use storage space on your Windows device. Select Next.
Note: If you were already syncing OneDrive for work or school to your computer (using the previous sync app) and you’ve just installed the sync app, you won’t see the This is your OneDrive folder or the Sync files from your OneDrive screen during OneDrive Setup. The sync app automatically takes over syncing in the same folder location you were using before. To choose which folders you’re syncing, right-click the blue cloud icon in the taskbar notification area, and select Settings > Account > Choose folders.
See and manage your OneDrive files
You’re all set. Your OneDrive files will appear in File Explorer in the OneDrive folder. If you use more than one account, your personal files appear under OneDrive – Personal and your work or school files appear under OneDrive — CompanyName.
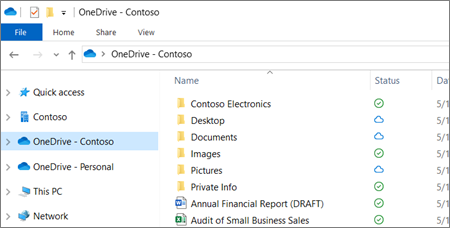
You now have a new white or blue cloud icon (or both) in your notification area and your files are synced to your computer. Your blue cloud icon will appear as OneDrive – CompanyName when you hover over the icon.
Note: Contoso is an example name — yours will show the name of your organization.
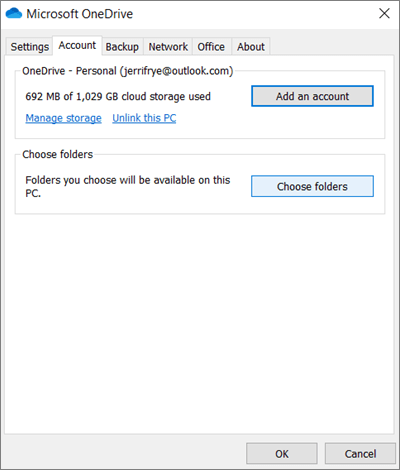
Any time you want to change the folders you sync on your computer, right-click that cloud icon in the taskbar notification area, and select Settings > Account > Choose folders. Find other information about your account and change other OneDrive settings from here.
Learn more
-
How to fix «A newer version of OneDrive is installed»
-
Learn about OneDrive Files On-Demand
-
Back up your Documents, Pictures, and Desktop folders with OneDrive
-
Choose which OneDrive folders to sync to your computer
-
Fix OneDrive sync problems
Need more help?
Important:
Support for the old OneDrive for Business sync app with SharePoint Online has ended. If you see this icon in your taskbar, read this article to learn more.
Need more help?
Want more options?
Explore subscription benefits, browse training courses, learn how to secure your device, and more.
- Are OneDrive files stored locally Windows 10?
- Where are OneDrive files stored?
- How do I get my documents folder from OneDrive?
- How do I stop OneDrive from syncing My Documents folder?
- How do I save files to my computer instead of OneDrive?
- Is OneDrive stored on my computer?
- How do I move files from OneDrive to my computer?
- How do I move files from OneDrive to Windows 10?
- Why are my documents in OneDrive?
- What happens if I unlink my PC from OneDrive?
- How do I recover files from OneDrive folder?
- Why are my documents not saving to OneDrive?
Are OneDrive files stored locally Windows 10?
The OneDrive sync client is included with every edition of Windows 10, allowing you to keep a local copy of files and folders stored in either OneDrive or OneDrive for Business. By default, your files are stored in a top-level folder in your user profile. … In OneDrive Settings, click Add an account.
Where are OneDrive files stored?
Right-click the System Tray icon for OneDrive and select Settings. Click the Account tab and then select Choose folders. Here you’ll see the files and folders that you moved into your OneDrive folder. If you wish to sync everything stored in your OneDrive folder, click the checkbox for Make all files available.
How do I get my documents folder from OneDrive?
From Onedrive go to settings—>account then click on the unlink tab. After that configure your account again, when the wizard ask you for the location select the C:\Users\jjcla\Documents path then click ok next choose this location. Was this reply helpful? Great!
How do I stop OneDrive from syncing My Documents folder?
Stop syncing a folder in OneDrive
- Open the settings options of your OneDrive for Business client. Right click (Windows) or double finger tap (Mac) the OneDrive icon near the clock.
- Click Settings option.
- Navigate to the Account tab.
- Find the folder sync you want to disable, and click Stop sync.
How do I save files to my computer instead of OneDrive?
First, open any Office program like Word. Then click on File and click on Options. Now go ahead and click on Save in the left-hand pane and then check the box that says Save to Computer by default. You can also change default local file location if you like in the box below the checkbox.
Is OneDrive stored on my computer?
When you save your files to OneDrive, they’re stored in the cloud on Microsoft’s servers and—sometimes, but not always—locally on your PC. It’s a bit confusing because where your files are stored depends on the version of Windows you’re using and your OneDrive settings.
How do I move files from OneDrive to my computer?
Here’s how.
- Right click the OneDrive taskbar icon and select Settings.
- Click the Unlink OneDrive button under the Account tab. …
- Launch File Explorer.
- Navigate to and select the OneDrive folder. …
- Click the Move to button on the Home tab.
- Select Choose location.
- Select the new location and click Move.
How do I move files from OneDrive to Windows 10?
Select the files you want to upload, and drag them to OneDrive in the File Explorer Navigation pane.
…
- Select File > Save a Copy > OneDrive — Personal.
- Select Enter file name here and type a name.
- If you want to save to another folder, select Browse, and select the folder you want.
- Select Save.
Why are my documents in OneDrive?
In Windows 10, OneDrive is the default save location for your files and documents. This means new documents or files are automatically saved to OneDrive unless you opt to save them to a different location on your PC.
What happens if I unlink my PC from OneDrive?
Unlink OneDrive
You won’t lose files or data by unlinking OneDrive from your computer. You can always access your files by signing in to OneDrive.com. Select the white or blue OneDrive cloud icon in the taskbar or menu bar. … If the icon doesn’t appear in the notification area, OneDrive might not be running.
How do I recover files from OneDrive folder?
Go to the OneDrive website, and sign in with either your Microsoft account or your work or school account.
- In the navigation pane, select Recycle bin.
- Select the files or folders you want to restore by pointing to each item and clicking the circle check box that appears, and then click Restore.
Why are my documents not saving to OneDrive?
If OneDrive isn’t syncing any files, it could be a connection problem, which you may be able to fix by restarting the app. To restart the OneDrive sync client on Windows 10, use these steps: Click the OneDrive button in the bottom-right corner. Click the More option.
You are here:
Home » Windows 10 » Save Desktop, Documents & Pictures To OneDrive In Windows 10
We all often save crucial documents and pictures in Documents, Pictures and Desktop folders. All these folders are located in your system drive (where Windows 10 is installed) by default, meaning when you reinstall Windows 10 or perform a clean install of Windows 10, these folders and files in them are deleted.
Because of this, there is a provision in Windows 10 and earlier versions to change the default location of Desktop, Documents, and Pictures folders. However, very few users relocate these folders and lose their data while reinstalling Windows operating system. To change the default location, refer to our how to move Desktop, Documents, Downloads, and Pictures folders to another drive guide.

If you are on Windows 10 and using OneDrive, you can change the default location of Desktop, Documents, and Pictures folders to OneDrive from the system folder. As you know, having data in a cloud account is one of the best ways out there to protect your data.
The benefit of saving Desktop, Documents and Pictures folders in OneDrive is that you don’t need to manually back up these folders or files in these folders as they are automatically being backed up.
When you choose OneDrive as the default location, Windows 10 creates Desktop, Documents, and Pictures folders in your OneDrive account. All feature files and folders that you might save in these folders will be automatically saved in the OneDrive account.
Users who have tens of GBs of free space in OneDrive should consider changing the default location of Desktop, Documents, and Pictures folders to OneDrive in Windows 10.
IMPORTANT: When you delete a file or folder from one of these folders, it will be removed from OneDrive as well.
Complete the directions to save Desktop, Documents, and Pictures folders to your OneDrive account.
Step 1: Right-click on the OneDrive icon in the system tray area of the taskbar and then click Settings to open OneDrive properties dialog.

Step 2: Switch to the Auto Save tab. Under Desktop, Documents, and Pictures section, you will see options to select a location to save your Desktop, Documents, and Pictures folders.

Select OneDrive from the drop-down box next to these three folders or select OneDrive for the folder that you wish to save in OneDrive.
We recommend you save at least Documents and Pictures folders to OneDrive, especially if you have TBs of space in your OneDrive account.
Click OK button.
Step 3: Next, you will get the following dialog box. Click Choose folders button.

Step 4: Sync your OneDrive files to this PC dialog will appear on your screen now. Select Desktop, Documents, and Pictures folders (or the folders that you want to save in OneDrive) and then click OK button.

That’s it! From now on, files that you save in these folders are automatically saved in your OneDrive account. Please note that existing files in these folders will not be saved in OneDrive account.
If you open the File Explorer, you will see green check marks on Desktop, Documents, and Pictures (or folders that you selected) to indicate these folders are synced.
Being a Windows 10 user, I consider OneDrive to be an extremely valuable tool for synchronizing and safeguarding my documents. With OneDrive, I can conveniently access my files from any device, with the assurance that they are regularly updated and safely stored in the cloud. In this article, I will walk you through the steps of syncing your documents with OneDrive on Windows 10, while incorporating my own personalized tips and thoughts.
Setting Up OneDrive
The first step is to ensure that OneDrive is set up on your Windows 10 device. By default, OneDrive is pre-installed on Windows 10, so you may already have it installed. If not, you can download and install it from the Microsoft website.
Signing in to OneDrive
Once OneDrive is installed, launch the application and sign in using your Microsoft account. If you don’t have a Microsoft account, you can easily create one for free. Signing in to OneDrive allows you to access all the features and benefits it offers, such as automatic syncing and sharing.
Syncing Your Documents
Now that OneDrive is set up and you’re signed in, it’s time to sync your documents. By syncing your documents, you ensure that any changes made to your local files are automatically reflected in your OneDrive account, and vice versa.
Selecting Folders to Sync
To select which folders you want to sync with OneDrive, simply right-click on the OneDrive icon in the system tray and select “Settings”. In the settings window, go to the “Account” tab and click on “Choose folders”. Here, you can select the specific folders you want to sync with OneDrive.
Personally, I like to sync all my important documents, such as my work files and personal projects. By doing so, I can access and work on these files from any device, knowing that they are safely backed up in the cloud.
Syncing Options and Preferences
OneDrive offers various syncing options and preferences that can be customized to fit your needs.
Files-on-Demand
OneDrive’s “Files-on-Demand” feature allows you to view and access all your files stored in OneDrive, even if they are not downloaded to your local device. This feature saves valuable storage space on your device and ensures that you can always access your files when needed. Personally, I find this feature to be incredibly convenient, especially when working with limited storage space.
Upload and Download Speeds
In the OneDrive settings, you can also customize the upload and download speeds. If you have a fast internet connection, you might want to increase the upload speed to ensure that your files are synced quickly. On the other hand, if you have a slow internet connection, you can decrease the upload and download speeds to avoid consuming too much bandwidth.
Accessing Your Synced Documents
Once your documents are synced with OneDrive, you can access them from any device with an internet connection. Simply log in to your OneDrive account using a web browser or the OneDrive app, and you’ll have instant access to all your synced files.
Collaboration and Sharing
OneDrive also offers collaboration and sharing features, allowing you to easily share files and collaborate with others. Whether you want to share a document with a colleague or collaborate on a project with a team, OneDrive makes it simple to do so. Just right-click on a file or folder, select “Share”, and choose the desired sharing options.
Conclusion
Syncing your documents with OneDrive on Windows 10 is an excellent way to ensure that your files are always accessible and backed up. With its seamless integration and customizable options, OneDrive provides a reliable and convenient solution for syncing and managing your documents.
Personally, I have found OneDrive to be a game-changer in terms of document management. It has made my life much easier by providing a secure and reliable way to access my files from anywhere. Whether I’m working on my laptop, tablet, or phone, I can always rely on OneDrive to keep my documents in sync.
If you haven’t already done so, I highly recommend giving OneDrive a try. Its user-friendly interface and powerful features make it an invaluable tool for any Windows 10 user.
Every account on Windows 10 comes with a default set of folders — you know them: Desktop, Documents, Downloads, Music, Pictures, and Videos — to organize your files. In addition, the operating system includes a OneDrive folder to store your synced files locally, which are always kept up to date automatically.
But what if we could merge the two, so your Desktop is still your Desktop, but it’s constantly synced to the OneDrive cloud instead of manually backed up? Thankfully you can do just that, and it’s easier than you might expect.
In this Windows 10 guide, we’ll walk you through the easy steps to move the default user folders in your profile to OneDrive to keep all your files protected and backed up in the cloud.
How to move default user folders to OneDrive
- Open File Explorer.
- Navigate the following path:
C:\Users\<AccountNane>Quick Tip: Alternatively, you can always use the Windows key + R to open the Run command, type %HOMEPATH%, and click OK to open the current home folder location. - Open the OneDrive folder.
- Create a folder with a descriptive name (e.g., MyFiles) to group your folders you’re about to move.
- Inside the newly created folder, create a folder for each location you want to move to OneDrive. For example, if you’re moving the Documents folder, then create a new Documents folder inside of OneDrive.
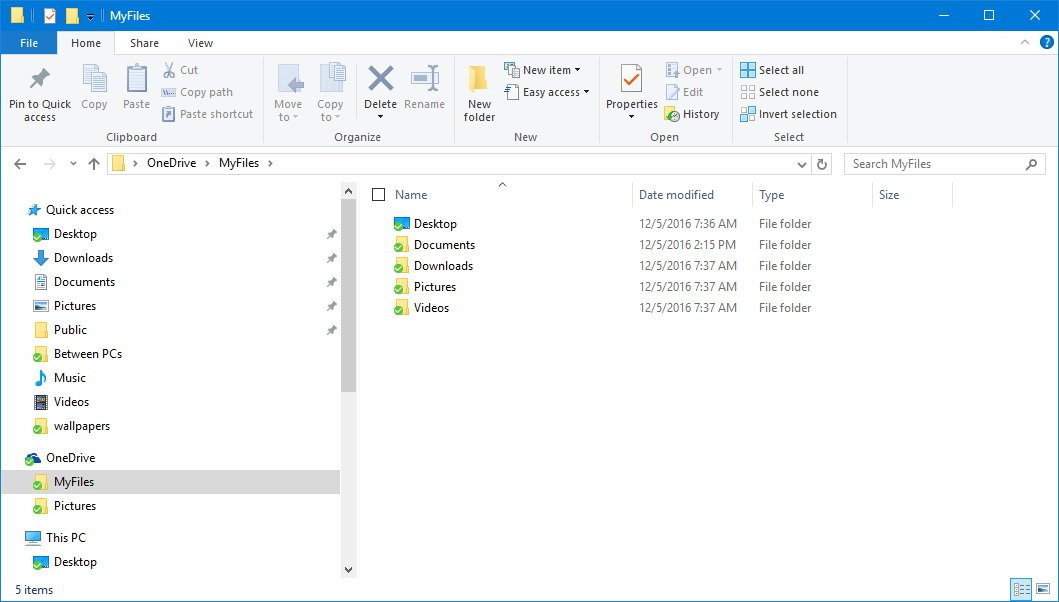
- Go back to your account name the folder where all the default folders are currently located.
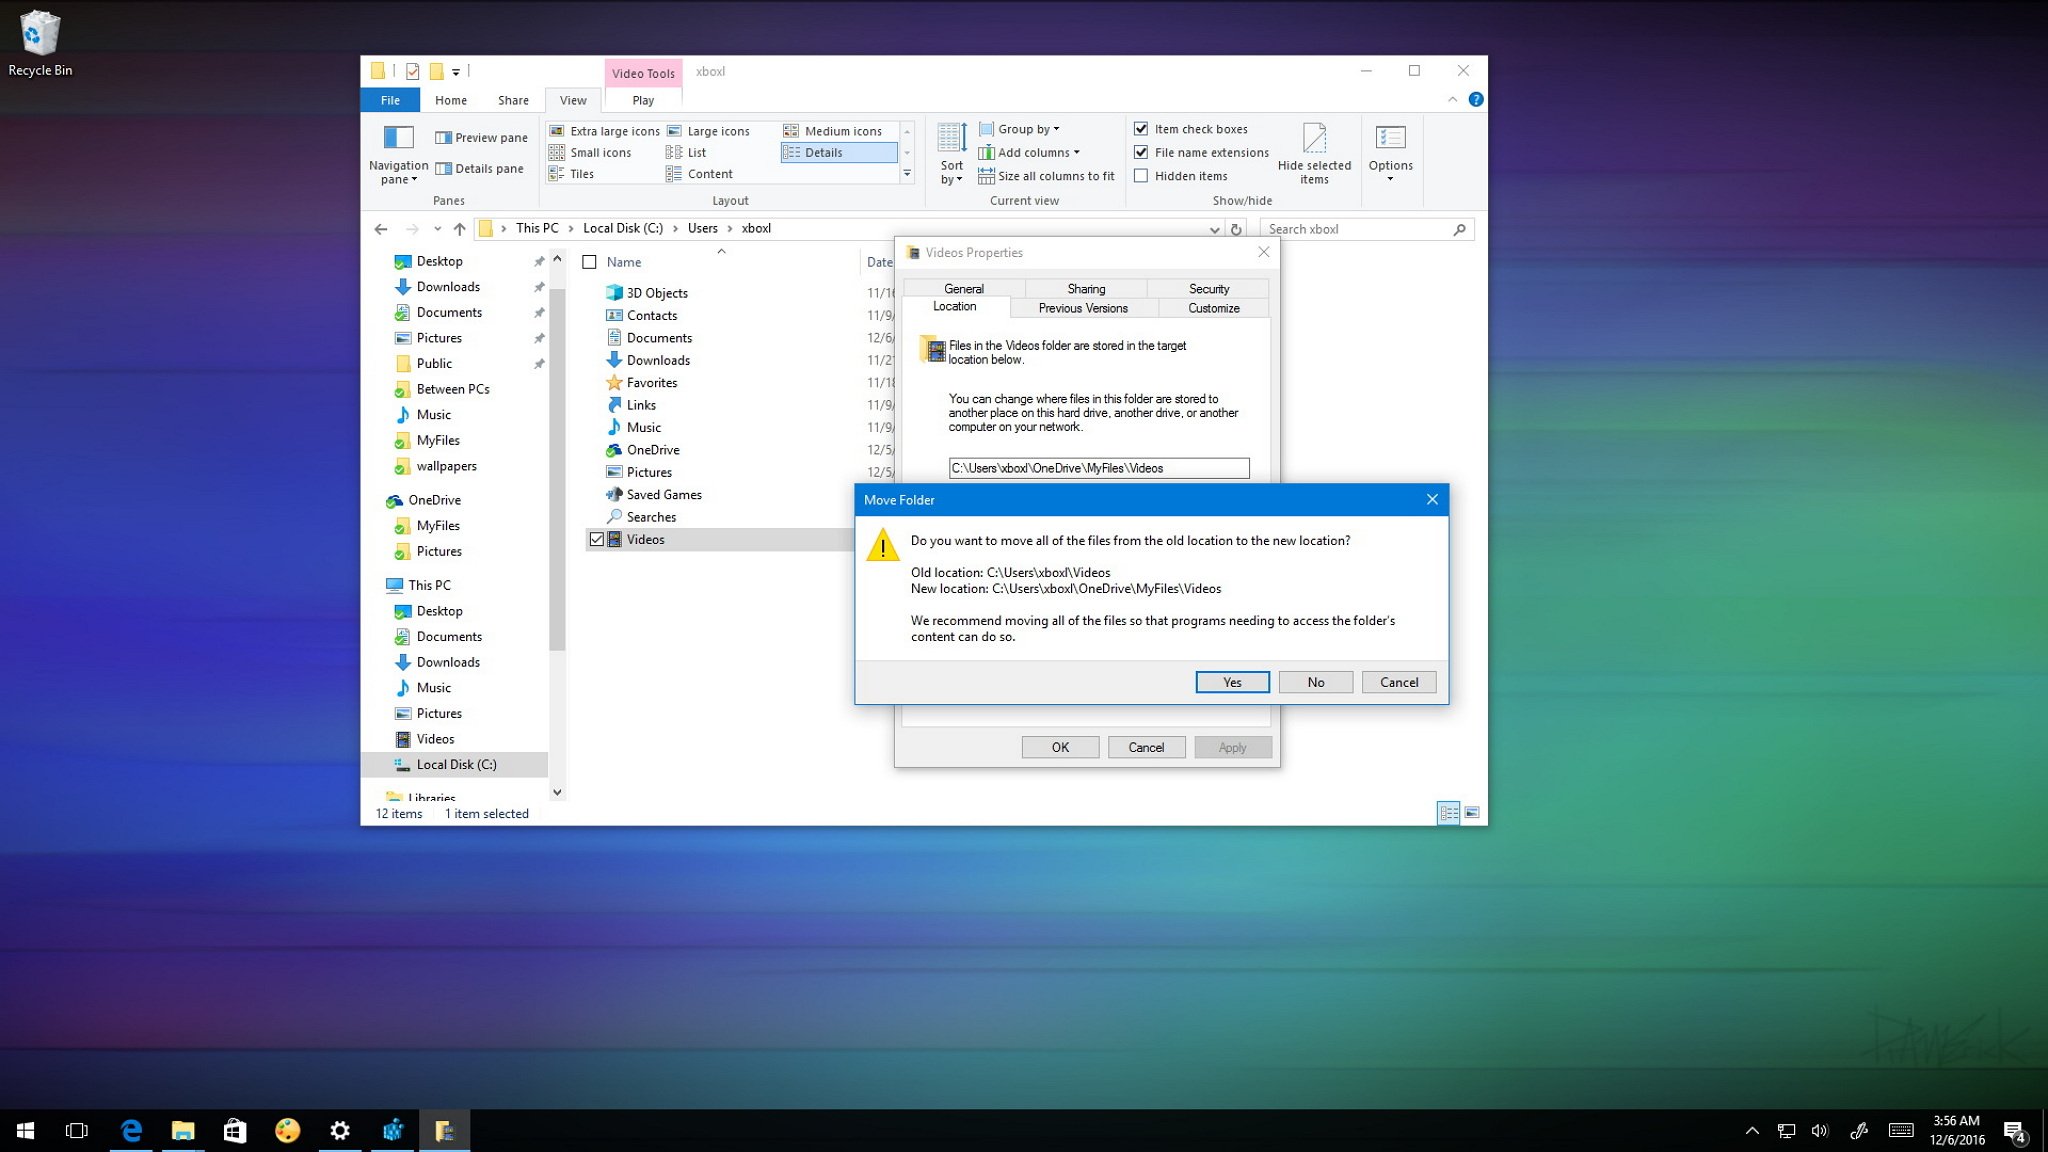
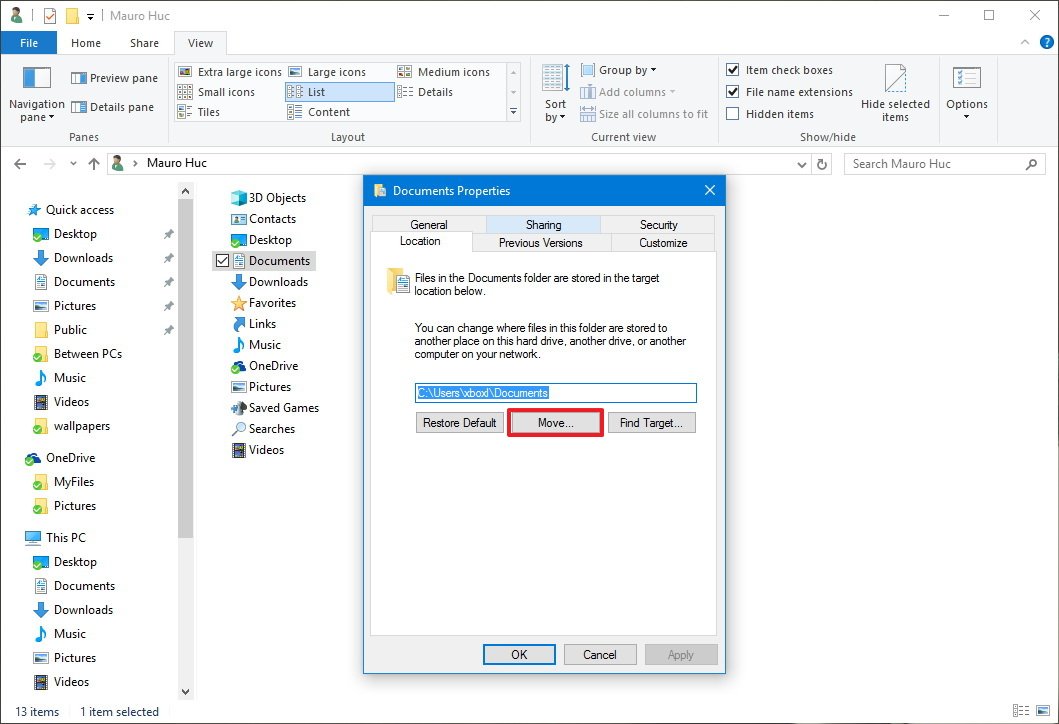
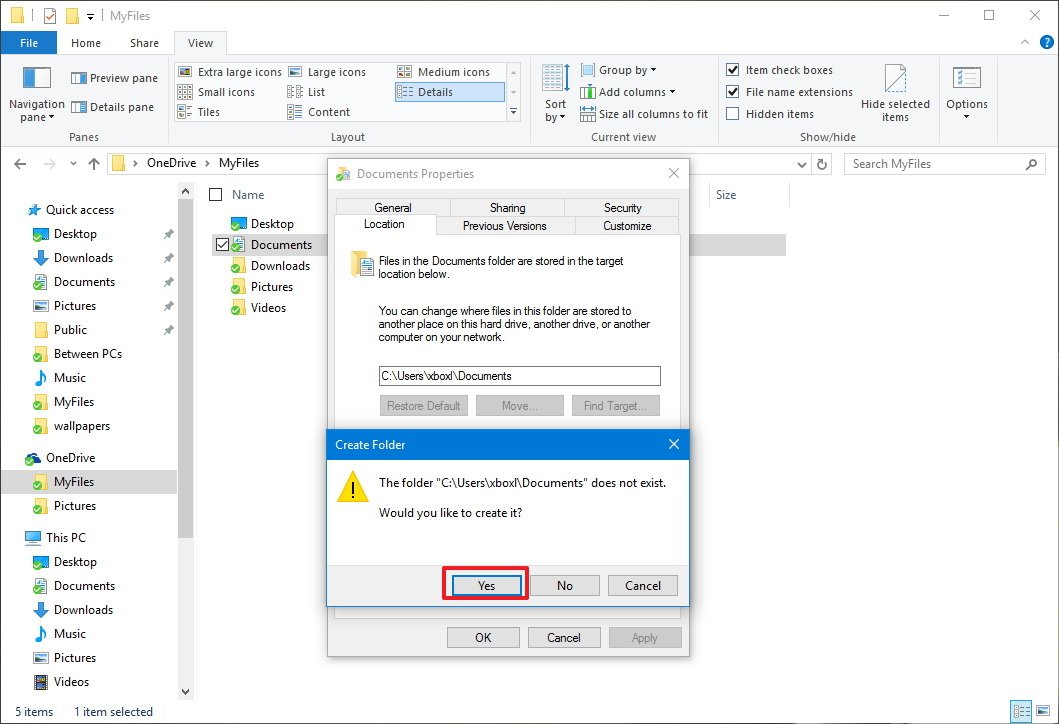
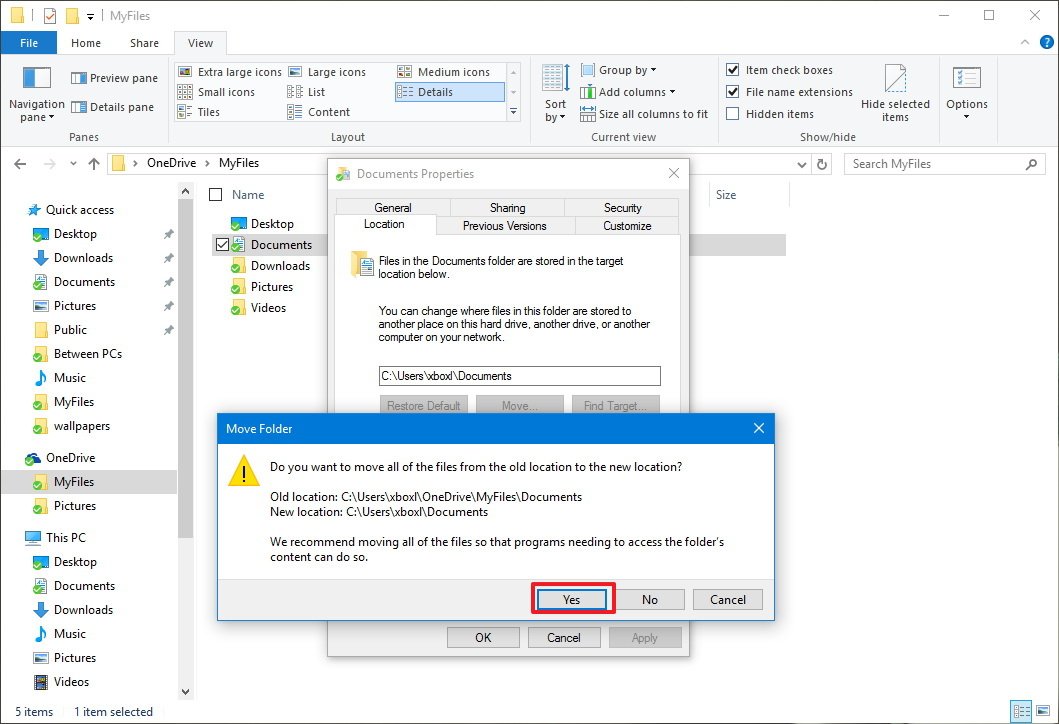
- Right-click Documents and select Properties.

- Click the Location tab.
- Click the Move button.
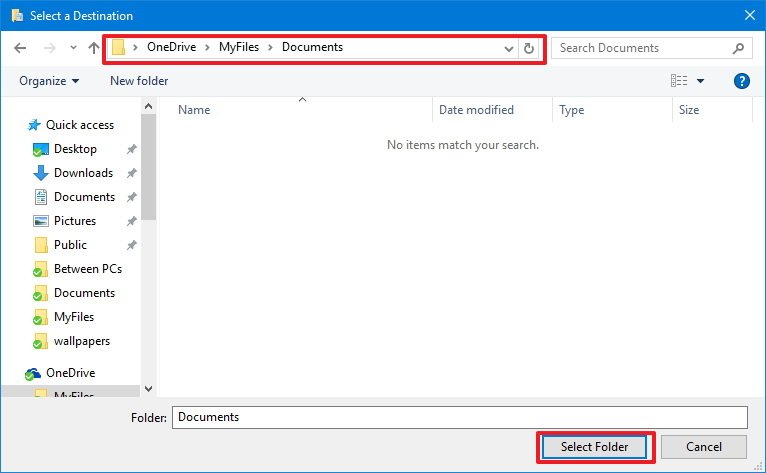
- Browse the OneDrive folder and open the newly created Documents folder.
- Click the Select Folder button, and you’ll notice that the default location path has now changed.
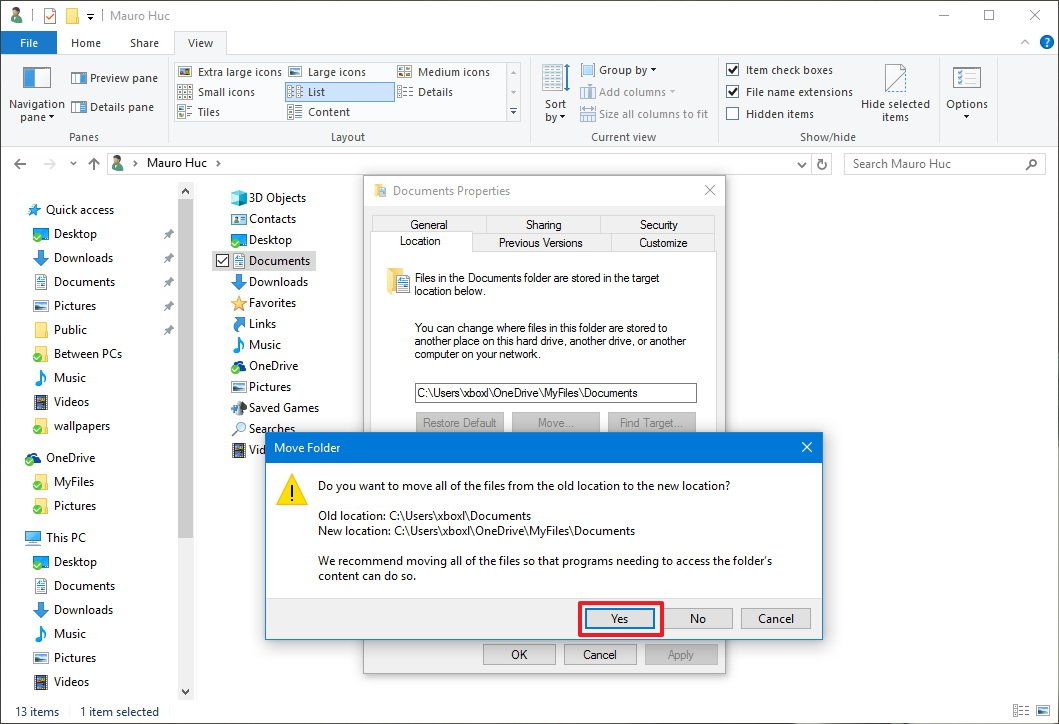
- Click Apply.
- You’ll be prompted to move any content from the old to the new location. Click Yes to continue.
- Click OK to complete the task.
It’s that simple. You can now repeat the same steps mentioned above to move remaining folders, including Desktop, Downloads, Music, Pictures, and Videos to the new location.
If you download a lot of stuff from the internet, you probably may want to consider to skip moving the Downloads folder, as usually, they’re not very important, and most of the time you can download them again.
You can always revert the process if you change your mind using the following steps:
- Open OneDrive.
- Navigate to the folders you want to restore their old location.
- Right-click the folder and select Properties.
- Click the Location tab.
- Click the Restore Default button.
- Click Apply.
- You’ll be prompted to recreate the original folder in the old location. Click Yes to continue.
- Click Yes to confirm that you want to move the folder and its content from the old to the new location.
- Click OK to complete the task.
- Repeat the steps for each folder you want to move back to its original location.
Wrapping things up
There are a number of advantages using this solution. You will not only be able to keep all your files in the default folders seamlessly backed up in the cloud, but if you have the same configuration on other computers your files will be organized and synced across devices too, and accessible from any web browser through <OneDrive.com>.
All the latest news, reviews, and guides for Windows and Xbox diehards.
Additionally, this will help you to prevent file duplication (which sometimes can be a nightmare) and apps that use the default save storage locations will now save directly to OneDrive without extra steps on your part.
While anyone with a free OneDrive account can follow these steps, the free 5GB will get eaten up quickly — so those with an Office 365 subscription or paid OneDrive storage plan will be best able to take advantage.
Do you think Microsoft should include an option in the Settings app to automate this process on Windows 10? Tell us in the comments!
More Windows 10 resources
For more help articles, coverage, and answers on Windows 10, you can visit the following resources:
- Windows 10 on Windows Central – All you need to know
- Windows 10 help, tips, and tricks
- Windows 10 forums on Windows Central
Mauro Huculak has been a Windows How-To Expert contributor for WindowsCentral.com for nearly a decade and has over 15 years of experience writing comprehensive guides. He also has an IT background and has achieved different professional certifications from Microsoft, Cisco, VMware, and CompTIA. He has been recognized as a Microsoft MVP for many years.