
How many processors does Windows 10 support? It’s a simple question, but the correct answer is surprisingly hard to come by.
What led me to ask this question was curiosity: I wondered whether it would be possible to run Windows 10 on a Supermicro 7089P-TR4T – a single-node server with eight Intel Xeon Scalable sockets in an S8S configuration.
Windows Server licenses come with a baseline limit of 16 physical processor cores. If you want to use more cores, you have to buy additional core licenses. For example, on an 8-socket system filled with Xeon 8280 CPUs, you’ve got 8 * 28 = 224 physical cores, which would require the purchase of thirteen additional 16-core licenses. There’s one exception here: each CPU socket must be licensed for at least 8 cores. This restriction means that you couldn’t, for example, run four quad-core CPUs on a base license – you’d need an additional 16-core license for that, to make up 8 licensed cores per socket. It’s also worth noting that only physical cores count; SMT cores (or “threads”) are not included in the licensing. Those additional licenses aren’t cheap. At time of writing a Windows Server 2019 Datacenter Additional 16 Core license costs in excess of 4000 GBP.
Windows Desktop is much less restrictive. Each edition of Windows 10 has an associated maximum number of allowed CPU sockets:
- Windows 10 Home supports 1 socket
- Windows 10 Pro and Windows 10 Education support 2 sockets
- Windows 10 Pro for Workstations supports 4 sockets
(quick terminology aside: a specific version and edition of Windows is usually referred to as a SKU, and it is common to refer to groups of related versions/editions of Windows as a set of SKUs, e.g. “Windows Desktop SKUs” means any desktop edition of Windows)
But where do these numbers come from? I could not find any official Microsoft documentation that details these limits.
At time of writing, the Wikipedia article for Windows 10 editions lists the above socket count limits, plus core count limits, for each Windows 10 edition:
| Feature | Home | Pro | Education | Pro for Workstations | Enterprise |
| Maximum CPU sockets | 1 | 2 | 2 | 4 | 2 |
| Maximum CPU cores | 64 | 128 | 128 | 256 | 256 |
So, according to these numbers, we could run Windows 10 on a four socket server, but we can’t run it on an eight socket server. Of course “unsupported” just means “a challenge”, so I started looking into how I could get around the limit.
The first thing I did was throw the ntoskrnl.exe binary from my Windows 10 Pro for Workstations install into Ghidra, and started looking for query/helper functions that determine the number of CPUs or CPU sockets on the system. My plan was to find out how the kernel keeps track of this count, then look for associated code that initialises the count during boot, and use that to find where the socket count limitation is applied. After a bunch of digging, and some help from prior work by other reverse engineers, I got a good grasp of how this all works.
Just to get everyone on the same footing, it helps to understand some terminology around cores and processors:
- A physical CPU, package, or socket refers to a whole physical CPU, i.e. a physical device that you can touch.
- A physical core or physical processor refers to an actual physical core inside a CPU, not an SMT core/thread.
- A logical core, logical processor, or processor thread refers to any logical processor that code can be executed on, including SMT threads.
- A NUMA node is a concept in non-uniform memory access (NUMA) topology referring to a set of logical processors that share the same memory controller. You usually have one NUMA node per CPU socket, but some AMD CPUs have multiple NUMA nodes per socket. Memory accesses across NUMA nodes require coordination between nodes, leading to increased latency.
With that all out of the way, let’s dig in.
In the Phase1InitializationDiscard function, the maximum number of licensed sockets is read from the Kernel-RegisteredProcessors license value and written into the KeRegisteredProcessors exported variable. This happens around the same time that BCD OSLOADER variables are read. The code looks something like this:
ULONG licenseValueType = 0;
ULONG resultSize = 0;

// get the socket count limit from the license
RtlInitUnicodeString(&krpName, L"Kernel-RegisteredProcessors");
status = ZwQueryLicenseValue(
  &krpName,                  /* license value name */
  &licenseValueType,         /* value type (0=ANY, 4=DWORD) */
  &KeRegisteredProcessors,   /* buffer */
  4,                         /* buffer size */
  &resultSize                /* output size */
);
// if getting the socket limit failed, default to 1 socket max
if (status != STATUS_SUCCESS || resultSize != 4 || licenseValueType != 4)
{
  KeRegisteredProcessors = 1;
}

// handle boot args
if (bootArgs != NULL)
{
  char* bootProcStr = strstr(bootArgs, " BOOTPROC=");
  if (bootProcStr != NULL)
  {
    char* bootProcVal = strstr(bootProcStr, "=") + 1;
    KeBootprocSpecified = atol(bootProcVal);
  }

  char* numProcStr = strstr(bootArgs, " NUMPROC=");
  if (numProcStr != NULL)
  {
    char* numProcVal = strstr(numProcStr, "=") + 1;
    KeNumprocSpecified = atol(numProcVal);
  }

  char* hvNumProcStr = strstr(bootArgs, " HYPERVISORNUMPROC=");
  if (hvNumProcStr != NULL)
  {
    char* hvNumProcVal = strstr(hvNumProcStr, "=") + 1;
    KeHypervisorNumprocSpecified = atol(hvNumProcVal);
  }

  if (KeRootProcNumaNodeLpsSpecified == 0)
  {
    char* hvRootProcNodeStr = strstr(bootArgs, " HYPERVISORROOTPROCPERNODE=");
    if (hvRootProcNodeStr != NULL)
    {
      char* hvRootProcNodeVal = strstr(hvRootProcNodeStr, "=") + 1;
      KeRootProcPerNodeSpecified = atol(hvRootProcNodeVal);
    }
    char* hvRootProcCoreStr = strstr(bootArgs, " HYPERVISORROOTPROCPERCORE=");
    if (hvRootProcCoreStr != NULL)
    {
      char* hvRootProcCoreVal = strstr(hvRootProcCoreStr, "=") + 1;
      KeRootProcPerCoreSpecified = atol(hvRootProcCoreVal);
    }
  }

  // if MAXPROC is specified, KeMaximumProcessors gets set to 1280
  // this is kinda weird! it'll come up later, though.
  if (strstr(bootArgs, " MAXPROC") != NULL)
  {
    KeMaximumProcessors = 0x500;
  }
}
(Side-note: you may notice the lack of validation on KeRegisteredProcessors here. This is not due to my own simplification of the code; at this point the KeRegisteredProcessors value is taken directly from the license. It is later capped to 0x500 in the KeStartAllProcessors function, right after the boot processor IDT is allocated.)
The ZwQueryLicenseValue function is undocumented, but Geoff Chappell saves the day as always. The license values are fetched from the following binary registry value:
HKLM\System\CurrentControlSet\Control\ProductOptions\ProductPolicy
Geoff also helpfully provides a description of the ProductPolicy data format. It’s a pretty simple structure – a header followed by an array of value entries. Each entry is comprised of a header, a UTF-16 entry name, and the entry value. I wrote a C# script to dump ProductPolicy data if you want to take a look inside the contents of your own system’s ProductPolicy.
Can this policy be edited? Yes, as it turns out! The process is roughly as follows:
- Disable the
sppsvcservice. - In
HKLM\SYSTEM\Setup, change theSetupTypeREG_DWORD value to 1. - In
HKLM\SYSTEM\Setup, change theCmdLineREG_SZ value to “cmd.exe” - Reboot the system.
- Modify the
Kernel-RegisteredProcessorsentry inProductPolicy. - Revert the registry changes in
HKLM\SYSTEM\Setupfrom steps 2 and 3. - Reboot the system.
Step 5 can be done directly in the Registry Editor. The dump script I linked above will tell you the offset of each entry, its name string, and its value. In my case the Kernel-RegisteredProcessors entry header is at 0x0000269E, its name is at 0x000026AC, and the value at 0x000026E2.

Note that sppsvc (the Software Protection Service) must remain disabled for this edit to work; if the service is allowed to run, the license tamper state will be set and the system will deactivate. This also means you can’t run Windows Update or other similar operations while you’ve got this hack in place. Cracked copies of Windows that bypass the license tampering check might work, but I haven’t tried for obvious reasons.
That being said, what fun is there in hacking octa-socket support in to Windows 10 if you can’t use all the cores? Eight 28-core / 56-thread CPUs would make for a whopping 448 logical processors – way beyond the supposed 256-core maximum. Looking through the ProductPolicy entries, though, I couldn’t find anything related to cores or logical processors. This got me intrigued – Wikipedia lists different core count limits for different editions, but nothing in the license data appears to actually restrict the core count. Where do those quoted numbers come from?
First up, I decided to check the citations. The table on Wikipedia generically cites some Microsoft comparison tables that do not contain any information on CPU limits, along with a Groovypost article as a source for socket count limits. That article does not cite any sources, nor does it document any core count limit, but it does talk about socket count limits.
Looking around online, the closest thing to an official source I could find is a Microsoft Community forum post in which a Microsoft MVP (not an employee) says:
Windows 10 supports maximum memory configurations that were formerly available only in the realm of servers. Windows 10 Home supports up to 128GB of RAM on the x64 platform. Windows 10 Pro and Enterprise both support up to 512GB on the x64 platform. The x86 versions of Windows 10 support a maximum of 4GB of RAM. Windows 10 supports a maximum of two physical CPUs, but the number of logical processors or cores varies based on the processor architecture. A maximum of 32 cores is supported in 32-bit versions of Windows 8, whereas up to 256 cores are supported in the 64-bit versions.
– Andrea Da Costa (July 9th 2015)
The eagle-eyed among you might notice two things. The first is that “a maximum of two physical CPUs” doesn’t match the socket counts in the Groovypost article, nor does it match the Wikipedia page. The second is the forum poster’s name – the Groovypost article was written by the same person.
As such, it appears that the three most authoritative sources on socket and core count limitations in Windows 10 SKUs – the Wikipedia article, the article it cites as a source, and the Microsoft Community forum post that appears right at the top of search results – are all effectively sourced to one person writing in an unofficial capacity. That doesn’t necessarily mean the numbers are wrong (ominous foreshadowing heavily implied) but it does mean they’re unreliable.
I was also confused by the values given for Windows 10 Enterprise. Why would it only support two sockets, but still support 256 cores? The Groovypost article is the source of the two sockets claim, but I was able to find lots of examples online of people running Enterprise on systems with four sockets. In the end I found concrete evidence that Kernel-RegisteredProcessors is set to 4 on Windows 10 Enterprise, in a forum post where someone dumped the default product policy data from a Windows 10 Enterprise install:
<sl:policyInt attributes="override-only" name="Kernel-RegisteredProcessors">4</sl:policyInt>
So where are these core count limits coming from?
Thinking back a little, we saw that KeMaximumProcessors gets set to 1280 by the kernel when the MAXPROC directive is set in the BCD options. This BCD value is a boolean, and is also known as BcdOSLoaderBoolean_ForceMaximumProcessors (entry ID 0x26000062). It causes the system to report the maximum possible number of CPUs as existing, presumably for debug purposes. This implies that the kernel technically supports up to 1280 logical processors! But where does that number come from? The answer is processor groups.
Multiprocessor builds of Windows have the concept of affinity for threads, i.e. a set of logical processors upon which a thread can be scheduled. The kernel tracks thread affinity in the KTHREAD structure, and each process has a default affinity for new threads which is tracked in the KPROCESS structure. Prior to NT6.1, affinity was tracked using a ULONG type (via the KAFFINITY typedef), where each bit corresponded to a logical processor. A set bit meant that the thread was free to be scheduled on the corresponding processor, and a zero bit meant that the thread should not be scheduled on that processor. This is generally referred to as an affinity mask. On 32-bit builds you had a hard limit of 32 logical processors on the system, and on 64-bit builds you had a hard limit of 64, because the affinity mask was a ULONG. You simply could not have more than 64 logical processors on the machine because the affinity mask didn’t extend any further. To get around this, Microsoft introduced the concept of processor groups in the NT6.1 kernel.
A processor group is a collection of logical processors. Each group can have up to 64 logical processors assigned to it. Each thread is assigned to a processor group, and the thread’s affinity mask applies to processors in that group. The old affinity mask behaviour still applies, but the exact logical core that each bit applies to is mapped through the thread’s assigned processor group instead of just directly referring to a logical processor by index. The processor grouping is optimised based on NUMA topology. For example, if you’re running a pair of 28-core SMT-enabled CPUs (i.e. 56 threads per socket), you’ll get two processor groups with 56 logical processors in each, rather than one group with 64 logical processors and another with 48 logical processors. This prevents threads from being scheduled on different NUMA nodes, which would harm performance due to memory accesses being performed across sockets.
The KiMaximumGroups exported variable tracks the maximum number of processor groups. In NT6.1 this was 4, but as of NT6.2 it’s 20.

If you multiply 20 groups by 64 logical processors, you get 1280. That’s where the number we saw with MAXPROC in the BCD came from earlier.
This is a hard-coded limit. The reason for hard-coding it is that the KAFFINITY_EX structure used for tracking processor affinities uses a fixed-size array of KAFFINITY masks. Altering the size would alter structure offsets. You’ll notice that KiMaximumGroups is written to in three functions, which might imply that it can dynamically change to more than 20. I thought so too, but after investigation I discovered that 20 is indeed the hard limit.
Phase1InitializationDiscard first calls into KiPerformGroupConfiguration. This function sets up groups based on the NUMA proximity of nodes. When running directly on hardware, it enumerates through the NUMA topology, figures out where to assign each logical processor, tracks how many processors have been inserted into each group, and then counts how many groups have at least one processor assigned to them. KiMaximumGroups is then set to that count. When running in a hypervisor the enumeration is done differently, and in certain cases KiAssignAllNodesToGroup0 is called, which sets KiMaximumGroups to 1. After KiPerformGroupConfiguration returns, Phase1InitializationDiscard carries on, and later calls KeStartAllProcessors. If dynamic hardware partitioning is not supported, KiMaximumGroups is set to KiActiveGroups, which is necessarily no greater than 20 in the first place.
It’s possible that custom builds of Windows exist with more than 20 groups supported, for example in some of Microsoft’s clustered hypervisors, but the Windows Server and Windows Desktop builds available in general release are limited to 20 processor groups.
Taking a look at the Wikipedia numbers again, you’ll notice that (if you correct Enterprise to supporting 4 sockets) each edition’s reported maximum core count matches the maximum socket count multiplied by 64. This starts to make some sense: if each CPU socket is one NUMA node, and each NUMA node gets a processor group, and each processor group can have 64 logical processors assigned to it, then the logical processor limit would be your socket count multiplied by 64. In addition, on NT 6.1, the processor group limit was 4 anyway, which is where the older hard limit of 256 logical processors came from.
According to Microsoft’s documentation on NUMA support, the mapping between physical CPUs/sockets, NUMA nodes, and processor groups isn’t as rigid as the above paragraph might imply:
Starting with Windows 10 Build 20348, the behavior of this and other NUMA functions has been modified to better support systems with nodes containing more that 64 processors.
Creating “fake” nodes to accommodate a 1:1 mapping between groups and nodes has resulted in confusing behaviors where unexpected numbers of NUMA nodes are reported and so, starting with Windows 10 Build 20348, the OS has changed to allow multiple groups to be associated with a node, and so now the true NUMA topology of the system can be reported.
Prior to build 20348, Windows would modify its representation of the system’s NUMA topology to ensure that each processor group was associated with a NUMA node, even if that meant faking the existence of additional NUMA nodes. For example, if you installed a CPU that reported a single NUMA node consisting of 48 physical cores and 96 logical processors, Windows would represent that as two NUMA nodes since the processor group implementation required that each group was directly tied to a NUMA node. Why is this relevant? Well, if Windows went out of its way to support more than 64 logical processors per physical socket (by faking extra NUMA nodes), then that means any purported limit derived from multiplying the maximum socket count by 64 cannot possibly be correct.
Further, as of build 20348, the concepts of groups and NUMA nodes were uncoupled so that multiple processor groups can be assigned to one NUMA node. The only remaining question is “wait, there’s a Windows 10 build 20348?” – that build number seems to be associated with Windows Server 2022 and Windows 11, so it’s not clear where 20348 fits into Windows 10. The article was last updated in August 2021, before the Windows 11 announcement, so it’s possible that 20348 was planned to be a Windows 10 build release but it was pushed into Windows 11 instead.
So what does all of this mean? I’m pretty certain that it means per-edition core count limits simply don’t exist in Windows 10, and probably didn’t in previous versions either. Most likely, Windows 7 supported a maximum of 4 groups of 64 logical processors, whereas Windows 8 and later support a maximum of 20 groups of 64 logical processors.
To wrap it all up, here are the actual limits:
- Sockets:
- 1 socket on Windows 10 Home (due to ProductPolicy)
- 2 sockets on Windows 10 Pro / Education (due to ProductPolicy)
- 4 sockets on Windows 10 Pro for Workstations / Enterprise (due to ProductPolicy)
- 64 sockets on Windows Server 2016, 2019, and 2022 (due to ProductPolicy), although this is effectively capped at 20 due to the processor group limit.
- Physical Cores:
- Physical cores must be licensed on Windows Server SKUs, with a minimum of 8 cores licensed per socket, but there is no upper limit on the number of supported cores.
- There is no specific maximum physical core count on Windows 10.
- Logical Processors:
- Processor groups are unsupported on Vista and prior, meaning a hard limit of 32 logical processors on 32-bit and 64 logical processors on 64-bit is set by the affinity mask.
- 32-bit builds of Windows 7 and later are limited to 32 logical processors.
- 4 processor groups are supported on Windows 7 (NT 6.1) on 64-bit builds. Each group can contain up to 64 logical processors. Each group must be associated with a single NUMA node.
- 20 processor groups are supported on Windows 8 (NT 6.2) and later, on 64-bit builds. This leads to a theoretical limit of 1280 logical processors. Each processor group must be associated with a single NUMA node, and the kernel will create fake NUMA nodes if a single socket has more than 64 logical processors.
- As of build 20348, groups no longer require a 1:1 mapping with NUMA nodes, so fake NUMA nodes are no longer created when a socket has more than 64 logical processors. One group cannot span multiple NUMA nodes, but each NUMA node can have multiple processor groups assigned to it. This has no affect on the maximum counts.
I am unaware of any commercially available x86_64 system, at time of writing, that can get close to the 1280 logical processor limit. An S8S board with Xeon 8280 processors gets as high as 448 logical processors. Higher core count Xeon Scalable Gen2 processors are available (9 series) but they are not for general sale and only support 2S configurations. Xeon Scalable Gen3 processors are documented as only supporting 2S scaling, even on the Xeon 8380. AMD EPYC offers higher core counts per socket, but so far we haven’t seen Infinity Fabric scaling beyond 2S. One can approximate the limit using CPU overcommitting in a hypervisor (KVM supports this), which basically involves lying about how many processors you have, but that’s cheating. It’s possible that specialised hypervisors operating on top of compute clusters can host a virtual machine with 1280 logical processors actually backed by hardware, but those processors would be on physically separate compute nodes interconnected by RDMA networking, and you don’t tend to run vanilla Windows 10 installs on that kind of platform.
Thanks for reading this post! If you enjoyed it and want to say thanks, consider purchasing some of my amusing warning stickers. They’re 100% guaranteed to be tangible objects.
Огромное количество инструкций в Интернете среди прочих адекватных и сомнительных шагов по оптимизации Windows 11 и 10, 8.1 и 7 предлагают, помимо прочего, «снять ограничения с максимума оперативной памяти и разблокировать все ядра процессора» в окне msconfig — «Конфигурация системы».
В этой статье о том, полезен ли совет или, напротив, не очень: стоит ли настраивать включать максимум ядер процессора и на что повлияет установка вручную значения в поле «Максимум памяти». Если вы уже столкнулись с проблемами, после изменения настроек, их можно сбросить даже если Windows не запускается.
Назначение настроек «Число процессоров» и «Максимум памяти»
Сначала о том, где находятся рассматриваемые параметры количества ядер CPU и максимума памяти в Windows 11, Windows 10 и предыдущих версиях ОС:
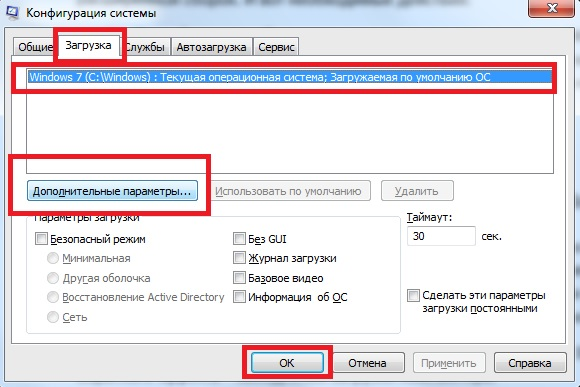
- Откройте окно «Конфигурация системы», для этого можно нажать клавиши Win+R, ввести msconfig и нажать Enter.
- Перейдите на вкладку «Загрузка» и нажмите кнопку «Дополнительные параметры».

- В результате вы увидите настройки, о которых идёт речь.


А теперь главное: эти параметры не предназначены для ускорения системы, их цель — не задействовать все ядра процессора и всю доступную память (а некоторые пробуют ввести и большие значения, чем фактически присутствует на ПК).
Назначение этих параметров — заставить систему использовать меньшее количество оперативной памяти и ядер процессора, когда это нужно. Зачем? Цели могут быть разными, среди типичных:
- Протестировать разрабатываемую программу в другой конфигурации. То есть разработчик создает свой софт на очень производительной машине, где всё работает отлично, но не уверен, что ситуация будет такой же, если запустить её на более распространённых у пользователей конфигурациях ПК.
- Диагностика каких-то проблем с оборудованием, когда есть предположение, что ограничение задействованных ядер или памяти может повлиять на поведение системы.
- Теоретически может быть старое ПО, которое неправильно работает на современных компьютерах с 16 ядрами процессора или огромным объемом оперативной памяти.
Таким образом, если вы выставляете в поле «Число процессоров» фактическое число ядер вашего ЦП, а в поле «Максимум памяти» — фактический объем оперативной памяти, в работе системы не изменится ничего: распределять ресурсы она будет точно так же, как если бы ни одна из отметок в окне выставлена не была.
Когда изменение параметров может быть полезным, а когда — вредным
Когда может быть полезным зайти в окно настроек числа процессоров и максимума памяти:
- Если вы хотите проверить работу чего-либо в ограниченной конфигурации.
- В ситуации, когда «доброжелатель» или вы сами ограничили используемые системой аппаратные ресурсы компьютера в этом окне и нужно вернуть всё в исходное состояние.
А вот в случае, если вы установили новенький многоядерный процессор, а число ядер, отображаемое в системе — меньше, вероятнее всего это окно не поможет (если только ранее там не были выставлены какие-либо значения вручную), скорее всего потребуется изучить параметры БИОС/UEFI.
В остальных случаях изменение этих настроек для рядового пользователя либо бесполезно, либо вредно.
Почему могут быть негативные последствия: нередко случается, что начинающий пользователь случайно установил не то число процессоров, например, 1. Либо памяти: ввёл число 8, 16, 32 — предполагая, что указывается число в Гб, оно при нажатии кнопки «Ок» будет изменено на 256 — это минимум в этом окне параметров, но всё равно мало для нормальной работы.
В результате получает не загружающуюся систему и синие экраны. А в случае, если Windows всё-таки запустилась — работа с ней становится невозможной. Но я всё-таки умудрился запустить, чтобы показать вам скриншот ниже.

Итог: значения параметров по умолчанию в окне настройки числа ядер процессора и максимума памяти (отсутствие отметок, 0 в обоих полях) равнозначны вручную выставленным на максимум значениям — как-то иначе системные ресурсы после изменения этих настроек Windows использовать не будет.
Существуют и другие похожие настройки: при желании вы можете изменить приоритет процессов в Windows (но ваша активная в настоящий момент игра и так по умолчанию работает с максимальным), или вручную указать, какие и сколько ядер процессора должен использовать процесс (но здесь мы тоже можем лишь ограничить его, а не предоставить больше возможностей), но это также никак не прибавит FPS и не ускорит работу ваших игр и программ по сравнению со значениями по умолчанию.
Почти на всех современные процессоры являются многоядерными. Все современные версии Windows поддерживают мультипроцессорные CPU и все ядра на них по умолчанию активны.
Содержание:
- Сколько процессоров и ядер доступно в Windows?
- Как включить все ядра процессора в Windows?
- Как запускать программу в Windows только на определенных ядрах?
- Включить все ядра Windows при загрузке
В Windows есть ограничение на максимальное поддерживаемое количество физических CPU и ядер (логических процессоров) в зависимости от версии и редакции:
- Windows 10 x86 (Enterprise Pro, Home) – до 2 CPU и 32 логических процессоров (учитываются как физические ядра, так и виртуальные ядра Hyper-Threading)
- Windows 10/11 x64 – до 2 CPU и 256 логических процессоров
- Windows Server 2019/2016/2012R2 – 640 логических процессоров
- Windows Server 2008 R2 – 256 логических ядер
Сколько процессоров и ядер доступно в Windows?
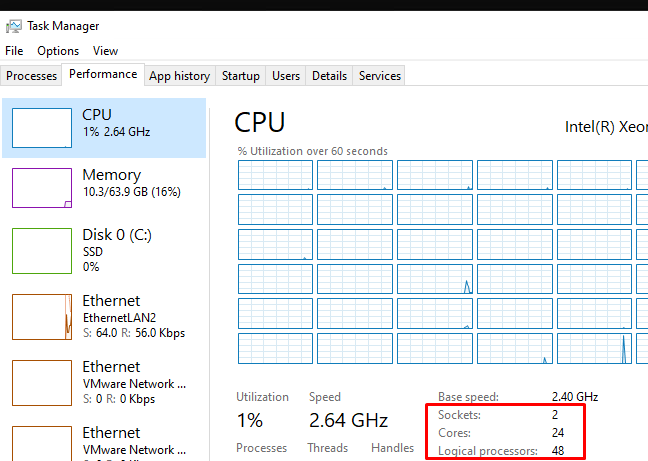
Проще всего проверить, сколько физических CPU, ядер и логических процессоров доступно в Windows с помощью Task Manager.
- Запустите
taskmgr.exe
и перейдите на вкладку Performance; - Выберите CPU;
- В правом окне указано количество доступных процессоров (sockets), физических ядер (24 cores) и логических процессоров (logical processors).
Логические процессоры показывают число доступных ядер с учетом того, что на компьютере включен HyperThreading.
В диспетчере устройств (
devmgmt.msc
) также отображается количество доступных логических ядер.
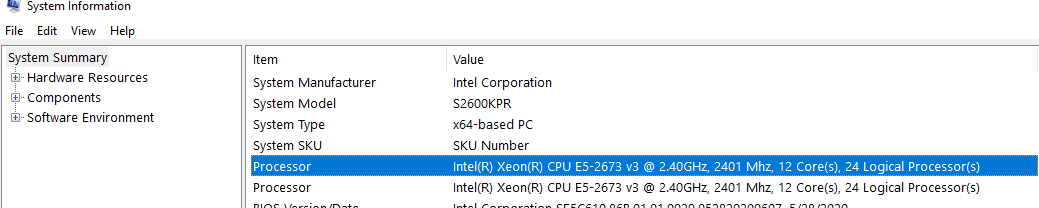
Также информация о физических CPU и количестве ядер на них отображается в разделе Processor утилиты msinfo32.exe
Processor Intel(R) Xeon(R) CPU E5-2673 v3 @ 2.40GHz, 2394 Mhz, 12 Core(s), 24 Logical Processor(s)
Processor Intel(R) Xeon(R) CPU E5-2673 v3 @ 2.40GHz, 2394 Mhz, 12 Core(s), 24 Logical Processor(s)
Вы можете получить информацию о количестве ядер и логических процессорах с помощью PowerShell:
Get-WmiObject -class Win32_processor | ft NumberOfCores,NumberOfLogicalProcessors
NumberOfCores NumberOfLogicalProcessors
------------- -------------------------
12 24
12 24

В переменной окружения Windows также есть информация о количестве логических процессоров в Windows:
echo %NUMBER_OF_PROCESSORS%
Как включить все ядра процессора в Windows?
Если в Windows недоступны все ядра CPU, проверьте включены ли они в настройках BIOS/UEFI. Здесь могут быть два параметра:
- HyperThreading – возможность использовать оба логических процессора ядра CPU
- Active Processor Cores – разрешено ли использовать все ядра процессора
Перезагрузите Windows и войдите в настройки BIOS (обычно для этого используются клавиши
F2
,
Del
,
F10
или
F1
.
Конкретные названия пунктов и их наличие зависит от версии BIOS и модели процессора. В моем случае все ядра и логические процессоры включены в разделе Processor Configuration:
- Hyper-Threading ALL:
Enabled - Active Processor Cores:
All
Эти настройки могут находится в разделах Advanced, Extreme Tweaker и называться Processor Options, AMD Core Select, Processor Core, Active Processor Cores, Core Multi-Processing, CPU Cores и т.д.
Как запускать программу в Windows только на определенных ядрах?
В Windows вы можете разрешить программе выполняться только на одном или нескольких ядрах. По-умолчанию запущенное приложение Windows может выполняться на любом ядре.
Если вам нужно привязать программу к определенным ядрам, можно воспользоваться функцией Processor Affinity. Это может понадобится, если вы хотите ограничить использование CPU программой, или запускать программу только на одном ядре (это бывает нужно для запуска старых приложений, которые некорректно работают на многоядерных компьютерах.
Вы можете изменить привязку запущенного приложения к ядрам с помощью Task Manager:
- Перейдите на вкладку Details;
- Щелкните правой кнопкой по процессу и выберите Set affinity;
- Отметьте физические ядра, на которых разрешено выполнять инструкции приложения.
Если нужно сразу запустить приложение на одном ядре, например, CPU0. Воспользуйтесь командой:
cmd.exe /c start "Acrobat DC" /affinity 1 "C:\Program Files\MyApp\yourappname.exe"
Включить все ядра Windows при загрузке
В Windows при загрузке компьютера всегда используется одно ядро. Вы можете разрешить использовать все ядра при загрузке Windows через System Configuration:
- Запустите утилиту
msconfig
; - Перейдите на вкладку Boot и выберите загрузочную запись вашей Windows;
- Нажмите Advanced options;
- Включите опцию Number of processors в окне BOOT Advanced Options;
- Выберите количество логических процессоров (потоков), которые можно использовать при загрузке .
Вы не заметите существенного ускорения загрузки Windows, если увеличите число доступных процессоров. Кроме того, в некоторых случаях эта опция может вызвать проблемы с загрузкой Windows, особенно при включении опции PCI lock (ошибка загрузки BAD SYSTEM CONFIG INFO). Поэтому в большинстве случаев не рекомендуется включать и настраивать эту опцию.
Технологии постоянно развиваются и совершенствуются и сегодня на 9 из 10 компьютерах установлены многоядерные процессоры. И если двухъядерные сами по себе могут использовать оба ядра, то в случае с четырех- или восьмиядерными процессорами все не так очевидно.
Зачастую пользователи даже не знают о скрытом потенциале своего процессора и не используют его на полную мощь в играх или сложных программах. В нашей статье мы расскажем вам о том, как включить все ядра процессора в Windows 10 и получить более подробную информацию о процессоре.
- Количество работающих ядер по умолчанию в Windows 10
- Способы включения ядер процессора на Windows 10
- Настройки процессора в BIOS
- Проверка данных и параметров процессора
- Стандартные средства ОС Windows 10
- Сторонние программы
Содержание:
Количество работающих ядер по умолчанию в Windows 10
На каждое отдельное ядро может оказываться разная нагрузка, что связано с изменением загруженности ПК. Настройки BIOS позволяют задать отдельную рабочую частоту для ядер. При равномерном распределении нагрузки на ПК пользователь получат высокую производительность.
Если говорить о двухъядерном процессоре, то лишь в одном случае будет задействовано всего лишь одно ядро – при загрузке компьютера. С другой стороны, всегда есть возможность активировать все ресурсы, чтобы ускорить процесс загрузки (с другой стороны, загрузка Windows это не самый требовательный к CPU процесс, и вы выиграете намного больше, если просто поставите свою Windows 10 на SSD).
Способы включения ядер процессора на Windows 10
Чтобы активировать все ядра четырехядерного (пример) процессора при включении ПК, можно использовать:
- Перенастройку конфигурации системы.
- Настройки BIOS.
Инструкция ниже подойдет как для 32-, так и для 64-битной ОС редакций Windows 10:
- Откройте меню «Выполнить», нажав на сочетание клавиш Windows + R. Введите msconfig и нажмите Enter, чтобы открыть окно конфигурации системы.
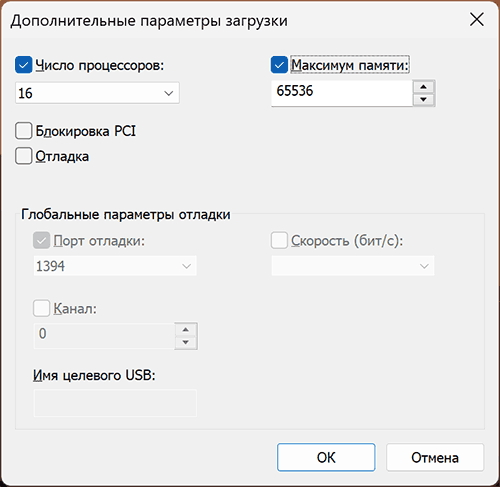
- Перейдите во вкладку «Загрузка», выберите нужную ОС и нажмите на функцию «Дополнительные параметры загрузки».
- Выберите строку «Число процессоров» и в развернутом списке выберите максимальное доступное количество ядер.
- Кроме этого следует повысить «Максимум памяти», отключить опцию «Блокировка PCI». В таком случае ОС будет распределять нагрузку на все ядра равномерно. Подтвердите настройки, нажав на OK.
_
Примечание. В настройках «Максимум памяти» нужно выбрать любое числовое значение не ниже 1024 Мбайт. Иначе скорость загрузки компьютера может и даже уменьшиться.
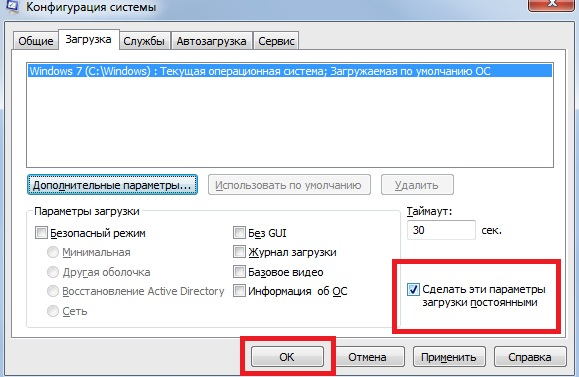
Чтобы не выполнять эти действия каждый раз, в предыдущем окне «Конфигурация системы» установите галочку на пункте «Сделать эти параметры загрузки постоянными». Подтвердите действия на «Применить» и OK.
Настройки процессора в BIOS
Изменять настройки BIOS нужно лишь в том случае, если ПК просто не загружается. Не нужно использовать данный метод, если у вас нет каких-либо начальных знаний по работе в BIOS. Лучше воспользуйтесь предыдущей инструкцией.
Для активации всех ядер многоядерного процессора через BIOS выполните следующие действия:
- Войдите в меню BIOS (перезагрузите компьютер и на начальном экране с информацией о материнской плате нажмите на F3,Del или Esc – зависит от производителя). Обычно на этом экране есть информация с указанием тех клавиш, которые необходимо нажать.
- В BIOS найдите раздел Advanced Clock Calibration и выберите параметры All Cores.
- Сохраните все настройки, нажав на F10 и Y (или используйте подсказки самого BIOS).
Проверка данных и параметров процессора
Чтобы узнать, какое количество ядер задействовано системой, а также какие параметры есть у CPU, можно воспользоваться стандартными средствами операционной системы или сторонними программами.
Стандартные средства ОС Windows 10
- Наведите курсор мыши на кнопку «Пуск» в левом нижнем углу экрана, щелкните правой кнопкой мыши и выберите «Параметры».
- Зайдите в категорию «Система».
- Откройте подкатегорию «О системе». Появится страница с информацией, где также будут указаны названия и частоты каждого из ядер.
Чтобы найти более подробную информацию обо всех устройствах, нужно открыть «Диспетчер устройств» (DEVMGMT.MSC).
Разверните ветку «Процессоры» и изучите графики (для четырехъядерного процессора их должно быть четыре и т. д.). Наведите курсор на любую строку, щелкните ПКМ и выберите опцию «Свойства». Здесь и будет вся необходимая информация о процессоре.
Сторонние программы
Если вам мало «Диспетчера устройств», то можно воспользоваться сразу несколькими программами, предназначенными для проверки информации о системе и аппаратной части:
- CPU-Z;
- AIDA64;
- Everest.
Все программы можно загрузить с официального сайта их разработчиков.
Most modern central processing units (CPUs) are now equipped with multiple cores. Each core is an independent processor that your system can use to perform tasks. These multiple cores can then work together to perform different tasks simultaneously, increasing speed and performance.
By default, both Windows 11 and Windows 10 support multi-core processors and activate all cores by default. However, these can be disabled manually, primarily through the system BIOS and within Windows.
This post discusses how you can enable all CPU cores supported by your CPU and operating system (if disabled), as well as its repercussions.
Table of Contents
Why Enable All CPU Cores
By default, Windows itself manages the available CPU cores. They are only used when required to speed up the tasks. However, you can manually enable some or all of them.
If you think that your computer is performing slow and can do better, you can manually enable all cores so the workload between them is divided, resulting in faster performance. However, doing so will have consequences.
Enable All CPU Cores In Windows 11/10
To manage CPU cores from within Windows, you must first ensure that the respective capabilities are enabled in BIOS. There are 2 main functionalities that need to be managed from BIOS:
- Multi Core Support
- HyperThreading
Enable All Physical CPU Cores from BIOS
First things first: configure your System BIOS to use all physical cores in the processor. To do this, you need to look for Multi Core Support (or relevant) settings in your BIOS and select All.
Restart your computer and access BIOS settings. From there, navigate to Multi Core Support and select the All option, as in the image below:

Do not exit BIOS yet. Rather, perform the next steps given below.
Enable HyperThreading
HyperThreading is Intel proprietary function that splits a physical core on a CPU into virtual cores (or logical processors), where each acts as an independent processor.
This means even more tasks can be executed simultaneously, further increasing the performance of the processor. For example, having 4 physical cores with HyperThreading enabled would split each core into 2, making 8 logical cores/processors.
This feature also needs to be enabled through System BIOS. Look for HyperThreading settings in BIOS, and then select the Enabled option.

Now that it is enabled, you can save the settings and exit BIOS.
Enable All Logical CPU Cores
Once you are done with BIOS, boot into Windows and perform the following steps to manually enable all CPU cores:
- Type msconfig in Run to open System Configuration.
- Switch to the Boot tab and click Advanced options.
- Now check the box next to “Number of processors” and then select the highest number available from the drop-down menu below it. Click Ok when done.
- Back in the System Configuration window, click Apply and OK.
- Now restart your computer for the changes to take place by clicking Restart on the dialog box.


Once the computer restarts, you can check that all cores are up and running through the method given in the next step.
How to Check Number of Cores in Windows
You can also know the number of physical cores and the logical cores in Windows. To know this information, launch the Task Manager by using the CTRL + Shift + Esc shortcut keys.
Now switch to the Performance tab, click CPU on the left of the window, and there you will find Cores, which is the actual number of physical cores on your processor, and Logical processors, which is the total number of processors (after HyperThreading) your system currently has.

How to Show All CPU Cores in Task Manager
Another useful piece of information you can benefit from is the performance of each CPU core. This way, you can identify whether you need to enable all CPU cores in the first place.
To view performance graphs on all CPU cores, open the Task Manager using the CTRL + Shift + Esc shortcut keys, and then switch to the Performance tab. From there, click on CPU from the left of the window. Now right-click on the CPU graph, expand Change graph to, and then click Logical processors.

Your graphical view within the Task Manager will now switch to smaller, individual graphs for all CPU cores.

Take Away
We think that meddling with CPU cores is not the wisest decision. If you are already Windows 10 or 11, we recommend leaving it to default and letting Windows manage the cores for you.
If you think your system can perform better, then you may want to try changing the process affinity. This way, you can free up some CPU cores for more critical tasks.