
Под очисткой жесткого диска средствами классической «Командной строки» можно понимать как удаление временных файлов, так и полное удаление всех данных с физического накопителя или конкретного логического раздела. Ниже приведены все три варианта очистки.
Вариант 1: Утилита очистки
Системная утилита «Очистка диска» больше известна пользователям как классическое приложение с интерфейсом, запускаемое через «Свойства» любого локального диска. С ее помощью можно безопасно удалить неактуальные файлы, накопившиеся в разных инструментах Windows. Она же поможет и тем пользователям, кому удобнее совершать различные действия по управлению системой, в том числе очистку накопителя от мусора, через консоль.
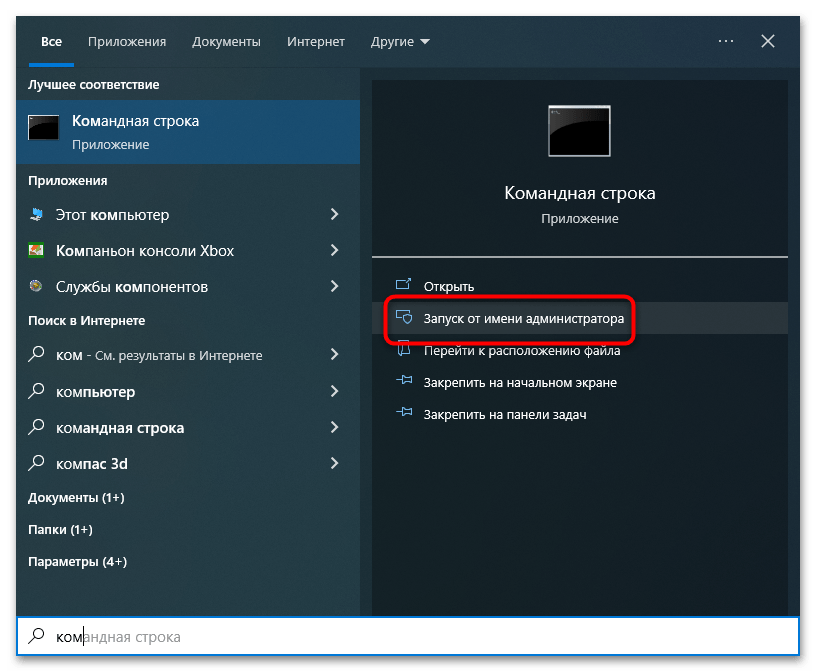
- Вызовите «Командную строку» от имени администратора из поиска Windows или другим известным способом.
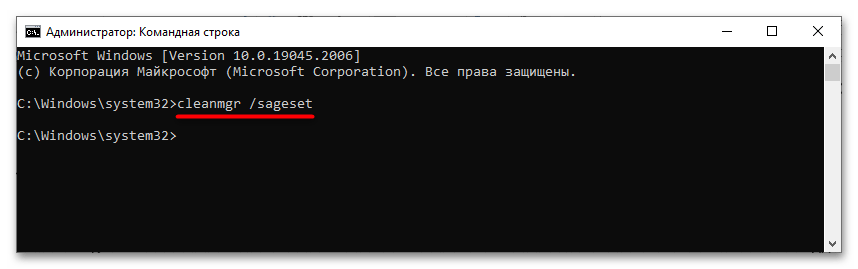
- Запустите штатную утилиту «Очистка диска», выполнив команду
cleanmgr /sageset. - Если желаете пропустить выбор файлов для удаления и выполнить очистку без диалога с настройками по умолчанию, используйте команду
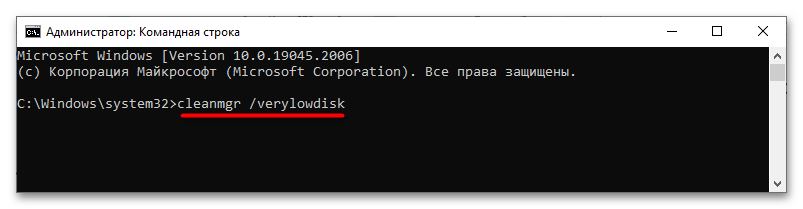
cleanmgr /sagerun. - Для максимальной очистки системного раздела в «cleanmgr» предусмотрена команда
cleanmgr /verylowdisk, для очистки временных файлов предыдущих установок Windows – командаcleanmgr /setup.

Вариант 2: Полная очистка диска
Если необходимо удалить все данные с физического диска, воспользуйтесь консольным средством «Diskpart».
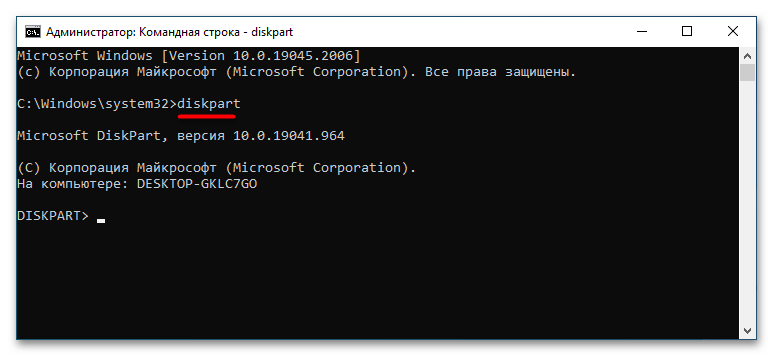
- Откройте от имени администратора «Командную строку» и выполните команду
diskpart, чтобы запустить одноименную утилиту управления дисками и разделами. - Выполните набор следующих команд:
list diskselect disk 1clean
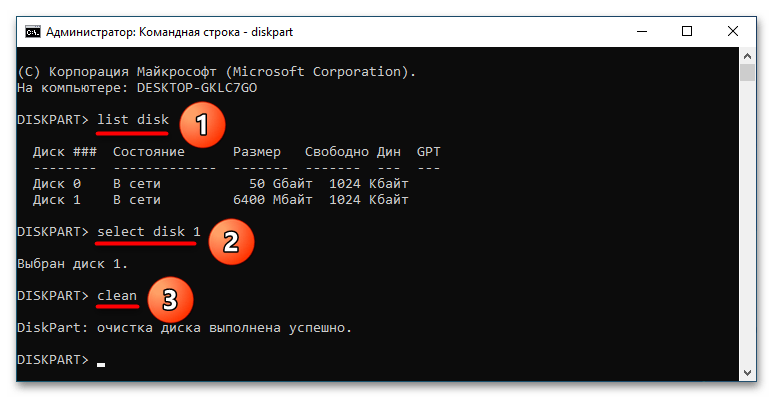
В результате выполнения этих команд с диска будут удалены все разделы. Кроме того, диск станет помечен как не проинициализированный. Также обратите внимание, что команда clean неприменима к физическому диску, на котором находится активная операционная система. Если необходимо очистить не весь диск, а конкретный раздел, используйте следующие команды:
list volumeselect volume №delete volume
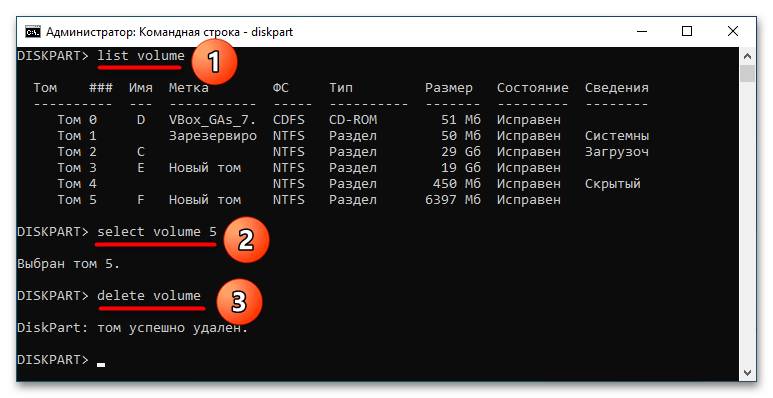
Первая команда в «Diskpart» выводит список не физических дисков, а имеющихся на них томов. Второй командой выбирается конкретный том, третьей командой выполняется его удаление.
Вариант 3: Форматирование
Такой вариант очистки отличается тем, что удаляются только данные, а не содержащие их разделы. Первоначальная разметка диска в этом случае остается неизменной.
- Откройте «Командную строку» от имени администратора.
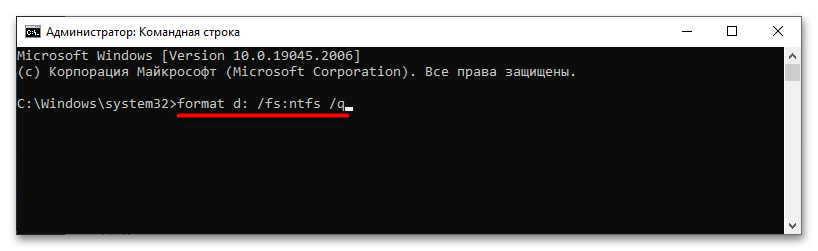
- Выполните команду
format d: /fs:ntfs /q, в которой d — это буква очищаемого раздела, ntfs — тип файловой системы, а q — ключ быстрого форматирования.
Как вариант, отформатировать раздел можно средствами консольной утилиты «Diskpart».
- Запустите в «Командной строке» утилиту «Diskpart» как было показано выше.
- Выполните одну за другой следующие команды:
list volumeselect volume №format fs=ntfs quick
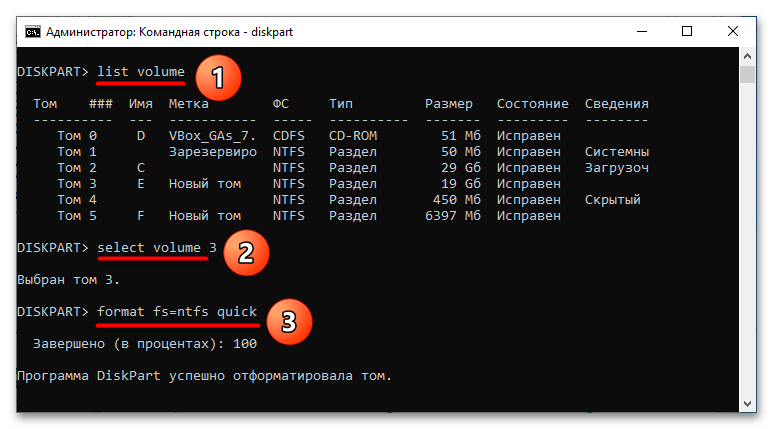
Как и в предыдущем варианте, первая команда выводит список доступных томов, а вторая выбирает нужный том. Форматирование выполняется третьей командой, в данном примере в файловую систему NTFS. Если необходимо отформатировать раздел в FAT32, соответственно, в качестве значения параметра «fs» необходимо указать fat32. Ключ «quick» указывает, что форматирование будет быстрым, то есть без фактической перезаписи данных на диске. Если файлы на разделе нужно удалить без возможности восстановления, не используйте этот параметр.
Наша группа в TelegramПолезные советы и помощь
Многие пользователи знают о встроенной утилите Windows 7, 8 и Windows 10 — Очистка диска (cleanmgr), позволяющей удалить разного рода временные файлы системы, а также некоторые системные файлы, которые не требуются для штатной работы ОС. Преимущества этой утилиты по сравнению с самыми разными программами для очистки компьютера — в том, что при ее использовании любой, даже начинающий пользователь, скорее всего, ничего не повредит в системе.
Однако, мало кто знает о возможности запуска этой утилиты в расширенном режиме, позволяющем очистить компьютер от еще большего количества различных файлов и компонентов системы. Именно о таком варианте использования утилиты очистки диска и пойдет речь в статье.
Некоторые материалы, которые могут быть полезны в данном контексте:
- Как очистить диск от ненужных файлов
- Как очистить папку WinSxS в Windows 7, Windows 10 и 8
- Как удалить временные файлы Windows
- Как очистить папку DriverStore/FileRepository (обычно очень большую)
Запуск утилиты очистки диска с дополнительными опциями
Стандартный способ запуска утилиты очистки диска Windows — нажать клавиши Win+R на клавиатуре и ввести cleanmgr, затем — нажать Ок или Enter. Также ее можно запустить в разделе Панели управления «Администрирование».
В зависимости от количества разделов на диске, появится либо выбор одного из них, либо сразу откроется список временных файлов и других элементов, которые можно очистить. По нажатию кнопки «Очистить системные файлы», можно будет также удалить некоторые дополнительные вещи с диска.
Однако, с помощью расширенного режима, можно выполнить еще более «глубокую очистку» и задействовать анализ и удаление еще большего количество не совсем нужных файлов с компьютера или ноутбука.
Процесс запуска очистки диска Windows с возможностью использования дополнительных опций начинается с запуска командной строки от имени администратора. Сделать это в Windows 10 и 8 можно через меню правого клика по кнопке «Пуск», а в Windows 7 — просто выбрав командную строку в списке программ, кликнув по ней правой кнопкой мыши и выбрав пункт «Запуск от имени администратора». (Подробнее: Как запустить командную строку).
После запуска командной строки, введите следующую команду:
%systemroot%\system32\cmd.exe /c cleanmgr /sageset:65535 & cleanmgr /sagerun:65535
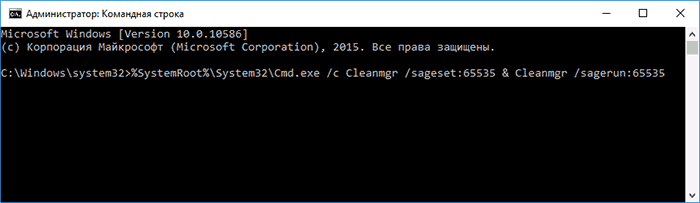
И нажмите Enter (после этого, пока не завершите действия по очистке, не закрывайте командную строку). Откроется окно очистки диска Windows с большим, чем обычно количеством пунктов для удаления ненужных файлов с HDD или SSD.
Список будет включать в себя следующие пункты (те, что появляются в данном случае, но отсутствуют в обычном режиме, выделены курсивом):
- Temporary Setup Files
- Старые файлы программы Chkdsk
- Файлы журнала установки
- Очистка обновлений Windows
- Защитник Windows
- Файлы журнала обновления Windows
- Загруженные файлы программ
- Временные файлы Интернета
- Файлы дампа памяти для системных ошибок
- Файлы мини-дампа для системных ошибок
- Файлы, оставшиеся после обновления Windows
- Пользовательские архивы отчетов об ошибках
- Пользовательские очереди отчетов об ошибках
- Системные архивы отчетов об ошибках
- Системные очереди отчетов об ошибках
- Временные файлы отчетов об ошибках
- Файлы установки Windows ESD
- BranchCache
- Предыдущие установки Windows (см. как удалить папку Windows.old)
- Корзина
- RetailDemo Offline Content
- Файлы резервной копии пакета обновления
- Временные файлы
- Временные файлы установки Windows
- Эскизы
- История файлов пользователя
Однако, к сожалению, в данном режиме не отображается, какое количество места на диске занимает каждый из пунктов. Также при таком запуске из пунктов очистки исчезают «Пакеты драйверов устройств» и «Файлы оптимизации доставки».
Так или иначе, думаю, такая возможность в утилите Cleanmgr может оказаться полезной и интересной.
Windows 10 is a phenomenal operating system (OS), but like any other OS, the more you install applications, change settings and browse the web, you can clutter it up. In this article, you’re going to learn how to keep Windows clean by covering how to delete backup files in Windows 10, use the disk cleanup cmd, remove file history, unnecessary system restore points, delete the Windows.old folder, and the $Windows.~BT folder and more.
By following the steps in this tutorial, you could potentially clean up tens or even hundreds of gigabytes of valuable space on your Windows 10 machine!
Before You Start
If you’d like to follow along with each of these handy storage-saving tips, you’ll only need to meet one prerequisite; Windows 10. All examples demonstrated in this tutorial were done on Windows 10 Build 1909, but these tips should work on older builds also.
Removing Windows 10 Backups
Let’s start this space-saving tutorial and cover how to delete backup files in Windows 10. Windows 10 has a built-in feature that automatically backs up files to a separate storage volume.
The Backup and Restore feature helps ensure you don’t lose important files, but it has a downside; the backed-up files’ size keeps inflating.
To conserve space, you should periodically check for and delete backup files. To do so, follow the instructions below to remove the backups you don’t need.
- First, click on the Start button, then type backup. You should see the Backup settings application; click on that.
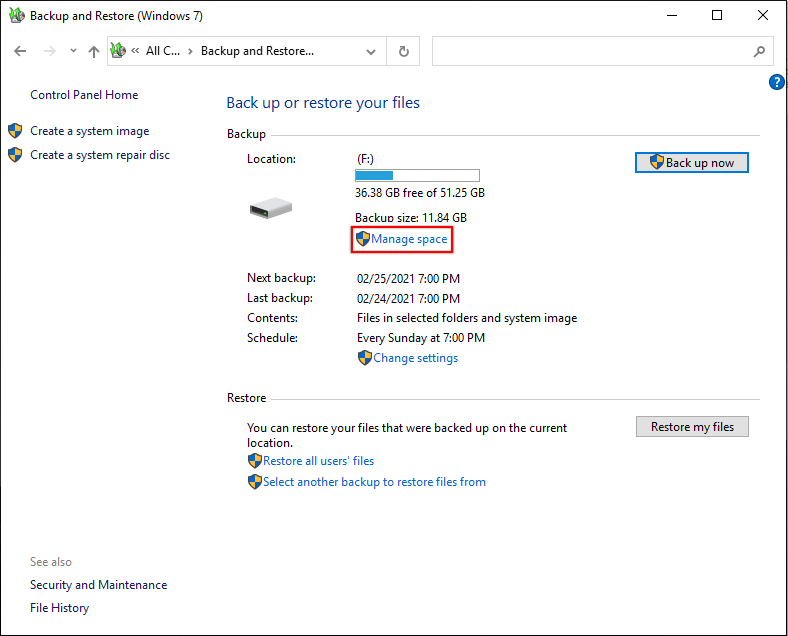
2. Once in the Backup settings, click on the Go to Backup and Restore (Windows 7) link to open up the Backup and Restore (Windows 7) app.

3. In the Backup and Restore window, you’ll see your backup drive. As shown below, click on the Manage space option.
If you see “Windows Backup has not been set up” under the Backup section, you can skip the rest of this section. You have no older Windows backups taking up space.
4. In the Manage Windows Backup disk space window, you’ll see two options to manage your backup drive; the View backup and Change settings options.
Click on the View backups… button. This button lets you choose and select a backup period to delete.

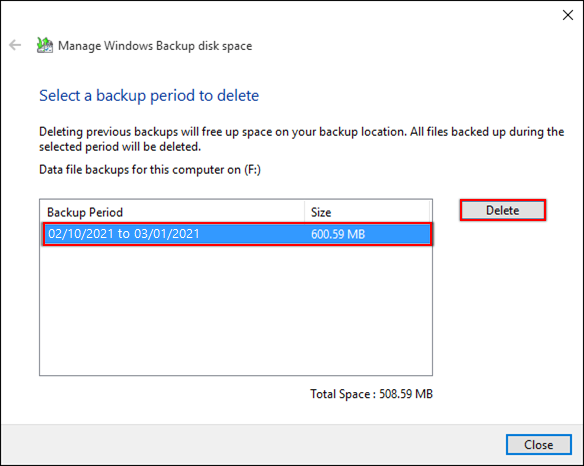
5. Choose a Backup Period from the list from a timeframe you feel comfortable with removing.
6. Click Delete to remove all contents of the backup files in the selected time period.
The Backup and Restore feature saves a copy of the files inside the folder you selected upon setting up this feature. Meaning, deleting a Backup Period will delete all the files the system backed up on that time period.
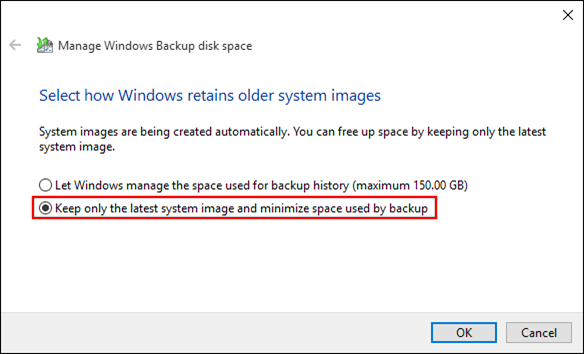
7. Back on the main Manage Windows Backup disk space window, click on the Change settings button.
8. Click on the Keep only the latest system image and minimize space used by backup option. Setting this option automatically removes all of the currently-stored backups and only keeps the latest ones.
9. Click OK to proceed with the option selected.
Deleting Windows File History
Assuming you’ve already cleared your backups from the previous example, but you’re still missing a large amount of space in your drive. Clearing up space from using the File History is another way to reclaim some space.
Windows File History is another built-in feature of Windows 10 that lets you automatically back up your files. Unlike the Backup settings, File History only stores files that are in your Documents, Music, Pictures, Videos, and Desktop folders to your separate or external drive.
To clean up Windows File History:
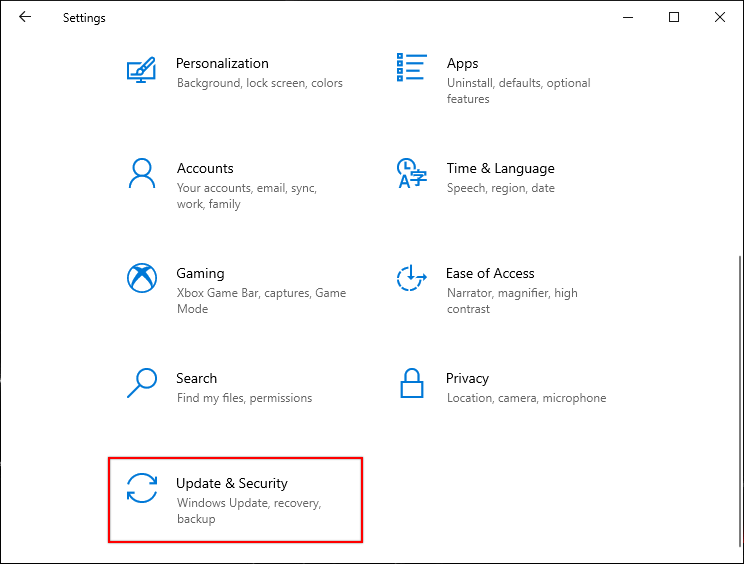
- Right-click on the Windows Start button and choose Settings to open up the Windows Setting window.
2. On the Windows Settings page. scroll down and click on Update & Security.
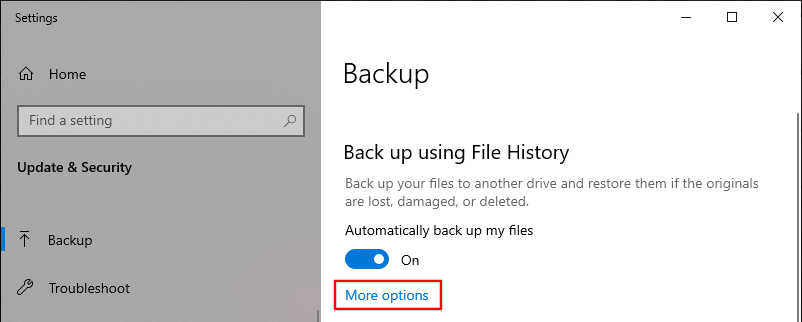
3. Click on Backup.
4. If you’re using Windows File History already, press the More options link to open the Backup Options window.
If you see Back up using File History turned off, you can skip the rest of this section. You have no backed-up files taking up space.
5. In the Backup options window, you’ll probably find the Keep my backups dropdown is set to keep files Forever. To free up space on your drive, change the Keep my backups option to 1 month or whatever time interval you prefer, as shown below.
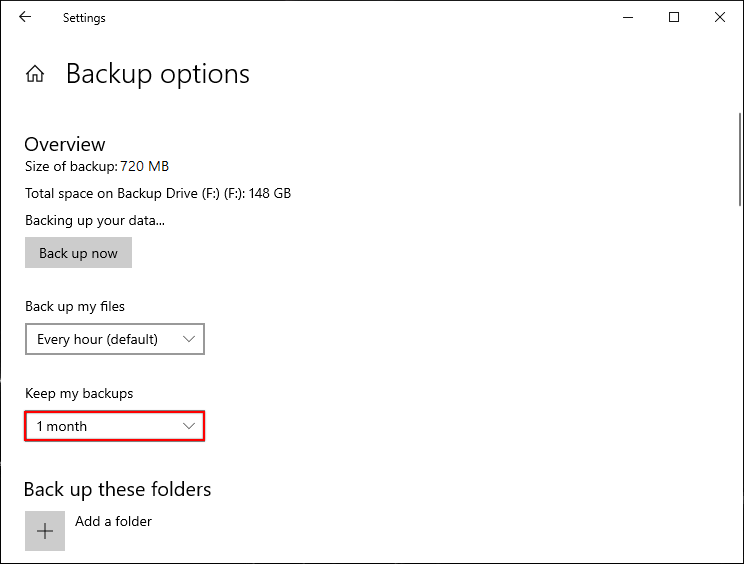
You can also remove the current backup drive as it completely disables the File History. But, you should think twice before doing so since you wanted to back up your files in an external drive in the first place!
6. While you’re in the Backup Options window, scroll down to the bottom. You’ll see an option as shown below, then click on the Stop using drive button.
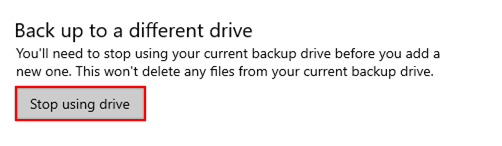
There’s also an option to delete all file backups while keeping the recent ones. Run PowerShell as an administrator, then type in this command
fhmanagew.exe -cleanup 0and press Enter.
Windows Backup and File History both focus on a separate or external drive. Now it’s time to clear up space in your local drive.
Removing Windows System Restore Points
If you’ve ever experienced corruption with your Windows 10 OS and discovered you could restore it with system Restore Points, you know the benefit. A system restore point is a collection of files and registry settings taken at a specific point in time.
Even though having a system restore point is a great benefit, storing many restore points will eventually take up disk space. To ensure restore points don’t go overboard, follow the steps below on how to remove them.
- Click the Start button and type restore, then click on Create a restore point.
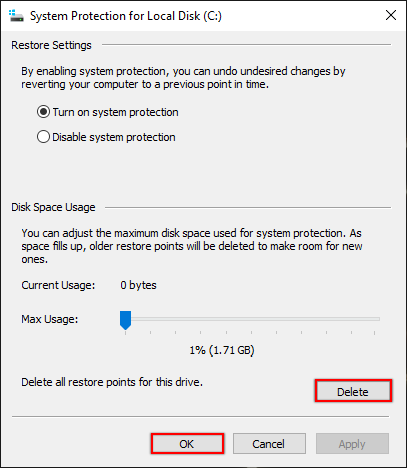
2. As demonstrated below, click on the Configure button under the System Protection tab. This will open up the System Protection window that lets you configure the system’s restore points settings.
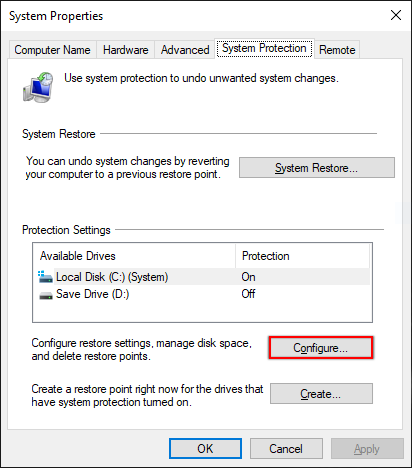
3. Click on the Delete button to delete all restore points freeing up the most space and click OK.
You can set the maximum space restore points consumes by adjusting the slider if you need to maintain some restore points.
Removing Cached Updates
Windows Updates tend to do what they please in the Windows 10 background. When Microsoft releases new updates, Windows 10 will tend to download and install them automatically.
When Windows 10 downloads and installs updates, it caches update files that let you uninstall them at some point if needed. The only caveat is that the files keep piling up, eating away storage space.
Other than cleaning up your storage, removing cached updates fixes issues with Windows Update. Perhaps you’re getting an error, or it’s stuck at 0% download progress. You should start with a clean slate.
Stopping the Windows Update Service
The Windows Update service typically locks cached updates. To remove cached updates, you’ll first need to stop the Windows Update service. To do so:
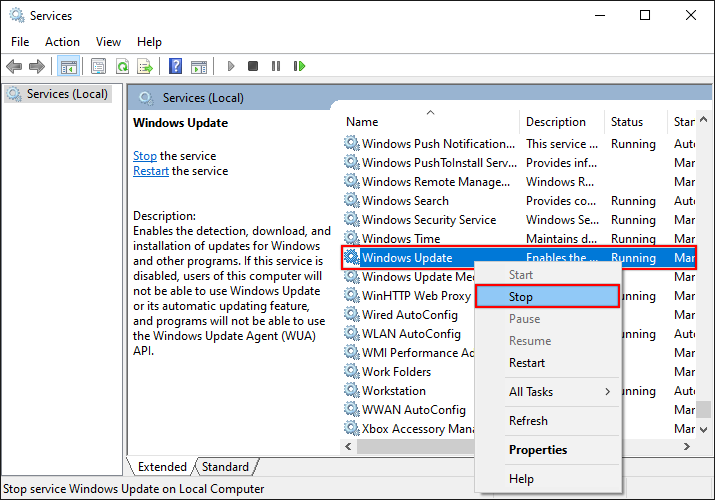
- Click on the Windows start menu and type services.msc. You should then see the Services window pop up.
2. Inside the Services window, right-click on Windows Updates and select Stop. Keep the Services window open to re-enable the Windows Update service later.
You can also stop the Windows Update service via PowerShell by running
Get-Service -Name 'wuauserv' | Stop-Service.
Deleting Cached Updates via the GUI
Once you’ve stopped the Windows Update service, it’s time to begin removing some files and folders.
- Open up File Explorer and navigate to the C:\Windows\SoftwareDistribution\Download folder.
2. Select all the files and folders by pressing Ctrl+A.
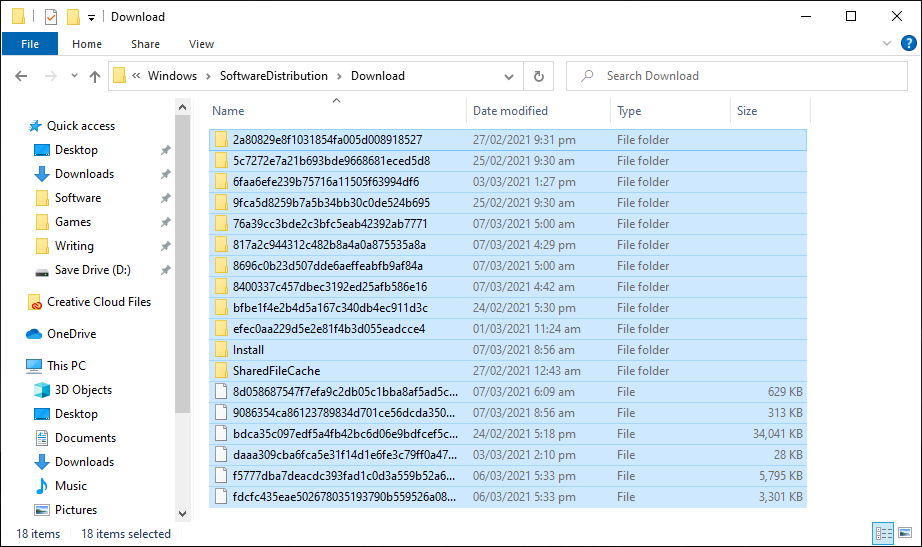
3. Once everything is selected, press the Delete key to remove the cached updates.
To delete the files without moving to Recycle Bin, press the Shift+Delete keys instead.
4. After removing the cached updates, go back to the Services window, right-click on the Windows Update service and choose Start.
Deleting Files Using PowerShell
In the previous example, manually removing the cached updates from the File Explorer is surely efficient. However, it takes a lot of effort to complete the process.
You can use PowerShell to remove the cached updates with a single script and it all happens at once.
Create a PowerShell script and paste the following code in or open up Windows PowerShell as Administrator and paste the code snippet below into the console.
## Stops the Windows Update Service
Stop-Service -Name 'wuauserv'

## Targets the Windows Cached Update location
Set-Location $env:windir\SoftwareDistribution\Download

## Deletes everything inside the *Download* folder *-Force - forces deletion of read-only files
## -Recurse - includes files in sub-directories
## -Confirm:$false - (quiet mode) suppresses prompts*
## Remove-Item * -Recurse -Force -Confirm:$false

## Starts the Windows Update Service
Start-Service -Name 'wuauserv'
Deleting the Windows.Old Folder After a Windows 10 Upgrade
If you were previously running Windows 7 on your computer and upgraded to Windows 10, you may have a folder named Windows.old on your computer. This folder is a backup of your Windows 7 installation when you upgrade to Windows 10.
In a sense, it’s great that you can still access stuff you had in your old Windows version. However, an old Windows version takes up a large amount of space in your drive, so how do you fix that?
You can clean up this Windows.old folder in three different ways, each with its advantages and disadvantages.
Using the Storage Sense Settings
You can remove old Windows versions by using a Windows 10 feature called Storage Sense. Storage Sense is a built-in Windows 10 feature that monitors storage and frees up space automatically. Below are some of Storage Sense features that make it stand-out from other methods of cleaning up your Windows 10 system.
- Clears Temporary Files in your system that are not in use
- Dehydrates cloud-backed content that hasn’t been opened in a certain amount of days
- Deletes files in the Downloads folder if they haven’t been opened for more than a certain number of days.
- Removes files in the Recycle Bin if they have been there longer than the time configured in the Storage Sense settings.
Storage Sense is pretty useful for many things, like the sole purpose of deleting the old versions of your Windows system, here’s how.
To delete a Windows.old folder with Storage Sense:
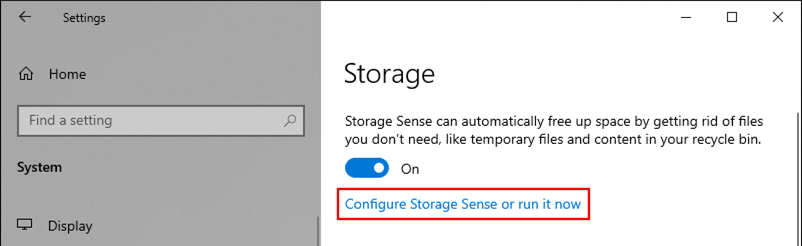
- Click on the Start button and type in storage, then click on Storage Settings.
2. Once you have the Storage settings up, click on the Configure Storage Sense or run it now option.
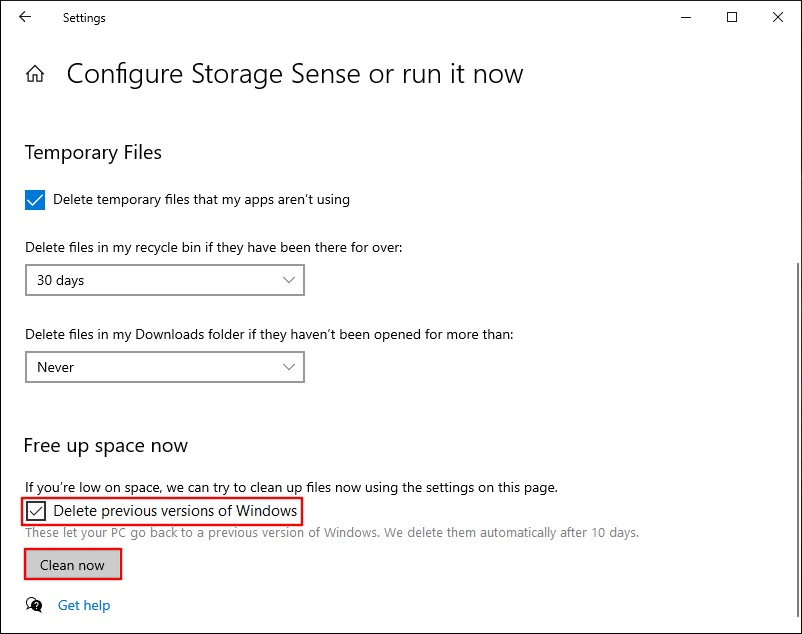
3. In the Configure Storage Sense window, scroll down and enable the Delete previous Windows option.
If you don’t see the Delete previous Windows option, you can skip this section.
4. Click on the Clean now button.
Using the Temporary Files Settings
Windows 10 also has a handy feature hidden under the Storage section in the Settings menu called Temporary Files. This feature can clean up many types of unwanted files but for now, let’s focus on deleting the Windows.old folder.
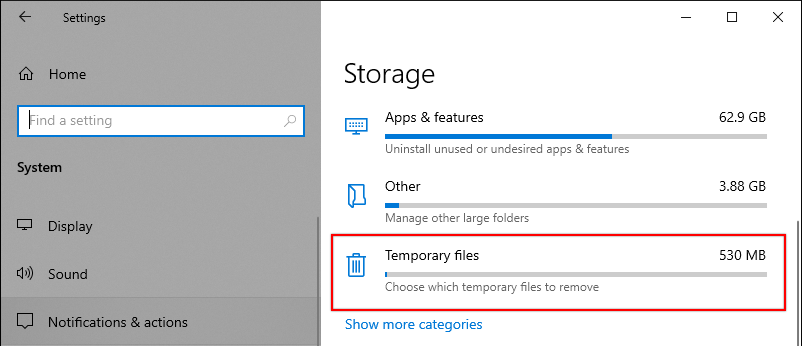
- Navigate back to the Storage settings window. Click on Temporary files.
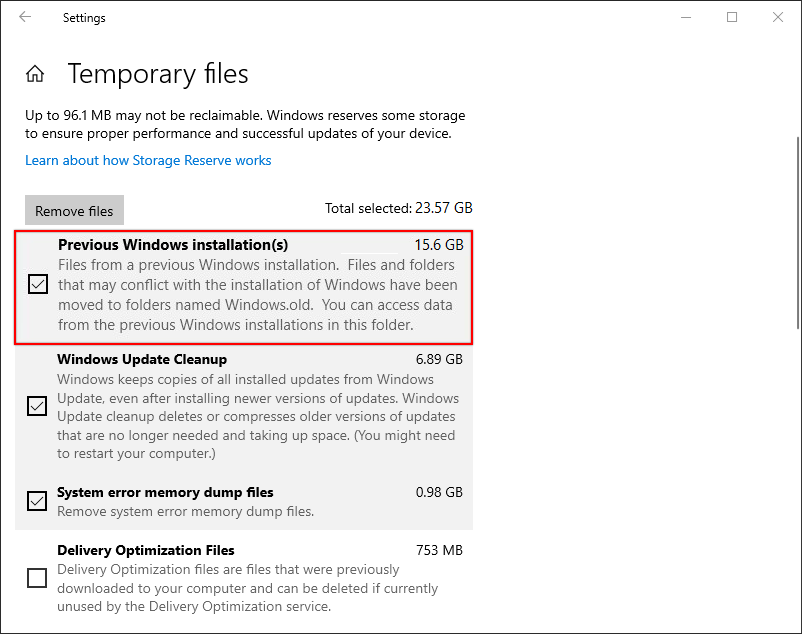
2. In the Temporary files window, check the Previous Windows installation(s) option. This selection includes the entire old Windows version.
In case you don’t see the Previous Windows installation(s) option, it means you don’t have old Windows versions in the system, and you can skip this section.
3. Click on the Remove files button to clean up every type of temporary file checked.
As shown below, the total space to be cleared is 23.57 GB—huge, right?
Running the Disk Cleanup Tool
For the final way to remove a Windows.old folder and old installation, we have the Disk Cleanup tool. Disk Cleanup is part of the Windows legacy tool. It was first introduced in Windows 98. You can say that the Disk Cleanup tool is an old version of the Storage Sense in Windows 10.
Yes, it’s old but not obsolete as it still does its job pretty well, such as cleaning up the previous version of Windows you have on your storage.
To run the Disk Cleanup tool to cleanup the Windows.old folder:
- Click on the Windows start button, type cleanmgr and select Disk Cleanup.
2. On the small pop-up window that comes up, choose the drive you want to clean up and click OK. Since you’re using the Disk Cleanup tool to remove the windows.old folder, choose C:\.
3. Inside the Disk Cleanup window, click on the Clean up system files button to include the system files on the list of files and folders you can delete.
You can also choose to delete temporary files in the Disk Cleanup selection area, which you’ll see covered later.
4. When you click on the Clean up system files button, select the C:\ again. You’ll then see a list containing the system files, such as the old windows versions displayed with Previous Windows installation(s).
5. Check the Previous Windows installation(s) option to add to the list of files to delete from the system and click OK.
It will take some time to complete cleaning up the drive depending on the total amount of disk space to be cleaned. Once the cleaning is done, then you’re all set!
Deleting the $Windows.~BT and $Windows.~WS Folders?
Like the Windows.old folder from the previous section, when you upgrade Windows to Windows 10, it creates a $Windows.~BT and a $Windows.~WS folder. These folders contain a copy of your Windows system that enables you to revert to your old version of Windows.
Since the release of the Windows 10 Anniversary Update (Version 1607), you can roll back to your previous Windows version within ten days after upgrading. Then, both the $Windows.~BT and $Windows.~WS folders are deleted automatically once the rollback period is over.
Is it safe to delete them on your own? Yes, but it’s a bit tricky getting rid of these folders.
The ~WS folders are system folders, meaning the system owns them, not the user. To delete the folders, you’ll first need to take ownership, see how to in the next section.
Deleting System Folders Using PowerShell
There are many ways to delete the $Windows.~BT and $Windows.~WS folders that you’ll find on the internet. Some say they work, some say they don’t do anything, but the most effective way of deleting these system files is using PowerShell as administrator.
To delete the $Windows.~BT Folder and other system folders, open up Windows PowerShell as administrator, and copy the following code into the console. You can also create a PowerShell script with this code.
## takes ownership of the folder
## */F - specifies the filename or directory name pattern
## /R - recurse: instructs the tool to operate on files in the specified directory and all subdirectories.
## /A - gives ownership to the administrators' group instead of the current user.*
takeown /F C:\'$Windows.~BT\*' /R /A

## Grants full control for the Administrator account to make changes on the folder
## */T - indicates that this operation is performed on all matching files/directories below the directories specified in the name.
## /grant - grants the specified user access rights.*
icacls C:\'$Windows.~BT\*.*' /T /grant administrators:F

## Deletes the system folder
## *-Force - forces deletion of read-only files
## -Recurse - includes files in sub-directories
## -Confirm:$false - (quiet mode) suppresses prompts*
Remove-Item C:\'$Windows.~BT\' -Recurse -Force -Confirm:$False
You can see the demonstration below of deleting the $Windows.~BT folder, but the same method applies for deleting the $Windows.~WS folder.
Other Space-Saving Tips to Clean up Windows 10
Aside from the main examples in this tutorial, there are other ways you can clear up space in your storage, such as deleting files from the Downloads folder and uninstalling unused applications.
Clearing Your Downloads Folder
A typical culprit causing you to lose space in your drive is your Downloads folder. Usually set as the default download location in your web browser, this folder can expand quickly.
To clean it up:
- Open up File Explorer, paste C:\Users\%USERPROFILE%\Downloads in the address bar, and press Enter. This path points to the Downloads folder in your home directory.
2. Select everything inside of this folder by pressing Ctrl+A to select all files or hold the Ctrl key while clicking on each file to delete and leave the ones you want to keep.
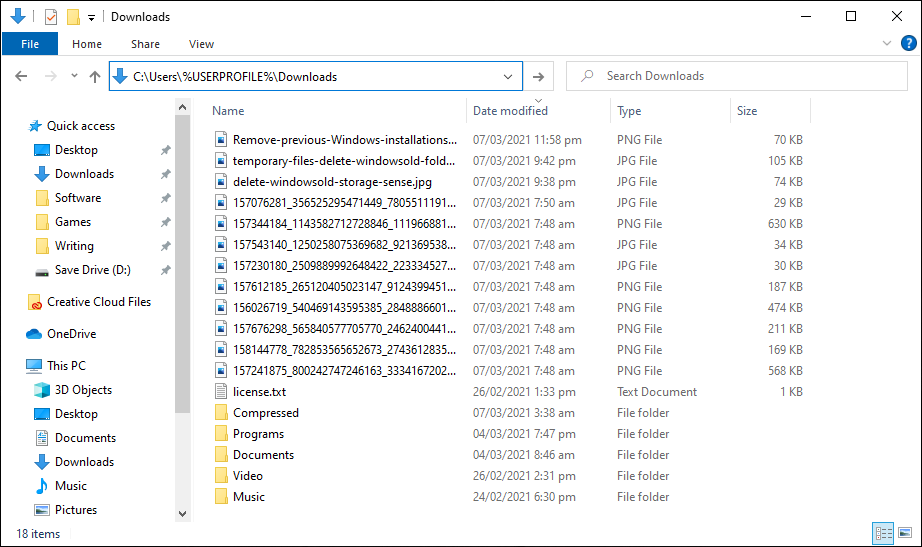
3. Once you’re happy with your selection, press the Delete or Shift+Delete keys to delete the files permanently.
Removing Unused Applications
Often than not, you tend to install applications and leave them there in the system even if you’re not using them. As a result, these applications take up space in your drive, so it would be wise to uninstall some of them.
To uninstall applications:
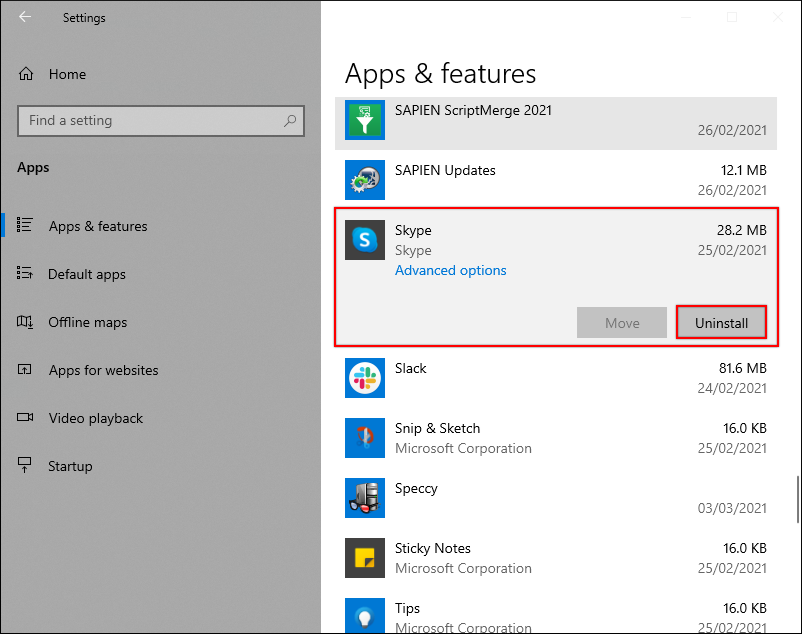
- Click on the Start button, type in apps and click on Apps & Features.
2. From the Apps & features section, look for any application you don’t need anymore, select an application and click on Uninstall to remove it from the system.
Deleting Temp Files in Windows 10
If you’ve been following along, you may have already run the Disk Cleanup tool. This tool, by default, Temporary Files are cleaned up when using Disk Cleanup. But if you’re skeptical and want to be on the safe side, you can also clean up temporary files via File Explorer or PowerShell.
Temp files are located in the C:\Users\%USERPROFILE%\AppData\Local\Temp folder. You can safely delete all files in this folder using either File Explorer or perhaps PowerShell if you prefer the command line or are automating this step.
If you’d like to delete temp files in Windows 10 with PowerShell:
- Click on the Windows start menu and type powershell.
2. Right-click on Windows PowerShell and choose Run as Administrator.
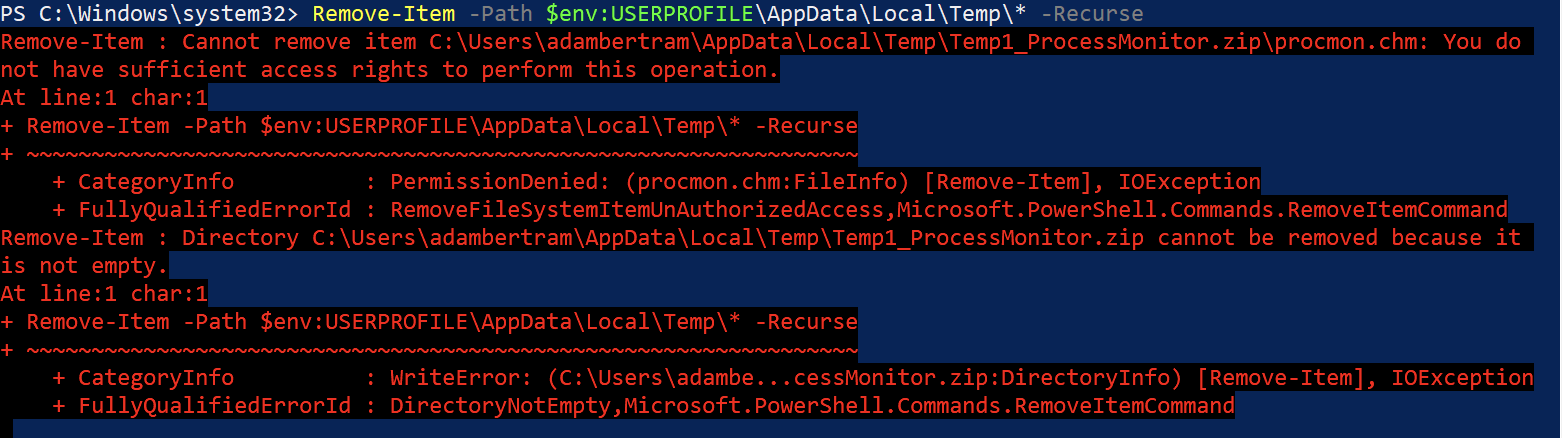
3. Paste the following command inside of the PowerShell console. This command will attempt to remove all files and folders inside of your temp file folder.
Remove-Item -Path $env:USERPROFILE\AppData\Local\Temp\* -RecursePowerShell may return a few errors, as shown below. This is to be expected. You’ll usually find other programs are actively using some files. If this happens, restart Windows 10 and try again, but you may not be able to remove all files.
Conclusion
You should now have the knowledge you need to keep Windows 10 free of clutter! Once you’ve deleted backup files, file history, the Windows.old folder, run disk cleanup cmd, and deleted temp files in Windows 10, your OS should be streamlined and ready to go!
How to clean computer using CMD if you find the PC runs slowly with low disk space? You come to the right place and you can find out how to run commands for cleaning PC from this post on the MiniTool website to free up disk space and improve the PC performance.
It Is Necessary to Clean Computer
Windows operating system is a popular system and you can use many features on the PC running Windows. But as time goes on, many background tasks run to take up many system resources, and temporary files are created to take up disk space although these files are small. As a result, the computer goes slow and low disk space will appear.
In this case, you need to clean your computer regularly to speed up the machine and improve the PC’s performance. Disk cleaning can let your PC work smoothly and eliminate some issues that cause the PC to crash.
Windows comes with some cleaning tools like Disk Cleanup, defragment tool, etc. But some of you choose to clean computer using CMD (Command Prompt). Although a graphical interface is handy for most people, some of you may prefer to use Command Prompt to do many tasks since it is more efficient, fun, and really powerful and brings performance benefits.
If you don’t know how to run commands for cleaning PC, follow the given guide to clean computer including deleting unwanted files, temp files, & prefetch files, defragging your hard drive, erasing a disk, and more.
In this part, we will show you how to use different commands to clean different files. Firstly, you need to open Command Prompt with admin rights.
Step 1: In Windows 10/11, type cmd into the search box.
Step 2: Click Run as administrator from the popup to open the CMD window.

Tips:
In addition to this way, you can open Command Prompt in other methods and refer to this related post — How to Open Command Prompt (CMD) in Windows 11? (7 Ways).
Next, perform the cleaning operation via some clean commands in CMD.
Run Cleanmgr to Clean Unwanted Files
Cleanmgr is an automating disk cleanup tool in Windows operating system. It can search and analyze your hard drive to find files that are no longer needed and delete them automatically to free up disk space on the hard drive.
By configuring cleanmgr.exe with command-line switches, temp setup files, Internet files, downloaded programs files, old chkdsk files, Recycle Bin files and more can be deleted. You can use the Scheduled Tasks tool to schedule the task to run at a specific time.
Let’s see how to clean computer using CMD – Cleanmgr.
Step 1: Open CMD with admin rights.
Step 2: Type Cleanmgr into the CMD window and press Enter.
Step 3: A small window pops up to ask you to choose the drive you want to clean up. Then, click OK.
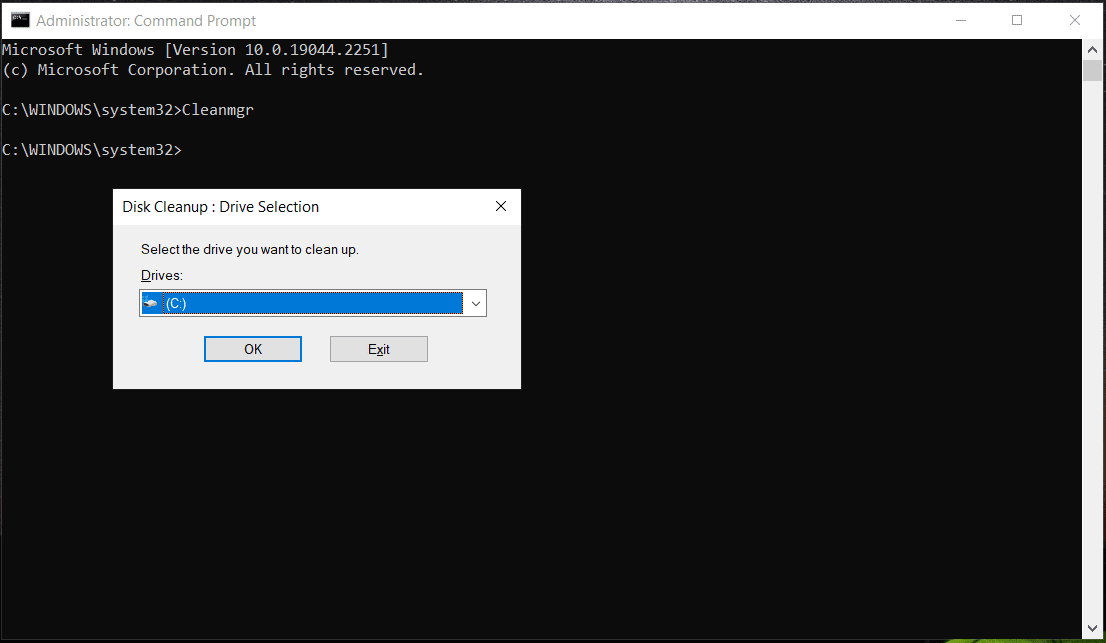
Step 4: Check the items you want to delete and then this tool will delete them to free up disk space.
Cleanmgr – the command for disk cleanup, offers multiple parameters dedicated to specific functions, and let’s see examples.
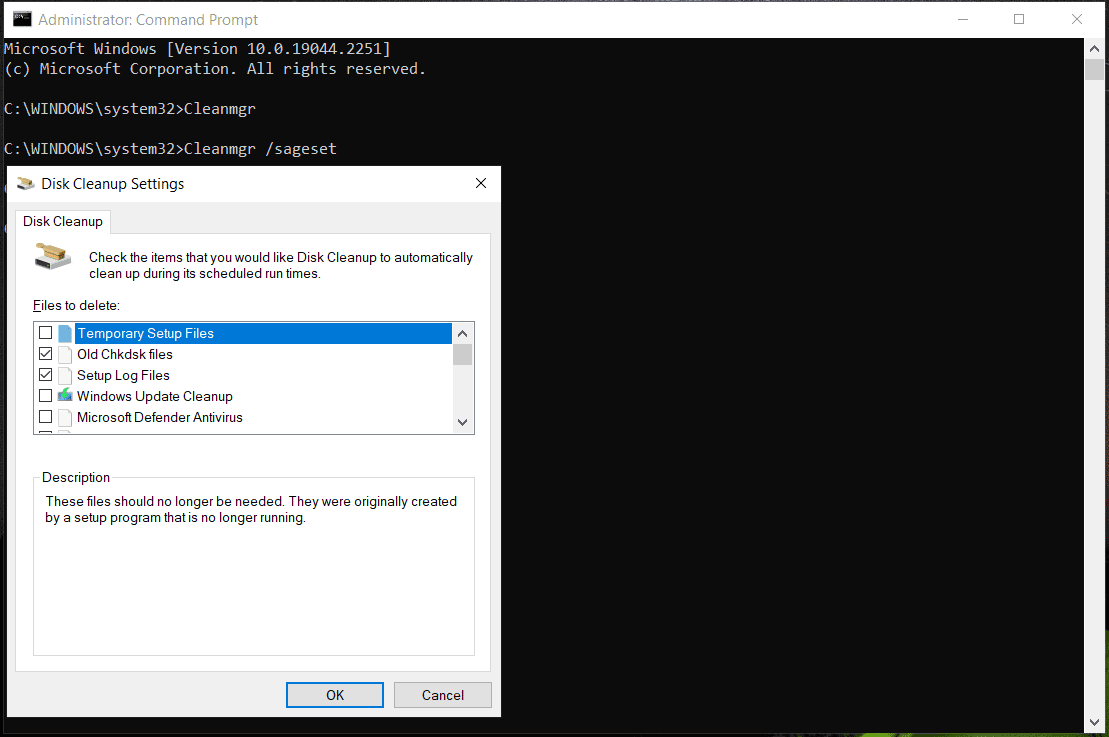
1. Cleanmgr /sageset
This command for disk cleanup helps to directly skip the selection of the drive and redirect you to the Disk Cleanup Settings window to choose the items you want Disk Cleanup to automatically clean up during its scheduled run times.
2. Cleanmgr /sagerun
This command doesn’t choose the category and helps to automate the disk-cleaning process.
3. Cleanmgr /lowdisk
This command is very useful when the hard drive meets low disk space. When running this command, all checkboxes of file categories will be selected by default. The command example is like – cleanmgr /lowdisk/dc. Here c refers to the drive letter.
The command – cleanmgr /verylowdisk/dc helps to delete all junk files quickly without the user prompt.
Tips:
To know more information about this clean manager, you can refer to our previous post — What Is Cleanmgr.exe & Is It Safe & How to Use It.
Run CMD to Temp Files
Windows can create temporary files for temporary use and they are called Temp. During the operation of a program, these files are generated for backup purposes and store information in a short time. They are primarily to store, transfer data and recover lost data.
Temp files won’t take up much disk space and play an important role in the smooth functioning of your system. After finishing tasks, the system will automatically remove them from the temporary folders. It is safe only when temp files are not used by any apps. Or else, Windows will block you from deleting them with the result – failing app tasks.
For temporary files created by Windows operating system, the storage path is %system%/windows/temp. While for the temporary files created by the users, the path is C:\Users\username\AppData\Local\Temp.
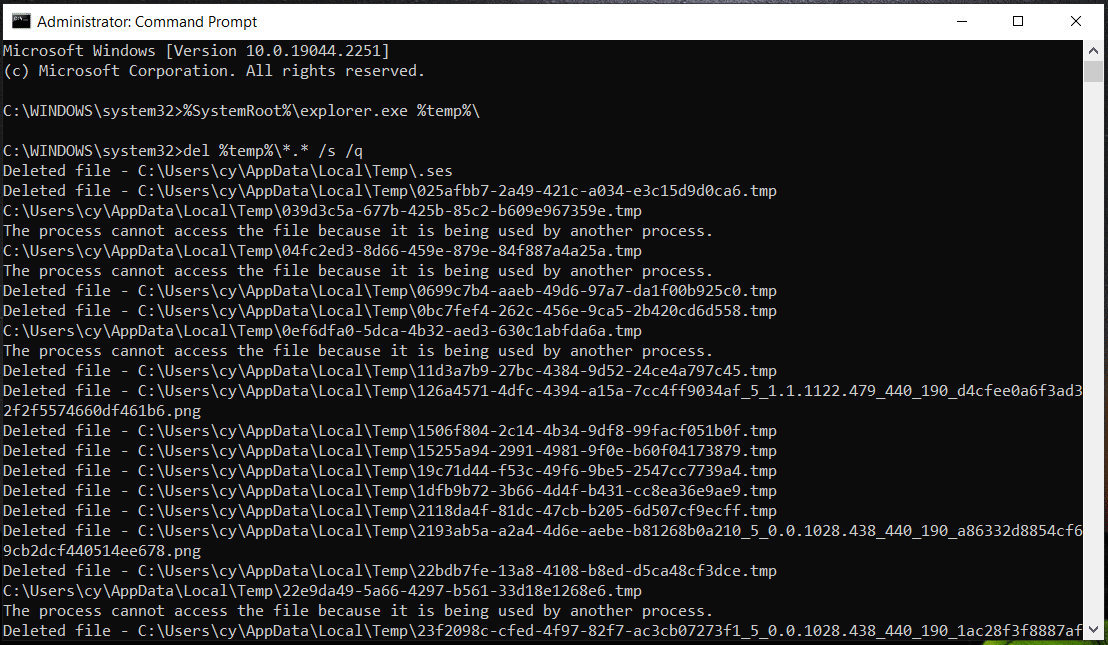
If you want to view temporary files, run this command – %SystemRoot%\explorer.exe %temp%\. This can open the Temp folder in File Explorer. Just press Ctrl + A to choose all the files and delete them. Or run the command – del %temp%\*.* /s /q to delete them. The CMD tool can automatically skip any files that are currently in use but delete the rest files.
Defragment Your Hard Drive via CMD
When talking about “clean computer using CMD”, there is one thing you should think of is the disk defrag. Although fragmentation on the hard drive (only for the traditional hard disk) is a natural occurrence, it may lead to PC performance issues, for example, the access and write speed can be impacted, slowing down the system.
Defrag can reorganize fragmented data in the hard drive so that your PC can access files from the hard drive. You don’t need to defragment your SSDs since this may destroy them or reduce their lifespan. Only defragment your HDDs by following the clean command in CMD – defrag driver letter:.
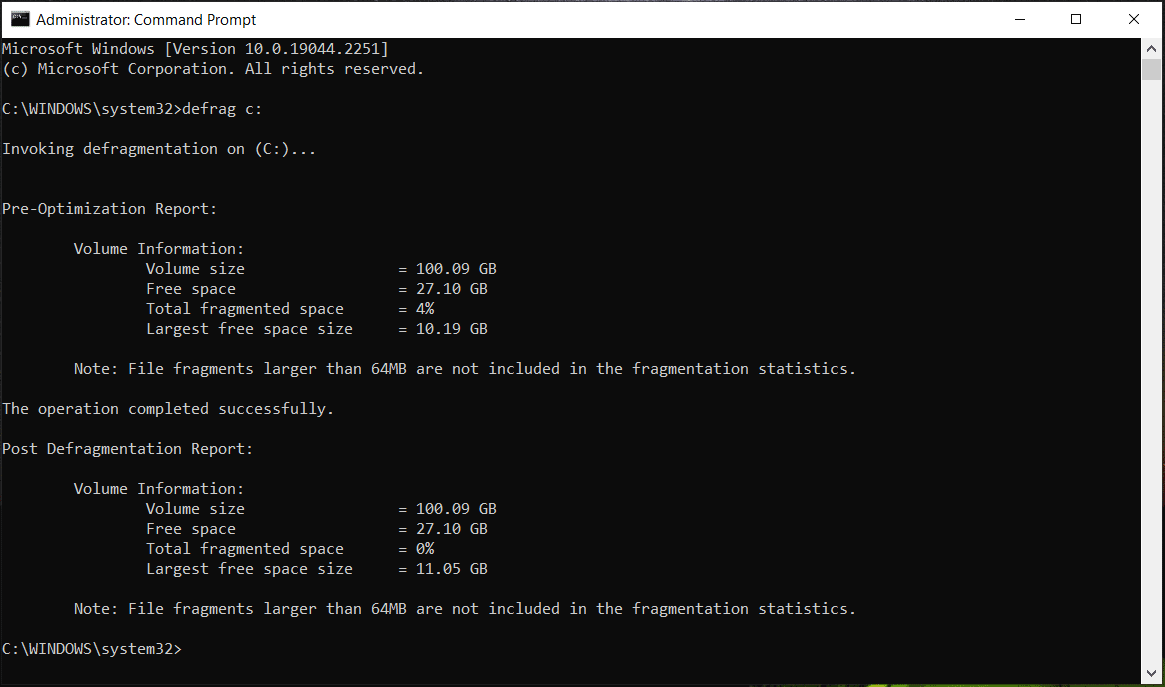
Step 1: Open Command Prompt as an administrator.
Step 2: Type defrag c: into the CMD window and press Enter. Here replace c: with your drive letter
Delete Prefetch Files Using Command Prompt
When you use a program first, Windows operating system will create prefetch files that can work as a cache later. That is, prefetch files are used to store information regarding software activity, including how many times the software has run, when the app was running and associated files used by the software.
These prefetch files are text files with a .pf extension and they are very useful in the quicker loading of programs. But they could take up much disk space. And if you run into app bugs or lags, you can choose to delete these files. Deleting them is harmless and Windows will create prefetch files again the next time you open programs on your computer.
See how to clean computer using CMD by deleting prefetch files:
Step 1: Open CMD with admin permissions in Windows.
Step 2: Type %SystemRoot%\explorer.exe C:\Windows\prefetch\ to the Command Prompt window and press Enter to check the prefetch files. This can open the Prefetch folder in File Explorer.
Step 3: Type del C:\Windows\prefetch\*.*/s/q and press Enter to delete these prefetch files. Alternatively, you can directly delete the Prefetch folder from Windows Explorer.

Clear Cache Memory in Windows
Cache files can dramatically improve performance, availability, and scalability, and they can bring the ability to serve data quickly and faster response times. However, if cache files go wrong, data fetching issues, glitches, or even crashes can happen. A common solution is to clear cache files regularly.
You can choose to clear the DNS cache and Windows store cache. If something goes wrong during the cache-clearing process, the Windows system will tell you.
To clear the DNS cache, execute the command – ipconfig/flushDNS in the CMD window. To clear the Windows store cache, execute this command – wsreset.exe.
DISM Windows Image Cleanup
Deployment Image Servicing and Management (DISM) is a useful command tool that can help to service and prepare system images. You can use DISM to manage a Windows image (.wim) and virtual hard disk (.vhd). It is used for Windows Recovery Environment (WinRE), Windows PE, and Windows Setup. Via the DISM tool, you can fix many system errors including update errors, boot errors, and more.
To check if there is any corruption, run DISM /online /Cleanup-Image /CheckHealth in the CMD window.
To scan the Windows image, execute this command – DISM /Online /Cleanup-Image /ScanHealth.
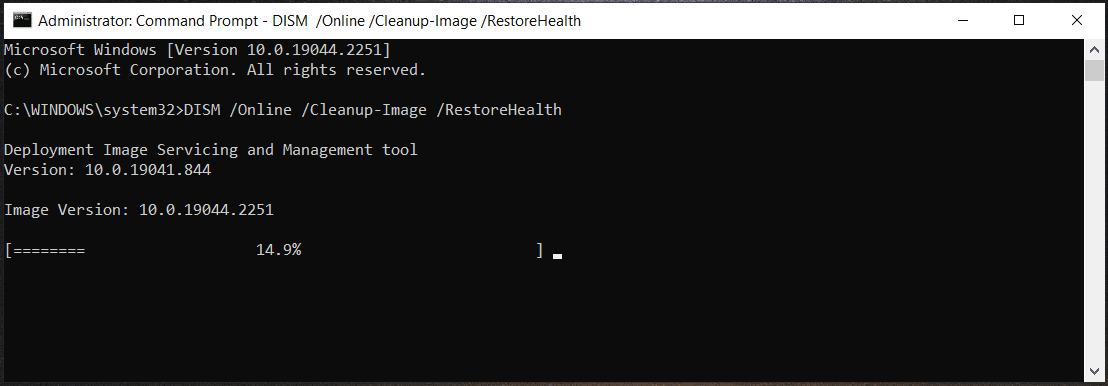
To fix Windows images, type DISM /Online /Cleanup-Image /RestoreHealth into the CMD window and press Enter.
Clean Command in Diskpart
In addition to cleaning the computer using CMD by deleting unwanted files, temp files, and prefetch files, clearing cache, defragmenting your hard drive, and running DISM, there is another aspect to clean your PC and that is using Diskpart to delete all the disk data.
Diskpart is a command-line disk utility included in Windows 2000 and later Windows operating systems to replace its predecessor – fdisk. It can be used to manage your disks and partitions, for example, create partitions, delete partitions, wipe the entire disk data, etc. To know more information about this tool, refer to our library document – What Is DiskPart and How to Use It? (Ultimate Guide & Tips).
If you prepare to give up your hard drive or USB flash drive, you can choose to use Diskpart to erase all the disk data and let the drive become unallocated space.
Note:
During using Diskpart, you may choose an incorrect object. As a result, data is lost and you cannot recover it. So, you can’t be too careful. Besides, we strongly recommend creating a backup for your important files.
Back up Critical Data Before Cleanup Command Diskpart
To back up your significant files on the hard drive or USB flash drive, you can choose to use the Windows built-in backup tool – Backup and Restore (Windows 7). Just go to open Control Panel, view all the items by Large icons, and click Backup and Restore (Windows 7) to open this tool. Then, click Set up backup and start a file backup by following the instructions on the screen.
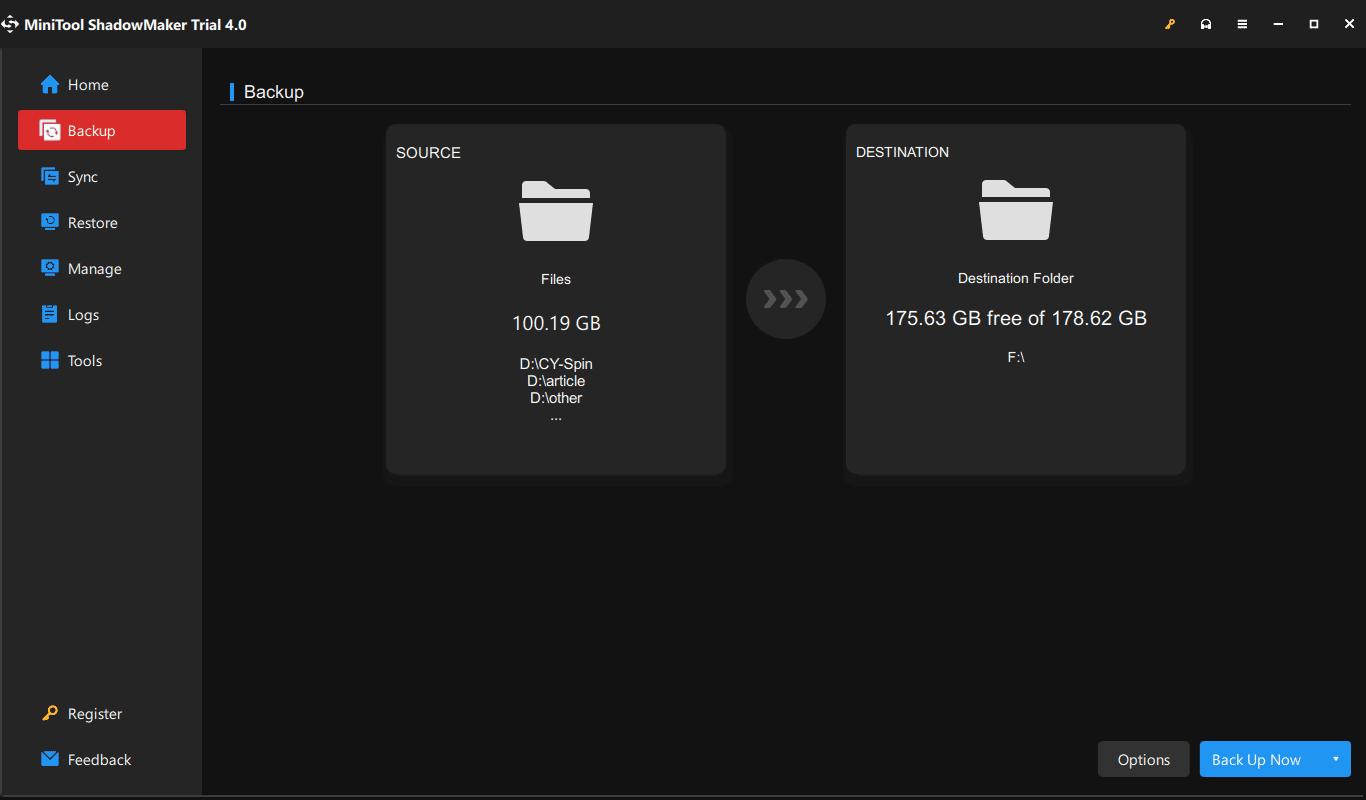
If you don’t want to use this tool but look for a professional and free backup software for file backup, MiniTool ShadowMaker is a good option. This software supports file, folder, disk, partition and system backup & recovery, file sync, and disk cloning. Importantly, it works although the PC fails to boot. Just click the following button to get its Trial Edition to free use for 30 days.
MiniTool ShadowMaker TrialClick to Download100%Clean & Safe
Step 1: Double-click on the .exe file and install MiniTool ShadowMaker on your PC by following the on-screen wizards.
Step 2: Open this software and click Keep Trial to continue.
Step 3: To back up your files, you can go to the Backup page or Sync tab, choose the items you want to back up, and the storage path like an external hard drive or USB flash drive.
Step 4: Click Back Up Now or Sync Now to execute the backup task.
Clean Hard Drive via Diskpart
Next, it is time to use the clean command in CMD – Diskpart. See how to clean computer using CMD:
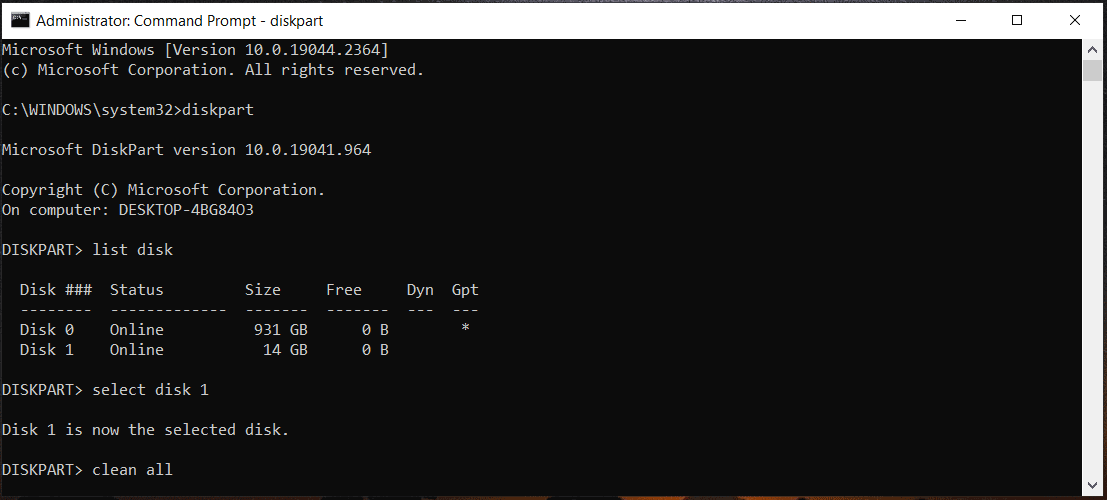
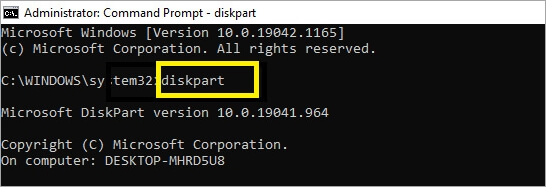
Step 1: In the CMD window, type diskpart and press Enter.
Step 2: Type list disk and press Enter.
Step 3: Execute the command – select disk n. N means the disk number. If you see the disk status shows offline, type online disk and hit Enter.
Step 4: To wipe your hard drive, run clean or clean all.
Tips:
If you want to know the difference between the command – clean and clean all, you can find details from our previous post — Diskpart Clean vs Clean All: Choose a Way to Wipe Disks.
Click to Tweet
Bottom Line
That’s all the information about how to clean computer using CMD including deleting unwanted files, temp files, & prefetch files, defragging your hard drive, cleaning cache, erasing a disk, and running DISM. If you need, just run commands for cleaning PC by following the given guide. Hope you can have a smooth PC. If you have other ideas on cleanup commands, let us know in the Comment part below. Thanks.
Thinking to clean a disk using CMD for your Windows 11/10/8.1/8/7? Or you’re confused about the pros and cons of the «clean disk using CMD» method? This EaseUS tutorial guide covers everything you need to understand. Also, check out our alternative way of disk cleaning without CMD.
| Workable Solutions | Step-by-step Troubleshooting |
|---|---|
| Fix 1. Delete All Partitions to Clean a Disk in CMD | Step 1. Hold down the Windows + S keys to open the search bar and type cmd…Full steps |
| Fix 2. Wipe to Clean a Disk Using CMD | Step 1. Press the Windows + S keys and type cmd in the search box…Full steps |
| Fix 3. CMD Alternative for Cleaning a Disk | Step 1. Run EaseUS BitWiper. Click the «Wipe Disk» tab. Step 2. Select the targeted HDD…Full steps |
Can I Clean a Disk in CMD?
Absolutely Yes! You can clean disk using CMD by following the guidelines in this tutorial. The CMD works in two ways: to clean disk by deleting all partitions or wiping the disk’s contents at once.
| Pros of using CMD to clean disk | Cons of using CMD to clean disk |
|---|---|
|
|
Getting started: How to clean disk using CMD?
Whether your hard disk is corrupt or you want to change ownership, an efficient solution is to clean disk using CMD. However, the process would mean you lose all existing data, including the essential ones. That’s why a backup is always advised.
It’s all right if you do not know how to back up a hard drive. Downloading an excellent third-party application like the EaseUS ToDo backup would help.
Now, let’s get started with the options to clean disk using CMD.
Option 1. Delete All Partitions to Clean a Disk in CMD
This first option uses the clean command to delete all existing partitions on the targeted hard disk. It’s a one-time operation that erases all saved data on the internal or external hard drive. Therefore, if you’re looking to clean a disk and remove all partitions and data quickly, this CMD clean command option is what you need.
Step 1. Hold down the Windows + S keys to open the search bar and type cmd in the box provided. Right-click Command Prompt and pick the Run as administrator option. Select Yes for the next prompt.
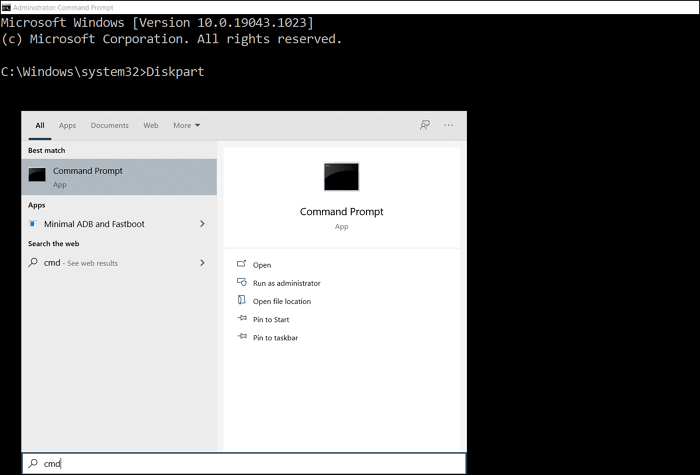
Step 2. A dark CMD command window should open. Type diskpart and hit Enter.
Step 3. Type list disk, and the command prompt will display all available disks. Go through the listed disks and type select disk # (replace # with the specific number of your targeted disk). Here, the target disk is disk 2. So, we enter select disk 2.
Step 4. You should see a message that Disk 2 is now the selected disk. Type clean and press Enter.
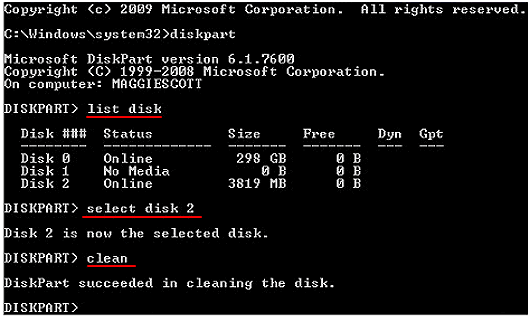
Step 5. Another message should display that Diskpart succeeded in cleaning the disk. Type exit and close the CMD command prompt windows.
Option 2. Wipe to Clean a Disk Using CMD
The CMD command prompt offers more than cleaning all partitions on your hard disk. You can also use the commands to wipe clean a disk using CMD. The clean all command is used in this case.
Compared to the clean command, the clean all command completely wipes the disk beyond recovery. Deleted partitions and data using this option 2 are permanently erased, and the disk is reset to its original state.
See the following steps to run the clean all command lines for your internal/external hard disks.
Step 1. Press the Windows + S keys and type cmd in the search box. Next, locate Command Prompt and right-click. Select the Run as administrator option. A pop-up dialogue box will appear. Select Yes to continue.
Step 2. The CMD command prompt will then open in the form of a dark window. Type diskpart and press Enter.
Step 3. Enter the following commands one after the other and press Enter after each.
- list disk
- select disk 0 (Here, we have only one disk 0. Remember to replace 0 with the number of the targeted disk)
- clean all
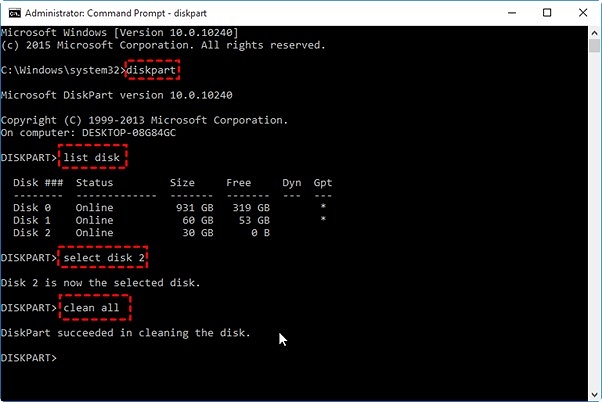
Step 4. Wait for the cleaning process to complete. Input Exit and close the CMD command prompt window.
CMD Alternative for Cleaning a Disk
Despite its effectiveness, many people might not want to clean disk using CMD command lines because of the setup that appears complicated. If that’s the case, using a professional disk cleaning tool like the EaseUS BitWiper becomes the recommended solution.
Regardless of the Windows version or disk type, the BitWiper software offers direct disk wipe assistance. It’s a reliable tool and does not have complex command lines like the CMD methods. The features of the EaseUS BitWiper are:
1. Clean and wipe multiple internal/external disks or HDDs/SSDs simultaneously.
Instead of running a CMD command prompt for the different disks one after the other, the EaseUS BitWiper helps wipe all targeted disks at once. Only ensure you have connected the internal or external disks to the same computer.
2. Delete all partitions, including the Operating System drive.
When trying a manual format, deleting the partition with the OS is impossible. However, BitWiper can perform a complete disk wipe of all data, including the OS drive.
3. Instantly erase or shred multiple files/folders.
You can also use the EaseUS BitWiper to shred selected files/folders on your internal or external hard drive. It’s called shredding because it only erases the specific items you selected and nothing more.
4. Allows different disk clean modes
It also supports rapid, quick, slow, and different disk clean modes. Just ensure you find the most suitable one for what you aim to achieve.
5. Compatible with Windows Server 2022-2012 and Windows 11/10/8.1/8/7 devices.
Works on all versions of Windows starting from Windows 7. That means you do not have to worry about the compatibility of the BitWiper tool during installation.
How to Clean a Disk using CMD Alternative – EaseUS BitWiper
Carefully follow these steps to use the EaseBitWiper to clean your SSDs, internal or external hard drives.
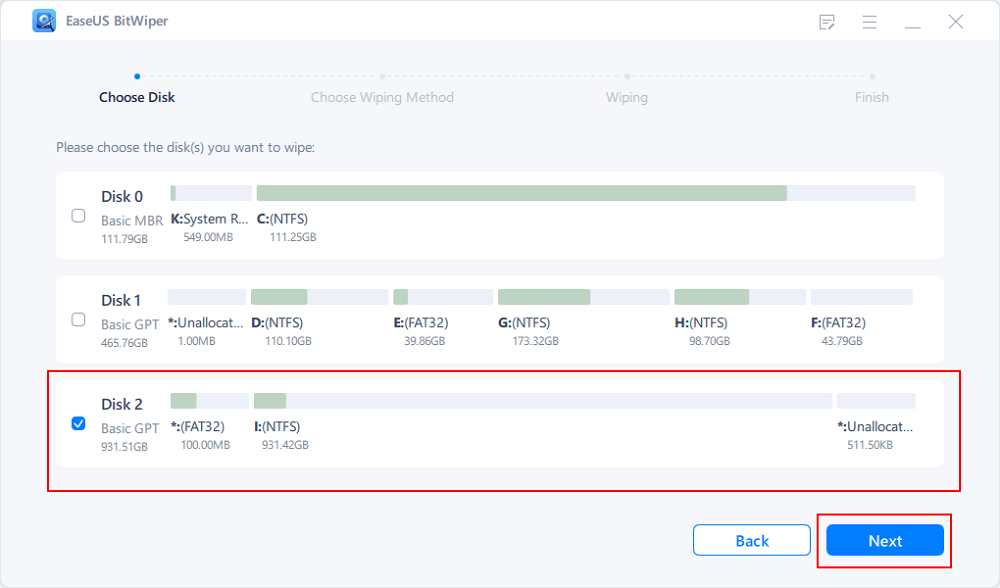
Step 1. Run EaseUS BitWiper. Click the «Wipe Disk» tab.
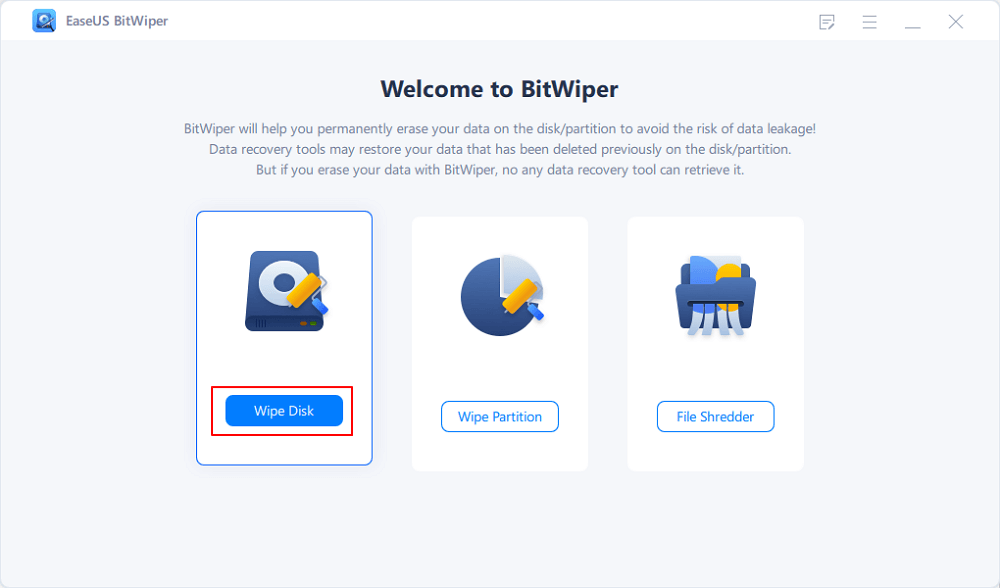
Step 2. Select the targeted HDD or SSD to wipe.
Notice: Please make sure you have chosen the correct HDD or SSD. Once the wiping starts, your data is irrecoverable.
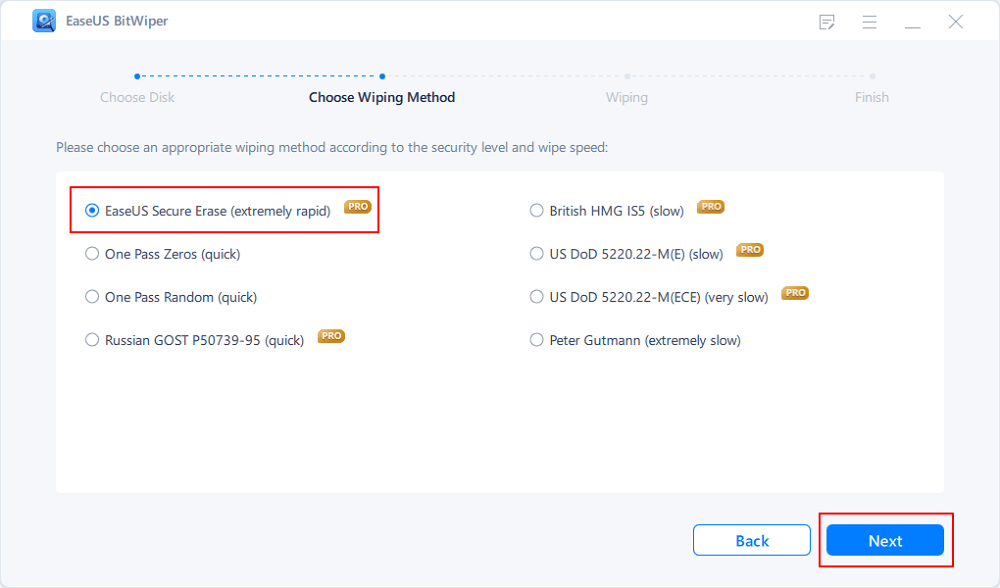
Step 3. Choose Wiping Method and click «Next.»
Choose a suitable wiping method. Recommend EaseUS Secure Erase!
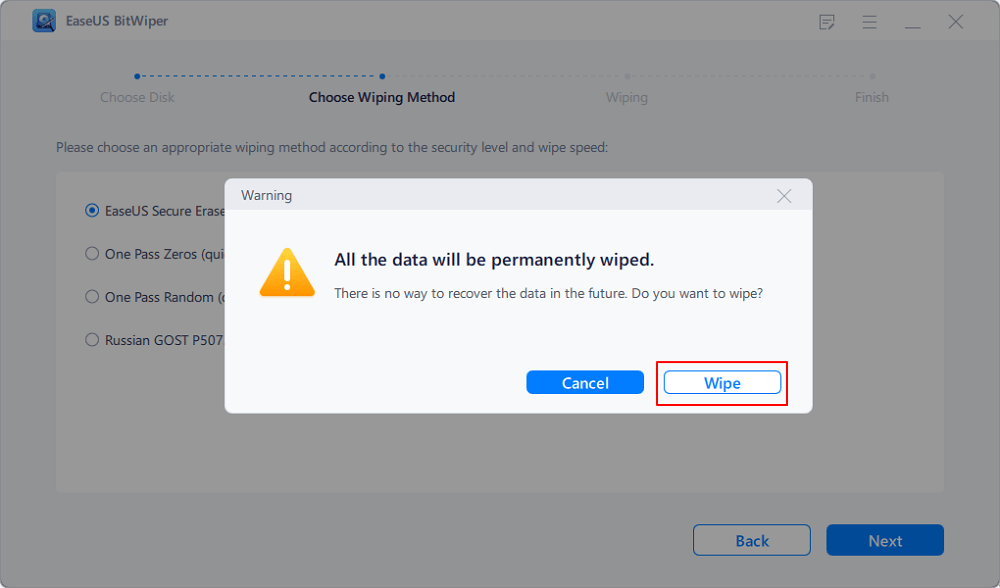
Step 4. Check the warning message and click «Wipe» to confirm.
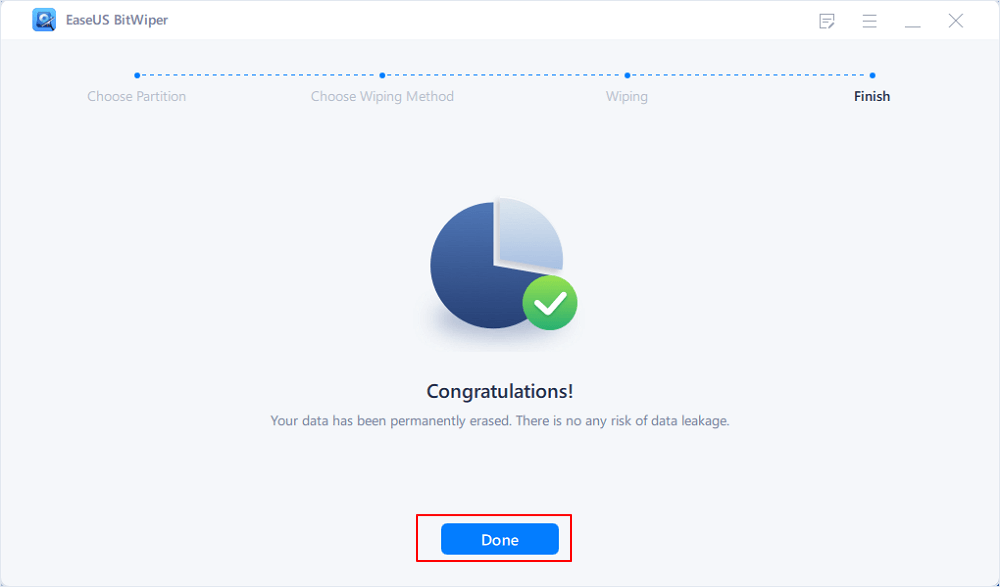
Step 5. Wait for wiping finish and click «Done.»
Conclusion
It is possible to clean a Disk using CMD. And there are two methods of achieving that. Either you carry out a clean command for the partitions/data or a clean all command for a permanent/complete disk wipe.
However, these methods can be sometimes complicated for beginners and unrecoverable for the clean all command. That’s when we recommend a safer, user-friendly, and reliable option – the EaseUS BitWiper software. Download it from the official page and get started. Are you having questions about the BitWiper tool? Don’t hesitate to contact the EaseUS support team.