
August 12, 2016 updated by
Leave a reply »
It could be quite annoying if your computer goes to sleep at all the wrong times or if you have trouble coming out of sleep state. In this tutorial we’ll show you 2 ways to put your computer to never sleep & disable sleep mode in Windows 10.
Method 1: Set Windows 10 PC to Never Sleep Using Control Panel
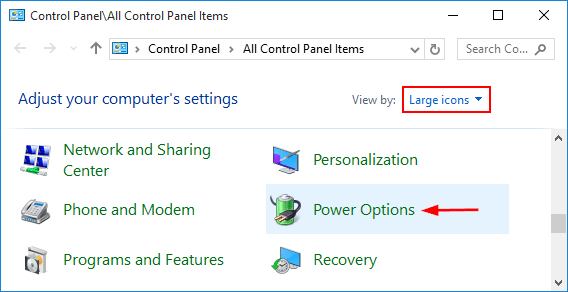
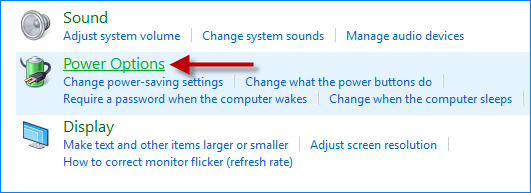
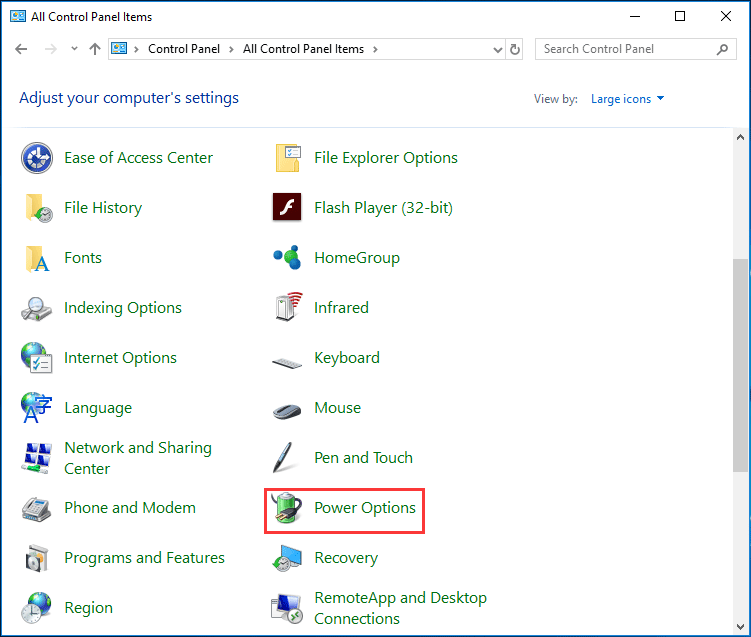
- Open the Control Panel in Windows 10. Change your view to either Large icons or Small icons. Look for and click on the Power Options.

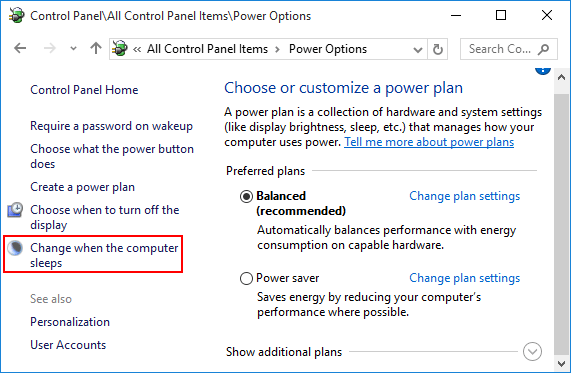
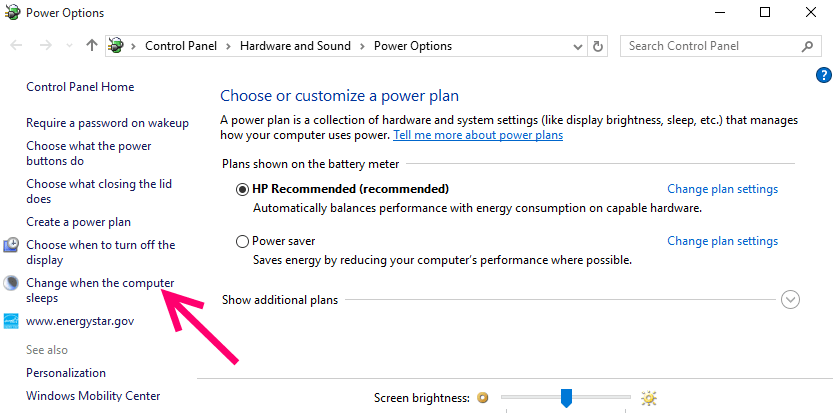
- This will bring you to a place where you can choose your power plan. From the left hand side of the window, select Change when the computer sleeps.

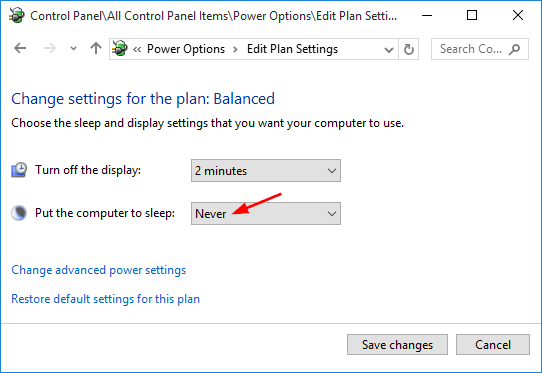
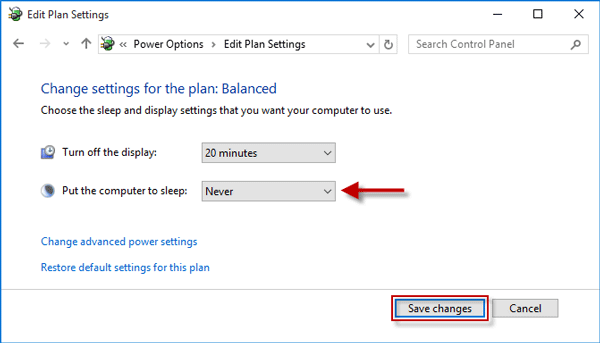
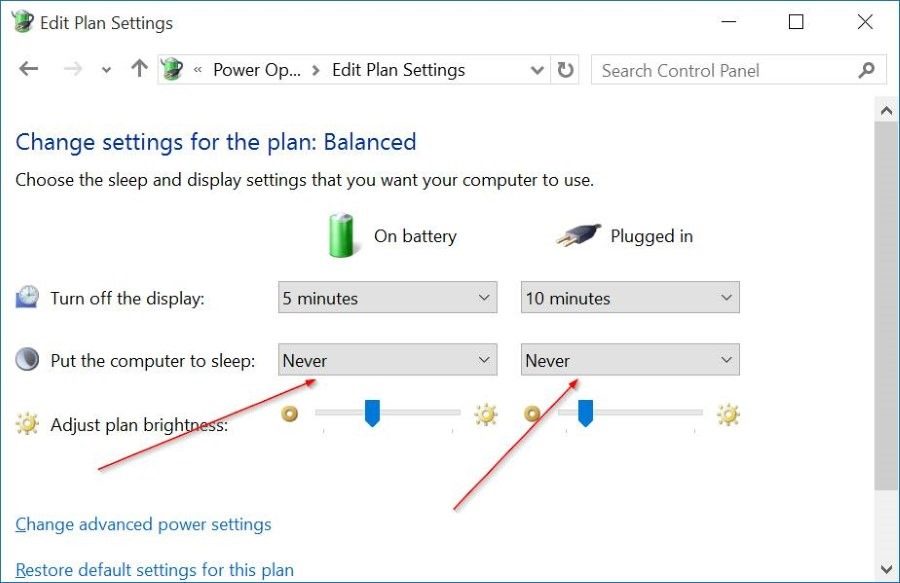
- From the drop down box next to Put the computer to sleep, select the amount of time you would like Windows 10 to wait before entering sleep state. If you want to stop Windows 10 from going to sleep, select Never from the list. From there, you can also see an option for making your computer never turn off monitor display.

- When done, click the Save changes button to exit.
Method 2: Set Windows 10 PC to Never Sleep Using Settings App
- To get started, open the Settings app by pressing Win + I keys together, or clicking on the Start button and selecting Settings.
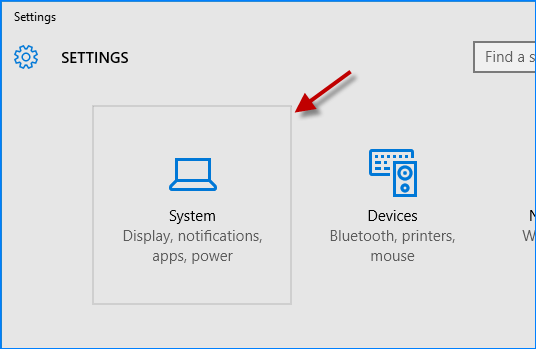
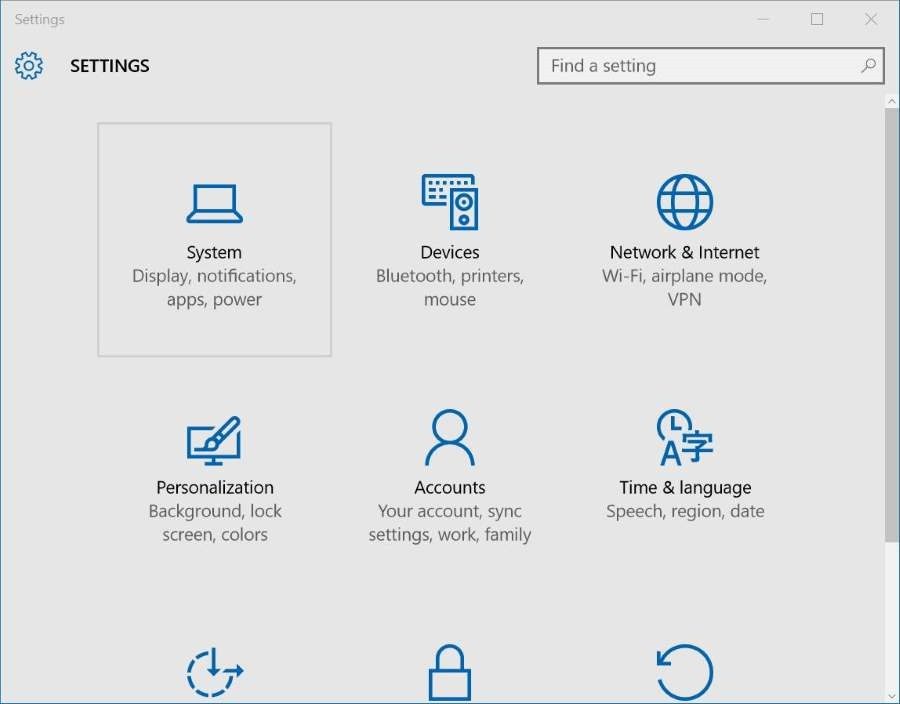
- From the Settings window, click on System.

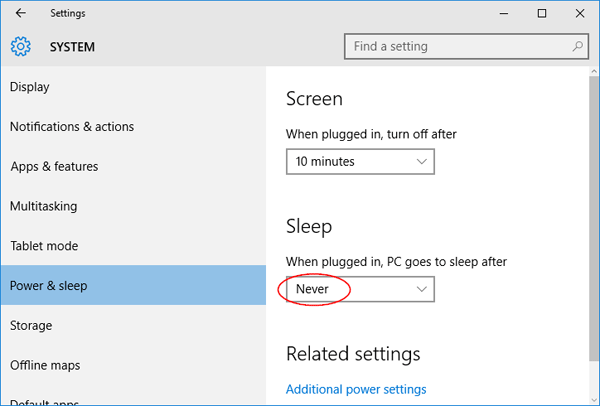
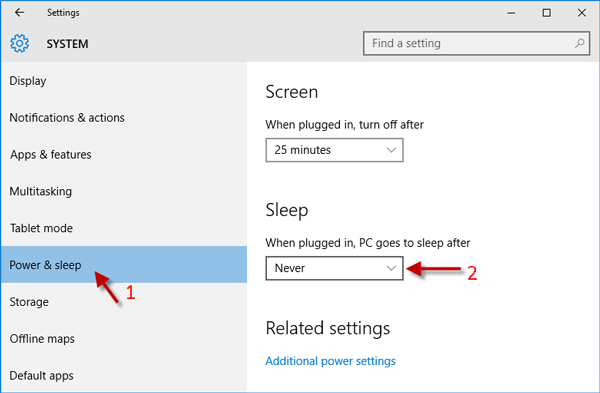
- Select Power & sleep on the left pane. Under the Sleep option, select Never from the drop-down list. You can also click the Screen drop-down list and then select Never if you want your PC to never turn off screen display.

- That’s it! Your PC will never go to sleep mode again.

- Previous Post: 6 Ways to Open Registry Editor in Windows 10
- Next Post: Fix Operating System Not Found When Booting Windows 10 / 8

By default, when your computer remains inactive for some minutes, it will automatically go to Sleep mode and turn off the display. Auto Sleep sometimes brings us great convenience, like when we have to walk away from the computer and don’t want to shut down the computer.
However, it could be quite annoying if your computer goes to Sleep at all the wrong times or if you have trouble waking your computer from Sleep mode. Fortunately, you can control when or whether your computer goes to Sleep. In this page, we will show you how to set your computer to Never Sleep with Windows 10. There are two methods for your choices.
- Method 1: via Settings
- Method 2: via Control Panel
Method 1: Set Windows 10 computer to Never Sleep via Settings
Step 1: Open the Settings app by using Win + I.
Step 2: Click the first item labeled “System (Display, notifications, apps, power)”.
Step 3: On the System section of Settings, click Power & Sleep on the left side. Locate the “Sleep” section on the right side, and choose “Never” from the drop-down list. That’s it.
Method 2: Set Windows 10 computer to Never Sleep via Control Panel
Step 1: Open Control Panel by pressing Win + X and then select Control Panel.
Step 2: Click “Hardware and Sound”, and then click “Power Options”.
Step 3: Click “Change when the computer sleeps” link on the left side.
Step 4: Click the drop-down button next to “Put the computer to Sleep”, choose “Never” from the drop-down list, and click the “Save changes” button. That’s it.
Using either method above, you can set your computer to never automatically Sleep. Your computer goes to Sleep only when you manually force it to Sleep by clicking the Sleep button in the Power options menu.
Top 2 Ways to Set Computer to Never Sleep Windows 10
“How can I make my computer not go to sleep? I’m trying to download some software that takes 10 hours; the problem is that my computer goes to sleep and then the download resets, so I have to start again. Is there any way that I can disable sleep mode on Windows 10 so it won’t reset the download?”
The sleep mode is a low-power state in Windows system, which only consumes a very small amount of power. When you’re away from your PC for 15 or 30 minutes, it will go to sleep mode automatically. The thing is if there are still programs running, it will result in data loss. Thus, many users want to set computer to never sleep with windows 10 to avoid data damage. This post will introduce you 2 ways to make your computer not sleep on Windows 10.
Note: If you lost your Windows 10 password after boot computer from the sleep mode, you can try Windows Password Key, the professional Windows password resetting tool to help you get access to your computer within minutes.
- Way 1: How to Disable Sleep Mode on Windows 10 Via Settings
- Way 2: How to Turn off Windows 10 Sleep Mode in Control Panel
Way 1: How to Disable Sleep Mode on Windows 10 Via Settings
- Open Setting in Windows by clicking the Settings icon or press Windows + I
- Click “System” option in the settings, which including Display, notifications, apps and power
- On the System section of Settings, click Power & Sleep on the left side. Find the “Sleep” and expand the drop-down menu, select “Never” to stop computer from sleeping on Windows 10.

Note: To enable the sleep mode, just select any other number instead of Never.
Way 2: How to Turn off Windows 10 Sleep Mode in Control Panel
- Type “Power Option” in the search box and then press Enter to open Power Option window.

- Click “Change when the computer sleeps” link in the left pane.
- Now you can see the “Put the computer to sleep” option, select “Never” for both “On battery” and “Plugged in” to prevent Windows 10 from going to sleep.
With the 2 easy methods mentioned, you must have understood how to set windows 10 never sleep completely. The changes made to sleep mode will only apply to the current power plan, if you want to turn off sleep mode in all power plans, just switch to that power plan and put computer to never sleep.
- Related Articles
- Top 2 Ways to Show Windows 10 Hidden Files
- Top 6 Options to Delete a User Account in Windows 10
- How to Factory Reset Windows 10 without Password
comments powered by
You are here:
Home » Windows 10 » How To Enable Or Disable Sleep Mode In Windows 10/11
The sleep mode or sleep state is a low-power state available in the Windows operating system, including Windows 10/11. This low-power sleep mode comes in handy, especially for notebook and tablet users, to extend the battery life.
What’s the sleep mode in Windows 10/11?
Unlike Hibernation, when a device is put into sleep mode or state, it will draw a very small amount of power, but you will be able to resume your work very quickly (almost instantly) by pressing any key on the keyboard, moving the mouse/touchpad, or pressing the power button.
Since the sleep state draws a small amount of power on a battery-powered device, if the battery level falls below the critical level, Windows automatically puts the device into hibernation mode (if enabled) to prevent any data loss.
With default settings, your PC might go to sleep mode after 15 (when on battery) or 30 (when plugged in) minutes of inactivity. This also means that, at times, your Windows 10/11 PC might go to sleep mode when a program is running in the background, resulting in loss of data.
For instance, your Windows 10/11 PC might go to sleep mode when a file is being downloaded via a web browser, forcing you to start the download all over again if the server from where you are downloading the file doesn’t offer resume support.
If you find that the sleep mode is not so useful, you can either configure your PC to enter the sleep mode after a long period of user inactivity or make your Windows 10/11 PC never sleep.
Method 1 of 2
For Windows 11 directions, scroll down the page.
Step 1: Open the Settings app. To do so, click on the Settings app icon on the Start menu or simultaneously press Windows and I keys.
Step 2: Click the first option titled System.

Step 3: On the resulting page, click Power & Sleep. Now, under the Sleep section, you will see two options:
# On battery power, PC goes to sleep after
# When plugged in, PC goes to sleep after

For both options, expand the drop-down menu and select Never. That’s it! Your PC will never go to sleep mode again. Here, as you can see in the above picture, you can configure how long should Windows 10 wait before putting the computer to sleep mode.
Note that changes made to the sleep mode will apply to the current power plan only. To make changes to other power plans, switch to the different power plans by right-clicking the battery icon in the system tray, clicking Power Options, and then selecting a power plan from the list.
Once a different power plan is selected, repeat above mentioned steps to configure or disable sleep mode for that plan.
Method 2 of 3
Disable sleep mode in Windows 11
Step 1: Open the Settings app. Go to System > Power & Battery page.
Step 2: Here, in the Power section, click on Screen and sleep to see related settings.

Step 3: To disable the sleep mode, select Never from all four drop-down boxes, as shown in the picture below.

Method 3 of 3
Another way to make your Windows 10/11 PC never sleep
Step 1: Open the Control Panel, change the View by to Small icons, and then click Power Options.
Step 2: On the left pane, click Change when the computer sleeps link to open the Edit plan settings window.

Step 3: Here, in the drop-down menus next to Put the computer to sleep, select Never for On battery and Plugged in. Click the Save changes button. That’s it!

Note that instead of selecting Never, selecting any other number will enable the sleep mode in Windows 10/11.
IMPORTANT: You need to repeat the steps mentioned above for all power plans. That is, if you have disabled sleep mode for the Power Saver plan, you will need to do the same for Balanced and other plans (if you have created one) to avoid Windows 10/11 putting your PC into sleep mode while on these power plans.
-
Home
-
News
- Here Is How to Stop Computer from Sleeping in Windows 10/8/7
By Vera | Follow |
Last Updated
Do you feel annoyed in this situation: you leave the computer for just a few minutes and you have to input the password again or sometimes you lose unsaved data when coming back since the computer goes to sleep? Take it easy, and MiniTool Solution offers this post to show you how to stop computer from sleeping easily.
Overview of Sleep Mode of Windows 10/8/7
Sleep mode is a useful function in Windows operating system and it refers to a low-power state. This mode can extend the life of your screen, hard drive and battery and prevent you from leaving your computer running for hours if you are distracted.
Unlike Hibernation mode, sleep mode will draw a very small amount of power when a device is in this mode. When it is enabled, the Windows system will store anything you open to RAM and all processes on your computer are paused. To go back to your work, you can press any key on the keyboard or move your mouse.
Sleep mode doesn’t always satisfy you. Sometimes you read some eBook, any article or watch a movie without pressing any key or touching the mouse but the PC goes to sleep. Or sometimes you only leave for a few minutes and you need to type the password again when going back from the sleep mode. How annoying it is!
Importantly, you should note that all contents will get lost if you haven’t saved them once power outage happens by accident. Luckily, you can stop computer from sleeping by following these methods mentioned below.
How to Make Computer Not Sleep Windows 7/8/10
To prevent computer from sleeping, you can set your power plan so your machine doesn’t go to sleep even though you don’t touch your mouse or press any key. Or you can go to Windows Settings to change the setting. Additionally, a third-party tool will be helpful.
Now, let’s see how to disable sleep mode in these ways.
Method 1: Stop Computer from Sleeping via Control Panel
Step 1: In Windows 7/8/10, type control panel in the search box and click this app to open it.
Step 2: View all Control Panel items by large icons and then click Power Options.
Step 3: Click the Change when the computer sleeps link from the left pane to edit plan settings.
Step 4: Go to the Put the computer to sleep section, select Never from the drop-down menu. If you are using a laptop, here choose Never for On battery and Plugged in.
Step 5: Click Save changes.

Now you successfully prevent computer from locking without admin rights. This way applies to Windows 10/8/7.
Method 2: Disable Sleep Mode Windows 10 via Settings
Step 1: Navigate to Start > Settings > System.
Step 2: Click Power & sleep in the left pane and go to the Sleep category to change the setting to Never.

This method is available only for Windows 10 operating system. If you need to stop computer from sleeping in Windows 7, you can try the first solution.
Method 3: Use a Third-Party Tool
In addition, you can also use a professional tool to make your computer not sleep. In the market, there are many third-party tools helping you to prevent computer from sleeping, such as, Don’t Sleep, Insomnia, Caffeine, etc. Just choose one based on your needs.
Bottom Line
How to stop computer from sleeping in Windows 10/8/7? Try these above methods and then you can easily let your PC not sleep.
If you need to re-enable sleep mode, you can also do this work via Control Panel, Settings or the third-party tool. But note that you should save your open documents to avoid data loss if power outage happens in sleep mode.
About The Author
Position: Columnist
Vera is an editor of the MiniTool Team since 2016 who has more than 7 years’ writing experiences in the field of technical articles. Her articles mainly focus on disk & partition management, PC data recovery, video conversion, as well as PC backup & restore, helping users to solve some errors and issues when using their computers. In her spare times, she likes shopping, playing games and reading some articles.