
Can’t change the screen resolution on Windows 10 and now everything looks so blurry? You’re not alone – many Windows users have also been in the same situation. But don’t worry, it’s often not hard to fix at all…
How to fix can’t change resolution on Windows 10
Here are three fixes that have helped other users resolve the can’t change resolution on Windows 10 problem. You may not have to try them all; just work your way down the list until you find the one that works for you.
- Update your graphics driver
- Uninstall graphics driver and reinstall
- Turn on GPU Scaling
Fix 1: Update your graphics driver
This problem may occur if you are using the wrong graphics driver or it’s out of date. So you should update your graphics driver to see if it fixes your problem. If you don’t have the time, patience or skills to update the driver manually, you can do it automatically with Driver Easy.
Driver Easy will automatically recognize your system and find the correct drivers for it. You don’t need to know exactly what system your computer is running, you don’t need to be troubled by the wrong driver you would be downloading, and you don’t need to worry about making a mistake when installing. Driver Easy handles it all.
You can update your drivers automatically with either the FREE or the Pro version of Driver Easy. But with the Pro version it takes just 2 steps (and you get full support and a 30-day money back guarantee):
1) Download and install Driver Easy.
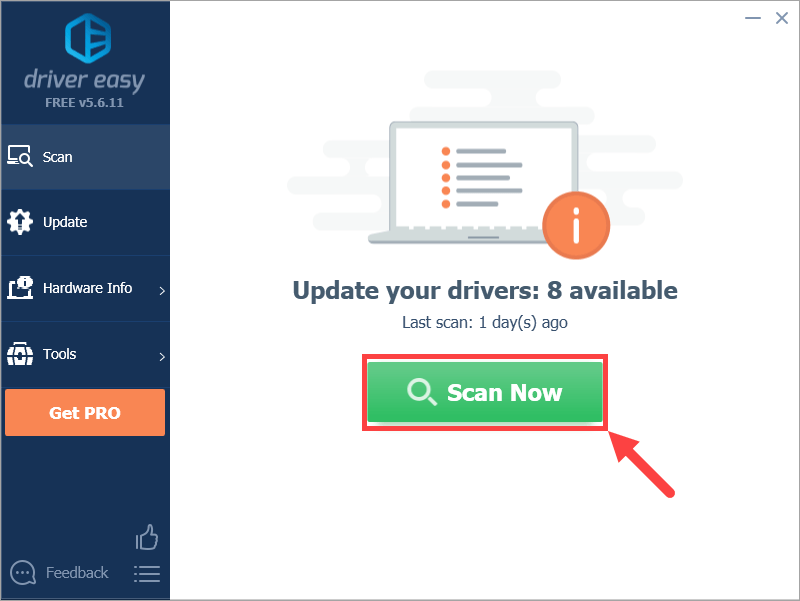
2) Run Driver Easy and click the Scan Now button. Driver Easy will then scan your computer and detect any problem drivers.
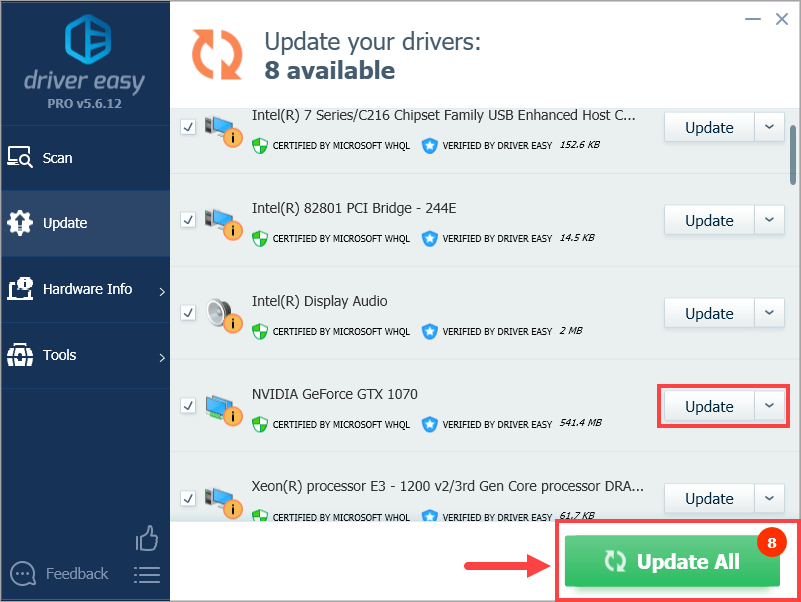
3) Click the Update button next to a flagged driver to automatically download the correct version of that driver, then you can manually install it (you can do this with the FREE version).
Or click Update All to automatically download and install the correct version of ALL the drivers that are missing or out of date on your system. (This requires the Pro version which comes with full support and a 30-day money back guarantee. You’ll be prompted to upgrade when you click Update All.)
4) Restart your computer for the changes to take effect.
5) Check to see if you can adjust the screen resolution properly. If yes, then great! If the issue remains, please try Fix 2, below.
Fix 2: Uninstall graphics driver and reinstall
You may also encounter this problem if the graphics driver is corrupt. So you can uninstall it first, then restart your computer so that Windows will automatically install the basic graphics driver. After that, check to see if you can change the screen resolution properly.
Here is how to do it:
1) On your keyboard, press the Windows logo key and R at the same time, type devmgmt.msc and press Enter.
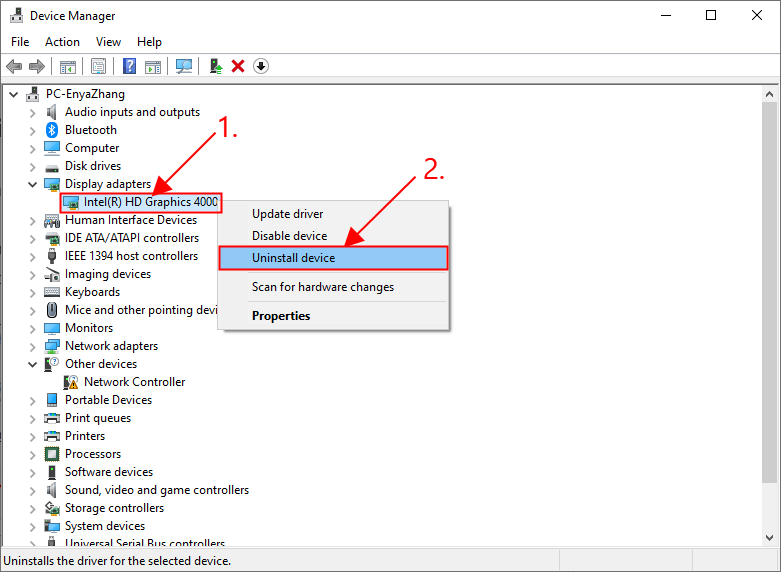
2) Locate and right-click on Display adapters (aka. Graphics card, Video card), then click Uninstall device.
3) Click Uninstall in the pop-up window.
4) Restart your computer for the changes to take effect.
5) Test to see if the can’t change screen resolution problem is resolved. If yes, congrats! If the issue persists, please move on to Fix 3, below.
Fix 3: Turn on GPU Scaling
You can also enable GPU scaling to find out a screen resolution that fits your screen.
Here is how to do it:
For AMD graphics card users:
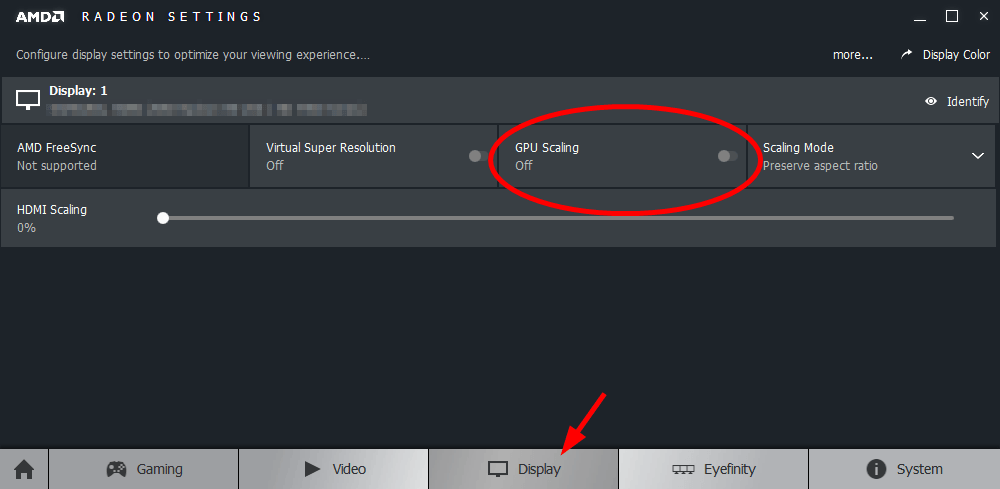
1) Open AMD Radeon Settings.
2) Click Display. Then turn on GPU Scaling.
For NVIDIA graphics card users:
1) On your keyboard, press the Windows logo key and R at the same time, then type control and press Enter to open Control Panel.
2) In View by, choose Large icons. Then click Nvidia Control Panel to open it.

3) From the NVIDIA Control Panel navigation pane, double click to expand Display, then click Adjust Desktop Size and Position.
4) Click the Scaling tab.
5) Experiment on different scaling methods and choose the one that fits best on your screen.
That’s it! Hope the post has guided you in the right direction in solving the can’t change screen resolution in Windows 10 issue If you have any ideas, suggestions or questions please do not hesitate to let us know in the comments. Thanks for reading!
3
3 people found this helpful
Readers help support Windows Report. We may get a commission if you buy through our links.
Read our disclosure page to find out how can you help Windows Report sustain the editorial team. Read more
The Windows 10 resolution setting doesn’t usually reconfigure itself. Yet, some users have said that their VDUs’ resolutions change from the default setting whenever they start Windows.
After adjusting the display resolution to a higher setting, it then dropdowns to a lower resolution after the users restart Windows. It is a somewhat baffling issue that arises for some users.
The resolution change can often be due to incompatible or corrupted graphics card drivers and the Base video option.
In addition, conflicting third-party software might adjust the resolution. In this article, we’ll show how you can fix the resolution in Windows 10 when it automatically changes.
Why does Windows 10 keep changing my screen resolution?
Here are a few reasons the resolution appears suddenly changed in Windows 10:
- Safe Mode is enabled: When you boot Windows into Safe Mode, the resolution is automatically decreased. So check if you have inadvertently enabled it.
- Incompatible, corrupt, or outdated driver: When the installed drivers are outdated, incompatible, or corrupt, especially an out-of-date graphics driver, the resolution may be affected.
- Conflicting third-party apps: Several third-party apps are found to change the display settings, especially the ones meant to optimize performance.
- Buggy Windows update: If the resolution suddenly changed in Windows 10 after an update, it could be a bug to blame. Check if others on the same version of the OS, too, are reporting the problem.
Why does screen resolution change after sleep on Windows 10?
There are many reasons for this issue, but the most common one is your drivers, however, this isn’t the only issue, and many reported that their screen became pixelated after Windows update.
Many users also reported that Windows goes to sleep too fast, which will cause your resolution to change more often than you would like.
Resolution change can also appear if your second monitor isn’t detected properly, but luckily there are ways to fix this issue, and in today’s guide, we’ll show you how to do it.
How do I stop my screen resolution from changing?
1. Update your drivers
1.1 Update the drivers manually
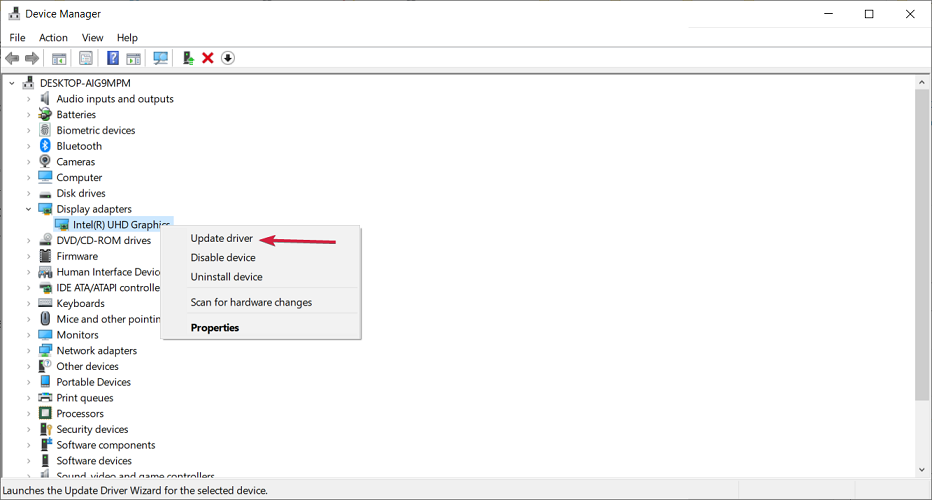
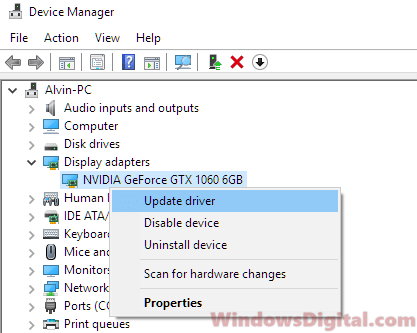
- Right-click the Start button and select Device Manager.
- Expand the Display adapters section, right-click the device, and select Update driver.

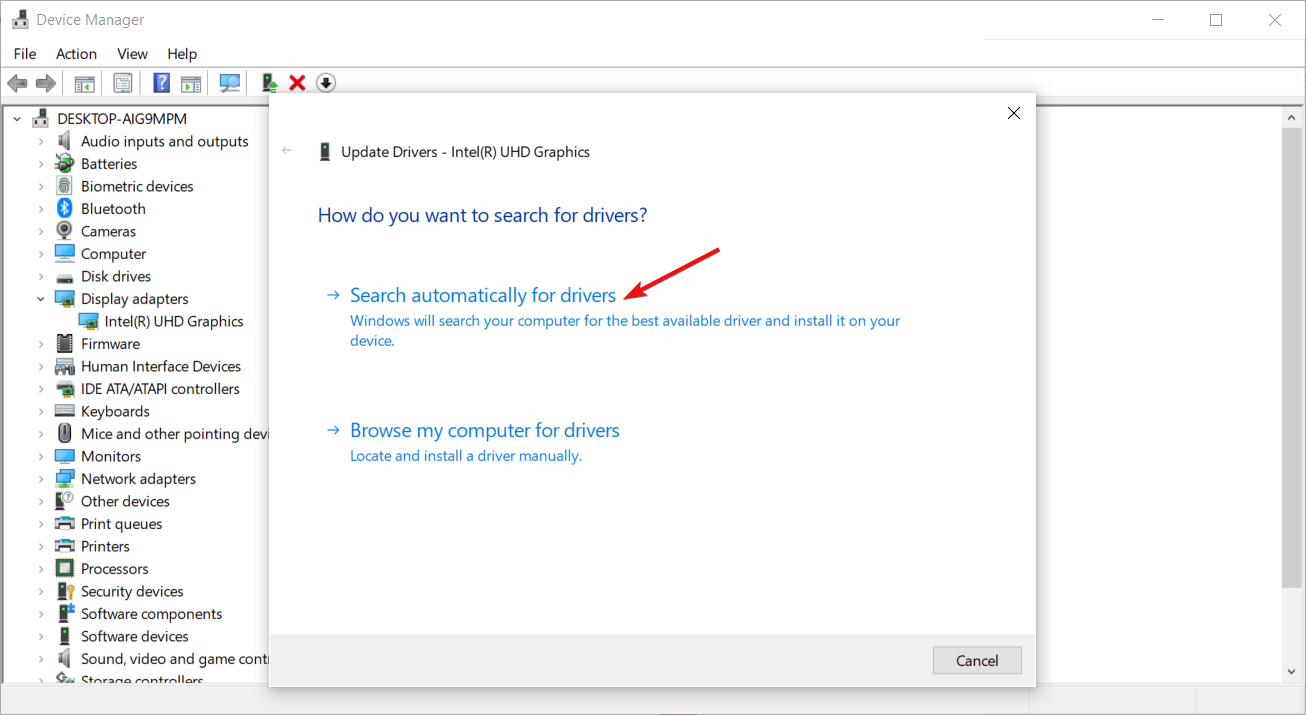
- Choose Search automatically for drivers.

- If the system finds a newer driver, it will install it.
You can also perform this step to update the Monitor driver. You will find the device under the Monitors section.
There is also the option to select Uninstall device instead of Update driver in step 2 of this solution.
That will trigger the system to automatically look for a new driver and install it after the restart.
1.2 Update the drivers automatically
You can update the card drivers using dedicated software. Here are the steps you need to follow:
- Install and Download PC HelpSoft Driver Updater and launch the tool.
- Wait for the automatic scan of your PC.

- Select the graphics card drivers from your list.
- Wait while it deals with your drivers.
- Restart your PC.
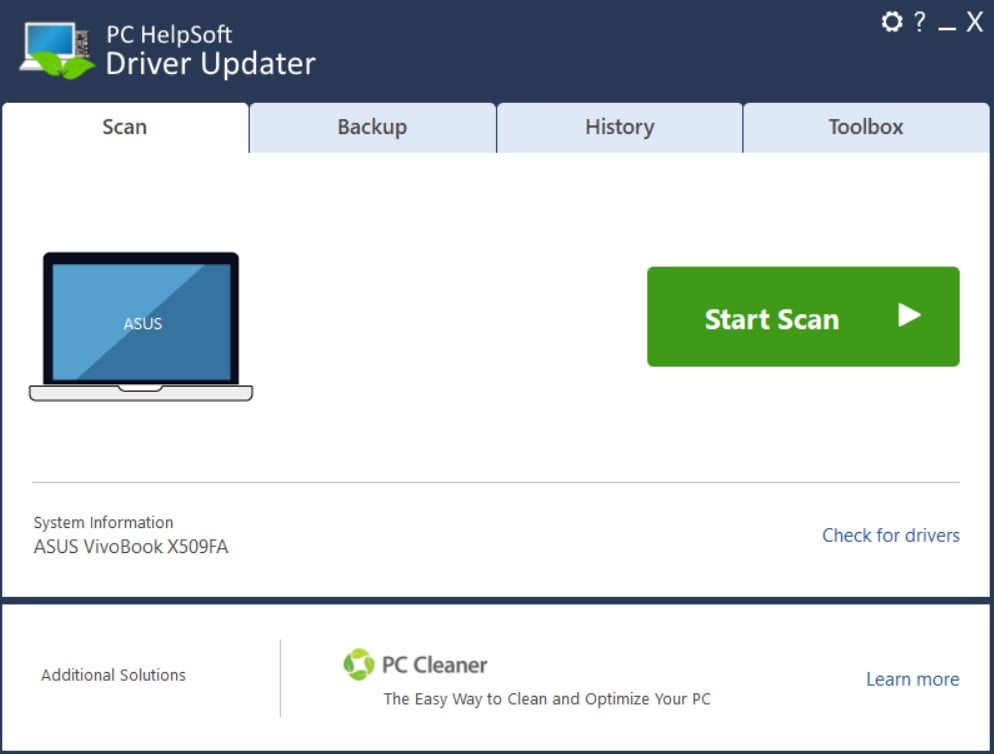
PC HelpSoft Driver Updater
Update your device graphics card drivers with this amazing tool and stop Windows 10 from changing the resolution automatically.
2. Deselect the base video option
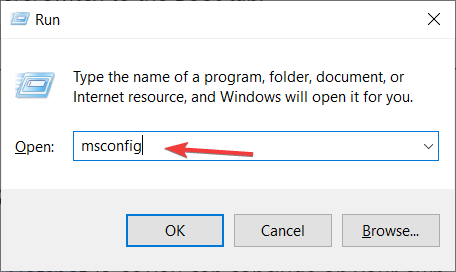
- Press the Windows+ X key and click Run on the menu to open that accessory.
- Enter msconfig in and click the OK button.

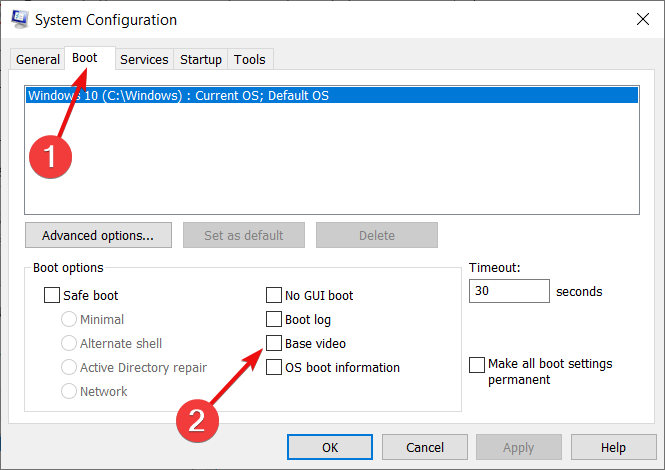
- Then click the Boot tab on the System Configuration window and deselect the Base video checkbox.

- Press the Apply button to confirm the new settings and click OK to close the window.
- Restart windows after closing System Configuration.
3. Clean boot Windows
-
1. Open Run with the Windows key + R hotkey.
-
2. In the text box, input msconfig, and click OK.
-
3. Click the Selective startup radio button on the General tab.
-
4. Deselect the Load startup items checkbox, then select the Load system services and Use original boot configuration options.
-
5. Select the Services tab and click the Hide all Microsoft services option.

-
6. Press the Disable all button.
-
7. Select the Apply option, and then press the OK button.
-
8. Lastly, select the Restart option on the System Configuration window.


Another great method that works for some users when encountering the screen resolution changing by itself problem is to perform a clean boot of your PC.
You can configure one via System Configuration in just a few steps, as seen above.
- Laptop screen keeps dimming or brightening [Windows 10/11]
- How to fix Windows 11’s screen dimming issue
- How to fix a pixelated screen after a Windows update
4. Rollback graphics card driver update
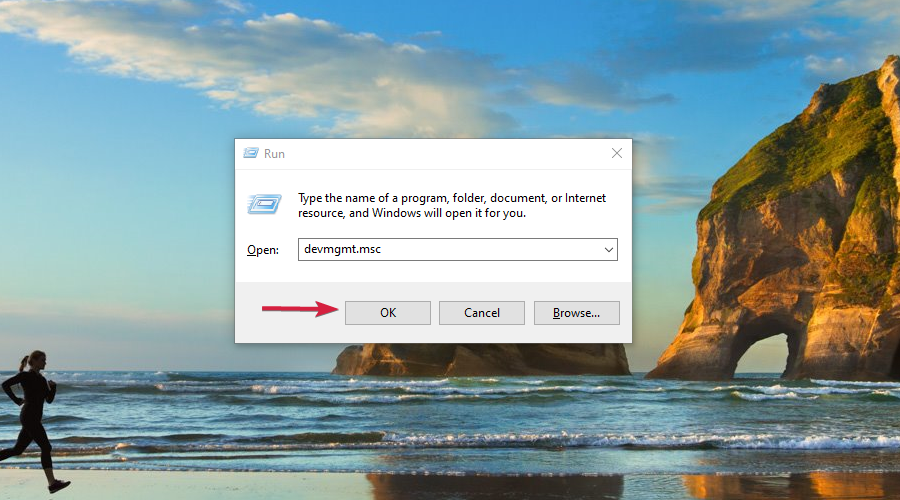
- Press the Windows key + R to launch Run, then input devmgmt.msc and click OK.

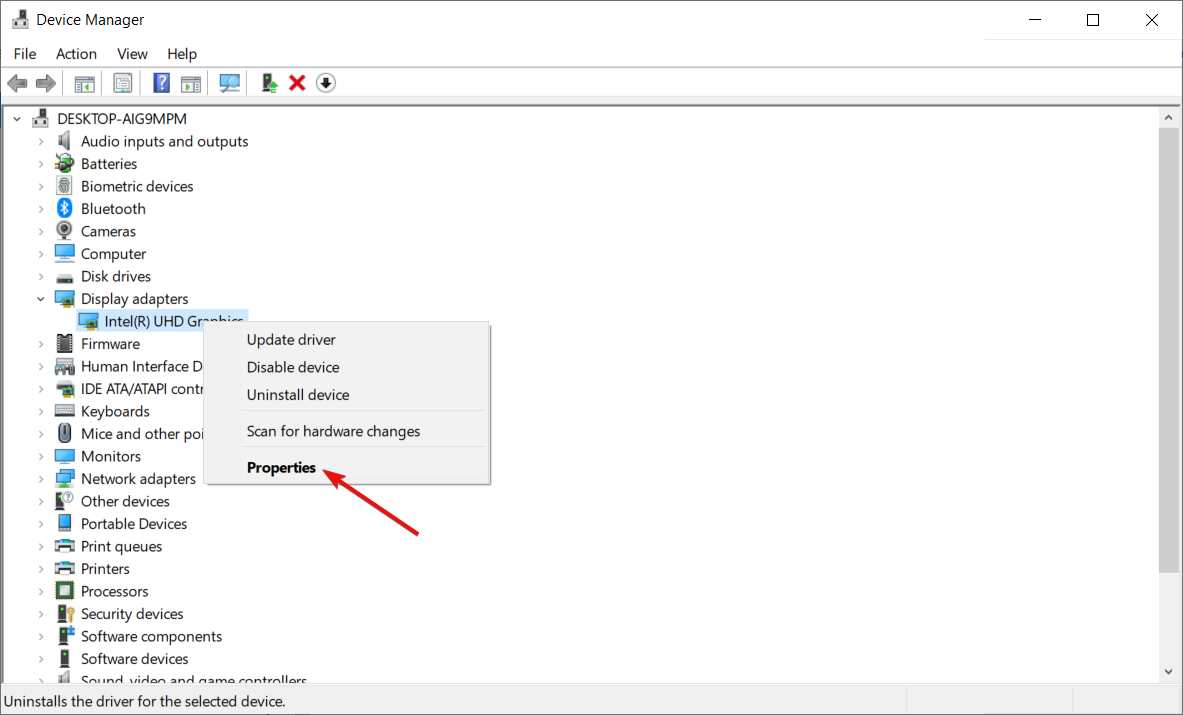
- Double-click Display adapters, right-click your video card, and select Properties.

- Then press the Roll Back Driver button on the Driver tab.
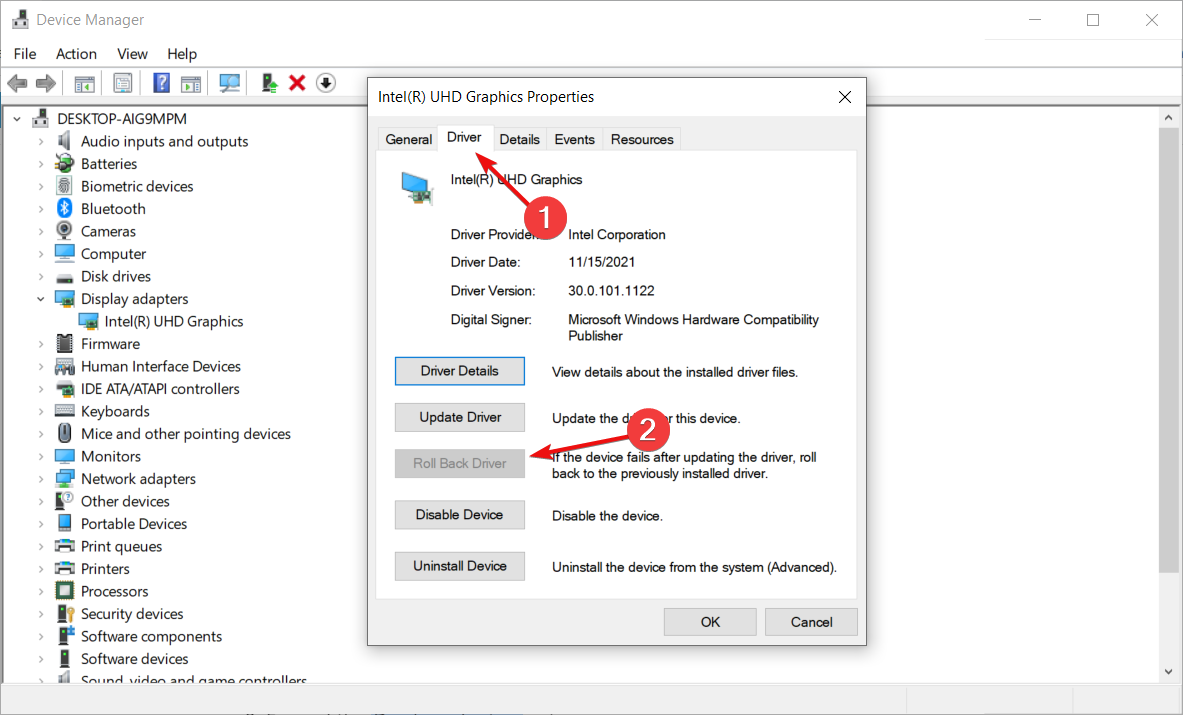
This solution is especially helpful if the problem started to occur after you installed a new graphics driver.
If the Roll Back Driver option is grayed out, it means that you don’t have an older driver to go back to so move on to the next solution.
5. Restore Windows to an earlier date
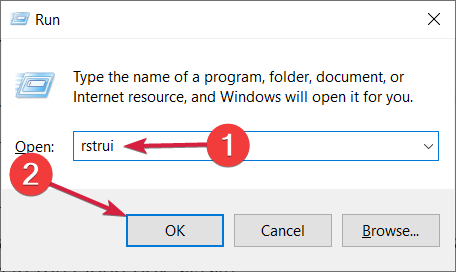
- Open Run with the Windows key + R hotkey, input rstrui, and press Enter.
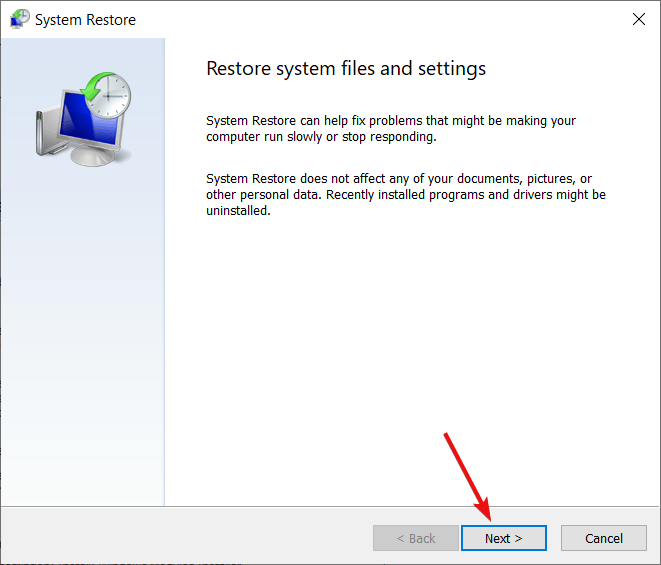
- Click Next when the System Restore app opens.

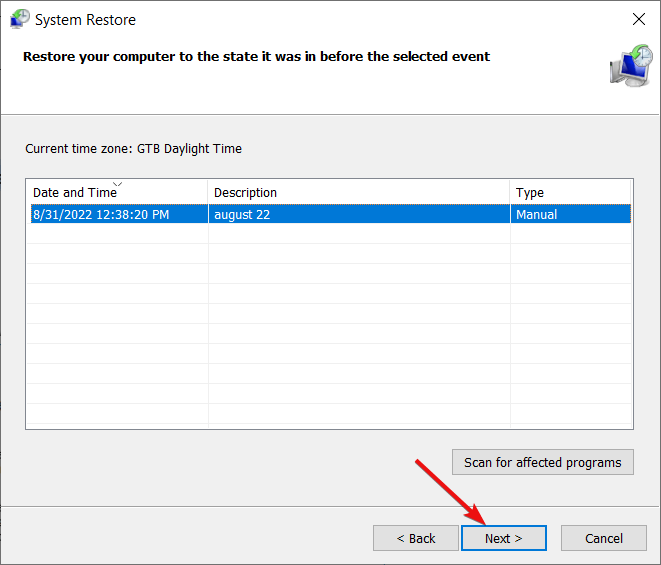
- Select a listed restore point, and press the Next button.
- Press the Finish button to confirm your selected restore point and roll back the OS.
What can I do if the resolution suddenly changes in Windows 11?
The new OS looks nicer and comes with new and improved features but is not so different from Windows 10 at its core.
That is why all the solutions we outlined above will also work like a charm on Windows 11.
The windows will have a slightly different design, with round corners, but the function will perform identically.
How do I reset my screen resolution in Windows 10?
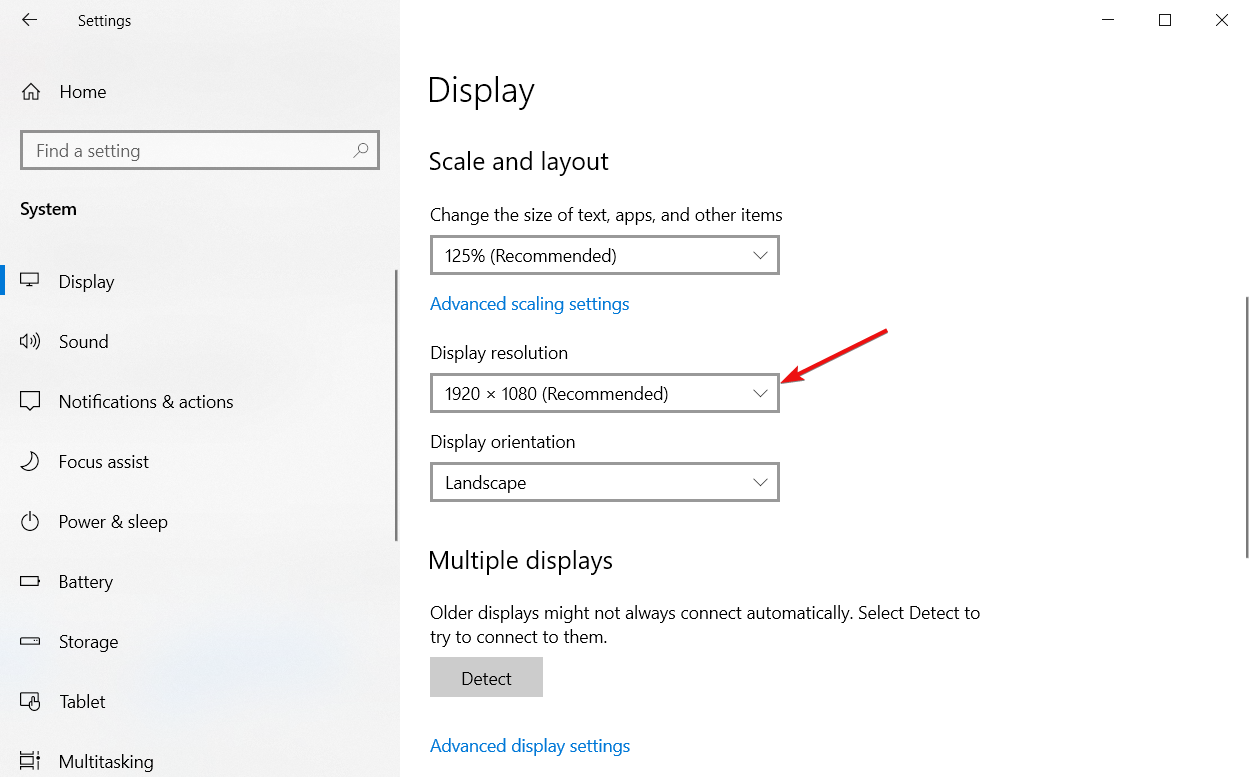
- Right-click on a free space on your desktop and select Display settings.
- Now, click on the Display resolution menu and choose a different resolution. If the resolution at this moment is different than the recommended one, we suggest switching to that one.

- Click Yes to accept the new resolution.
Those are some of the fixes users have fixed the display resolution with. In addition to those fixes, turning off the screen saver and fast startup mode might resolve the issue.
You might also be interested in reading our guide on how to set custom resolution on Windows 10.
Let us know in the comments section below if you have additional suggestions or recommendations.
Matthew Adams
Windows Hardware Expert
Matthew is a freelancer who has produced a variety of articles on various topics related to technology. His main focus is the Windows OS and all the things surrounding it.
He is passionate about the tech world, always staying up-to-date with the latest and greatest. With an analytical view, he likes problem-solving, focusing on errors and their causes.
In his free time, he likes to read and write about history and tries to always develop new skills.
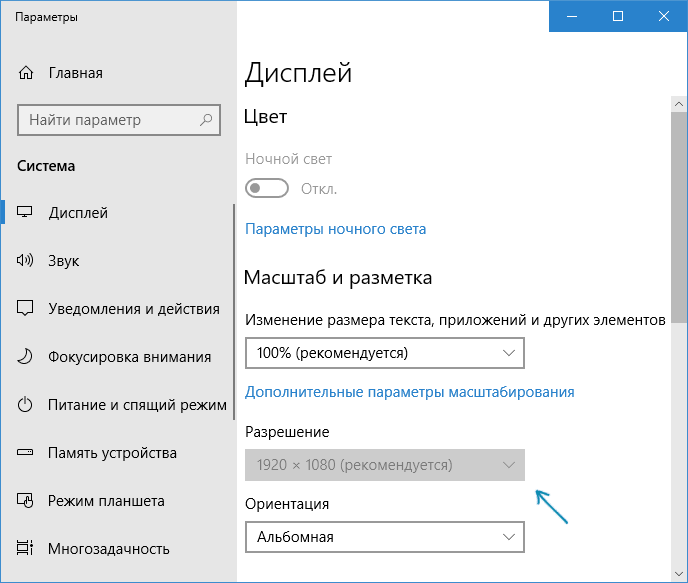
Если вам нужно поменять разрешение экрана в Windows 10, почти всегда сделать это очень просто, а необходимые шаги описывались в материале Как изменить разрешение экрана Windows 10. Однако, в некоторых случаях возможна проблема — разрешение не меняется, пункт для его смены в параметрах не активен, равно как и не работают дополнительные методы изменения.
В этой инструкции подробно о том, что делать, если не меняется разрешение экрана Windows 10, способах исправить проблему и вернуть возможность настройки разрешение на компьютере и ноутбуке, если это возможно.
Почему нельзя изменить разрешение экрана
Стандартно, изменить разрешение в Windows 10 вы можете в параметрах, нажав правой кнопкой мыши в пустом месте рабочего стола, выбрав пункт «Параметры экрана» (или в Параметры — Система — Дисплей). Однако, иногда выбор разрешения не активен или в списке разрешений присутствует только один вариант выбора (также возможен вариант, когда список присутствует, но в нем нет правильного разрешения).
Существует несколько основных причин, по которым может не меняться разрешение экрана в Windows 10, которые будут рассмотрены подробнее далее.
- Отсутствие необходимого драйвера видеокарты. При этом, если вы нажимали «Обновить драйвер» в диспетчере устройств и получали сообщение о том, что наиболее подходящие драйверы для данного устройства уже установлены — это не говорит о том, что у вас есть и установлен правильный драйвер.
- Сбои в работе драйвера видеокарты.
- Использование некачественных или поврежденных кабелей, переходников, конвертеров для подключения монитора к компьютеру.
Возможны и другие варианты, но указанные встречаются чаще других. Перейдем к способам исправления ситуации.
Как исправить проблему
Теперь по пунктам о различных способах исправить ситуацию, когда нельзя изменить разрешение экрана. Первый шаг — проверить, всё ли в порядке с драйверами.
- Зайдите в диспетчер устройств Windows 10 (для этого можно нажать правой кнопкой мыши по кнопке «Пуск» и выбрать нужный пункт контекстного меню).
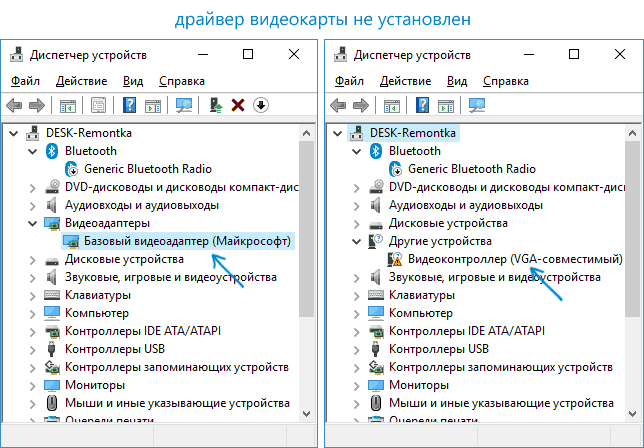
- В диспетчере устройств откройте раздел «Видеоадаптеры» и посмотрите, что там указано. Если это «Базовый видеоадаптер (Майкрософт)» или раздел «Видеоадаптеры» отсутствует, но зато в разделе «Другие устройства» есть «Видеоконтроллер (VGA-совместимый)», драйвер видеокарты не установлен. Если указана правильная видеокарта (NVIDIA, AMD, Intel), всё равно стоит выполнить дальнейшие шаги.

- Всегда помните (не только в этой ситуации), что правый клик по устройству в диспетчере устройств и выбор пункта «Обновить драйвер» и последующее сообщение, что драйверы для данного устройства уже установлены говорят лишь о том, что на серверах Майкрософт и у вас в Windows нет других драйверов, а не о том, что у вас установлен правильный драйвер.
- Установите «родной» драйвер. Для дискретной видеокарты на ПК — с сайта NVIDIA или AMD. Для ПК с интегрированной видеокартой — с сайта производителя материнской платы для вашей модели МП. Для ноутбука — с сайта производителя ноутбука для вашей модели. При этом для двух последних случаев, установите драйвер даже если на официальном сайте он не самый новый и нет драйвера для Windows 10 (устанавливаем для Windows 7 или 8, если не устанавливается — пробуем запустить установщик в режиме совместимости).
- Если установка не проходит успешно, а какой-то драйвер уже установлен (т.е. не базовый видеоадаптер и не видеоконтроллер VGA-совместимый), попробуйте предварительно полностью удалить имеющийся драйвер видеокарты, см. Как полностью удалить драйвер видеокарты.
В результате, если всё прошло гладко, вы должны получить правильный установленный драйвер видеокарты, а также возможность изменения разрешения.
Чаще всего дело именно в драйверах видео, однако возможны и другие варианты, а соответственно и способы исправления:
- Если монитор подключен через какой-либо адаптер или вы недавно приобрели новый кабель для подключения, дело может быть в них. Стоит попробовать другие варианты подключения. Если есть какой-то дополнительный монитор с другим интерфейсом подключения, можно провести эксперимент на нем: если при работе с ним выбор разрешения возможен, то дело явно в кабелях или переходниках (реже — в разъеме на мониторе).
- Проверьте, а появляется ли выбор разрешения после перезагрузки Windows 10 (важно выполнить именно перезагрузку, а не завершение работы и включение). Если да, установите с официального сайта все драйверы чипсета. Если проблема не решится, попробуйте отключить быстрый запуск Windows 10.
- Если проблема появляется спонтанно (например, после какой-либо игры), есть способ перезапуска драйверов видеокарты с помощью сочетания клавиш Win + Ctrl + Shift + B (однако можно в результате остаться с черным экраном до принудительной перезагрузки).
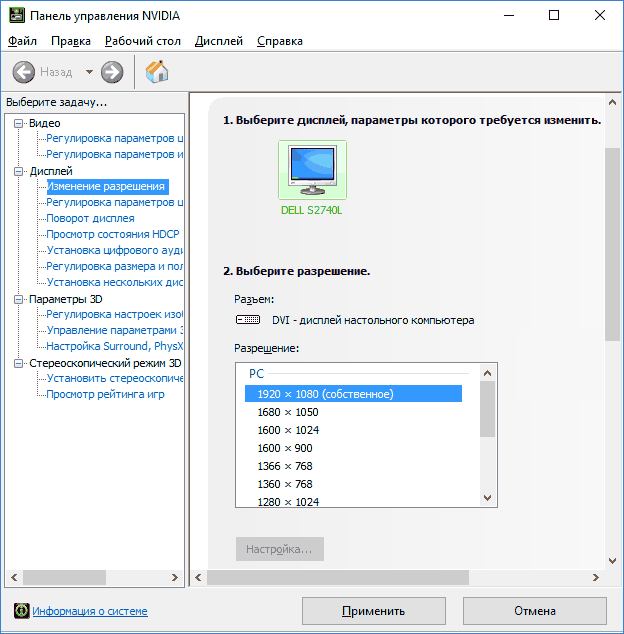
- Если проблема никак не решается, загляните в Панель управления NVIDIA, AMD Catalyst или Панель управления Intel HD (графической системы Intel) и проверьте, а возможно ли изменение разрешения экрана там.

Надеюсь, руководство оказалось полезным и один из способов поможет вам вернуть возможность изменения разрешения экрана Windows 10.
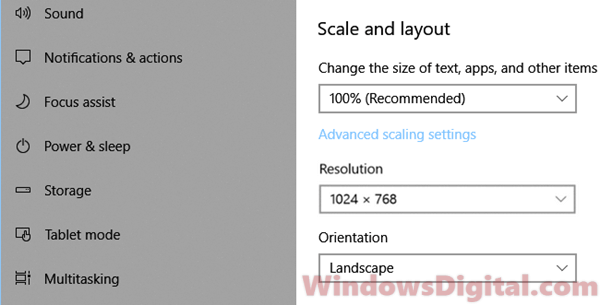
Have you tried changing your screen resolution on Windows 11 or Windows 10 only to find that the only option you can select in the display settings is “1024×768“? This strange problem can occur after a random Windows boot up, or after you tried to change to a screen resolution larger than your usual resolution, which is usually followed by a black screen. All other options will be grayed-out, and you will be left with only the 1024 option. If this has happened to you, try the following solutions.
Related issue: Screen Size Smaller or Larger Than Monitor Issue
Reasons behind the issue
There are a few situations that can lead to the Windows 11 or 10 resolution being stuck at 1024×768 only problem, including:
- A corrupted, missing, or incorrectly installed graphics driver.
- The cable you are using to connect your monitor with your GPU doesn’t support the resolutions you want.
- A defective graphic card, cable, or monitor.
How to fix screen resolution stuck at 1024×768 on Windows 11/10
Start with some basic steps first to figure out and maybe fix the issue instantly. Restart your computer first—this can sometimes clear up resolution problems. Make sure your monitor is properly hooked up to your computer and the cable is securely plugged in. Try using a different monitor or cable to see if it’s a hardware issue. If these steps don’t help, you can then proceed to the solutions below to fix the resolution being stuck at 1024×768 issue.
Update graphics driver
If both your monitor and graphic card support screen resolution larger than 1024×768, the most likely cause of the issue is a corrupted, missing, or incorrectly installed graphic drivers. Try to update or reinstall your graphic drivers and see if it fixes the issue.
You can update your GPU driver by either manually downloading from “Nvidia.com” for Nvidia graphic card or “AMD.com” for ATI video card, or by updating via “Device Manager” in Windows 10/11. Here are the steps to update via Device Manager:
Also see: How to check what graphics card you have on Windows 11/10
- Go to start menu or Cortana.
- Search for and open “Device Manager“.
- In Device Manager, expand the “Display adapters” category.
- Right-click on your primary graphic processing unit, then select “Update driver“.

- On the next window, select “Search automatically for updated driver software” to allow Windows to automatically search for the latest driver and install it for your PC.

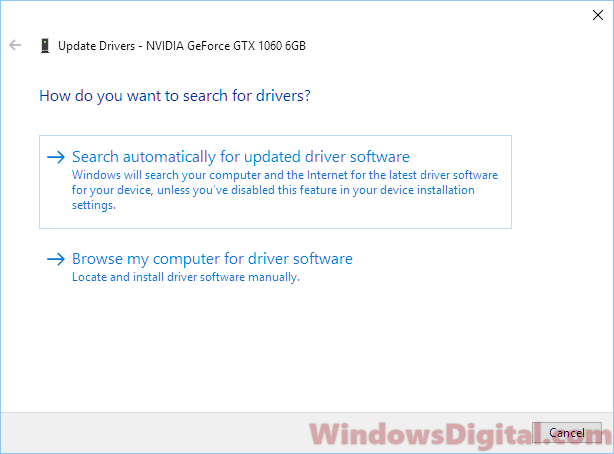
Your GPU may appear as an unknown device with a yellow exclamation mark under the display adapters category in Device Manager if Windows couldn’t correctly detect your GPU. In that case, right-click it and select “Update driver” to allow Windows to install the driver for you.
Similar problem: Monitor Not Working After Windows Update (Fix)
If you are using a Windows 11/10 laptop from manufacturers such as Dell, HP, Lenovo, Asus, Acer, or Toshiba, and Windows is unable to locate the appropriate GPU driver, visit your laptop manufacturer’s website. From there, download the graphics driver (typically an M series) specifically tailored for your laptop model.
Uninstall and reinstall graphics driver
Another way to fix this is to uninstall your GPU driver. Right-click on it in Device Manager and select “Uninstall driver“. After your computer restarts, reinstall the driver using the method above or download it manually from your GPU maker’s website.
Usually, if Windows notices the GPU driver is missing, it will automatically update and reinstall the right driver for you when you reboot.
Try changing the resolution via other software
If you have an Nvidia graphics card, consider changing your Windows screen resolution using the “Nvidia Control Panel” to see if it resolves the issue. For those with ATI video cards, use the “AMD Catalyst Software” instead.
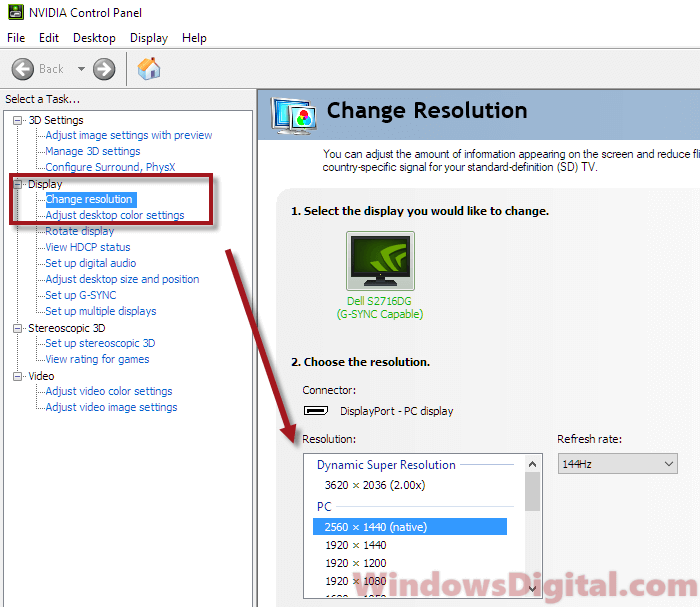
- Go to the start menu.
- Search for “Nvidia Control Panel“.
- Expand “Display” and then select “Change resolution“.
- From there, you can try to change the screen resolution for your monitor under “Resolution“.
Cable you are using doesn’t support 4k / 2k
A common reason for being stuck at the “1024×768” resolution is that the cable connecting your monitor to your GPU might not support higher resolutions like 2k or 4k.
You’ll need at least a DisplayPort 1.2 or HDMI 2.0 cable for 4K at 60Hz. Also, you have to make sure that both your monitor and GPU support the necessary port version to work correctly. Some monitors only support their maximum resolution through specific ports, so it’s important to check this.
Suggested read: Generic PnP Monitor Driver Problem in Windows 11/10
Check Monitor to GPU connection
Double-check that your monitor is correctly connected to your GPU, not to the built-in video adapter on your motherboard. It is a common mistake for people who don’t actually understand their PC, especially those with older motherboards.
But, even if you did connect your monitor to an onboard graphics card, most modern ones should support much higher resolutions than just “1024×768”.
Potential hardware defects: Graphics card, cable, or monitor
If nothing else works, a hardware problem might be to blame. It could be your GPU, monitor, or the cable between them. If you think this might be the case, try testing with parts borrowed from another computer and see if you’re still stuck with “1024×768”. Replace them as needed.