
Table of contents
- Why is a computer not showing a 5GHz Wi-Fi connection?
- Do your devices support 5GHz Wi-Fi?
- How to Force Windows to Use 5GHz Wi-Fi
- Solution 1: Run the Network Adapter troubleshooter
- Solution 2: Change the band settings
- Solution 3: Prevent your operating system from shutting down the network adapter
- Solution 4: Reset your network adapters
- Solution 5: Fix network adapter driver problems
- Update your drivers automatically
- Solution 6: Get rid of recent Windows updates
- Solution 7: Perform a system restore
- Solution 8: Reset your PC
- Conclusion
These days, the Internet has become necessary for doing just about anything on a computer. So, failing to connect to a Wi-Fi network has got to be one of the most harrowing experiences.
Your computer’s network adapter connects to a Wi-Fi network over a frequency band that it supports. The connection will fail if the wireless device is broadcasting on an unsupported frequency.
However, that’s not always the case. Your computer can still fail to connect to the network even if its adapter supports the Wi-Fi frequency.
There are two Wi-Fi radio bands: 5GHz and 2.4GHz which most modern computers support.
5GHz is the newer Wi-Fi version that maximizes short-range connection to boost speed. Meanwhile, the 2.4Ghz version provides coverage at a longer range.
However, it doesn’t offer the same performance and speed that comes with the 5GHz band.
You’re probably reading this article because your Windows 10 or Windows 11 system can’t seem to detect a 5GHz Wi-Fi connection.
We’ll deal with this issue and show you how to get Windows 10 to recognize a 5GHz Wi-Fi network.
Also, if you’re asking questions like, “Why is the Wi-Fi not showing up in Windows 11?” and “Why doesn’t Windows 11 recognize a 5ghz Wi-Fi?” this article is for you.
Why is a computer not showing a 5GHz Wi-Fi connection?
As we mentioned, your network adapter has to support the Wi-Fi version of the wireless device. So, the simple cause of the issue is unsupported Wi-Fi.
However, things are not always simple.
Other issues, such as wrong settings and configurations and driver problems, could also trigger the problem.
What’s more, if your router is configured to not support 5GHz, your Windows 10 or Windows 11 computer won’t detect it over the 5GHz spectrum.
The 5GHz frequency only tends to short-range needs. So, another reason that your system might not recognize the network is that it’s far away from the Wi-Fi router.
PRO TIP
For optimal network adapter performance and support for necessary Wi-Fi standards, consider using Auslogics Driver Updater. This tool scans your system for outdated or incompatible drivers, ensuring that all your hardware, including your network adapter, runs with the most recent and stable drivers.
With up-to-date drivers, you can significantly reduce connectivity issues and improve the overall speed and reliability of your internet connection.
Do your devices support 5GHz Wi-Fi?
Before you start working on making your computer recognize a 5GHz Wi-Fi, you have to confirm that your network adapter and router support the band.
You can do that for your system by going through Command Prompt. Follow these steps:
- Launch the Run dialog box by tapping the
Windows + Rkeyboard buttons together. - After the Run dialog window appears, type “CMD” (no quotes) and press the CTRL, Shift, and Enter keys together to launch Command Prompt as an administrator.
- Select Yes once you see the User Account Control pop-up.
- After the Command Prompt opens in admin mode, type
netsh wlan show driversand tap Enter. - You’ll now see your network adapter’s Wi-Fi version and drivers.
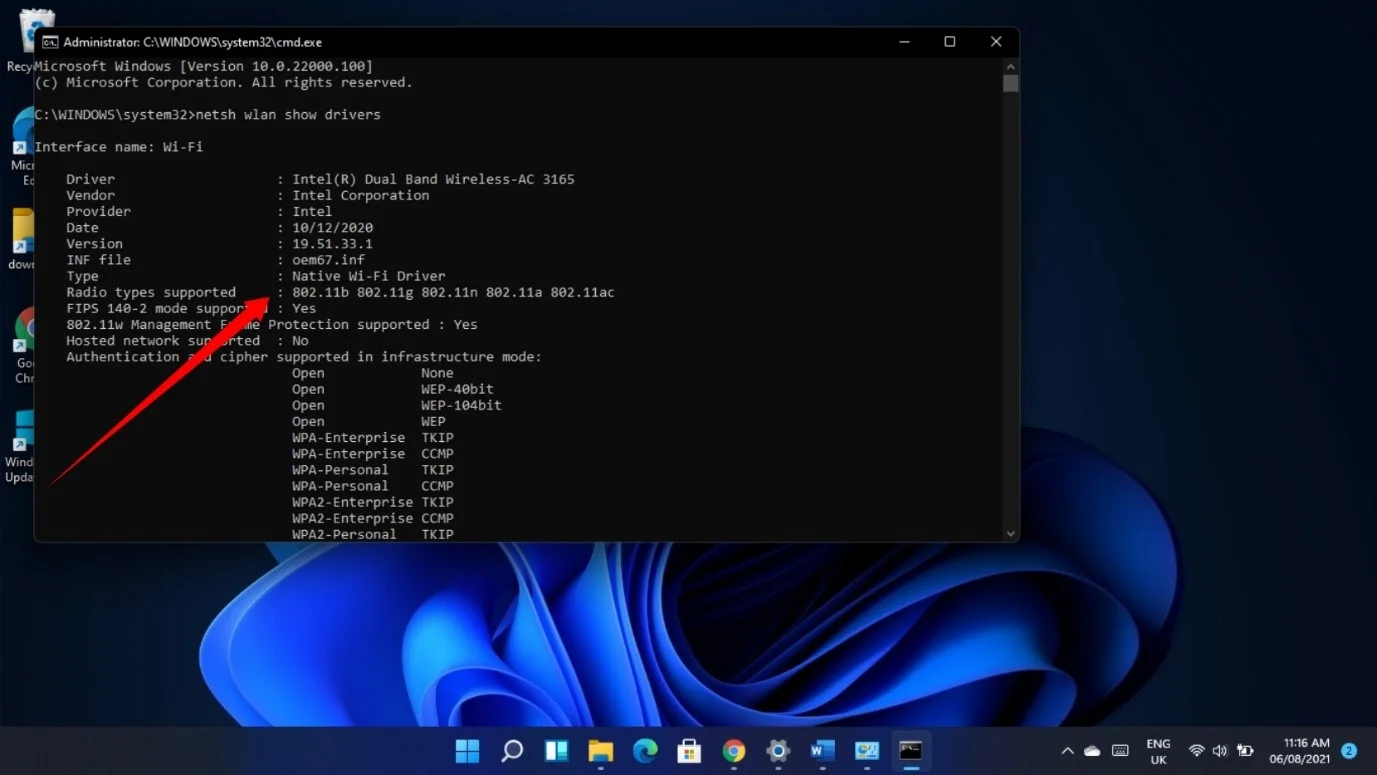
If you only see 802.11g and 802.11b in the “Radio types supported” section, your adapter only supports 2.4Ghz
802.11a 802.11g 802.11n means your adapter supports 2.4GHz and 5GHz.
In some cases, you’ll also see the 802.11ac and 802.11ax radio types. They also support 5GHz.
You can also check if your computer supports 5GHz by going through the network adapter’s Properties dialog. Here’s how:
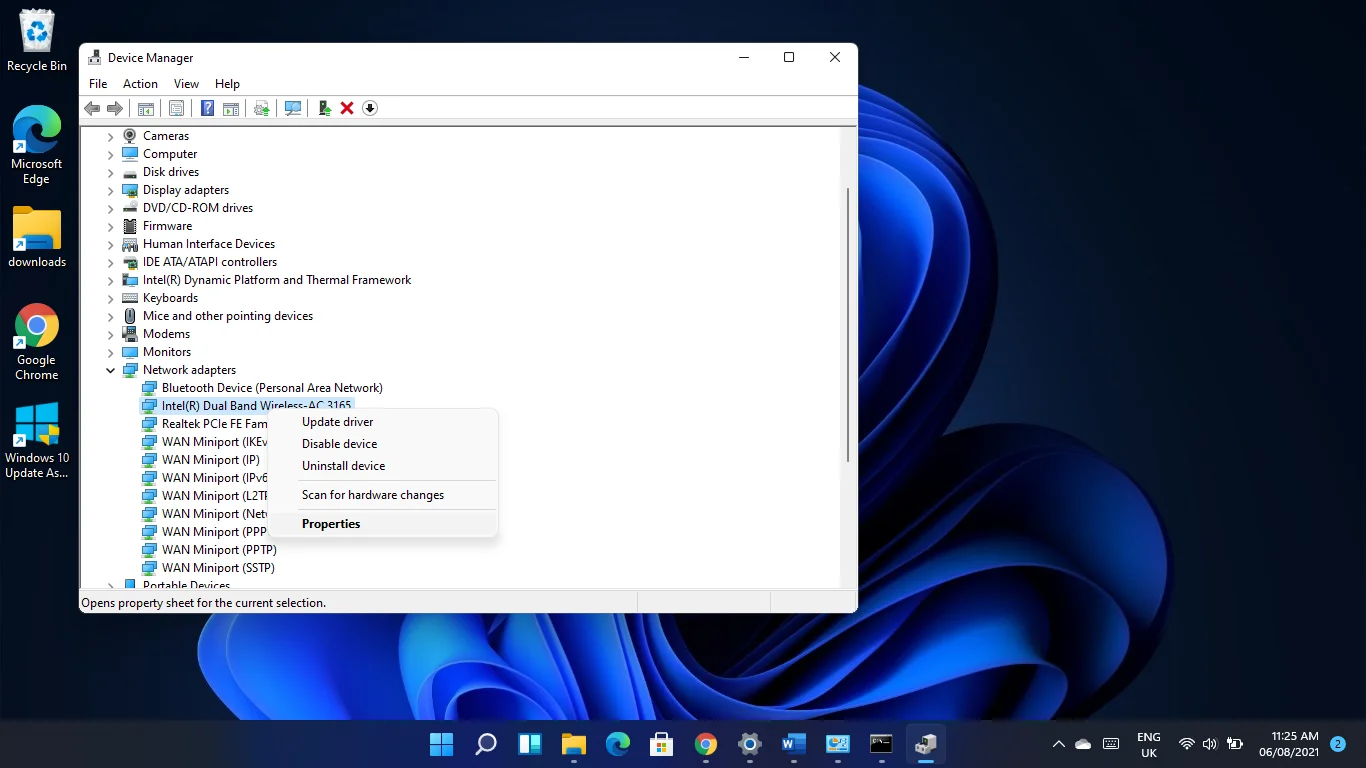
- In the taskbar, right-click on the Start button or tap
Windows logo + X. - After the Power User menu appears, select Device Manager.
- When the Device Manager shows up, expand the Network Adapters category. Click on the arrow beside Network Adapters.
- Next, right-click on your wireless adapter and select Properties.
Note
If you see “Dual Band” anywhere in the wireless adapter description, it supports 5GHz and 2.4GHz.
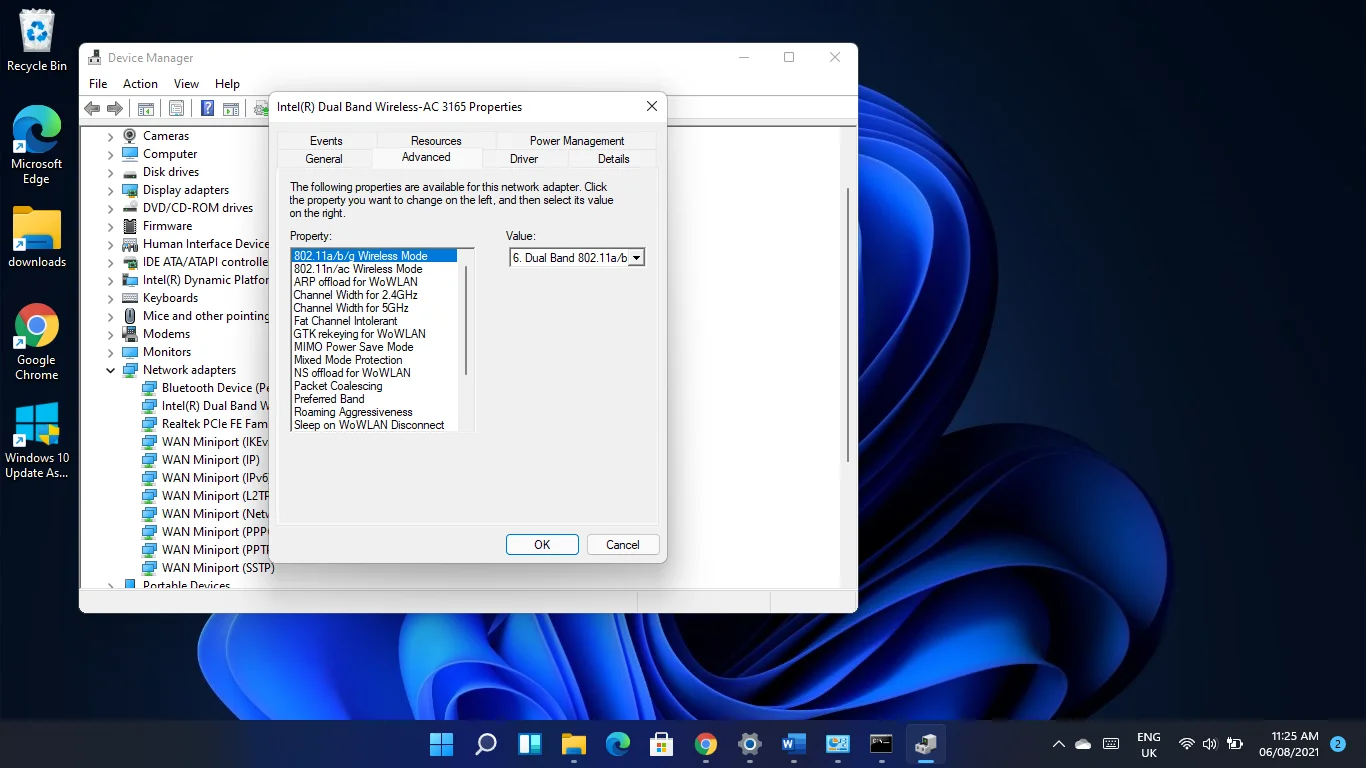
- After the Properties dialog window shows up, head to the Advanced tab.
- If you see 80211n (or 80211n/ac) Wireless Mode or 802.11a/b/g Wireless Mode, then your computer supports the band.
If your computer doesn’t have support for 5GHz, you’ll have to either upgrade your network adapter or go for a 5GHz-supported external USB Wi-Fi adapter.
However, if your PC supports 5GHz, you have to check your router to confirm if it supports the band.
The information you need should be in your router’s manual or the device’s box.
You can also check for details about the router on the manufacturer’s website to confirm if it supports 5GHz.
How to Force Windows to Use 5GHz Wi-Fi
If your router and network adapter support 5GHz, the steps below will show you how to fix the problem preventing your computer from recognizing the network.
Follow the guides one after the other as they’ve been arranged from simple to complex.
Before you start, however, you should power cycle your devices.
Your computer, network adapter, or router, could be stuck. Restarting your system and router will allow both devices to reinitialize their configurations and regain functionality.
Turn off your router and shut down your computer, then unplug both machines from their power sources. Plug them back in and restart after a couple of minutes.
Head to the first fix below if power cycling your devices doesn’t do the trick.
Solution 1: Run the Network Adapter troubleshooter
The Network Adapter troubleshooter is Windows’ built-in tool responsible for finding and resolving issues related to the device.
It can detect app conflicts and common bugs that are preventing the adapter from running correctly.
If the troubleshooter can’t fix the problem, it will display info that you can use to resolve the issue manually.
Follow these steps to run the Network Adapter troubleshooter:
- Tap the
Windows + Ikeyboard shortcut to start the Settings app. - If you’re on Windows 10, click on Update & Security and select Troubleshoot on the left side of the window that follows.
- If you’re running Windows 11, scroll down under System and click on Troubleshoot.
- Click on Other Troubleshooters (Windows 11) or Additional Troubleshooters (Windows 10).
- Next, scroll down, click on Network Adapter, and select Run the Troubleshooter if you’re on Windows 10. You’ll only have to click on Run next to Network Adapter on Windows 11.
- The troubleshooter will now check for problems and attempt to fix them.
Related: Windows Update Troubleshooter: Easily Fixing Windows Update Issues
Solution 2: Change the band settings
The problem could be related to how your adapter is configured. For example, the device may be programmed to search for only 2.4GHz connections, causing it not to recognize 5GHz connections.
You can put things back in order by applying the correct settings in the adapter’s Properties dialog window.
Follow these steps:
- Right-click on the Start button in the taskbar or tap
Windows logo + X. - After the Power User menu appears, select Device Manager.
- When the Device Manager shows up, expand the Network Adapters category. Click on the arrow beside Network Adapters.
- Next, right-click on your wireless adapter and select Properties.
- Go to the Advanced tab when you see the Properties dialog window.
- Now, select 802.11n under Properties and select Enabled in the Value drop-down menu on the right.
Note
If you use a dual-band adapter, you’ll probably see 802.11n/ac, in which case you can choose between 802.11ac and 802.11n under Value.
- Select 802.11a/b/g and choose the Dual Band option in the Value drop-down menu if that doesn’t work.
- Another setting that can work is choosing Preferred Band under Property and selecting Prefer 5GHz band under Value.
Click on the OK button after making each change.
Solution 3: Prevent your operating system from shutting down the network adapter
Windows could be turning off the network adapter to save power. You’re likely experiencing this issue if you can’t see any network connection. You can easily prevent this from happening by making changes in the device’s Properties dialog.
Here’s how:
- Right-click on the Start button in the taskbar or tap
Windows logo + X. - After the Power User menu appears, select Device Manager.
- When the Device Manager shows up, expand the Network Adapters category. Click on the arrow beside Network Adapters.
- Next, right-click on your wireless adapter and select Properties.
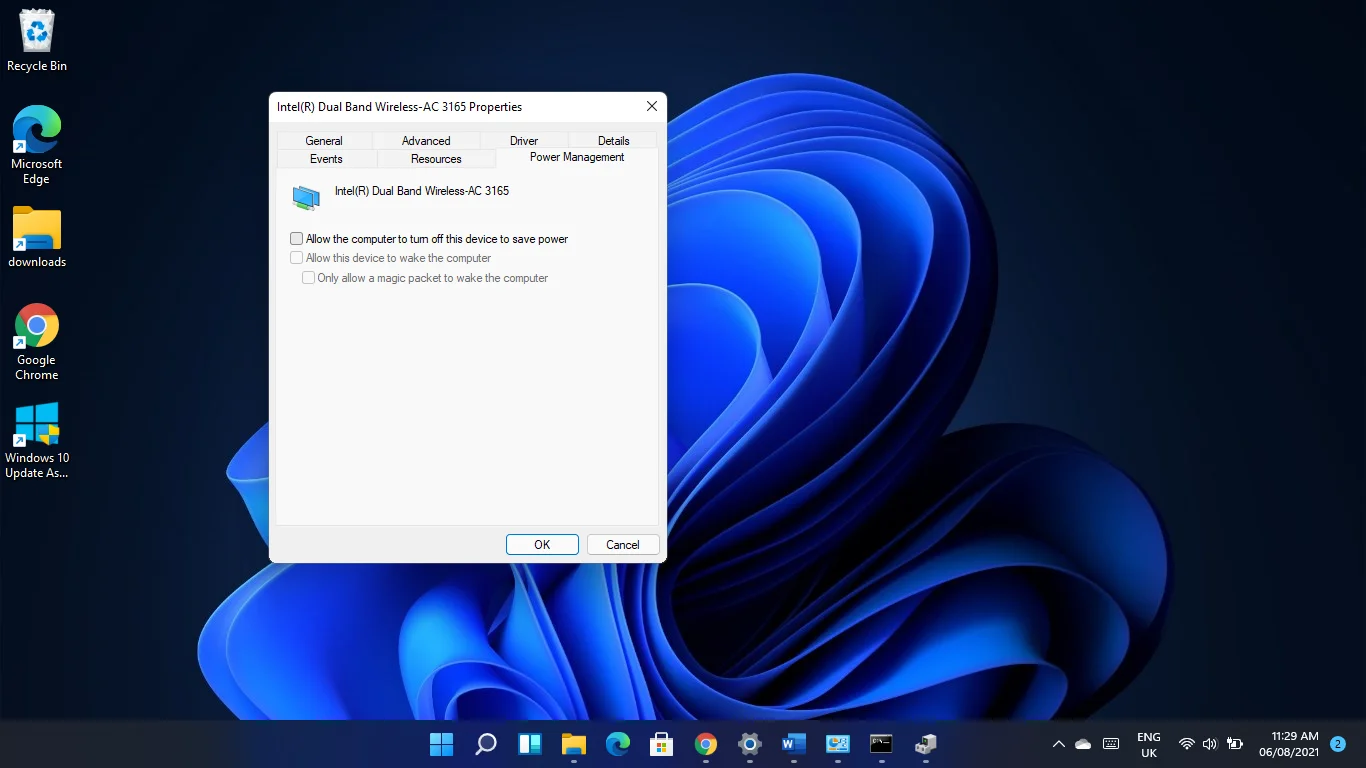
- Go to the Power Management tab when you see the Properties dialog window.
- Uncheck the box beside Allow the computer to turn off this device to save power.
- Click on the OK button.
Solution 4: Reset your network adapters
Resetting your network adapters will return all your network settings to default and clear out the configurations you’ve applied.
This means your Wi-Fi passwords, proxy settings, VPN applications, and other settings will be cleared.
Before you start, you should write down your passwords and other configurations if you’ve forgotten them.
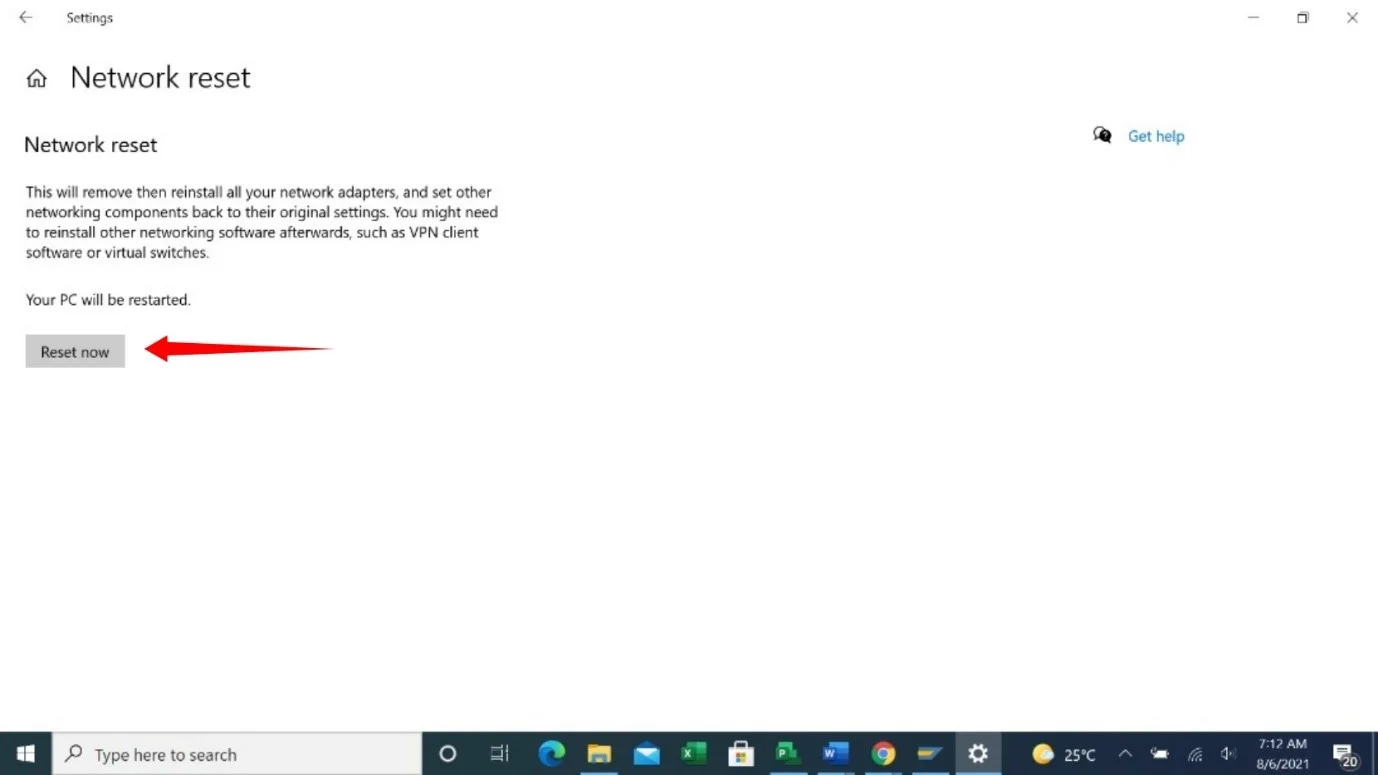
Now, follow these steps to reset the adapters in Windows 10:
- Tap
Windows key + Ito launch Settings. - After the Settings app opens, click on Network & Internet.
- Click on Advanced Network Settings.
- Next, click on Network Reset.

- You’ll see a prompt, warning you about the implications of resetting your network.
- Click on Reset Now.
To reset your network on Windows 11:
- Start the Settings app by pressing the
Windows key + Ishortcut. - Head to the left pane of the Settings window and click on Network & Internet.
- Click on Advanced Network Settings.
- After Advanced Network Settings opens, go to the Other section and click on Network Reset.
- Click on Reset Now once you see the confirmation page.
- Click in the dialog that pops up.
Solution 5: Fix network adapter driver problems
If resetting the network adapter doesn’t do the trick, your network drivers could be the cause of the problem.
Outdated and corrupt drivers cause all sorts of device problems, and it’s no different for the network adapter drivers.
First, you should roll back to your previous driver if you started experiencing the problem after installing an update. Here’s how to do that:
- Right-click on the Start button in the taskbar or tap
Windows logo + X. - After the Power User menu appears, select Device Manager.
- When the Device Manager shows up, expand the Network Adapters category. Click on the arrow beside Network Adapters.
- Next, right-click on your wireless adapter and select Properties.
- Once you see the Properties dialog window, go to the Driver tab.
- Now, click on the Roll Back Driver button.
Note
If the Roll Back Driver button is greyed out, you can check the driver version, then go to the adapter’s manufacturer’s website to find and download the previous version.
If rolling back the driver doesn’t fix the problem, update it. To do that, you have to uninstall the current driver as it could be corrupt. Follow these steps:
- Right-click on the Start button in the taskbar or tap
Windows logo + X. - After the Power User menu appears, select Device Manager.
- When the Device Manager shows up, expand the Network Adapters category. Click on the arrow beside Network Adapters.
- Next, right-click on your wireless adapter and select Uninstall Device.
- Check the box beside Delete the software for this device and click on Uninstall.
- Once your operating system completes the process, restart your computer.
After removing the old driver, head to your network adapter’s manufacturer’s website to download your device’s latest driver version and install it.
Ensure you get the correct driver for your device model and operating system’s 64 or 32-bit architecture.
To avoid anything going wrong, you’d also have to update your Bluetooth, USB, sound, and other device drivers.
If updating these drivers one after the other sounds stressful, head to the following guide to find out how to do it automatically.
Update your drivers automatically
It’s recommended that you update your device drivers regularly to avoid issues like the Wi-Fi problem. However, the process can be tedious, and it’s easy to forget to update your devices.
Things will be a lot less complicated if you have a third-party application such as Auslogics Driver Updater. The tool helps to check for outdated and faulty drivers and updates them automatically.
This way, you won’t have to deal with driver-related problems. In addition, the program can download multiple driver updates at once. So, whatever driver it detects as faulty or outdated, it will fetch the official update for any device and install it.
Here’s how to use it:
- Go to Auslogics Driver Updater’s download page and click on the Download Now button.
- Run the installation package after your browser completes the download.
- Click on Run in the warning dialog, then click on Yes in the User Account Control dialog.
- After the setup window appears, select a language and install location.
- After that, you can choose to allow the program to run at startup and send anonymous crash reports to its developers.
- Click on the Click to install button once you’re done.
- The tool will start checking for outdated and corrupt drivers after the installation is complete.
- You’ll see a list of those drivers once it finishes the scan.
- Click on the update button to download and install the updated version of each driver.
Download Auslogics Driver Updater
Prevent hardware errors and ensure problem-free device operation with this advanced tool that detects outdated drivers and safely gets them updated.
Related: Auslogics Driver Updater: Update Your Drivers in One Click!
Solution 6: Get rid of recent Windows updates
If the problem started occurring after you updated your Windows 10 PC, the update could be responsible. Uninstalling it should resolve the issue for good.
Follow these steps to uninstall the update:
- Tap
Windows key + Ito launch Settings. - After the Settings app opens, click on Update & Security.
- Once you see the Update & Security page, click on View Update History.
- After the View Update History window shows up, go to the Update History section and expand the different categories to check the last update you installed.
- Now, go to the top of the window and click on Uninstall Updates.
- Once the Uninstall an update window appears, click on the update you want to remove and select Uninstall.
- Click on Yes in the confirmation dialog.
- Restart your computer after Windows uninstalls the update.
Also Read: How to Fix Windows Update Error 80004002?
Solution 7: Perform a system restore
The System Restore wizard allows you to restore your computer to a previous working state. If you could connect to the network before, a recent change you made must have messed things up.
You can undo that by restoring your computer to the date you last successfully connected to the network.
Here’s how to restore your operating system:
- Open the search window using the
Windows key + Skeyboard shortcut. - After the search box shows up, type System restore and click on Create a Restore Point in the search results.
- Click on System Restore once you see the System Properties window.
- Once the System Restore wizard shows up, select the Recommended Restore option if it falls on your desired date, click on Next, and click on Finish.
- Select the Choose a different restore point option and click Next if the Recommended Restore date isn’t what you want. Select a restore point and click on the Next button. Click on Finish.
Solution 8: Reset your PC
If none of the solutions we’ve shown you worked, then you should consider resetting your operating system.
This should be your last resort. However, if you believe you missed anything, we recommend going back and applying all the fixes again before resetting your computer.
You can save your files, but you’ll lose your third-party apps and settings.
If you’re ready to reset your computer, follow these steps:
- Launch the Settings application by pressing
Windows + I. - Click on Update & Security on the app’s home page.
- Go to the left pane of the next window and click on Restore.
- Head to the right side of the window and select Get Started under Reset this PC.

- Select the Keep My Files option once the setup window shows up.
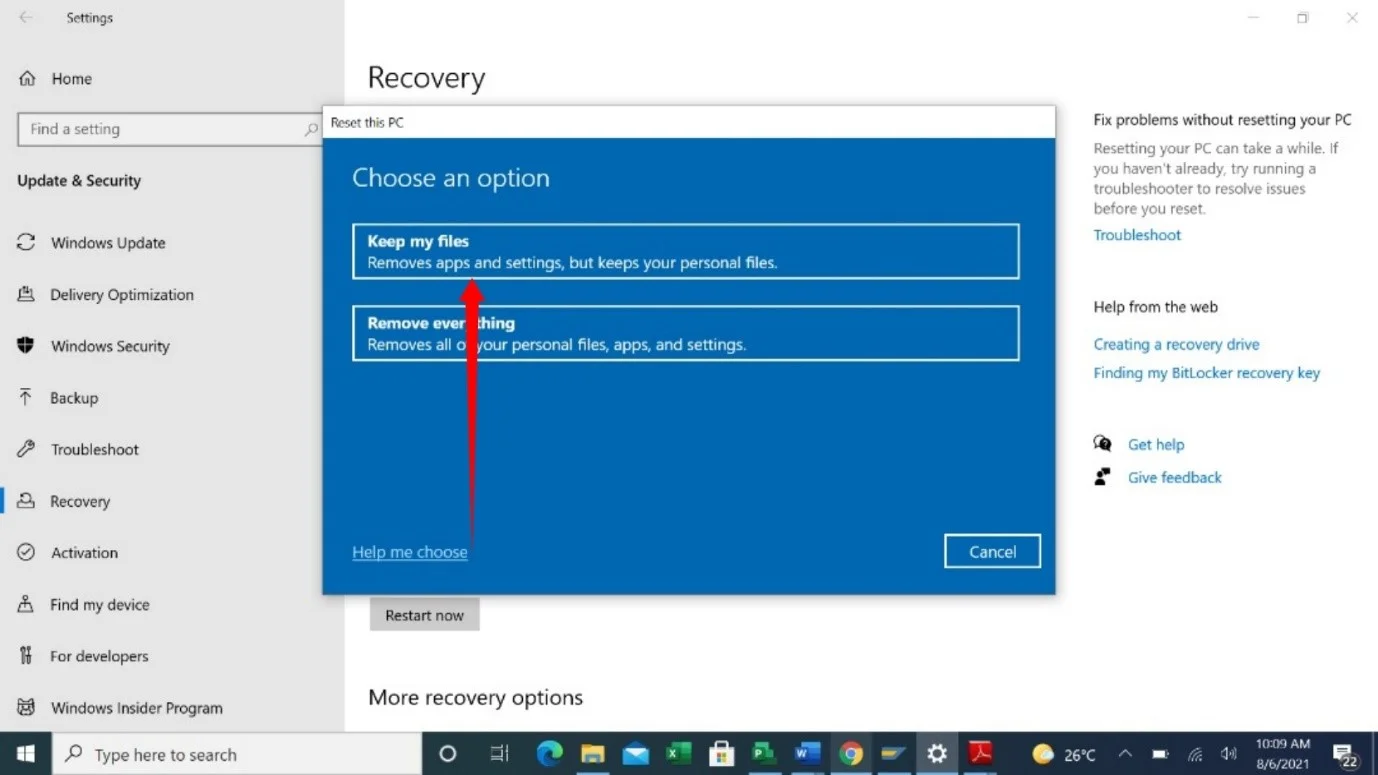
- Next, click on Local Install.
- Select Next.
- Finally, click on Reset
Conclusion
If resetting your computer doesn’t resolve the problem, your network adapter might be faulty. You can either change it or use an external USB Wi-Fi device.
With the advancements in wireless technology, 5GHz WiFi has become the preferred choice for many users due to its faster speeds and better network performance compared to the traditional 2.4GHz frequency.

However, some Windows 11 users have reported an issue where their devices fail to detect or display the 5GHz WiFi network, making it difficult to take advantage of the higher bandwidth and reduced interference.
In this blog post, we will delve into the possible reasons behind this problem and provide you with a comprehensive guide on how to fix the issue of 5GHz WiFi not showing up in Windows 11.
Keep in mind that, the steps discussed below are applicable to your query i.e. how to fix 5ghz wifi not showing up in Windows 10 issue
Restart Router
First of all, try restarting your router to rule out any temporary glitches that might be affecting the 5GHz network’s visibility. Here’s what you need to do:
Simply turn off your router, wait for about 10-15 seconds, and then turn it back on.
Check If Wireless Adapter Support 5GHz Band
Ensure that your wireless adapter supports the 5GHz frequency. Many older devices and some entry-level laptops only 2.4GHz band. As a result, 5GHz Wifi network connections don’t show up in network connections.
To check if your adapter is 5GHz compatible, here’s what you need to do:
Right-click on the Windows button and select Terminal.
In the Terminal window, you need to execute this command: netsh wlan show drivers
In the results that appear, locate the Number of supported bands entry.

If 2.4GHz and 5GHz are listed next to the entry confirms that your PC supports the 5GHz band. Conversely, if 2.4GHz is listed, indicates that your device lacks support for a 5GHz connection.
If your Wireless adapter doesn’t support a 5GHz band then upgrade the network adapter or device. On the other hand, if it supports the required band, then follow the next method.
Manually Enable 5GHz Wi-Fi Band
Sometimes your device supports the 5GHz Wi-Fi band, but it’s disabled due to this reason it doesn’t appear in the network connection. Fortunately, you can enable it manually by following these steps:
Press Win + X on your keyboard and select “Device Manager.“
Expand the “Network adapters” category.
Look for your wireless network adapter, which may be named differently based on the manufacturer (e.g., Intel, Realtek, Qualcomm). In my case, its Intel(R) Dual Band Wireless -AC 8265

Right-click on the adapter and select “Properties.“
Navigate to the “Advanced” tab and look for an option like “802.11n/ac/ax”, “Preferred Band” or “Channel Width for 5GHz“
Ensure that the Value is set to “5GHz” or “Auto.“
After that, restart your computer and check if this fixes the issue or not. Else move on to the next step.
Update Wireless Drivers
Outdated or corrupted wireless drivers can also lead to issues with detecting 5GHz WiFi networks. To update your drivers, follow these steps:
Go to the manufacturer’s website of your wireless adapter to download the latest drivers. Check this blog post to how to download drivers from manufacturers. Or check this to learn How to Update Drivers for Windows 11.
Locate and download the appropriate driver for your adapter model and Windows 11 version. Install the driver and restart your computer.
Restart Wireless AutoConfig Service
Sometimes, the Wireless AutoConfig service can experience issues, resulting in problems with network detection. Restarting this service might resolve the problem:
Click on the Search icon and type services.msc, when the same app appears in search results, click to open it.

In the Services window, scroll down and locate “WLAN AutoConfig” in the list of services.
Right-click on it and select “Restart.”
Close the Services window and check if the 5GHz WiFi network appears.
Update Windows
Keeping your Windows 11 up to date is essential for resolving various issues, including problems related to network connectivity. To check for updates and install them:
Press Win + I to open the Windows Settings app.
Switch to “Windows Update” in the left pane.
On the right side, click on “Check for updates” and allow Windows to search for and install any available updates.
Restart your computer after the updates are installed.
Check Router Settings
There might be some settings on your router that are causing the 5GHz WiFi network to be invisible to your Windows 11 device. Access your router’s settings by entering its IP address in a web browser, then:
- Ensure that the 5GHz band is enabled and broadcasting.
- Check for any MAC filtering or access control lists that may be preventing your device from connecting.
- Experiment with different WiFi channels as interference might be affecting the network’s visibility.
Run Internet Connection Troubleshooter
If the issue still persists, you can run the Internet connection troubleshooter built into Windows 11. Here’s how you can run it:
Click on the Search icon and type Troubleshoot other problems, when the same system setting appears in the search results, click to open it.

On the Other Troubleshooters Setting page, locate Network and Internet option and click on the Run button next to it.
Follow the on-screen instructions and allow Windows to diagnose and attempt to fix the issue.
Reset TCP/IP and Flush DNS Cache
Sometimes resetting TCP/IP and flushing DNS Cache helps in restoring bring 5ghz wifi option in Windows 11, here’s how you can do that:
Click on the Search icon and type cmd, when Command Prompt appears in the search results, click to open it. When the UAC dialog box appears, click Yes to continue.
In the Command Windows, you need to execute the following commands back to back:
netsh winsock reset
netsh int ip reset
ipconfig /release
ipconfig /flushdns
ipconfig /renew
Once done, restart your computer to apply the changes.
Reset Network Settings:
If all else fails, resetting your network settings can often resolve obscure connectivity issues. After the reset, restart your computer and set up your WiFi connection again.

Experiencing a problem with your 5GHz WiFi network not showing up in Windows 11 can be frustrating, but with the steps provided in this blog post, you can troubleshoot and resolve 5ghz wifi not showing up in Windows 11 issue.
If you know any other solution that we missed covering in this blog post, then feel free to share in the comments.
Viney Dhiman, the mind behind GeekerMag, is a seasoned content writer with over 12 years of experience. Specializing in simplifying complex tech concepts, he covers Windows OS, Android, iOS, web apps, and product reviews. His work can be found on popular tech websites like Gizmodo and The Verge, and he has been interviewed by the Microsoft Edge team.
Jun. 23, 2022 / Updated by
Bessie Shaw to
Windows 10
Nowadays, dual-band wireless routers are very popular, which contain both 2.4 GHz and 5 GHz. If your desktop or laptop also supports 5GHz Wi-Fi, you could get a faster and smoother Internet connection. After upgrading to Windows 10, your 5GHz Wi-Fi doesn’t work or disappear. Don’t tear your hair out. Here’s how to fix the 5GHz Wi-Fi not showing up or not working in Windows 10 issue if your PC supports 5GHz, also applied to Windows 10 Creators Update, Windows 10 Fall Creators Update and Windows 10 April Update 2018.

2.4GHz WiFi and 5GHz WiFi
802.11a, 802.11g and 802.11n can work on both 2.4GHz and 5GHz, and 802.11ac can only work on 5GHz. There are two primary differences between 2.4GHz and 5GHz: interference and range.
1. The 2.4GHz is way more crowded than 5GHz, and devices on 2.4GHz run into more interference than on 5GHz. The 5GHz band has 23 available channels for devices, while the 2.4 GHz has only 3 channels.
2. The 2.4GHz has a further range compared with 5.0GHz band, and goes through walls better. The 5GHz is limited to indoor use only.

These WiFi-related posts may also interest you:
-
Top 7 Ways to Fix No WiFi after Windows 10 Update
-
Fix WiFi Adapter Not Showing up after Windows 10 Update
-
Fix No LAN (Local Area Network) Access in Windows 10
Fix 5GHz Wi-Fi Not Showing Up after Upgrade to Windows 10
After Windows 10 upgrade, the most common reason for 5GHz WiFi not showing up or not working is the inappropriate wireless adapter driver. After you download and install the suitable adapter driver for Windows 10, the 5GHz WiFi will appear.
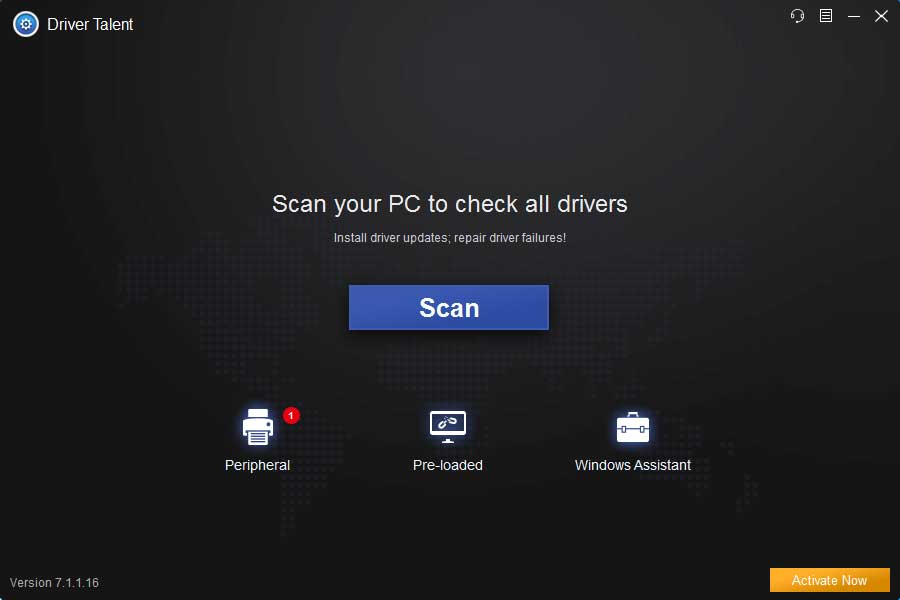
You could head over to the official website of your router’s manufacturer to manually download the wireless adapter driver. Alternatively, you could try an easy-and-quick automatic drivers update utility Driver Talent, which can help you instantly download the genuine adapter driver that fits your need.
Click the button below to get Driver Talent directly.
Download Now
1. Scan Your PC
Click «Scan» to identify your outdated, corrupted or broken wireless adapter driver in seconds.
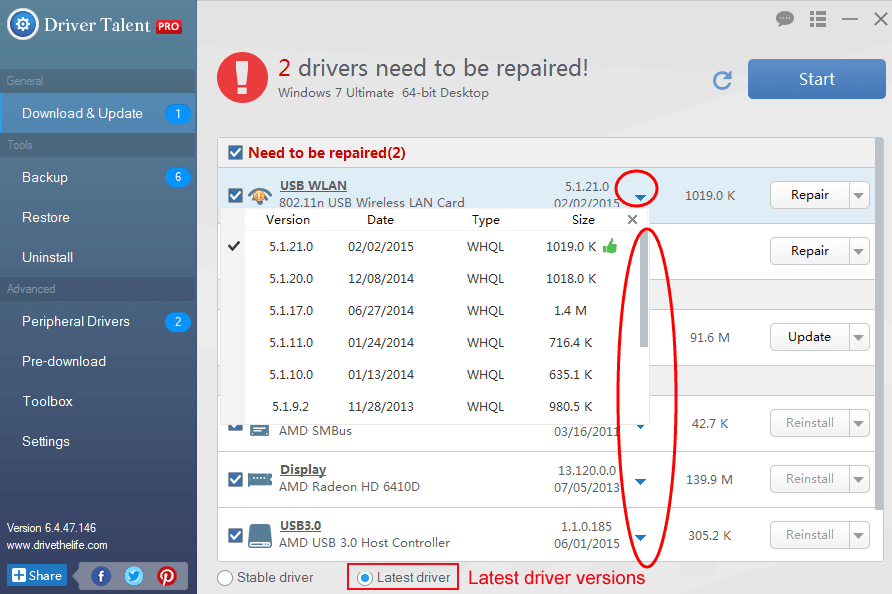
2. Download and Update Your 5GHz Adapter Driver
One-click «Repair» or «Update» to download and install the most compatible wireless network adapter driver within quite a few minutes.
3. Reboot Your PC
Follow the on-screen instruction to reboot your desktop or laptop to make all change take effect.
Note: Keep in mind that back up your drivers before installing a new wireless network driver, which will be very convenient for you to restore the new driver to a previous version in some cases.
These WiFi-related posts may also interest you:
-
How to Fix Windows 10 WiFi Problems
-
Fix «WiFi Doesn’t Have a Valid IP Configuration» on Windows 10
-
How to Fix Unidentified Network Problem on Windows 10
-
5 Ways to Fix WiFi «No Internet, Secured» Issue on Windows 10
-
Top 5 Ways to Fix Wireless Adapter Not Showing Up on Windows 10
-
Top 2 Ways to Fix No Wi-Fi Available after Windows 10 Update Issue
Improve 5GHz Signal Strength
If your 5GHz WiFi connection is very poor, you could try to adjust the placement and orientation of your wireless network adapter, or adjust the antennas of your adapter.
For more details about wireless adapter download and update, please see Quick Way to Free Download, Update Network Adapter Driver for Windows 10, 8, 7, XP, Vista
For no Wi-Fi available on Windows 10, please refer to this article Can’t Connect to Wi-Fi on Windows – How to Fix It
You may also like to check out:
-
How to Tell If Your Computer Has Bluetooth
-
How to Determine If Windows 10 Is 32-bit or 64-bit
-
How to Remove Test Mode Watermark in Windows 10
-
How to Enter Safe Mode in Windows 10
-
How to Launch Command Prompt on Windows 10
If you’d like to contribute other solutions to 5GHz Wi-Fi not showing up, 5GHz WiFi not connecting or not working issue, please leave comments below. If you encounter other problems after the latest Windows 10 update, you can also drop a line below or click the support menu on the left of this page for help. Hope you continue to have access to Windows 10 section as well as provide support.
Recommended Download
|
ExplorerMax |
Driver Talent for Network Card | |||
| Smart and advanced file explorer tool for Windows platforms | Download & Install Network Drivers without Internet Connection | |||
|
30-day Free Trial |
Free Download |
Добрый день!
После большого весеннего обновления Windows 10 появилась одна неприятная проблема. Дело в том, что после выключения или перезагрузки компьютера система перестает видеть WiFi на частоте 5 GHz, одновременно с этим проблем с 2.4 GHz нет. Если вручную перезапустить адаптер, то 5 GHz начинает обнаруживаться и компьютер к ней подключается. В редких случаях даже если 5 GHz сеть обнаруживается, подключение не происходит. На всех других домашних устройствах — это несколько телефонов, MacBook Air, пару планшетов — проблем с 5 GHz нет.
Конфигурация:
- адаптер WiFi — Qualcomm Atheros AR946x (интегрированный, материнская плата ASUS Z87-Pro);
- версия ОС — официальная Windows 10 Pro 1709 (сборка 16299.64);
Что делал:
- для адаптера WiFi откатывался к драйверам по умолчанию;
- устанавливал до 10 различных версий драйвера для адаптера WiFi, включая версии для Win8 и Win7;
- сбрасывал настройки сети;
- с тех пор как появилась проблема, я сменил роутер с ASUS RT-N66U на ASUS RT-AC66U;
В интернет решения проблемы я за долгое время так и не нашел, причем как в англоязычном сегменте, так и в русскоязычном. Полгода назад создал тикет в Центре отзывов Microsoft, ответа до сих пор нет. Экспериментировать и покупать другие адаптеры WiFi (USB или PCI-E) не хочу, так как дорого и нет гарантии, что проблема не будет воспроизведена на новом устройстве.
Распределенное обучение с TensorFlow и Python
AI_Generated 05.05.2025
В машинном обучении размер имеет значение. С ростом сложности моделей и объема данных одиночный процессор или даже мощная видеокарта уже не справляются с задачей обучения за разумное время. Когда. . .
CRUD API на C# и GraphQL
stackOverflow 05.05.2025
В бэкенд-разработке постоянно возникают новые технологии, призванные решить актуальные проблемы и упростить жизнь программистам. Одной из таких технологий стал GraphQL — язык запросов для API,. . .
Распознавание голоса и речи на C#
UnmanagedCoder 05.05.2025
Интеграция голосового управления в приложения на C# стала намного доступнее благодаря развитию специализированных библиотек и API. При этом многие разработчики до сих пор считают голосовое управление. . .
Реализация своих итераторов в C++
NullReferenced 05.05.2025
Итераторы в C++ — это абстракция, которая связывает весь экосистему Стандартной Библиотеки Шаблонов (STL) в единое целое, позволяя алгоритмам работать с разнородными структурами данных без знания их. . .
Разработка собственного фреймворка для тестирования в C#
UnmanagedCoder 04.05.2025
C# довольно богат готовыми решениями – NUnit, xUnit, MSTest уже давно стали своеобразными динозаврами индустрии. Однако, как и любой динозавр, они не всегда могут протиснуться в узкие коридоры. . .
Распределенная трассировка в Java с помощью OpenTelemetry
Javaican 04.05.2025
Микросервисная архитектура стала краеугольным камнем современной разработки, но вместе с ней пришла и головная боль, знакомая многим — отслеживание прохождения запросов через лабиринт взаимосвязанных. . .
Шаблоны обнаружения сервисов в Kubernetes
Mr. Docker 04.05.2025
Современные Kubernetes-инфраструктуры сталкиваются с серьёзными вызовами. Развертывание в нескольких регионах и облаках одновременно, необходимость обеспечения низкой задержки для глобально. . .
Создаем SPA на C# и Blazor
stackOverflow 04.05.2025
Мир веб-разработки за последние десять лет претерпел коллосальные изменения. Переход от традиционных многостраничных сайтов к одностраничным приложениям (Single Page Applications, SPA) — это. . .
Реализация шаблонов проектирования GoF на C++
NullReferenced 04.05.2025
«Банда четырёх» (Gang of Four или GoF) — Эрих Гамма, Ричард Хелм, Ральф Джонсон и Джон Влиссидес — в 1994 году сформировали канон шаблонов, который выдержал проверку временем. И хотя C++ претерпел. . .
C# и сети: Сокеты, gRPC и SignalR
UnmanagedCoder 04.05.2025
Сетевые технологии не стоят на месте, а вместе с ними эволюционируют и инструменты разработки. В . NET появилось множество решений — от низкоуровневых сокетов, позволяющих управлять каждым байтом. . .