
Synology NAS Device is one of the most secure file-level architecture for storing and sharing a significant amount of data. This high-capacity storage device can be easily connected to your home or office networks though WI-FI or LAN. Multiple users and heterogeneous client devices can store, access, and recover data from a centralized storage (NAS), which appears in your Windows system as a shared network device.
Unfortunately, there are times when you may experience NAS device visibility issues in Windows Explorer. This problem worsens when you provide the correct password to access the Network Attached Storage device but receive an error instead. NAS Device Not Visible error occurs while you’re trying to access your Synology NAS and the access is blocked.
What Causes NAS Device Not Visible Error?
The common reasons behind the error are SMBv1 not being enabled on the system, incorrect network proxy settings, network discovery being turned off, corrupt IP or DNS cache, or a third-party firewall interfering with the connection. The error is mainly affecting Windows 10 and 11 users as per most tech forums.
Older versions of Windows are not typically affected by this error. Microsoft has disabled the Server Message Block (SMBv1) protocol on Windows 10 and 11 due to security reasons. The error occurred after the Fall Creators Update, version 1709, or Windows reinstallations.
How to Fix NAS Drive Not Showing on Network Error?
Although advanced methods to fix the NAS drive not showing on network in Windows 10 and 11 exist, below are some quick fixes you can try!
Quick Fixes
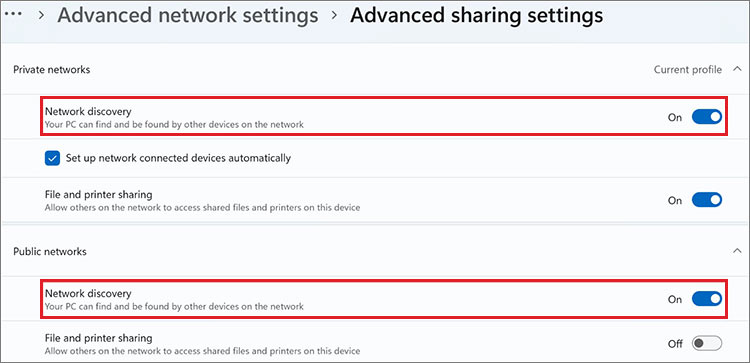
- Turn on network discovery by following Control Panel > Network and Internet > Network and Sharing Center > Change Advanced Sharing Settings > Turn on network discovery > Save changes.
- Edit Group Policy by accessing Group Policy Editor > Computer Configuration > Administrative Templates > Network > Lanman Workstation > Enable insecure guest logons > Enabled > OK.
However, the above-shared quick fixes are only impactful in limited scenarios. Hence, if you fail to solve the NAS device not visible error on Windows 10 and 11, try the proven methods shared below!
Methods to Fix NAS Device Not Visible on Network
To fix the NAS device not visible on Windows Explorer error, try the methods discussed below. Carefully follow the steps and notes, wherever mentioned!
#1 Enable Windows Network Discovery on Synology NAS
This method applies to Synology NAS running DSM 6.2 or above versions or computers with Windows Vista or later versions. You can enable the Windows Network Discovery to allow file access via the SMB checkbox at one of the following locations in the DSM:
For DSM 6.2:
- Open the Control Panel and locate File Services.
- Open File Services, go to the SMB tab and then select WS-Discovery.
For DSM 7.0:
- Go to Control Panel and open File Services.
- Next, go to the Advanced tab and open WS-Discovery.
#2 Enable Local Master Browser on Synology NAS
In case your Synology NAS is running 6.1 or below versions, or the system has older versions of Windows installed, enable the Local Master Browser with the following steps:
For DSM 6.0 and 6.1:
- Open the Control Panel, go to File Services, and locate the SMB/NFS/AFP tab.
- Next, go to SMB and click Advanced Settings.
For DSM 5.2:
- Follow Control Panel > File Services > Win/NFS/Mac tab.
- Further, go to Windows File Service > Advanced Settings.
#3 Enable SMBv1 on Windows 8.1, 10, and 11
If your NAS device needs the SMBv1 (Server Message Block version 1) network protocol to communicate over the network, you can try this method. Enable SMBv1 with the following steps:
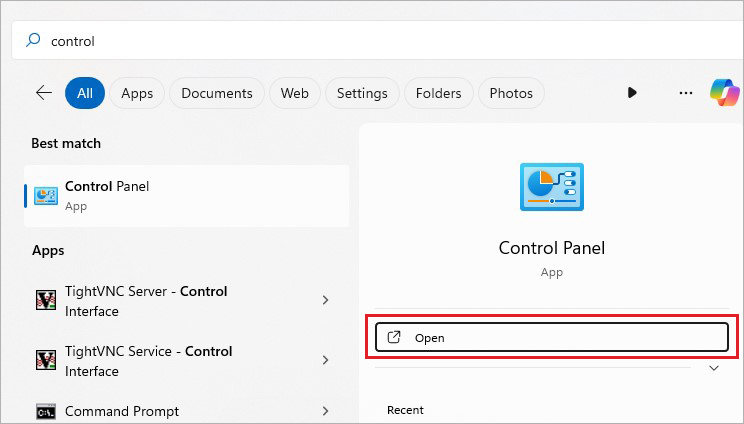
- Access Windows Search by pressing Windows + S, and type Control Panel to open it.
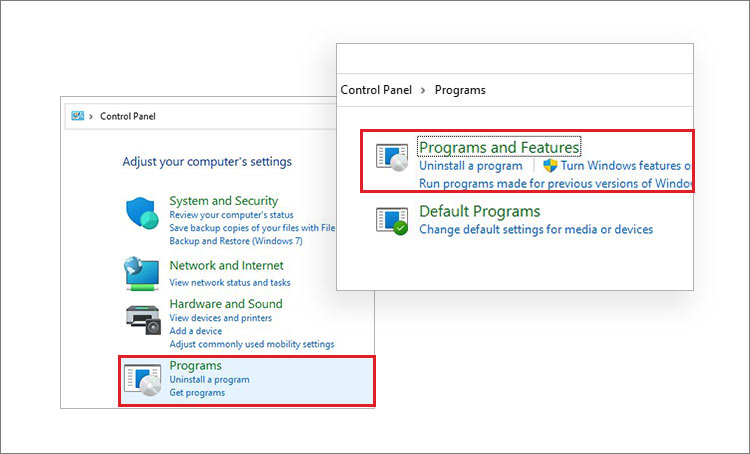
- In the Control Panel, select Programs > Programs and Features.
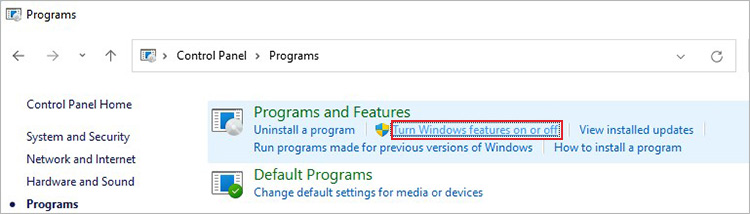
- There, click Turn Windows features on or off.
- Thereafter, locate SMB 1.0/CIFS File Sharing Support and select the checkbox given against it.
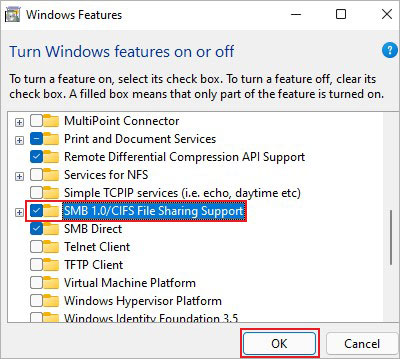
- Click OK to apply the changes. Finally, click Restart now and check if you can access your NAS on your system after reboot.
Note: SMBv1 is no longer available in Windows 10 and later versions except in Home and Pro editions; Microsoft advises against installing the SMBv1 protocol. Instead, update the SMB server, which is still required.
#4 Enable NetBIOS Service on your System
You can also enable the NetBIOS service on your system and see if it fixes the NAS device not visible error on the Windows system. Follow the given steps:
- Go to Control Panel, and follow Network and Internet > View network status and tasks.
- Next, change the adapter settings, click Change settings for this connection, and select the connection you’re using.
- Double-click Internet Protocol Version 4 (TCP/IPv4) in the ‘This connection uses the following items list.
- Click the Advanced button and go to the WINS tab.
- Select Enable NetBIOS over TCP/IP and click OK on every window to save all the settings.
Once done, check if the Local Master Browser is enabled on your Synology NAS. Re-enable the network discovery by following Network and Internet > Network and Sharing Center > Change advanced sharing settings.
Turn off network discovery under the Network discovery section and clear the DNS cache.
#5 Reset Synology NAS
If you’ve performed all the methods and are still unable to fix the NAS Device Not Visible error on the Windows system, try resetting your Synology NAS with the following steps:
- Ensure your Synology NAS and system are in the same local area network and subnet.
- Disable or temporarily remove the firewall software from your system.
- Use a different Ethernet cable to connect to the Synology NAS to look for the defective wires.
- If the NAS device has multiple network ports, connect the Ethernet cable to that port to identify the defective ports.
- Finally, press the RESET button on the back of your Synology NAS for four seconds or until you hear a beep sound. You can also refer to this guide to learn to reset Synology NAS.
Final Words:
Synology NAS device is an excellent data storage and file-sharing solution. However, it’s not immune to errors such as NAS devices not visible. The error makes your NAS invisible, blocking access to your files. Even though the files can be recovered if you have NAS backup or a reliable NAS data recovery software available, fixing the issue needs a proper approach. Another quick solution to fix the NAS device not visible on Windows 10 and 11 devices could be mapping the shared folder to a drive letter to show NAS under Network Devices on the system. Try the solutions and tell us which solution helped you overcome the issue.
People Also Ask
Q. How do I assign an IP address to my NAS?
You can set up the IP address of your NAS manually by following NAS WebUI > Control Panel > Network → TCP/IP > General Settings > DNS server > Provide a server entry > Apply.
Q. Is Synology better than QNAP for NAS setup?
Where QNAP can only handle traditional RAID drives, Synology NAS supports Synology Hybrid RAID. Additionally, QNAP supports EXT4 formatted devices, while Synology offers EXT4 as well as the latest B-Tree File system. There are several other factors that you may consider while choosing between Synology and QNAP for NAS setup.
Q. Are RAID and NAS the same?
RAID is a set of multiple hard drives configured to function as one logical unit to deliver performance, redundancy, or both. NAS is a file-level data storage architecture, connected over a local-area network or Wi-Fi, providing a single access point to store and share files easily.
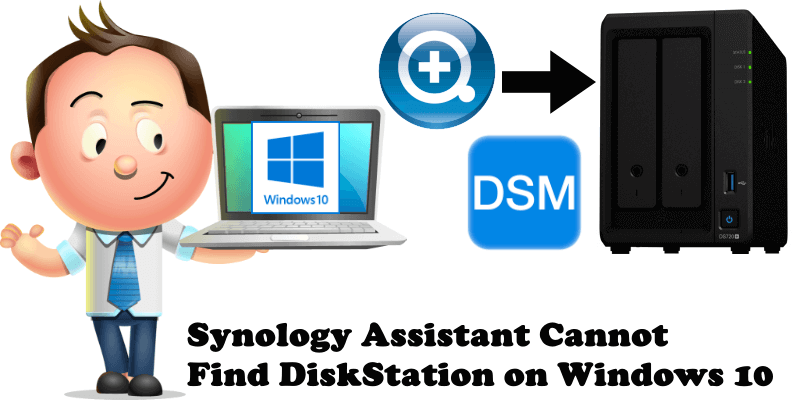
Has it ever happened to you that Synology Assistant couldn’t find your NAS on the local area network? I’ve found this can happen with Windows 10 and Windows 7. I’ve noticed the problem occur after you just install a Windows update. So if one day Synology Assistant cannot find your NAS on the local area network, it might just be because of a recent Windows update that might have made some sort of changes to your network. For example, a Windows update might change your local area network from Private to Public which could cause this sort of issue with Synology Assistant. This has happened to me a couple of times actually, and each time I’ve found that changing it back to Private allowed Assistant to then find my DiskStation.
What is Synology Assistant? Synology Assistant is a desktop utility that searches for Synology DiskStations in the local area network. It helps you set up and install DSM on your DiskStation, connect to a local network or multi-functional printers shared by your DiskStation, setup Wake on LAN (WOL), or view monitored resources of your DiskStation.
Note: Some software for Windows, such as Malwarebytes, an anti-malware software for Microsoft Windows, macOS, Android, and iOS that finds and removes malware, once installed, can completely block access to your NAS. Just uninstall it and everything should return to normal. This is just an example, but it’s possible for other anti-malware software to cause this same sort of issue with Synology Assistant not finding your NAS on your local network.
This post was updated on Thursday / August 18th, 2022 at 3:31 AM
Can’t Map Synology Drive on Windows 10? 4 Ways to Fix it
Mapping a Synology Drive on a Windows 10 system is an efficient way to access files and folders stored on a Synology NAS (Network Attached Storage). However, users sometimes encounter issues that prevent them from mapping their Synology Drive properly. This article explores four comprehensive methods to troubleshoot and fix the common problems that arise when attempting to map a Synology Drive on Windows 10.
Understanding the Basics of Mapping a Network Drive
Before diving into the possible solutions, it’s essential to grasp what mapping a network drive entails. When you map a network drive in Windows, you create a shortcut that connects to a shared folder located on another computer or network device. By assigning a drive letter (such as Z: or Y:), you can access your Synology files more conveniently as if they were stored on your local machine.
Common Reasons for Mapping Errors
While the process is generally straightforward, various factors can lead to frustrations. Users may experience one or more of the following issues:
-
Network Connectivity Problems: Poor internet connection or an unstable local network can interfere with accessing your Synology NAS.
-
Incorrect Credentials: Entering the wrong username and password can result in failed connections.
-
Windows Firewall or Antivirus Settings: Sometimes security software can block file-sharing protocols used by Synology.
-
Incorrect Network Settings on NAS: Insufficient settings can cause problems in file sharing and access rights.
Fix 1: Check Network Connectivity
The first and foremost step in troubleshooting mapping issues is to ensure your Windows 10 PC is connected to the same network as your Synology NAS. Follow these steps to verify connectivity:
-
Check Network Status:
- Click on the Network icon in the system tray on the Windows taskbar.
- Confirm that you are connected to the correct Wi-Fi or LAN network.
-
Ping the Synology NAS:
- Open Command Prompt by pressing
Win + R, typingcmd, and hitting Enter. - Type
ping [IP address of your Synology NAS](replace «[IP address of your Synology NAS]» with the actual address). - Analyze the results. If you receive replies, your PC can communicate with the NAS. If not, you may need to troubleshoot your network connection.
- Open Command Prompt by pressing
-
Ensure LAN Isolation is Disabled:
- If you are on a guest network, certain routers may have «LAN Isolation» enabled, which prevents devices from communicating with each other. Make sure this option is disabled in your router settings.
-
Try Other Devices:
- Check if other devices like your smartphone or another computer can access the Synology Drive. This helps determine if the issue is specific to your Windows 10 machine.
Fix 2: Verify Credentials
If you’ve established that the network is functioning correctly, the next step is to ensure that you are entering the right credentials to access the Synology NAS. Incorrect login information can lead to a failure to map the drive.
-
Double-Check Your Username and Password:
- Ensure that you are using the correct account credentials. Synology devices often have multiple users, and each user will have their own set of permissions and passwords.
-
Account Permissions:
- Log into your Synology NAS via its web interface.
- Navigate to Control Panel > User & Group > Users.
- Select your user account and check the «Privileges» tab to confirm that you have permissions to access the shared folders you’re trying to map.
-
Reset Password if Necessary:
- If you’ve forgotten your password, you can reset it via the Synology interface. Select your account and click the «Edit» button to modify your password.
-
Use the Domain Name if Applicable:
- If your NAS is part of a domain, you may need to enter your credentials in a specific format:
DOMAINusername.
- If your NAS is part of a domain, you may need to enter your credentials in a specific format:
Fix 3: Check Windows Firewall and Antivirus Settings
Windows Firewall or other third-party antivirus programs may inadvertently block the protocols required for network discovery and file sharing. Here’s how to adjust these settings:
-
Windows Defender Firewall:
- Go to Control Panel > System and Security > Windows Defender Firewall.
- Click on «Allow an app or feature through Windows Defender Firewall.»
- Ensure that «File and Printer Sharing» and «Network Discovery» are checked for your network type (private, public).
-
Add Firewall Exception:
- If the Synology services aren’t listed, add an exception manually by clicking «Allow another app» and browsing for the Synology application.
-
Antivirus Software:
- If you use third-party antivirus programs (like Norton, McAfee, etc.), check their settings for any blocked connections related to file sharing or network discovery. You may need to add the NAS protocols or create a custom rule allowing access.
-
Disable Firewall Temporarily:
- As a last resort, temporarily disable the firewall or antivirus to check if it resolves the issue. If the drive maps successfully, you’ll know where the problem lies. Remember to turn it back on afterward for security.
Fix 4: Adjust Network Settings on Synology NAS
If you still can’t map the drive after ensuring credentials and firewall settings are correct, the next step is to check the network settings and shared folder permissions on your Synology NAS:
-
Enable SMB Protocol:
- Log into your Synology NAS as an admin.
- Access Control Panel > File Services and ensure the SMB protocol is enabled (it is usually enabled by default, but it’s worth checking).
- You may also want to consider enabling AFP and NFS protocols if you are connecting from various operating systems.
-
Check Shared Folder Permissions:
- Go to Control Panel > Shared Folder.
- Select the shared folder you want to map, then click the «Edit» button.
- Review the permissions assigned to the user account you are using on your Windows 10 PC and ensure that the “Read/Write” permissions are granted as needed.
-
Reduce the Maximum SMB Protocol Level:
- Sometimes Windows 10 may require SMB version 1, which is often disabled for security reasons. If you suspect this is the issue, you can manually adjust the SMB settings in the same File Services menu by clicking on “Advanced Settings” and selecting SMB1 if your setup allows it.
-
Network Profile:
- Make sure your Windows Network Profile is set to Private instead of Public. This is essential for network discovery and sharing.
- Go to Settings > Network & Internet > Status and click on «Change connection properties.» Choose «Private» for the network profile.
Final Thoughts
Mapping a Synology Drive on Windows 10 should not be a source of frustration. With the four methods outlined above, users can address and resolve common issues that prevent connectivity. Begin with a simple check of the network and credentials, followed by adjusting firewall settings and finally ensuring that all shared folder permissions and protocols on the NAS are correctly configured.
If you still encounter issues after trying all the solutions provided, it may be a good idea to consult Synology support or your network administrator for further assistance. Properly mapping and accessing your Synology Drive can significantly enhance your file management capabilities and provide seamless access to your data. Thus, it is worth taking the time to ensure you resolve these mapping challenges effectively.
Table of Contents
- How connect NAS drive to network?
- Why is Synology NAS not showing on network?
- How do I install NAS on Windows 10?
- How do I find the IP address of my NAS?
- How do I fix SMB protocol in Windows 10?
- How do I share an external hard drive on my network Windows 10?
- What is the difference between NAS and NFS?
- What is the difference between a NAS and a server?
- How do I find my Synology NAS on my network?
- How do I access my Synology NAS from Windows 10?
- How do I connect my Synology NAS to my network?
- How do I find my network Map in Windows 10?
- Does NAS have IP address?
- Does a NAS drive have an IP address?
- How do I find the IP address of a device on my network Windows 10?
- How do I know if SMB is enabled?
- How do I open port 445 on Windows 10?
- How do I enable Windowsoptionalfeature?[+]
- Related posts
If you’re still unable to see/access the NAS device on Windows 10, try accessing it from a working Windows 8 or lower version of the Windows system on the same network as NAS. If the NAS device is still invisible, there might be some issues with your NAS device. In such a case, your data on NAS disks might be at risk.
Can’t find NAS drive on network Windows 10?
FIX NAS Drive NOT VISIBLE on Network Windows 10 – YouTube
How do I make my network NAS visible?
NAS Drive NOT VISIBLE on Network Windows 11 FIX [Tutorial]
How do I access my NAS from Windows 10?
Follow the steps below:
- Open File Explorer, then select This PC.
- Click the Computer tab on the upper part of the windows.
- Click Map network drive.
- Select a drive letter you want, then click Browse.
- Navigate to your NAS drive, then click OK.
- Confirm your selection, click Finish.
How connect NAS drive to network?
Plug an external hard drive or even a USB flash drive (preferably not a flash drive if you intend on using it heavily) into the USB port. The router has built-in NAS software that can do the rest, exposing it to the network as a NAS. You can enable the NAS server from your router’s web interface and set everything up.
Why is Synology NAS not showing on network?
Make sure that your Synology NAS and computer are located on the same local area network and subnet. Temporarily disable or remove firewall software on your computer. Try using other Ethernet cables to connect to your Synology NAS to check for defective cables.
How do I install NAS on Windows 10?
Map a network drive in Windows
- Open File Explorer from the taskbar or the Start menu, or press the Windows logo key + E.
- Select This PC from the left pane.
- In the Drive list, select a drive letter.
- In the Folder box, type the path of the folder or computer, or select Browse to find the folder or computer.
- Select Finish.
How do I find the IP address of my NAS?
How To Find IP Address of Synology NAS Diskstation
How do I fix SMB protocol in Windows 10?
[Network] SMB1 Sharing Protocol on Windows 10
- Click and open the Search Bar in Windows 10. Type Windows Features in the search bar.
- Scroll down to SMB 1.0/CIFS File Sharing Support.
- Check the box net to SMB 1.0/CIFS File Sharing Support and all other child boxes will auto populate.
- Click Restart Now to reboot the computer.
How can you share an external hard drive over the network on Windows 10?
- Connect the device to your Windows computer via a USB port.
- Click Start and select Computer.
- Right-click on the device and select Share with > Advanced sharing.
- In the Properties window, choose the Sharing tab and click the Advanced Sharing button.
What is the difference between NAS and NFS?
Network Attached Storage (NAS) is a device that allows users to access files through a network. It allows users to access and share files from their individual stations through a central server. NFS (Network File System) is a protocol that is used to serve and share files on a network.
What is the difference between a NAS and a server?
A server is much larger than a NAS device thus the server is not suitable for office applications which are limited in space. In contrast, the NAS devices are portable and easy to move around so that they can be connected to a router or switch in small and medium-sized businesses (SMBs).
How do I find my Synology NAS on my network?
You may find your Synology NAS via either of the following tools:
- Web Assistant: Enter find.synology.com or synologynas:5000 (synologynas. local:5000 for Mac computers) in the address bar of your web browser.
- Synology Assistant: Open Synology Assistant desktop utility.
How do I access my Synology NAS from Windows 10?
Overview
- Open a Windows Explorer window and go to Computer.
- Click Map network drive.
- On the Map Network Drive window, choose a drive letter from the Drive drop-down menu.
- In the Folder field, enter the server name of your Synology NAS and shared folder name preceded and separated by backslashes.
How do I connect my Synology NAS to my network?
How to troubleshoot connecting to your Synology NAS
- Head to the Synology website.
- Choose your NAS model.
- Download Synology Assistant.
- Install the software.
- Run Synology Assistant.
- Allow the suite to search your network.
- Right-click your NAS and choose Connect.
How do I find my network Map in Windows 10?
First, open the Network and Sharing Center. On top of the window, you will see a basic network map, showing if and how your computer is connected to the internet. To view the full network map, click on ‘See full map’. The network map should look somewhat like this.
Does NAS have IP address?
Once connected to the network, your NAS device will share the general IP address of your own computer. Therefore, if you want to find out the IP address of your NAS device you just have to find out your computer’s IP address through the Control Panel.
Does a NAS drive have an IP address?
To determine the IP address of your NAS system, you have to look it up in the network settings of your computer. In Windows, go to ‘Control Panel’, click on ‘Network and Sharing Center’, then click on ‘Change Adapter Settings’.
How do I find the IP address of a device on my network Windows 10?
Windows 10: Finding the IP Address
- Open the Command Prompt. a. Click the Start icon, type command prompt into the search bar and press click the Command Prompt icon.
- Type ipconfig/all and press Enter.
- The IP Address will display along with other LAN details.
How do I know if SMB is enabled?
Click on Programs. Click on Turn Windows features on or off link. Expand the SMB 1.0/CIFS File Sharing Support option. Check the SMB 1.0/CIFS Client option.
How do I open port 445 on Windows 10?
Go to Computer Configuration > Policies > Windows Settings > Security Settings > Windows Firewall with Advanced Security > Windows Firewall with Advanced Security – LDAP > Inbound Rules. Right-click and choose New Rule. Choose Port and click Next. Choose TCP and at specific local ports enter 135, 445, then click Next.
How do I enable Windowsoptionalfeature?
Here’s how to turn on or off optional features on Windows 10 using Control Panel:
- Open Control Panel.
- Click on Programs.
- Click the Turn Windows features on or off link.
- On Windows Features, check or clear the feature you want.
- Click OK to enable and disable the feature.
Hi, I’m Nam Sun-Hi. My first name means: «One with a joyful demeanor.»
I’m a Korean student and author at FindDiffer.com. I spend all my time either writing or studying. I love learning new things, and I think that’s why I enjoy writing so much — it’s a way of learning more about the world around me.