
Table of contents
- What if Kindle is not Recognized Under Windows 10/11?
- Method 1: Trying a different port or cable
- Method 2: Use a different computer
- Method 3: Try charging your Kindle for a longer period
- Method 4: Performing a hard reset
- Method 5: Connecting Kindle as a camera
- Method 6: Connecting Kindle using caliber
- Method 7: Enabling ADB
- Method 8: Installing the Kindle driver
- Method 9: Reinstalling Kindle
- Method 10: Disabling the USB selective suspend feature
- You Kindle Not Showing Up On PC Issue: Solved
- FAQ
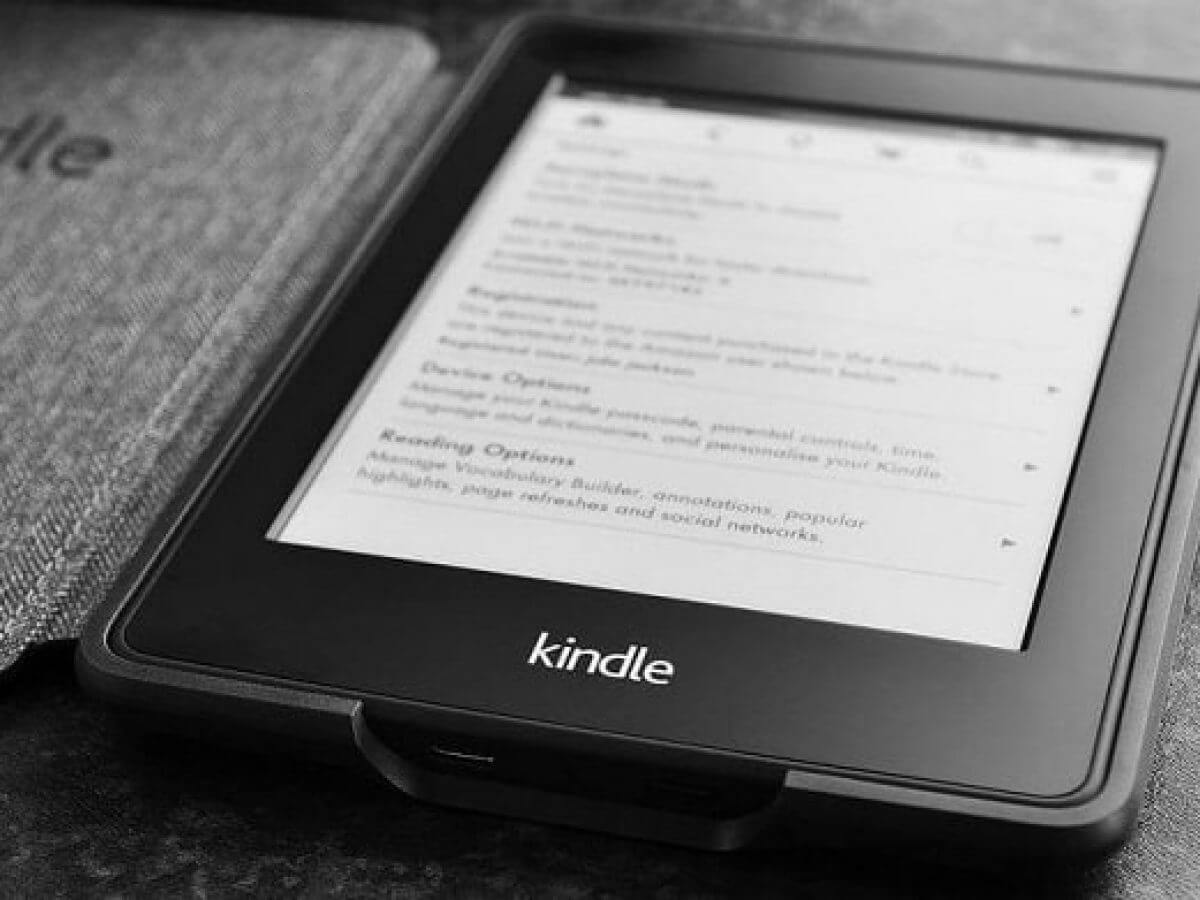
Over time, Amazon’s Kindle has transformed from a simple e-book reader into a versatile and user-friendly device packed with a wide range of features.Users can conveniently browse, purchase, and download various books and magazines, making it a powerful tool for reading enthusiasts .However, despite Amazon’s efforts to align this device with Microsoft’s updates to the Windows OS, the Kindle, like other tablets, remains susceptible to connectivity issues, such as the Kindle not showing up on a PC.
What if Kindle is not Recognized Under Windows 10/11?
If you’re having trouble connecting your Kindle to your PC, do not worry. In this article, we will teach you what to do if your computer doesn’t detect a Kindle.The workarounds for this issue are quite easy to follow. Make sure you work your way down the solutions until you successfully fix your PC’s failure to recognize the Kindle.
Download Auslogics Driver Updater
Prevent hardware errors and ensure problem-free device operation with this advanced tool that detects outdated drivers and safely gets them updated.
Method 1: Trying a different port or cable
The first thing you should do is check if there are physical issues with your computer’s USB port or with the cable itself. You must make sure that they are not damaged.You can check your USB port’s functionality by connecting a different device to it. For instance, if you have an external web camera, you can try plugging that into the USB port.If your PC automatically recognizes the device, then the port is functional. In this case, it is possible that the problem lies with the USB cable.Also you can try other ports and see if they can recognize your Kindle. If you’ve found out that the cable is the problem, you can try using a different USB cable to fix the PC’s failure to recognize the Kindle.
Method 2: Use a different computer
You can also try connecting your Kindle to a different PC. This will allow you to identify whether the problem is with your computer, Kindle, or USB cable.
Method 3: Try charging your Kindle for a longer period
Users who had experienced the same problem tried charging their Kindle for around 30 minutes. After that, they performed a hard reset and were able to connect their device to their computer successfully.
Method 4: Performing a hard reset
Like other smartphones and tablets, Kindle also has a reset function that allows users to clear their device’s memory and clean install the operating system.When you try to reset your Kindle, you will be able to address software problems that might prevent your PC from recognizing the device. To hard reset your Kindle, follow the steps below:
- Plug Kindle to your computer.
- Press and hold the Power button for around 40 seconds.
- Wait for your Kindle to restart automatically.
- Once your device restarts, release the Power button.
- If your Kindle does not restart automatically, you can turn it on by pressing the Power button.
Related: Easily Reset Your PC: How to Factory Reset a Windows 10 & 11 Computer
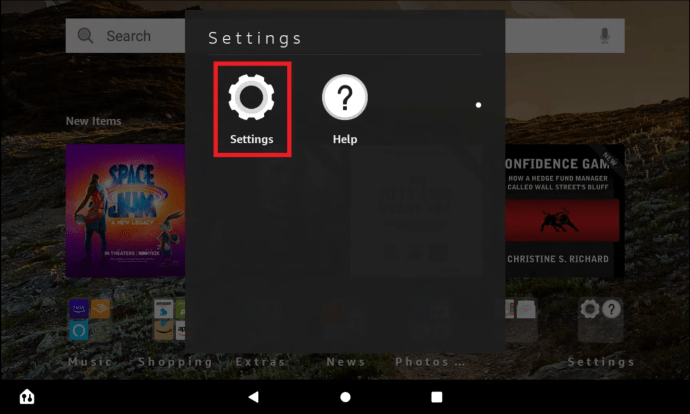
Method 5: Connecting Kindle as a camera
If your PC does not recognize your Kindle, you can try connecting it as a camera. Once you’ve plugged your device into your computer, open the Notifications bar, then select the Connection Options .Choose the Connect as a camera option. If this is not available from the list, you can select it from the Settings or Storage options on your device.
Method 6: Connecting Kindle using caliber
You can also try connecting your Kindle to your PC using Caliber. Switch off your computer and Kindle, then unplug all the cables attached.Once you’ve switched your PC back on, you can open Caliber, then try connecting your Kindle to your computer. Turn on your device and check if you’ve resolved the issue.
Method 7: Enabling ADB
Another solution you can try is enabling the ADB (Android Debug Bridge) feature on your Kindle. If you notice that it is already activated on your device, you can disable it and check if that fixes the issue.You can do this by going to Settings and then selecting Device . There, you will see an option to either enable or disable the ADB feature.
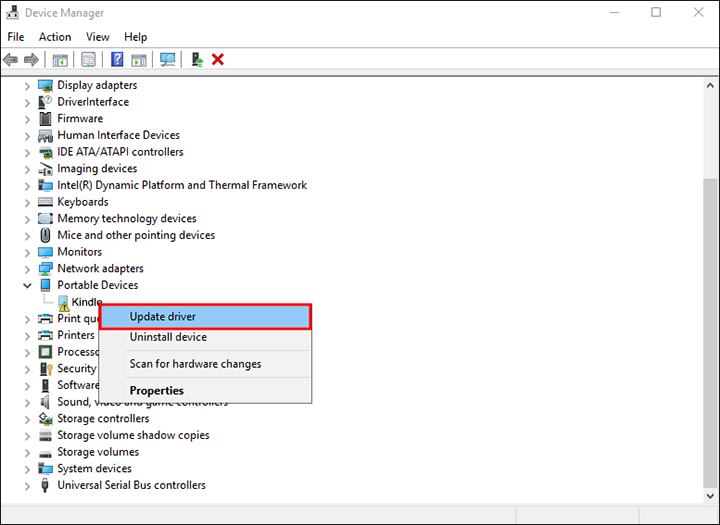
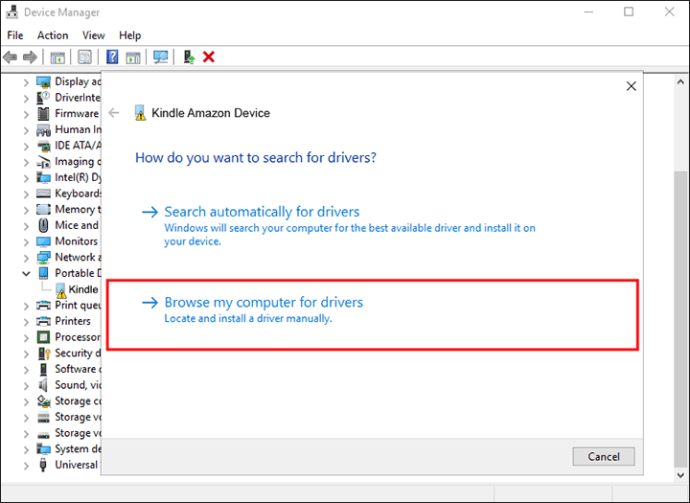
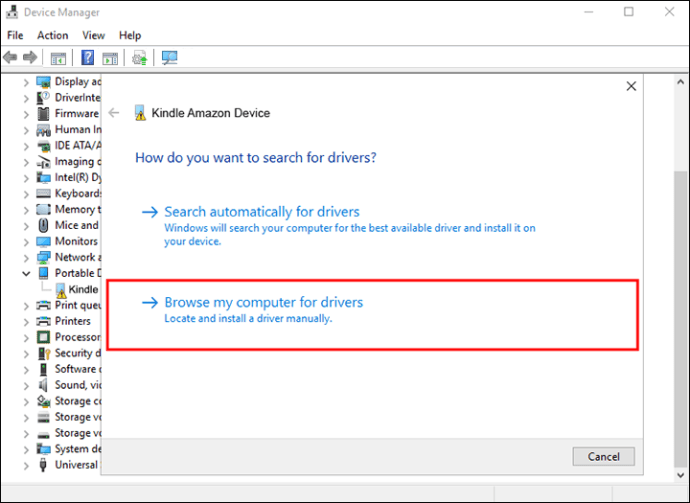
Method 8: Installing the Kindle driver
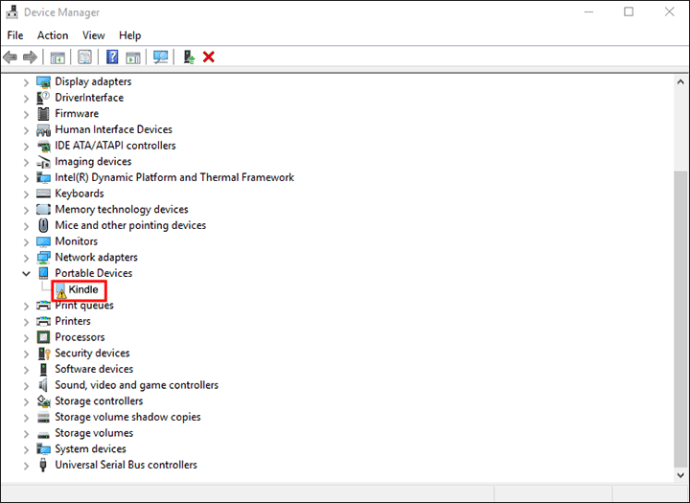
It can happen that your computer is not detecting Kindle because you haven’t installed its driver properly. It is possible that the driver is corrupted or missing.So, the best solution is to update or install the Kindle driver. You can update your drivers manually, but you should know that the process can be complicated and time-consuming.Follow the steps below:
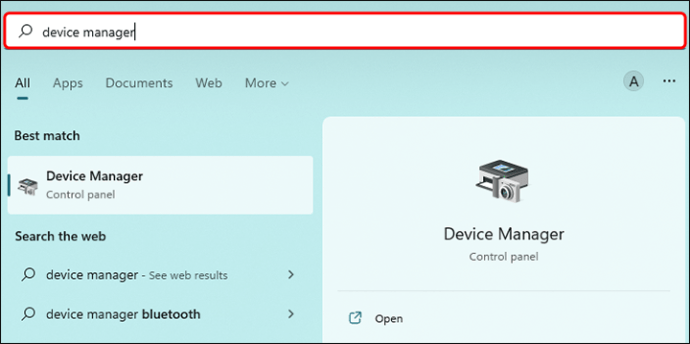
- On your keyboard, press
Windows Key + S. - Type device manager then hit Enter.
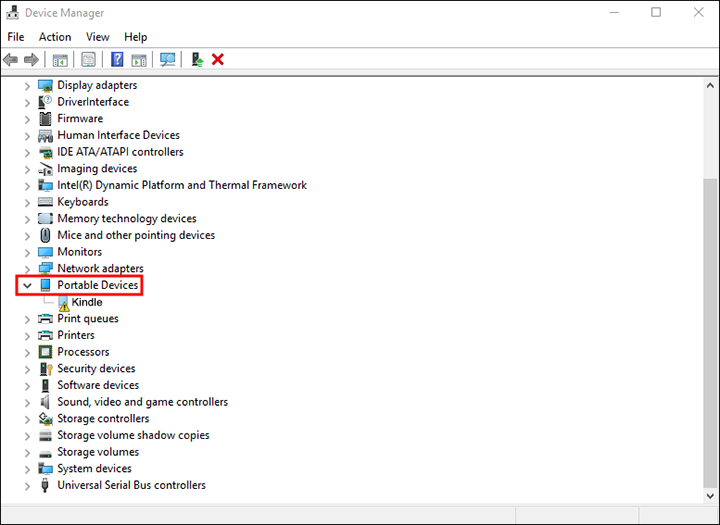
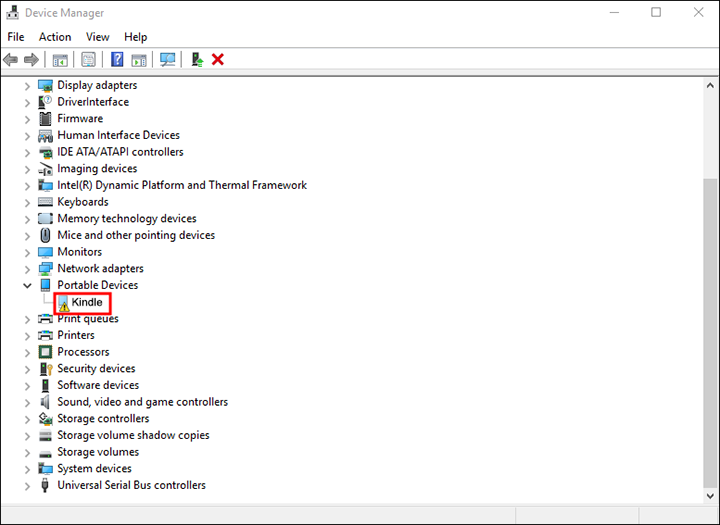
- Expand the contents of the Portable Devices category.
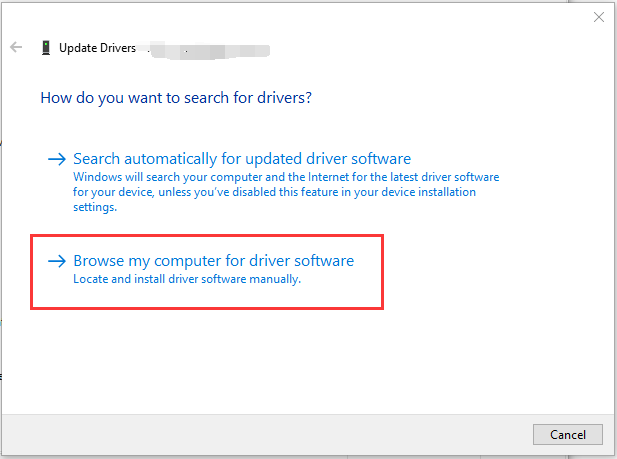
- Right-click MTP Device or Kindle , then select Update Driver Software from the options.
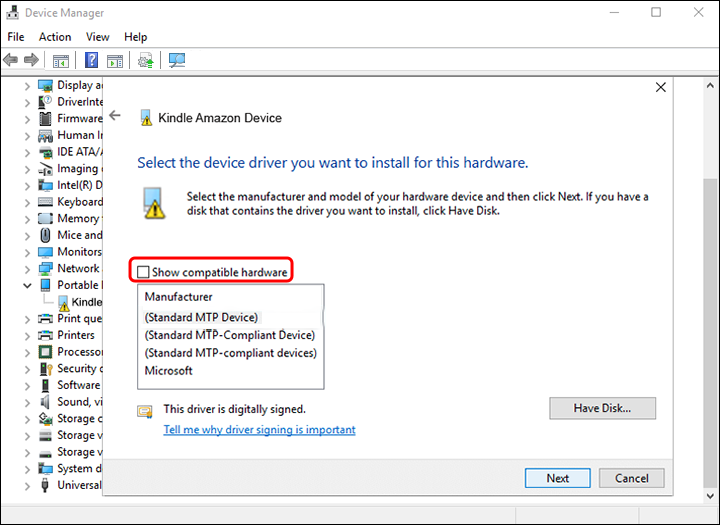
- Select the Browse my computer for driver software option.
- Choose the Let me pick from a list of drivers device on my computer option.
- Select Show Compatible Hardware.
- Choose MTP USB Device , then click Next .
- Install the driver on your computer.
PRO TIP
Manually updating your drivers can be risky. If you download and install the wrong driver, you may cause system instability issues on your PC. As such, we recommend opting for a reliable tool like Auslogics Driver Updater .
When you use this program, it will automatically recognize your system and find the latest compatible drivers for it.
It will address your Kindle issues and other driver-related problems. Once the process is complete, you will notice a significant improvement in your computer’s performance.
Method 9: Reinstalling Kindle
You can also try reinstalling the latest Kindle software for Windows 10/11 to resolve the issue. To do this, follow the instructions below:
- Press Windows Key + S on your keyboard.
- Type settings then hit Enter .
- Select Apps .
- Go to the left-pane menu, then choose Apps & Features .
- Go to the right pane, then search for Kindle.
- Click it, then select Uninstall .
- Restart your computer.
- Go to the Downloads page of Amazon , then get the latest Kindle software for Windows 10/11
Method 10: Disabling the USB selective suspend feature
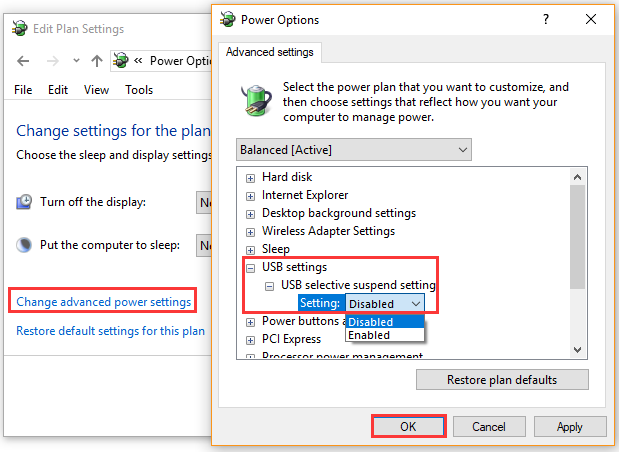
If your computer still doesn’t detect a Kindle, you can try disabling the USB selective suspend feature.By default, it is enabled in portable computers to conserve power and help prolong the battery’s life. However, it can also cause USB connectivity problems. So, try to disable it to get rid of the issue.Here’s how to do that:
- Open the Run dialog box by pressing
Windows Key+Ron your keyboard. - Type control panel , then hit Enter.
- Once the Control Panel is up, make sure that the View By option is set to Category.
- Select Hardware and Sound.
- Click Power Options.
- On the new window, look for your chosen power plan, then click Change Plan Settings.
- Click the Change advanced power settings option.
- Expand the contents of USB Settings.
- Click USB Selective Suspend Setting, then choose Disabled for the Battery and Plugged In options.
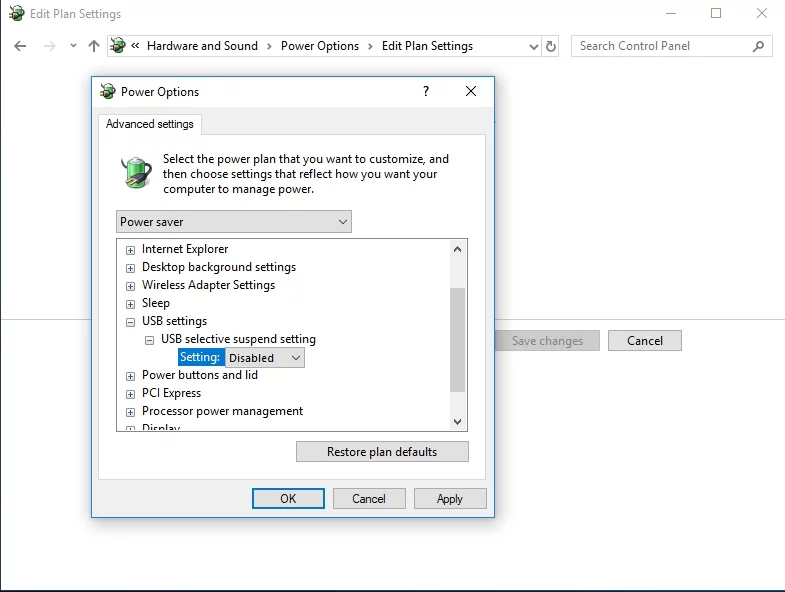
- Save the changes you made.
Also Read: How to speed up USB 3.0 transfer speed in Windows 10?
You Kindle Not Showing Up On PC Issue: Solved
While Amazon’s Kindle has evolved into a feature-rich device, it still faces connectivity issues when it comes to recognizing it under Windows 10/11However, several easy-to-follow methods address this problem. From checking USB ports and cables to reinstalling Kindle software, users have various options to troubleshoot and establish a successful connection.Was this guide helpful? Share the article with your friends and let us know in the comment section below any additional thoughts you have!
FAQ
Why is my Kindle not being recognized by my PC?
There can be several reasons why your Kindle is not being recognized by your PC. Some possible causes include faulty USB ports or cables, outdated or missing Kindle drivers, software conflicts, or issues with the Kindle’s settings.
What is USB drive mode on a Kindle?
USB Drive Mode on a Kindle refers to a mode that allows the Kindle device to be recognized by a computer as a removable storage device, similar to a USB drive. In this mode, users can transfer files between their Kindle and computer by simply connecting the device via a USB cable.
What if my Kindle is stuck in USB Drive Mode?
If your Kindle is stuck in USB Drive Mode, it means that the device is not properly disconnecting from the computer. To resolve this issue, you can try restarting both the Kindle and the computer, disconnecting and reconnecting the USB cable, or performing a hard reset on the Kindle. If the problem persists, contacting Kindle customer support for further assistance is recommended.
Kindle is the most recognized e-reader in the world, but it is also known for its troubles connecting to Windows. If you just upgraded your Kindle operating system, you may find that your PC is struggling to recognize the device. The solutions for this frequent problem are straightforward.
Read on to find several solutions based on your Windows operating system.
Kindle Not Showing Up on a Windows 10 PC
Windows 10 will automatically detect and install drivers that let a device work properly. If Windows can’t install the correct drivers, you will have to fix the problem in the device manager.
Install Kindle as an MTP on Windows 10
Follow the steps below to install Kindle as a Media Transfer Protocol or MTP on Windows 10.
- Plug the Kindle into the computer.

- Press “Windows + R.” In the dialogue box that appears, type “
devmgmt.msc” and press the enter key. - The device manager will open. Find the category called “Portable device.” Expand the category by clicking the sideways arrow.

- Find the Kindle. If you do not see your Kindle listed, look for something labeled “Portable device.” There should be a yellow exclamation mark next to the device name.
- Right-click the device and select “Update driver.”
- In the pop-up, select “Browse my computer for driver software.”
- Select “Let me pick from a list of available drivers on my computer.”
- Find “Portable Devices” and click on it. A list will appear. Find the option called “Standard MTP Device.”
- Select “MTP USB Device” and click Next and follow the prompts.
- Restart your computer.


Once your computer restarts, Windows 10 should be able to see the Kindle.
Kindle Not Showing Up on a Windows 11 PC
Many users see connectivity issues with Kindle and Windows 11. A standard solution addresses how the computer recognizes the Kindle via the drivers.
Install Kindle as MTP on Windows 11
The computer system will automatically attempt to install the correct drivers to any device. If this process goes wrong, you can correct the problem in the device manager. Follow these steps to install Kindle as an MTP in Windows 11.
- Plug your Kindle into your computer.
- Press “Windows + S” on your keyboard.
- A search box will appear. Type “Device Manager” in the search bar.

- Under the best match options, click on “Device Manager.”
- Double-click on “Portable Devices” and locate your Kindle. It may appear under another name.
- Right-click on the device and select “Update driver” and select “Browse my computer for drivers.”
- Click “Let me pick from a list of available drivers on my computer.”
- Uncheck the “Show compatible hardware” box.
- Select “Standard MTP Device” on the left and then “MTP USB Device” on the right.
Click next at the bottom and when the confirmation box appears, click “Yes.”
- Restart your computer.


Once your computer restarts, Windows 11 should be able to see your Kindle.
Solutions From Your Kindle
Sometimes the error is on the Kindle and not on the computer. You can try several solutions on your Kindle to establish a connection.
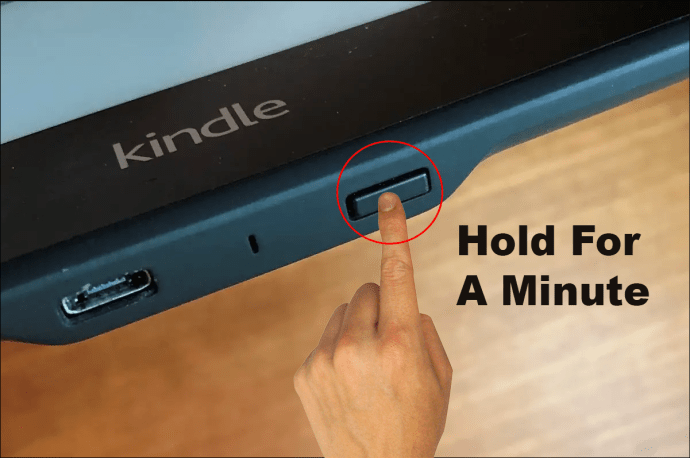
Restart Kindle
Sometimes the best way to reestablish a connection is to reboot the Kindle device. This can force the two devices to talk to each other again. To restart your Kindle, follow these steps.
- Plug Kindle into the computer’s USB port.

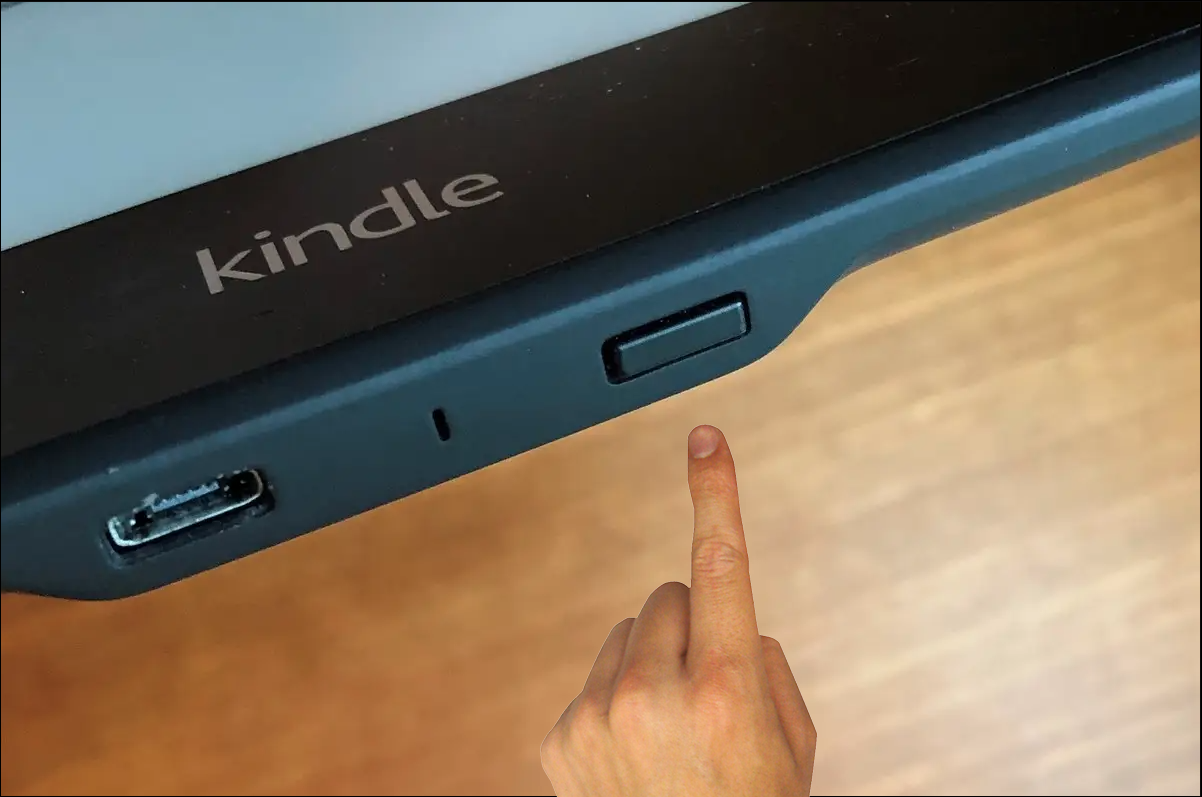
- Locate the power button on your Kindle.

- Press and hold the power button for 40 seconds to a minute.
- Once the Kindle restarts, release the power button.


Once the Kindle fully restarts, check your computer to see if it is now being recognized.
Connect as Camera
Oddly, many users have solved the problem by forcing their computer to recognize the Kindle as a camera. To connect the Kindle as a camera, do the following.
- Connect the Kindle to the USB port.
- Open your Kindle.
- Open the Kindle menu by sliding your finger down from the top of the screen.

- Locate “Connection Options” and tap on it.

- Tap on the “Connect as Camera” option.


If the Kindle doesn’t automatically connect, try unplugging the cable from the USB port and plugging it back in again.
Unlock the Kindle
If you use a pin code on your Kindle, Windows 10 may be unable to connect to the device. When connected to your computer, try unlocking the device. You may need to turn off the pin authentication if this doesn’t reestablish the connection. This is how to turn off the Kindle pin code setting.
- Connect the Kindle to the computer.
- Go to the Kindle Home Screen.
- Swipe down from the top of the screen.
- Tap “Settings.”

- Select “Security & Privacy.”

- Find “Lock Screen Passcode.”

- Click “Off.”


Once the pin code is disabled, your connection with Windows 10 should be restored.
Use Debug Option
Your Kindle contains a tool called Android Debug Bridge, which is supposed to help your Kindle and computer talk to each other. This setting is usually turned on automatically. If your device has somehow turned it off, you can follow these steps to turn it on again.
- Connect the Kindle to the USB port.
- Navigate to the Kindle Home Screen.
- Swipe down from the top of the screen.
- Tap on “Settings.”
- Find “Device” and select it.

- Tap on “ADB” to turn it on.

Once this setting is turned on, Windows should be able to see your Kindle device again.
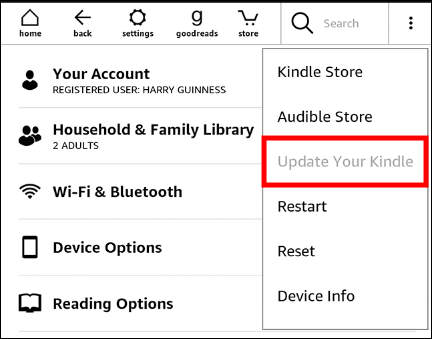
Update Kindle
While many users find that updating their Kindle software causes disruption, not updating can cause problems. Take the steps below to update your Kindle software.
- Plug your Kindle into a power source.

- On your Home screen, Swipe down from the top of the screen.

- Select “Settings.”

- Find “Update Your Kindle.”

- If the option is black, click it to update your system. If the option is gray, your system is already up to date.


An outdated system on your Kindle can make it difficult for Windows to recognize what kind of device it’s looking at. Once the Kindle is updated, you should have the connection again.
Hardware Solutions
You may be experiencing problems due to your USB cable. There are several solutions you can attempt to fix a cable issue.
Correct USB Cable Type
You can connect your Kindle to Windows using two types of USB cables. One type of cable will only charge the device. The other will charge the device and allow for data transfer. For Windows to recognize your Kindle, you need to use the USB for data transfer.
The USB that came with your Kindle will be the correct type. If you don’t have this cable, smartphone USB cables will also work. There’s no easy way to see if the cable is right by simply looking at it. You will need to check the original packaging the cable came in.
Upgrade USB Cable Type
If your USB cable is over a year old, it may be that the cable is just too worn out. USB cables have short lives from constant use. Try connecting your Kindle with a less-used cable and see if that solves your problem.
USB Hubs
USB hubs are excellent tools for connecting more devices to your computer. Some users have found that plugging their Kindle into a hub rather than directly into their PC has solved the connection problem. You can find a budget-friendly USB hub online or at most electronics stores in your area.
Check USB Ports
You should also check that the USB port you’re plugging the Kindle into is still functioning. USB ports can wear out just like any other computer part. If you have an older PC, there may also be a buildup of dust in the port.
The easiest way to check if the port is working is to plug in a different device, like your phone. If the computer doesn’t recognize any device, you likely have an issue with the USB port. You can use compressed air to get the dust out of the port and try again. If clearing the dust doesn’t solve the problem, you may need to take your computer in for repairs.
Missed Connection: Kindle and Windows
Kindle not showing up on PC is a common issue with many potential solutions. There are plenty of ways to try and solve the error. How did your fix your Kindle not showing up on PC? Let us know in the comments below.
Kindle, the popular e-reader device by Amazon, is a convenient way to carry your entire library of books in a compact form. For many users, the process of transferring books and documents from their Windows 10 computer to their Kindle is straightforward.
However, there are times when Kindle not recognized Windows 10. This issue can be frustrating, but it’s not uncommon. In this article, we’ll explore some common reasons why your Kindle may not be recognized on Windows 10 and how to troubleshoot and resolve the problem.
This device is aligned with the Microsoft updates which is why sometimes most users are going to face an issue like kindle not recognized Windows 10 or won’t turn on issue. There might be other reasons as well where you might be facing this issue. Most users are going to resolve the issue by just following some steps.
On the other hand, the users who are not able to resolve the issues are going to look for help. What they can do is to get in touch with our experts who are always available to help you out.
Let us discuss the steps that can be used to resolve the issue of kindle Not recognized Windows 10.
1. USB Connection Issues
One of the most common reasons for Kindle not recognized Windows 10 is related to USB connection issues. To address this problem, follow these steps:
- Ensure your USB cable is in good condition. Sometimes, a damaged or frayed cable can lead to connectivity problems.
- Try using a different USB port on your computer. Sometimes, the USB port you’re using may be faulty.
- Restart both your Kindle device and your Windows 10 computer. This can help clear any temporary glitches that might be affecting the connection.
- Make sure your Kindle is fully charged. A low battery can sometimes interfere with the connection process.
2. Restart your device
The first thing that you need to make sure is to switch off your kindle by holding the power button for at least 5 to 10 seconds. Switch the device on and then try to connect it.
Most of the time it is going to solve the issue but if it does not, move to the next step.
3. Driver Issues
Windows 10 relies on device drivers to communicate with external hardware, including your Kindle. If the necessary drivers are missing or outdated, it can result in your Kindle not recognized Windows 10. To address this issue:
- Connect your Kindle to your computer and open the Device Manager (you can do this by right-clicking on the Start button and selecting “Device Manager”).
- Look for your Kindle under the “Portable Devices” section. If it’s not listed, or if you see a yellow triangle icon next to it, the drivers might need updating.
- Right-click on the Kindle device and select “Update driver.” Follow the on-screen instructions to let Windows search for updated drivers online.
4. Update your Kindle
Well, the app that you are trying to install, it is not going to work with the older version of the operating system. Well, when you are installing the app that has been designed for the newer version of the OS is not going to work in the old version of the OS.
Make sure that when you are going to install the app, you are on the latest version of the OS and not the older one that may be the sole reason for the error. To avoid this issue, make this a habit of updating your kindle fire from time to time so that you can exclude this cause from the list of causes.
5. Trying Different Ports
The first thing that you must try is to see whether there are any physical issues with your USB port. You need to make sure that there is no damage to the port. Also, you need to check the functionality of your port by connecting different devices to the same USB.
If the windows 10 is not recognizing the device automatically, the port is functional. If the device is not working, then it means that the port is faulty and you need to change it.
6. Incorrect USB Mode
Kindles have different USB modes for different purposes, such as charging or transferring files. If your Kindle is set to the wrong mode, it may not be recognized by your Windows 10 computer. Here’s how to check and change the USB mode on your Kindle:
- On your Kindle device, go to the “Settings” menu.
- Select “Device Options” or “Device” depending on your Kindle model.
- Find and select “Advanced Options.”
- Look for the “USB Mode” or “USB Settings” option.
- Choose “Media Transfer Protocol (MTP)” or “File Transfer” if it’s not already selected.
7. Software Conflicts
Sometimes, third-party software or security applications can interfere with the recognition of your Kindle. To address this issue, try the following steps:
- Temporarily disable or uninstall any third-party security or antivirus software to see if they are causing the problem.
- Make sure you are using Amazon’s official Kindle for PC app to transfer books and documents, as other software might not work correctly with your Kindle device.
In Conclusion
Having your Kindle not recognized Windows 10 can be frustrating, but most of the time, it’s a solvable issue. By checking your USB connections, updating drivers, ensuring the correct USB mode, and addressing any software conflicts, you can often resolve the problem and get back to enjoying your e-books.
If you’ve tried all these steps and are still facing issues, consider contacting Amazon’s customer support or visiting their website for additional resources and guidance on troubleshooting your specific Kindle model.
Proud father to a Charming Princess 👑 | Fueled by Endless Cups of Coffee ☕ | Passionate about all things tech, gadgets, and the latest news 📱💻✨ | Wordsmith weaving tales of innovation and excitement 🖊️
-
Home
-
Partition Magic
- Kindle Not Showing up on PC? Here Are Simple Fixes for You
By Ariel | Follow |
Last Updated
Kindle provides great convenience for users. It can be used to browse, download, and buy numerous e-books. However, a lot of users complain about Kindle not showing up on PC. Are you also struggling to resolve it? Today, MiniTool will share you with many effective troubleshooting methods.
Preliminary Fixes
Kindle doesn’t show up on PC after it’s upgraded to the latest build. The Kindle connectivity issue can be caused by various factors such as USB cable, incorrect connection, corrupt drivers, etc. When you encounter Kindle not showing up on PC, you can try the following preliminary fixes first.
- Use a different USB cable or computer. Usually, Kindle is connected to the Windows PC via a USB cable. Once the USB cable gets damaged, you may encounter Kindle fire not showing up on PC. To check if functionality, you can try connecting the USB cable to a different device. If your PC can recognize the device, the USB cable is functional. Also, you can connect the Kindle to a different computer.
- Charge your Kindle for a longer time. Some users reported that they fixed Kindle not showing up on Windows 10 by charging for a longer time. Here you’d better charge it for more than 30 minutes and then hard reset Kindle.
- Connect Kindle as camera. When your Kindle fire not showing up on PC, you can try connecting it to the PC as a camera. To do so, plug the device to your computer, and then open the Notification bar, select the Connection Options, and set the Connect as a camera
If the above simple fixes can help you fix the Kindle not showing up on PC issue, don worry. Here are some other useful tips for you.
Fix 1. Perform a Hard Reset
Hard resetting Kindle enables users to clear the memory of the device and clean install the operating system, which can help fix the Kindle charging but not recognized issue. To hard reset your Kindle, you can follow the steps below:
Step 1. Plug your Kindle to the computer.
Step 2. Hold the Power button on your Kindle for about 40 seconds and the Kindle will restart automatically.
Step 3. When your device restarts, release the Power button. If your Kindle can’t restart automatically, press the Power button to turn it on.
Fix 2. Install Kindle as an MTP Device
If your Kindle is not correctly installed, Windows can’t detect the type of the device and installing the default driver for. To fix Kindle not showing up on PC, you can try installing the Kindle as an MTP device.
Step 1. Right-click the Start menu and select Device Manager from the context menu.
Step 2. Expand the Portable device category in the Device Manager window, and then right-click the Kindle driver and select Update Driver.
Step 3. Select the second option Browse my computer for driver software.
Step 4. Click on Let me pick from a list of available drivers for my computer in the pop-up window.
Step 5. Select the Portable Devices option and select the MTP USB Device from the listed drivers, click on Next.
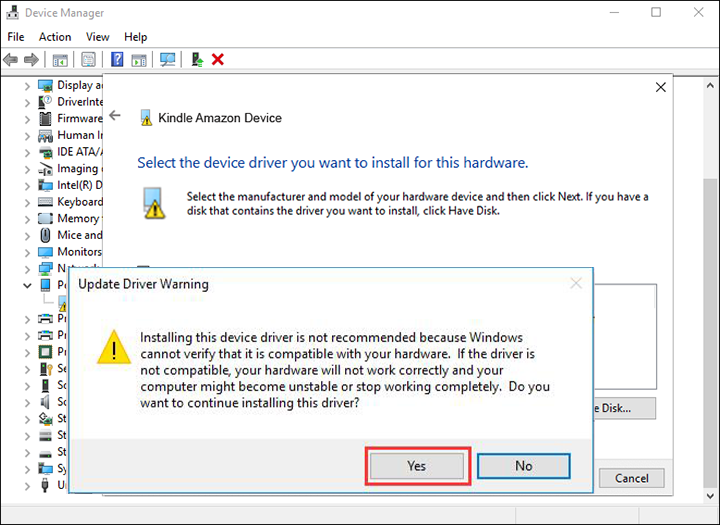
Step 6. Click on Yes in the Update Driver warning window. Then Windows will install the compatible device driver for your Kindle.
Tip: If you can’t find the MTP driver, uncheck the box for Only show compatible drivers to get more listed drivers.
Now, you can restart your computer and see if Kindle not showing up on Windows 10 has been fixed.
Fix 3. Use Calibre to Connect Kindle
If Kindle doesn’t show up on PC by using the USB cable, you can try using Calibre to connect Kindle to your PC. To use Calibre, you can turn off the PC and Kindle first. Then unplug all the cables attached. Once your computer is turned back on, open Calibre and connect Kindle to PC. After that, you can turn on Kindle and check if the Kindle fire not showing up on PC issue still persists.
Fix 4. Enable ADB
In addition to the above methods, you can try enabling the Android Debug Bridge (ADB) feature on Kindle. If this feature has been activated on your device, you can disable it first and see if it can fix the Kindle not showing up on PC issue. If not, you can enable it again. To do so, you can navigate to the Settings and select the Device, and then turn ADB on or off.
Fix 5. Disable the USB Selective Suspend Feature
The USB selective suspend feature allows the hub driver to suspend an individual port without affecting other ports on the hub. It can help conserve power and prolong battery life. However, this feature can cause some connectivity issues.
So, you can try disabling the feature. Here’s how:
Step 1. Open your Control Panel, and then change the View by type to Category and select the Hardware and Sound option.
Step 2. Click on Power Options, and then navigate to the Power Plan that you have selected and click on Change plan settings.
Step 3. Click on Change advanced power settings and expand the USB Settings category.
Step 4. Click on USB selective suspend setting and select Disabled from the drop-down menu.
Step 5. Click on OK and Apply to execute the changes.
About The Author
Position: Columnist
Ariel has been working as a highly professional computer-relevant technology editor at MiniTool for many years. She has a strong passion for researching all knowledge related to the computer’s disk, partition, and Windows OS. Up till now, she has finished thousands of articles covering a broad range of topics and helped lots of users fix various problems. She focuses on the fields of disk management, OS backup, and PDF editing and provides her readers with insightful and informative content.
Kindle — самая известная в мире программа для чтения электронных книг, но она также известна своими проблемами при подключении к Windows. Если вы только что обновили операционную систему Kindle, вы можете обнаружить, что ваш компьютер не может распознать устройство. Решения этой часто встречающейся проблемы просты.
Читайте дальше, чтобы найти несколько решений для вашей операционной системы Windows. .
Kindle не отображается на ПК с Windows 10
Windows 10 автоматически обнаружит и установит драйверы, обеспечивающие правильную работу устройства. Если Windows не может установить правильные драйверы, вам придется решить проблему в диспетчере устройств.
Установите Kindle в качестве MTP в Windows 10
Следуйте приведенным ниже инструкциям, чтобы установить Kindle в качестве протокола передачи мультимедиа или MTP в Windows 10.
- Подключите Kindle к компьютеру.

- Нажмите “ Windows + R.” В появившемся диалоговом окне введите “devmgmt.msc” и нажмите клавишу ввода.
- Откроется диспетчер устройств. Найдите категорию «Портативное устройство». Разверните категорию, нажав на боковую стрелку.
- Найдите Kindle. Если вы не видите свой Kindle в списке, найдите что-нибудь с пометкой “Портативное устройство” Рядом с названием устройства должен стоять желтый восклицательный знак.
- Щелкните правой кнопкой мыши устройство и выберите “Обновить драйвер».
- Во всплывающем окне выберите “Выполнить поиск драйверов на моем компьютере. .”
- Выберите “Позвольте мне выбрать из списка доступные драйверы на моем компьютере”
- Найти “Портативные устройства” и щелкните по нему. Появится список. Найдите параметр “Стандартное устройство MTP”
- Выберите “USB-устройство MTP” и нажмите «Далее» и следуйте инструкциям.
- Перезагрузите компьютер.< /li>


После перезагрузки компьютера Windows 10 должна увидеть Kindle.
Kindle не отображается на ПК с Windows 11
Многие пользователи сталкиваются с проблемами подключения к Kindle и Windows 11. A Стандартное решение касается того, как компьютер распознает Kindle с помощью драйверов.
Установка Kindle как MTP в Windows 11
Компьютерная система автоматически попытается установить правильные драйверы на любое устройство. Если этот процесс пойдет не так, вы можете исправить проблему в диспетчере устройств. Выполните следующие действия, чтобы установить Kindle в качестве MTP в Windows 11.
- Подключите Kindle к компьютеру.
- Нажмите “Windows + S” на клавиатуре.
- Появится окно поиска. Введите “Диспетчер устройств” в строке поиска.
- Под вариантами наилучшего соответствия нажмите “Диспетчер устройств”< br>
- Дважды щелкните “Портативные устройства” и найдите свой Kindle. Он может отображаться под другим именем.
- Щелкните устройство правой кнопкой мыши и выберите “Обновить драйвер” и выберите “Выполнить поиск драйверов на моем компьютере”
- Нажмите “Позвольте мне выбрать из списка доступных драйверов на моем компьютере”
- Снимите флажок “Показать совместимое оборудование” box.
- Выберите «Стандартное устройство MTP». слева, а затем “MTP USB Device” справа.
Нажмите «Далее» внизу и, когда появится окно подтверждения, нажмите “Да”
- Перезагрузите компьютер.


После перезагрузки компьютера Windows 11 должна увидеть ваш Kindle.
Иногда ошибка на Kindle, а не на компьютере. Вы можете попробовать несколько решений на своем Kindle, чтобы установить соединение.
Перезапустите Kindle
Иногда лучший способ восстановить соединение — перезагрузить устройство Kindle. Это может заставить два устройства снова общаться друг с другом. Чтобы перезапустить Kindle, выполните следующие действия.
- Подключите Kindle к USB-порту компьютера.
- Найдите кнопку питания на Kindle.
- Нажмите и удерживайте кнопку питания. от 40 секунд до минуты.
- После перезапуска Kindle отпустите кнопку питания.


Как только Kindle полностью перезагрузится, проверьте, распознается ли ваш компьютер.
Подключиться как камера
Как ни странно, многие пользователи решили проблему, заставив свой компьютер распознавать Киндл как фотоаппарат. Чтобы подключить Kindle в качестве камеры, выполните следующие действия.
- Подключите Kindle к USB-порту.
- Откройте Kindle.
- Откройте меню Kindle, проведя пальцем вниз от верхнего края экрана.
- Найдите “Параметры подключения” и нажмите на него.
- Нажмите на “Подключиться как камера&rdquo ; вариант.


Если Kindle не подключается автоматически, попробуйте отсоединить кабель от USB-порта и снова подключить его.
Разблокируйте Kindle
Если вы используете пин-код на Kindle , Windows 10 может не подключиться к устройству. При подключении к компьютеру попробуйте разблокировать устройство. Возможно, вам придется отключить аутентификацию по PIN-коду, если это не приведет к восстановлению соединения. Вот как можно отключить настройку пин-кода Kindle.
- Подключите Kindle к компьютеру.
- Перейдите на главный экран Kindle.
- Проведите вниз от верхнего края на экране.
- Нажмите “Настройки”
- Выберите “Безопасность & Конфиденциальность».
- Найдите “Код блокировки экрана”
- Нажмите “Выкл.”


После отключения пин-кода ваше соединение с Windows 10 должно быть восстановлено.
Использовать параметр отладки< /h3>
Ваш Kindle содержит инструмент под названием Android Debug Bridge, который должен помочь вашему Kindle и компьютеру взаимодействовать друг с другом. Этот параметр обычно включается автоматически. Если ваше устройство каким-то образом выключило его, вы можете выполнить следующие действия, чтобы снова включить его.
- Подключите Kindle к USB-порту.
- Перейдите на главный экран Kindle.
- Проведите сверху вниз по экрану.
- Нажмите “ Настройки.”
- Найти “Устройство” и выберите его.
- Нажмите “ADB” чтобы включить его.


После включения этого параметра Windows должна снова увидеть ваше устройство Kindle.
Обновить Kindle
Хотя многие пользователи считают, что обновление их программного обеспечения Kindle вызывает сбои, отсутствие обновления может вызвать проблемы. Выполните следующие действия, чтобы обновить программное обеспечение Kindle.
- Подключите Kindle к источнику питания.
- На главном экране проведите вниз от верхнего края экрана.
- Выберите “Настройки”
- Найдите “Обновите свой Kindle”
- Если параметр черный, щелкните его, чтобы обновить систему. Если вариант серый, ваша система уже обновлена.

Устаревшая система вашего Kindle может затруднить распознавание Windows устройства, на которое она смотрит. После обновления Kindle у вас снова должно быть соединение.
Аппаратные решения
Возможно, у вас возникли проблемы из-за USB-кабеля. Есть несколько способов решить проблему с кабелем.
Правильный тип USB-кабеля
Вы можете подключить Kindle к Windows с помощью USB-кабелей двух типов. Кабель одного типа будет заряжать только устройство. Другой будет заряжать устройство и разрешать передачу данных. Чтобы Windows распознала ваш Kindle, вам нужно использовать USB для передачи данных.
USB, поставляемый с вашим Kindle, будет подходящего типа. Если у вас нет этого кабеля, USB-кабели для смартфонов также подойдут. Нет простого способа убедиться, что кабель исправен, просто взглянув на него. Вам нужно будет проверить оригинальную упаковку кабеля.
Обновление типа USB-кабеля
Если вашему USB-кабелю больше года, возможно, он слишком изношен. Кабели USB имеют короткий срок службы при постоянном использовании. Попробуйте подключить Kindle с помощью менее используемого кабеля и посмотрите, решит ли это вашу проблему.
Концентраторы USB
Концентраторы USB — отличные инструменты для подключения большего количества устройств к компьютеру. Некоторые пользователи обнаружили, что подключение Kindle к концентратору, а не напрямую к компьютеру, решило проблему с подключением. Недорогой USB-концентратор можно найти в Интернете или в большинстве магазинов электроники в вашем районе.
Проверьте USB-порты
Вы также должны убедиться, что USB-порт, к которому вы подключаете Kindle, все еще работает. Порты USB могут изнашиваться, как и любая другая часть компьютера. Если у вас старый компьютер, в порту также может быть скопление пыли.
Самый простой способ проверить, работает ли порт, — подключить другое устройство, например телефон. Если компьютер не распознает какое-либо устройство, скорее всего, у вас проблема с USB-портом. Вы можете использовать сжатый воздух, чтобы удалить пыль из порта и повторить попытку. Если удаление пыли не помогло решить проблему, возможно, вам придется отнести компьютер в ремонт.
Нарушение соединения: Kindle и Windows
Kindle не отображается на ПК — это общая проблема с множеством возможных решений. Есть много способов попытаться устранить ошибку. Как вы исправили, что ваш Kindle не отображается на ПК? Дайте нам знать в комментариях ниже.