
Ошибки сетевого доступа в Windows — вещь довольно неприятная, тем более что не все умеют их правильно диагностировать и исправлять. При том, что интернет кишит различными способами самой разной степени сомнительности. Поэтому мы решили подробно разобрать одну из типовых ситуаций, показав как процесс диагностики, так и различные способы решения проблемы, каждое из которых имеет свои особенности, в частности влияние на безопасность. Такой подход позволит не только выяснить причины ошибки и устранить ее, но и поможет подойти к этому вопросу осознанно, полностью представляя последствия своих действий.
Онлайн-курс по устройству компьютерных сетей
На углубленном курсе «Архитектура современных компьютерных сетей» вы с нуля научитесь работать с Wireshark и «под микроскопом» изучите работу сетевых протоколов. На протяжении курса надо будет выполнить более пятидесяти лабораторных работ в Wireshark.
С ситуацией, когда компьютер под ОС Windows не хочет подключаться или перестает подключаться к общим ресурсам на сервере Samba под управлением Linux встретиться можно довольно часто и тому есть объективные причины, которые мы рассмотрим ниже, ну а пока посмотрим на ее внешние симптомы. Система неожиданно сообщает, что она не может получить доступ к указанному ресурсу и выдает абсолютно неинформативную ошибку:
Код ошибки: 0x80004005
Неопознанная ошибка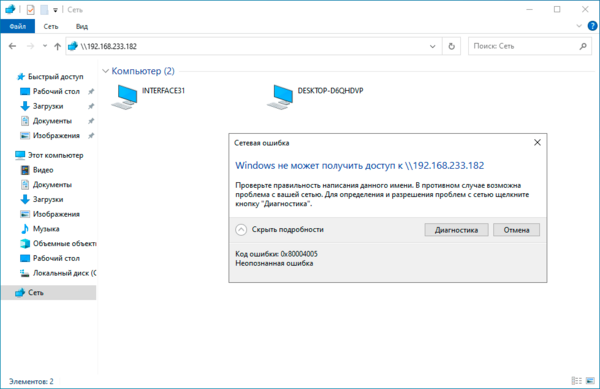
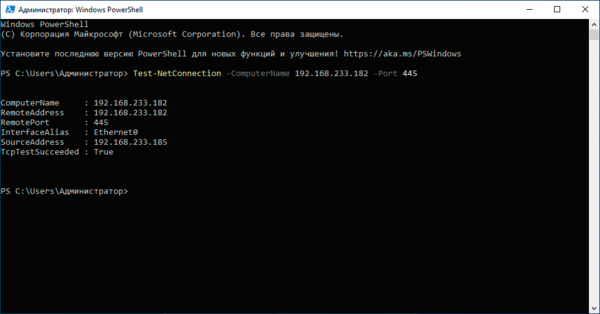
Если попробовать подключиться в консоли, например, командой:
net view \\192.168.233.182Где 192.168.233.182 — адрес искомого сервера, то получим немного другую ошибку:
Системная ошибка 53.
Не найден сетевой путь.
При этом указанный узел нормально пингуется, а проверка доступности 445 порта говорит, что все нормально:
После этого обычно начинается сетование на кривизну какого-либо из решений (в зависимости от личных предпочтений) и поиск решения в интернете, где можно найти как условно рабочие, так и полную дичь, вроде включения SMB1 и бездумного изменения различных политик и ключей реестра.
Но не будем спешить, вы же не глотаете все подряд из домашней аптечки только почувствовав недомогание? Так и здесь, поэтому будем разбираться.
Но сперва поясним ситуацию по протоколу SMB1:
Протокол SMB1 устарел и небезопасен, в настоящее время отключен на всех современных системах.
Кроме того, даже если вы включите его поддержку, то начиная с Windows 1709 она автоматически отключится после 15 дней неиспользования. В общем: включать SMB1 не нужно, разве что только вам действительно нужна поддержка устаревших клиентов.
В современных версиях Samba протокол SMB1 также отключен и минимальной поддерживаемой версией является SMB2_02, а максимальной SMB3. Это параметры по умолчанию и проверить их можно командами:
testparm --parameter-name="min protocol"
testparm --parameter-name="max protocol"
Настройки по умолчанию достаточно актуальны, и мы не советуем отдельно задавать версии протоколов без особой на то нужды. SMB2_02 — обозначает младшую версию протокола SMB2, а SMB3 указывает на старшую доступную версию, таким образом поддерживаются все системы начиная с Windows Vista и Server 2008. Причиной ошибки SMB1 быть не может.
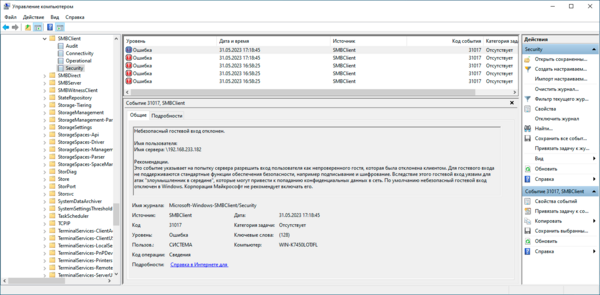
Поэтому не занимаемся ерундой, а ищем истинную причину, в этом нам поможет Журнал событий. Раскрываем последовательно Журналы приложений и служб — Microsoft — Windows — SMBClient и в журнале Security находим ошибку 31017:
Небезопасный гостевой вход отклонен.Рекомендации.
Это событие указывает на попытку сервера разрешить вход пользователя как непроверенного гостя, которая была отклонена клиентом.
Для гостевого входа не поддерживаются стандартные функции обеспечения безопасности, например подписывание и шифрование.
Вследствие этого гостевой вход уязвим для атак "злоумышленник в середине", которые могут привести к попаданию конфиденциальных данных в сеть.
По умолчанию небезопасный гостевой вход отключен в Windows. Корпорация Майкрософт не рекомендует включать его.
После чего все становится на свои места. Нет никаких чудес, просто политики безопасности Windwos не позволяют подключаться к серверу с анонимным гостевым доступом. Кстати, это относится не только к Samba.
Теперь, когда есть понимание происходящего мы можем выбрать одно из двух решений указанной проблемы.
Решение №1. Отключаем гостевой доступ на сервере Samba
С точки зрения безопасности это наиболее правильное решение, которое позволит получать доступ к общим ресурсам не снижая уровень безопасности сети. Для этого внесем некоторые изменения в конфигурационный файл Samba, обычно он располагается в /etc/samba/smb.conf. Прежде всего найдем и приведем к следующему виду директиву:
map to guest = neverА в настройках каждого общего ресурса укажем:
guest ok = noВозможно, вам еще придется выполнить некоторые настройки, скажем, завести пользователей и назначить им права, для всего этого рекомендуем воспользоваться нашей статьей:
Настройка файлового сервера Samba на платформе Debian / Ubuntu
Сохраняем все изменения и проверяем конфигурацию на ошибки:
testparmЗатем перезапускаем службу:
systemctl restart smbdПосле чего повторно пробуем подключиться и сразу видим окно для ввода учетных данных:
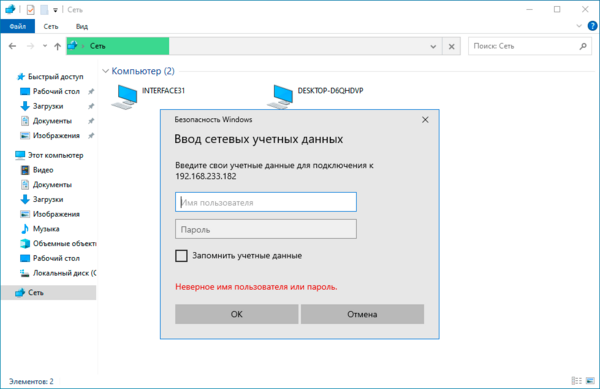
Проблема решена, ресурсы файлового сервера Samba снова доступны.
Решение №2. Разрешаем небезопасный гостевой вход в Windows
Если Решение №1 вас по каким-либо причинам не устраивает, и вы осознанно хотите понизить уровень безопасности вашей сети, то можно пойти другим путем и разрешить небезопасный гостевой вход.
Запустим редактор групповой политики (gpedit.msc) и перейдем в Конфигурация компьютера — Административные шаблоны — Сеть — Рабочая станция Lanman и переводим политику Включить небезопасные гостевые входы в положение Включено.
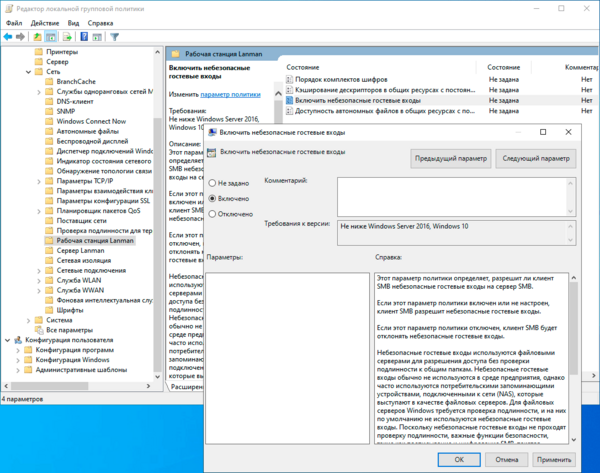
После чего вам потребуется перезапустить службу Рабочая станция или перезагрузить компьютер.
Альтернативой этому способу будет внесение изменений через реестр:
reg add "HKLM\SYSTEM\CurrentControlSet\Services\LanmanWorkstation\Parameters" /v AllowInsecureGuestAuth /t REG_DWORD /d 1Затем перезапустим службу:
net stop LanmanWorkstation && net start LanmanWorkstationПосле чего можем продолжать привычно использовать общие сетевые ресурсы с гостевой моделью доступа.

Какой вывод можно сделать после прочтения данного материала? Прежде всего понять, что любые сетевые ошибки имеют под собой вполне определенную причину, а не являются воздействием некой неведомой силы. И эти причины имеют свойство отображаться в журналах и логах.
Решений таких проблем также может быть несколько, каждое из которых может иметь свои достоинства и недостатки. Поэтому не нужно хватать первый попавшийся рецепт из интернета, а следует разобраться в причинах и выбрать из доступных вариантов тот, который будет вас наиболее устраивать.
Онлайн-курс по устройству компьютерных сетей
На углубленном курсе «Архитектура современных компьютерных сетей» вы с нуля научитесь работать с Wireshark и «под микроскопом» изучите работу сетевых протоколов. На протяжении курса надо будет выполнить более пятидесяти лабораторных работ в Wireshark.
Всем додброго!
Помогите разобратся с проблемой подключения к самба серверу, который расположен на удаленном VPS (Ubuntu 18)
С Mac OS и Windows 7 — все работает отлично и без проблем, но вот с Win 10 подключатся не хочет, выдает ошибку типа «Удалленый комп не отвечает на соединения через порт 445…..»
Фаервол на Win 10 отключил, на ubuntu где крутится самба сервер утилитой ufw все разрешил, но никак.
Читал что на 10-ке по умолчанию SMB1 отключен, и его уже включил (хотя конечно было бы хорошо работать с версией 2 или 3). И все равно не работает.
В логах ничего, только добавляется новый пустой файл лога с именем компа с которого пытаюсь подключится….
Пользователи тоже добавленны (работает с win7 и мак ос)
Вот конфиг самбы:
.....

[samba-share]
comment = Samba on Ubuntu
path = /mnt/volume-nbg1-1/shared_files
read only = no
browsable = yes
Тут как бы все дефолтное + 5 моих строк в конце файла
For the past few weeks I’ve been battling to get my Linux instances to access file shares on my Windows 10 instances over the network. Whether it was Ubuntu, Fedora, or RedHat, the recent upgrades to Windows 10 left my Windows shares inaccessible via Samba. Troubleshooting was difficult as I had nothing to go on exception really ambiguous messages via the syslog (“Failed to mount Windows share: Connection timed out”). After some trial and error it all came down to an undocumented change in how Windows 10 supports the SMB protocol.
Like most horrible troubleshooting stories, my one was filled with dead ends and false (and self inflicted) root causes.
I run a number of Linux based hosts on my home network, and after installing the latest version of Windows 10 Insider Edition, accessing network file shares on Windows 10 hosts from from Ubuntu simply stopped working. I immediately assumed that the Insider Edition had broken network sharing support, as among other things Home Groups were gone (I later discovered this was sadly by design from Creators Update onwards – and I was running the Insider version of Spring Creators Updates).
After configuring a non-Insiders Edition Windows desktop to run file sharing, I realized that this was also broken – This issue must have existed for a few months before i’d noticed it.
Then I turned to my primary Ubuntu file server.
This is the ambiguous error I was seeing in the Ubuntu Network Manager:

Unable to access location
Failed to mount Windows share: Connection timed out
Digging a little deeper the syslog showed a similar message with little additional context:
dbus_mount_reply: Error from org.gtk.vfs.Mountable.mount(): Failed to mount Windows share: Connection timed out
Assuming this was a samba file sharing issue I set about attempting to troubleshoot the networking issue by running smbclient and smbtree varying levels of logging turned on (eg “smbtree –d4”) to see if there was anything going wrong in the handshake process to my Windows 10 machines.
Frustratingly I saw similar timeout errors while attempting to troubleshoot.
The Solution (and a guess at Root Cause)
After rummaging around in both the Samba and Windows 10 release notes for the past few version I noticed that Windows 10 now offers you install a Windows feature to enable Samba 1 shares. This indicates that SMB 1 isn’t supported by default:

With this little fact to go on, I had the idea that Windows 10 may be blocking Samba clients from negotiating at lower levels of the SMB protocol. SMB 3.1.1 was released with Windows 10 and Windows Server 2016, adding improved encryption. Assuming the latest version of Windows 10 has started enforcing use of higher versions of SMB this sounded like a possible cause.
While this might make sense, Samba is meant to support SMB 3 (man pages), so running the latest version of Samba assumes this isn’t a problem.
Well you’d assume incorrectly.
Reconfiguring Samba to use a minimum protocol version of SMB 3, all of my issues were magically resolved.
To do this, edit your /etc/samba/smb.conf and under the [global] section of your Samba config define the minimum version of the SMB protocol to use SMB 3.
[global]
client min protocol = SMB3
Alternatively, this can also be done with the following one-liner:
$ sudo sed -i "/\\[global\\]/a client min protocol = SMB3" /etc/samba/smb.conf
Once these settings are saved, Windows 10 shares should be accessible from your Ubuntu/Fedora/Redhat instance and you’re off and racing again.
- Forum
- The Ubuntu Forum Community
- Ubuntu Specialised Support
- Ubuntu Servers, Cloud and Juju
- Server Platforms
- [SOLVED] Cannot connect to Samba share (4.1.11) from Windows 10
-
Cannot connect to Samba share (4.1.11) from Windows 10
Hi!
I have a Samba server version 4.1.11 running on Ubuntu Server 14.04. I cannot connect from Windows 10 (but I can from Windows 7).
The server and the clients are not on the same LAN.
The error message given by Windows is that the server is online but not responding. However the Samba logs say otherwise.
I have attached the logs for a failed connection attempt from Windows 10, and those for a successful attempt from Windows 7 (for comparison).
Briefly, unlike the successful attempt, the failed one starts with:
Code:
switch message SMBnegprot (pid 2855) conn 0x0
then it requests a number of different protocols before selecting SMB2_FF. Then, after some security negotiations, it switches to protocol SMB 2.???, then SMB3_00, followed by:
Code:
Server exit (NT_STATUS_END_OF_FILE).
The successful attempt selects protocol SMB2_10 from the start, but this protocol is not even requested by Windows 10.
Here are the logs :
Failed attempt (from Windows 10)
http://pastebin.com/M0xmBuY3Successful attempt (from Windows 7)
http://pastebin.com/jF8VzaiAsmb.conf
http://pastebin.com/CWYqGuBa
-
Re: Cannot connect to Samba share (4.1.11) from Windows 10
I see some unconventional share configuration.
What is «<user>» accomplishing? Is this to force samba to accept any username?
I suggest setting up a simple share without «<user>» to see if you can connect?
Are you trying to connect to a specific share, or the root of the server?
You say the Window’s 10 machine is on a separate LAN. Do windows 7 machines also connect from the same separate LAN?
Nothing is ever easy, but if it is difficult you must be doing it wrong.
-
Re: Cannot connect to Samba share (4.1.11) from Windows 10
Hi, thanks for your answer! <user> is just a stand-in for the actual user name. The configuration file has some username where <user> is written here.
I am trying to connect to a specific share (I think). I write \\<url>\<folder> when I try to connect from Windows.
Yes, Windows 7 and Windows 10 are on the same LAN.
This solved my problem:
Windows 10 will try to negotiate SMB3_11, which Samba4 doesn’t yet support
except in the current 4.3 release candidate. I suspect for now disabling
SMB2/3 on the Windows 10 client is your best, if not ideal, option.Instructions for doing.this can be found
here: https://support.microsoft.com/en-us/kb/2696547https://lists.samba.org/archive/samb…er/193886.html
Last edited by howefield; January 28th, 2016 at 03:42 PM.
-
Re: Cannot connect to Samba share (4.1.11) from Windows 10
Windows 10 will try to negotiate SMB3_11, which Samba4 doesn’t yet support
except in the current 4.3 release candidate. I suspect for now disabling
SMB2/3 on the Windows 10 client is your best, if not ideal, option.Hm……
If I connect to my Xubuntu machine from Windows 10:
w10toLinux.png
I can get access to it’s samba shares without any adjustment to Windows:
w10Explorer.png
It even works using the legacy netbios mechanism:
w10Explorer2.png
Now I’m running samba 4.1.6 in Xubuntu. And this is a home lan where everyone is in the same network. But if there was an incompatibility in SMB levels I would think it would impact me as well. Maybe it’s a Samba 4.1.11 issue.Last edited by Morbius1; September 12th, 2015 at 05:32 PM.
-
Re: Cannot connect to Samba share (4.1.11) from Windows 10
How did you solve it?
I tried the link you mentioned but ended up fail.I disabled SMB2/3 according to the instruction.
1. Open the PowerShell with admin authority and type
Code:
Set-ItemProperty -Path "HKLM:\SYSTEM\CurrentControlSet\Services\LanmanServer\Parameters" SMB2 -Type DWORD -Value 0 -Force2. Open the command line window with admin authority and type
Code:
sc.exe config lanmanworkstation depend= bowser/mrxsmb10/nsi
sc.exe config mrxsmb20 start= disabled
Every command did not show any errors.
So I restarted my PC to see nothing changed.
It still doesn’t work.Can you explain more details what you have done?
Thanks.
ps.
I’m using Windows10 and Ubuntu14.04 with samba 4.1.6.Last edited by LeeJaeJun; January 28th, 2016 at 03:41 PM.
-
Re: Cannot connect to Samba share (4.1.11) from Windows 10
I’m using Windows10 and Ubuntu14.04 with samba 4.1.6.
I suspect that you should probably start a new topic since it has nothing to do with this one.
And you might want to describe the issue you are having. The Win10 machine can’t see the Ubuntu machine or you can’t connect to the Ubuntu machine? There’s a problem with Win10 «discovering» the Linux machine. It has no problem connecting to one — you just have to ask for it by name.
Besides the whole premise of this doesn’t make sense to me:
Windows 10 will try to negotiate SMB3_11, which Samba4 doesn’t yet support
except in the current 4.3 release candidate. I suspect for now disabling
SMB2/3 on the Windows 10 client is your best, if not ideal, option.I just connected to a Xubuntu 14.04 samba share from WIn10. If I look at the connection parameters on WIn10 this is what I see:
Code:
Windows PowerShell
Copyright (C) 2015 Microsoft Corporation. All rights reserved.

PS C:\WINDOWS\system32> Get-SmbConnection | Select ServerName,ShareName,Dialect

ServerName ShareName Dialect
----------   ---------  -------
xub1404.local  Downloads   3.0
There’s no doubt that Win10 starts with SMB3_11 but both it and the samba server can auto-negotiate this.
Bookmarks
Bookmarks
Posting Permissions
Here is a step guideline to install Samba in Ubuntu 20.04, Focal Fossa, to enable sharing with Windows 10 as the client. I write this article to help people solving problem around:
1. Windows 10 not connecting properly with Samba 4.7.6 on Ubuntu 18.04
2. Ubuntu 16 Samba server with Windows 10 client – Tutorial/Howto
3. I can’t get Win10 PC to Access Ubuntu 18.10 Samba Shares
4. Cannot access smb share from Windows 10
5. Fixing broken Samba File Share access for Linux hosts after installing the latest version of Windows 10
In this case, I didn’t change Windows features for Samba v1 or change regedit configuration. This is works on pure Windows 10 and Ubuntu 20.04 without additional changes

Here are the steps on “How to install Samba on Ubuntu 20.04 and Fix Sharing with Windows 10”
1. Install Samba server
First, we need to install Samba by running this command
sudo apt-get install samba -y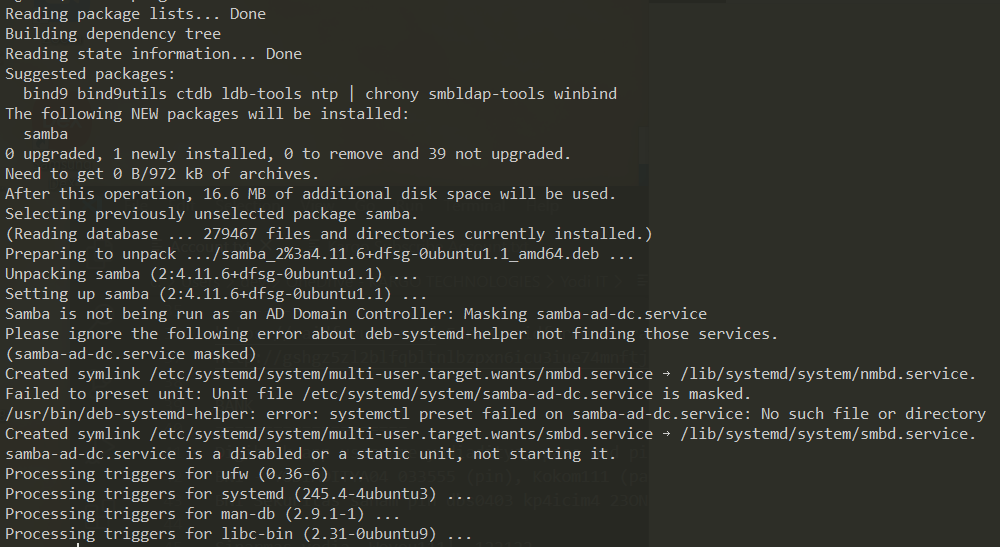
2. Adding user to samba group
Now our Samba is running under smbd service. Next step, we need to add users to samba group
sudo smbpasswd -a username3. Change samba configuration to works with Windows 10
Go edit file “/etc/samba/smb.conf” and edit this part to enable succesfull sharing with Windows 10 Network.
Add this in Global part
   passdb backend = tdbsam
   security = user
Enable interfaces by binding it with device IP address or eth0 or wlan0 (check with sudo ifconfig)
#### Networking ####

# The specific set of interfaces / networks to bind to
# This can be either the interface name or an IP address/netmask;
# interface names are normally preferred
interfaces = 192.168.100.63 wlp1s0

bind interfaces only = yes
For user part, we need to disable bad_user map and force user with our added user previously
#map to guest = bad user
force user = username
The last part, we can add folder to shared
[Users]
  path = put your path here
  browseable = yes
  read only = no
  force create mode = 0660
  force directory mode = 2770
  valid users = @username_here
Just in case you have messy samba configuration, as long as your are using the latest Ubuntu 20.04, this configuration will work like a charm.
This configuration will help to avoid problem to connect to Windows 10 SMB share or Samba file sharing not working
#
# Sample configuration file for the Samba suite for Debian GNU/Linux.
#
#
# This is the main Samba configuration file. You should read the
# smb.conf(5) manual page in order to understand the options listed
# here. Samba has a huge number of configurable options most of which
# are not shown in this example
#
# Some options that are often worth tuning have been included as
# commented-out examples in this file.
#  - When such options are commented with ";", the proposed setting
#    differs from the default Samba behaviour
#  - When commented with "#", the proposed setting is the default
#    behaviour of Samba but the option is considered important
#    enough to be mentioned here
#
# NOTE: Whenever you modify this file you should run the command
# "testparm" to check that you have not made any basic syntactic
# errors.

#======================= Global Settings =======================

[global]

## Browsing/Identification ###

# Change this to the workgroup/NT-domain name your Samba server will part of
   workgroup = WORKGROUP
   passdb backend = tdbsam
   security = user

# server string is the equivalent of the NT Description field
   server string = %h server (Samba, Ubuntu)

#### Networking ####

# The specific set of interfaces / networks to bind to
# This can be either the interface name or an IP address/netmask;
# interface names are normally preferred
interfaces = 192.168.100.63 wlp1s0

# Only bind to the named interfaces and/or networks; you must use the
# 'interfaces' option above to use this.
# It is recommended that you enable this feature if your Samba machine is
# not protected by a firewall or is a firewall itself.  However, this
# option cannot handle dynamic or non-broadcast interfaces correctly.
bind interfaces only = yes

#### Debugging/Accounting ####

# This tells Samba to use a separate log file for each machine
# that connects
   log file = /var/log/samba/log.%m

# Cap the size of the individual log files (in KiB).
   max log size = 1000

# We want Samba to only log to /var/log/samba/log.{smbd,nmbd}.
# Append syslog@1 if you want important messages to be sent to syslog too.
   logging = file

# Do something sensible when Samba crashes: mail the admin a backtrace
   panic action = /usr/share/samba/panic-action %d

####### Authentication #######

# Server role. Defines in which mode Samba will operate. Possible
# values are "standalone server", "member server", "classic primary
# domain controller", "classic backup domain controller", "active
# directory domain controller".
#
# Most people will want "standalone server" or "member server".
# Running as "active directory domain controller" will require first
# running "samba-tool domain provision" to wipe databases and create a
# new domain.
   server role = standalone server

   obey pam restrictions = yes

# This boolean parameter controls whether Samba attempts to sync the Unix
# password with the SMB password when the encrypted SMB password in the
# passdb is changed.
   unix password sync = yes

# For Unix password sync to work on a Debian GNU/Linux system, the following
# parameters must be set (thanks to Ian Kahan <<kahan@informatik.tu-muenchen.de> for
# sending the correct chat script for the passwd program in Debian Sarge).
   passwd program = /usr/bin/passwd %u
   passwd chat = *Enter\snew\s*\spassword:* %n\n *Retype\snew\s*\spassword:* %n\n *password\supdated\ssuccessfully* .

# This boolean controls whether PAM will be used for password changes
# when requested by an SMB client instead of the program listed in
# 'passwd program'. The default is 'no'.
   pam password change = yes

# This option controls how unsuccessful authentication attempts are mapped
# to anonymous connections
#   map to guest = bad user
force user = dev

# It specifies the location of the user's
# profile directory from the client point of view) The following
# required a [profiles] share to be setup on the samba server (see
# below)
;   logon path = \\%N\profiles\%U
# Another common choice is storing the profile in the user's home directory
# (this is Samba's default)
#   logon path = \\%N\%U\profile

# The following setting only takes effect if 'domain logons' is set
# It specifies the location of a user's home directory (from the client
# point of view)
;   logon drive = H:
#   logon home = \\%N\%U

# The following setting only takes effect if 'domain logons' is set
# It specifies the script to run during logon. The script must be stored
# in the [netlogon] share
# NOTE: Must be store in 'DOS' file format convention
;   logon script = logon.cmd

# This allows Unix users to be created on the domain controller via the SAMR
# RPC pipe.  The example command creates a user account with a disabled Unix
# password; please adapt to your needs
; add user script = /usr/sbin/adduser --quiet --disabled-password --gecos "" %u

# This allows machine accounts to be created on the domain controller via the
# SAMR RPC pipe.
# The following assumes a "machines" group exists on the system
; add machine script  = /usr/sbin/useradd -g machines -c "%u machine account" -d /var/lib/samba -s /bin/false %u

# This allows Unix groups to be created on the domain controller via the SAMR
# RPC pipe.
; add group script = /usr/sbin/addgroup --force-badname %g

############ Misc ############

# Using the following line enables you to customise your configuration
# on a per machine basis. The %m gets replaced with the netbios name
# of the machine that is connecting
;   include = /home/samba/etc/smb.conf.%m

# Some defaults for winbind (make sure you're not using the ranges
# for something else.)
;   idmap config * :              backend = tdb
;   idmap config * :              range   = 3000-7999
;   idmap config YOURDOMAINHERE : backend = tdb
;   idmap config YOURDOMAINHERE : range   = 100000-999999
;   template shell = /bin/bash

# Setup usershare options to enable non-root users to share folders
# with the net usershare command.

# Maximum number of usershare. 0 means that usershare is disabled.
#   usershare max shares = 100

# Allow users who've been granted usershare privileges to create
# public shares, not just authenticated ones
   usershare allow guests = yes

#======================= Share Definitions =======================

# Un-comment the following (and tweak the other settings below to suit)
# to enable the default home directory shares. This will share each
# user's home directory as \\server\username
;[homes]
;   comment = Home Directories
;   browseable = no

# By default, the home directories are exported read-only. Change the
# next parameter to 'no' if you want to be able to write to them.
;   read only = yes

# File creation mask is set to 0700 for security reasons. If you want to
# create files with group=rw permissions, set next parameter to 0775.
;   create mask = 0700

# Directory creation mask is set to 0700 for security reasons. If you want to
# create dirs. with group=rw permissions, set next parameter to 0775.
;   directory mask = 0700

# By default, \\server\username shares can be connected to by anyone
# with access to the samba server.
# Un-comment the following parameter to make sure that only "username"
# can connect to \\server\username
# This might need tweaking when using external authentication schemes
;   valid users = %S

# Un-comment the following and create the netlogon directory for Domain Logons
# (you need to configure Samba to act as a domain controller too.)
;[netlogon]
;   comment = Network Logon Service
;   path = /home/samba/netlogon
;   guest ok = yes
;   read only = yes

# Un-comment the following and create the profiles directory to store
# users profiles (see the "logon path" option above)
# (you need to configure Samba to act as a domain controller too.)
# The path below should be writable by all users so that their
# profile directory may be created the first time they log on
;[profiles]
;   comment = Users profiles
;   path = /home/samba/profiles
;   guest ok = no
;   browseable = no
;   create mask = 0600
;   directory mask = 0700

[printers]
   comment = All Printers
   browseable = no
   path = /var/spool/samba
   printable = yes
   guest ok = no
   read only = yes
   create mask = 0700

# Windows clients look for this share name as a source of downloadable
# printer drivers
[print$]
   comment = Printer Drivers
   path = /var/lib/samba/printers
   browseable = yes
   read only = yes
   guest ok = no
# Uncomment to allow remote administration of Windows print drivers.
# You may need to replace 'lpadmin' with the name of the group your
# admin users are members of.
# Please note that you also need to set appropriate Unix permissions
# to the drivers directory for these users to have write rights in it
;   write list = root, @lpadmin

[Users]
  path = put your path here
  browseable = yes
  read only = no
  force create mode = 0660
  force directory mode = 2770
  valid users = @username_here
4. Restart samba service
sudo service smbd restart
sudo service nmbd restart
5. Open Ubuntu Samba folder from Windows 10
Go to your network and access to your IP from path \

6. BONUS: Enable follow symlinks in samba folder
To enable symbolic link path or shortcut in Samba, you can add these configuration
[global]
allow insecure wide links = yes

[YouShareFolder]
follow symlinks = yes
wide links = yes