
-
Home
-
News
- [Solved] How to Fix Ping General Failure on Windows 10?
By Stella | Follow |
Last Updated
Have you ever encountered the ping general failure issue when you want to use Command Prompt to test the response time of an IP address on your Windows 10 computer? If yes, do you want to fix the issue? This post from MiniTool Software will show you 4 methods that are proved to be effective.
The ping general failure error is an issue that happens when you run ping commands in Command Prompt to test the response time of an IP address. The reason for this issue is not clear now because there is no available explanation of this ping transmit failed general failure issue on the interface of Command Prompt.
But, don’t worry. MiniTool Software collects some solutions that are proved to be effective and shows them to you in this post. You can try these methods to find out the most suitable one.
How to Solve Ping General Failure in Windows 10?
- Use IPv4
- Disable all IPv4 or IPv6 transition technologies
- Reset TCP/IP for your computer
- Uninstall suspected applications
Solution 1: Use IPv4
By default, Windows 10 is set to use the IPv6 rather than IPv4. This can be the possible reason for this ping transmit failed general failure error. To rule out this possibility, you can follow this guide to set Windows 10 to use IPv4:
- Go to this page to download the Prefer IPv4 over IPv6 in prefix policies.
- Click the downloaded file and then follow the on-screen guide to complete the process.
- When the progress ends, you need to reboot your computer and check whether the issue disappears.
Solution 2: Disable all IPv4 or IPv6 Transition Technologies
Some users reflect that they solve the issue by disabling all IPv4 or IPv6 transition technologies. So you can also use this method to have a try.
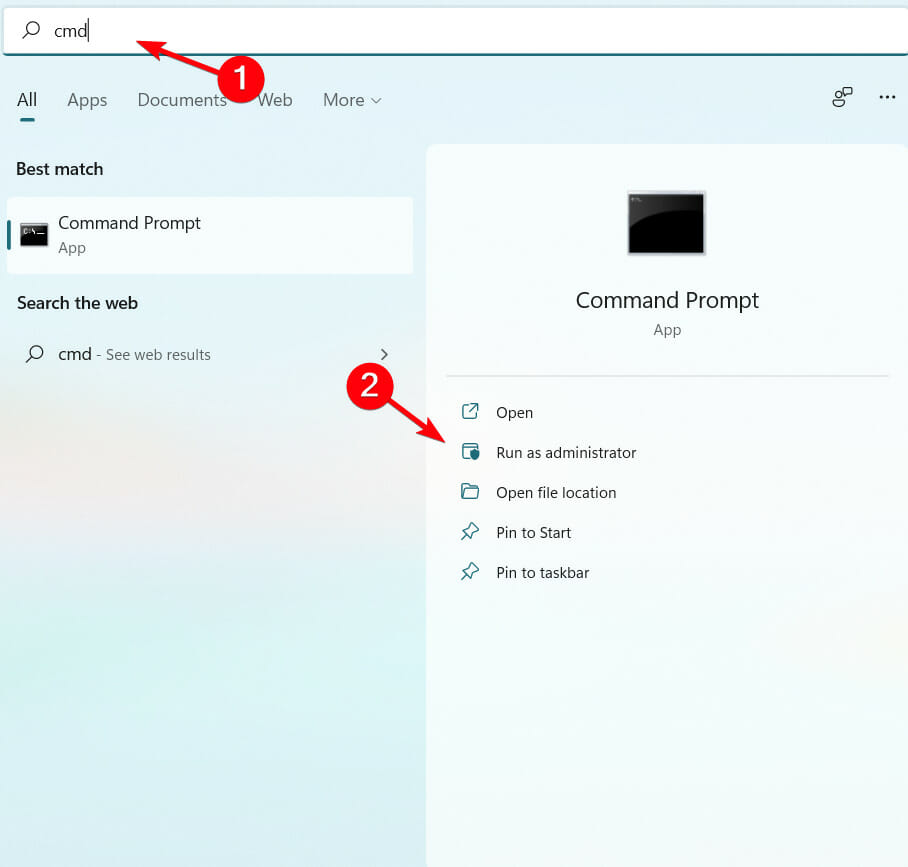
1. Run Command Prompt as administrator.
2. Run the following commands and press Enter after each command:
netsh int ipv6 isatap set state disabled
netsh int ipv6 6to4 set state disabled
netsh interface teredo set state disable
3. Close Command Prompt and reboot your computer.
Solution 3: Reset TCP/IP for Your PC
If the ping general failure Windows 10 issue still persists, you can try to reset your computer’s TCP/IP to see whether the issue can be solved.
Here is a guide:
1. Run Command Prompt as administrator.
2. Run the following commands and press Enter after each command.
netsh i i r r
netsh winsock reset
3. Shut down Command Prompt and reboot your computer.
Solution 4: Uninstall Suspected Applications
If all the above solutions don’t work you, you need to consider that where there are conflicting programs that can stop HTTP traffic and cause Ping general failure on your Windows 10 computer. You can install all these conflicting programs to have a try.
However, you may don’t know which applications you should block. We show you some advice. You can uninstall these programs: Charles, Wireshark, Peerblock, and the AnyConnect mobility client.
After the uninstallation, you can reboot your computer and then check whether the issue disappears.
Bottom Line
We hope these methods can help you solve the Ping general failure issue on Windows 10. Should you have any related issues, you can let us know in the comment.
About The Author
Position: Columnist
Stella has been working in MiniTool Software as an English Editor for more than 8 years. Her articles mainly cover the fields of data recovery including storage media data recovery, phone data recovery, and photo recovery, videos download, partition management, and video & audio format conversions.

По умолчанию в операционной системе Windows 8, 8.1 и 10 ответ на ping-запросы (входящие эхо-сообщения ICMP) отключен. Это сделано с целью повышения безопасности на уровне сети.
Активировать возможность ответа на эхо-запрос можно указанным ниже способом:
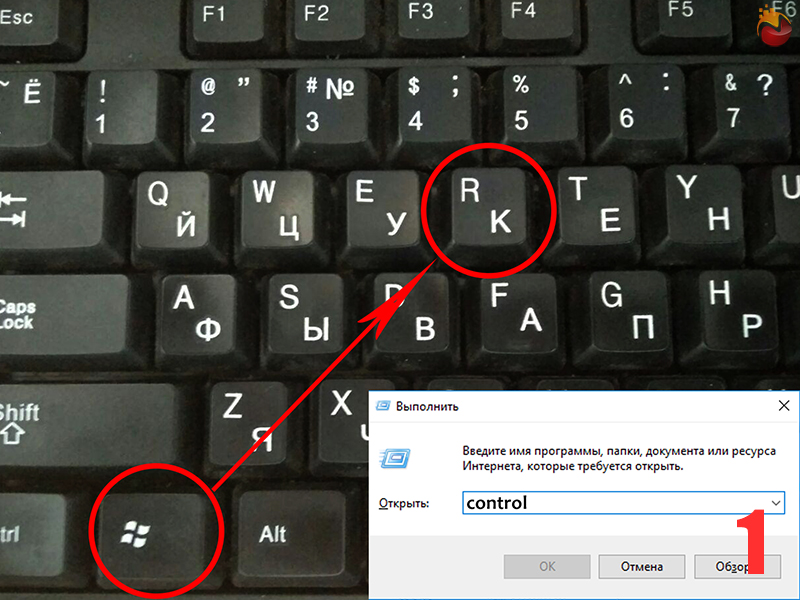
1) Во первых, откройте панель управления. Наиболее быстро это можно сделать нажав на клавиатуре сочетание клавиш «Win»+R, а далее в строке «открыть» напишите «control», рисунок 1.
2) В панели управления находите «Брандмауэр Windows», или как он называется в Windows 10 — «Брандмауэр Защитника Windows», и запускаете опцию «Дополнительные параметры», рисунок 2.

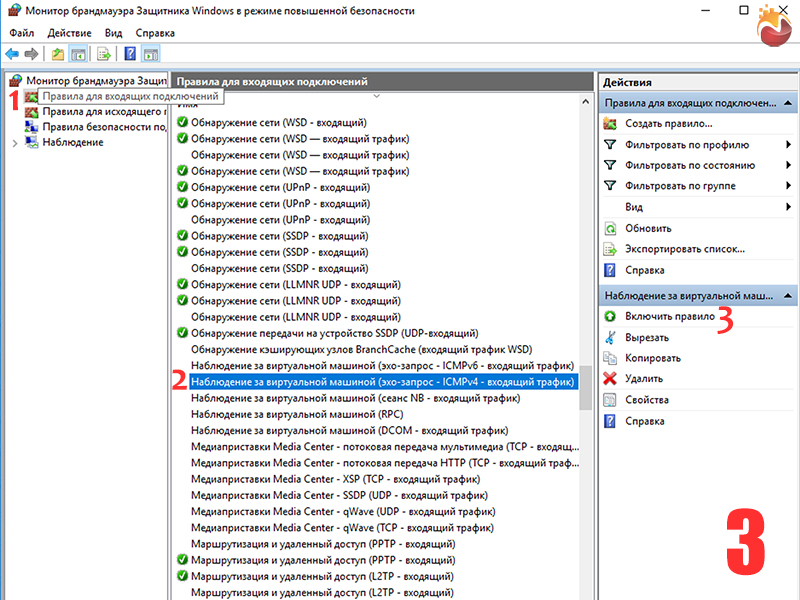
3) В окошке дополнительных параметров Вам нужно найти следующее правило — «Наблюдение за виртуальной машиной (эхо-запрос ICMPv4)» и включить его, рисунок 3.
Сразу после включения правила, компьютер станет отвечать на ping-запросы в пределах локальной сети.
Windows OS is a versatile and capable OS that delivers all features that an OS needs to provide for successfully running a computer. The OS is unparalleled and is still one of the best in the industry. Well, the OS has got several good features and one among them is the networking feature. Microsoft designs Windows OS in such a way that the OS offers users the best networking features. Especially, Windows 10/11 are built for modern times and the OSes are much more advanced in terms of networking.

Windows 10/11 OSes offers users great and simple to use networking tools and features, and apart from the good networking features the OS also has some tools that allow users to check, fix and do much more in case of an issue with the networking feature on the OS. Even such facilities on the OS are not foolproof and there can be some minor issues with these tools and features here in this article, we will look into an issue that has been bugging many users when they tried using the Ping Commands on command prompt. So, hop on and learn, the fix for these simple issues on Windows 10/11.
Recommended Post:- Fixed: 0x800f0805 Windows Update Error on Windows 10 and 11
Command Prompt, as we all know is a very powerful tool, that has been tagging along with the OS for a long time, this tool has been in for a long time and it has various functions like resolving issues, checking up things and functions, running applications, performing operations that normally causes issues when running and much more. So, putting such a powerful tool to good use is in the hands of the users and many users do so. Well, when some Windows 10/11 users tried using the command prompt to run some Ping commands, general failure error messages popped out. Well, this issue on a Windows 10/11 computer is pretty common and can be resolved with some simple methods.
Simple Methods to Fix the Ping Transmit Failed General Failure Error on Windows 10/11
Well, the Ping Transmit Failed error on Windows is a common error as mentioned previously, yet the issue can be resolved with some simple methods. Well, here are the methods, that you can use and fix the issue on your computer and then use the command prompt to run the Ping Commands without errors.
Method 1: Run a Network Adapter Troubleshooter
Troubleshooting is one of the best ways of dealing with common issues on Windows OSes. running the network adapter troubleshooter can help you fix the issue related to any network-related problems on the computer.
- To run the network troubleshooter, open the Settings application.
- Here in the Settings, go to the update and security tab.
- Here, select the troubleshoot tab.
- Under the troubleshoot option, select the additional troubleshooter option.
- Now, from the list of troubleshooters, select the internet connection troubleshooter and then run it.
- Once the troubleshooter is done, restart your computer and try running the Ping commands using the command prompt.
Method 2: Flush the DNS
Flushing the DNS will help with resolving command errors with networking.
- To flush the DNS, run the command prompt as an administrator.
- Here in the terminal, type in ipconfig /flushdns and then run it.
- Now, once the command has been run, restart your computer.
Method 3: Use IPv4 Instead of IPv6 on your Computer
- To use IPv4 over IPv6, download the preferred IPv4 over IPv6 in the prefix policy and install Microsoft Easy Fix 21066.
- Once, you have downloaded, install the downloaded file.
- Now, follow the steps on the screen to complete the process.
- Once, done, restart your computer and check whether the Ping Commands works on your computer.
Method 4: Uninstall Applications that Stop HTTP Traffic
An application that stops the HTTP traffic can be the cause for the Ping general failure error on your computer, so uninstalling the applications, responsible can help you fix the error on your computer.
- To uninstall applications, open the Settings application, here go to the Apps tab.
- Now, in the apps and features option, select the application that you want to uninstall, click on it and then select the uninstall option.
- Once you have uninstalled the applications that cause issues on your computer, you are good to go with using the Ping commands on the command prompt.
Method 5: Restart TCP/IP
- To restart the TCP and IP on your computer, run the command prompt as an administrator.
- Here, in the terminal, run the command “netsh i i r r”.
- Now, run the command “netsh winsock reset”.
- Now, exit the command prompt and then restart your computer.
Method 6: Disable IPv4 and IPv6 Transition Tech
- To disable the IPv4 and IPv6 transition tech, run the command prompt as an administrator.
- Now, in the terminal, type in “netsh int ipv6 isatap set state disabled” and hit enter.
- Now, type in “netsh int ipv6 6to4 set state disabled” and hit enter.
- Now, type in “netsh interface teredo set state disable” and hit enter.
- Once done, exit the command prompt and then restart your computer.
Well, these are some simple methods that you can use and fix the Ping Transmit failed issue on your Windows 10/11 computer.
Hope the information provided above was helpful and informative, with these simple methods, you can fix the error with ease and run the Ping commands on the computer with great ease.
Встроенный брандмауэр Windows в целях безопасности по умолчанию блокирует входящий ICMP трафик как в десктопных Windows 10/11, так и в Windows Server. Это означает, что вы не сможете удаленно проверить доступность компьютера с помощью стандартной команды
ping
, т.к. она будет отвечать о превышении интервала ожидания запроса (
Request timed out
) для ICMP Echo-Reply. Если вы хотите сделать возможной проверку доступности хостов Windows по протоколу ICMP из системы мониторинга или вручную из командной строки, можно разрешить ответы на ICMP эхо-запросы.
Чтобы разрешить отправку ответов на запросы по протоколу ICMP, нужно включить предустановленные правила в брандмауэре Windows.
- Откройте оснастку управления Windows Defender Firewall with Advanced Security, выполнив команду
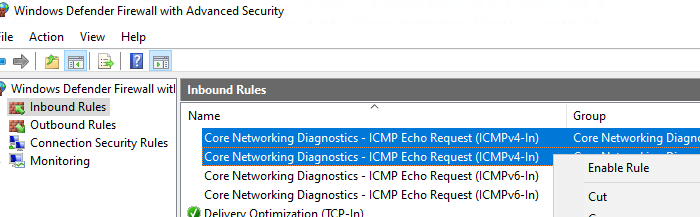
wf.msc - Перейдите в раздел Inbound Rules
- Найдите правило Core Network Diagnostics – ICMP Echo Request (ICMPv4-In) и включите его.
- В моем случае есть два правила с этим именем. Одно для частного и общедоступного сетевого профиля Windows, и второе для доменного. Я включил их оба. Можно также включить правило, разрешающее ICMP ответы для IPv6 протокола (если используется).

Есть также другое правило File and Printer Sharing (Echo Request – ICMPv4-In), которое также разрешает компьютеру отвечать на эхо-запросы
ping
.
Попробуйте пропиговать ваш компьютер и убедитесь, что теперь он отвечает на ICMP запросы.
Можно включить правила Windows Firewall, разрешающие ответы на эхо-запросы ICMP с помощью такой команды PowerShell:
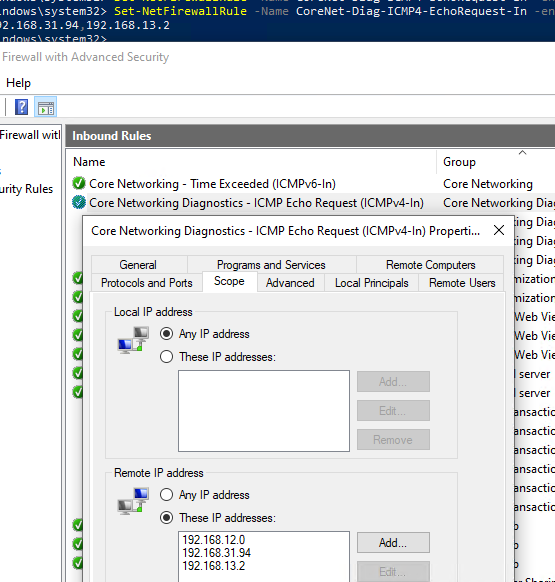
Set-NetFirewallRule -Name CoreNet-Diag-ICMP4-EchoRequest-In -enabled True
Если нужно ограничить список IP подсетей или хостов, которым разрешено отправлять ответы на ICMP запросы, выполните команду:
Set-NetFirewallRule -Name CoreNet-Diag-ICMP4-EchoRequest-In -enabled True -RemoteAddress 192.168.12.0,192.168.31.94
Откройте свойства правила в Windows Firewall и проверьте, что теперь правило разрешающие ICMP ответы будет работать только для указанных IP/подсетей.
Если в файрволе отсутствует (удалено) правило для входящих ICMP запросов, можно создать его из командной строки:
netsh advfirewall firewall add rule name="Allow_ICMPv4_Echo" protocol=icmpv4:8,any dir=in action=allow
Другой пример PowerShell команды, которое создаст правило файервола, разрешающего ping для всех хостов в локальной сети:
New-NetFirewallRule -DisplayName "Allow_ICMPv4_Echo" -Direction Inbound -Protocol ICMPv4 -IcmpType 8 -RemoteAddress localsubnet -Action Allow
Если нужно заблокировать ответы на ICMP эхо-запрос независимо от того, какие правила включены, создайте запрещающее правило, которое будет иметь более высокий приоритет:
New-NetFirewallRule -DisplayName "Block_ICMPv4_Echo" -Direction Inbound -Protocol ICMPv4 -IcmpType 8 -RemoteAddress localsubnet -Action Block
Чтобы разрешить ответы на ICMP ping на всех компьютерах в сети, можно включить правило Windows Firewall с помощью доменной групповой политики .
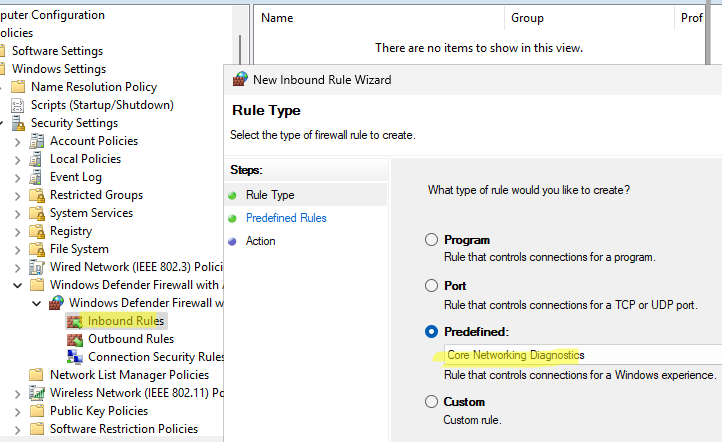
- Откройте редактор доменных GPO (
gpmc.msc
), создайте или отредактируйте имеющуюся GPO и назначьте ее на целевую OU или корень домена. - Перейдите в раздел Computer Configuration -> Windows Settings -> Security Settings -> Windows Firewall with Advanced Security -> Inbound rules
- Создайте новое правило, выберите Predefined rule типа Core Networking Diagnostics

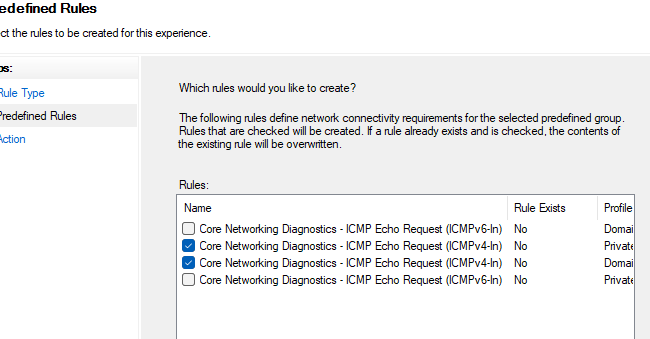
- Укажите какие правила ICMP Echo request нужно включить.

- На следующем шаге вы берите Allow the connection.
Если вы точно уверены, что компьютер находится в сети, что он получает правильные настройки IP и пр., попробуйте выполнить ещё 2 дополнительных действия.
1. Проверьте, включено ли Брандмауэре правило, которое разрешает ответ на пинги.
Перейдите в «Параметры Windows», далее «Сеть и Интернет».
В открывшемся окне (справа или внизу), найдите пункт Брандмаэр Windows.
Далее, в окне Брандмауэра, выберите пункт «Дополнительные параметры».
В левой части открывшегося окна, выберите пункт «Правила для входящих подключений», затем, прокрутите список вниз, пока не найдёте правило с названием «Наблюдение за виртуальной машиной (эхо-запрос — ICMPv4 — входящий трафик)», нажмите на нём правой кнопкой мыши и выберите пункт «Включить правило».
Проверьте, появился ли пинг по IP и имени компьютера (хоста).
Если пинг по имени хоста не включился, то, на компьютере который не пингуется выполните второе действие.
2. Перейдите в «Параметры Windows» и выберите пункт «Сеть и Интернет».
Далее выберите пункт «Ethernet».
Далее «Настройка параметров адаптера»
Найдите интерфейс, который подключен к вашей локальной сети. Нажмите на нём правой кнопкой мыши и выберите пункт «Свойства».
В свойствах сетевого интерфейса отключите протокол IPv6.
Пинги по имени хоста должны проходить.