
Internet speeds can sometimes be very problematic and no one wants that. Whether you are a student or a professional, bad internet is bound to spoil your mood. There are different things that you can do, to ensure that you get good internet speeds. One of these things is that you can change Wi-Fi bands on your PC. In this tutorial, I will show you how to change between 2.4GHz and 5GHz WiFi bands on Windows 10.
Change Between 2.4Ghz and 5GHz WiFi Bands
So, why should you change Wi-Fi bands? If your router has a 5GHz frequency and your computer has the same adapter, you will get a better internet speed. However, sometimes your computer is unable to detect the 5GHz band and you will automatically use the 2.4GHz band. Some computers can use both 2.4GHz and 5GHz bands and you can force it, to use the latter. First, you need to figure out what bands are supported on your PC.
Check Supported Bands
A 2.4GHz WiFi can cover a large area and can penetrate solid objects and walls. A 5GHz WiFi will give you speeds of about 1 Gbps.
Step-1: Go to the Start menu and type cmd. Click Open.

Step-2: Type the following command and click Enter:
netsh wlan show drivers

Step-3: Now look for Radio types supported:
- 802.11g and 802.11n means that your system only supports 2.4GHz
- 802.11n, 802.11g, and 802.11b means your system only supports 2.4GHz
- If multiple bands show up including 802.11a or 802.11ac then it means that your system supports both the 2.4GHz and 5GHz bands.
In the image below, you can see that there is a string of bands including 802.11a and 802.11ac, hence the system supports both bands.

Change Between 2.4Ghz and 5Ghz Bands
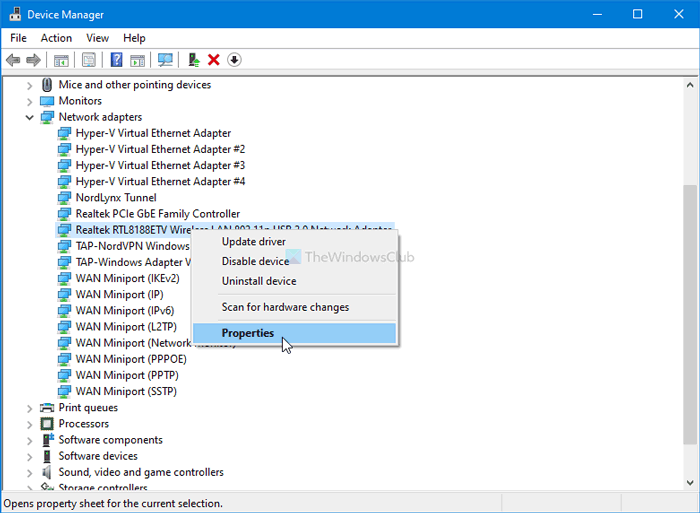
- Right-click on the Start menu to display the WinX menu. (Shortcut keys: Win + X)
- Select Device Manager.
- Click on Network Adapters to expand the option.

- Right-click on the WiFi adapter and select Properties.
- Click on the Advanced tab.
- In the the Property section click on Band or Preferred Band option. The name may vary for you depending on the adapter manufacture.
- Now, in the Value section the 5GHz option.
- Click OK.


This simple method will change the bands and will help improve your internet speeds.
In order to change the WiFi channel on Windows 10, you will need to follow these steps:
1. Go to the Start menu and search for “Network and Sharing Center”. Click on it to open the window.
2. Select “Change adapter settings” from the left side of your screen.
3. Right-click on your WiFi connection and select “Properties” from the dropdown list.
4. Select “Configure” from the bottom of the window that opens up, then click on the Advanced tab at the top of this new window that appears.
5. Look for a setting named ‘Preferred Channel Width’ or something similar; this is where you can change your WiFi channel width (20MHz, 40MHz). Make sure it is set to 20MHz if you want better performance or reliability in congested areas with many networks running in parallel — otherwise leave it as it is if you want maximum speed but may experience interference from other networks nearby due to overlapping channels .
6. Next, look for a setting called Country Code or Region Code (depending on your network card) and make sure this is set correctly according to your geographic location; failing to do so may cause interference problems with some routers in certain countries/regions due to different regulatory requirements for wireless transmissions across regions/countries in various territories around the world .
7 Click OK twice and restart your computer for changes take effect properly — after restarting, check if everything works as expected by connecting back again using WiFi 8 If not satisfied with current settings then try switching between different channels available within range; this can be done by repeating step 5 above while making sure preferred channel width remains unchanged at all times . Additionally, always make sure that any other devices connected via wireless are also configured correctly according their own manuals before attempting any changes with main router configuration – sometimes outdated firmware versions or incorrect driver installation may cause unexpected compatibility issues even though basic settings seem correct at first glance .
How do I change my Wi-Fi channel on Windows 10?
How do I change my Wi-Fi channel?
Changing your Wi-Fi channel is a great way to improve the speed and performance of your network. Here are the steps you need to take:
1. Access your router’s settings page. You can do this by entering the IP address of the router into your web browser’s address bar. The IP address will be listed in the documentation that came with your router, or you can search online for it using the make and model number of your router.
2. Once on the settings page, navigate to where you can adjust the Wi-Fi channel settings (this may be under “Wireless” or “Wi-Fi”).
3. Choose a different channel than what is currently selected (ideally one that is not used by other nearby networks). Be sure to save any changes before exiting out of this page.
4. Test out how well your connection works on this new channel and repeat these steps if necessary until you find an optimal setting.
I hope this advice helps!
How do I see Wi-Fi channels on Windows 10?
To see Wi-Fi channels on Windows 10, you can use the Network Status window. Here are the steps:
1. Open Settings (Windows key + I)
2. Click on Network & Internet
3. Select Wi-Fi from the left pane
4. In the right pane, scroll down to Related Settings and click on Change Adapter Options
5. Right-click your active network adapter and select Status from the menu
6. In the Network Status window, select Wireless Properties
7. Go to the Advanced tab and select your preferred channel from the list under Preferred Networks
8. Click OK and then Apply
9. Restart your computer for changes to take effect
10. To verify that you are connected to a specific channel, open Command Prompt (Windows key+X) and type “netsh wlan show networks mode=bssid” and press enter
It is recommended to set your wireless connection’s channel manually in order to get better performance out of it as well as avoid possible interference with other nearby devices using conflicting channels or signals in a crowded area/network environment like an office or apartment complex with lots of people using their own routers or access points at once etc..
How do I change my Windows 10 from 2.4 GHz to 5GHz?
To change your Windows 10 device from 2.4 GHz to 5GHz, you will first need to make sure that your hardware supports 5GHz Wi-Fi. You can check this in your device’s manual or by looking up the specifications online.
Once you have verified that your hardware is compatible, follow these steps:
1. Open the Start Menu and type «Network & Internet Settings» into the search bar and select it from the list of results.
2. Select Wi-Fi from the left side menu, then click on Advanced Options at the bottom of the window.
3. Under “Wireless Mode”, select “5 GHz” and save your settings by clicking OK at the bottom of the window.
You should now be connected to a 5GHz network! If you are still having trouble connecting, contact a technical support representative for further assistance.
How do I connect to 2.4 GHz instead of 5GHz?
If you need to connect to a 2.4 GHz network instead of a 5GHz network, the first step is to verify that the device you are trying to connect with supports 2.4GHz connections. If it does, then you will need to access your wireless router’s settings page and look for an option that allows you to switch between 2.4GHz and 5Ghz networks. Once you have switched the setting, save your changes and attempt to reconnect your device with the new network connection settings. If the issue persists after making this change, please contact your Internet Service Provider for additional assistance in troubleshooting your connection issue.
What channel is best for 2.4 GHz WiFi?
The best channel for 2.4GHz WiFi is typically Channel 1, 6, or 11. To determine the best channel for your network, you can use a WiFi analyzer app to scan the area and see what channels are being used by nearby networks and which ones have the least interference. Additionally, you should also refer to your router’s documentation or manufacturer website for specific setup instructions and recommendations on the best channel for your particular router model.
Is 2.4 GHz better than 5GHz?
It depends on the situation. 2.4GHz is a longer range frequency than 5GHz, meaning it can travel farther distances with fewer obstructions in the way. However, 5GHz has much faster speeds and less interference from other wireless networks and devices. It is best to consider your needs and environment before making a decision about which frequency to use for your network connection. For instance, if you need fast speeds and do not have many obstacles in the way, then 5GHz may be better for you. On the other hand, if you have a lot of interference or need to cover large distances with few obstacles, then 2.4GHz may be more appropriate for your situation.
Why can’t I change my WiFi channel?
It is possible that you may not be able to change your WiFi channel if the router settings are locked or if the router does not allow for manual configuration. To determine whether you can change your WiFi channel, please try the following steps:
1. Log into your router settings by typing your IP address into a browser window.
2. Find the Wireless section of the menu and look for a setting for selecting a channel or frequency band.
3. If there is an option to select a different WiFi channel, make sure to save any changes before exiting out of the menu.
4. If there is no option to select a different WiFi channel, then it may not be possible to change it without upgrading or replacing your current router with one that allows manual configuration options.
Download Windows Speedup Tool to fix errors and make PC run faster
Depending upon the hardware, you can use 2.4 GHz and 5 GHz Wi-Fi bands in your Windows 11/10 computer to get a better internet speed. Here is how you can switch between 2.4 GHz and 5 GHz Wi-Fi bands in Windows 11/10.
In general, if your computer has a 5 GHz adapter and your Wi-Fi router broadcasts the same frequency, you should switch to the 5 GHz band instead of using 2.4 GHz to get a better internet speed. At times, your computer might not detect the 5 GHz band due to some reasons, and you will end up using the 2.4 GHz band. However, if your computer shows the 5 GHz band, you can force your PC to use it instead of 2.4 GHz. Before that, you should check if your Windows laptop supports 2.4 GHz or 5 GHz.

Device Manager shows all the connected devices and allows you to switch between 2.4 GHz and 5 GHz Wi-Fi bands. However, this feature is Wi-Fi adapter or component-specific, meaning you may not find it even though you have a 5 GHz enabled Wi-Fi adapter attached to your computer. The only way to see whether your Wi-Fi adapter supports band forcing is by opening the settings mentioned below.
How to change Wi-Fi band from 2.4 GHz to 5 GHz in Windows 11/10
To switch between 2.4GHz and 5GHz Wi-Fi bands on Windows 11/10, follow these steps:
- Press Win+X to open the menu.
- Select the Device Manager option.
- Expand the Network Adapters menu.
- Right-click on the Wi-Fi adapter.
- Select the Properties option.
- Switch to the Advanced tab.
- Select Band or Preferred Band option.
- Expand the Value drop-down list.
- Select 5 GHz only or Prefer 5 GHz band option.
- Click the OK button.
To learn more about these steps, keep reading.
At first, you have to open the Device Manager on your computer. For that, press the Win+X keyboard shortcut to open the menu and select the Device Manager option.
Here it displays all the device categories on your screen. You have to expand the Network Adapters menu > right-click on the Wi-Fi adapter you are using with your computer > select the Properties option from the context menu.
Now switch to the Advanced tab and find out the Band or Preferred Band option. However, this option can be named after something else as it depends on the adapter manufacturer.
After selecting, you can find the Value data drop-down list on the right side. Expand it and select the 5 GHz only or Prefer 5 GHz band option.
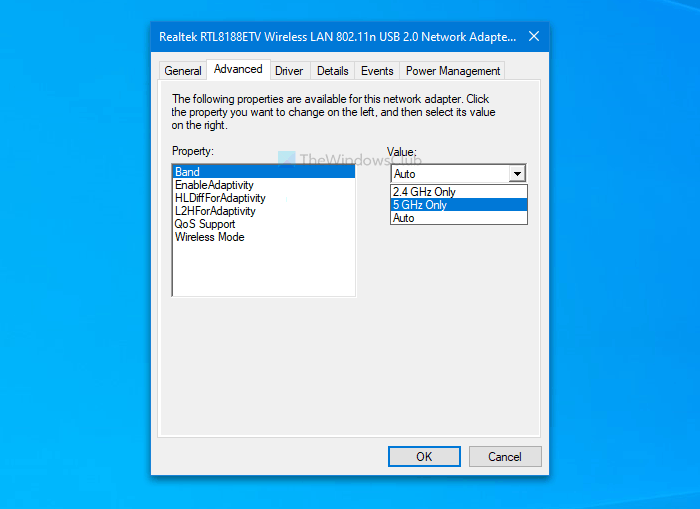
Click the OK button to save the change.
This is how you can switch between different bands in Windows 11/10 to get a better Wi-Fi connection.
You can also force WiFi to connect over 5GHz in Windows 11.
Read: What are the differences between 2.4GHz and 5GHz Wi-Fi bands?
When he is not writing about Microsoft Windows or Office, Sudip likes to work with Photoshop. He has managed the front end and back end of many websites over the years. He is currently pursuing his Bachelor’s degree.
Depending on what you want to achieve, you can switch the WiFi radio frequency on some of the 5GHz supported wireless adapters between 5GHz and 2.4GHz in Windows 11 or Windows 10, or you can also change the WiFi frequency directly from your wireless router which will affect all devices connected to it.
This guide shows how to change radio frequency (band) of a wireless adapter (only adapters that support radio frequency switching) from 2.4ghz to 5ghz or vice versa in Windows 11 or 10, and how to force change the WiFi radio frequency on a wireless router.
Also see: Change Ethernet from 100Mbps to 1Gbps in Windows 11/10
Change 5GHz to 2.4GHz or vice versa in Windows 11/10 (Wireless Adapter)
The ability to force change the preferred band of radio frequency of a wireless adapter depends on if the adapter has the option for it. Not all wireless adapters have the option to switch between 2.4GHz and 5GHz bands.
To switch between the preferred bands – 5GHz and 2.4GHz, of a wireless adapter in Windows 10/11, follow the steps below.
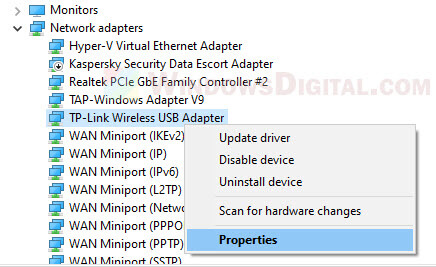
- On Windows 11/10 search bar, search for and open “Device Manager“.
- In the device manager window, click on “Network adapters” to expand it. This will list all network adapters detected on your PC.
- Right-click on the Wireless adapter that you wish to change the radio frequency, then select Properties.

- Go to Advanced tab.
- Under Property, look for an option called “Preferred Band” or “Band“. Select it.
- Click on the drop down menu under Value and select your preferred band: 2.4GHz or 5GHz.
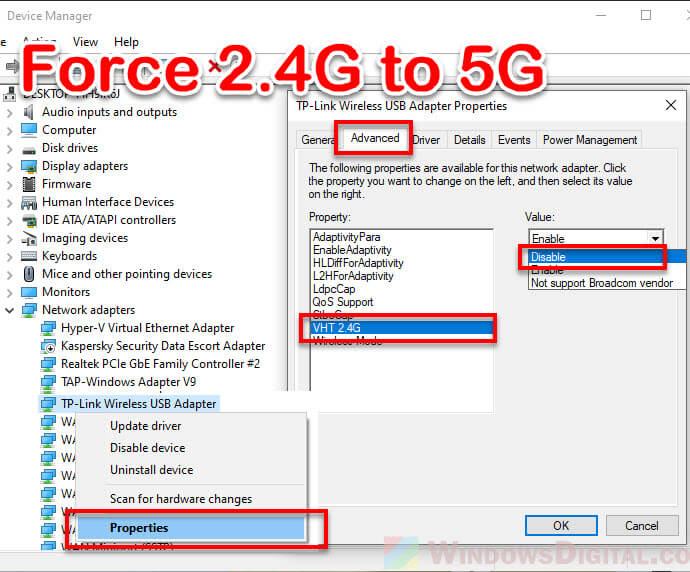
Force change 2.4GHz to 5GHz
If you want to force change your wireless adapter to use only 5GHz instead, if there is no option for “preferred band” in the properties of the wireless adapter, look for another option called “VHT 2.4G“.
If the “VHT 2.4G” option is available, you can change the value to “Disable” to disable the 2.4G entirely and force your wireless adapter to use only 5G.
No option for “preferred band” or “VHT 2.4G”
If you don’t see any of these option, it’s likely that your adapter only supports 2.4 GHz. In some cases though, even if an adapter supports both 5GHz and 2.4GHz, there isn’t any option for you to change its preferred band.
If this is the case, the only choices you have would be to manually connect to a 2.4G or 5G wireless network (WiFi that supports both bands usually have both 2.4G and 5G networks that you can connect to).
Or to change the preferred radio frequency of the WiFi on your wireless router, which will affect all devices connected to it.
Change WiFi radio frequency in Wireless Router
Most modern wireless routers have both 2.4 GHz and 5 GHz wireless networks available for any nearby devices to connect to. If you prefer to use 2.4G or 5G, just choose the respective network.
If you insist to force change your wireless router’s radio frequency so that it uses only 2.4 GHz or 5 GHz, below is an example of what settings you should look for to change the radio frequency of a wireless router.
What you need:
- You need to have access to the wireless router.
- You need to know the address to your router – the default gateway of your network. You can check this by entering “ipconfig” in command prompt.
- You need to know the login credentials to your wireless router.
- The wireless router has to have the relevant settings for you to change its wireless frequency.
As different routers have different user interfaces, the instruction and screenshot below are just examples of what settings you should look for on your router to change the preferred wireless frequency.
- On a browser, enter the default gateway of your network (the address to your router), for example, 192.168.0.1.
- Login to your router.
- Look for “Wireless” settings, then look for “Wireless signal“, “Wireless frequency“, “WiFi frequency” or “Radio frequency” where you can find the settings to enable or disable the 5GHz and 2.4GHz wireless frequency.
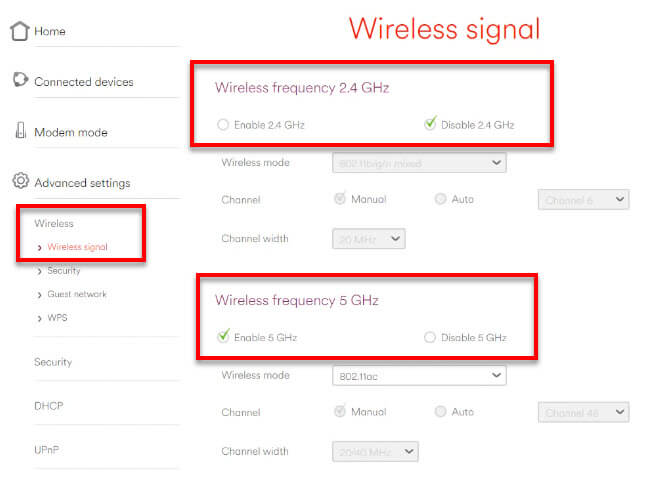
In the screenshot above, as an example, to change my router so that it uses only 5 GHz wireless frequency, I would need to enable only 5 GHz and disable 2.4 GHz.
Not all wireless routers allow user to force enable or disable the wireless frequency modes. If you can’t find any relevant settings to change the wireless frequency on your router, it’s likely because your router doesn’t allow wireless frequency changing or simply doesn’t support 5G.
У многих пользователей дома или на работе присутствует более одной точки доступа Wi-Fi — обычно, работающих на разных частотах, для которых в Windows сохранены учётные данные. При этом автоматически подключение может устанавливаться не для той сети, к которой вы хотели бы подключаться по умолчанию. Это поведение можно изменить.
В этой инструкции подробно о том, как изменить приоритет Wi-Fi сетей в Windows 11 и Windows 10 таким образом, чтобы при доступности нескольких беспроводных сетей автоматическое подключение выполнялось к выбранной вами.
Настройка приоритета беспроводных сетей в командной строке
Изменение приоритета Wi-Fi сетей в Windows 11/10 возможно с помощью команды netsh в командной строке, других способов не предусмотрено. Порядок действий будет следующим:
- Запустите командную строку от имени администратора, либо Терминал Windows от имени администратора (сделать это можно в меню по правому клику на кнопке «Пуск»).
- Введите команду
netsh wlan show profiles
и нажмите Enter. Команда отобразит список сохранённых Wi-Fi сетей на компьютере.

- Для установки приоритета сетей используйте команду
netsh wlan set profileorder name="ИМЯ_СЕТИ" interface="Беспроводная сеть" priority=ПРИОРИТЕТ
где приоритет задаётся числом, а 1 означает первую по порядку подключения сеть. Например, на скриншоте ниже команда устанавливает мою сеть, работающую на частоте 5 ГГц в качестве предпочтительной:
- Аналогичным образом можно установить приоритеты для других сохранённых сетей.


Обратите внимание, что значение для параметра «interface» в команде на первом шаге может отличаться в зависимости от языка системы, например, быть «Wi-Fi» вместо «Беспроводная сеть». Правильное значение будет отображено сразу после выполнения команды для показа списка сохранённых профилей Wi-Fi сетей как имя интерфейса.
Дополнительная информация
В завершение — некоторые дополнительные нюансы, которые могут быть полезными в контексте рассмотренной темы:
- Если зайти в (пример для Windows 11) Параметры — Сеть и Интернет — Wi-Fi — Управление известными сетями и открыть свойства какой-либо сохранённой сети, можно отключить автоматическое к ней подключение сняв отметку «Подключаться автоматически в радиусе действия». В результате автоматическое подключение к сети выполняться не будет, но её пароль всё также будет храниться в системе для подключения вручную при необходимости.

- Вы можете скрыть Wi-Fi сети соседей и просто ненужные Wi-Fi сети в списке доступных для подключения.

Если у вас остаются дополнительные вопросы, связанные с порядком подключения к Wi-Fi сетям в зоне действия, их можно задать в комментариях, я постараюсь помочь.