

Последнее время в новостях про свежие накопительные обновления мы стали давать ссылки, по которым можно загрузить .cab или .msu файлы данных сборок. В этой статье мы разберёмся, зачем они нужны, и как ими воспользоваться.
Что такое CAB и MSU файлы
В Windows 10 существует несколько форматов файлов, использующихся для обновления тех или иных компонентов системы. Это:
- ESD-файлы. Они представляют собой зашифрованный и сильно сжатый ISO-образ. Используются для установки крупных обновлений (сборок, в которых меняется не только индекс, но и основной номер). С их помощью можно, например, создать ISO-образ инсайдерской сборки Windows 10.
- CAB- или MSU-файлы. Они представляют собой, можно сказать, архивы. Используются для установки небольших обновлений — накопительных, обновлений безопасности, обновлений Adobe Flash Player и так далее.
В систему встроены все механизмы работы с данными файлами. Именно их использует Центр обновления — он просто загружает нужный файл, а затем автоматически делает то, что описано в этой инструкции. Минусы этого подхода — невозможность офлайн-установки каких-либо обновлений, которая время от времени необходима некоторым пользователям.
Сразу отмечу, что в Windows 10 CAB- или MSU-файл какого-то накопительного обновления содержит в себе также все предыдущие накопительные обновления! Нет нужды сначала, например, устанавливать сборку 14393.187, потом — .189, потом — .222. Достаточно сразу установить последний пакет.
Где скачать MSU файл обновления Windows 10
Найти MSU-файлы накопительных обновлений Windows 10 можно в каталоге обновлений Microsoft. Подробная инструкция — в статье «Как скачать и установить обновления для Windows 10 вручную».
Как установить CAB и MSU
- Скачайте CAB или MSU-файл.
- Переместите его в папку с каким-нибудь коротким путём. То есть лучше, чтобы путь к файлу был, например, C:\CAB\update.cab, а не C:\Users\Public\Downloads\Folder\CAB Files\CabFile1\update.cab.
Установка CAB-файлов
- Нажмите Win + S.
- Введите слова Командная строка.
- Кликните по результату поиска правой клавишей мыши и нажмите Запустить от имени администратора.
- Введите следующую команду и нажмите Enter:
dism /online /add-package /packagepath:»Путь к CAB-файлу» - В кавычках вместо надписи «Путь к CAB-файлу» вставьте путь к файлу, например, «C:\CAB\update.cab». Сами кавычки тоже должны остаться!
- После выполнения команды перезагрузите ваш ПК.
Установка MSU-файлов
С ними всё немного проще. Их можно установить, даже просто кликнув на них два раза. Но существует способ сделать это и через консоль.
- Нажмите Win + S.
- Введите слова Командная строка.
- Кликните по результату поиска правой клавишей мыши и нажмите Запустить от имени администратора.
- Введите следующую команду и нажмите Enter:
wusa.exe «Путь к MSU-файлу» - В кавычках вместо надписи «Путь к MSU-файлу» вставьте путь к файлу, например, «C:\MSU\update.msu». Сами кавычки тоже должны остаться!
- После выполнения команды перезагрузите ваш ПК.
Как видите, всё довольно просто. Теперь вы умеете устанавливать CAB и MSU файлы.
Обновления для операционной системы Windows выпускаются в виде файлов с расширением MSU или CAB. Если на компьютере не работает (отключена) служба Windows Update (Центр обновления Windows), вы можете скачать и установить накопительные обновления или обновления безопасности Windows вручную. В этой статье мы покажем, как скачать и установить в Windows обновления в формате MSU и CAB файлов.
Содержание:
- Как вручную скачать MSU файлы обновлений для Windows?
- Установка обновлений из MSU файлов в Windows
- Как извлечь CAB файл из MSU обновления?
- Установка CAB файла обновлений в Windows 10/11
- Установка CAB и MSU обновления с помощью скриптов
Как вручную скачать MSU файлы обновлений для Windows?
Microsoft выпускает обновления и патчи в формате CAB файла. Именно в таком виде ваш компьютер получает обновления с серверов обновлений Microsoft или локального сервера WSUS. Для более удобного ручного распространения отдельных обновлений клиентами через каталог обновлений Microsoft, такие CAB файлы упаковываются в специальный формат MSU (Microsoft Update Standalone Package).
Вы можете скачать MSU файлы обновлений Windows (а в некоторых случаях и CAB) и других продуктов MSFT можно в каталоге обновлений Microsoft (https://www.catalog.update.microsoft.com/). Перейдите в Microsoft Update Catalog, найдите и скачайте нужное обновление. К примеру, я хочу установить обновление стека 2022-05 Servicing Stack Update for Windows 10 Version 21H2 for x64-based Systems (KB5014032). Нажмите на кнопку Download.

Переместите скачанный файл ssu-19041.1704-x64_70e350118b85fdae082ab7fde8165a947341ba1a.msu в каталог C:\temp. Переименуйте файл на более короткое имя — windows10-21h2-kb5014032.msu.
Установка обновлений из MSU файлов в Windows
Для запуска установки пакета обновления в Windows достаточно дважды щёлкнуть по скачанному MSU файлу. Если обновление применимо к данному компьютеру, откроется диалоговое окно Автономного установщика обновлений Windows (Windows Update Standalone Installer), в котором нужно подтвердить установку апдейта.
При установке MSU обновления может появится ошибка “Обновление неприменимо к этому компьютеру”. Причины этой ошибки подробно разобраны в статье по ссылке.
Также вы можете установить msu пакет обновления из командной строки с помощью утилиты wusa.exe.
Для установки обновления в «тихом» режиме (пользователю не будут показываться никакие всплывающие окна) с отложенной перезагрузкой, откройте командную строку с правами администратора и выполните команду:
wusa.exe c:\Temp\windows10-21h2-kb5014032.msu /quiet /norestart
Через некоторое время проверьте, что обновление успешно установлено:
wmic qfe list | findstr 5014032
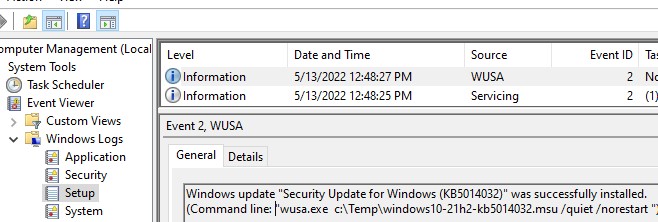
Или найдя в журнале событий Установка (Event Viewer -> Windows Logs -> Setup) запись с Event ID 2 от источника WUSA с текстом:
Windows update "Security Update for Windows (KB5014032)" was successfully installed. (Command line: "wusa.exe c:\Temp\windows10-21h2-kb5014032.msu /quiet /norestart ")
Обновление Windows "Security Update for Windows (KB5014032)" было успешно установлено. (Командная строка: C:\Windows\system32\wusa.exe c:\Temp\windows10-21h2-kb5014032.msu /quiet /norestart)
Обратите внимание, что установка обновлений в msu формате в Windows через wusa.exe выполняется медленнее, чем при установке того же обновления в виде cab файла. Причина в выполнении дополнительного сканирования на серверах Windows Update/WSUS. См статью о медленной установке msu обновлений.
Как извлечь CAB файл из MSU обновления?
Если служба Windows Update (wuausrv) работает некорректно, вы не сможете установить обновление из MSU файла. В этом случае можно вручную распаковать пакет MSU, извлечь из него CAB файл обновления и вручную установить его в Windows.
Чтобы распаковать MSU пакет в каталог C:\Temp\kb4056887 (каталог нужно предварительно создать), выполните следующую команду:
expand -f:* “C:\Temp\windows10.0-kb4056887-x64.msu” C:\Temp\kb4056887
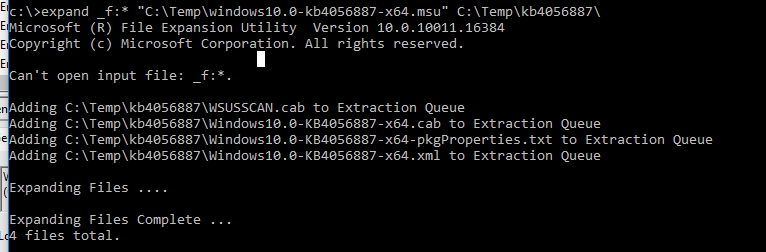
Microsoft (R) File Expansion Utility Version 10.0.10011.16384
Copyright (c) Microsoft Corporation. All rights reserved.
Adding C:\Temp\kb4056887\WSUSSCAN.cab to Extraction Queue
Adding C:\Temp\kb4056887\Windows10.0-KB4056887-x64.cab to Extraction Queue
Adding C:\Temp\kb4056887\Windows10.0-KB4056887-x64-pkgProperties.txt to Extraction Queue
 Adding C:\Temp\kb4056887\Windows10.0-KB4056887-x64.xml to Extraction Queue
Expanding Files ....
Expanding Files Complete ...
4 files total.
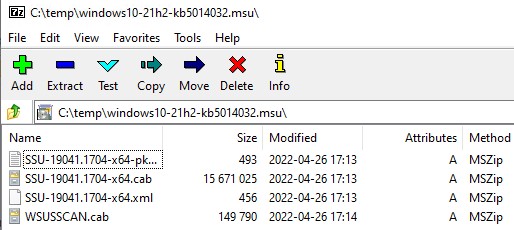
Как вы видите в каталоге появилось 4 типа файлов:
- .xml файл (Windows10.0-KB4056887-x64.xml) — содержит метаданные пакета msu и используется программой Wusa.exe
- .cab файл (Windows10.0-KB4056887-x64.cab — один или несколько) – непосредственно архив с обновлением Windows
- *pkgProperties.txt файл (Windows10.0-KB4056887-x64-pkgProperties.txt)– содержит свойства пакета (дата выпуска, архитектура, тип пакета, ссылка на KB и т.д.)
Также вы можете открыть любой MSU файла с помощью утилиты 7-ZIP и извлечь из него CAB файл.
Установка CAB файла обновлений в Windows 10/11
Вы можете установить CAB файл обновления в Windows двумя способами.
Наиболее универсальный способ установки обновления из CAB файл – утилита DISM.exe. Команда установки может быть такой:
DISM.exe /Online /Add-Package /PackagePath:c:\Temp\kb4056887\Windows10.0-KB4056887-x64.cab
Deployment Image Servicing and Management tool
Version: 10.0.10240.16384
Image Version: 10.0.10240.16384
Processing 1 of 1 - Adding package Package_for_KB4056887~31bf3856ad364e35~amd64~~10.0.1.0
[==========================100.0%==========================]
The operation completed successfully.
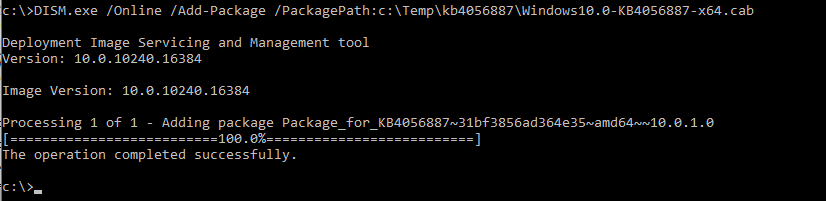
Примечание. Обратите внимание, как быстро происходит установка пакета через DISM по сравнению со скоростью установки обновления из MSU файла.
Если нужно установить CAB пакет в тихом режиме и подавить запрос на перезагрузку компьютера после установки обновления, команда DISM будет такой:
start /wait DISM.exe /Online /Add-Package /PackagePath: c:\Temp\kb4056887\Windows10.0-KB4056887-x64.cab /Quiet /NoRestart
Команда DISM.exe /Add-Package позволяет установить и MSU обновление (поддерживается только установка в офлайн образ Windows). Также вы можете в параметре
/PackagePath
указать путь к каталогу, в котором хранятся MSU и CAB файлы обновлений. DISM рекурсивно просканирует указанные каталог и вложенные папки и установит в образ Windows все найденные CAB и MSU пакеты.
Здесь нужно отметить, что команда DISM.exe /Add-Package не проверяет зависимости и требования к окружению при добавлении CAB файла в образ Windows (в отличии от wusa.exe которая предварительно проверяет, применимо ли MSU обновление к компьютеру.
Для установки CAB файлов в образ Windows вместо команды DISM /Add-Package можно использовать PowerShell командлет
Add-WindowsPackage -Online -PackagePath "C:\win10_kb123456.cab"
В Windows 8 и Windows 7 можно установить обновление с помощью менеджера пакетов Pkgmgr. Команда:
start /w Pkgmgr /ip /m:c:"c:\Temp\kb4056887\Windows-KB123456.cab"
Примечание. В Windows 10 / Windows Server 2016 менеджер пакетов PkgMgr.exe более не поддерживается. При его запуске появляется предупреждении о необходимости использовать для управления пакетами DISM.exe.
Note: The PkgMgr.exe has been deprecated. Please update your scripts to use dism.exe to extract, install, uninstall, configure and update features and packages for Windows.

Примечание. Обратите внимание, что языковые пакеты Windows (MUI) также распространяются в формате CAB. Однако не получиться использовать для их установки команду DISM. Вместо этого, для установки новых языков в систему нужно использовать отдельную утилиту lpksetup.exe.
Вы можете добавить в контекстное меню File Explorer контекстное меню для установки CAB файлов. Для этого добавьте следующие *.reg файл в реестр:
Windows Registry Editor Version 5.00
[-HKEY_CLASSES_ROOT\CABFolder\Shell\RunAs]
[HKEY_CLASSES_ROOT\CABFolder\Shell\RunAs]
@="Install"
"HasLUAShield"=""
[HKEY_CLASSES_ROOT\CABFolder\Shell\RunAs\Command]
@="cmd /k dism /online /add-package /packagepath:\"%1\""
Теперь для установки CAB файла нужно выбрать пункт Install в контекстном меню.
Установка CAB и MSU обновления с помощью скриптов
Если вам нужно установить сразу несколько CAB или MSU обновлений на компьютере, вы можете использовать BAT и PowerShell скрипты. Благодаря таким скриптам вам не придется по ставить обновления вручную по одному.
Создайте на диске каталог с обновлениями и скопируйте в него все MSU файлы, которые нужно обновить. Теперь для установки всех обновлений из указанного каталога, достаточно запустить скрипт install_msu.bat:
Set Folder="C:\updates"
for %%f in (%Folder%\*.msu) do (
 wusa.exe %%f /quiet /norestart
)
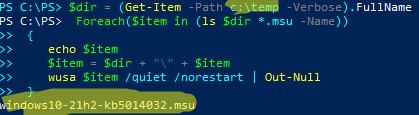
По аналогии можно использовать PowerShell скрипт для установки MSU обновлений из указанной папки:
$dir = (Get-Item -Path c:\temp -Verbose).FullName
Foreach($item in (ls $dir *.msu -Name))
{
 echo $item
 $item = $dir + "\" + $item
 wusa $item /quiet /norestart | Out-Null
}
Данная инструкция по ручной установке накопительных (если вы не помните что это такое, прочитайте статью про новую модель обновлений Windows систем) и любых других обновлений Windows применима ко всем поддерживаемым версиям ОС: Windows 11/10/8.1 и Windows Server 2022/2019/2016/2012R2.
Have you ever thought of downloading the Windows 10 updates manually and later installing them on your PC? Well, you can easily do this no matter which error you are receiving on your computer. The Update Catalog is an official site by Microsoft wherein developers put all the latest cumulative updates date-wise. In this post, we will discuss the correct way to manually download and install Windows 10 updates on your computer.
Though Windows Update is sufficient to download the pending updates on your PC, this may sometimes fail on an arbitrary error code. It doesn’t matter which solution you try, the error will never fade away. In all such scenarios, downloading the relevant standalone package becomes an essential process.
Since this package exists in “.msu” file format, just double-click on this setup file and the update starts installing on your Windows 10 PC. This method becomes very important if you have intentionally disabled automatic updates of Windows 10 on your computer.
Through this channel, you may download standalone packages of different kinds. A few examples include Security Patches, Servicing Stack Updates, Optional updates, and many others. Let’s learn how to perform this task on Windows 10 PC.
How to manually install Windows 10 updates
If Windows 10 updates fail at download or while installing, you may get its standalone package by visiting Microsoft’s Update Catalog. Once you have the required setup file, double-click on it to upgrade your system. Here’s how to manually download and install the pending updates on your PC –
- First of all, you need to know the latest KB number corresponding to a failed cumulative update.
- To get this info, visit the Windows 10 Update History page.
- On the left pane, click the top link under the “In this Release“ section. See the Snapshot below –
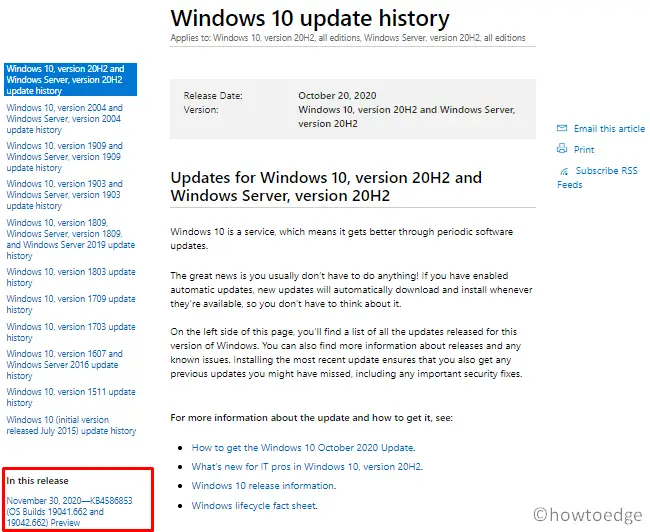
- Head over to the right side and copy the patch number starting with “KB”.
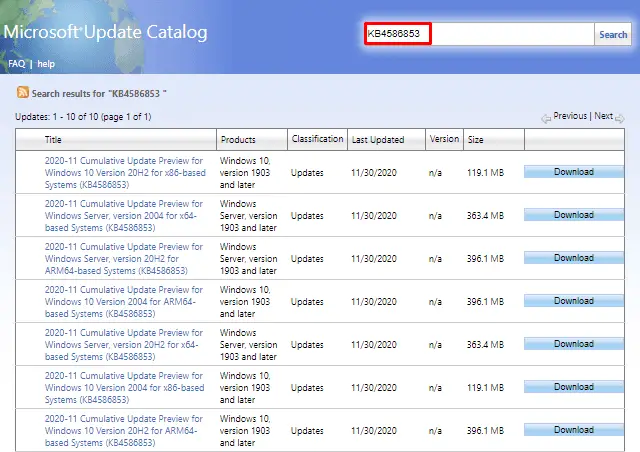
- Now that you have noted down the CU number, visit Microsoft Update Catalog.
- Paste the copied number in the search bar and press Enter.

- You may now see all the updates starting with the typed-in number.
- Pick the one that matches your system architecture and hit the Download button.
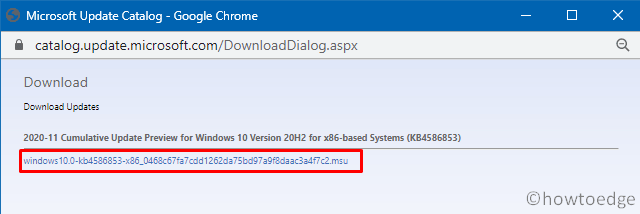
- Hit the top link to start downloading the standalone package in the .msu file format.
- When the download completes, open the folder containing this file, and double-click on the setup file.
Note: Your system may restart several times during the update process. Nothing to worry about, just wait for this process to finish. Once over, you may start using your computer.
-
Home
-
Clone Disk
- [Tutorial] How to Download & Install Windows 10 Updates Manually
By Ariel | Follow |
Last Updated
Sometimes you may need to download Windows 10 updates manually due to some reason. How to manually download and install Windows 10 updates? Now, you can get a complete guide from this post of MiniTool.
As it’s well known to us, Microsoft release Windows updates that include new security features and bug fixes regularly. Usually, these updates are downloaded and installed automatically if you haven’t disabled the Windows Automatic Update.
Sometimes, however, if you encounter some issues that require the latest updates to fix, you need to manually download Windows 10 updates. How to do that? Let’s keep reading the following content.
What You Need to Do Before Installing Windows 10 Updates
Before you manually install Windows 10 updates, you need to know something important. Here we summarize them as follows.
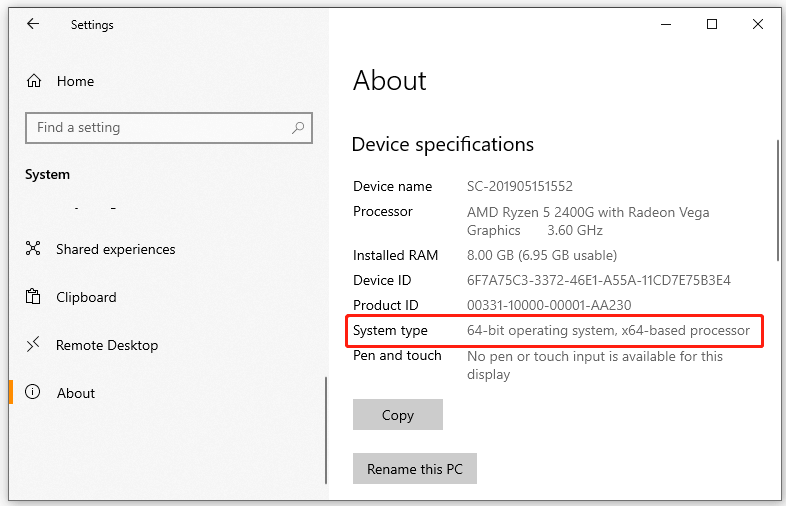
Check Your Windows Build and Version
First of all, you should check your system type is 32-bit or 64-bit that you download the right version of Windows updates. If you don’t know how to check that, follow the quick guide below:
Step 1. Press Win + I keys to open the Settings window and navigate to the System section.
Step 2. In the Settings window, select About from the left vertical pane and check the System type from the right pane.
Check the Latest Updates Installation on Your PC
In addition, you need to find the latest update dates you installed on your PC. Here’s how to do that:
Step 1. Open the Settings window again and navigate to the Update & Security section.
Step 2. With the Windows Update option selected from the left pane and click on View update history from the right pane.
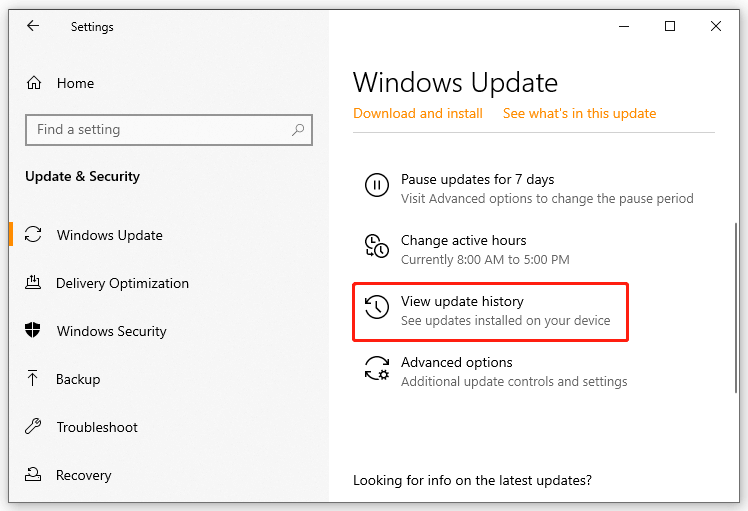
Step 3. Now, you can find the latest updates you installed on the computer. In my case, the latest update is Windows 10 version 20H2 for x64-based systems KB5009543.

How to Download and Install Windows 10 Updates Manually
In most cases, we can install Windows updates by clicking on Check for updates in the Settings window. However, sometimes these updates fail to install and throw various update errors like 0x80040154, 0x80073712, and so on. So, you may need to download Windows 10 updates manually. How to manually download Windows 10 updates and install them? Let’s try the following 2 methods.
Tip: Here we take downloading Windows 10 21H2 updates manually for example.
# 1. Download Windows 10 Updates Manually from Microsoft Update Catalog
Step 1. Click here to open the Microsoft Update Catalog website and do a search for the updates you want to install. Here we take Windows 10 21H2 for example. Type Windows 10 21h2 in the Search box and click on Search.
Step 2. Now, you can see a list of Windows 10 21H2 Cumulative Updates. Here you need to determine the correct update package based on your system type. Once confirmed, click on Download. In my case, I should download the Windows 10 Version 21H2 x64-based Systems (KB501079).

Step 3. Then a pop-up window with a direct download link will appear, click the link to download the .msu file.
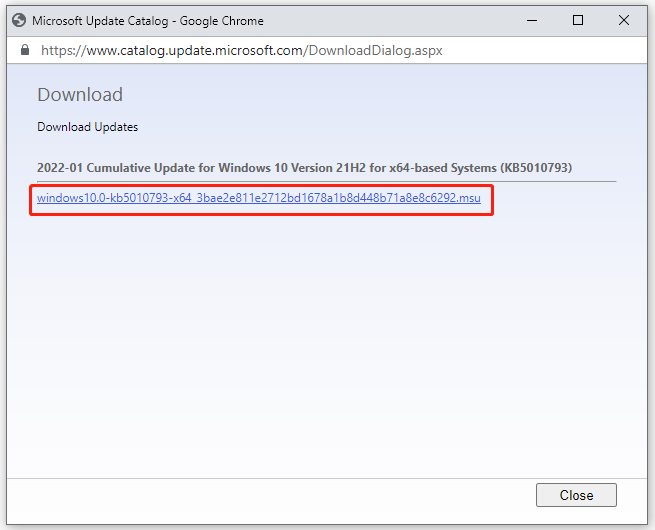
Step 4. Once downloaded, double click the .msu file and follow the on-screen prompts to manually install Windows update.
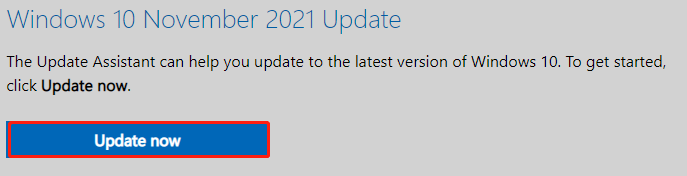
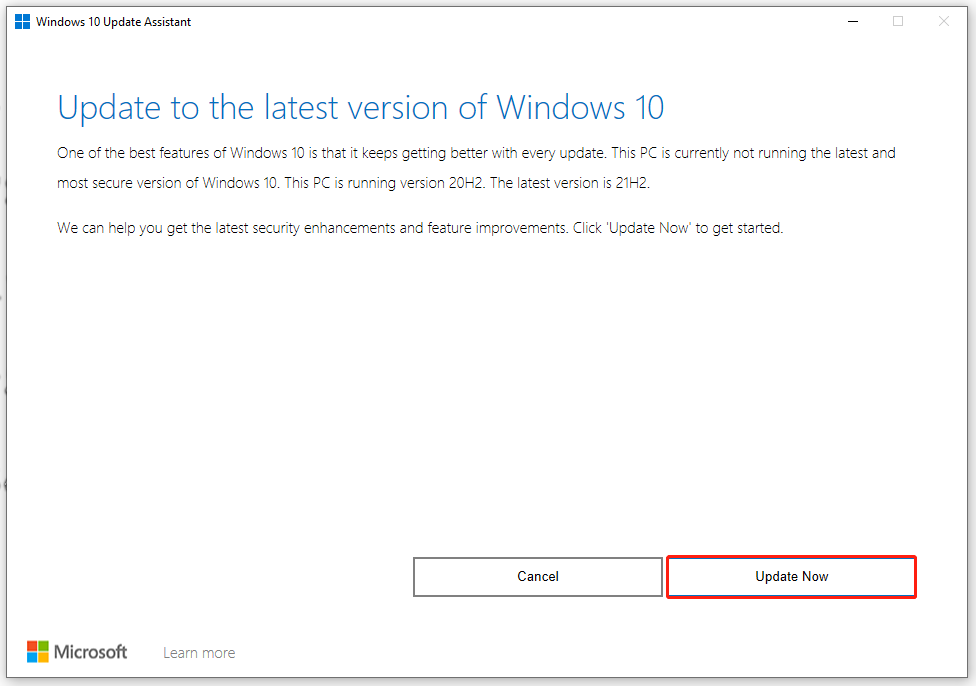
# 2. Download Windows 10 Updates Manually via Windows 10 Update Assistant
Step 1. Click here to open the Windows 10 software download page and click on Update now under the Windows 10 November 2021 Update section.
Step 2. Once downloaded, double click the Update Assistant tool and click on Yes in the UAC window to access this tool.
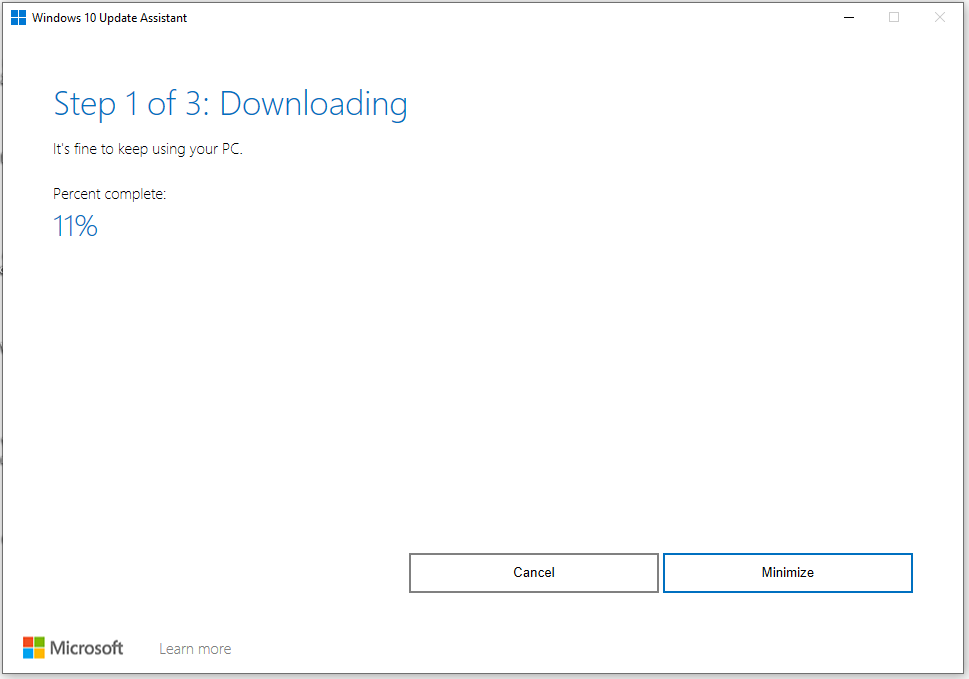
Step 3. Click on Update Now to start downloading the Windows 10 21H2 update.
This process may take you a while, so please wait for it to complete patiently.
How to manually update Windows 10? The top 2 methods have been illustrated. Now, it’s your turn to have a try.
About The Author
Position: Columnist
Ariel has been working as a highly professional computer-relevant technology editor at MiniTool for many years. She has a strong passion for researching all knowledge related to the computer’s disk, partition, and Windows OS. Up till now, she has finished thousands of articles covering a broad range of topics and helped lots of users fix various problems. She focuses on the fields of disk management, OS backup, and PDF editing and provides her readers with insightful and informative content.
Are you frequently encountering challenges while attempting to install MSU files on your Windows 10 system? Fret not, as we have a comprehensive step-by-step guide designed to simplify the entire installation process for you. Understanding how to properly install MSU files is crucial in ensuring smooth operation and compatibility with your Windows 10 OS.
In this article, we will walk you through each stage of the installation process in a clear and concise manner, providing essential insights and tips that will empower you to successfully install MSU files with confidence. By following our detailed instructions, you will be equipped to streamline your installation experience and effectively manage MSU files on your Windows 10 system.
Key Takeaways
To install MSU files on Windows 10, simply double-click the MSU file to run the Windows Update Standalone Installer. Follow the on-screen instructions to complete the installation process. Alternatively, you can use the command prompt by opening it with administrator rights and typing “wusa
” to install the MSU file silently.
Understanding Msu Files
MSU files, also known as Microsoft Update Standalone Package files, are used to deliver updates and patches for the Windows operating system. These files come in a format that includes all the necessary files and resources needed for the installation process. Understanding MSU files is crucial for Windows 10 users looking to stay up to date with system enhancements and security fixes.
When you download an MSU file, you essentially have a standalone installer that contains all the components required to apply the update. This eliminates the need for an active internet connection during the installation process and ensures that the update is applied correctly. MSU files are particularly useful for offline installations or when multiple systems need to be updated without relying on Windows Update.
With MSU files, users can manually install updates or patches, providing more control over the update process. By understanding how MSU files work and how to install them on Windows 10, users can ensure their systems are running smoothly and securely with the latest enhancements and fixes offered by Microsoft.
Preparing Your Windows 10 System
Before installing MSU files on Windows 10, it is crucial to prepare your system to ensure a smooth installation process. Start by running Windows Update to ensure your operating system is up to date with the latest patches and updates. This step is crucial to avoid any compatibility issues that may arise during the installation of MSU files.
Next, make sure you have administrative privileges on your Windows 10 system to install the MSU file successfully. Admin permissions are necessary to make system-level changes required for the installation process. Additionally, it is recommended to create a backup of your important files and data before proceeding with the installation to safeguard against any potential data loss that may occur during the process.
Taking the time to prepare your Windows 10 system before installing MSU files can help prevent common installation issues and ensure a trouble-free experience. By following these preparation steps, you can set the stage for a successful installation process and maximize the efficiency of your Windows system.
Downloading The Msu File
When downloading MSU files for Windows 10, it is crucial to ensure that you obtain the file from a reputable source to avoid any potential security risks. Typically, MSU files are distributed by Microsoft or trusted software vendors. Visit the official website of the software provider or Microsoft’s official download center to acquire the necessary MSU file for installation.
Once you have located the correct MSU file, click on the download link provided on the website. Ensure that you save the file to a location on your computer where you can easily access it later during the installation process. It is recommended to download the MSU file directly to your desktop or a designated folder for better organization.
Before proceeding with the installation, verify that the downloaded MSU file is not corrupted or incomplete. You can perform a quick check by comparing the file size of the downloaded MSU file with the size indicated on the download page. If the file size matches, you can proceed confidently with the installation process on your Windows 10 system.
Running The Installation Process
To run the installation process for an MSU file on Windows 10, you have two primary methods: using the Windows Update Standalone Installer (WUSA) or executing the installation directly from the Command Prompt. The easiest way is to double-click on the MSU file, which will automatically launch the Windows Update Standalone Installer. Follow the on-screen prompts to complete the installation process, and then restart your computer if prompted to do so.
Alternatively, you can run the installation from the Command Prompt by typing ‘wusa.exe FileName.msu’ (replace ‘FileName’ with the name of your MSU file) and pressing Enter. This method provides more control and allows for additional command-line options if needed. After the installation command is executed, the update will be installed, and you will see a completion message once it’s done. Be sure to restart your system after the installation to ensure the updates take effect.
Remember to ensure that you have administrative privileges when running the installation process to avoid any permission-related issues. Following these steps will help you smoothly run the installation process for MSU files on Windows 10, keeping your system up-to-date and running efficiently.
Troubleshooting Common Installation Issues
Encountering common installation issues can be frustrating when installing MSU files on Windows 10. One prevalent problem is insufficient disk space, which can halt the installation process. To troubleshoot this, free up disk space by deleting unnecessary files or programs and then attempt the installation again.
Another frequently encountered issue is compatibility errors. Ensure that the MSU file you are trying to install is compatible with your version of Windows 10. If not, seek out the correct version or update your operating system to match the file requirements. Additionally, administrative permissions are crucial for successful installation. Make sure you have the necessary permissions to install software on your system to avoid any authorization-related glitches.
Moreover, network connectivity problems can also hinder the installation process. Check your internet connection and ensure it is stable before attempting to install the MSU file. Troubleshooting these common installation issues can streamline the process and help you successfully install MSU files on Windows 10.
Verifying Successful Installation
After the installation process is complete, it is essential to verify that the MSU file has been successfully installed on your Windows 10 system. To verify the successful installation, you can check if the software or update associated with the MSU file is functioning as expected. Open the program or feature that the MSU file was meant to install and ensure that it is running properly without any errors or issues.
Another way to verify the successful installation of an MSU file is to check the Windows Update history. Navigate to the Windows Update section in the Settings menu and review the update history to confirm that the MSU file has been installed without any errors or failures. Look for the specific update KB number associated with the MSU file to ensure that it has been successfully applied to your system.
By following these steps to verify the successful installation of an MSU file on Windows 10, you can ensure that the software or update is correctly installed and functioning as intended on your system. This verification process helps in confirming that the MSU file has been applied without any issues, providing you with a seamless user experience.
Managing Installed Msu Files
Once you’ve successfully installed an MSU file on Windows 10, it’s essential to understand how to manage these files for efficient system maintenance. To manage installed MSU files effectively, you can utilize the built-in “Programs and Features” utility in Windows 10. This utility allows you to view a list of all installed programs and updates, including MSU files.
Within the “Programs and Features” utility, you can uninstall MSU files by simply selecting the file and choosing the uninstall option. This can help free up disk space and ensure your system remains clutter-free. Additionally, you can use this feature to check for any installed MSU file updates or to repair existing installations if needed.
Regularly managing your installed MSU files is crucial for maintaining system stability and performance. By utilizing the tools available in Windows 10, you can easily oversee and control these files, ensuring your system runs smoothly and efficiently over time.
Tips For Optimizing Msu File Installations
When optimizing MSU file installations on Windows 10, it’s essential to ensure system performance and stability. To start, always check for software updates and patches before installing MSU files to prevent compatibility issues. Additionally, consider freeing up disk space on your device to allow for smooth installation processes.
Moreover, closing unnecessary applications and background processes can improve the installation speed and reduce the likelihood of errors during the process. It’s also recommended to run a disk cleanup and defragmentation before installing MSU files to enhance system efficiency and avoid potential conflicts. Following these optimization tips can help streamline the MSU file installation process and ensure a hassle-free experience on your Windows 10 system.
Frequently Asked Questions
What Is An Msu File And How Is It Different From Other Installation Files?
An MSU file is a Microsoft Update Standalone Package used to distribute updates and patches for Microsoft Windows operating systems and software. It contains updated files and information related to a specific software update. Unlike traditional installation files like EXE or MSI, MSU files are specifically designed for system updates and are typically applied through Windows Update or the standalone Windows Update Installer. MSU files are more streamlined and targeted towards system-wide updates, while EXE files are typically used for application installations and have a wider range of functionalities.
Can Msu Files Be Installed On All Versions Of Windows 10?
No, MSU files can be installed on all versions of Windows 10. MSU files are Windows Update Standalone Installer packages used for updating Windows operating systems. They can be installed on Windows 10 Home, Pro, Education, and Enterprise editions as long as the update is compatible with the specific version and architecture of the Windows operating system.
How Do I Download An Msu File For Installation On Windows 10?
To download an MSU file for installation on Windows 10, you can simply navigate to the official Microsoft Update Catalog website and search for the specific update you need. Once you’ve found the desired MSU file, click on the download button to save it to your computer. After the download is complete, you can double-click on the MSU file to initiate the installation process on your Windows 10 system.
Are There Any Specific System Requirements Needed To Install Msu Files On Windows 10?
To install MSU files on Windows 10, you do not need any specific system requirements beyond what is already needed to run the operating system. MSU files are Microsoft Update Standalone Package files used for updating Windows components. As long as your system meets the basic requirements to run Windows 10, you should be able to install MSU files without any additional specifications. Simply ensure that your Windows 10 installation is up to date and has the necessary administrative privileges to install these update packages.
What Steps Do I Need To Follow To Successfully Install An Msu File On Windows 10?
To install an MSU file on Windows 10, first, download the MSU file from a trusted source. Then, simply double-click on the downloaded MSU file to initiate the Windows Update Standalone Installer. Follow the on-screen instructions to complete the installation process. If prompted, restart your computer to apply the changes from the MSU file installation.
Conclusion
In simplifying the process of installing MSU files on Windows 10, this step-by-step guide has provided users with a comprehensive and user-friendly approach to ensure a seamless installation experience. By breaking down each step and offering clear instructions, users can confidently navigate through the process with ease and efficiency. Embracing this guide empowers users to optimize their Windows 10 system by incorporating essential updates and enhancements through MSU files effortlessly.
Mastering the installation of MSU files not only streamlines the update process but also enhances the functionality and performance of Windows 10 for a smoother user experience. By leveraging the insights and instructions outlined in this guide, users can embark on a journey towards maximizing the potential of their operating system, promoting productivity, security, and overall system efficiency with each successful installation.