
Если зайти в оснастку управления дисками современной операционной системы Windows, например такой как Windows 11, то можно увидеть, что системный диск разбит довольно своеобразным образом.
Сразу за разделом с операционной системой стоит так называемый раздел восстановления (Recovery Partition).

Что такое раздел восстановления и для чего он нужен?
Раздел восстановления Windows — это специальный раздел на системном диске, предназначенный для восстановления работоспособности операционной системы в случае проблем с загрузкой.
Раздел восстановления содержит в себе среду восстановления Windows (Windows RE), в которую входит набор инструментов для восстановления системы. В том случае если операционная система, по какой либо причине, не может загрузиться, вы можете загрузить компьютер в режиме восстановления и попытаться с помощью этих инструментов ее починить.

Раздел восстановления используется в Windows довольно давно, но изначально он размещался в начале диска, до операционной системы. Это позволяло без проблем расширять системный диск в случае необходимости. Однако при таком размещении разделов Windows не могла расширить раздел восстановления, когда системе не хватало места для необходимых данных, и создавала дополнительный раздел на диске, в результате чего в одной операционной системе могло быть несколько разделов восстановления.
Поэтому Microsoft рекомендует размещать раздел восстановления на системном диске, сразу после раздела с Windows. Это позволяет операционной системе изменять раздел, если для будущих обновлений потребуется больший по размеру образ для восстановления. А начиная с Windows версии 2004 при установке операционной системы раздел восстановления по умолчанию создается в конце системного диска, после раздела с операционной системой.
В результате подобного разбиения диска становится невозможно расширить системный раздел. Даже если на диске есть свободное место, использовать его не получится, поскольку этому мешает раздел восстановления. И это является большой проблемой, особенно для виртуальных машин, где расширение диска является стандартной операцией.
Для примера возьмем виртуальную машину с Windows Server 2022. Увеличим размер диска на 10ГБ, зайдем в оснастку управления дисками и попробуем расширить системный раздел. Как видите, это невозможно, поскольку между системным разделом и свободным местом находится раздел восстановления.

К счастью эту ситуацию можно исправить. Для начала откроем командную консоль и отключим восстановление командой:
reagentc /disable

При этом образ восстановления будет выгружен в файл Winre.wim и сохранен на диск, в папку C:\Windows\System32\Recovery.

Затем запускаем утилиту diskpart:
diskpart
выводим список дисков:
list disk
и выбираем системный диск, на котором должен находиться раздел восстановления:
sel disk 0

Затем выводим список разделов на выбранном диске:
list part
В полученном списке находим раздел восстановления и выбираем его:
sel part 4

Ну и наконец удаляем выбранный раздел:
del part override
и еще раз проверяем список разделов. Как видите, раздела восстановления больше нет.

Теперь заходим в оснастку управления дисками и видим, что свободное место доступно

и можно беспрепятственно расширить системный диск.

В принципе можно просто удалить раздел восстановления и занять все свободное дисковое пространство. На работу ОС это никак не повлияет, а при необходимости всегда можно загрузить режим восстановления с любого загрузочного диска или образа с дистрибутивом Windows.
А можно оставить немного свободного места (примерно 700-900МБ) и вернуть раздел на место, что мы и сделаем. Для этого на оставшемся месте создадим новый раздел

без буквы диска

с настройками по умолчанию. Обзовем его Recovery.

Теперь перейдем в свойства диска

и уточним тип таблицы размещения файлов — GPT или MBR.
Возвращаемся обратно в diskpart и выводим список разделов:
list part
Находим свежесозданный раздел и переходим на него:
sel part 4
теперь для диска GPT изменяем ID раздела, чтобы Windows опознала его как раздел восстановления:
set id=de94bba4-06d1-4d40-a16a-bfd50179d6ac
Дополнительно требуется скрыть диск и пометить его как обязательный раздел, для этого нам нужно установить атрибут GPT:
gpt attributes=0x8000000000000001
Если же диск MBR, то назначить раздел восстановления можно командой:
set id=27

Теперь подключаем обратно образ восстановления:
reagentc /enable

И проверяем его состояние:
reagentc /info

В итоге мы и системный диск расширили, и раздел восстановления сохранили.

Вот как то так 🙂
For some reason, you may need to move Windows recovery partition to a different place. How to do this? In this post, MiniTool Partition Wizard provides a detailed guide on Windows 11 or Windows 10 move recovery partition. You can follow it to move your partition.
What Is Windows Recovery Partition
The Windows recovery partition is a unique partition that is automatically created on the system disk when you install the Windows operating system. Generally, this partition just takes up several hundred MB of disk space, at least 300MB.
The Windows recovery partition is invisible in File Explorer as it has no drive letter. And in Disk Management, you can see it with only a Help option. That protects the partition from being changed or deleted accidentally.
It’s worth noting that the Windows recovery partition contains a copy of the operating system and system settings. Therefore, you can easily boot into Windows Recovery Environment (WinRE) and restore your system to factory settings when there is something wrong with the Windows OS.
Windows 10 Move Recovery Partition After Unallocated Space
Sometimes when trying to extend your system partition, you may fail because the recovery partition is in the way. As for this, you need to move the Windows recovery partition after the unallocated space. How to move recovery partition Windows 10/11?
Since the Windows built-in partition manager, Disk Management doesn’t support moving partitions, we’d like to recommend you use MiniTool Partition Wizard. It’s third-party professional disk partition software that allows you to move a partition with ease.
Additionally, it also enables you to partition/resize/clone a hard drive, format SD card FAT32/NTFS/exFAT, convert MBR to GPT and vice versa, recover data from hard drive, and more.
To move recovery partition Windows 11/10 with MiniTool Partition Wizard, simply follow the steps below.
Step 1: Download and install MiniTool Partition Wizard on your PC. Then launch it to get into the main interface.
MiniTool Partition Wizard FreeClick to Download100%Clean & Safe
Step 2: Right-click the recovery partition and then select Move/Resize from the context menu. Also, you can highlight the target partition and select Move/Resize Partition from the left action panel.
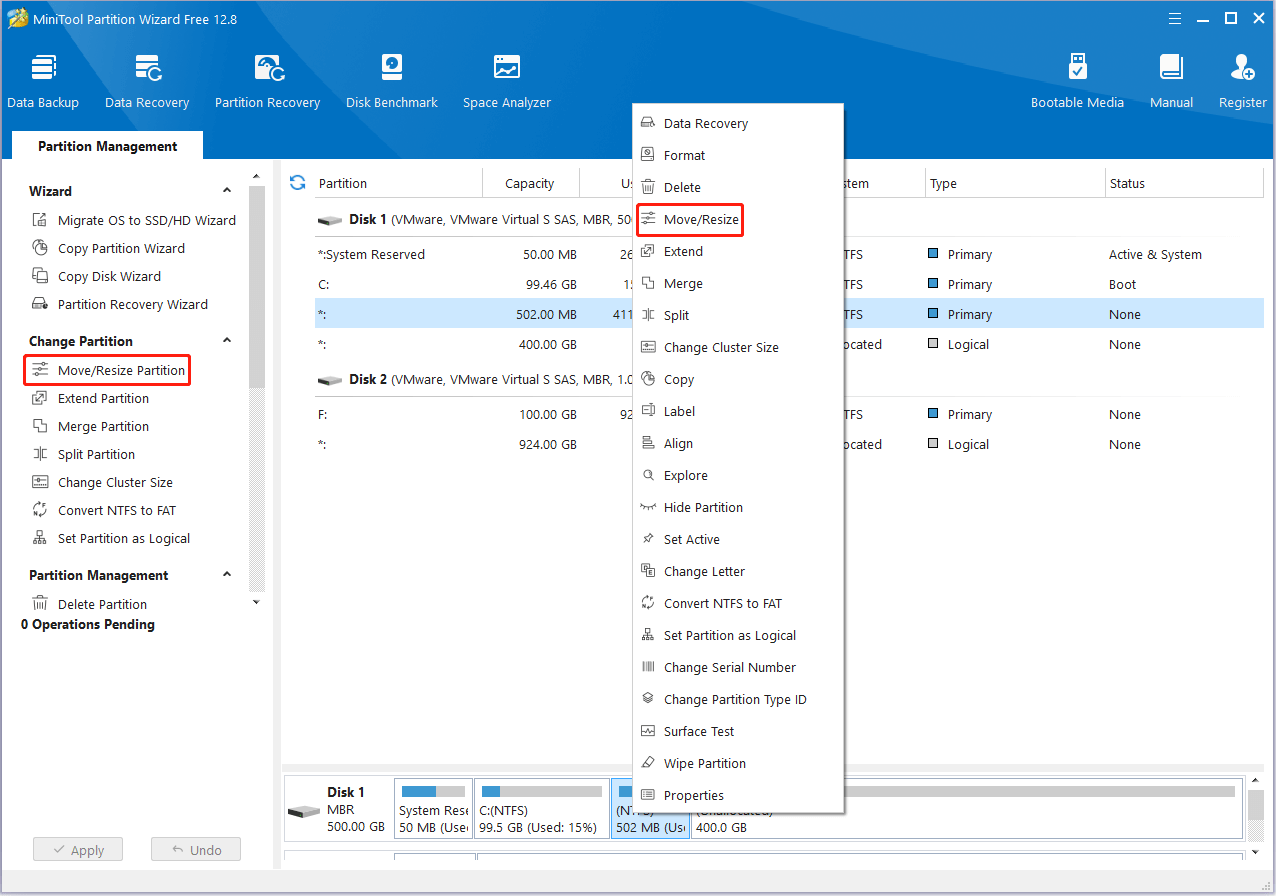
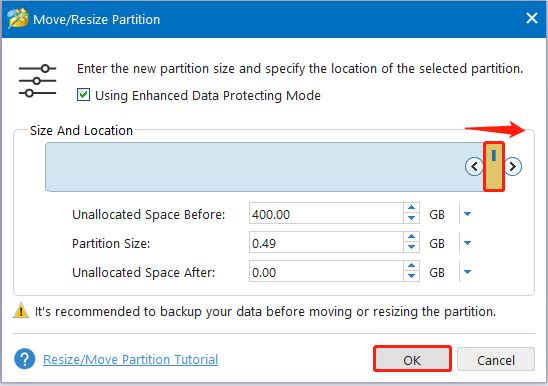
Step 3: In the pop-up window, drag the whole partition slider to the rightmost and click OK.
Tips:
You can also try to change the partition size by dragging the triangle handle. Here, we just do the Windows move recovery partition operation without resizing it.
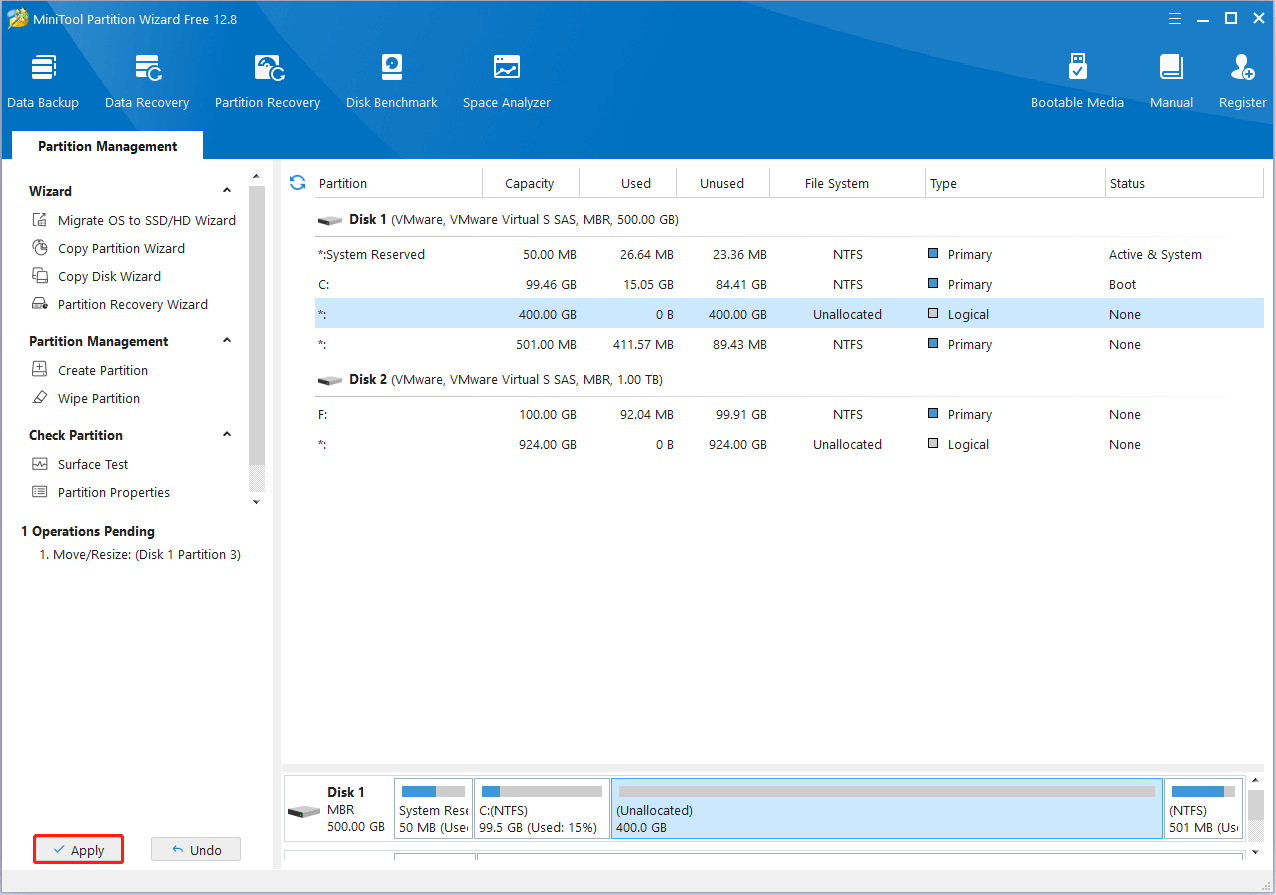
Step 4: Finally, click Apply at the bottom-left corner to save the pending change. When prompted, click Yes for confirmation.
For more information on the “extend system drive but Recovery Partition is in the way” issue, you can pay attention to this post: Windows 10 Can’t Extend Volume Recovery Partition in the Way.
Windows 10 Move Recovery Partition After Windows Partition
Many users report the Windows recovery partition on their system disk is the first partition with the Windows partition next, which prevents them from installing certain updates that require a larger recovery image.
If you have the same problem with Windows updates, you’d better move the Windows recovery partition after the Windows partition. By doing so, Windows can modify and recreate the partition efficiently while installing an update.
The following are details on how to move recovery partition Windows 10/11 after the Windows partition. You can follow them to move Windows recovery partition to the desired location.
Part 1: Shrink Windows Partition to Release Unallocated Space
First of all, you should shrink the Windows partition to get some unallocated space for the Windows recovery partition. You can complete the operation in either of the following ways.
Way 1: Use Disk Management
Step 1: Press the Windows and X keys at the same time to open the Start menu.
Step 2: Choose Disk Management from the context menu.
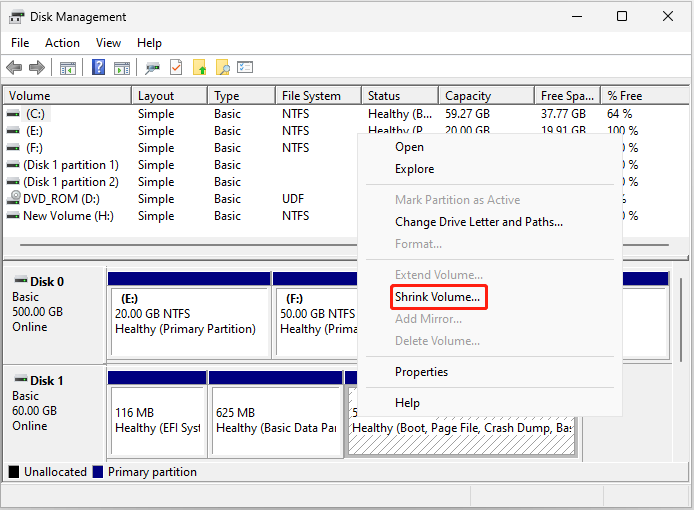
Step 3: Right-click the Windows partition and select Shrink Volume.
Step 4: After this tool queries the selected partition for available shrink space, you will enter the Shrink screen. Enter the amount of disk space to shrink in MB and click Shrink.
Tips:
Make sure the disk space you shrink is no smaller than the size of the Windows recovery partition.
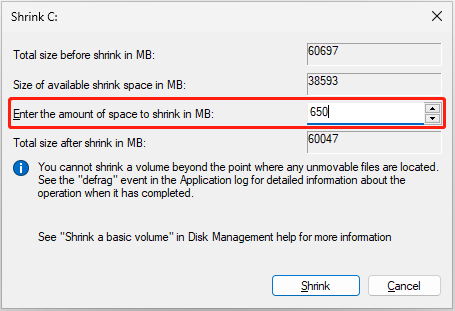
Step 5: After that, click the Shrink button to execute the operation.
Way 2: Use Diskpart
Step 1: Press Windows + R to open the Run dialog.
Step 2: Type cmd in the text box and then press Ctrl + Shift + Enter to open Command Prompt as an administrator.
Step 3: In the elevated Command Prompt, type diskpart and press Enter to access the Diskpart window.
Step 4: After that, type the following commands and then press Enter after each.
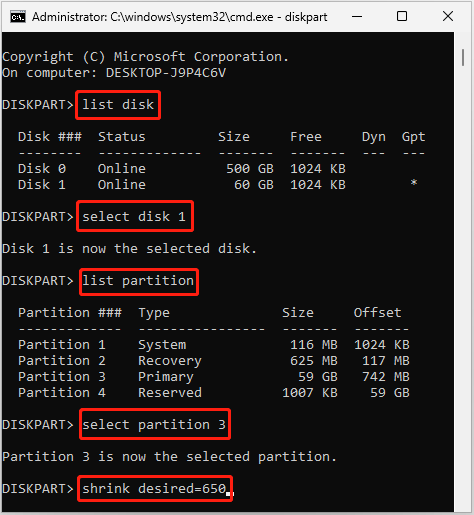
- diskpart
- list disk
- select disk 1 (Replace 1 with the number of your system disk)
- list partition
- select partition 3 (3 represents the number of your Windows partition)
- shrink desired=650 (You can replace 650 with the size in MB you want to shrink)
Step 5: Once done, type exit and press Enter to close Diskpart.
Part 2: Copy Recovery Partition to the Unallocated Space
After releasing enough unallocated space after the Windows partition, you can now help Windows move recovery partition to the unallocated space. To move Windows 10 recovery partition, MiniTool Partition Wizard comes here to help you again.
You can use MiniTool Partition Wizard to copy the Windows recovery partition to the unallocated space with a few clicks. Here’s how to do this.
Step 1: Download, install, and launch MiniTool Partition Wizard on your computer.
MiniTool Partition Wizard FreeClick to Download100%Clean & Safe
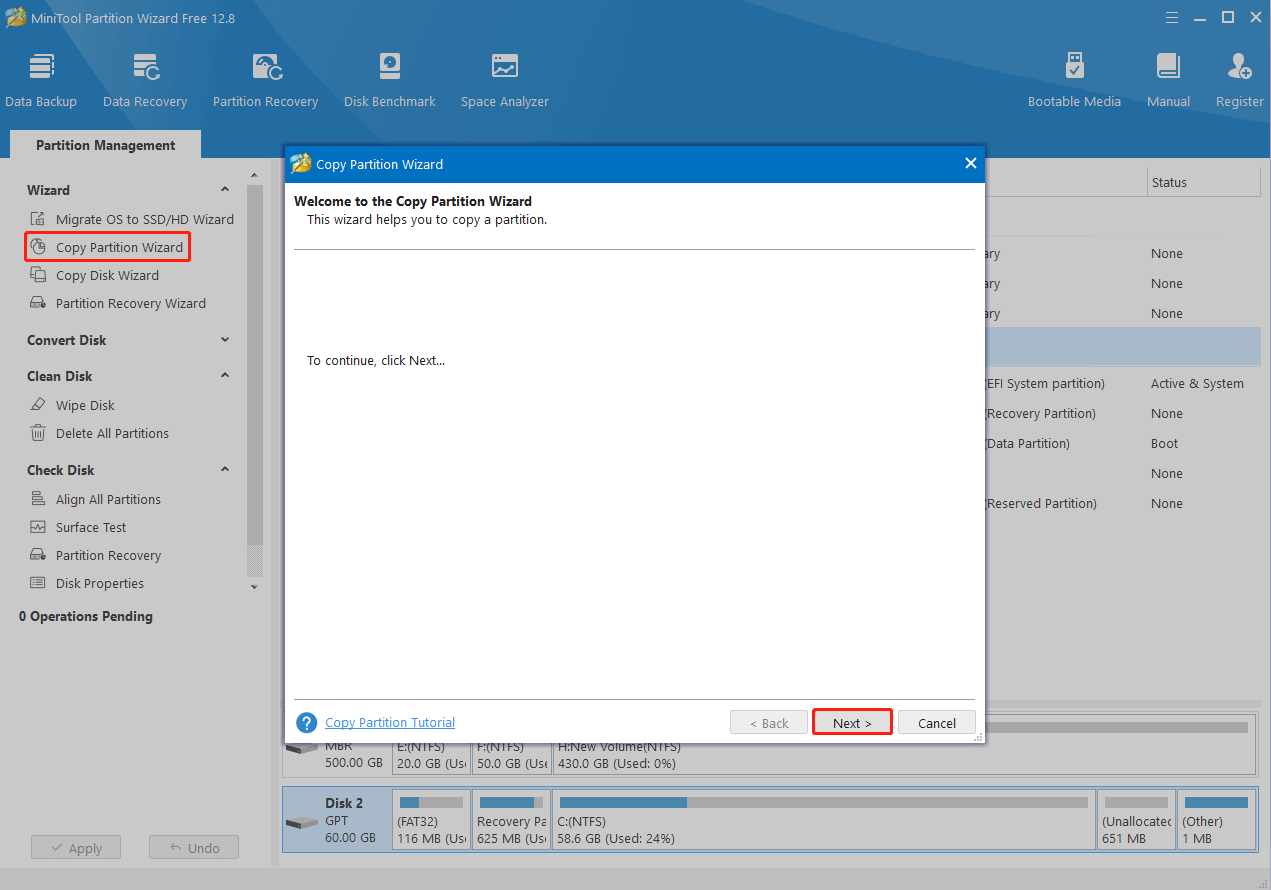
Step 2: In the main interface of this program, choose Copy Partition Wizard from the left action panel.
Step 3: In the Copy Partition Wizard window, click Next to continue.
Step 4: In the next window, select the recovery partition and click Next.
Step 5: Select the unallocated space you get through shrinking, and then click Next.
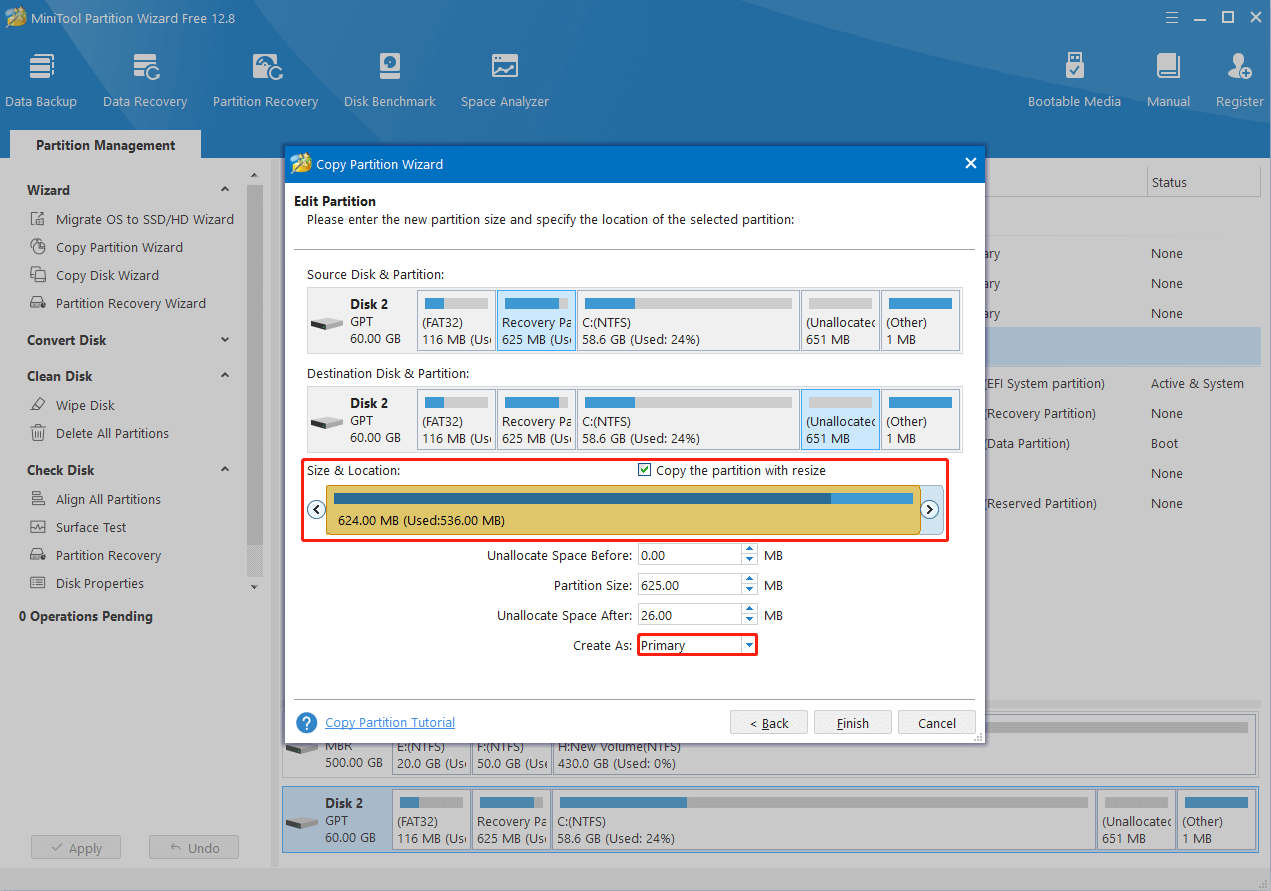
Step 6: After that, you can enter the new partition size and determine the location of the copied partition. Then choose Primary in the Create As section.
Step 7: Once you finish setting everything according to your needs, click Finish.
Step 8: When back to the main interface, right-click the original recovery partition and select Delete.
Step 9: At last, don’t forget to click Apply to execute these operations.
Recommended article: Can I Delete Recovery Partition in Windows 7/8/10 for Further Use
Part 3: Make the Cloned Partition Recovery Partition
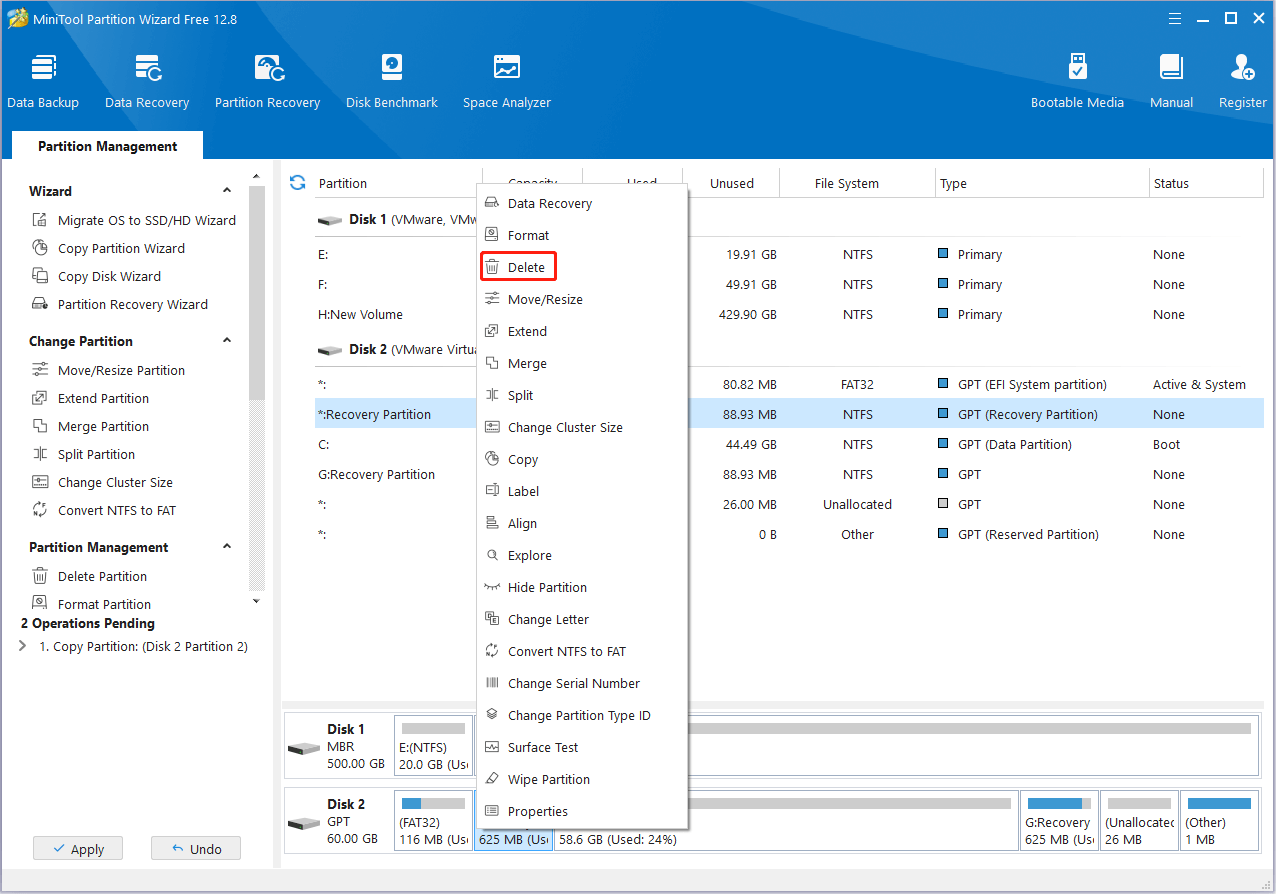
You need to make some changes to the cloned recovery partition so that it can show the same and work well as the original one. Removing its drive letter to hide it from File Explorer and setting the correct Type ID to it are two of the most important things to do. You can finish them with the given guide.
Step 1: Access the main interface of MiniTool Partition Wizard.
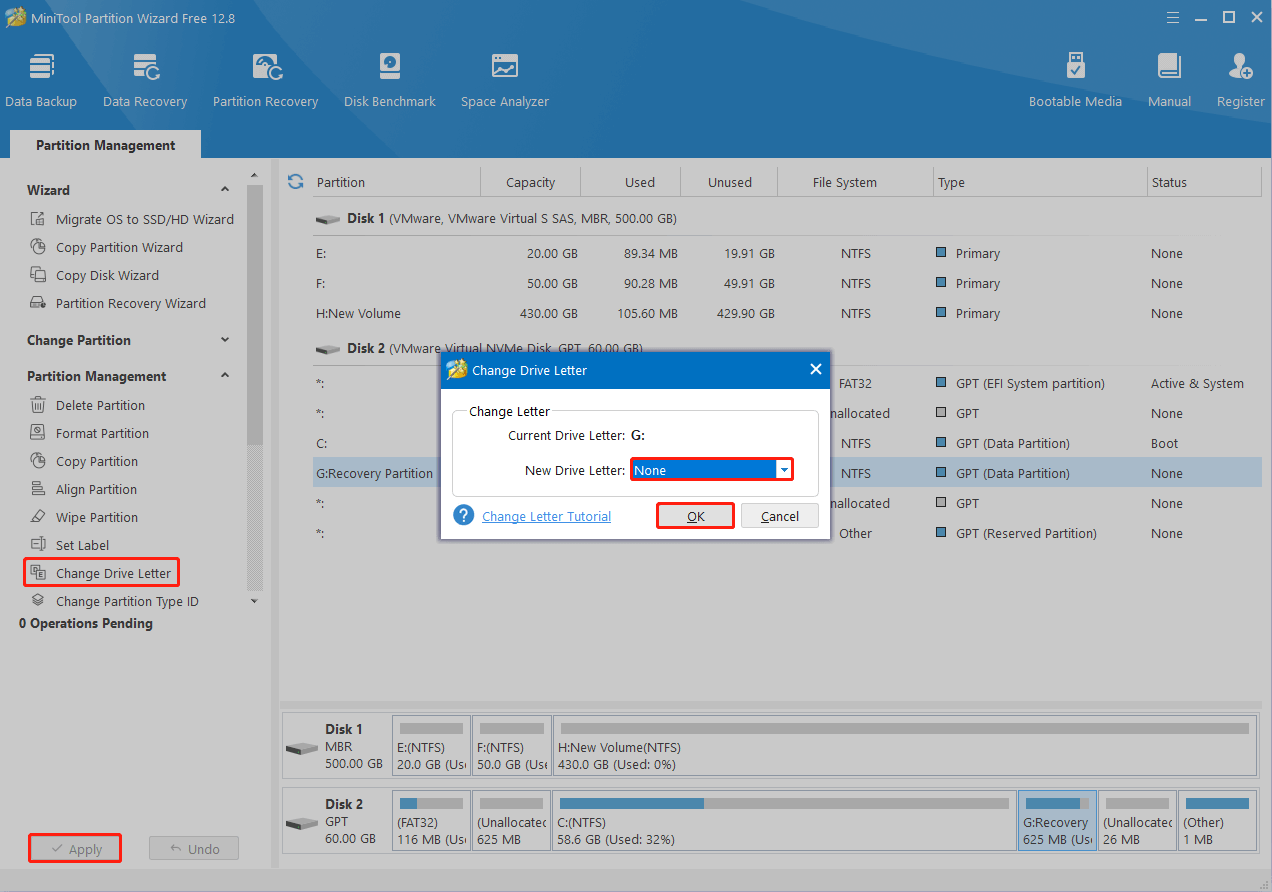
Step 2: Highlight the new recovery partition and then select Change Drive Letter from the left side.
Step 3: Choose None from the New Drive Letter drop-down menu and click OK.
Step 4: Click Apply > Yes to remove the current drive letter of the selected partition.
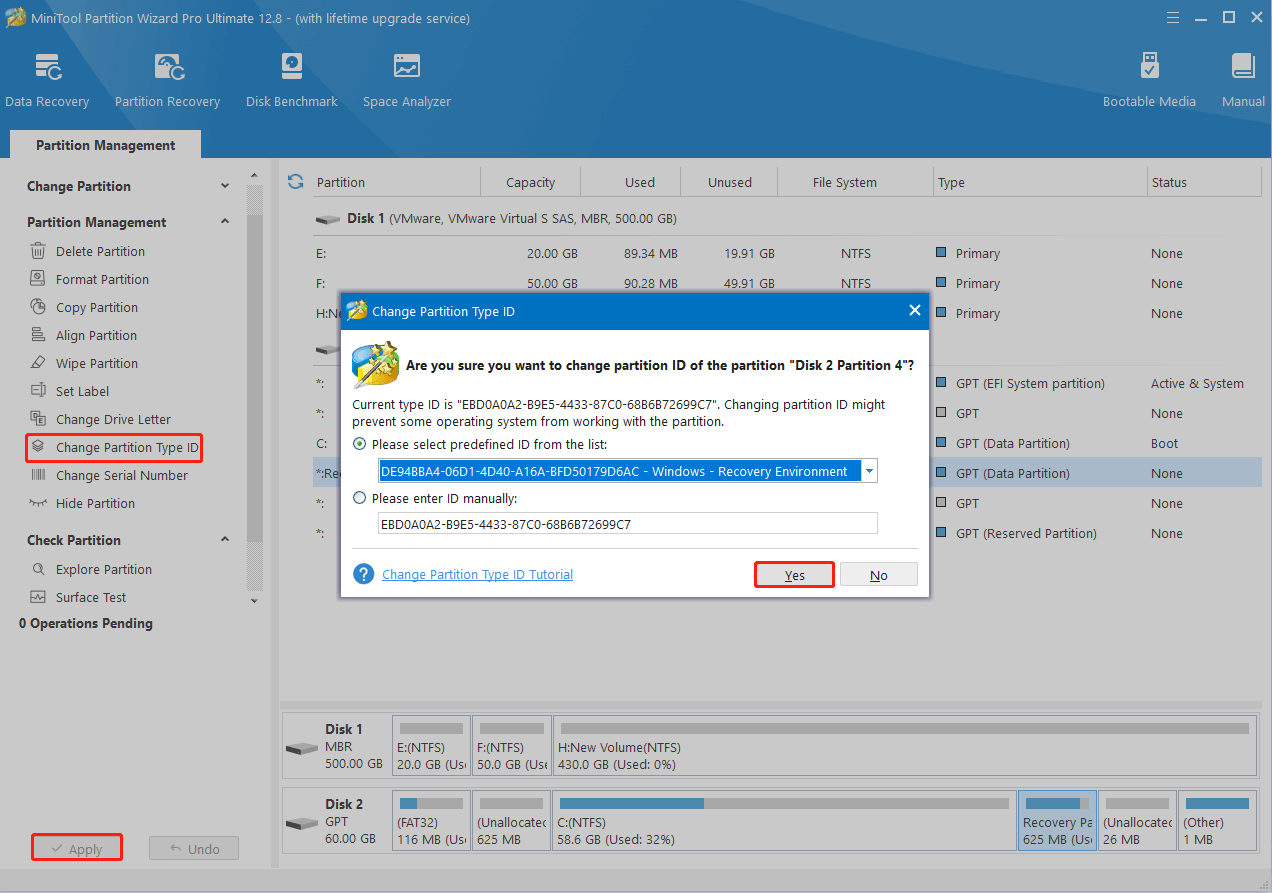
Step 5: After that, highlight the recovery partition again and select Change Partition Type ID.
Tips:
Change Partition Type ID is a paid feature in MiniTool Partition Wizard. Hence, make sure you get a suitable edition before the operation. You can get useful information on the Edition Comparison page.
MiniTool Partition Wizard DemoClick to Download100%Clean & Safe
Step 6: In the prompted window, you can choose the specified ID for the recovery partition from the list. Alternatively, you can enter the ID manually.
Tips:
Typically, the Type ID of the Windows recovery partition on a GPT disk is set to DE94BBA4-06D1-4D40-A16A-BFD50179D6AC, while on an MBR disk, it’s set to 0x27.
Step 7: Once you set the right ID, click Yes to move on.
Step 8: Click Apply > Yes to carry out the operation.
Windows 10 Move Recovery Partition to the New Hard Disk
How to clone HP Recovery partition to new hard drive? How to clone Dell Recovery partition to new hard drive? Users of these computer brands may ask these questions because they may want to move Windows 10 recovery partition to another hard disk to make a backup or simply release disk space.
How can Windows 10 move recovery partition under these situations? Well, this can be easily done by copying the existing recovery partition to a different hard disk. If you have no idea, you can refer to this guide: How to Clone Recovery Partition with Free Drive Cloning Software.
Bonus Tip: What If the Cloned Recovery Partition Isn’t Labeled as Normal
After you move Windows recovery partition on a GPT disk by cloning it to the desired place, you may find the cloned partition not labeled Recovery Partition or Healthy in Disk Management. What’s worse, it even doesn’t show up in the initial list. Don’t worry. Here, we will discuss how to return the recovery partition to normal. Just keep reading.
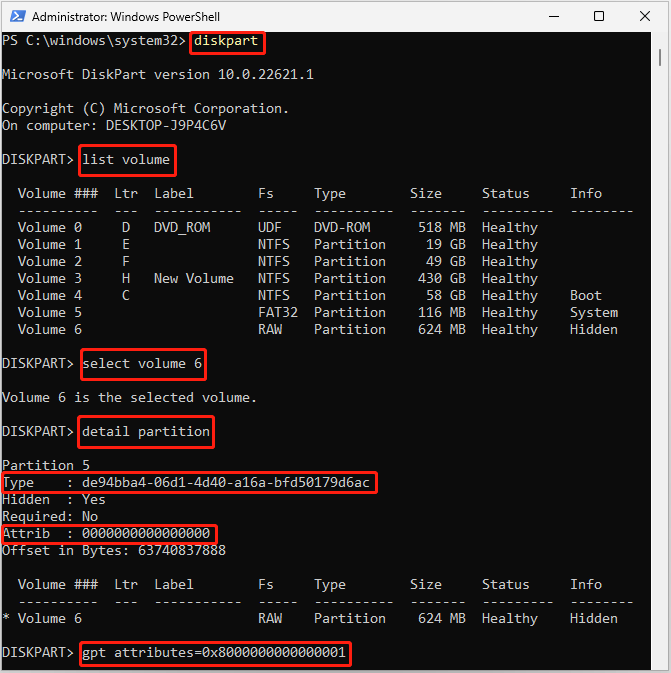
Step 1: Right-click the Start icon and select Windows PowerShell (Admin).
Step 2: In the PowerShell window, type diskpart and press Enter.
Step 3: Type list volume within Diskpart and press Enter.
Step 4: Type select volume 6 and press Enter. Replace 6 with the number of your recovery partition.
Step 5: Type detail partition and press Enter to check if the partition Type ID and attribute are set correctly. If not, run the set id=de94bba4-06d1-4d40-a16a-bfd50179d6ac and gpt attributes=0x8000000000000001 commands one by one.
Tips:
Here we just need to set the GPT attribute to 0x8000000000000001.
If you wonder how to move recovery partition Windows 11 /10, this post deserves your attention. It talks about the Windows 10 move recovery partition operation in detail. Click to Tweet
Bottom Line
Hope you move Windows recovery partition successfully with the help of this guide. If you have any questions about the Windows 10 move recovery partition topic, you can leave a message in our comment part below.
For any issues related to MiniTool Partition Wizard, please feel free to contact us for assistance via [email protected]. We’ll reply to you as soon as possible.
Recently I needed to expand a disk on a Windows 10 VM and a Windows Server 2022 VM, but I couldn’t because the Recovery Partition was in the way.
When searching for a way to do this I discovered that the internet is full of posts about simply deleting the Windows Recovery Partition. I am not a fan of simply deleting a recovery tool. On numerous occasions the recovery partition has been instrumental in helping me to fix a system.
If you search for how to move the Windows Recovery Partition the internet has many posts of fake ways to do it or ways to do it with third-party tools like GParted. I have nothing against third-party tools or GParted and I don’t doubt some of those methods do work. The issue I have with those methods is that you have to take the system offline in order to do them or the tools cost money.
Now yes you could just delete the Windows Recovery partition, but before you do that make sure you understand that you will lose a bunch of recovery options. You can read more about the recovery options you’ll lose in an earlier post I made about the Windows Recovery Partition.
Here’s how to correctly move the Windows Recovery Partition on a Windows server or a normal Windows system.
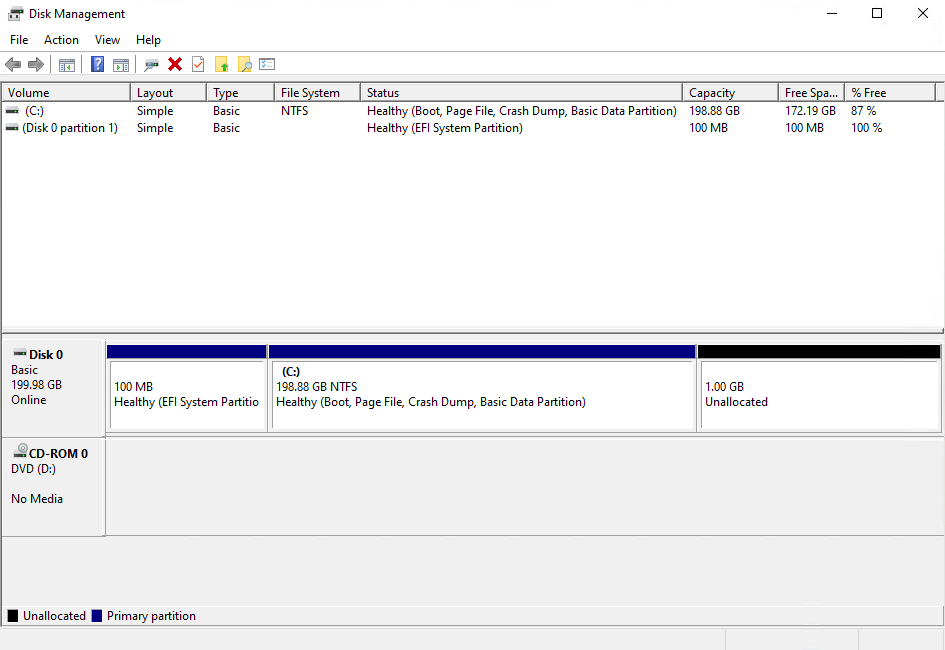
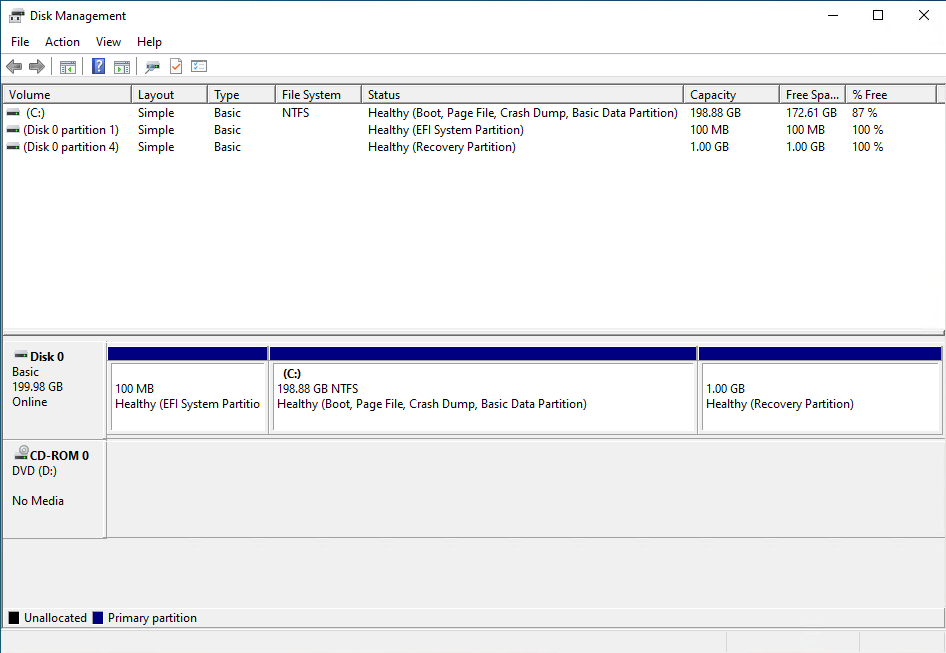
This is what my partitions look like in Disk Management.

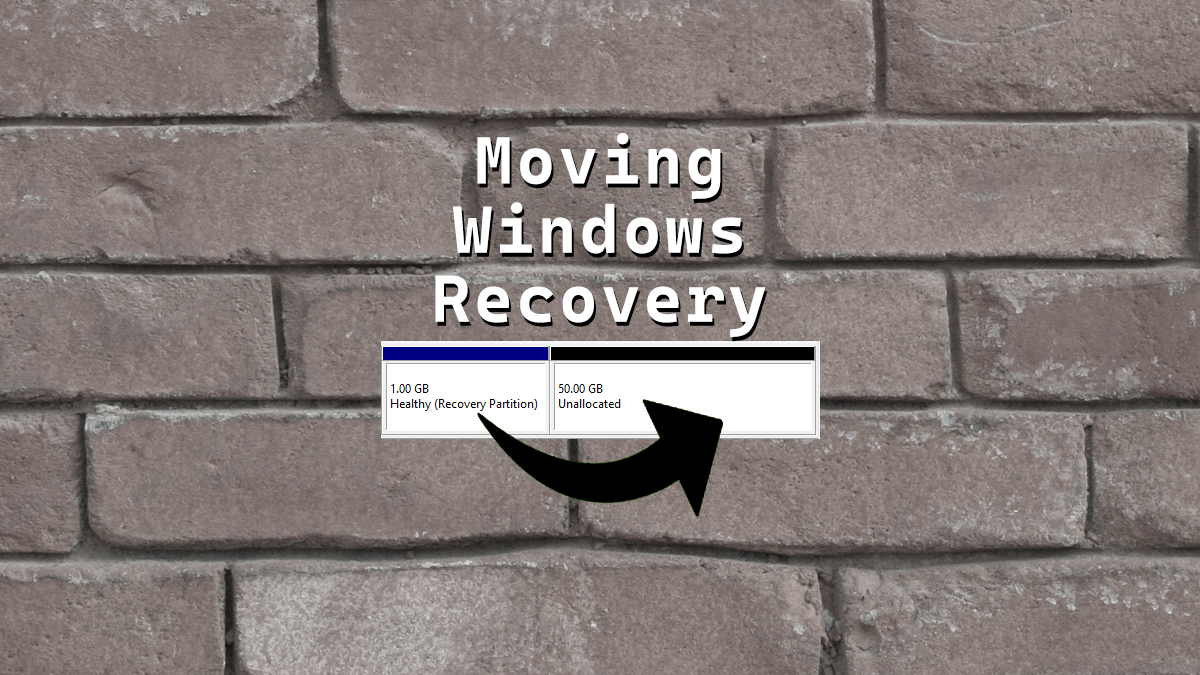
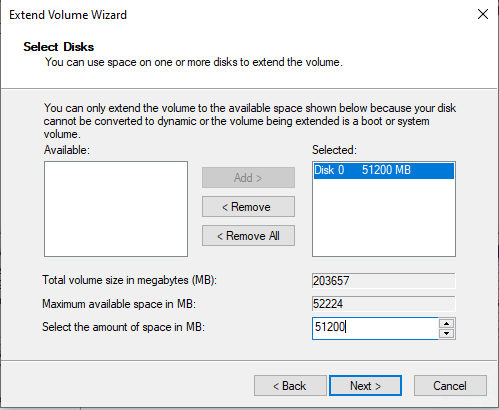
We will move the 1 GB recovery partition to the end of the disk allowing us to add the 50 GB of unallocated space to the C drive.
The Process
- Make sure you have a backup of the system you are going to edit the partitions on.
- Open Command Prompt as admin
Disabling The Windows Recovery Partition
- We need to disable the existing Windows Recovery Partition to do that run the command
reagentc /disable
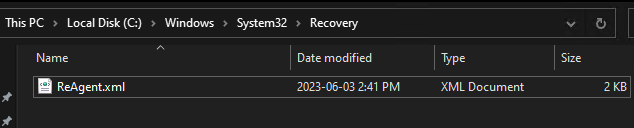
The reagentc /disable command will disable the recovery partition and will move the recovery partition into a file named Winre.wim and will be located in C:\Windows\System32\Recovery (you have to enable showing hidden system files if you want to see it)

DiskPart
- Run the command
diskpartto launch DiskPart
- List the disks in your system. You can do this by using the command
list disk
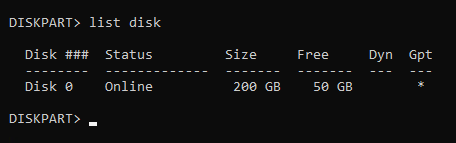
Pro tip from Matt in the comments, if there’s a * in the column for Gpt that means the disk is likely a GPT disk and if there isn’t a * in the Gpt column the disk is likely MBR. Make a note of this as it will be important further down.
- Select the disk you need to move the recovery partition on. You can do this by using the command
select diskand the disk number. In my setup disk 0 was the correct disk and the command I entered wasselect disk 0.
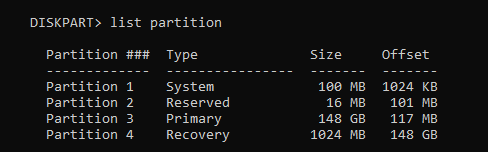
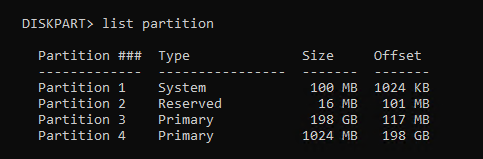
- List the partitions on that disk. You can do this by using the command
list partition
- Select the recovery partition. You can do this by using the command
select partitionand the partition number. In my setup partition 4 is my recovery partition and the command I entered wasselect partition 4
The recovery partition is a protected partition so we need to use a bit more force to delete it.
- Force the deletion of the recovery partition. You can do this by using the command
delete partition override

Disk Management
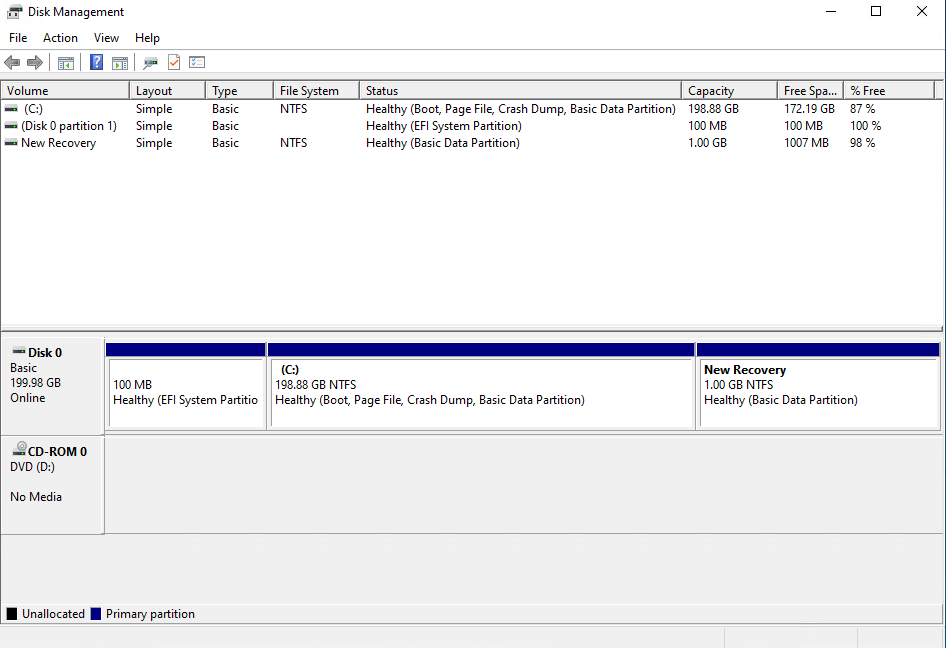
Now if you look in Disk Management you should no longer have the Recovery Partition and it should show up as unallocated.
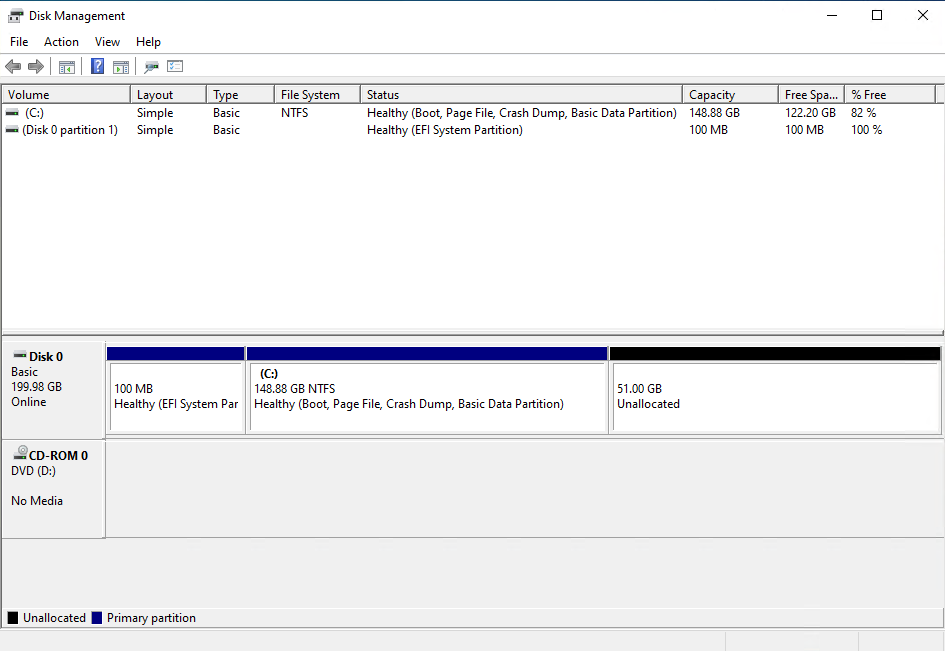
- Expand your disk and leave about 1024 MB off your resized size to leave room for the re-enabling the Recovery Partition.
Disk Management should now look something like this.
Once the disk is expanded we need to rebuild everything that is needed for Windows to know that the extra space that we left unallocated can be used to for the recovery partition.
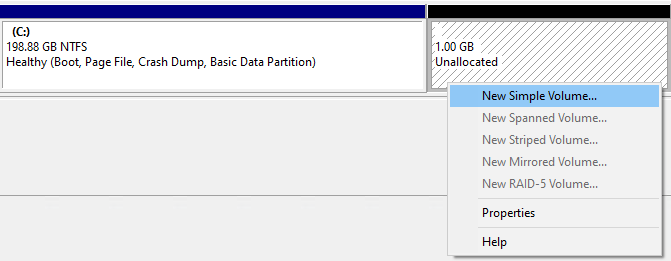
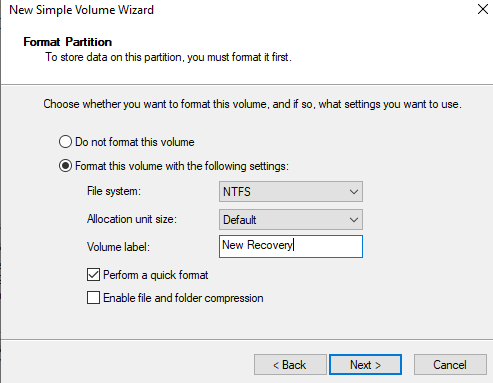
- Create a New Simple Volume with the unallocated space.
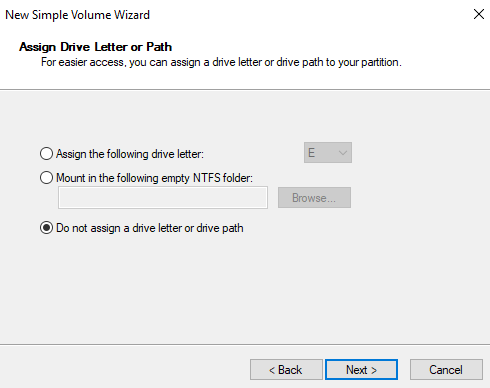
- Don’t give it a drive letter.
- You can give the new partition a name if you want it does not mater. I’m going to call mine New Recovery.
Disk Management should now look something like this.
Back to DiskPart
- In DiskPart list your partitions again by running the command
list partition
- Select the 1024 MB partition with the command
select partitionand the partition number. In my setup it was partition 4 and the command I ran wasselect partition 4
If you have a GPT disk you need to run some very specific command and if you have an MBR disk you need to run different very specific commands.
GPT disk
On GPT disks we need to change the partition ID to de94bba4-06d1-4d40-a16a-bfd50179d6ac which tells Windows that this is a recovery partition
- Run the following command to set the partition as a recovery partition
set id=de94bba4-06d1-4d40-a16a-bfd50179d6ac

We also need to hide the drive and flag it as a required partition to do that we have to set a GPT attribute to 0x8000000000000001
- Run the following command to set the GPT attribute to hide the drive and flag it as required
gpt attributes=0x8000000000000001

- Now we can exist DiskPart.
MBR disk
On MBR disks we need to change partition ID to 27 which will tell Windows that this is a recovery partition.
- Run the following command to set the partition as a recovery partition
set id=27
- Now we can exist DiskPart.
Enabling The Windows Recovery Partition
- Now we can re-enable the recovery partition by running the command
reagentc /enable
The reagentc /enable command will copy the Winre.wim file from C:\Windows\System32\Recovery into our new recovery partition.
If you look at Disk Management again everything shows up correctly.
That’s all there is to it.
Technically speaking we did just delete the Windows Recovery Partition but we did so in a way to keep our existing recovery partition safely intact and then we rebuild the recovery partition and re-enabled it.
I prefer doing it this way as it leaves your recovery options intact and you can do it all live without any reboots.
If you want to read more about deploying the Windows Recovery Partition you can do so by reading Microsoft’s documentation about it.
If you want to read more about reagentc command you do so by reading Microsoft’s documentation about it.
**Move the Recovery Partition in Windows**
When you install Windows, a recovery partition is created on your hard drive. This partition contains files that can be used to repair or restore your system if it becomes damaged. By default, the recovery partition is located at the end of your hard drive. However, you may want to move the recovery partition to a different location for a variety of reasons.
For example, you may want to move the recovery partition to a faster hard drive or to a hard drive that is not used as often. You may also want to move the recovery partition to a smaller hard drive if you are running out of space.
In this article, we will show you how to move the recovery partition in Windows 10. We will also provide some tips on how to choose the best location for your recovery partition.
What is the Recovery Partition?
The recovery partition is a small partition that is created on your hard drive when you install Windows. This partition contains files that can be used to repair or restore your system if it becomes damaged. The recovery partition typically includes the following files:
- A copy of the Windows operating system
- A set of recovery tools
- A system image
The recovery partition can be used to repair a damaged operating system by restoring it to a previous state. It can also be used to create a system image, which is a backup of your entire system.
Why Would You Want to Move the Recovery Partition?
There are a few reasons why you might want to move the recovery partition to a different location.
* **To improve performance.** If your recovery partition is located on a slow hard drive, moving it to a faster hard drive can improve the performance of your system.
* **To free up space.** If you are running out of space on your hard drive, moving the recovery partition to a smaller hard drive can free up space.
* **To improve security.** If your recovery partition is located on a hard drive that is not used as often, it is less likely to be damaged.
How to Move the Recovery Partition in Windows 10
To move the recovery partition in Windows 10, you will need to use the **Disk Management** tool.
1. Open the **Settings** app.
2. Go to **System** > Storage.
3. Under Disks and volumes, click Manage disk and volumes.
4. Right-click the recovery partition and select Properties.
5. Click the Volumes tab.
6. Click Move.
7. Select the new location for the recovery partition and click OK.
8. Click Apply.
The recovery partition will be moved to the new location. You may need to restart your computer for the changes to take effect.
Tips for Choosing the Best Location for Your Recovery Partition
When choosing the best location for your recovery partition, you should consider the following factors:
- Performance. The recovery partition should be located on a fast hard drive.
- Space. The recovery partition should be located on a hard drive that has enough space.
- Security. The recovery partition should be located on a hard drive that is not used as often.
By following these tips, you can choose the best location for your recovery partition and ensure that it is protected and accessible when you need it.
| Step | Instructions | Screenshot |
|---|---|---|
| 1 | Open the **Disk Management** tool. | |
| 2 | Right-click on the recovery partition and select **Delete Volume**. | |
| 3 | Click **Yes** to confirm. | |
| 4 | Right-click on the unallocated space and select **New Simple Volume**. | |
| 5 | Follow the on-screen instructions to create a new volume. | |
| 6 | The recovery partition has been moved. |
What is a recovery partition?
A recovery partition is a small partition on your hard drive that contains the files necessary to restore your computer to its original state. It is created when you install Windows, and it is typically located at the end of your hard drive.
The recovery partition can be used to repair your computer if it becomes damaged or infected with malware. It can also be used to restore your computer to a previous state if you make changes that you don’t like.
Purpose of a recovery partition
The purpose of a recovery partition is to provide a way to restore your computer to its original state if it becomes damaged or infected with malware. It can also be used to restore your computer to a previous state if you make changes that you don’t like.
The recovery partition contains the following files:
- A copy of the Windows operating system
- Drivers for your computer’s hardware
- A recovery console that you can use to repair your computer
Location of the recovery partition
The recovery partition is typically located at the end of your hard drive. This is because it is the least likely place to be overwritten by other data.
If you have a small hard drive, the recovery partition may not be visible in Windows File Explorer. To view the recovery partition, you can use the following steps:
1. Open the Disk Management tool.
2. Right-click on the recovery partition and select Properties.
3. In the Volume Label field, you will see the name of the recovery partition.
How to move a recovery partition
It is not recommended to move the recovery partition unless you are sure of what you are doing. If you move the recovery partition, you may lose access to it and be unable to restore your computer if it becomes damaged or infected with malware.
If you do decide to move the recovery partition, you can use the following steps:
1. Back up the recovery partition to an external hard drive or USB drive.
2. Boot your computer from the Windows installation media.
3. Select Repair your computer.
4. Select Troubleshoot.
5. Select Advanced options.
6. Select Command Prompt.
7. Type the following command:
diskpart
8. Type the following command to list the partitions on your hard drive:
list disk
9. Type the following command to select the recovery partition:
select disk
10. Type the following command to move the recovery partition to the beginning of the hard drive:
move partition 1
11. Type the following command to exit the Command Prompt:
exit
12. Restart your computer.
Things to keep in mind when moving a recovery partition
- Make sure you back up the recovery partition before you move it.
- Make sure you know the exact location of the recovery partition before you move it.
- If you are not sure how to move the recovery partition, do not attempt to do it. You may lose access to the recovery partition and be unable to restore your computer if it becomes damaged or infected with malware.
Risks of moving a recovery partition
There are a few risks associated with moving a recovery partition. These include:
- You may lose access to the recovery partition and be unable to restore your computer if it becomes damaged or infected with malware.
- You may accidentally delete the recovery partition, which will prevent you from being able to restore your computer.
- You may move the recovery partition to a location where it is not accessible by the Windows recovery console.
The recovery partition is a valuable tool that can help you restore your computer to its original state if it becomes damaged or infected with malware. However, it is important to be aware of the risks associated with moving a recovery partition. If you are not sure how to move the recovery partition, do not attempt to do it. You may lose access to the recovery partition and be unable to restore your computer.
There are a few reasons why you might want to move your recovery partition.
- To free up space on your C drive. The recovery partition is typically located on the C drive, and it can take up a significant amount of space. If you’re running low on disk space, moving the recovery partition to a different drive can free up some space on your C drive.
- To improve performance. If your C drive is getting full, it can slow down your computer. Moving the recovery partition to a different drive can help improve performance by freeing up space on your C drive.
- To protect your data. If your C drive fails, you won’t be able to access the recovery partition. By moving the recovery partition to a different drive, you can protect your data in case your C drive fails.
Reasons to move a recovery partition
There are a few reasons why you might want to move your recovery partition.
- To free up space on your C drive. The recovery partition is typically located on the C drive, and it can take up a significant amount of space. If you’re running low on disk space, moving the recovery partition to a different drive can free up some space on your C drive.
- To improve performance. If your C drive is getting full, it can slow down your computer. Moving the recovery partition to a different drive can help improve performance by freeing up space on your C drive.
- To protect your data. If your C drive fails, you won’t be able to access the recovery partition. By moving the recovery partition to a different drive, you can protect your data in case your C drive fails.
When not to move a recovery partition
There are a few reasons why you might not want to move your recovery partition.
- If you’re not comfortable using the command line. Moving the recovery partition requires using the command line. If you’re not comfortable using the command line, you may want to avoid moving the recovery partition.
- If you’re not sure how to restore the recovery partition. If you move the recovery partition and then need to restore it, you’ll need to know how to do so. If you’re not sure how to restore the recovery partition, you may want to avoid moving it.
- If you’re concerned about data loss. There is always a risk of data loss when you move a partition. If you’re concerned about data loss, you may want to avoid moving the recovery partition.
How to restore a recovery partition
If you move your recovery partition and then need to restore it, you can do so by following these steps:
1. Boot your computer from the Windows installation media.
2. Select “Repair your computer”.
3. Select “Troubleshoot”.
4. Select “Advanced options”.
5. Select “Command Prompt”.
6. Type the following command:
diskpart
7. Type the following command:
list disk
This will list all of the disks on your computer.
8. Type the following command to select the disk that contains the recovery partition:
select disk
9. Type the following command to list the partitions on the disk:
list partition
This will list all of the partitions on the disk.
10. Type the following command to select the recovery partition:
select partition
11. Type the following command to restore the recovery partition:
active
12. Type the following command to exit the Diskpart utility:
exit
13. Restart your computer.
Things to keep in mind when restoring a recovery partition
When restoring a recovery partition, there are a few things to keep in mind:
- Make sure that you have the Windows installation media available.
- Make sure that you know the disk number and partition number of the recovery partition.
- Be careful not to overwrite any other partitions on your disk.
- If you’re not sure how to restore the recovery partition, you may want to consult a professional.
Moving a recovery partition can be a good way to free up space on your C drive, improve performance, and protect your data. However, it’s important to understand the risks involved before moving
Q: What is a recovery partition?
A: A recovery partition is a section of your hard drive that is used to restore your computer to its original state if it becomes damaged or infected with malware. It typically contains a copy of the operating system, drivers, and other essential files.
Q: Why do I need to move my recovery partition?
A: There are a few reasons why you might want to move your recovery partition. For example, if your recovery partition is small, you may want to move it to a larger hard drive so that you have more space to store your data. Additionally, if your recovery partition is located at the beginning of your hard drive, it can be difficult to access if you have a lot of other files on your computer.
Q: How do I move my recovery partition?
There are a few different ways to move your recovery partition. You can use a third-party recovery partition manager, or you can use the built-in Windows tools.
To use a third-party recovery partition manager, follow these steps:
1. Download and install a recovery partition manager.
2. Launch the recovery partition manager.
3. Select the recovery partition that you want to move.
4. Follow the instructions in the recovery partition manager to move the partition.
To use the built-in Windows tools, follow these steps:
1. Open the Disk Management tool.
2. Right-click on the recovery partition that you want to move.
3. Select Move/Resize Volume.
4. Drag the recovery partition to the desired location.
5. Click OK.
Q: What happens if I delete my recovery partition?
If you delete your recovery partition, you will not be able to restore your computer to its original state if it becomes damaged or infected with malware. Additionally, you may lose access to any files that were stored on the recovery partition.
Q: How can I protect my recovery partition?
There are a few things you can do to protect your recovery partition:
- Back up your recovery partition regularly.
- Keep your recovery partition up-to-date with the latest security patches.
- Use a strong password to protect your recovery partition.
- Disable the recovery partition if you do not need it.
Q: Where can I find more information about recovery partitions?
You can find more information about recovery partitions on the following websites:
- [Microsoft Support](https://support.microsoft.com/en-us/help/12415/windows-7-recovery-partition)
- [TechNet](https://technet.microsoft.com/en-us/library/cc721795.aspx)
- [Lifewire](https://www.lifewire.com/what-is-a-recovery-partition-2626148)
In this article, we have discussed how to move the recovery partition in Windows. We have covered the reasons why you might want to move the recovery partition, as well as the steps involved in doing so. We have also provided some tips on how to avoid common problems that can occur when moving the recovery partition.
We hope that this article has been helpful. If you have any questions or comments, please feel free to leave them below.
Here are some key takeaways from this article:
- The recovery partition is a small partition on your hard drive that contains system files that can be used to restore your computer if it becomes corrupted.
- There are several reasons why you might want to move the recovery partition, such as to free up space on your hard drive, to make it easier to access, or to protect it from being accidentally deleted.
- The steps involved in moving the recovery partition vary depending on the version of Windows you are using.
- You can avoid common problems by backing up your data before you move the recovery partition, making sure that you have the correct drivers installed, and using a reputable third-party tool to move the partition.
Author Profile
-
Hatch, established in 2011 by Marcus Greenwood, has evolved significantly over the years. Marcus, a seasoned developer, brought a rich background in developing both B2B and consumer software for a diverse range of organizations, including hedge funds and web agencies.
Originally, Hatch was designed to seamlessly merge content management with social networking. We observed that social functionalities were often an afterthought in CMS-driven websites and set out to change that. Hatch was built to be inherently social, ensuring a fully integrated experience for users.
Now, Hatch embarks on a new chapter. While our past was rooted in bridging technical gaps and fostering open-source collaboration, our present and future are focused on unraveling mysteries and answering a myriad of questions. We have expanded our horizons to cover an extensive array of topics and inquiries, delving into the unknown and the unexplored.