
Some people are very much eager to Change Mouse Sensitivity in Windows 10 in order to make it smoother and faster. The mouse is a key peripheral of your computer and you use it to input something. It quickly responses to your actions and executes it in faster means. But out there are certain users who prefer to modify this sensitive nature of the device. So, here, we are going to show you some really effective ways that can help you in modifying the speed of this hardware.
Microsoft has released Windows 10 Version 1703 in June last year including a feature to Change Mouse Sensitivity in Windows 10. You can accomplish the task using the built-in Settings app. Meanwhile, we present you have some other ways to do the same. Here are the methods showing you how you can change mouse sensitivity.
How to Change Mouse Sensitivity in Windows 10
Here is How to Change Mouse Sensitivity in Windows 10 –
Way-1: Using Default Settings App
Step-1: Press Windows + I keys together in order to access default Settings program and click on Devices among other categories.
Step-2: Select Mouse section on the left pane of the Devices settings page. Shift to the corresponding right pane and click on Additional mouse options under Related settings (see screenshot).
Step-3: Once Mouse Properties pop-ups on the PC screen, switch to Pointer Options tab.
Step-4: In the Motion section, you can see an option and slider namely Select a pointer speed. Moving it to forward will increase the sensitivity while dragging it backward will decrease.
Step-5: When you have reached your desired sensitivity level, hit Apply then Ok from the bottom of this dialog.
In this regard, you may also like to read How to Turn On and Off Mouse Pointer Trail in Windows 10.
Mouse sensitivity will be changed to the speed you are waiting for. There are few more methods to Change Mouse Sensitivity in Windows 10, let us see them also.
Way-2: Adjusting Sensitivity with Software Tweak
Latest computers are coming up with the high configuration so that game freaks can play video games on PC. Super exciting games like 1st-degree shooting or strategy games need a super sensitive mouse. There is certain software available on the net which allows the users to configure sensitivity of the mouse. Moreover, the third-party tools also let you adjust macros, light settings and so on. Remember, all these things are not supported in all computers and merely with all mice.
Way-3: Change Mouse Sensitivity in Windows 10 with Appropriate Mouse Pad
Sensitivity and precision of a mouse sometimes vary for using a mouse pad. Some mouse pads are made with a variety of textures and the specially made ones enhance the sensitivity but those may be little expensive too. However, relatively affordable pads are also available in the market. You can buy them and experience super sensitive mouse moves.
Follow our related tutorial to Display Virtual Touchpad on Windows 10.
Way-4: Involving Registry Hack
Little modification in the registry key can also change the mouse sensitivity. This task is little complex and expert hands are preferable. The tweak might affect the default settings for other things in the computer. As a result, we prefer saving a backup. However, these given series of steps can also help you to succeed.
Learn How to Import and Export Registry Editor on Windows 10.
Step-1: Use Win + R hotkeys to invoke Run dialog. Upon opening, type regedit in the box and press Enter key. Registry Editor will open in the first place after you agree to the UAC prompt.
Step-2: Navigate to the following path in the left pane of the Registry Editor:
HKEY_CURRENT_USER\Control Panel\Mouse
Step-3: On the right side of the desired key path, put double-click on MouseSpeed. Upon opening a popup with name Edit String, reach out to Value data section and input 2. Press Ok in order to save the change.
Step-4: Now, change the value data for MouseThreshold1 and MouseThreshold2 to 0 putting double click on each at a time. This will set the mouse sensitivity to maximum.
If you find it uncomfortable, you can adjust the same by changing the Value data as per preference using the above steps.
Note – Keep it in mind that you need to put MouseThreshold1 value less or equal to MouseThreshold2.
As we said before, this process may damage the functioning of certain programs in case anything goes wrong. Therefore, if you think this one is invalid for you; you may proceed to another method.
Way-5: Changing Mouse DPI Settings
Changing DPI settings affects the mouse sensitivity. Gaming mice have a dedicated key to change DPI. These provide various levels of sensitivity. However, this modification is temporary as it will revert to the previous settings once you turn Off the device.
Nowadays, the modern mice have a DPI button and you can afford it quite easily as they offer different sensitivity levels.
Conclusion
A mouse may be a simple hardware tool but it has great uses when talking about accessibility. It makes the job faster than using a mouse pad. Additionally, gamers need mice to experience exciting gaming in computers. Manufacturers are also releasing mice with high configuration nowadays. However, the sensitivity of a mouse is very much important not only for gaming but also for other works. We have covered all possible ways to Change Mouse Sensitivity in Windows 10. Execute any of these to adjust your settings and enjoy the desired performance.
Changing your mouse sensitivity in Windows 10 can greatly improve your computer experience, whether you’re gaming or working. You’ll be tweaking settings in the Control Panel to get that perfect glide. Here’s a quick look at what you’ll be doing: Open the Control Panel, find the Mouse settings, and adjust the sensitivity to your liking. Easy, right? Let’s dive into the step-by-step guide to ensure you get it just right.
Adjusting your mouse sensitivity in Windows 10 can make your cursor respond more swiftly or slowly, depending on your preference. Follow these steps to fine-tune your mouse sensitivity for a smoother and more precise experience.
Step 1: Open the Control Panel
First, open the Control Panel by searching for it in the Start Menu or pressing Windows + R, typing «control panel,» and hitting Enter.
Finding the Control Panel is your gateway into the various settings of Windows 10, including those for your mouse. It’s like opening a toolbox to get to the specific tool you need.
Step 2: Go to «Hardware and Sound»
Next, navigate to «Hardware and Sound» within the Control Panel options.
The «Hardware and Sound» section is where all things related to your computer’s hardware, including your mouse, are configured. Consider it the control center for your devices.
Step 3: Click on «Mouse»
Within «Hardware and Sound,» click on «Mouse» under the «Devices and Printers» section.
Clicking on «Mouse» will bring up the Mouse Properties window. This is where the magic happens.
Step 4: Adjust the Pointer Options
In the Mouse Properties window, go to the «Pointer Options» tab. Here, you can adjust the «Select a pointer speed» slider.
The «Pointer Options» tab is where you’ll find the slider to adjust your mouse sensitivity. Moving the slider to the right increases sensitivity, and moving it to the left decreases it.
Step 5: Apply and Save
After adjusting the slider to your desired sensitivity, click «Apply,» then «OK» to save your changes.
Clicking «Apply» and «OK» ensures that your new settings are saved and take immediate effect. You’ll notice the difference in cursor speed right away.
After completing these steps, your mouse sensitivity will be adjusted to your liking. Whether you want a faster or slower cursor, these changes will take effect immediately, making your mouse movements more intuitive and comfortable.
Tips for Changing Mouse Sensitivity in Windows 10
Here are some additional tips to make the most out of your mouse sensitivity settings:
- Test Your Settings: After adjusting, test your mouse sensitivity with different tasks like dragging files, typing, or gaming to find the perfect balance.
- Use Mouse Software: Some mouse brands offer dedicated software that provides more advanced sensitivity settings and features.
- Adjust DPI Settings: If your mouse has a DPI button, you can use it to quickly change sensitivity without opening the Control Panel.
- Keep it Comfortable: Ensure your sensitivity setting doesn’t strain your wrist or hand, especially if you use your computer for long periods.
- Regular Updates: Keep your mouse drivers updated to ensure compatibility and smooth performance.
Frequently Asked Questions
How do I find the Control Panel in Windows 10?
You can find the Control Panel by searching for it in the Start Menu or by pressing Windows + R, typing «control panel,» and pressing Enter.
Can I change mouse sensitivity without accessing the Control Panel?
Yes, some mice have DPI buttons that allow you to change sensitivity settings on-the-fly.
What should I do if my mouse sensitivity keeps resetting?
Check your mouse driver settings and update them if necessary. Some software may override your settings, so ensure no conflicting programs are running.
Is high sensitivity better for gaming?
It depends on the game and personal preference. Some gamers prefer high sensitivity for faster movements, while others prefer lower sensitivity for better precision.
Can I reset my mouse settings to default?
Yes, you can reset your mouse settings to default in the Mouse Properties window by clicking on the «Restore Defaults» button.
Summary
- Open the Control Panel.
- Go to «Hardware and Sound.»
- Click on «Mouse.»
- Adjust the Pointer Options.
- Apply and save.
Conclusion
Changing mouse sensitivity in Windows 10 is a simple yet impactful way to tailor your computer experience to your needs. Whether you’re adjusting your settings for work, gaming, or general use, the process is straightforward and can be completed in just a few minutes. Remember, fine-tuning your sensitivity can prevent strain and improve accuracy, making your time on the computer more enjoyable.
Don’t forget to explore additional settings and tools like mouse software or DPI adjustments for even more control. With these tips and steps, you now have the knowledge to customize your mouse sensitivity and enhance your overall computer interaction.
Happy computing! If you found this guide helpful, why not share it with friends or family who might benefit from optimizing their mouse settings?
Matt Jacobs has been working as an IT consultant for small businesses since receiving his Master’s degree in 2003. While he still does some consulting work, his primary focus now is on creating technology support content for SupportYourTech.com.
His work can be found on many websites and focuses on topics such as Microsoft Office, Apple devices, Android devices, Photoshop, and more.
In today’s digital age, where efficiency and productivity are paramount, the sensitivity of your computer mouse can make all the difference. Did you know that adjusting the mouse sensitivity on your Windows 10 system can greatly enhance your overall user experience? Whether you’re a professional user looking for precision control or a casual gamer seeking optimal gameplay, knowing how to change mouse sensitivity can help you achieve your desired level of accuracy and comfort.
Changing the mouse sensitivity on Windows 10 is a simple yet powerful adjustment that can be done within the system settings. By altering the speed at which your mouse cursor moves across the screen, you can tailor your mouse’s responsiveness to your specific needs. This flexibility not only enables you to seamlessly navigate through documents and web pages but also enhances your performance in various tasks, such as graphic design, video editing, and gaming. Whether you prefer a faster or slower mouse cursor movement, Windows 10 provides you with the tools to fine-tune your settings and optimize your user experience accordingly.
To change the mouse sensitivity on Windows 10, follow these steps:
- Click on the Start menu and select «Settings».
- Go to «Devices» and click on «Mouse».
- Under the «Mouse Sensitivity» section, slide the bar left or right to adjust the sensitivity level.
- Test the sensitivity by moving the mouse and make further adjustments if needed.
- Click «Apply» and then «OK» to save the changes.
Understanding Mouse Sensitivity on Windows 10
Mouse sensitivity refers to how quickly the cursor moves across the screen in response to mouse movement. On Windows 10, you can easily adjust the mouse sensitivity to suit your preferences and improve your overall user experience. Whether you want a faster or slower cursor movement, this article will guide you through the process of changing the mouse sensitivity settings on Windows 10.
Adjusting Mouse Sensitivity in Settings
The simplest way to change mouse sensitivity on Windows 10 is through the Settings menu. Here’s how:
- Click on the Start button in the bottom-left corner of your screen and select Settings (gear icon).
- In the Settings window, click on Devices.
- From the left-hand menu, select Mouse.
- In the Mouse settings, scroll down to the Related settings section and click on Additional mouse options.
- A new window will open. Go to the Pointer Options tab.
- Under the Motion heading, you’ll find a slider for Pointer Speed. Move the slider to the left for slower sensitivity or to the right for faster sensitivity.
- Once you’ve adjusted the pointer speed to your liking, click Apply and then OK.
Fine-Tuning Mouse Sensitivity with Advanced Options
If you need more precise control over your mouse sensitivity, Windows 10 provides additional settings in the «Mouse Properties» window:
- Open the «Mouse Properties» window by following steps 1-4 mentioned earlier.
- In the «Pointer Options» tab, select the checkbox for Enhance pointer precision. This feature adds acceleration to the mouse movement.
- Below the checkbox, you’ll find a slider for Motion. This controls the mouse sensitivity while the checkbox for «Enhance pointer precision» is selected. Adjust the slider according to your preference.
- Within the same tab, there’s also an option to display the mouse trail, which can help you visualize the cursor movement. You can adjust the length of the trail using the slider.
- After making any changes, click Apply and then OK.
Changing Mouse Sensitivity for a Gaming Mouse
For gamers who use a specialized gaming mouse, there may be additional software provided by the manufacturer that allows more precise control over mouse sensitivity. Typically, this software offers advanced features such as adjustable DPI (dots per inch) settings and the ability to create custom profiles for different games.
If you have a gaming mouse, check the manufacturer’s website or the documentation that came with your mouse to see if there is any specialized software available. Install the software and follow the instructions provided to adjust the mouse sensitivity to your liking.
Using Third-Party Mouse Sensitivity Software
If you’re looking for even more customization options for your mouse sensitivity, there are third-party software options available. These software solutions are designed to offer advanced control over mouse settings and may provide additional features such as macros, button remapping, and profile management.
Some popular third-party mouse sensitivity software options include:
- X-Mouse Button Control: This software allows you to remap mouse buttons and create custom profiles for different applications.
- Logitech Gaming Software: If you have a Logitech gaming mouse, this software provides extensive control over mouse sensitivity, DPI settings, lighting, and more.
- Razer Synapse: Designed for Razer gaming mice, this software offers customization options such as adjustable DPI and advanced macro creation.
Visit the respective websites of these software options to download and install them on your Windows 10 computer. However, be cautious when downloading and installing third-party software from the internet. Only use trusted sources and ensure that you have up-to-date security software installed on your computer.
Changing Mouse Sensitivity in Third-Party Applications
In addition to the system-wide mouse sensitivity settings, many applications and games offer their own mouse sensitivity options. These settings override the system settings, allowing you to customize the mouse sensitivity specifically for that application or game.
To change the mouse sensitivity in specific applications, follow these general steps:
- Open the application or game that you want to adjust the mouse sensitivity for.
- Look for the settings or options menu within the application. This is typically located in the top menu bar or in an options submenu.
- Navigate to the mouse settings or controls section.
- Adjust the mouse sensitivity or DPI slider according to your preference.
- Save your changes and exit the settings menu.
Optimizing Mouse Sensitivity for Productivity
While mouse sensitivity adjustment is often associated with gaming, it can also enhance your productivity when using Windows 10 for everyday tasks. Here are a few tips for optimizing mouse sensitivity for increased productivity:
Finding the Right Balance
The optimal mouse sensitivity will vary depending on individual preferences and usage scenarios. It’s important to find the right balance between cursor speed and precision.
If the mouse sensitivity is too high, you may have difficulty accurately clicking on small elements or icons, whereas if it’s too low, you might find it frustratingly sluggish to navigate across the screen. Experiment with different settings to find the sensitivity that feels comfortable and efficient for your workflow.
Consider Your Work Environment
The lighting conditions and the type of surface you use your mouse on can affect its performance and responsiveness. If you’re experiencing inconsistent or jumpy cursor movement, make sure you’re using a mouse pad or a suitable surface. Additionally, adjust the pointer speed accordingly if you’re working in a bright or dimly lit environment.
Utilize Mouse Shortcut Gestures
Windows 10 supports various mouse shortcut gestures that can improve your productivity. For example, you can perform a two-finger swipe on a touchpad or a mouse scroll wheel to quickly scroll through documents or web pages. Familiarize yourself with these gesture shortcuts to navigate and multitask more efficiently.
Customize Mouse Buttons and Macros
Many mice come with additional programmable buttons that can be customized to perform specific tasks or keyboard shortcuts. Utilizing these buttons can streamline your workflow, allowing you to perform frequently used actions with a single click.
Software provided by the mouse manufacturer or third-party applications, as mentioned earlier, often offer customization options for these buttons. Take advantage of this feature to further optimize your mouse’s functionality and tailor it to your specific needs.
Changing the mouse sensitivity on Windows 10 can significantly enhance your user experience and increase productivity. Whether you’re a gamer or an everyday computer user, finding the perfect mouse sensitivity can make a noticeable difference in your work and play. Experiment with different settings, utilize third-party software if necessary, and take advantage of additional mouse features to tailor your mouse sensitivity to your exact preferences.

Adjusting Mouse Sensitivity on Windows 10
If you find that your mouse is either too slow or too fast on your Windows 10 computer, you can easily adjust the mouse sensitivity to your preference. Here’s how:
Method 1: Using the Settings Menu
1. Open the Start menu and click on the «Settings» gear icon.
2. In the Settings menu, click on «Devices».
3. Select the «Mouse» option from the left sidebar.
4. In the Mouse settings, scroll down and find the «Related settings» section, then click on «Additional mouse options».
5. In the Mouse Properties window, navigate to the «Pointer Options» tab.
6. Adjust the slider under «Motion» to increase or decrease the mouse sensitivity. You can test the sensitivity by moving the slider back and forth.
7. Click «Apply» and then «OK» to save the changes.
Method 2: Using the Control Panel
1. Open the Control Panel by typing «Control Panel» in the search bar and selecting it from the results.
2. In the Control Panel, click on «Hardware and Sound».
3. Under the «Devices and Printers» section, click on «Mouse».
4. In the Mouse Properties window, navigate to the «Pointer Options» tab.
5. Adjust the slider under «Motion» to change the mouse sensitivity.
6. Click «Apply» and then «OK» to save the changes.
Key Takeaways: How to Change Mouse Sensitivity on Windows 10
- Adjusting mouse sensitivity can improve accuracy and comfort while using your computer.
- To change mouse sensitivity on Windows 10, go to the Control Panel and click on «Hardware and Sound.»
- Under the «Devices and Printers» section, click on «Mouse.»
- In the «Mouse Properties» window, go to the «Pointer Options» tab.
- Move the slider to the right to increase mouse sensitivity or to the left to decrease it.
Frequently Asked Questions
Here are some commonly asked questions about changing mouse sensitivity on Windows 10:
1. How do I adjust the mouse sensitivity on Windows 10?
To adjust the mouse sensitivity on Windows 10, follow these steps:
Step 1: Click on the Start button and open the Settings menu.
Step 2: In the Settings menu, select «Devices.»
Step 3: In the Devices menu, click on «Mouse.»
Step 4: Under the «Related settings» section, click on «Additional mouse options.»
Step 5: In the Mouse Properties window, go to the «Pointer Options» tab.
Step 6: Adjust the mouse sensitivity by moving the slider towards the left or right. Moving it to the left decreases sensitivity, while moving it to the right increases sensitivity.
2. Can I customize the mouse sensitivity for different users?
Yes, you can customize the mouse sensitivity for different users on Windows 10. Here’s how:
Step 1: Follow the steps mentioned above to open the Mouse Properties window.
Step 2: In the Mouse Properties window, go to the «Pointer Options» tab.
Step 3: Check the box that says, «Enhance pointer precision.»
Step 4: Click on «Apply» and then click on «OK.»
Step 5: Repeat these steps for each user account on your Windows 10 computer.
3. What is mouse sensitivity and why should I adjust it?
Mouse sensitivity refers to how the cursor on your screen moves in response to the physical movement of your mouse. Adjusting the mouse sensitivity allows you to control the speed and precision of the cursor movement.
You may need to adjust the mouse sensitivity if:
— The cursor is moving too fast or too slow for your liking.
— You’re experiencing difficulty in accurately clicking on icons or buttons.
— You want to improve your overall productivity and comfort while using the computer.
4. Can I adjust the mouse sensitivity for a specific program or game?
Yes, you can adjust the mouse sensitivity for a specific program or game on Windows 10. Here’s how:
Step 1: Open the program or game for which you want to adjust the mouse sensitivity.
Step 2: Follow the steps mentioned above to open the Mouse Properties window.
Step 3: In the Mouse Properties window, go to the «Pointer Options» tab.
Step 4: Check the box that says, «Enhance pointer precision.»
Step 5: Click on «Apply» and then click on «OK.»
Step 6: The adjusted mouse sensitivity will now apply specifically to the program or game you opened.
5. Is there a keyboard shortcut to change mouse sensitivity on Windows 10?
No, there isn’t a specific keyboard shortcut to change mouse sensitivity on Windows 10. The adjustment needs to be made through the Mouse Properties window as mentioned in the previous answers.
Changing the mouse sensitivity on Windows 10 is a simple process that can greatly enhance your computing experience. By adjusting the sensitivity, you can find the perfect balance between precision and speed for your mouse movements. To change the mouse sensitivity, go to the Windows Settings, click on «Devices,» and then select «Mouse.» From there, you can adjust the sensitivity by moving the slider or selecting a preset sensitivity level.
Once you have changed the mouse sensitivity, you can test it out and make further adjustments if needed. Remember, finding the right sensitivity may take some trial and error, but the end result will be smoother and more precise mouse movements. So, go ahead and give it a try to find your ideal mouse sensitivity on Windows 10!
Adjusting mouse sensitivity in Windows 10 can make your computer experience smoother and more tailored to your needs. Whether you’re gaming, working, or just browsing, tweaking this setting can improve your comfort and efficiency. Here’s a quick guide on how to do it.
We’ll walk through the steps to tweak your mouse sensitivity settings in Windows 10. This will help you fine-tune how fast your mouse pointer moves across the screen, making it more responsive to your personal preferences.
Step 1: Open Settings
To start, click on the Start menu and select the gear icon to open the Settings app.
The Settings app is your go-to place for making changes to your computer’s system settings. Opening it up will give you access to various options, including the device settings we need.
Step 2: Go to Devices
In the Settings window, click on the “Devices” option to proceed.
The Devices section contains all settings related to the hardware connected to your computer, including your mouse. Selecting this option brings you closer to adjusting your mouse sensitivity.
Step 3: Select Mouse
Within the Devices menu, click on “Mouse” from the sidebar on the left.
This section is dedicated entirely to mouse settings, where you can tweak various aspects of how your mouse behaves. We’re looking for the sensitivity settings here.
Step 4: Adjust the Pointer Speed
Look for the “Cursor speed” slider under the “Mouse” section and drag it left or right to adjust your mouse sensitivity.
The slider allows you to increase or decrease the speed at which your mouse pointer moves. Sliding it to the right makes the pointer move faster, while sliding it to the left slows it down.
Step 5: Apply the Changes
After adjusting the slider, simply close the Settings window. Your changes are automatically saved.
You don’t need to click an “apply” button. Windows 10 will remember your new settings, making your mouse sensitivity just right for your needs.
After completing these steps, your mouse pointer will move at the speed that feels most comfortable for you. This small adjustment can make a big difference in how you interact with your computer every day.
Tips for Adjusting Mouse Sensitivity in Windows 10
- Test your settings: Spend some time using your adjusted settings to make sure they feel right.
- Gradual changes: Make small adjustments rather than big jumps to find the perfect setting.
- Gaming considerations: If you’re a gamer, you might need different sensitivity settings for different games.
- DPI settings: If your mouse has a DPI button, you can use it to change sensitivity on the fly.
- Software help: Some mice come with dedicated software for more advanced sensitivity settings.
Frequently Asked Questions
Why is mouse sensitivity important?
Mouse sensitivity affects how quickly your pointer moves, impacting your overall computer experience. Whether for gaming or work, finding the right sensitivity can increase your efficiency.
Can I revert back to default settings?
Yes, you can easily reset the slider to its original position if you find the new setting uncomfortable.
Is there a way to have different sensitivities for different apps?
Some third-party software allows you to set different sensitivities for different applications, but Windows 10 does not support this natively.
What if my mouse still feels too slow?
If adjusting sensitivity doesn’t help, check if your mouse has DPI settings or consider updating your mouse driver.
Do all mice have the same sensitivity settings?
No, different mice may have different default sensitivities and capabilities. Always refer to your mouse’s manual for specific features.
Summary
- Open Settings.
- Go to Devices.
- Select Mouse.
- Adjust the Pointer Speed.
- Apply the Changes.
Conclusion
Adjusting mouse sensitivity in Windows 10 is a simple yet powerful way to customize your computer experience. Whether you’re navigating spreadsheets, designing graphics, or conquering virtual battlefields, the right sensitivity can make all the difference. Remember, it’s not just about speed—it’s about finding that sweet spot where your movements feel natural and intuitive.
If you’re still unsure about your settings, don’t hesitate to experiment with different levels until you find the one that suits you best. And if you’re looking for more advanced options, consider exploring your mouse’s software or additional tools available online.
Fine-tuning your mouse sensitivity could be a game-changer, making your daily interactions with your computer more seamless and enjoyable. So, take a few minutes to adjust your settings—you might be surprised at how much smoother everything feels!
Matthew Burleigh has been writing tech tutorials since 2008. His writing has appeared on dozens of different websites and been read over 50 million times.
After receiving his Bachelor’s and Master’s degrees in Computer Science he spent several years working in IT management for small businesses. However, he now works full time writing content online and creating websites.
His main writing topics include iPhones, Microsoft Office, Google Apps, Android, and Photoshop, but he has also written about many other tech topics as well.
Read his full bio here.
Мышь является одним из главных инструментов взаимодействия с компьютером, незаменимым средством управления графическими интерфейсами абсолютно разных систем. Максимальная простота и удобство – два основных параметра, определивших популярность устройства в своё время.
Но, к сожалению, штатные настройки мыши не всегда удовлетворяют даже базовым задачам – курсор может перемещаться слишком медленно или, наоборот, слишком быстро, что в разы ухудшает удобство повседневной работы с компьютером. Как в такой ситуации гибко настроить мышь под себя? См. также: меняем, добавляем и создаём курсор для мыши на Windows 10.
Настраиваем общие свойства мыши
Чувствительность, скорость прокрутки колёсика и щелчка мыши являются важнейшими параметрами такого рода устройств. От них зависит скорость передвижения курсора – будет ли он перемещаться плавно или резко, какова будет скорость реакции системы на сигналы, подаваемые устройством.
Чтобы отрегулировать общие параметры мыши на Windows 10, подойдут следующие способы.
С помощью меню «Параметры».

Несмотря на перенос части функций в «Параметры», свойства мыши всё так же открываются в классическом меню.
- Откроем меню «Параметры» любым удобным способом – нажав на иконку в виде шестерёнки в меню «Пуск» или просто зажав комбинацию Win + I.
- Перейдём к разделу «Устройства», нажав на плитку с иконкой в виде клавиатуры и колонки.
- В новом меню обратимся к левой панели и откроем вкладку «Мышь». Используем доступные настройки, а при необходимости обращаемся к «Дополнительным параметрам мыши», выбрав одноимённую ссылку в нижней части меню.
Через «Панель управления».
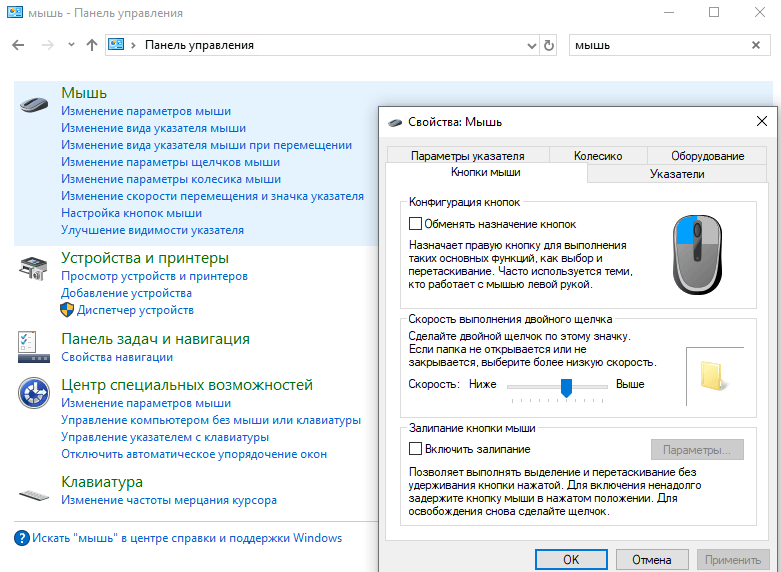
«Панель управления» сразу перебрасывает настройки мыши в отдельное окно.
- Откроем «Панель управления», найдя ее в панели поиска.
- Обратимся к строке поиска в верхнем правом углу и введём название «Мышь».
- Нажмём на одноимённую ссылку – она появится в списке результатов в центральной части окна.
После того как мы попадём в параметры мыши, мы сможем обратиться к более детальным настройкам.
Регулируем чувствительность мыши
От этого параметра будет зависеть то, насколько быстро будет двигаться курсор, а это является одинаково важным параметром как для активной игры в экшны или шутеры, так и для простой офисной работы.
Чтобы отрегулировать скорость курсора на экране, сделаем следующее:
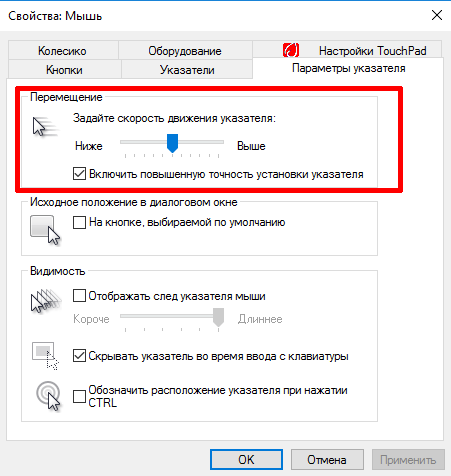
Замену классическому ползунку настроек пока что не придумали.
- Перейдём к настройкам мыши одним из описанных ранее способов.
- В окне «Свойства: Мышь» перейдём к вкладке «Параметр указателя». Нужная нам настройка является первой – «Задайте скорость движения указателя». Для нахождения оптимальной скорости курсора попробуем подвигать ползунок в разные стороны и понять, где находится наша золотая середина между скоростью и удобством.
Настраиваем колёсико и скорость прокрутки
Чуть менее важный параметр, влияющий на комфорт в повседневном использовании. Чтобы настроить чувствительность системы на прокручивание колёсика мыши:
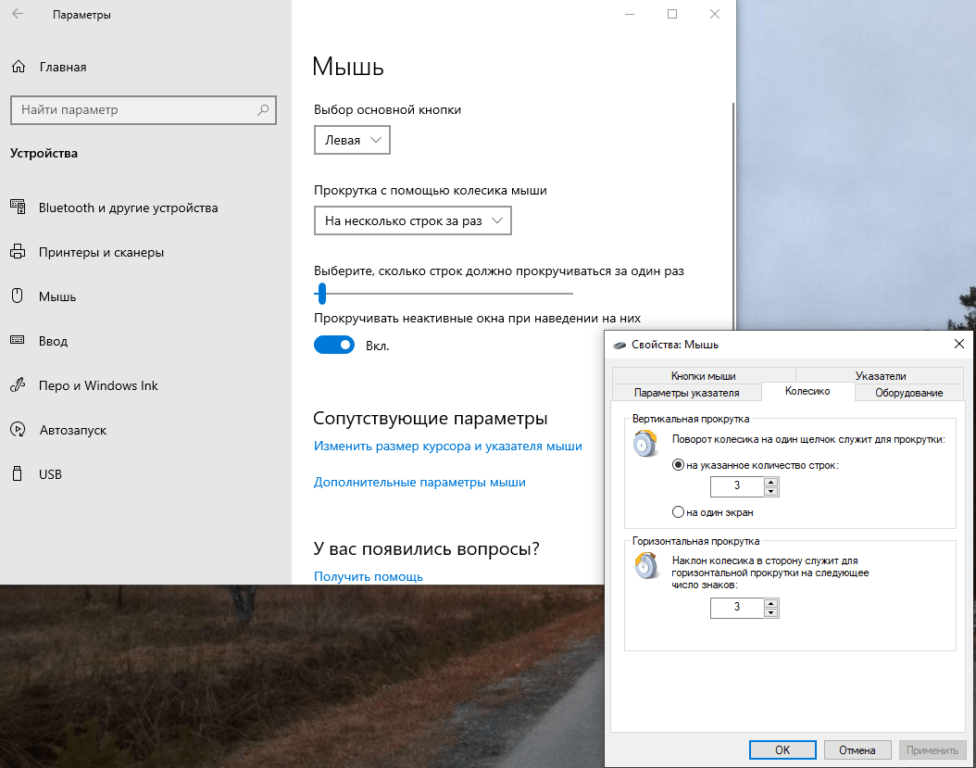
Подпись – Всё то же универсальное меню с настройками мыши.
- Откроем меню «Параметры» любым удобным способом – нажав на иконку в виде шестерёнки в меню «Пуск» или зажав комбинацию Win + I.
- Перейдём к разделу «Устройства», нажав на плитку с иконкой в виде клавиатуры и колонки.
- В новом меню обратимся к левой панели и откроем вкладку «Мышь». Нужный нам параметр – «Выберите, сколько строк должно прокручиваться за раз». Отрегулируем ползунок до нужных значений, тестируя изменения в любом подходящем приложении – например, пролистывая страницу в браузере с каждым сдвигом.
- Чтобы подтвердить установленные настройки, нажмём на кнопки «Применить» и «ОК».
Аналогичный параметр может быть найден в окне «Свойства: Мышь» – только вместо сдвига ползунка мы будем указывать количество строк в цифровом виде.
Изменяем реакцию двойного щелчка левой кнопкой
Отработанное двойное нажатие на мышь позволяет довольно быстро запускать нужные приложения, но из-за скорости этого действия могут возникать определённые сложности: например, мы будем кликать слишком быстро или слишком медленно из-за некорректных настроек системы. Чтобы исправить такое неудобство:
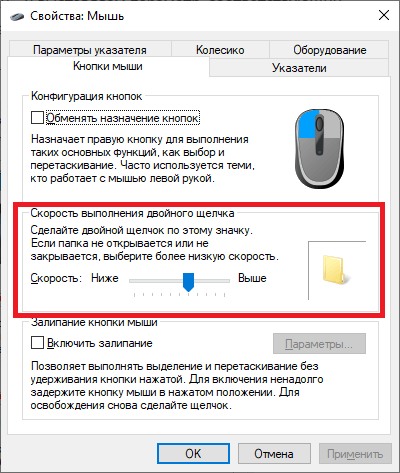
Ползунок для настройки и иконка папки для проверки – нужно ли больше?
- Откроем «Дополнительные настройки мыши» в меню «Параметры» или через «Панель управления».
- Перейдём на вкладку «Кнопки мыши» – нужная нам настройка находится ровно посередине.
- Двигая ползунок, определим подходящую нам скорость – для проверки мы можем использовать иконку в виде папки справа от параметра. Не перестарайтесь.
- Для подтверждения изменений нажмём на кнопки «Применить» и «ОК».
Меняем внешний вид указателя (для настоящих эстетов)
Не нравится стандартный вид курсора в Windows 10? Хочется чего-то нового, в сравнении с предыдущими версиями системы? Система настроек в Windows может удовлетворить и такие требования.
Для изменения внешнего вида указателя:
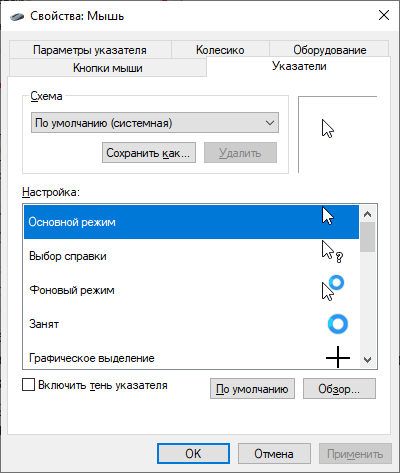
Меняем курсоры на любой вкус и ситуацию.
- Откроем «Дополнительные настройки» мыши в меню «Параметры» или нужный нам набор через «Панель управления».
- Перейдём на вкладку «Указатели». Мы сразу увидим список доступных для изменения курсоров. Мы сможем изменить курсор в каждой ситуации под свои требования – в том числе и заменив его на какое-нибудь изображение. Для этого достаточно выбрать режим щелчком мыши и нажать на кнопку «Обзор», указав затем путь к нужной картинке.
- После внесения изменений нажмём на кнопки «Применить» и «ОК».
Особенности настройки игровых мышей с дополнительными кнопками
Мышь является довольно простым устройством, но определённые модели превращают простое устройство ввода в едва ли не замену клавиатуры в определённых действиях. Чаще всего, такие девайсы позиционируются как игровые, и дополнительные клавиши, в таком случае, превращаются в хоткеи в определённых приложениях. Хочется также отметить, что подобные решения могут подойти и для простых пользователей – поддержка макросов позволяет использовать их даже в стандартном «Офисе».
К сожалению, даже Windows 10 не поддерживает полноценной настройки таких мышек без использования дополнительного ПО. Обычно оно поставляется вместе с устройством на диске или оказывается доступно на сайте разработчиков. К примеру, так выглядит настройка мыши от A4TECH.
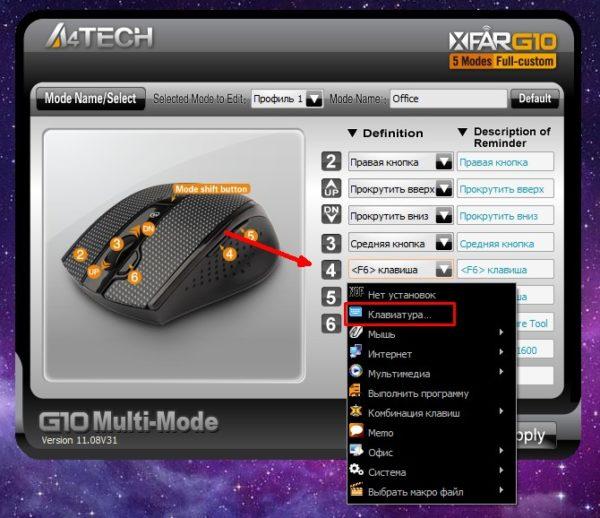
Типовая утилита для настройки клавиш на быстрые действия.
Такие утилиты часто обладают широким набором предустановленных настроек для использования в определённых типах игр – например, шутерах – и удобным функционалом для привязки любых действий на незадействованные клавиши. Среди таких опций можно отметить:
- включение и выключение компьютера;
- запуск определённых приложений;
- быстрое переключение между вкладками/окнами и т.д.
Функционал мыши будет зависеть от конкретной модели и ПО от компании-разработчика. Также можно использовать универсальные утилиты по типу «X-Mouse Button Control» – при наличии драйверов они позволяют настроить практически все модели мышей с дополнительными кнопками, в том числе и китайские no-name девайсы,
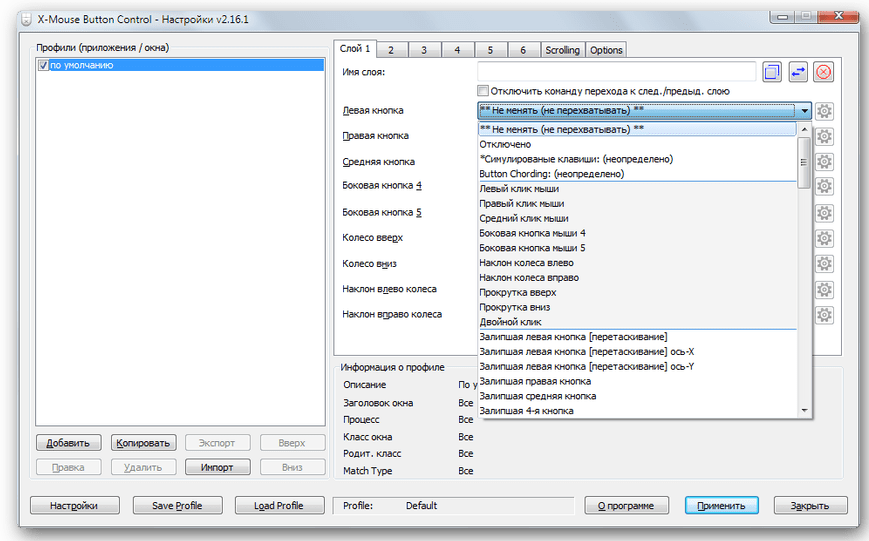
Универсальная утилита для работы с дополнительными кнопками на мышах даже не именитых производителей
Использование тех или иных утилит – вопрос требований и пристрастий конкретных пользователей, но чаще всего стандартного ПО оказывается достаточно для всех основных настроек.
Post Views: 3 376