
how to check mouse dpi windows 10
Ever wondered just how sensitive your mouse is? Well, knowing your mouse’s DPI (dots per inch) can make all the difference in your user experience, especially if you’re into gaming or graphic design. In Windows 10, it’s actually pretty straightforward to check your mouse DPI. You don’t even need any fancy software! You can do it with just a few steps. Ready to get started?
In the following steps, I’ll show you how to check your mouse DPI in Windows 10. You’ll be able to find out the sensitivity settings and make any adjustments if needed.
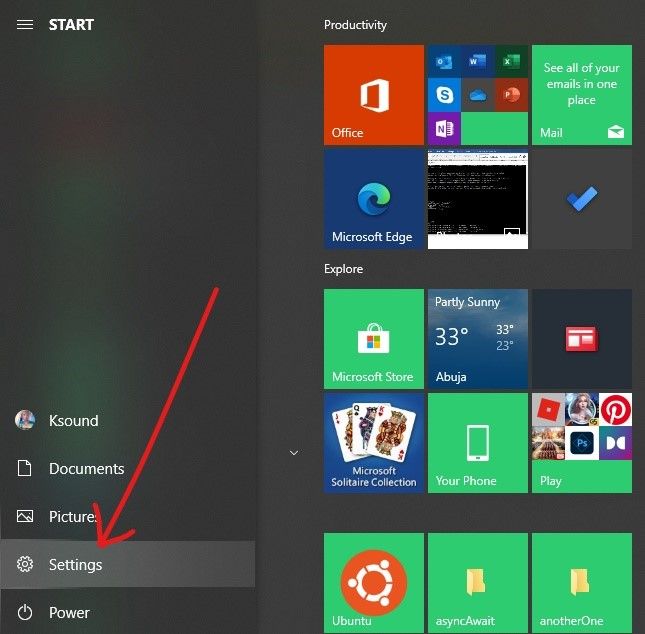
Step 1: Open Settings
Head to the Start Menu and click on the «Settings» icon.
You can also press “Windows key + I” on your keyboard to open Settings directly. This is where you’ll find most of the customization options for your Windows 10 system.
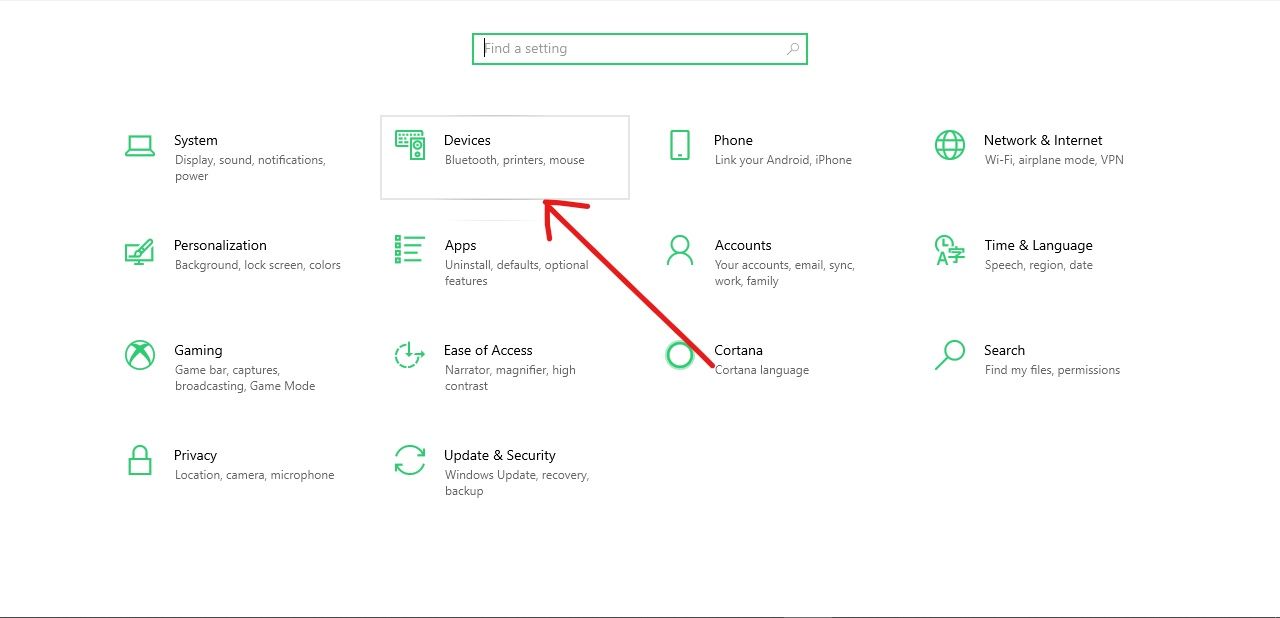
Step 2: Go to Devices
In the Settings window, select «Devices.»
This section contains all the settings for things like Bluetooth, printers, and, you guessed it, your mouse.
Step 3: Select Mouse
Click on «Mouse» on the left side of the Devices menu.
Here, you’ll see options to adjust various mouse settings like scrolling, primary button selection, and more.
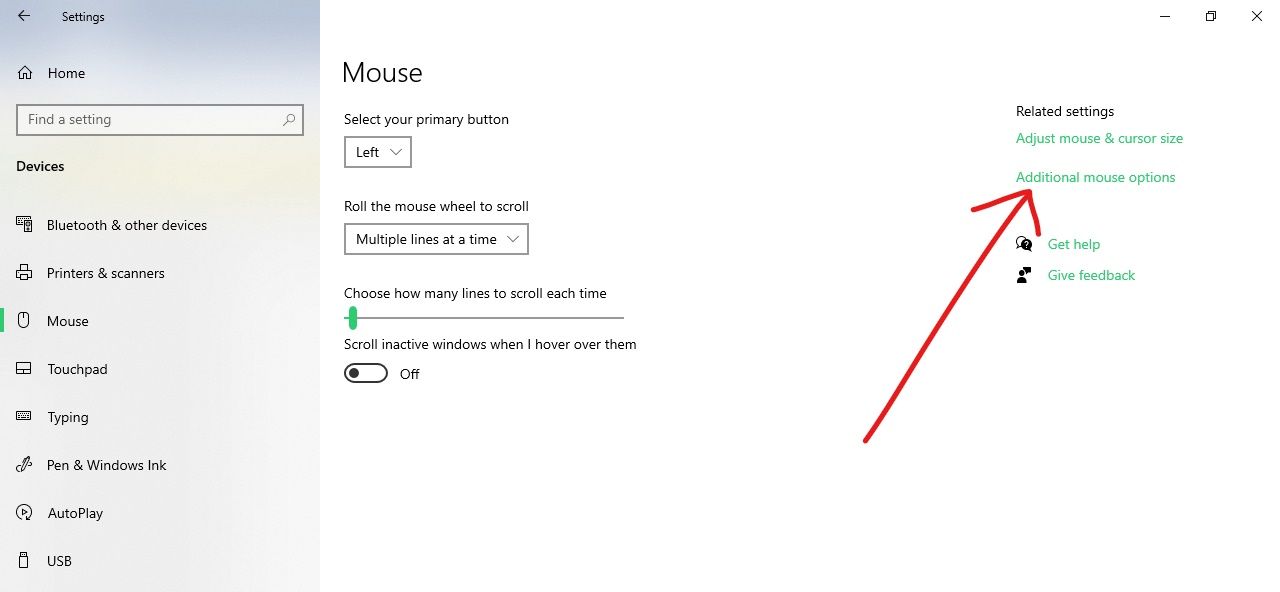
Step 4: Additional Mouse Options
Scroll down and click on «Additional mouse options.»
This will open a new window where you can access more detailed settings for your mouse, including pointer speed and hardware properties.
Step 5: Pointer Options Tab
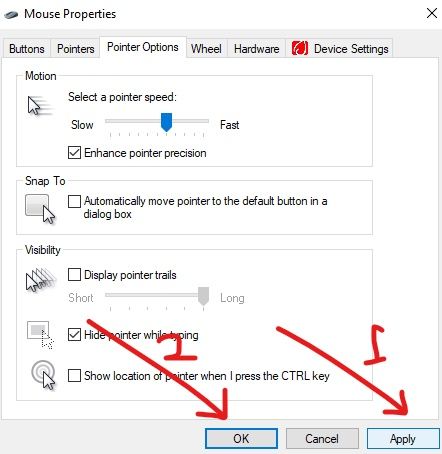
In the Mouse Properties window, go to the «Pointer Options» tab.
This tab lets you change settings like pointer speed and enhance pointer precision. While it doesn’t directly show DPI, it affects how your mouse sensitivity feels.
Step 6: Use DPI Checker or Software
For an exact DPI number, you may need to use a DPI checker tool or the software that came with your mouse.
Some brands provide their own software that allows you to see and adjust the DPI settings. If not, you can use online DPI calculator tools to find out the precise DPI.
After completing these steps, you will have a clearer understanding of your mouse’s DPI settings and how they affect your daily tasks or gaming performance.
Tips for Checking Mouse DPI in Windows 10
- Know Your Mouse Model: Some mice have built-in DPI buttons or come with software that lets you check and adjust DPI easily.
- Use Online Tools: There are various online tools and websites where you can measure your mouse DPI.
- DPI Buttons: If your mouse has DPI buttons, press them to cycle through the presets. These are usually located on the mouse itself.
- Mouse Software: Check if the mouse manufacturer provides software. This software typically provides DPI settings and allows you to fine-tune sensitivity.
- Manual Calculation: You can manually calculate DPI by moving your mouse a set distance and measuring the cursor movement on-screen.
Frequently Asked Questions
What is mouse DPI?
Mouse DPI stands for «dots per inch» and is a measurement of how sensitive a mouse is.
Why is DPI important?
Higher DPI means higher sensitivity, which can be crucial for activities like gaming or graphic design where precision matters.
Can I change my mouse DPI?
Yes, many mice come with DPI buttons or software that lets you change the DPI settings.
How do I find out my mouse’s default DPI?
You can usually find this information in the mouse’s manual or product specifications on the manufacturer’s website.
Do all mice have adjustable DPI?
No, not all mice have adjustable DPI. Basic models might have fixed DPI settings.
Summary of Steps
- Open Settings
- Go to Devices
- Select Mouse
- Additional Mouse Options
- Pointer Options Tab
- Use DPI Checker or Software
Conclusion
In a nutshell, checking your mouse DPI in Windows 10 is pretty straightforward, especially if you follow the steps laid out above. Whether you’re a gamer looking for that competitive edge or just someone who wants a more comfortable computing experience, knowing your mouse DPI can be incredibly useful. You might find that tweaking it to the right level will significantly improve your efficiency and accuracy.
Feel free to explore different settings and tools until you find the perfect sensitivity for your needs. And remember, understanding your mouse DPI is just one part of optimizing your overall computer setup. Happy clicking!
Matt Jacobs has been working as an IT consultant for small businesses since receiving his Master’s degree in 2003. While he still does some consulting work, his primary focus now is on creating technology support content for SupportYourTech.com.
His work can be found on many websites and focuses on topics such as Microsoft Office, Apple devices, Android devices, Photoshop, and more.
If your work requires a lot of precision, like graphic design and gaming, then you might want to adjust how fast or slow your external mouse or keyboard is.
In this guide, I will show you how you can make your mouse more sensitive or less sensitive by changing its DPI.
What is DPI?
DPI stands for dots per inch. It is the measurement of mouse sensitivity and cursor speed.
The higher your mouse DPI, the faster your mouse responds to movement per inch and the farther it travels. The slower the DPI, the slower your mouse responds to movement.
You can change your mouse DPI through the Settings app.
Step 1: Click on Start or press the WIN (Windows) key on your keyboard and select Settings.
Step 2: Out of the menu items you see, select «Devices».
Step 3: Click on the Mouse tab on the Devices page, then select «Additional mouse options» under “Related settings”.
Step 4: A pop-up will appear. Click on the «Pointer options» tab.
Step 5: You will see a slider under «Select pointer speed» which you can use to adjust your mouse DPI. Move the slider to the left to reduce the DPI and to the right to increase it.

Step 6: Click the «Apply» button to save changes and click «Ok» to close the pop-up.
Advanced mice such as those used for gaming often have buttons or sliders for adjusting their DPI, so you can change the DPI of those mice without opening the Settings app.
Final Words
In this guide, you learned what DPI is and how to change it on your Windows 10 computer.
Changing the DPI is useful if what you do requires a lot of precision.
If you game on your PC, you probably need a faster DPI to beat intervals. And if you’re a designer, you might need the DPI slower for the sake of precision.
I hope this article helps you change your mouse DPI. If you find it useful, please share it with your friends and family.
Thank you for reading.
Learn to code for free. freeCodeCamp’s open source curriculum has helped more than 40,000 people get jobs as developers. Get started
Changing mouse DPI is usually a gamer’s concern, especially for first-person shooter games which mouse DPI or sensitivity plays a big role in improving aiming in the game. Most players would want to use the same DPI settings (commonly 400, 800 or 1200) as the pro players who are at the top of the game.
However, changing mouse DPI can be challenging depending on if you have a gaming mouse or just a normal mouse that doesn’t have a driver software. In this guide, you will learn how to change mouse DPI in Windows 11 or Windows 10 based on what mouse you use.
What is mouse DPI? DPI stands for Dots Per Inch. It is a unit used to measure how many dots (or pixels) the cursor on the screen can move if you move your mouse an inch in real life. So, if you have a mouse DPI of 800, moving your mouse an inch would move the cursor exactly 800 pixels on the screen.
How to change mouse DPI settings for gaming mouse
If you have a gaming mice, you can change your mouse DPI settings directly from the driver software. Most gaming mouses will come with a driver CD or a downloadable web address where you can download and install the driver software. These manufacturer software usually allow you to configure the settings of any peripheral of the same brand.
For example, you would want to use Razer synapse if you have a Razer mouse, Logitech G Hub for Logitech mouse, SteelSeries Engine for SteelSeries mouse, etc.
Note that you cannot use a different software that is not made for your mouse. For example, you cannot change the mouse DPI settings in SteelSeries Engine if you are actually using a Razer mouse, because the app is made only for mouse and other peripherals of the same brand.
Since different brand’s configuration software have different interfaces, we couldn’t show you the exact instructions on how to change mouse DPI in each of these software. It is not difficult to do so as most of these software have a well refined user interface that is very easy to use.
To change mouse DPI settings for a gaming mouse:
- Install the mouse’s driver and configuration software.
- Open the configuration software and look for setting that has the keyword “DPI” and/or “Sensitivity“.
- Change the mouse DPI settings (usually a slider) to your preference.
Below are a few screenshots of the mouse DPI settings in different configuration software.
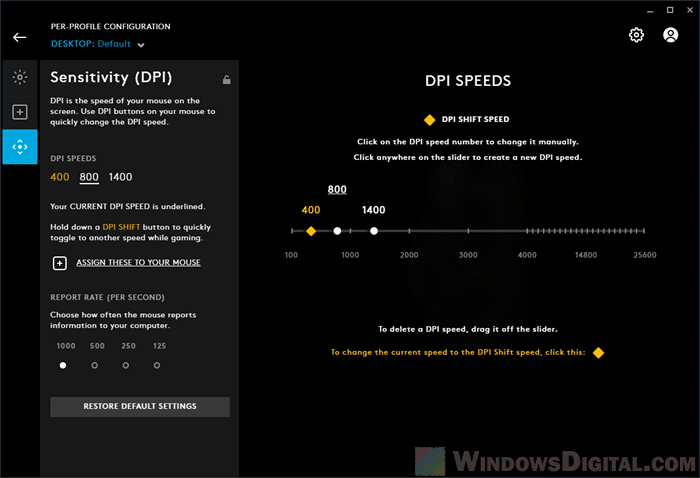
Mouse DPI (Sensitivity) setting in Logitech G Hub
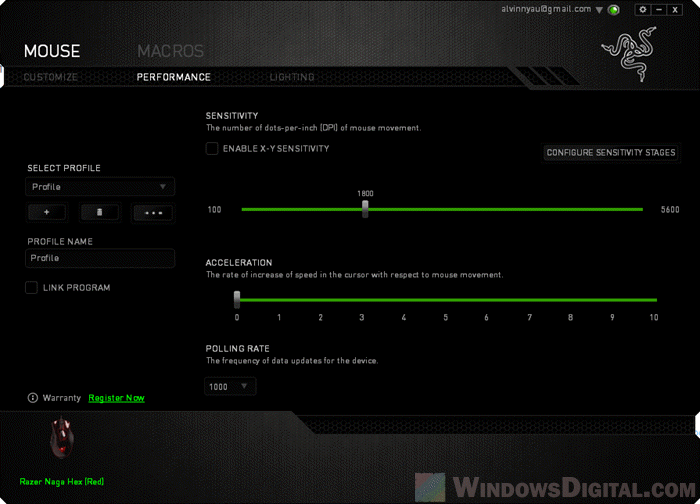
Mouse DPI settings in Razer Synapse for Razer mouse
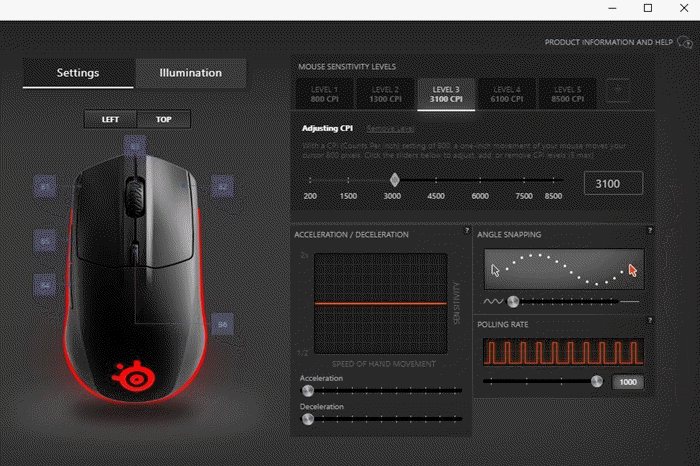
Adjust SteelSeries mouse DPI settings in SteelSeries Engine
How to change mouse DPI in Windows 11/10 for normal mouse
If your mouse is just a normal mouse that are not supported by any configuration software, since there is no setting for mouse DPI in Windows 10/11, you are left with only two options.
- Change the Windows mouse sensitivity instead.
- Or manually measure your mouse DPI and change the Windows mouse sensitivity accordingly to match your desired DPI value.
Change mouse sensitivity in Windows 11 or 10
Similar to mouse DPI, mouse sensitivity controls how fast your mouse cursor moves across the screen. Unlike DPI, there is no number that represent the sensitivity used in Windows 11/10. The mouse sensitivity is just a slider with steps that you can choose from.
To change the mouse sensitivity setting in Windows 11/10, follow the steps below.
- On Windows search bar, search for and open Mouse Settings.
- There are two sliders you can use to change the mouse sensitivity.
Both sliders are essentially the same. Changing one will affect the other.
How to manually check and measure your mouse DPI
If you insist to change your mouse sensitivity to be exactly the same as a certain DPI number, you can manually measure your mouse DPI and change the Windows mouse sensitivity to match the DPI you want.
Before measuring your mouse DPI, there is an option you have to disable in order to get the accurate mouse DPI when you measure it. Search for and open Mouse settings in Windows 11/10. Click on Additional mouse options, then go to Pointer Options tab. Under Motion, uncheck the “Enhance pointer precision” option.
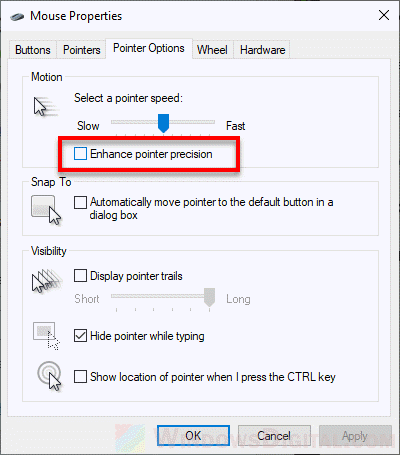
This particular option acts similarly to mouse acceleration. It will accelerate your mouse sensitivity as you move your mouse faster, which means that your mouse DPI will differ based on how fast you move your mouse. Most pro FPS players will have this option disabled at all cost.
To measure your mouse DPI, follow the steps below.
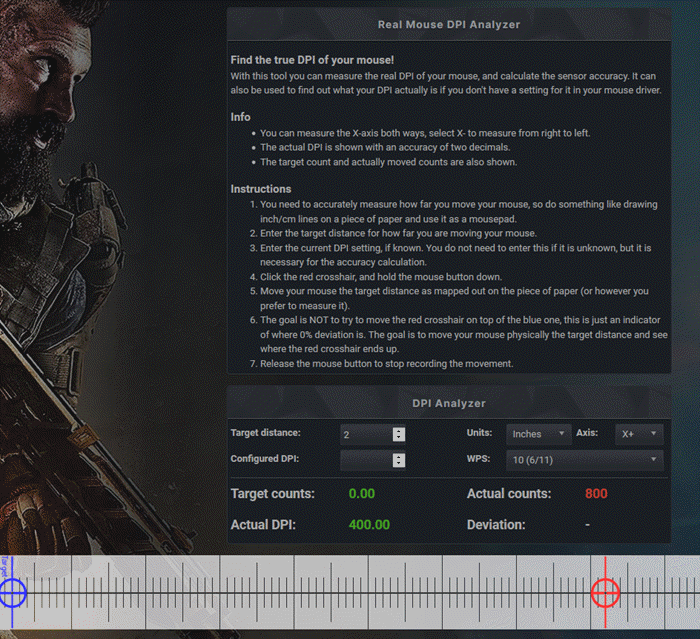
- Prepare a piece of paper (big enough to be a temporary mouse pad) and draw a 2 inches (or 5 cm) line on it.
- Go to the following website:
https://www.mouse-sensitivity.com/dpianalyzer/
- In the webpage, enter 2 as the target distance and select inches as the unit (or 5 and CM as unit).
- Now, place your mouse on the beginning of the line on the paper you’ve prepared earlier.
- While clicking and holding the red Target on the webpage, move your mouse towards the end of the line on the paper.
- Record the Actual DPI and repeat the process several times to get a more accurate average DPI.
The 2 inches and 5 cm is just an example. You can use a longer or shorter line for the DPI measurement. Be sure to also change the “target distance” value on the webpage if you use a different length of line.
Now that you are able to manually measure the DPI of your mouse, you can then change the mouse sensitivity and re-measure again until you find the sensitivity that matches the DPI that you’re looking to achieve.
People game on PCs. Some might prefer consoles, but others do prefer PCs. If you’re new to gaming, or you’ve been playing a while but never felt your mouse performed right during games, you might have been advised to change the DPI for the mouse. DPI is the somewhat technical term that’s used to describe how sensitive the mouse is. It is easier for end-users to understand what sensitivity is in terms of a point & click device than it is to understand DPI. That said, this little setting can help improve a mouse’s performance in a game. Whether you need to increase the DPI, or decrease it really depends on you.
This is useful for gamers however if you don’t game but are not entirely comfortable with your mouse’s performance, the settings we discuss here are worth going over.
Open the Settings app and go to the Devices group of settings. Select the Mouse tab. On the right, or somewhere at the bottom, look for an option called ‘Additional mouse options’ and click it.
A new window will open. This is the old Mouse settings that came from Windows 7 and 8/8.1. Microsoft hasn’t migrated them to the Settings app yet.
There are two settings that you need to change here. The first is the slider under ‘Motion’. This is basically the mouse sensitivity and it dictates how fast and how much screen space the cursor covers when you move the actual mouse. It will take a little trial and error to get it just right, but this is the setting you want to change first.
Under this slider is the ‘Enhance pointer precision’ option. It is usually enabled by default and it is meant to prevent clicks on empty spaces. Basically, it allows the OS to guess what you actually intended to click on even if the cursor was a few pixels away. For games, this is more a hindrance so disable it. I personally find that it isn’t all that useful for normal, non-gaming use. That’s about it.
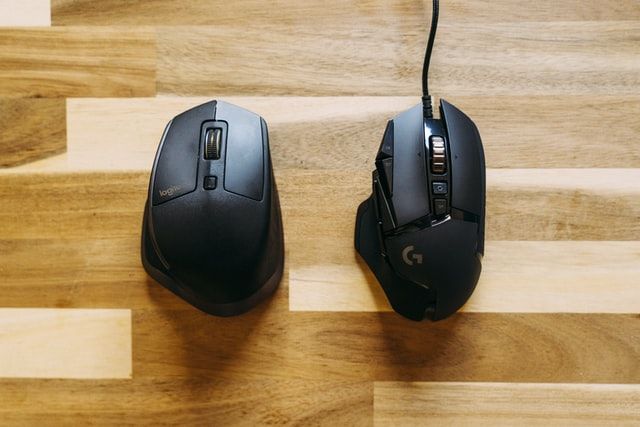
A word about hardware
There are special mice made for gaming. They have a few extra buttons that can be mapped to specific functions and they usually come with their own app to manage them. If you have such a mouse, it is a good idea to use its own app to change the DPI settings. The option may or may not be there but that’s where you should check.
All mice are not created equal. Some support a higher DPI rate i.e., gaming mice, while others are for normal use. You can use a normal mouse to game but if you’re not satisfied with it and changing the settings doesn’t help, you might need to upgrade your hardware.
If your mouse is lagging in general, you should go over these tips to see what might be the problem.

Fatima Wahab
Fatima has been writing for AddictiveTips for six years. She began as a junior writer and has been working as the Editor in Chief since 2014.
Fatima gets an adrenaline rush from figuring out how technology works, and how to manipulate it. A well-designed app, something that solves a common everyday problem and looks
Всем привет, друзья! Я для вас подготовил отличную статью. В ней я постарался максимально подробно описать все варианты изменения чувствительности мыши на Windows 10. Статью я разбил на 4 шага. В самом начале мы разберемся, что же такое DPI и для чего этот параметр нужен. Далее мы изменим настройки в самой операционной системе. После этого кратко рассмотрим специализированные программы.
Для геймеров мы также рассмотрим вариант конфигурации в самой игре. Можете также глянуть видосы по настройке для CS:GO, Dota 2 и LoL – в самом конце статьи. Поехали!
Содержание
- ШАГ 1: Изменение DPI на самой мыши
- ШАГ 2: Настройки в Windows
- ШАГ 3: Фирменная программа настройки
- ШАГ 4: Настройка в игре
- Видео по настройке для игр: CS:GO, Dota 2, LoL
- Задать вопрос автору статьи
ШАГ 1: Изменение DPI на самой мыши

Что же такое DPI? DPI (сокращение с англ. яз. – dots per inch) – это количество точек на квадратный дюйм. Описывает скорость перемещения курсора от чувствительности сенсора, прикасающегося к поверхности стола или коврика для мыши. Если вы когда-либо покупали мышь, то могли встретить этот показатель в характеристиках устройства. Также можно встретиться и другое наименование – CPI (counts per inch). Показатель может варьироваться от 400 до 20000 (или даже больше). В простонародье чувствительность называют – «сенсой».
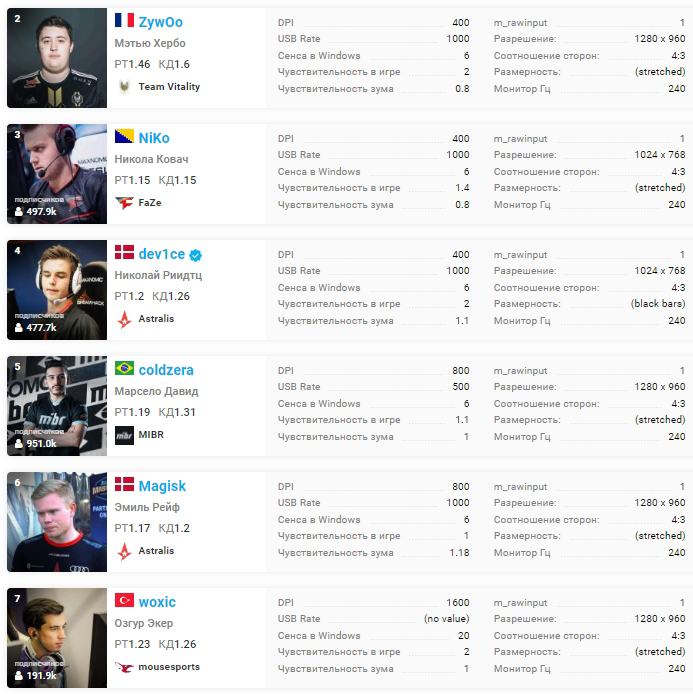
Но, как правило, профессиональные геймеры (CS:GO, LoL, Dota 2 и т.д.) выбирают значения от 400 до 1600 DPI. Чем выше показатель, тем быстрее будет двигаться курсор во время игры. На самом деле геймеры тут разделяются на два лагеря:
- Меньше чувствительность, а значит больше точность наведения курсора или прицела.
- Большая чувствительность, а значит можно резче реагировать на какие-то ситуации в игре. Например, резко разворачиваться и давать хэдшоты.
Напишите в комментариях, к какому лагерю относитесь вы?
Оба варианта имеют как свои плюсы и минусы, но отталкиваться стоит от привычки. Именно поэтому в первом шаге мы должны понять, сколько DPI выдает ваша мышь. Обычно на мышке ниже колёсика между двумя кнопками есть маленькая клавиша – она и переключает различные режимы DPI.

Если у вас не профессиональная мышь, то, скорее всего, эти режимы статические и их нельзя поменять. Но о них вы должны помнить – но зачем? Об этом я расскажу чуть позже.
Как же можно понять, сколько DPI (CPI) у твоей мыши? Тут есть два способа. Первый – если у вас еще осталась коробка или документация, то можно глянуть там. Второй – это просто загуглить информацию по этой мыши. Можно зайти в любой магазин. Там обычно в характеристиках пишут DPI.
ПРИМЕЧАНИЕ! Иногда в магазинах не пишут режимы DPI, которые вшиты по умолчанию. Эту информацию можно поискать на форуме, но найти её нужно обязательно, если вы собираетесь посвятить часть жизни игровому спорту.
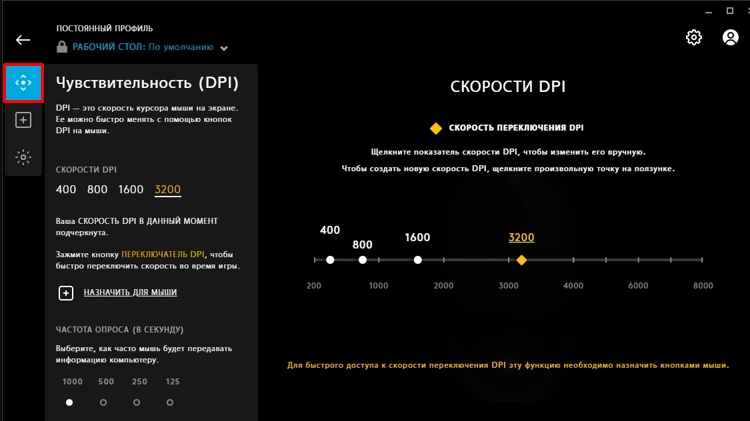
Для примера, я возьму самую популярную на данный момент мышку – Logitech G102 LightSync. По умолчанию в характеристиках стоит 4 режима:
- 400
- 800
- 1600
- 3200
То есть при нажатии по кнопке DPI переключаются и режимы. Распознать, какой режим включен, очень просто – нужно немного поводить курсор по экрану. Чем быстрее он двигается и резче реагирует, тем больше значение DPI. После этого просто выбираем тот режим, который наиболее вам привычен.
Для чего нужно запомнить это значение? Если мышь сломается или выйдет из строя, вам нужно будет или купить мышь с подобными значениями, или взять программируемый, профессиональный девайс. Например, у недорогой и популярной Logitech G102 LightSync есть отдельное приложение, где можно изменить встроенные DPI. Не подумайте, что это реклама? – я ею даже не пользовался никогда, просто посмотрел самый популярный вариант в интернете. Для профессионального спорта, я бы взял что-то подороже. Теперь переходим ко второму шагу.
В основном профессиональные игроки выбирают сенсу с параметром DPI в 400. На втором месте– 800. Но есть также и игроки, играющие с DPI – 1600.
Напишите в комментариях сколько DPI выбрали вы?
Итак, мы поняли какие режимы есть у нашей мышки. Теперь наша задача настроить чувствительность мыши (сенсу) на Виндовс 10. На самом деле рекомендации далее подойдут для всех версий «Окон», так как мы будет все делать через «Панель управления».
- Чтобы попасть в панель, воспользуйтесь поиском, введя туда название утилиты.
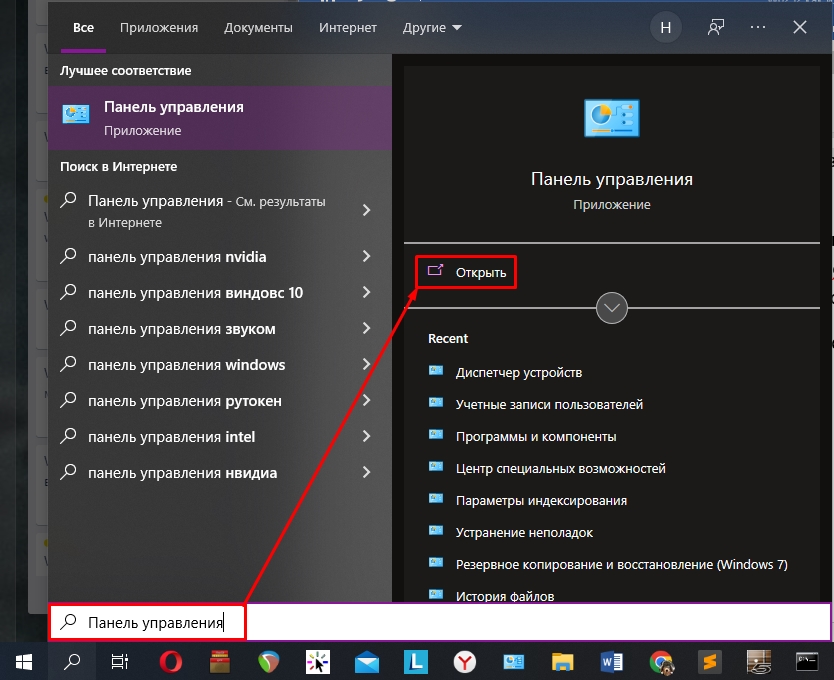
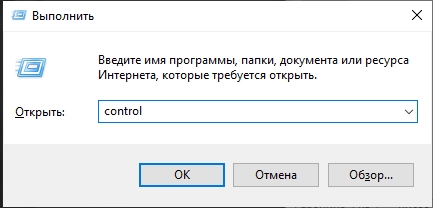
- Или зажимаем кнопки + R и вводим команду:
control
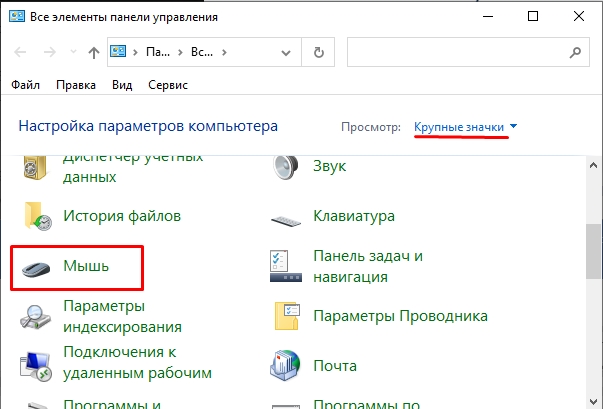
- Находим раздел «Мышь». Если вы не можете найти этот пункт, посмотрите, чтобы у вас стоял тот же режим просмотра, как и на картинке ниже.
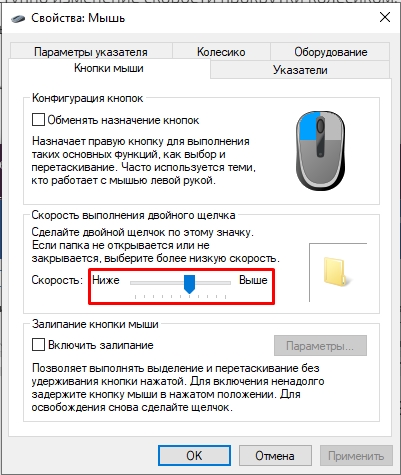
- Теперь просто перетаскиваем бегунок влево или вправо. После изменения конфигурации обязательно нажмите по кнопке «Применить» и проверьте, чтобы вам было удобно.
Поменять чувствительность мыши в Виндовс 10 можно и с помощью параметров. На всякий случай напишу этот способ, а то мало ли разработчики могут выпилить настройку мыши из панели управления.
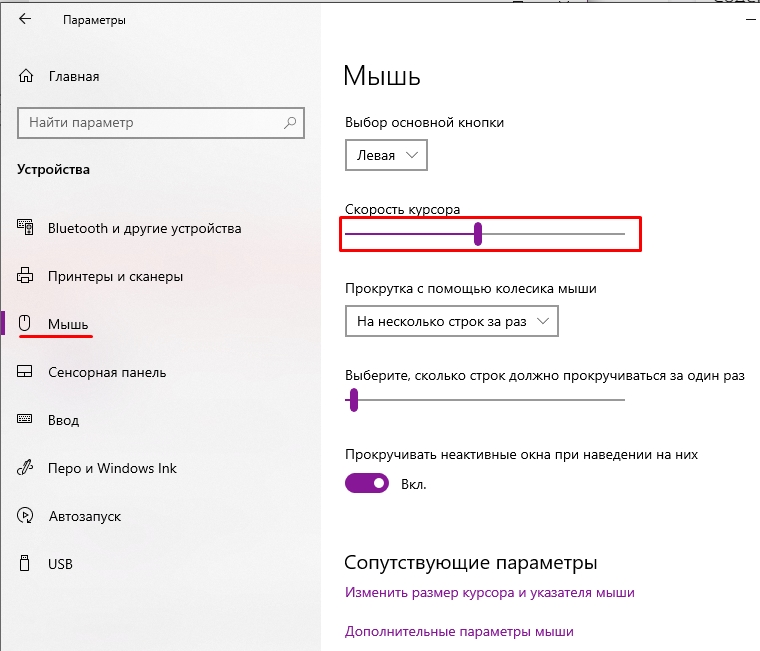
- Чтобы попасть в настройки, кликните по кнопке «Пуск» и потом по шестеренке.
- Теперь заходим в «Устройства».
- Далее в разделе «Мышь» устанавливаем «Скорость курсора». Настройки будут применяться сразу.
Для нормальной комфортной игры и работы вам также обязательно нужно сделать две вещи:
- Убрать залипание клавиш Shift. Иначе в любой момент игра или программа будет свернута, а вы увидите окно залипания. Лучше эту штуку деактивировать.
- Убрать ускорение мыши. Ускорение увеличивает скорость прокрутки курсора при преодолении большего расстояния. То есть чем дальше проходит курсор, тем быстрее он двигается. Для игр – это противопоказано, так как точность стрельбы и наведения курсора уменьшается в двое. Для работы можно этот параметр не отключать.
ШАГ 3: Фирменная программа настройки
У большинства мышей, которые заявлены как игровые, есть дополнительное программное обеспечение. В нем можно изменять различные настройки: от цвета подсветки до чувствительности. Можно создавать различные профили и изменять для них настройки. Мне привычнее играть со стандартными DPI, но вы можете его подстроить под себя.
Рассказывать подробно про сами программы я не буду – они все одинаково работают. Для начала вам нужно погуглить и поискать информацию о том, поддерживает ли ваша мышь данное ПО. Если да – то скачиваем его с официального сайта, устанавливаем, и уже в самой программе настраиваем DPI.
ШАГ 4: Настройка в игре
Ну и самый последний способ уменьшить или увеличить чувствительность мыши: в самой игре, а не в Windows 10. Покажу на примере Counter-Strike: Global Offensive. Просто запускаем игру, заходим в «Настройки», находим «Клавиатуру и мышь». Меняем конфигурацию «Чувствительности мыши». Обязательно проверьте, чтобы была отключена настройка «Ускорение мыши».

Вообще каждый геймер делает настройки в консоли или заводит отдельный конфигурационный файл. Вот пару консольных команд:
- m_rawinput (0.1) – если установить значение 1, то все настройки Виндовс будут игнорироваться, и сигнал будет неизменно поступать в игру.
- sensitivity (0.1-12000) – чувствительность. Будьте внимательны, так как тут значение не в DPI. Например, я в КС играл с параметром – 1.5.
- m_yaw – чувствительность по оси X.
- m_pitch – чувствительность по оси Y.
- m_customaccel (0) – режимы акселерации или ускорения мыши, про которую я говорил ранее. Есть несколько режимов. От нуля (полностью отключено) до 3 (полное ускорение).
С настройками лучше уже познакомиться на специальных форумах, или можно скачать конфигурационные файлы профессиональных игроков. Просто загружаем их к себе в игру, и далее меняем некоторые настройки под себя.
Видео по настройке для игр: CS:GO, Dota 2, LoL
На этом все, дорогие читатели. Надеюсь, вам удалось настроить сенсу под себя. Пишите свои дополнения и вопросы в комментариях. Также вы можете делиться своими настройками там же. Всем до встречи на портале WiFiGiD.RU.