
If you are having trouble with your microphone features, or with the microphone on your headset or webcam, the following information can help you troubleshoot and resolve issues.
Make sure apps have access to the microphone

If your microphone isn’t detected after updating Windows 11, you may need to give your apps permission to use it. Here’s how:
-
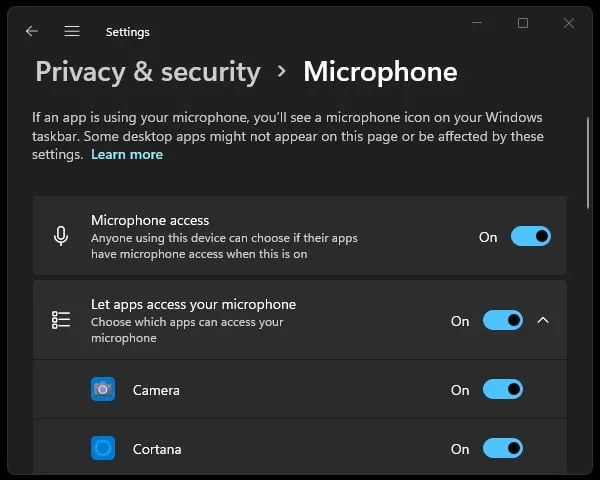
Select Start > Settings > Privacy & security > Microphone and make sure Microphone access is turned on.
-
Make sure Let apps access your microphone is turned on, then choose which apps have access. Desktop apps won’t appear in this list.
If you want to give access to desktop apps, make sure that Let desktop apps access your microphone is turned on. You can’t turn off microphone access for individual apps.
If your camera contains a microphone, you might also need to give your apps permission to use your camera. If so, select Start > Settings > Privacy & security > Camera and make sure Camera is turned on.
Others can’t hear me
Try the following solutions:
-
If your headset has a Mute button, make sure it isn’t active.
-
Make sure that your microphone or headset is connected correctly to your computer. If your headset is a wireless Bluetooth device, make sure your Bluetooth device is paired and connected by following the steps at Pair a Bluetooth device in Windows.
-
Make sure that your microphone or headset is the system default recording device. Here’s how to do this in Windows 11:
-
Select Start > Settings > System > Sound.
-
In Input, go to Choose a device for speaking or recording, and select the device you want.
-
To test your microphone, speak into it. In Volume, make sure the blue bar moves to make sure Windows hears you.
-
-
Run the Recording Audio Troubleshooter. Select Settings > System > Troubleshoot > Other troubleshooters. Select the Recording Audio troubleshooter.
Windows isn’t detecting the headset, camera, or microphone
If the previous troubleshooting steps do not resolve the problem and Windows is not even detecting your microphone, try reinstalling your audio drivers:
-
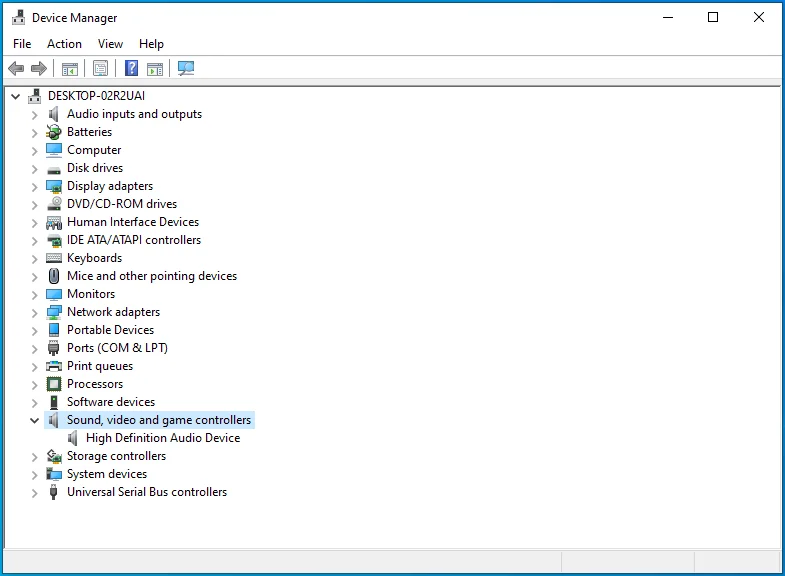
Right-click the Start button and select Device Manager.
-
Expand the Sound, video and game controllers section.
-
Look for any audio devices or drivers. Right-click the audio device and select Uninstall device. Make sure to check the box that says Delete the driver software for this device and then select Uninstall. Repeat this process for any other audio devices.
-
Restart your computer. Windows will attempt to reinstall your audio devices and drivers automatically. If it does not, right-click the Start button and select Device Manager. Right-click the Sound, video and game controllers section and select Scan for hardware changes.
-
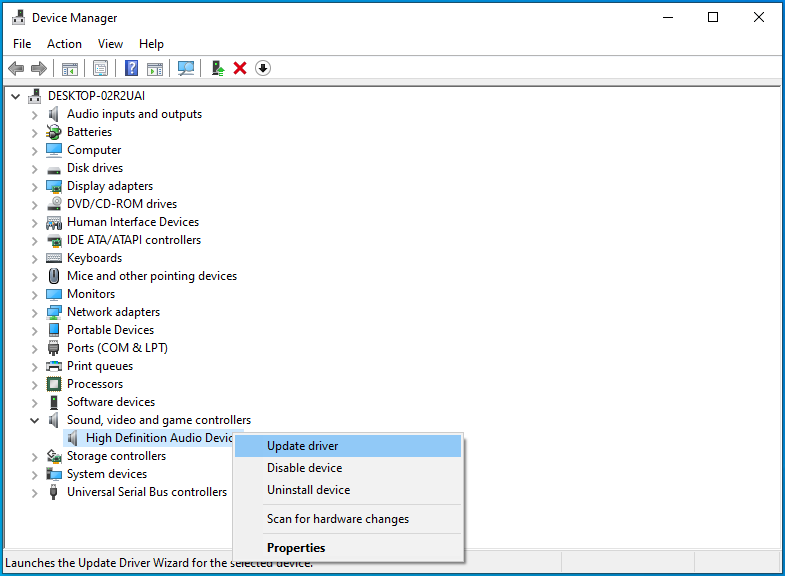
Update your drivers. Once your computer restarts, go back to Device Manager. Expand the Sound, video and game controllers section. Right-click your audio driver and select Update driver.
The microphone volume is too low or does not appear to be working at all
Try the following solutions:
-
Make sure that the microphone or headset is connected correctly to your computer.
-
Make sure that the microphone is positioned correctly.
-
Increase the volume of your microphone. Here’s how to do this in Windows 11:
-
Select Start > Settings > System > Sound.
-
In Input, select a microphone to see its properties.
-
In Input volume, make sure the blue bar adjusts as you speak into the microphone.
-
If it doesn’t, go to Test your microphone and Start test. This will help you troubleshoot any issues with your microphone.
-
Table of contents
- What If a Microphone Keeps Muting Itself in Windows 10?
- 1. The system sound settings are incorrect
- 2. The sound drivers are outdated
- 3. Malware infection has corrupted the sound files
- How to Fix an Auto-Muting Microphone on Windows 10
- Solution 1: Temporarily disable your antivirus
- Solution 2: Change your microphone settings
- How to Fix an Auto-Muting Microphone on Windows 11
- Fix 1: Reinstall or update the sound drivers
- Fix 2: Use another format for the microphone
- Wrapping Up
- FAQ
The microphone is an essential part of the computer for those who spend a lot of time recording media files or using communication apps or unified communications systems. Imagine, therefore, the annoyance caused by an auto-muting microphone without user input. Some Windows 10 users report experiencing the issue with their microphone. Moreover, this issue affects internal and external mics equally.
Some issues are specific to a certain version of Windows, but the auto-muting mic issue isn’t one of them. The microphone can randomly start muting itself.
Suppose your PC’s mic suddenly starts muting itself – what do you do? This guide was created to answer this question for you.
If you’re looking for a way to resolve this malfunction on your PC, the tips we provided here will help you.
What If a Microphone Keeps Muting Itself in Windows 10?
If a microphone keeps going to zero volume levels in Windows 10, it can be incredibly frustrating. Imagine having to stop enjoying that fantastic and immersive conversation because you suddenly went silent.
Naturally, when something like this happens, knowledge of the immediate cause would help. If the microphone keeps resetting itself to zero volume despite your best efforts to fix it at a certain sound level, these are the likely reasons:
1. The system sound settings are incorrect
Most of us don’t need to configure any special settings for sound on Windows 10. We simply use the volume controls to increase or decrease audio per our requirements at any point during the viewing, gaming, streaming, chatting, or recording experience.
If sound keeps being muted, perhaps your system volume has been set to Mute unknowingly.
More likely, either the internal microphone or the external one has been disabled — which would prevent sound from coming through that device.
Other improper sound settings can have a similar effect.
2. The sound drivers are outdated
If you’re getting this sound malfunction on a PC that has seen better days, perhaps the sound drivers haven’t been updated for a long time.
If you have recently upgraded or updated the OS, the current sound drivers might have become incompatible with the firmware. Only compatible device drivers can be used by PC hardware, such as your video, sound and network cards.
Incompatible PC drivers may not work at all. When they do, they usually work incorrectly, leading to all manner of bugs, such as the auto-muting mic issue.
3. Malware infection has corrupted the sound files
There are many system files that play a role in delivering audio input. If these files get targeted by malware, the result will be myriad sound issues, including the mic randomly muting itself.
Now that we’ve explained the potential causes of the random microphone muting issue on Windows 10, let’s go ahead and check out the possible solutions.
PRO TIP
Don’t let malware compromise your audio experience or any other crucial system functions. Auslogics Anti-Malware is designed to detect and remove even the most elusive threats, providing you with peace of mind and reliable system performance. Keep your PC safe and enjoy uninterrupted audio and overall system functionality.
How to Fix an Auto-Muting Microphone on Windows 10
If your mic starts behaving erratically and mutes itself at random intervals, you won’t have a pleasant experience on Skype until the behavior returns to normal.
The following fixes have worked for a majority of Windows 10 users with the same issue, and there’s no reason yours won’t be resolved after applying them.
Solution 1: Temporarily disable your antivirus
Some antivirus tools, such as Norton, have been known to cause unintended side effects. They are very aggressive with their anti-malware measures and sometimes end up affecting system functioning.
If your mic keeps going to zero volume at inopportune times and without your manual input, try turning off your antivirus for a time and see what happens.
Whether you’re using Norton, Windows Defender or another popular security software tool, turning off real-time protection is pretty easy.
Once you’ve done that, use your mic for up to an hour and see if the problem happens again.
If it does, consider updating the antivirus software for better performance and fewer bugs.
Use Auslogics Anti-Malware
If no update is available, your best bet might be switching to a highly recommended security tool like Auslogics Anti-Malware.
This tool has been approved by Microsoft for use as a primary or secondary antivirus on Windows 10 systems.
It scrutinizes all parts of your system for potential threats that might be lurking in obscure locations and quarantines or removes them.
Related
: Auslogics Anti-Malware: Features and Reviews
Solution 2: Change your microphone settings
From the evidence of the users who have reported this issue in public Windows forums, incorrect sound settings are the prime culprit that causes device mics to self-mute at random intervals.
In that case, you might reasonably expect that introducing the correct sound settings will restore normal audio functioning. This is indeed the case.
Here’s what you need to do:
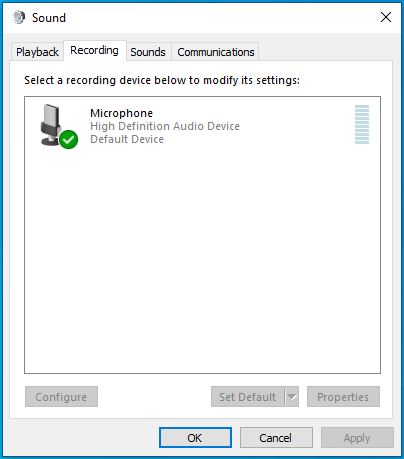
- There is a speaker icon in the right corner of your taskbar. Right-click it and select Recording Devices.
Note
On the latest version of Windows 10, the Recording Devices option no longer exists. You must select Sounds instead when you right-click the speaker icon.
- The Sound Control window will open.
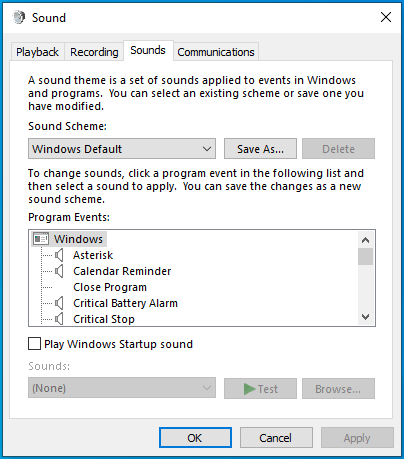
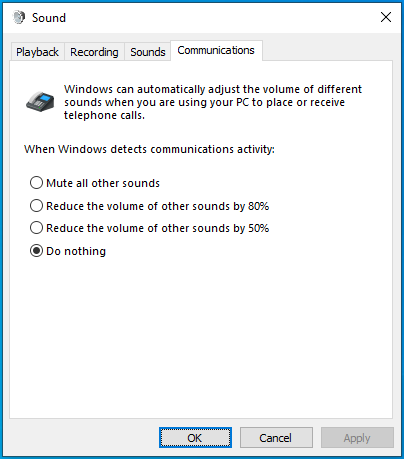
- Select the Communications tab.
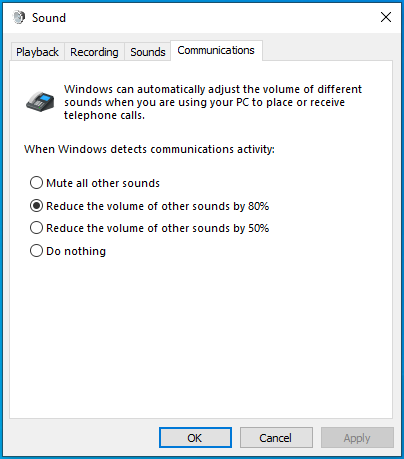
- Under When Windows detects communications activity, select Do nothing.
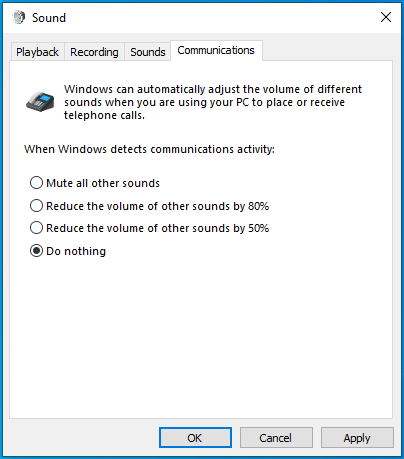
- Click Apply and then OK.
- Test your microphone for a few minutes. Has the random muting stopped? If the bug still occurs, repeat Step 1.
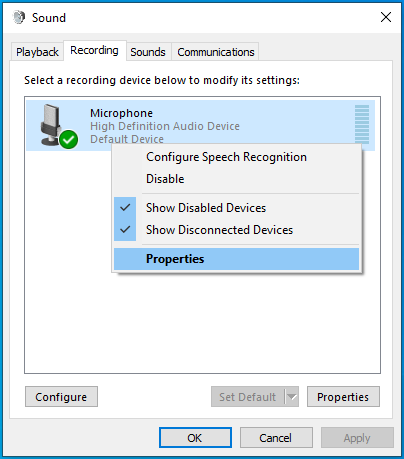
- Switch to the Recording tab.
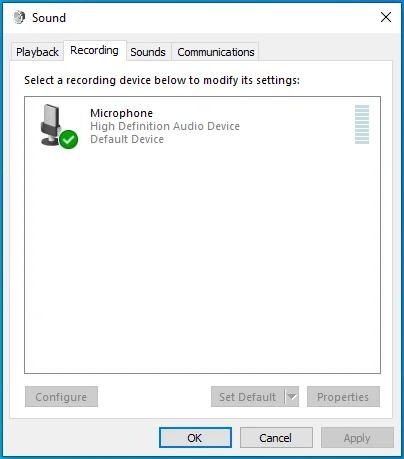
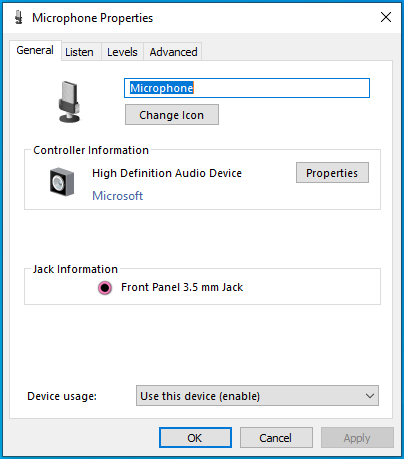
- Right-click your sound device and select Properties.
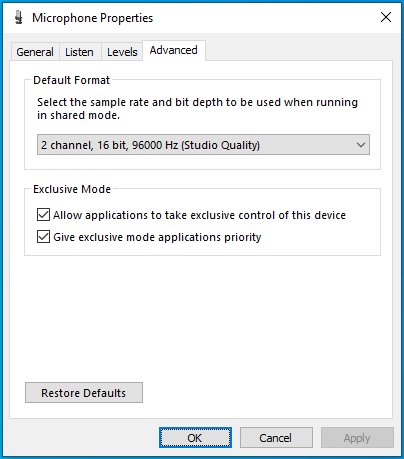
- The Microphone Properties window will open.
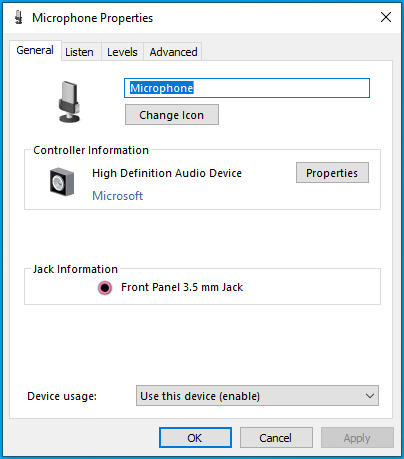
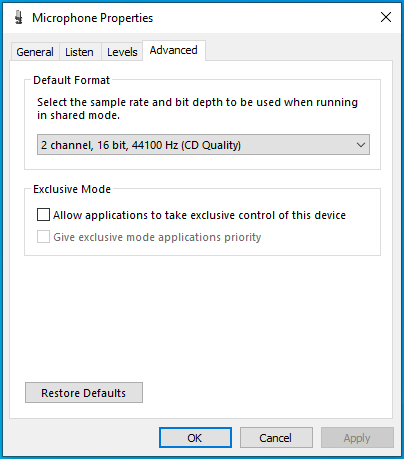
- Switch to the Advanced tab.
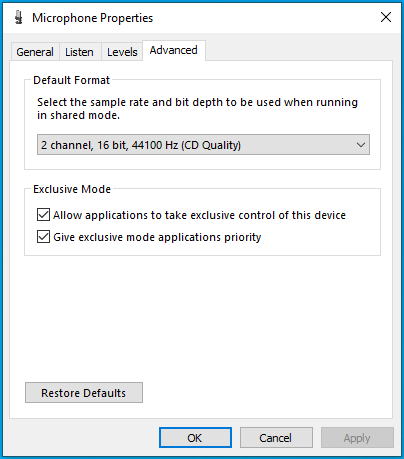
- In the Exclusive Mode group, deselect the Allow applications to take exclusive control of this device option.
- Click Apply to save your changes and then click OK to return to the Sound dialog.
Also Read:How to Fix Blue Yeti Microphone Not Detected or Recognized in Windows 10 and 11?
How to Fix an Auto-Muting Microphone on Windows 11
Note
You can implement the solutions discussed above to see if it works. if it doesn’t follow the solutions below.
Fix 1: Reinstall or update the sound drivers
The correct sound drivers are required for the best audio experience on a Windows 10 PC.
If the sound driver is corrupted by malware, damaged by manual modification, or has been rendered obsolete after an upgrade, you should update it to restore stable sound functionality.
Otherwise, be prepared to deal with annoying sound bugs, such as the microphone muting itself at random.
If the sound driver is old, an update is required. If the driver is already up to date but is buggy, reinstalling it can fix the issue. You can update your sound card driver or reinstall it using Device Manager.
Let’s show you how:
To reinstall the sound card driver, do the following:
- Press the
Windows key + Xcombination to bring up the Quick Access menu on Windows 10 or Windows 11.
- Select Device Manager.
- In Device Manager, locate “Sound, video and game controllers” and click it to expand its contents.
- Double-click your sound device to open its Properties dialog.
- Switch to the Driver tab.
- Click the Uninstall Device button.
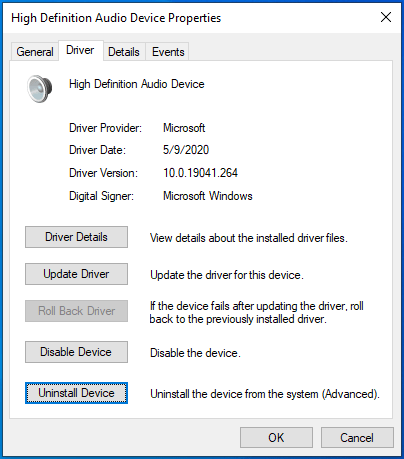
- When you get the warning prompt that you’re about to uninstall your sound device driver from your system, click Uninstall to confirm your action.
- Reboot your computer, and the sound driver will be automatically reinstalled.
Update your sound card driver if it’s old
If the sound card driver is old and requires an update, follow these steps:
- Right-click the Windows icon on the taskbar and select Device Manager.
- The Device Manager app will open.
- Locate the Sound, video and game controllers option and expand it.
- Right-click your sound device and select Update driver.
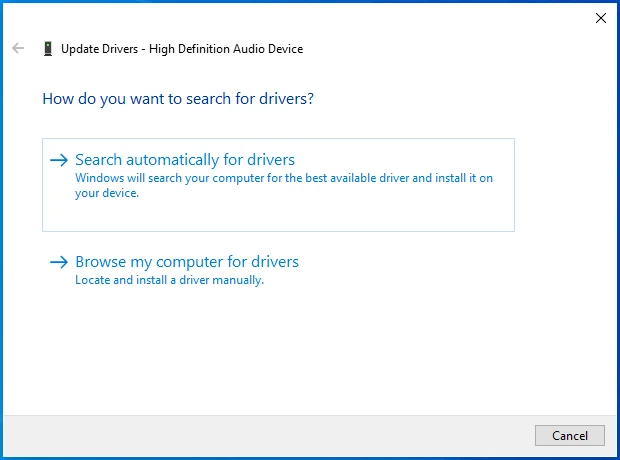
- Choose the Search automatically for updated driver software option.
Note
On the latest Windows 10 and Windows 11 versions, this option is named Search automatically for drivers.
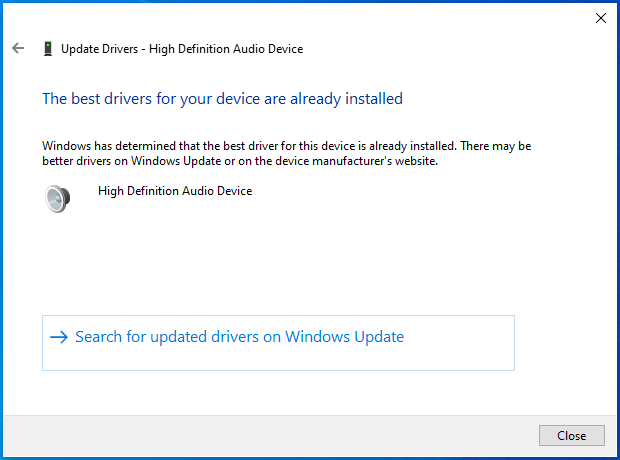
- Windows will attempt to locate and download the latest driver for the device. If it can’t find any, it will inform you that the best drivers for your device are already installed.
Use Auslogics Driver Updater to automatically update drivers
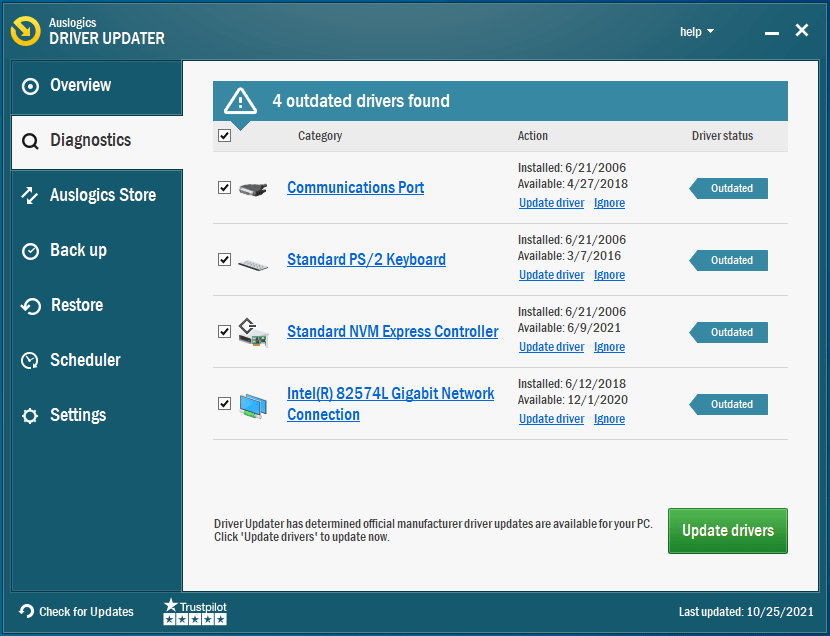
You can simplify the process of updating your sound drivers by using a reputable driver updater like Auslogics Driver Updater.
This tool will scan your PC and present a comprehensive list of devices with obsolete drivers.
You can update an individual driver by clicking the Update button or, if you have a premium license, bring all your device drivers up to date with a single click.
Download Auslogics Driver Updater
Prevent hardware errors and ensure problem-free device operation with this advanced tool that detects outdated drivers and safely gets them updated.
Related
: Auslogics Driver Updater: Update Your Drivers in One Click!
Fix 2: Use another format for the microphone
It is possible that the microphone malfunctions because the wrong audio format is in use. You can try other sound formats and stick with the one that stops further self-muting.
If you don’t know how to change the sound format, follow these steps:
- Right-click the icon and select Sound settings then scroll down the Sound window and click the More sound settings link.
- The Sound dialog will open.
- Make sure you’re on the Recording tab.
- Double-click your current sound device to open its Properties dialog.
- Switch to the Advanced tab.
- Click the drop-down arrow under Default format and choose an option different from the one currently in use. The option you choose should be a 16-bit option.
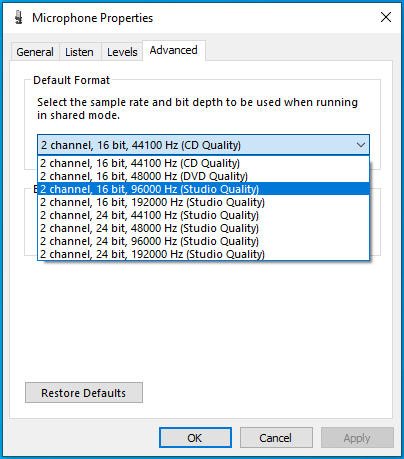
- Click Apply to save your changes and then OK to close the dialog.
Your PC’s mic should be working fine now.
Wrapping Up
When a PC microphone keeps muting itself, it isn’t funny to the affected user. This type of bug interrupts conversations over VoIP software, like Skype, and should be nipped in the bud.
This article presents a few methods to stop the self-muting issue from happening again. It explains how to fix a microphone that keeps turning itself down using the correct steps.
Hopefully, this article has helped you to regain full control of your internal or connected microphone. We’d like to hear about your experience. Hit us up in the comments.
FAQ
How do I fix my microphone muted on my desktop?
If your desktop microphone is muted, you can unmute it by looking for the physical mute button or, if it doesn’t apply, turning on the microphone itself. Make sure the microphone is at the right volume and that the mute feature is turned off. If the microphone lacks physical mute controls, make sure it’s not muted or turned down by checking the sound settings in your operating system. Mice mute problems on your desktop can also be fixed by updating the audio drivers, looking for software conflicts, and adjusting the system-wide mute settings.
How do I fix mic muted by system settings in Windows 11?
You can resolve the issue of your microphone being muted in Windows 11 by modifying the operating system’s sound settings. To access the Sound settings, simply perform a right-click on the taskbar’s volume icon and choose “Open Sound settings.” Make sure the right microphone device is set as the default recording device by selecting it under the Input tab. Look for any volume or mute settings that might be interfering with the microphone and make the necessary adjustments. To ensure that the microphone works properly, make sure that any system-wide mute settings, such as those found in communication or conference applications, are disabled.
Why does my mic keep muting itself Windows 10?
There are several reasons why your microphone can keep muting itself, including wrong settings, program incompatibilities, or hardware problems. Check and make any necessary adjustments to any third-party programs or applications that might be in charge of the microphone settings. If the microphone is muting itself unintentionally, you can try to fix any compatibility issues by updating the audio drivers using Device Manager or the manufacturer’s website.
Most of the keyboards come with a specific key to mute/unmute the speakers. And, if there isn’t any specific key, you can find media controls options in function keys. For example, on my keyboard, the F4 key is dedicated to Mute the sound. So, by pressing it with the Fn key, I can mute and unmute speakers. But, there is not any keyboard key to mute the microphone. Because you can control microphone access through Windows settings easily. And, the mic only gets turned on when an application accesses it. But, in Windows 10, when an application does access a microphone, you can see a mic icon in the Taskbar. And, you can even disable mic permission for that Application by going into Windows Settings App > Privacy > Microphone.
Even, chrome browser comes with an option to disable microphone access. But, it could be possible that a third-party Application or site is using your mic. In that case, disabling the mic is a good idea if it’s not in use. But, disabling/enabling microphone access from the settings App is time-consuming. So, In this article, you will get to know a way to mute the mic using a keyboard Shortcut.
Apps to Mute Microphone using Keyboard Shortcut
1. Mute the Microphone using a Keyboard Shortcut.
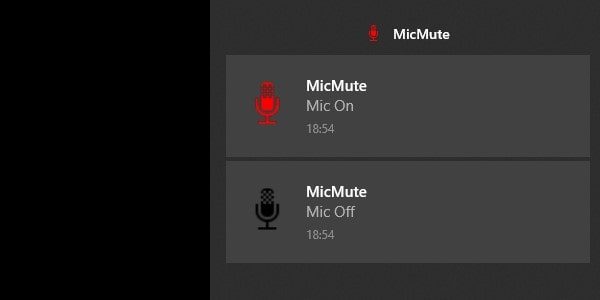
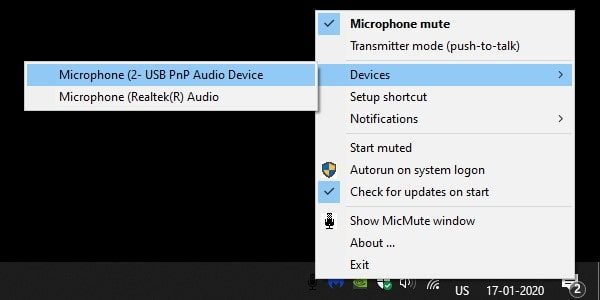
Though, there are some ways to create a Keyboard Shortcut to mute the mic. But, not that easy. So, I will suggest you install this free application, ‘MicMute’. After installing this small application, you will be able to mute the mic using any Keyboard key. That means you can configure any keyboard key you want. MicMute application runs in this taskbar and adds a microphone icon. The icon is to show the status of the microphone. If the mic icon is red, that means the mic is ‘on’. And, if it’s black, that means ‘off’.
Apart from mute mic using a Keyboard shortcut, some other helpful features also feature this application. For example, MicMute App can mute the microphone at startup. And, it does detect all audio input devices. The “Push to talk” feature is also available. But, this means the mic will only work when a key is pressed or held.
How to mute a microphone in Windows using Hotkey.
1. Download the MicMute Application from the SourceForge site. And, Install it on your Windows 10/11 Computer.
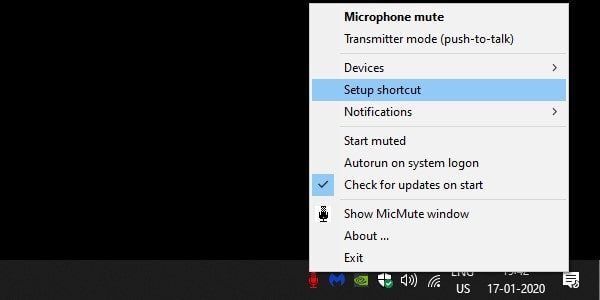
2. After completing the installation, you will see a mic icon on the right side of the Taskbar.
3. Right-Click on the MicMute icon from the system tray. And, then click on Setup Shortcut.
4. A small configure window will appear, click on it. And, press the keyboard key that you want to use. And, click on ok.
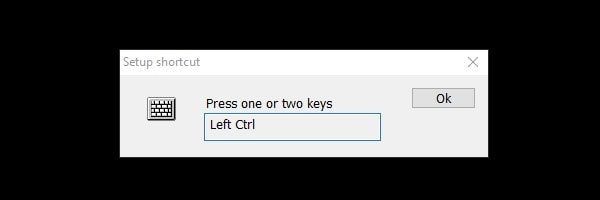
(You can also create a key combination. The keyboard can recognize normal keys as well as special keys on the keyboard.)
5. Every time, you mute and unmute the microphone using a keyboard key. You will receive an alert on the Desktop.
If your microphone is not getting muted with the Application. Then, you have to configure it from Devices. (Just right-click on the App icon to access device settings.)
After selecting the right microphone keyboard shortcuts will start working.
2. PowerToys (Video Conference Mute)
Microsoft PowerToys is a suite of utilities that maximizes the productivity of Windows systems; it’s free. Recently, Microsoft introduced the Video Conference Mute utility in the experimental version of PowerToys. It allows users to turn off the microphone alongside the webcam using keyboard shortcuts. You have to install the experimental version of PowerToys and enable Video Conference Mute feature in it. After that, you can use the shortcuts shown in the App.
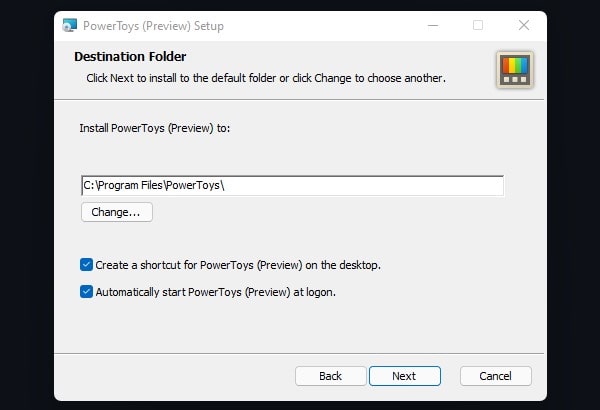
1. First, download the Experimental version of PowerToys from Github. (Check the assets section for the setup file.)
2. Once it gets downloaded, install it in your system. (Don’t forget to enable the “Automatically start PowerToys at logon option during installation.)
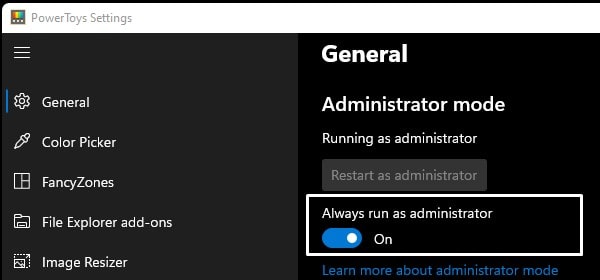
3. Open PowerToys App and click on settings. First-time PowerToys will get open in user mode. To open it with administrator privileges, click on “Restart as administrator” from general settings. Once it gets restarted, do enable the “Always run as administrator” option.
4. Now, go to Video Conference Mute and Enable Video Conference.
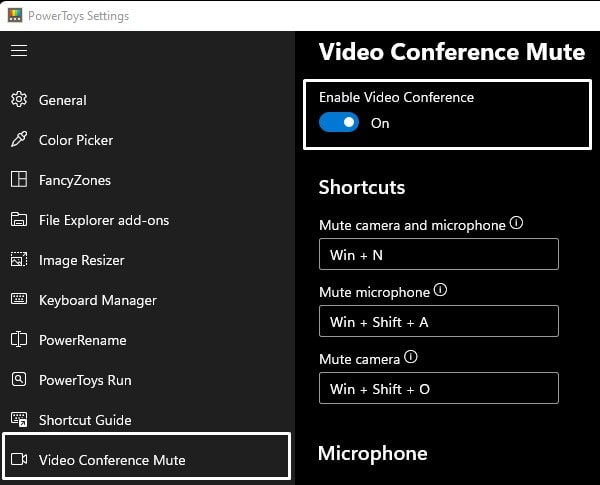
5. After that, select your camera and microphone so that you can turn them off using keyboard shortcuts.
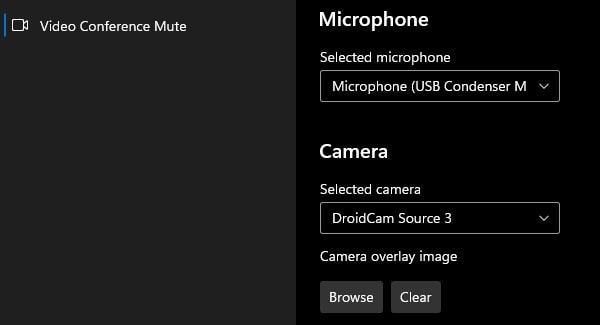
On the same page, you will find three shortcuts that you can use.
Mute camera and microphone - Win + N
Mute Mic - Win + Shift + A
Mute Camera - Win + Shift + O
6. So, that’s how you can mute your microphone with a webcam using PowerToys.
3. Windows 11 Microphone Access Settings.
If you’re using Windows 11, then you will see a Microphone icon in Taskbar, when an app is using your mic. And, latest Windows also gives you an option to enable or disable microphone access for selected Apps.
1. Do click on the Microphone icon from Windows 11 Taskbar.

Alternatively, you can just open the Settings App. Click on Privacy & Security. After that, scroll down and click on Microphone from the App permission section.
2. Now, you can either disable microphone access completely for all Windows Apps. Or, you can select an App from the list.
4. Use the Realtek Audio Console.
Suppose the Realtek Audio driver is installed on your Windows 11/10 PC. Then, with the Realtek Audio Control, you can mute Mic. You can download it from the Microsoft Store. Just install the App, and then mark the “Mute” option. That’s it; the Microphone will get muted.
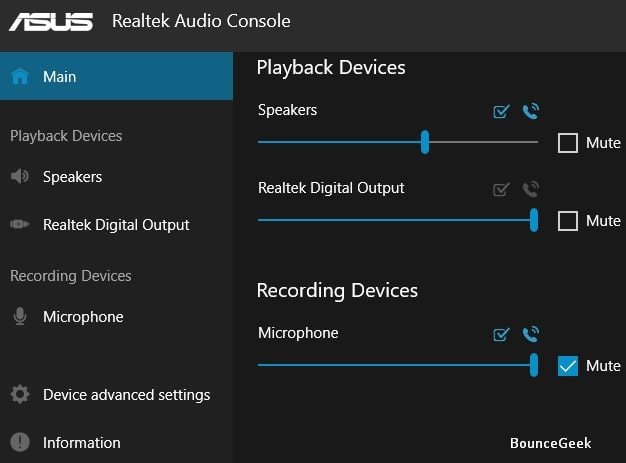
This is better than going into the Settings App. You just have to keep this App always open. That’s it, so these are the ways to mute the microphone using a Keyboard shortcut.
Sometimes you might experience Microphone muting itself on a Windows 10 laptop. Or the microphone keeps muting itself in google meet while attending an important video meeting. You are not alone several users report similar problems, Microphone keeps resetting to 0 volume or the microphone keeps muting itself after Windows 10 update.
Contents
- 1 Why does my mic keep muting itself?
- 2 Microphone keeps muting itself in google meet
- 2.1 Allow google meet use microphone
- 2.2 Unmute audio
- 2.3 Allow access to microphone on your browser
- 2.4 Check microphone input level
- 3 How to fix Microphone Keeps Muting Itself?
- 3.1 Install the latest Windows update
- 3.2 Run the microphone troubleshooter
- 3.3 Check for misconfigured settings
- 3.4 Change the Format of Your Microphone
- 3.5 Reinstall the audio driver
Why does my mic keep muting itself?
According to Microsoft experts, this problem “microphone keeps muting itself” commonly occurs because of improper sound settings or outdated device drivers.
Yes, incorrect sound settings cause an internal or external microphone sets itself to mute automatically. Again outdated sound drivers cause different sound problems in Windows 10. There are several more reasons behind this issue but these are common. Here In this post, we have the best working solutions to fix the Microphone not working or keeps muting itself on Windows 10.
Microphone keeps muting itself in google meet
If microphone keep muting itself only while using Google meet apply soltuions listed below.
Allow google meet use microphone
Here the most working soltuion fix the problem for users microphone randomly auto mute while use google meet.
- Go to “settings” using Windows key + I windows 10
- Click on privacy then microphone on left
- Here make sure Turn “Allow apps to access your microphone” to ON
- In addition check microphone acces for this device is on or clcik on change to toggle it on.
Unmute audio
look at the bottom of the screen during a meeting if red-colored microphone icon with a slash is there you need click on it to unmute your audio.
Allow access to microphone on your browser
Click the padlock-shaped icon to the left corner of the address bar, and then set Microphone to Allow.
Check microphone input level
- Open settings and click system then sound
- click Sound Control Panel under Related Settings.
- Move to recording tab, select your microphone, then click Properties.
- Underneath the Levels tab of the Microphone Properties dialog box, move the slider under Microphone to a higher input level.
Let’s move to the troubleshooting part if you are struggling with similar problem where mic keeps muting itself or not working in Windows 10 apply the solutions listed below.
Disconnect and reconnect the microphone or connect to a different USB port (applicable for external mic only)
Restart your computer, this will refresh the system and fixes minor software conflicts that may be causing the problems.
Perform a clean boot and check, if any third-party applications or services are conflict with the microphone driver causing the issue.
Install the latest Windows update
Microsoft regularly releases Windows updates with security improvements and various bug fixes. And installing the latest Windows updates not only fix previous problems but also installs the latest device driver that helps your PC optimize and error free.
- Press the Windows key + I to open the Settings app,
- Go to Update & Settings then hit the check for updates button,
- This will start to download and install the latest Windows updates from the Microsoft server
- Once done you need to restart your computer to apply them.
- After that check the status of your microphone if this helps
Run the microphone troubleshooter
The latest Windows 10 has a built-in microphone troubleshooter, running that automatically detects and microphone-related issues.
- Press the Windows key + I to open the Settings app,
- Click on the system then sound on left,
- Scroll down to the Input section, select your preferred microphone using the menu under ‘Choose your input device,’ and then click Troubleshoot.
Check for misconfigured settings
Again Sometimes this issue can be caused by wrong settings. Follow the steps listed below to check if this is the case.
- Locate the Volume icon on the right part of your taskbar, right-click on it and open Sound.
- Navigate to the Communications tab and click on Do Nothing option When Windows detects communication activity
If the issue persists then continue with the following steps.
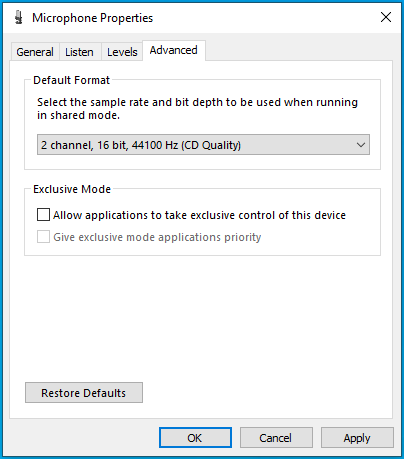
- Navigate to the Recording tab inside the Sound control panel again, and then select the microphone and click on the Properties button.
- Go to the Advanced tab and untick the checkbox next to Allow applications to take exclusive control of this device.
- Click on Apply to execute the operation.
Change the Format of Your Microphone
For some of windows users changing the format of your microphone help fix the issue. You may have a try. For that:
- Right-click on the volume icon and select Sound to Open the Sound control panel
- Go to the Recording tab and then select the mute microphone and click on Properties.
- Go to the Advanced tab and select the format of other 16-bit options from the drop-down list.
- Click on Apply to save the changes.
Reinstall the audio driver
And the ultimate solution, reinstall the audio driver. If the above solutions didn’t help or the microphone still mutes itself you need to look at the sound driver it may be corrupted or outdated causing the issue. you can try updating the driver by following the steps below:
- Right-click the Start button and select Device Manager from the context menu.
- This will display all installed device driver list, locate Expand the Sound, video and game controllers categories,
- Right-click the audio device (Most likely you have Realtek High Definition Audio.) Right-click on it and then click Uninstall device option.
- Select Delete the driver software for this device checkbox and click uninstall again when ask for confirmation.
Restart your PC, on the next start windows automatically install build in audio driver now check the microphone status.
Alternatively, you can download the sound device driver from the manufacturer’s website and install it on your computer
Did these solutions help fix the microphone keeps muting itself in google meet or Windows 10? Let us know in the comments below.
Also read:
- Mic no longer working on Discord after Windows 10 update? Let’s fix it
- Solved: No Sound In Windows 10 Update version 22H2
- Skype Audio or Microphone not working after Windows 10 update
- Solved: “No Audio Output Device Is Installed” Windows 10
- 9 Reasons why windows 10 computer running slow and how to speed up it?
When it comes to using a microphone on Windows 10, sometimes you may find yourself needing to mute it. Whether it’s for privacy during a video conference or to prevent any background noise from being transmitted, muting the microphone can be a useful feature. But how exactly can you do it on Windows 10?
One way to mute your microphone on Windows 10 is through the Sound settings. By accessing the system’s sound controls, you can easily disable your microphone with just a few clicks. This is particularly handy when using a desktop PC without a dedicated mute button on your keyboard or microphone. With the ability to mute your microphone effectively, you can have more control over your audio input and ensure a seamless and uninterrupted experience.
To mute your microphone on Windows 10, follow these steps:
- Right-click the sound icon in the System Tray located at the bottom right corner of the screen.
- Select «Open Volume Mixer.»
- Locate the microphone volume slider and click on the speaker icon next to it to mute the microphone.

Why Muting Your Microphone in Windows 10 is Important
Muting your microphone in Windows 10 is an essential feature that allows you to control the audio input from your microphone. Whether you are in a video conference, online class, or recording audio, muting your microphone can prevent unintentional noise or background sounds from being transmitted. It ensures clear communication and eliminates distractions for both yourself and others. In this article, we will explore different methods to mute your microphone in Windows 10 and provide step-by-step instructions to help you easily navigate through the settings.
Using the Volume Mixer
The Volume Mixer in Windows 10 allows you to adjust the volume levels for different apps and devices individually. It also provides an easy way to mute your microphone. Here’s how:
- Right-click the Volume icon located in the system tray at the bottom right corner of your screen.
- Select «Open Volume Mixer».
- Locate the microphone icon in the Volume Mixer window.
- Click on the speaker icon below the microphone icon to mute the microphone.
You have now successfully muted your microphone using the Volume Mixer in Windows 10.
Using the Sound Settings
If you prefer using the Sound settings to mute your microphone, here’s how:
- Open the Start menu and click on the «Settings» gear icon.
- In the Settings window, select «System».
- Click on the «Sound» tab in the left sidebar.
- Scroll down and click on «Sound Control Panel» under the «Related settings» section.
- In the Sound window, go to the «Recording» tab.
- Locate your microphone in the list of recording devices.
- Right-click on your microphone and select «Disable».
Your microphone is now muted using the Sound settings in Windows 10.
Using Third-Party Software
There are also various third-party software available that offer additional features for muting your microphone in Windows 10. These software provide more advanced settings and customization options. Some popular examples include:
- Voicemeeter Banana: Allows you to manage audio inputs and outputs with advanced controls.
- VB-Audio Virtual Cable: A virtual audio device that acts as a bridge between different applications.
- ExpStudio Audio Editor: Offers audio editing tools along with the ability to mute or adjust microphone levels.
When using third-party software, make sure to follow the provided instructions for muting the microphone as they may vary based on the software you choose.
Using Keyboard Shortcuts
Windows 10 also allows you to mute or unmute your microphone conveniently using keyboard shortcuts. Follow these steps to set up a keyboard shortcut for muting your microphone:
- Open the Sound settings by right-clicking the Volume icon in the system tray and selecting «Open Sound settings».
- In the Sound settings window, scroll down and click on «Sound Control Panel» under the «Related settings» section.
- In the Sound window, go to the «Recording» tab.
- Right-click on your microphone and select «Properties».
- In the Properties window, go to the «Shortcut» tab.
- Click inside the «Press shortcut key» field and press the desired keyboard combination (e.g., Ctrl + Shift + M).
- Click «Apply» and then «OK» to save the changes.
You can now use the assigned keyboard shortcut to mute or unmute your microphone without navigating through the settings each time.
Using Device-specific Software
If you are using a microphone with specific software provided by the manufacturer, you may have additional options to mute your microphone. These software often come bundled with the device drivers and offer specific controls for managing your microphone settings. Check the user manual or the manufacturer’s website for instructions on how to access and utilize the features of the device-specific software.
Using Microsoft Teams
If you frequently use Microsoft Teams for video conferences or online meetings, you can mute your microphone directly within the application. Here’s how:
- During a Microsoft Teams meeting, locate the microphone icon at the bottom of the screen.
- Click on the microphone icon to mute or unmute your microphone.
This allows you to quickly toggle your microphone on or off without affecting the system-wide settings.
Conclusion
Muting your microphone in Windows 10 is a crucial feature to ensure effective communication in various scenarios. Whether you are attending virtual meetings, recording audio, or simply want to eliminate background noise, the methods mentioned in this article provide you with different ways to achieve this. By using the Volume Mixer, Sound settings, third-party software, keyboard shortcuts, and device-specific software, you have the flexibility to find the most convenient method for muting your microphone based on your preferences and requirements.

Mute Microphone in Windows 10
If you want to mute your microphone in Windows 10, there are several ways to do it:
- Using system settings: Go to the «Sound» settings in the Windows 10 Control Panel. Select the «Recording» tab and find your microphone. Right-click on it and choose «Disable» or «Mute».
- Using the taskbar: Locate the speaker icon on the taskbar and right-click on it. Select «Recording devices» from the menu. Find your microphone and right-click on it. Choose «Disable» or «Mute».
- Using keyboard shortcuts: Some keyboards have dedicated mute keys or function keys that can be used to quickly mute/unmute the microphone. Refer to your keyboard’s user manual for instructions.
Benefits of Muting the Microphone
Muting your microphone in Windows 10 can provide several benefits, including:
- Privacy: Muting the microphone ensures that no sound is captured or transmitted, protecting your privacy.
- Noise control: Muting the microphone eliminates background noise or accidental noise, making your audio clearer during meetings or recordings.
- Convenience: Muting the microphone allows you to avoid any unintentional audio interruptions or disturbances while you are not speaking.
Key Takeaways — How to Mute Microphone Windows 10
- Muting your microphone on Windows 10 is simple and easy to do.
- You can mute your microphone using the volume mixer or the sound settings.
- There are multiple ways to access the volume mixer or sound settings.
- By muting your microphone, you can prevent others from hearing your audio.
- Remember to check your microphone settings if you’re experiencing any issues.
Frequently Asked Questions
Here are some commonly asked questions about muting the microphone on Windows 10:
1. How do I mute the microphone on Windows 10?
To mute the microphone on Windows 10, follow these steps:
1. Right-click on the speaker icon in the taskbar and select «Sounds».
2. In the «Recording» tab, locate your microphone and right-click on it.
3. Click on «Disable» or «Mute» to prevent the microphone from capturing any audio.
4. Click «Apply» and then «OK» to save the changes.
2. Can I mute the microphone using keyboard shortcuts?
Yes, you can mute the microphone using keyboard shortcuts. Here’s how:
1. Press the Windows key + X to open the Power User Menu.
2. Select «Device Manager» from the menu.
3. Expand the «Audio inputs and outputs» category.
4. Right-click on your microphone and select «Disable» to mute it.
3. How do I unmute the microphone on Windows 10?
To unmute the microphone on Windows 10, follow these steps:
1. Right-click on the speaker icon in the taskbar and select «Sounds».
2. In the «Recording» tab, locate your microphone and right-click on it.
3. Click on «Enable» or «Unmute» to allow the microphone to capture audio again.
4. Click «Apply» and then «OK» to save the changes.
4. How can I test if my microphone is muted on Windows 10?
To test if your microphone is muted on Windows 10, follow these steps:
1. Right-click on the speaker icon in the taskbar and select «Sounds».
2. In the «Recording» tab, locate your microphone and right-click on it.
3. Click on «Properties».
4. In the «Levels» tab, speak into the microphone and observe the volume level. If it remains at zero or does not change, your microphone is muted.
5. Why is my microphone automatically unmuting on Windows 10?
If your microphone is automatically unmuting on Windows 10, it may be due to the following reasons:
1. Check if any applications or programs are automatically unmuting the microphone in their settings.
2. Update your microphone drivers to ensure compatibility with Windows 10.
3. Scan your computer for malware or viruses that may be interfering with your microphone settings.
4. If the issue persists, try resetting your audio settings or performing a system restore to a previous point where the microphone was working properly.
In conclusion, muting your microphone on Windows 10 is a simple process that can be done in a few different ways. You can use the Volume Mixer to adjust individual app volume levels or disable the microphone altogether through the Sound settings. Another option is to use the microphone mute button on your headset or external microphone, if available.
Remember that muting your microphone can be useful in various situations, such as when you don’t want others to hear background noise or when you need privacy during a call or recording. By following the steps outlined in this article, you can easily mute and unmute your microphone on Windows 10, ensuring that you have control over when and where your voice is heard.