
Проверка контрольной суммы скачанного файла позволяет проверить его целостность и убедиться, что содержимое файла не было изменено. Чаще всего администраторы используют процедуру проверки чексуммы для загруженных дистрибутивов ОС и установочных образов ПО.
Идея контрольной суммы заключается в том, что для оригинального файла выполняется расчет некоего значения (хэша) по определенному алгоритму получения хэш-функции (чаще всего это MD5, SHA1 и SHA256), а пользователи потом могут выполнить такую же проверку для файла, который они скачали. Сравнение этих двух значений хэшей позволяет убедиться, что вы получили не модифицированный оригинальный файл. Если хэши файлов отличаются, значит файл был изменен или поврежден.
Для проверки контрольной суммы файла в Windows можно использовать встроенный PowerShell командлет Get-FileHash или утилиту certutil.
Например, чтобы получить значение хэша ISO образа, выполните команду:
Get-FileHash "F:\ISO\en-us_windows_10_enterprise_ltsc_2021_x64_dvd_d289cf96.iso"

Черех некоторое время (расчет может занять некоторое время в зависимости от размера файла), командлет вернет контрольную сумму файла по алгоритму SHA-256 (по умолчанию). С помощью атрибута
-Algorithm
можно задать другой алгоритм вычисления контрольной суммы
-
SHA1 -
SHA256
(по умолчанию) – наиболее популярный алгоритм с наименьшей вероятности возникновения коллизий (когда два разных файла имеют одинаковую контрольную сумму) -
SHA384 -
SHA512 -
MD5
– самый быстрый, но устаревший алгоритм хэширования
Аналогично можно получить хэш сумму файла с помощью certutil.exe:
certutil -hashfile F:\ISO\en-us_windows_10_enterprise_ltsc_2021_x64_dvd_d289cf96.iso SHA256

Где получить контрольные суммы оригинальных ISO файлов образов Windows?
Если у вас есть учетная запись Microsoft, вы можете найти контрольную сумму интересующего вас дистрибутива на сайте https://my.visualstudio.com/Downloads/. Для этого не обязательно иметь активную подписку MSDN. Информация о контрольной сумме образа доступна на вкладке с информацией о продукте.
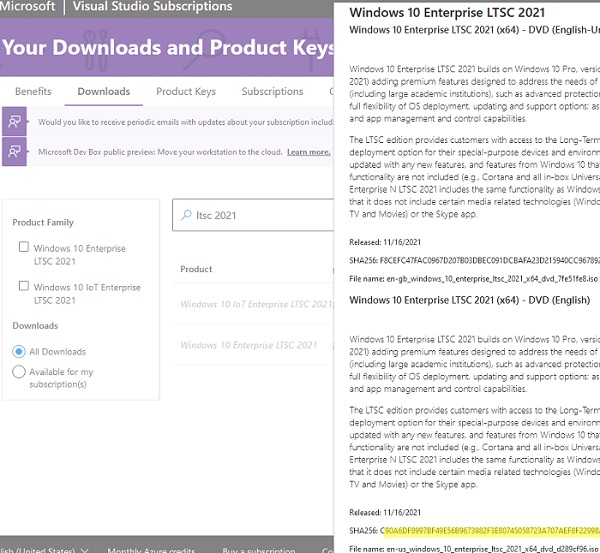
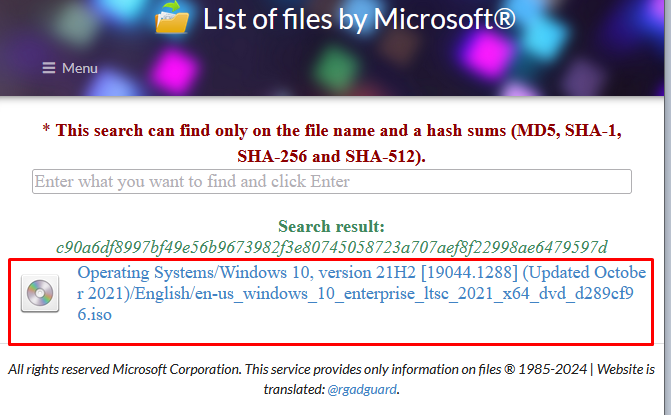
Также список всех оригинальных образов от Microsoft и их хэшей доступен в следующей сторонней онлайн базе https://files.rg-adguard.net/search. В отличии от сайта Microsoft, здесь можно искать сразу по значению хэша. Выполните поиск по полученному хэшу, чтобы убедиться, что вы скачали оригинальный файл образа.
Регистр символов в хэш сумме не имеет значения.
Для автоматизации проверки хэш сумму скачанного образа с оригинальным значением, можно использовать такой однострочник PowerShell:
((get-filehash .\ en-us_windows_10_enterprise_ltsc_2021_x64_dvd_d289cf96.iso).hash) -eq "c90a6df8997bf49e56b9673982f3e80745058723a707aef8f22998ae6479597d"

Команда вернет
True
, если контрольная сумма файла совпадает с эталонной.
Хэш или контрольная сумма файла — короткое уникальное значение, вычисляемое из содержимого файла и обычно использующееся для проверки целостности и соответствия (совпадения) файлов при загрузке, особенно если речь идет о больших файлах (образы системы и подобные), которые могут быть скачены с ошибками или есть подозрения о том, что файл был подменен вредоносным ПО.
На сайтах загрузок часто бывает представлена контрольная сумма, вычисленная по алгоритмам MD5, SHA256 и другим, позволяющая сверить загруженный файл с файлом, выложенным разработчиком. Для вычисления контрольных сумм файлов можно использовать сторонние программы, но есть способ сделать это и стандартными средствами Windows 10, 8 и Windows 7 (требуется версия PowerShell 4.0 и выше) — с помощью PowerShell или командной строки, что и будет продемонстрировано в инструкции.
Получение контрольной суммы файла средствами Windows
Для начала потребуется запустить Windows PowerShell: проще всего использовать поиск в панели задач Windows 10 или меню Пуск Windows 7 для этого.
Команда, позволяющая вычислить хэш для файла в PowerShell — Get-FileHash, а чтобы использовать ее для вычисления контрольной суммы достаточно ввести ее со следующими параметрами (в примере вычисляется хэш для образа ISO Windows 10 из папки VM на диске C):
Get-FileHash C:\VM\Win10_1607_Russian_x64.iso| Format-List

При использовании команды в таком виде, хэш вычисляется по алгоритму SHA256, но поддерживаются и другие варианты, задать которые можно с помощью параметра -Algorithm, например, для вычисления контрольной суммы MD5 команда будет выглядеть как в примере ниже
Get-FileHash C:\VM\Win10_1607_Russian_x64.iso -Algorithm MD5 | Format-List

При этом поддерживаются следующие значение для алгоритмов вычисления контрольной суммы в Windows PowerShell
- SHA256 (по умолчанию)
- MD5
- SHA1
- SHA384
- SHA512
- MACTripleDES
- RIPEMD160
Подробное описание синтаксиса команды Get-FileHash доступно также на официальном сайте https://technet.microsoft.com/en-us/library/dn520872(v=wps.650).aspx
Получение хэша файла в командной строке с помощью CertUtil

В Windows присутствует встроенная утилита CertUtil для работы с сертификатами, которая, помимо прочего, умеет высчитывать контрольную сумму файлов по алгоритмам:
- MD2, MD4, MD5
- SHA1, SHA256, SHA384, SHA512
Для использования утилиты достаточно запустить командную строку Windows 10, 8 или Windows 7 и ввести команду в формате:
certutil -hashfile путь_к_файлу алгоритм
Пример получения хэша MD5 для файла показан на скриншоте ниже.

Дополнительно: на случай, если вам требуются сторонние программы для вычисления хэшей файлов в Windows, можно обратить внимание на SlavaSoft HashCalc.
Если же требуется вычислить контрольную сумму в Windows XP или в Windows 7 без PowerShell 4 (и возможности его установить), вы можете использовать утилиту командной строки Microsoft File Checksum Integrity Verifier, доступную для загрузки на официальном сайте https://www.microsoft.com/en-us/download/details.aspx?id=11533 (формат команды для использования утилиты: fciv.exe путь_к_файлу — результат будет MD5. Также можно вычислить хэш SHA1: fciv.exe -sha1 путь_к_файлу)
Checking an MD5 checksum on Windows 10 is a simple process that helps verify the integrity of files. By comparing the MD5 hash of your downloaded file against the one provided by the source, you can ensure that the file hasn’t been tampered with or corrupted. To do this, you’ll use a built-in Windows tool called CertUtil. With just a few command line instructions, you’ll be able to verify the authenticity of any file on your system.
Checking an MD5 checksum involves a few simple steps using the Command Prompt to verify a file’s integrity. Here’s how you can do it.
Step 1: Open Command Prompt
Open the Command Prompt by searching for “cmd” in the Windows search bar and selecting the corresponding app.
The Command Prompt is your gateway to executing commands on your computer. It’s important to run it with administrative privileges to ensure you have the necessary permissions to check file checksums.
Step 2: Navigate to the File Location
Use the ‘cd’ command to change the directory to where your file is located.
Navigating to the file’s directory allows you to easily access and specify the file for which you want to check the MD5 checksum. Make sure you know the exact path where your file is stored.
Step 3: Enter the CertUtil Command
Type CertUtil -hashfile MD5 and press Enter.
This command instructs Windows to calculate the MD5 checksum for your specified file. Replace “ with the name of the file you want to check, including its extension.
Step 4: Copy the MD5 Checksum
After executing the command, you will see the MD5 hash displayed in the Command Prompt.
Make sure to copy this hash value carefully. You can compare it against the official MD5 checksum provided by the file source to ensure file integrity.
Step 5: Compare Hash Values
Check the MD5 checksum you copied against the official checksum from the file provider.
If the two hash values match, it confirms that your file is intact and identical to the source. Any discrepancy indicates possible file corruption or tampering.
After completing these steps, you’ll have verified the integrity of your file. If the hashes match, the file is intact and secure. If not, you may need to redownload the file to ensure its authenticity.
Tips for Checking MD5 Checksum on Windows 10
- Ensure that you have the correct file path before executing any commands.
- Always verify that you have the official MD5 checksum from the file provider.
- Use a reliable source to download your files to reduce the risk of corruption.
- Familiarize yourself with other hash types like SHA256, which may also be used for verification.
- Consider using checksum verification tools for a more user-friendly experience.
Frequently Asked Questions
What is an MD5 checksum?
An MD5 checksum is a mathematical hash value used to verify the integrity of files. It ensures that a file has not been altered.
Why should I check an MD5 checksum?
Checking an MD5 checksum helps ensure that your file is legitimate and free from corruption or tampering.
Can I trust MD5 for modern security needs?
While MD5 is useful for checking file integrity, it’s not recommended for modern cryptographic security due to vulnerabilities.
Are there alternatives to MD5 checksums?
Yes, SHA256 and SHA1 are more secure alternatives often used to verify file integrity.
Do I need any special software to check MD5 checksums on Windows 10?
No, you can use the built-in CertUtil tool in Command Prompt to check MD5 checksums.
Summary
- Open Command Prompt.
- Navigate to the file location.
- Enter the CertUtil command.
- Copy the MD5 checksum.
- Compare hash values.
Conclusion
In today’s digital age, ensuring the integrity of your files is crucial. Checking an MD5 checksum on Windows 10 is a straightforward step you can take to verify that your files are exactly as they were intended to be. With just a few commands in the trusty Command Prompt, you can compare hash values like a pro, ensuring your downloads are safe and secure. While MD5 isn’t the latest in cryptographic technology, it’s still widely used for basic file integrity checks. By following these steps, you’re taking a proactive approach to cybersecurity. Remember, when downloading files from the internet or transferring them across devices, an MD5 checksum can be your best friend in verifying their authenticity. So, the next time you download a file or receive one via email, take a moment to check the MD5 checksum. You’ll feel more confident knowing your files are intact. And, if you’re keen on exploring further, delve into other hash algorithms like SHA256 for even more robust security. Happy hashing!
Kermit Matthews is a freelance writer based in Philadelphia, Pennsylvania with more than a decade of experience writing technology guides. He has a Bachelor’s and Master’s degree in Computer Science and has spent much of his professional career in IT management.
He specializes in writing content about iPhones, Android devices, Microsoft Office, and many other popular applications and devices.
Read his full bio here.
В процессе исследования интернета или перед загрузкой определенных файлов вы можете столкнуться с загадочными параметрами MD5, SHA-1 и SHA-256, также известными как хеш-суммы. То, что сначала кажется просто случайным набором букв и цифр, на самом деле является уникальным ключом, который позволяет проверить подлинность файлов и узнать, не были ли они изменены или подделаны.
Что такое хеш-суммы и для чего они нужны
Хеш – это результат работы криптографических алгоритмов, разработанных для создания набора цифр и букв. Его еще называют «цифровым отпечатком». Обычно эти наборы имеют фиксированную длину и количество знаков, вне зависимости от размера входной информации. К примеру, у “WP” и “WP-SEVEN” будут хеш-суммы абсолютно одинакового размера. Длина суммы зависит только от того, какой алгоритм хеширования вы проверяете. К примеру, SHA1 выдаст сумму размером 40 знаков, а MD5 только 32.
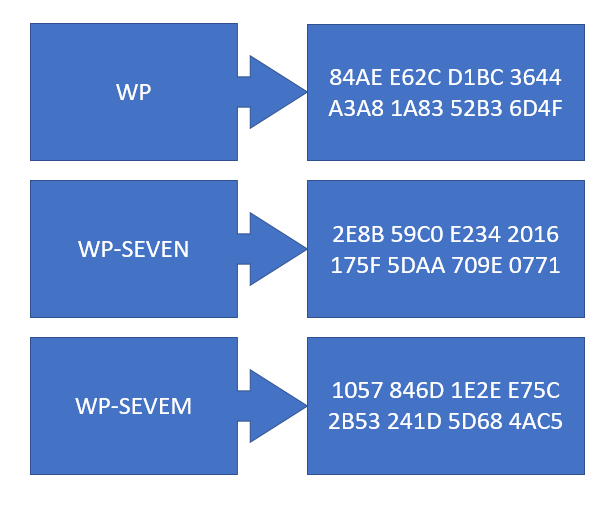
Кроме того, обратите внимание, что, несмотря на минимальное различие между “WP-SEVEN” и “WP-SEVEM”, хеш-суммы полностью разные и не имеют ничего общего. Это значит, что, даже если кто-то изменит файл хоть на 1 бит (грубо говоря), конечный результат получит совершенно другую хеш-сумму. Это и делает хеш удобным способом проверки подлинности файла. Издатель указывает оригинальную сумму, а пользователь проверяет полученный результат и сравнивает его с оригиналом.
Хеширование осуществляется при помощи различных стандартов. Зачастую это MD5, SHA-1 и SHA-256. Все три алгоритма работают по-разному, но концепция у них одинакова. Мы не будем здесь внедряться в принцип работы каждого алгоритма, поскольку это весьма сложная информация, а только приведем общие сведения, необходимые для обычного пользователя.
Как проверить хеш в Windows 10
Любая настольная операционная система, будь то Windows 10, Linux или MacOS, имеет стандартные механизмы проверки хеш-сумм любых файлов на вашем диске.
Как узнать хеш в PowerShell
- Для начала вам надо запустить PowerShell. Для этого можно нажать Win + X и выбрать PowerShell, либо нажать Win + R и ввести команду powershell.
- В открывшемся синем окне вам надо ввести следующую команду: Get-FileHash F:\Test.txt. Вместо F:\Test.txt вам надо вставить путь к файлу. Обязательно указывайте его расширение.

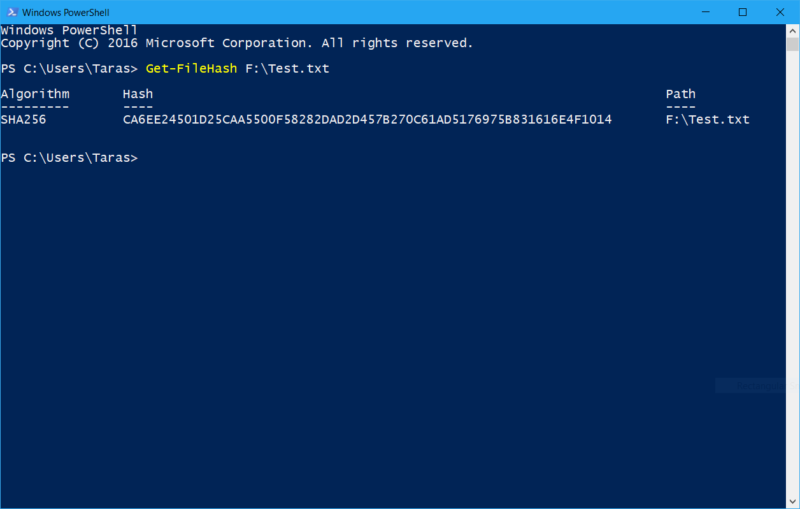
PowerShell выдаст вам хеш-сумму вашего файла. По умолчанию Windows генерирует хеш SHA-265, но вы можете указать, что вам нужен хеш другого алгоритма. Для этого используйте следующие команды:
- Get-FileHash F:\Test.txt -Algorithm MD5
- Get-FileHash F:\Test.txt -Algorithm SHA1
- Get-FileHash F:\Test.txt -Algorithm SHA256
- Get-FileHash F:\Test.txt -Algorithm SHA384
- Get-FileHash F:\Test.txt -Algorithm SHA512
- Get-FileHash F:\Test.txt -Algorithm MACTripleDES
- Get-FileHash F:\Test.txt -Algorithm RIPEMD160
Как проверить хеш-сумму через Командную строку
Множество действий, которые вы выполняете в PowerShell, можно сделать и в классической командной строке. Проверка хеша через Командную строку делается следующим образом.
- Нажмите Win + R и введите cmd.
- В открывшемся окне Командной строки введите команду certutil -hashfile F:\Test.txt. Разумеется, вместо F:\Test.txt у вас должен быть свой путь к вашим файлам.

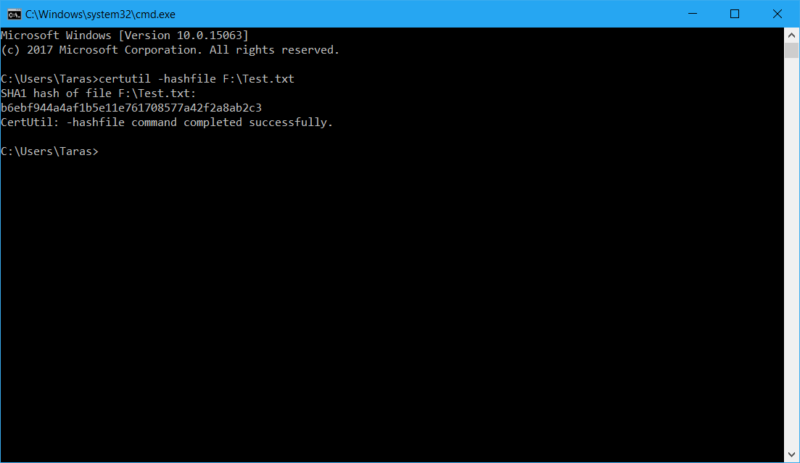
По умолчанию Командная строка выводит на экран хеш-сумму SHA1, но вы можете изменить это, указав системе, какой именно хеш вы хотите получить. Для этого используйте следующие команды:
- certutil -hashfile F:\Test.txt MD5
- certutil -hashfile F:\Test.txt MD4
- certutil -hashfile F:\Test.txt MD2
- certutil -hashfile F:\Test.txt SHA512
- certutil -hashfile F:\Test.txt SHA384
- certutil -hashfile F:\Test.txt SHA256
- certutil -hashfile F:\Test.txt SHA1
Как проверить хеш через HasTab
HashTab – это отличная небольшая утилита, которая упростит проверку хеш-сумм. Вам не надо будет каждый раз вводить сложные команды для проверки. Достаточно будет только зайти в свойства файла, где уже будут собраны все суммы.
- Перейдите по ссылке и скачайте приложение HashTab.
- Запустите установочный файл и следуйте указаниям мастера по установке. Примечание: для установки этой утилиты нужны права Администратора, либо пароль от учетной записи Администратора.
- Найдите в Проводнике нужный вам файл, кликните по нему правой кнопкой мыши и выберите Свойства. Затем перейдите на вкладку Хеш-суммы файлов.

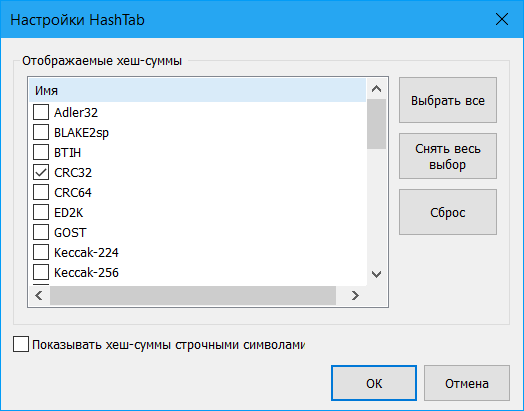
- Здесь вы найдете имена алгоритмов и соответствующие хеш-значения. По умолчанию приложение отображает только CRC32, MD5 и SHA-1, но вы можете отобразить дополнительные суммы, если нажмете на Настройки и отметите алгоритмы, которые вам нужны.


Кроме того, HashTab позволяет легко сравнить хеш-суммы двух файлов. Для этого по первому файлу кликните правой кнопкой мыши, выберите Свойства, а затем откройте вкладку Хеш-суммы файлов. Нажмите Сравнить файл и укажите путь к второму файлу.
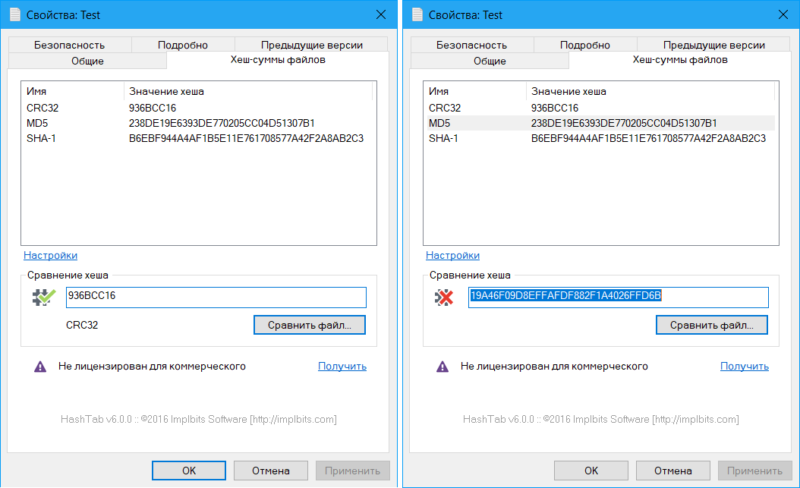
Хеш-сумма второго файла отобразится в поле Сравнение хеша, и, если суммы совпадают, возле иконки решетки будет зеленая галочка. Если не совпадают – красный крестик.
If you’re regularly downloading files from the Internet, you might have been advised to check the files with Windows MD5 Checker. The concept of file hashing algorithms, MD5 checksum could be unfamiliar to you, unless you’re a software engineer or a maths student.
Recommended: Scan Your Computer with Clone Files Checker and delete 1000s of duplicate files.
Before we head on to the actual process, here’s a quick explanation of the concept of checksum and why it holds significance. In the latter part of the article, we’ll discuss how to delete identical files with Windows MD5 Checker. Let’s begin.
What is Checksum? How Does it Work?
A checksum is an alphanumeric string produced by cryptographic file comparison algorithms. It is a fixed-character string that helps you identify whether a file is identical in nature to another file. A checksum usually contains a random set of characters with a fixed length.
No matter whether you hash a small file with only 20 characters or a large file with 2000 characters, the resulting checksum would still have the same character length. Hashing the same file over and again will produce the same checksum again without any change. Remember, if you modify the file contents or add just a little single extra space, the entire set of checksum characters would change.
But wait, do not confuse checksums with file encryptions. It is not yet another technology to encode and decode information or to shorten (compress) your text. You cannot encrypt a 2000 character text into a 16 character checksum and then decode it back to its original state. It doesn’t work like that. File checksums are not meant for transferring confidential information or for compressing larger data into smaller texts.
Why Does a Checksum Hold Significance in Computing?
There are different circumstances when you will need to compute a file’s checksum. Here are some typical scenarios:
Validate your Downloaded Files
Internet connectivity issues are not uncommon. If you’re downloading a large file, constant Internet issues can surely irritate you in many ways. Your download may get worse during peak hours. The increased load on your bandwidth distribution can cause the download to become terribly slower or even stop in the middle for apparently no reason.
Windows MD5 Checker can help you verify the integrity of your downloaded files. If you’ve downloaded a large file (e.g. 5 GB), you may want to validate it to ensure that it is completely downloaded.
File validation is a common practice while sharing large files. The publishers of large Linux distributions such as Ubuntu, often provide a checksum of those files. After downloading your distribution, you can use those checksums to verify if your file has been completely downloaded.
Digital Security
Downloading files from untrusted sources can have adverse and disastrous consequences. Unsolicited programs and files could transmit computer malware, viruses, or Trojans. They can perform backdoor activities without your consent. So if you’ve downloaded a file without verifying its legitimacy, you can use Windows MD5 Checker to do it now.
Identify Duplicate Files
Computing the file checksum will enable you to identify unique and duplicate files. If your PC has gotten gunked up with too many identical files eating your storage, you can compute the file hashes to find and delete duplicate files. Cleaning duplicates on a regular basis is a good practice to save storage, make room for new files and increase your computer’s performance.
How to Use Windows MD5 Checker?
Here are the steps to use Windows MD5 Checker to computer file hashes and identify duplicates:
- Download Microsoft File Checksum Integrity Verifier.
- After successful download, double-click the Windows-KB841290-x86-ENU.exe file.
- Click Yes to accept the License Agreement.
- Click on Browse, and select your desired folder (preferably, MS MD5 Checker on your Desktop) to extract the Microsoft File Checksum Integrity Verifier tool.
- Click on OK thrice.
- Now navigate to the folder where you’ve extracted your files. (MS MD5 Checker in our example).
- Copy the file fciv.exe to C:\Windows\System32 directory.
- Your computer will prompt you to approve the administrative privileges. Click Yes.
- Type Command Prompt in the Search Box on the taskbar.
- Right-click on Command Prompt, select Run as administrator.
- Use one of the following commands:Generate MD5 hashTo generate the MD5 hash of a file, use the following command:FCIV.exe -md5 directory\file.ext
Example: To generate the MD5 hash of a file Project.pdf stored in the Documents directory, type the following command. Replace the user name example with your actual user name.
FCIV.exe -md5 C:\Users\Vikas\Documents\Project.pdf
Generate SHA1 hash
Similarly, to generate the SHA1 hash of a file, use the following command:
FCIV.exe -sha1 directory\file.ext
Example:
FCIV.exe -sha1 C:\Users\Vikas\Documents\Project.pdf
Generate both MD5 and SHA1
You can also generate both the MD5 and SHA1 hashes together for a file using the command given below:
FCIV.exe -md5 -sha1 directory\file.ext
Example:
FCIV.exe -md5 -sha1 C:\Users\Vikas\Documents\Project.pdf
- Now, going ahead, you’ll need to store these hash values in one place and compare them to distinguish unique and duplicate files. How will you do that?
There are two ways:- Create a database: Using the in-house functionality, you can create a database of all the MD5 or SHA1 checksums you’ve calculated.
- Manually store in an Excel spreadsheet: You can also store your MD5 or SHA1 checksums into a Microsoft Excel spreadsheet for reviewing later.
- Once you’ve created an automated database or an Excel spreadsheet, review and compare all the hashes. Files with matching hashes are duplicates. Files with unique hashes are originals.
- Keep one original file aside in each duplicate pair (group), and move the rest of the files to a separate folder on your hard disk.
Drawbacks
Although you can use Windows MD5 Checker to find and compare duplicates, it has some major drawbacks as well. It is the most suited option for hashing a few dozen files rather than a collection of hundreds of files. Manually scanning multiple files using Windows MD5 Checker can be a long, tedious job. You will need to hash each file independently, store the results and then review the hashes yourself. It’s simply not worth your time.
Moreover, Microsoft has officially discontinued the support for Windows MD5 Checker. So, we cannot rule out the possibility of running into compatibility issues or other technical glitches with the usage of this product on newer operating systems. As an unsupported product, you will NOT avail of any technical support or assistance should you run into any issues.
A Better Alternative
Thanks to the advancement in technology, there are better alternatives available today. Clone Files Checker is a fully automated duplicate files finder that does the automated hash computing and duplicates cleaning tasks in minutes.
- Download and install Clone Files Checker.
- First, add the folders that you want to scan for duplicates.
- Select a scan type (All Files to search for all file types, or Custom scan to search only specific file types).
- Use the optional file size settings if you want to further limit the scope of your scan.
- Start the scan and wait for some time.
- Once the scan is finished, you can use the Wizard-based appearance to automatically fix duplicates in seconds.
- Alternatively, you can review your files and use automated file selection patterns to batch select/ de-select your files.
- Finally, use the Select Action menu to choose if you want to permanently delete the duplicates or move them to a folder.
Raza Ali Kazmi
Raza Ali Kazmi works as an editor and technology content writer at Sorcim Technologies (Pvt) Ltd. He loves to pen down articles on a wide array of technology related topics and has also been diligently testing software solutions on Windows & Mac platforms. If you have any question about the content, you can message me or the company’s support team.