
Операционные системы, браузеры и другие приложения обзаводятся темной темой оформления, среди них и стандартный файловый менеджер Windows. В этой краткой инструкции о том, как сделать темный проводник в Windows 10, об ограничениях встроенного метода, а также некоторая дополнительная полезная информация.
Также может быть интересным: Темная тема Google Chrome (а также — как отключить темную тему Chrome при темной теме Windows 10), Темная тема оформления в Word, Excel и других программах Microsoft Office.
Включение темной темы оформления в проводнике
Прежде всего одни важный нюанс: темный проводник доступен только в Windows 10 версии 1809 и 1903 (и, предполагаю, останется в более новых). Если у вас установлена необходимая версия, можно приступать.
- Откройте параметры (клавиши Win+I или в меню Пуск).
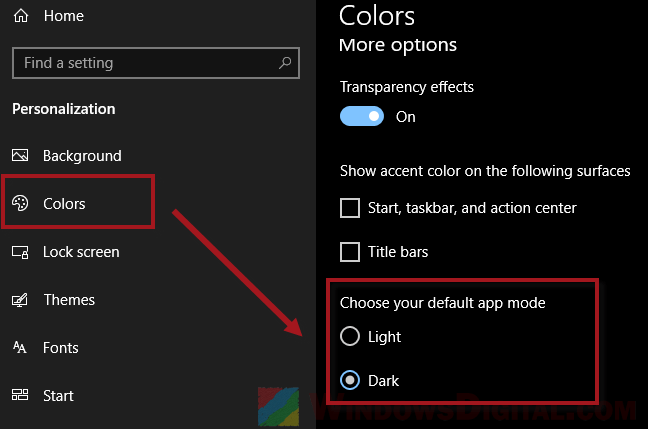
- Перейдите к разделу Персонализация — Цвета.
- Пролистайте список параметров цветов до раздела «Выберите режим приложения по умолчанию». Установите «Темный».

- Готово, сразу после этого большая часть элементов Windows 10, а также проводник приобретут темную тему оформления, как на скриншоте ниже.


Учитывайте, что эта же настройка может затронуть и сторонние приложения: например, последние версии Google Chrome также включают темную тему, когда она включена в параметрах Windows 10.
И в завершение несколько дополнительных моментов, касающихся темного режима в Windows 10:
- На настоящий момент времени нет методов изменять параметры отдельно для разных элементов: например, нельзя включить темную тему только для проводника, а остальное оставить светлым.
- В интернете можно найти сторонние темы оформления для Windows 10, включая темные. Однако, мне пока не удалось обнаружить что-то, что выглядело бы действительно хорошо (см. Как установить темы оформления Windows 10). Пара примеров таких тем оформления — на скриншотах ниже.

- Некоторые программы для настройки оформления системы могут мешать включить темную тему проводника и Windows Также темная тема может не включаться при использовании тем оформления высокой контрастности.
- За использование темной темы оформления в Windows 10 отвечает параметр DWORD32 с именем AppsUseLightTheme в разделе реестра HKEY_CURRENT_USER\Software\Microsoft\Windows\CurrentVersion\Themes\Personalize (при значении 0 используется темная тема, при значении 1 — светлая).

While working on your Windows computer, the lighting conditions in your environment may change continuously. To ensure the screen display is readable at all times, you have the option to adjust the screen brightness in Windows. But the operating system offers another feature that ensures ideal legibility in dark working environments. Windows 10 dark mode displays windows and menu elements in dark colors. These display settings go easy on your eyes and save battery life, since energy consumption is reduced. What’s more, the black elements can look sleeker compared to the default white. We show you three ways to activate the Windows 10 dark theme.
Option 1: manage Windows 10 dark mode via the settings
The settings application is the quickest and easiest option for enabling and disabling Windows 10 dark mode. Here, you can define the main settings of Windows 10 in just a few clicks, including the display language, lock screen or sound effects. Follow our step-by-step guide and learn how to enable the Windows 10 dark mode in the personalization area.
This option is only available from Windows 10 Version 1607.
Step 1: open the settings app
To open the settings app, enter the corresponding term into the search field in the task bar. Select the right search result in the left area by clicking the left mouse button or click on the option “Open” on the right.

Open the settings app directly using the shortcut [Windows] + [i].
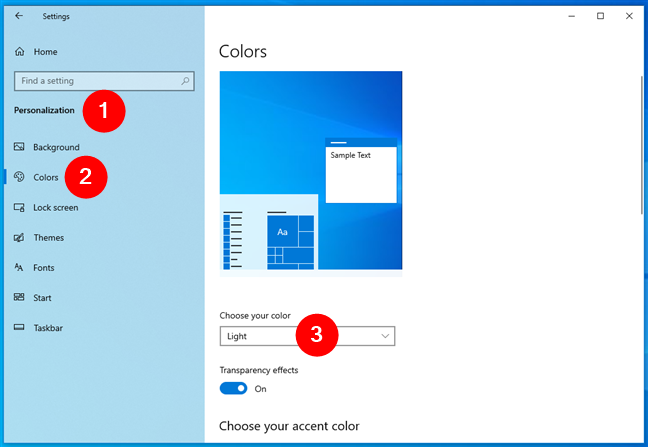
Step 2: access the “Colors” tab in the “Personalization” menu
Next, select the option “Personalization” in the Windows settings using the left mouse button.

Alternatively, you can access this section by right-clicking on the desktop to launch the context menu and then selecting the option “Personalize”.
Select the “Colors” menu tab to access the settings for the color display of Windows 10.

Step 3: activate Windows 10 dark mode
To activate the Windows 10 dark theme, click on the “Choose your color” drop-down menu and then select the option “Dark”. The operating system will immediately apply the setting and display the dark mode, with all elements in black or gray. If you want to deactivate the Windows 10 dark theme at a later time, select the option “Bright” here instead.

Step 4: Define other settings
You also have the option to choose an accent color. If you personalize this setting, Windows will display certain elements in the selected color. Once you select an accent color, it will be shown with a checkmark in the top-right corner. Scroll down to define the color for other areas too, such as for the “Start” section, task bar or info center.

Option 2: enable/disable the Windows 10 dark theme via Windows Registry
If you’re working with an older Windows 10 version, the option to enable the Windows 10 dark theme is often not yet available in the settings app. In this case, you can activate and deactivate the dark mode in the registry. Simply use the default registry editor – also known as “Regedit”.
Step 1: open the “Run” dialog
Open the “Run” dialog via the Start menu or by using the key combination [Windows] + [R]. Next, enter the command “regedit” into the entry field and confirm with “OK”.

If the program asks for permission to make changes, confirm by pressing “OK”. The registry editor will launch.
Step 2: open the file path for Windows 10 dark mode
The Windows Registry is a configuration database. In the left area, Regedit gives you access to all content in this database – like how you may be used to with the Windows file manager. First select the drop-down menu “HKEY_Current_User”. Next, follow the file path below:
.\Software\Microsoft\Windows\CurrentVersion\Themes\PersonalizeCopy the path “Computer\HKEY_CURRENT_USER\Software\Microsoft\Windows\CurrentVersion\Themes\Personalize” using the key combination [Ctrl] + [C] and insert it into the address bar of the registry editor using [Ctrl] + [V] to gain direct access to the registry entry for the Windows 10 dark theme.

Step 3: activate the Windows 10 dark theme
After you have opened the entry, click on an empty space in the right area using the right mouse button. You will then see the drop-down menu “New”. Select the option “DWORD-Value (32-Bit)”.

After you have selected the option, a new value will appear in the list.

Next, rename the value to “AppsUseLightTheme”. Open it by double-clicking. Check whether the entered value equals “0”. This means “No” and deactivates the bright mode. If this is not the case, adjust the value accordingly and confirm with OK. This activates Windows 10 dark mode.

To deactivate the dark theme, change the value for the registry entry “AppsUseLightTheme” to “1”.
Option 3: use external software for dark mode management
If you often switch between Windows 10 dark mode and the standard bright settings, the process via the registry is rather cumbersome. When activating the dark mode via the system settings is not possible, it’s advisable to install suitable software. This way, you will also be able to switch between a bright and dark mode in older Windows versions. So you won’t need to go through the registry editor. Here are two free tools that are available.
Easy Dark Mode for Windows
The free tool Easy Dark Mode enables you to switch between both themes (“Bright” and “Dark”) with just a few clicks. The optional switch panel is size-adjustable and is shown before all other windows. Plus, you have the option to enable and disable the dark mode in Chrome (from Version 74) and in Firefox (from Version 63).
Windows 10 Dark Theme Activator
Another free option is the Windows 10 Dark Theme Activator. This tool also lets you conveniently activate and deactivate the Windows 10 dark theme. The disadvantage with this software is that you need to log in and out with your user account to switch between modes.
Was this article helpful?
Trying to work early in the morning with a bright computer screen can often feel like a shock to the system. Even if you have the brightness level turned down, some laptops just feel too bright for certain times of the day. This is where dark mode comes in.
Besides giving your eyes a break, enabling dark mode on a system such as Windows 11 can also potentially help preserve the life of your battery. These steps also work on Windows 10.
Turning on Windows dark mode
In both Windows 10 and Windows 11, the dark theme includes all parts of operating system unless a specific app has an override. The result is a vibrant desktop experience with dark mode enabled. Here’s how you can enable it in Windows 10 and 11.
Step 1: Go to Settings. You can either type it into the Windows search bar or click the Gear icon in the Start menu. Or use the Windows + I keyboard shortcut.
Step 2: Head to Personalization, which features an icon of a paintbrush over a computer monitor.
Step 3: When the window opens, click Colors.
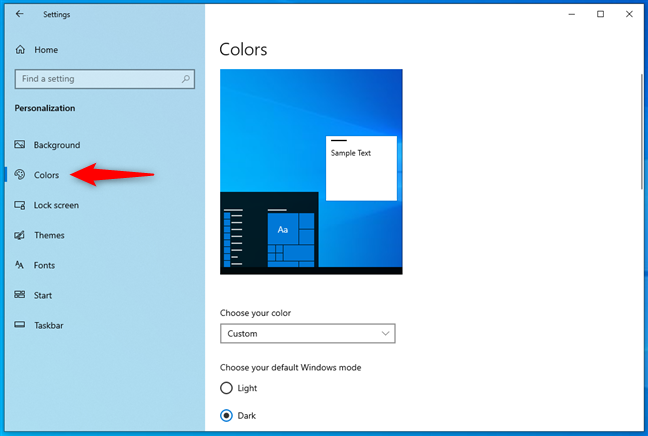
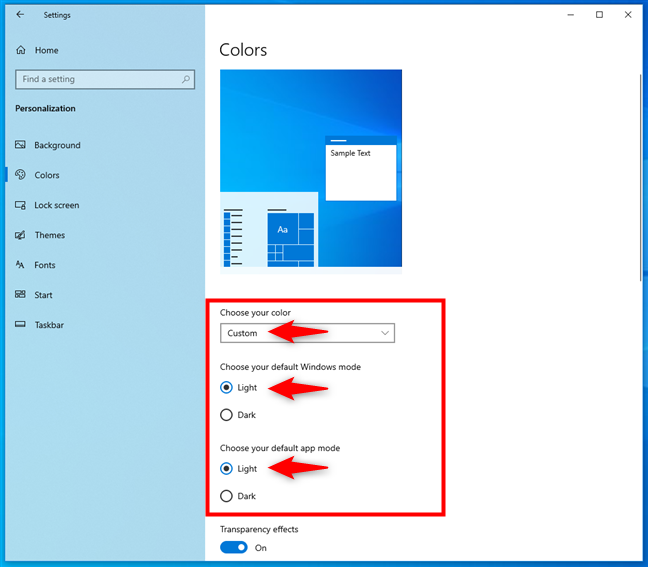
Step 4: Under the heading Choose Your Color, click on the drop-down menu. This menu offers three theme options: Light, Dark, and Custom. For dark mode, select Dark. In contrast, the Light option will turn your menus and windows to a bright shade of white. Selecting the Custom option will trigger two more options to appear: Choose Your Default Windows Mode and Choose Your Default App Mode.
For these options, you will be prompted to choose either Light or Dark, for each option. And so, this way, with the Custom option, choosing Light or Dark doesn’t have to mean it will apply to the whole system at once. It can mean just choosing dark mode for certain situations.

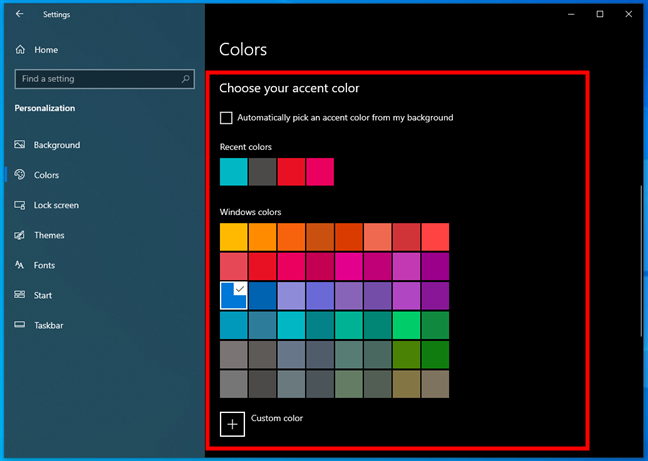
Step 5: This step is optional, but the Colors section of the Settings menu also allows you to further customize your dark mode (or other modes) with accent color options. If enabled, accent colors can show up in things like menu icons, the Start menu, or the taskbar. The accent color options are located under the heading Choose Your Accent Color.
If you want Windows to automatically choose an accent color to match your wallpaper, tick the box next to the phrase Automatically Pick an Accent Color From My Background.

Your Windows OS should come with a preset collection of 48 accent colors from which to select that you can access by navigating to the heading Windows Colors. You can also choose a custom color by clicking on the Plus Sign icon next to the phrase Custom Color.
Lastly, you can also control where these colors show up.
In Windows 10, tick the box next to either or both of these phrases: Start, Taskbar, and Action Center or Title Bars and Window Borders. Both of those options are available for Dark and Custom modes, but not for Light mode. Light mode only offers the Title Bars and Window Borders option. These last two options should be located in the Colors menu under the heading Show Accent Color on the Following Surfaces.
For Windows 11, you have the option to enable Transparency effects, and opt to Show accent color on Start and taskbar and Show accent color on title bars and window borders. Both are disabled by default.
Bonus tip: Activate dark mode in Microsoft Office to match system settings
If you’ve already set Windows to dark mode, you might also want to do the same with your Microsoft 365 apps, like Microsoft Word. The latest version of Office allows for the application of dark mode, having added the option to apply the visuals you’ve set up for your current setting background to the app. Here’s how:
Step 1: Set Windows 10 on your device to dark mode using the steps outlined earlier in this guide.
Step 2: Open a Microsoft 365 app like Word. Then choose Account from the lower-left corner of your screen.
Step 3: Under the heading Office Theme, click to view all of the drop-down menu options.

Step 4: Choose Use System Setting from the drop-down menu. If you already had your system setting on dark mode, your Microsoft 365 apps should immediately darken and turn black.
Note: If you’re trying to use dark mode across all of your Office apps, you should know that Use System Setting might not work for every app. This option doesn’t exist in certain Office app menus, and if you don’t have a paid subscription to Microsoft Office or Microsoft 365, you’ll find even more limitations. If you don’t have full access to the software, you might not be able to use dark mode or the Black option for every app.
If you’re looking for more desktop tweaks, learn how to adjust the screen resolution in Windows for improved visuals.
Did you know that Windows 10 has a Dark Mode? Having been present in the operating system for quite a while, it has seen significant improvements since its introduction in 2016. This mode transforms the interface from white to black, enhancing usability in low-light environments and when working during the night. It’s also great for those who simply prefer the way of the Dark Force. 🙂 Without further introductions, let’s see how to enable Dark Mode in Windows 10, how to customize it, and how to remove Dark Mode on your laptop or desktop computer:
Initial considerations about the Dark Mode
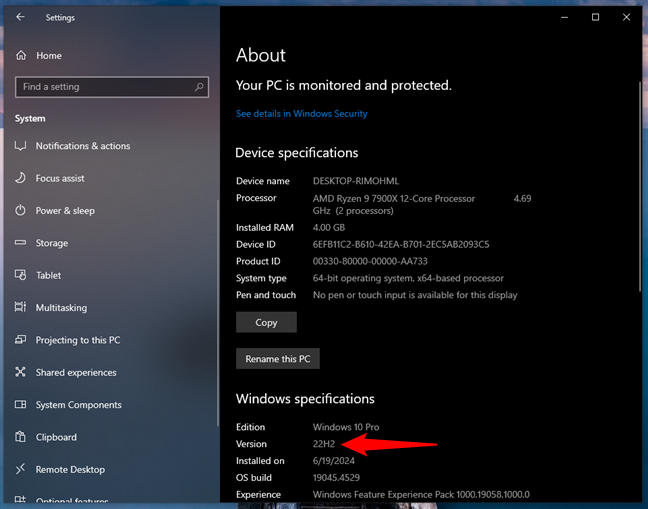
Although Dark Mode has been a feature in Windows 10 for quite some time, its current appearance and customization options have significantly improved since the early versions. For this tutorial, I am using the latest and last Windows 10 version, 22H2, released in 2022. If your interface looks different from the one in the screenshots provided, you might be using an older version of the operating system. In that case, you should update your system using the Windows 10 Update Assistant.
Dark Mode in Windows 10 version 22H2
When you enable Dark Mode in Windows 10, the operating system and many of its apps switch to darker visuals. The most noticeable changes are:
- The plain white background in apps turns dark (black or dark gray).
- Menu backgrounds change from white to dark.
- Scrollbars in apps become gray.
- Default black text displayed in apps turns white.
How the Dark Mode looks in Windows 10
Now… before we go ahead, I’d like to make one thing clear: Dark Mode is not the same thing as Night Light. This is a separate feature designed to reduce eye strain and improve sleep quality. It does so by decreasing the amount of blue light emitted from your screen. Blue light can alter your circadian rhythm, making it difficult for you to fall asleep. When enabled, Night Light makes the screen display warmer tones. If you want to learn how to enable or how to turn off Night Light for your screen on Windows 10, read this guide instead: Night light: What it does and how to use it.
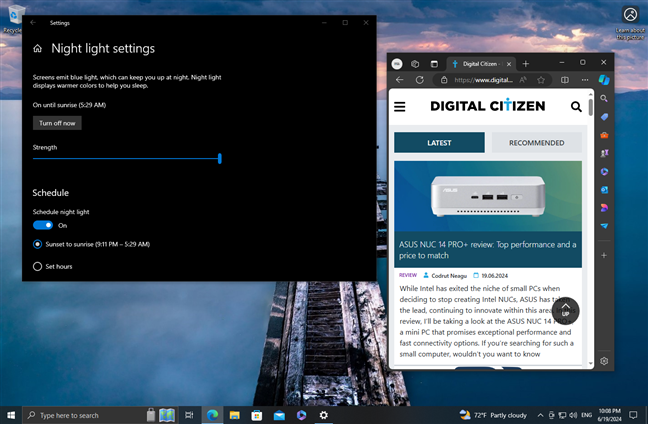
Dark Mode is not the same as Night Light
Having said all that, let’s see…
How to turn on Dark Mode in Windows 10
If you want to enable Dark Mode in Windows 10, first open the Settings app (Windows + I). Then, go to the Personalization section.
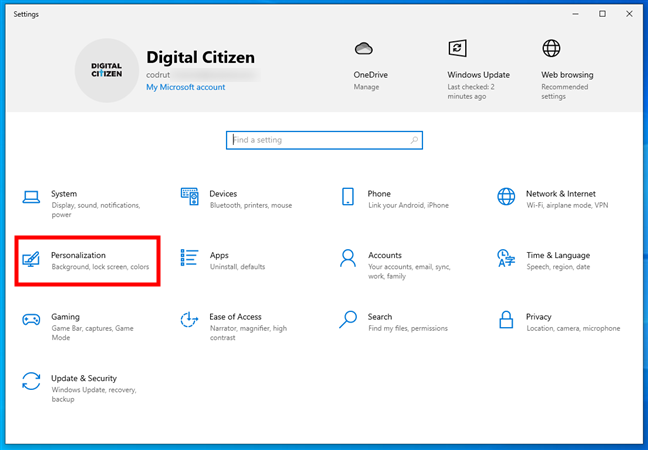
Open Settings and go to Personalization
In the left sidebar, select Colors. On the right, you’ll see several settings related to colors.
Go to Colors
There are two ways to enable Dark Mode. The fastest is to select Dark in the Choose your color dropdown list. When you do that, the Dark Mode is applied immediately to Windows 10 and the apps that support it.
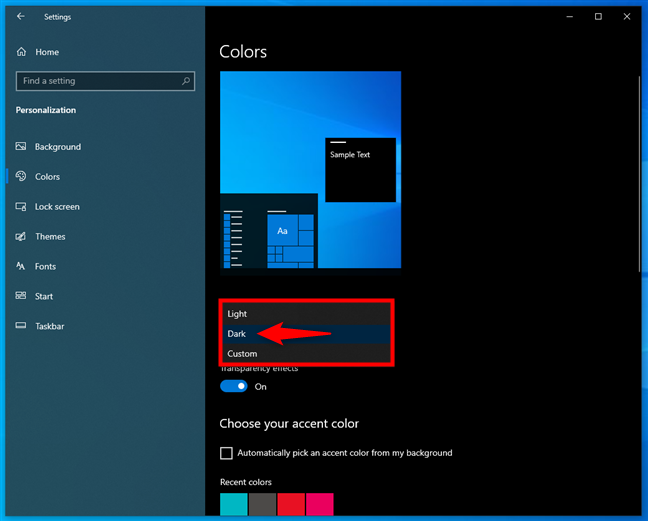
Choose Dark as your color
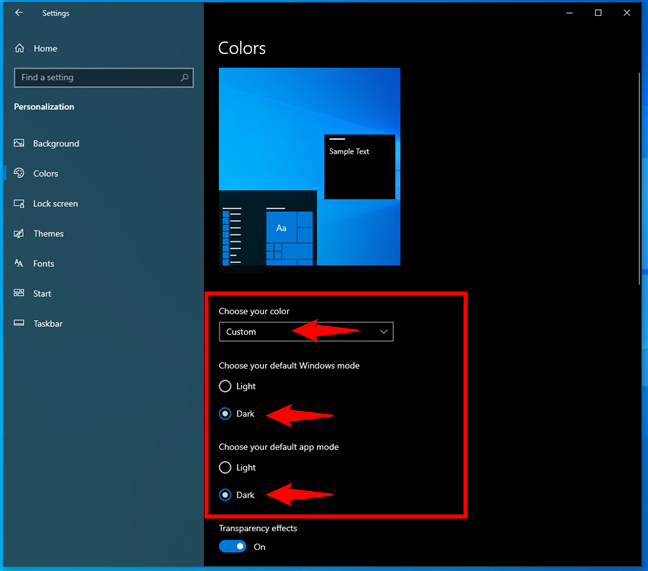
Another method to enable the Dark Mode is to select Custom in the Choose your color dropdown list, and then check the Dark option for both “Choose your default Windows mode” and “Choose your default app mode.”
Windows 10 gives you two independent options for greater flexibility. The first option turns on Dark Mode only for the Windows 10 user interface, while the second enables it just for the apps that support Dark Mode.
Another way to enable Dark Mode in Windows 10
Regardless of how you’ve decided to turn on Dark Mode, once you do that, you can also set whether you want Transparency effects by enabling or disabling their switch.
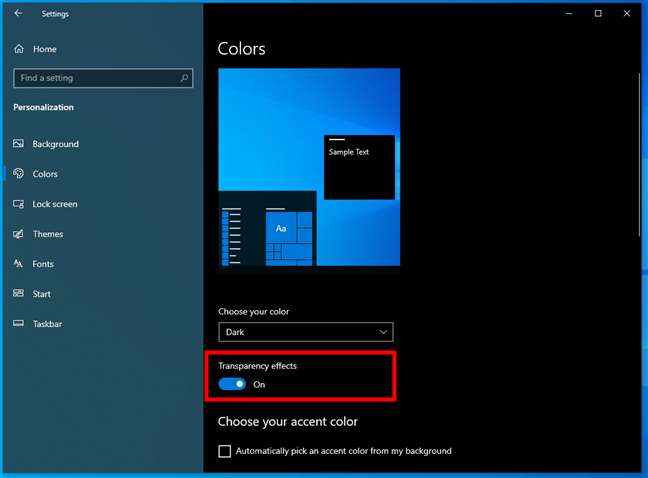
Enable or turn off Transparency effects
If you scroll down a bit, you can also choose an accent color.
Choose your accent color
Under the list of Colors, you can also decide where the accent color gets applied:
- Start, taskbar, and action center
- Title bars and window borders

Set where the accent color gets applied
Experiment with the transparency effects and the accent color, and set them as you wish. When you’re done, close Settings and the Dark Mode will remain activated using the personalization settings you’ve chosen.
How to turn off Dark Mode in Windows 10
If you’re bored by the Dark Mode, you may want to disable it and switch to Light Mode. While we covered all the steps in the How to enable or disable the Light Mode in Windows 10 tutorial, here’s a quick rundown of what you’ll need to do:
Open Settings on your Windows 10 computer and go to Personalization. Select Colors in the left sidebar, then Light in the Choose your color dropdown list on the right. This will immediately remove the Dark Mode from your laptop, desktop PC, or tablet.
How to get Microsoft Windows 10 out of Dark Mode
Alternatively, you can also get Microsoft Windows 10 out of Dark Mode by selecting the following options:
- Choose Custom in the Choose your color dropdown list.
- Select Light under “Choose your default Windows mode.”
- Check the Light option under “Choose your default app mode.”
Note that, if you prefer, you can also choose to keep the Dark Mode only for the Windows 10 interface, but switch to Light Mode for the apps. The other way around too.
Turn off the Dark Mode in Windows 10
Scroll down a bit and experiment with the transparency effects and the accent colors, as explained in the previous section of this guide.
What apps support Dark Mode in Windows 10?
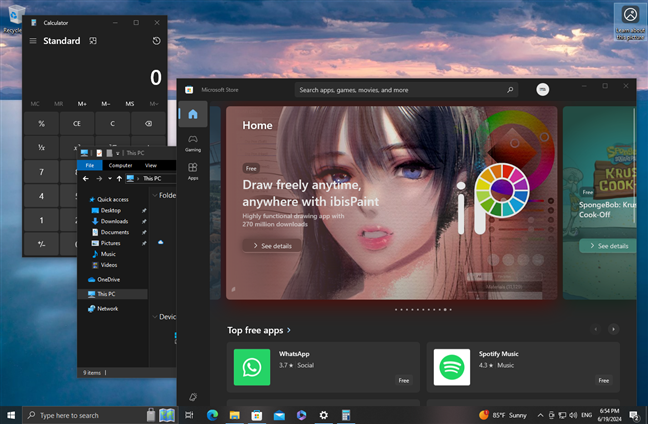
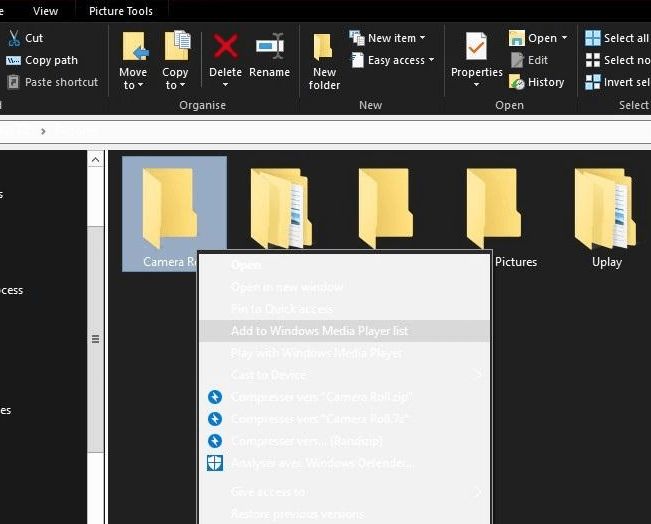
When enabled, the Dark Mode is applied to many parts of Windows 10: Start Menu, Search, Settings, File Explorer, and many built-in and third-party apps like Calculator, Photos, Outlook, Microsoft Store, and Facebook Messenger. The number of apps supporting Dark Mode continues to grow as more and more software developers implement this feature.
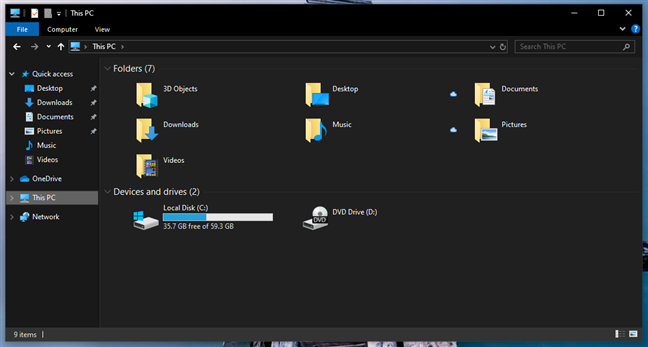
File Explorer in Dark Mode
Microsoft Office applications, including Word, Excel, and PowerPoint, can also use Dark Mode, which reduces the strain on your eyes when working for long periods of time. To learn how to enable Dark Mode in Microsoft Office, read this tutorial: How to enable the Dark Mode in Microsoft Office (change themes and backgrounds).
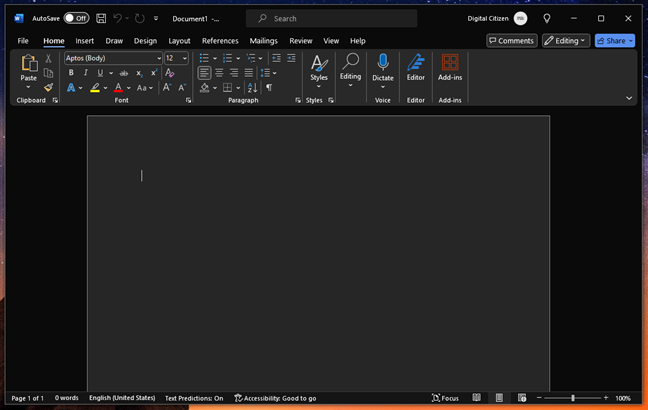
Microsoft Office (Word) in Dark Mode
Similarly, Microsoft Edge can be set to respect the Dark Mode settings configured in Windows 10. If you want Edge to automatically adjust its appearance to match your operating system’s settings and provide a consistent look, follow the steps in this guide: How to turn on and off Dark Mode in Microsoft Edge.
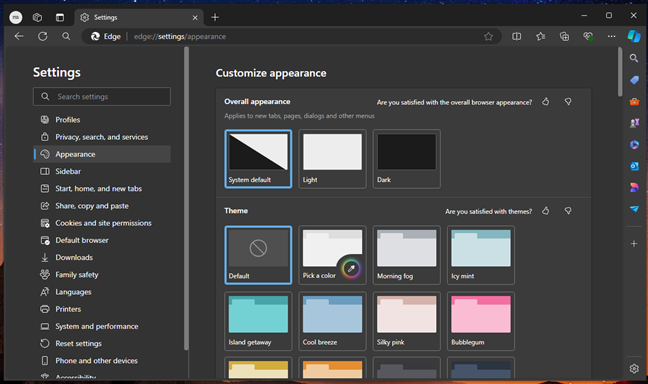
Microsoft Edge in Dark Mode
And now, as I’ve reached the end of this article, I’d like to ask you…
Do you like the Dark Mode in Windows 10?
The Dark Mode can be a cool way to use Windows 10. It can be easier on the eyes, it can make the apps more readable, and, in my opinion, look better than Light Mode. However, according to Wired, Dark Mode might not be as good for your eyes as you might think. Before closing this tutorial, I’d love to hear your thoughts. Which mode do you prefer and why? Are you a fan of the dark side, or do you prefer light as it’s the only path forward? 🙂 Comment below, and let’s talk about it.
Dark mode is one of the most talked-about features in the Windows 10 community since its introduction in the 1809 major update. However, many users have reported facing bugs and issues with the dark mode feature, especially while browsing the File Explorer. This guide will show you how to fix some of the most common issues with dark mode in Windows 10 or Windows 11.
Also see: How to Turn On Dark Mode in Windows 11 for Everything
Common Windows 10 or 11 dark mode issues and solutions
Here are some of the most commonly reported issues related to dark mode in Windows 10:
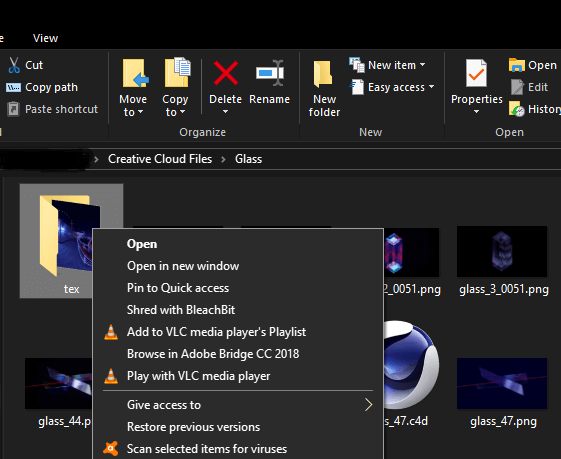
- The file explorer becomes partially dark mode in file explorer
- File explorer still appears in white even after switching Windows to dark mode.
- Dark mode or dark theme simply does not work.
If you’re having any of these issues, try the solutions below.
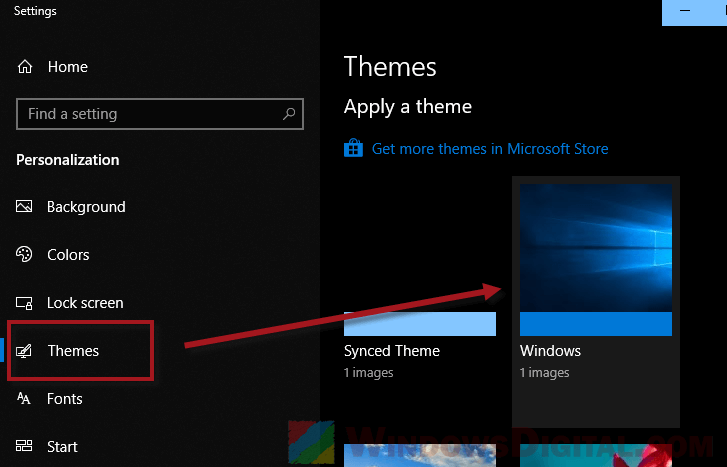
Switch to Windows Default Theme
In most cases, there will be some bugs or conflicts between the dark mode and the custom theme you are currently using. The first solution you should try is to switch your Windows 10 theme to the default theme, then optionally, switch back to your custom theme. This workaround should fix the dark mode not working issue. Here’s how to do it:
- Right-click anywhere on your desktop and select Personalize. Alternatively, you can access Personalize from the Settings app.
- In the left pane, select Themes.
- Under Apply a theme, select the Windows default theme.

- The dark mode issue should be fixed now. Optionally, you can switch back to the custom theme you were using if you don’t like the default Windows theme.
The file explorer with dark mode turned on should look like this:
If the above solution does not work to fix your dark mode related issue, ensure that you have turned on the dark mode option in Windows 10. Here’s how to do it:
- Follow step 1 in the instructions above to open Personalize settings.
- In the left pane, select Colors.
- On the right, scroll down until you see the option that reads “Choose your default app mode“.
- Select Dark to switch your Windows 10 to dark mode.
- Restart your computer for the changes to take effect.
“Choose your default app mode” missing or not working
If you do not see the “Choose your default app mode” option in the personalize settings, your Windows 10 probably does not have the version 1809 update installed. As mentioned before, the dark mode feature is only available in Windows 10 with version 1809 update or later. Try to run Windows Update by going to Settings, then Update & Security to check for updates. Alternatively, you can try running the Windows Update assistant, which can be downloaded from here.
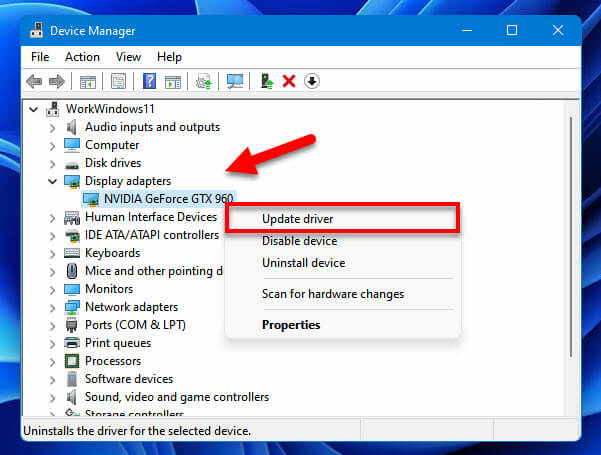
Update your graphics drivers
Sometimes, outdated graphics drivers can cause issues with dark mode in Windows 11 or 10. To fix this issue, you can try updating your graphics drivers. Here’s how you should do it:
- Press the Windows key + X and select Device Manager from the menu.
- In the Device Manager window, expand the Display adapters section.
- Right-click on your graphics card and select Update driver.

- Select Search automatically for updated driver software and wait for Windows to search for and install any available updates.
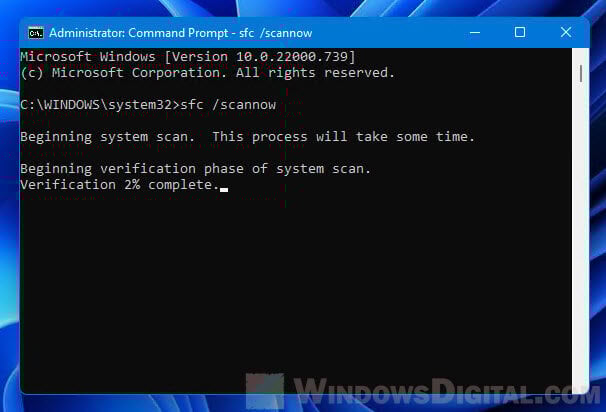
Run the System File Checker tool in CMD
Corrupted system files can also cause issues with the dark mode feature in Windows 10 or 11. To double-check if this is the case, you can try running the SFC (System File Checker) tool via Command Prompt.
- Press Win + X and select Command Prompt (Admin) from the menu.
- In the Command Prompt window, type sfc /scannow and press Enter.
- Wait for the scan to complete and restart your computer.
Last resort: Reset your PC
If nothing seems to work and you’re desperate to solve the dark mode problem, resetting your PC could be your last resort. Just keep in mind that this action might remove your files and programs. The following steps will show you how to reset your PC:
- Go to Settings by pressing Win + i, and click on Update & Security.
- Click on Recovery in the left pane, and then click on Get started under the Reset this PC section.
- Choose whether you want to keep or remove your personal files. If you choose to keep your files, Windows will remove all apps and settings, but keep your personal files. If you choose to remove everything, Windows will remove all your personal files, apps, and settings.

- If you chose to remove everything, you will be prompted to select a reset method. There are two options: Just remove my files and Fully clean the drive. If you choose Just remove my files, Windows will remove your files, but the data will still be recoverable using data recovery software. If you choose Fully clean the drive, Windows will remove your files and overwrite the data with random characters, making it much harder to recover the data.
- Follow the rest of the on-screen instructions to complete the reset. This process may take some time, so make sure to have your computer plugged in and don’t turn it off during the reset process.
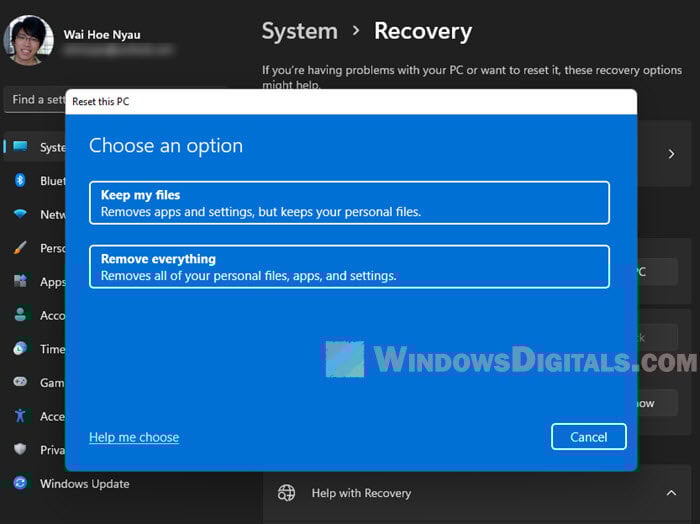
Once the reset is complete, you will need to set up your computer again, just like you did when you first got it. You can then try turning on dark mode again and see if the issue is resolved.