Уровень сложностиСредний
Время на прочтение8 мин
Количество просмотров51K
Несмотря на огромное количество текстов по установке Home Assistant, решил написать свой.
В первую очередь для себя, чтобы при повторной установке не рыться в бесконечном количестве ссылок.
Home Assistant развивается, часть мануалов устарела, часть содержит ошибки, часть написана Очень Умными Парнями, живущими в Линуксе и которые пишут что-то вроде: «сделай три раздела, два для систем и один для хомяка, и при установке систем подключай раздел с хомяком к каждой, только не форматируй его постояннo» (с). Это подлинная цитата, причём одна из самых понятных.
Мой текст написан виндузятником для себя и для людей, которые видят командную строку максимум раз в пару дней и не обязаны помнить все ключи команд линкуса. Описан весь процесс, собранный по многим мануалам. На часть мануалов приведена ссылка.
Итак.
В качестве подопытного был выбран ноутбук Acer Aspire E15. Тупо был. Был куплен бэушным семь лет назад за 10 тыс. рублей для разъездного менеджера по принципу: если потеряет – чтобы было не жалко. То есть, он был изрядно устаревшим уже тогда. Потом лежал на антресолях, всеми забытый. Думаю, в каждой мало-мальской приличной фирме такого хлама найдется с десяток штук и вам его подарят за пару пива знакомому сисадмину. Если нет знакомого сисадмина, то авито в помощь. Все равно в итоге получится в те же деньги или чуть дешевле и лучше, чем приличный одноплатник. Плюсом вы получите нормальный процессор, жесткий диск вместо вечно умирающей флешки и, если повезёт, не совсем дохлую батарею вместо источника бесперебойного питания.
На моём ноуте был проводной Ethernet, кто-то (возможно даже я) уже позаботился дорастить память до 8Gb вместо 4 и воткнуть древний SATA SSD диск на 256 Gb. Для работы с Windows так себе, но для моих целей – за глаза.
Способ установки — виртуальная машина на Debian. Попробую объяснить, почему.
1. Немного пояснений
1.1. Почему всё-таки, хоть плохонький, но PC, я объяснил выше. Основное – это желание иметь полноценный жесткий диск. Наличие у ноута своего экрана и клавиатуры – тоже плюс в тех редких случаях, когда удалённый доступ почему-либо невозможен.
1.2. С другой стороны, для одного HA, такой машины, всё таки, жирновато, поэтому хочется, если уж затевать такую пьянку, повесить на него функции домашнего NAS на внешнем диске и DLNA сервера, чтобы смотреть скачанные с торрентов купленные на официальных сервисах кино долгими зимними вечерами. Чуть позже добавится маленький Apache и VPN сервер.
1.3. Можно тупо поставить HASSOS, как операционную систему. Тогда DLNA и NAS можно запустить, как плагины. Я попробовал — мне не понравилось. Во-первых очень заморочная установка, во-вторых нужные мне плагины показались мне довольно кривыми. В третьих, сама операционка и мои права в ней усечены до крайности. Для Raspberry пойдет, для полноценного ноута – так себе.
1.4. Можно поставить как контейнер в докере. В таком случае вы автоматически лишаетесь плагинов. Среди них есть очень даже полезные. Можно, конечно, каждый из них ставить отдельными контейнерами. По мне – тот еще гемор.
1.5. Более продвинутый вариант – тот же докер в режиме Supervised. Моя предыдущая установка была именно такая. Плагины работают. Не все, правда, но почти все. Но с какого-то обновления пошли необъяснимые проблемы с совместимостью, перестал обновляться супервизор. Стал рыться – проблема не у меня одного. Возникает спорадически у разных людей. Лечение – полная переустановка. Или «Обновитесь до последней версии». А у меня какая??? Я тебя ставил 10 минут назад. Бесит, короче.
1.6. Ну и чисто эстетически мне перестал нравится docker. Постоянная борьба с логами, которые он пишет в самые затейливые места и тихо засирает диск, проблемы с совместимостью пакетов. Нельзя, как в Windows, поставить пакет, а потом его просто удалить. Обязательно либо остаются хвосты по всему диску, либо удаляемый пакет забирает с собой что-то важное. То есть – штука одноразовая. Короче, после очередного раунда безуспешной борьбы, я решил, что у меня есть более важные занятия в жизни, чем разбираться в докере и его причудах. Память позволяет, диск позволяет, процессор позволяет. Итак: виртуальная машина с HASSOS живёт, никому не мешает и ей никто не мешает. В остальной памяти делаю, что хочу.
2. Предварительные ласки
2.1. Загружаем образ Debian с официального сайта. Можно любой другой дистрибутив Linux. Лично мне нравится Debian своей незамутненностью. Он не пытается быть похожим на винду, как многие, ибо все равно получается плохо. Такой чистый брутал. Стабильный. Ну и много литературы по нему, конечно. Внимание. Некоторые команды отличаются в разных дистрибутивах. Всё, что написано далее – написано про Debian 12.
2.2. Скачиваем с официального сайта последнюю версию Rufus. Вставляем флешку, все настройки по умолчанию, выбираем только что скачанный образ — делаем загрузочную флешку.
3. Установка
3.1. На ноуте, нажинаем F2 при загрузке, проверяем настройки загрузки. В параметрах должно стоять UEFI, флешка первой в порядке загрузки. Корректируем при необходимости.
3.2. Для некоторых дистрибутивов (например для HASSOS) требуется отключить безопасную загрузку, но соответствующий пункт меню подсвечен серым и не выбирается. Для того, чтобы его активировать, нужно установить пароль супервизора. После этого выбор режима безопасной загрузки становится активным. К счастью, Debian 12 такого не требует. Оставляем, как есть. Если безопасный режим всё-таки выключен, то ИМХО лучше включить.
3.3. Запускается загрузка. Выбираем установку в графическом режиме. Красноглазые поборники расовой чистоты пингвинов конечно фыркнут, но графический режим чисто визуально приятнее.
3.4. Выбор языка. Выбираем русский, страну, раскладку клавиатуры, часовой пояс. Далее пароли администратора, имя и пароли пользователя и т.п.
3.5. Сетевые карты установились автоматически, но иногда приходится бежать за драйвером. На этот случай полезно иметь под рукой второй компьютер и еще одну флешку.
3.6. Спрашивает про разметку диска. Я весь диск отдал целиком, с разделами по умолчанию. Переспросила — уверен ли я. Уверен. Все данные на диске уничтожены. Плакать поздно.
3.7. Выбор софта. Я оставляю выбор по умолчанию, оболочку Gnome по причинам, указанным в п.1.1, добавляю к умолчанием еще SSH сервер. После этого можно идти пить чай. Что-то устанавливается сразу, что-то подкачивается из интернета и тоже устанавливается. Процесс небыстрый.
3.8. Перезагрузка. Вынимаем флешку. После перезагрузки нелишне проверить в биосе порядок загрузки. Правим при необходимости.
4. Настраиваем вход через терминал
4.1. Идем в настройки роутера, ищем нового клиента, в настройках DHCP прописываем ему статический адрес. Передергиваем DHCP, убеждаемся, что ваш компьютер переподключился по новому адресу. Выписываем адрес на листочек, запоминаем.
4.2. Теперь можно заходить на него со своего рабочего компьютера по SSH через PuTTY или что-у-вас-там-вместо-телнета.
4.3. Свой логин и пароль, введенные ранее в п.2.4., надеюсь, помним?
5. Включаем себя в группу sudo
5.1. Заходим под рутом. Другой вариант – заходить под своим логином , далее уходить в root командой su –
usermod -aG sudo ИмяПользователя
5.2. Возвращаемся обратно
su – «Имя пользователя»
4.3. Проверяем. Например:
sudo ls -la /root
6. Лично мне иногда удобно пользоваться графическим удаленным рабочим столом. Настраиваем его. Опционально.
5.1. Включаем
sudo apt install xrdp
5.2. В Windows набираем «Подключение к удаленному рабочему столу». Получаем примерно это.
5.3. Вводим адрес из п. 3.1. Подключаемся.

7. Убираем засыпание Debian
7.1. Убираем общие засыпания.
sudo systemctl mask sleep.target suspend.target hibernate.target hybrid-sleep.target
7.2. Поскольку у нас ноутбук, нам надо убирать засыпание при закрытии крышки
sudo nano /etc/systemd/logind.conf
7.3. В секции [Login] Находим строчки HandleLidSwitch= и HandleLidSwitchDocked=
7.4. Ставим ignore
HandleLidSwitch=ignore
HandleLidSwitchDocked=ignore
7.5. Не забываем раскомментировать.
7.6. Сохраняем, выходим,
7.7. Рестарт службы
sudo systemctl restart systemd-logind.service
8. Полезности
8.1 Файл менеджер mc. Опционально. Иногда удобно.
sudo apt install mc
8.2. Пакет управления сетью. Потребуется для следующих шагов.
sudo apt install ethtool
9. Если несмотря на ИБП питание выключилось, а с ним выключился компьютер, полезно иметь возможность разбудить компьютер по сети
9.1. При загрузке, заходим в BIOS. Проверяем в биосе, что WOL включен. Если не включен – включаем.
9.2. Смотрим список сетевых интерфейсов
ip a
9.3. Находим название проводного интерфейса. Обычно это eth0, но бывают варианты. У меня enp3s0
9.4. Делаем временный WOL
sudo ethtool --change enp3s0 wol g
9.5. Проверяем
sudo ethtool enp3s0
9.6. Смотрим вывод. Ищем строчку wake-on: g. Если есть, то всё в порядке.
9.7. Запихиваем это в автозагрузку. Для этого:
9.8. Узнаем путь к ethtool
which ethtool
9.9. Смотрим вывод. У меня оно хранится в /usr/sbin/ethtool
9.10. Создаём файл wol.service в /etc/systemd/system
sudo nano /etc/systemd/system/wol.service
9.11. В него вписываем:
[Unit]

Description=Enable Wake On Lan

[Service]

Type=oneshot

ExecStart = /usr/sbin/ethtool --change enp3s0 wol g

[Install]

WantedBy=basic.target
9.12. Запускаем службу
sudo systemctl daemon-reload
sudo systemctl enable wol.service
9.13. Проверяем
sudo shutdown
9.14. Будим машину удобным для вас способом. В интерфейсе кинетике для есть специальная кнопочка.
9.15. Если все работает, настраиваем автозапуск будилки на роутере или на другом внешнем устройстве гарантированно запасающемся по сбою питанию. На Keenetic это делается через opkg
10. Устанавливаем виртуальную машину.
(сперта https://g-soft.info/linux/10968/kak-ustanovit-virtualbox-7-0-v-debian/)
10.1. Проверяем зависимости, большая часть уже на месте, те, которых не хватает, устанавливаем.
sudo apt install dirmngr ca-certificates software-properties-common apt-transport-https curl -y
10.2. Необходимо импортировать ключ GPG (GNU Privacy Guard). Ключ GPG является частью системы криптографии с открытым ключом, которая позволяет убедиться в том, что устанавливаемые пакеты являются подлинными и получены из официального репозитория VirtualBox
curl -fSsL https://www.virtualbox.org/download/oracle_vbox_2016.asc | gpg --dearmor | sudo tee /usr/share/keyrings/virtualbox.gpg > /dev/null
10.3. Добавляем репозиторий Virtialbox
echo "deb [arch=$( dpkg --print-architecture ) signed-by=/usr/share/keyrings/virtualbox.gpg] http://download.virtualbox.org/virtualbox/debian $(lsb_release -cs) contrib" | sudo tee /etc/apt/sources.list.d/virtualbox-7.list
10.4. Обновляем список репозиториев
sudo apt update
10.5. Установка Virtual Box
sudo apt install virtualbox-7.0 linux-headers-$(uname -r) -y
10.6. Добавляем пользователя в группу
sudo usermod -aG vboxusers alexl
10.7. Находим значок VirtialBox. Запускаем, проверяем
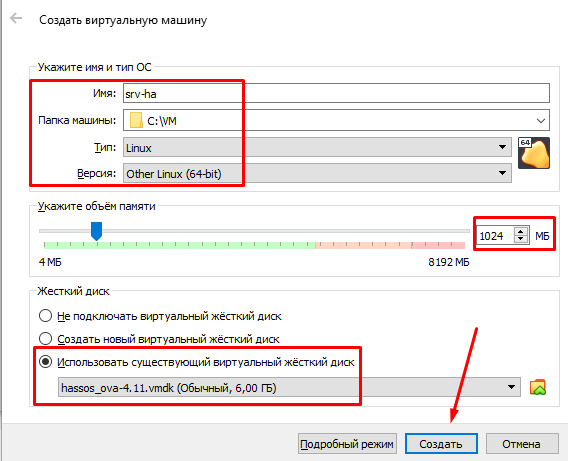
11. Установка Home assistant.
подсмотрено здесь: https://ivan.bessarabov.ru/blog/how-to-install-home-assistant-in-virtualbox)
11.1. Скачиваем vdi образ с официального сайта https://www.home‑assistant.io/installation/alternative
11.2. Разархивируем
11.3. Открываем виртуальную машину
11.4. На правой панели жмём Создать
11.5. Пишем название (лучше без пробелов)
11.6. Образ ISO оставляем пустым
11.7. Тип: Linux
11.8. Версия: Linux 2.6 / 3.x / 4.x (64-bit).
11.9. Вкладка Оборудование: сколько не жалко, но не менее 2 процессоров и не менее 2GB RAM
11.10. Ставим галку EFI
11.11. Вкладка Жесткий диск: ставим использовать существующий виртуальный диск. Выбираем наш скачанный образ
11.12. Создать машину
11.13. Идем в опции сети. Меняем NAT на bridge
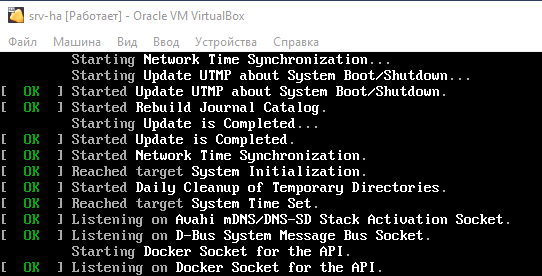
11.14. Запускаем
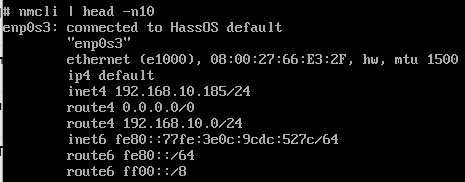
12. Настройка доступа из сети
12.1. Идем в роутер, видим новое устройство. Это виртуальная машина. Прописываем ей статический адрес
12.2. В настройках роутера прописываем доменное имя на этот адрес и порт 8123
13. Прописываем автозапуск виртуальной машины при перезагрузке.
(https://redos.red-soft.ru/base/arm/os-virtual/virtualbox/virtualbox-autostart/)
13.1. Создаем новую службу
sudo nano /etc/systemd/system/vbox@.service
13.2. Прописываем туда
Description=Virtual Box Guest %I

After=network.target vboxdrv.service

Before=runlevel2.target shutdown.target

[Service]

User=свой юзернайм

Group=vboxusers

Type=forking

Restart=no

TimeoutSec=5min

IgnoreSIGPIPE=no

KillMode=process

GuessMainPID=no

RemainAfterExit=yes

ExecStart=/usr/bin/VBoxManage startvm %i --type headless

ExecStop=/usr/bin/VBoxManage controlvm %i acpipowerbutton

[Install]

WantedBy=multi-user.target
13.3. Реинициализируем службы.
systemctl daemon-reload
13.4. %1 в первой строке – это параметр, куда вставляется имя или идентификатор вашей виртуальной машины. Имя вы знаете из п. 10.5, но идентификатор использовать правильнее. Узнаем его
VBoxManage list vms
13.5. Находим нужную машину, копируем идентификатор, вставляем в следующую команду
sudo systemctl status vbox@идентификатор
13.6. Что‑то вроде:
sudo systemctl status vbox@cea2060b-61a1-44a1-b5df-f9a6b0b82f43
13.7. Если ошибки нет, смотрим статус. После @будет ваш идентификатор.
sudo systemctl status vbox@cea2060b-61a1-44a1-b5df-f9a6b0b82f43
13.8. Если все норм, добавляем в автозагрузку. (идентификатор меняем на свой)
sudo systemctl enable vbox@cea2060b-61a1-44a1-b5df-f9a6b0b82f43
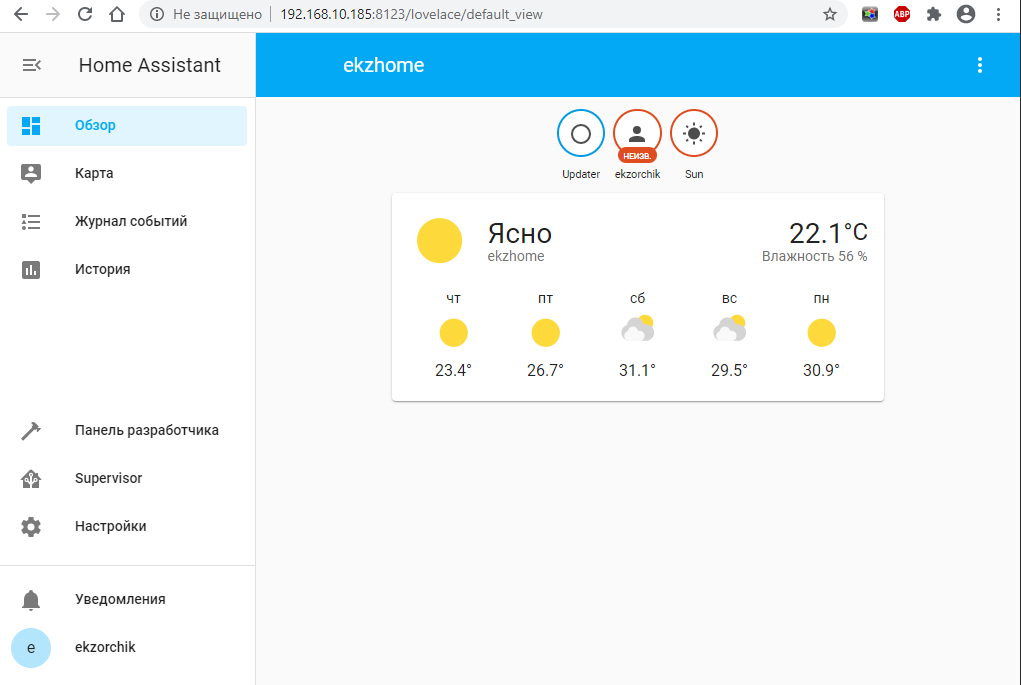
14. Финальная настройка
14.1. Заходим по вашему адресу, например:
http://192.168.0.15:8123
14.2. Или, как у меня
https://Hassio.mydomen.keenetic.pro
14.3. Вводим пароль, логин
14.4. Ждём
14.5. Настраиваем параметры места.
14.6. Пользуемся!
I will show you how to create Home Assistant Wake on Lan (WoL) switch to turn on your desktop computer. As well as how to use Home Assistant RPC shutdown add-on to turn off a Windows PC with a click of button.
Using Home Assistant you can control many things and probably you already doing this, but after you read this you will add your computer to the list. Let start this!
Table of Contents
What is Wake on LAN (WoL)?
Wake on Lan is a standard that allows a computer to be awakened by a network message called magic packet. To use the Wake On LAN, your computer should support this feature and it have to be always connected to your network. You can use Wake on LAN regardless of the installed Operating System as this feature is usually controlled by the motherboard of your device.
After you finish reading this you will be able to create a Home Assistant Wake on LAN Switch, Script or Automation that will awaken any device that supports WoL.
What is RPC Shutdown?
On the opposite side to turn off a Windows PC from Home Assistant you will need the Home Assistant RPC Shutdown add-on. The RPC Shutdown add on is available in the Add-On store in Home Assistant and you can install it with 1 click.
If you don’t have Home Assistant yet, or your Home Assistant is without the Supervisor menu (Add-on store) check these two tutorials of mine and you will have everything that is needed in no time:
- Home Assistant Supervised 👉 LINK
- Home Assistant OS 👉 LINK
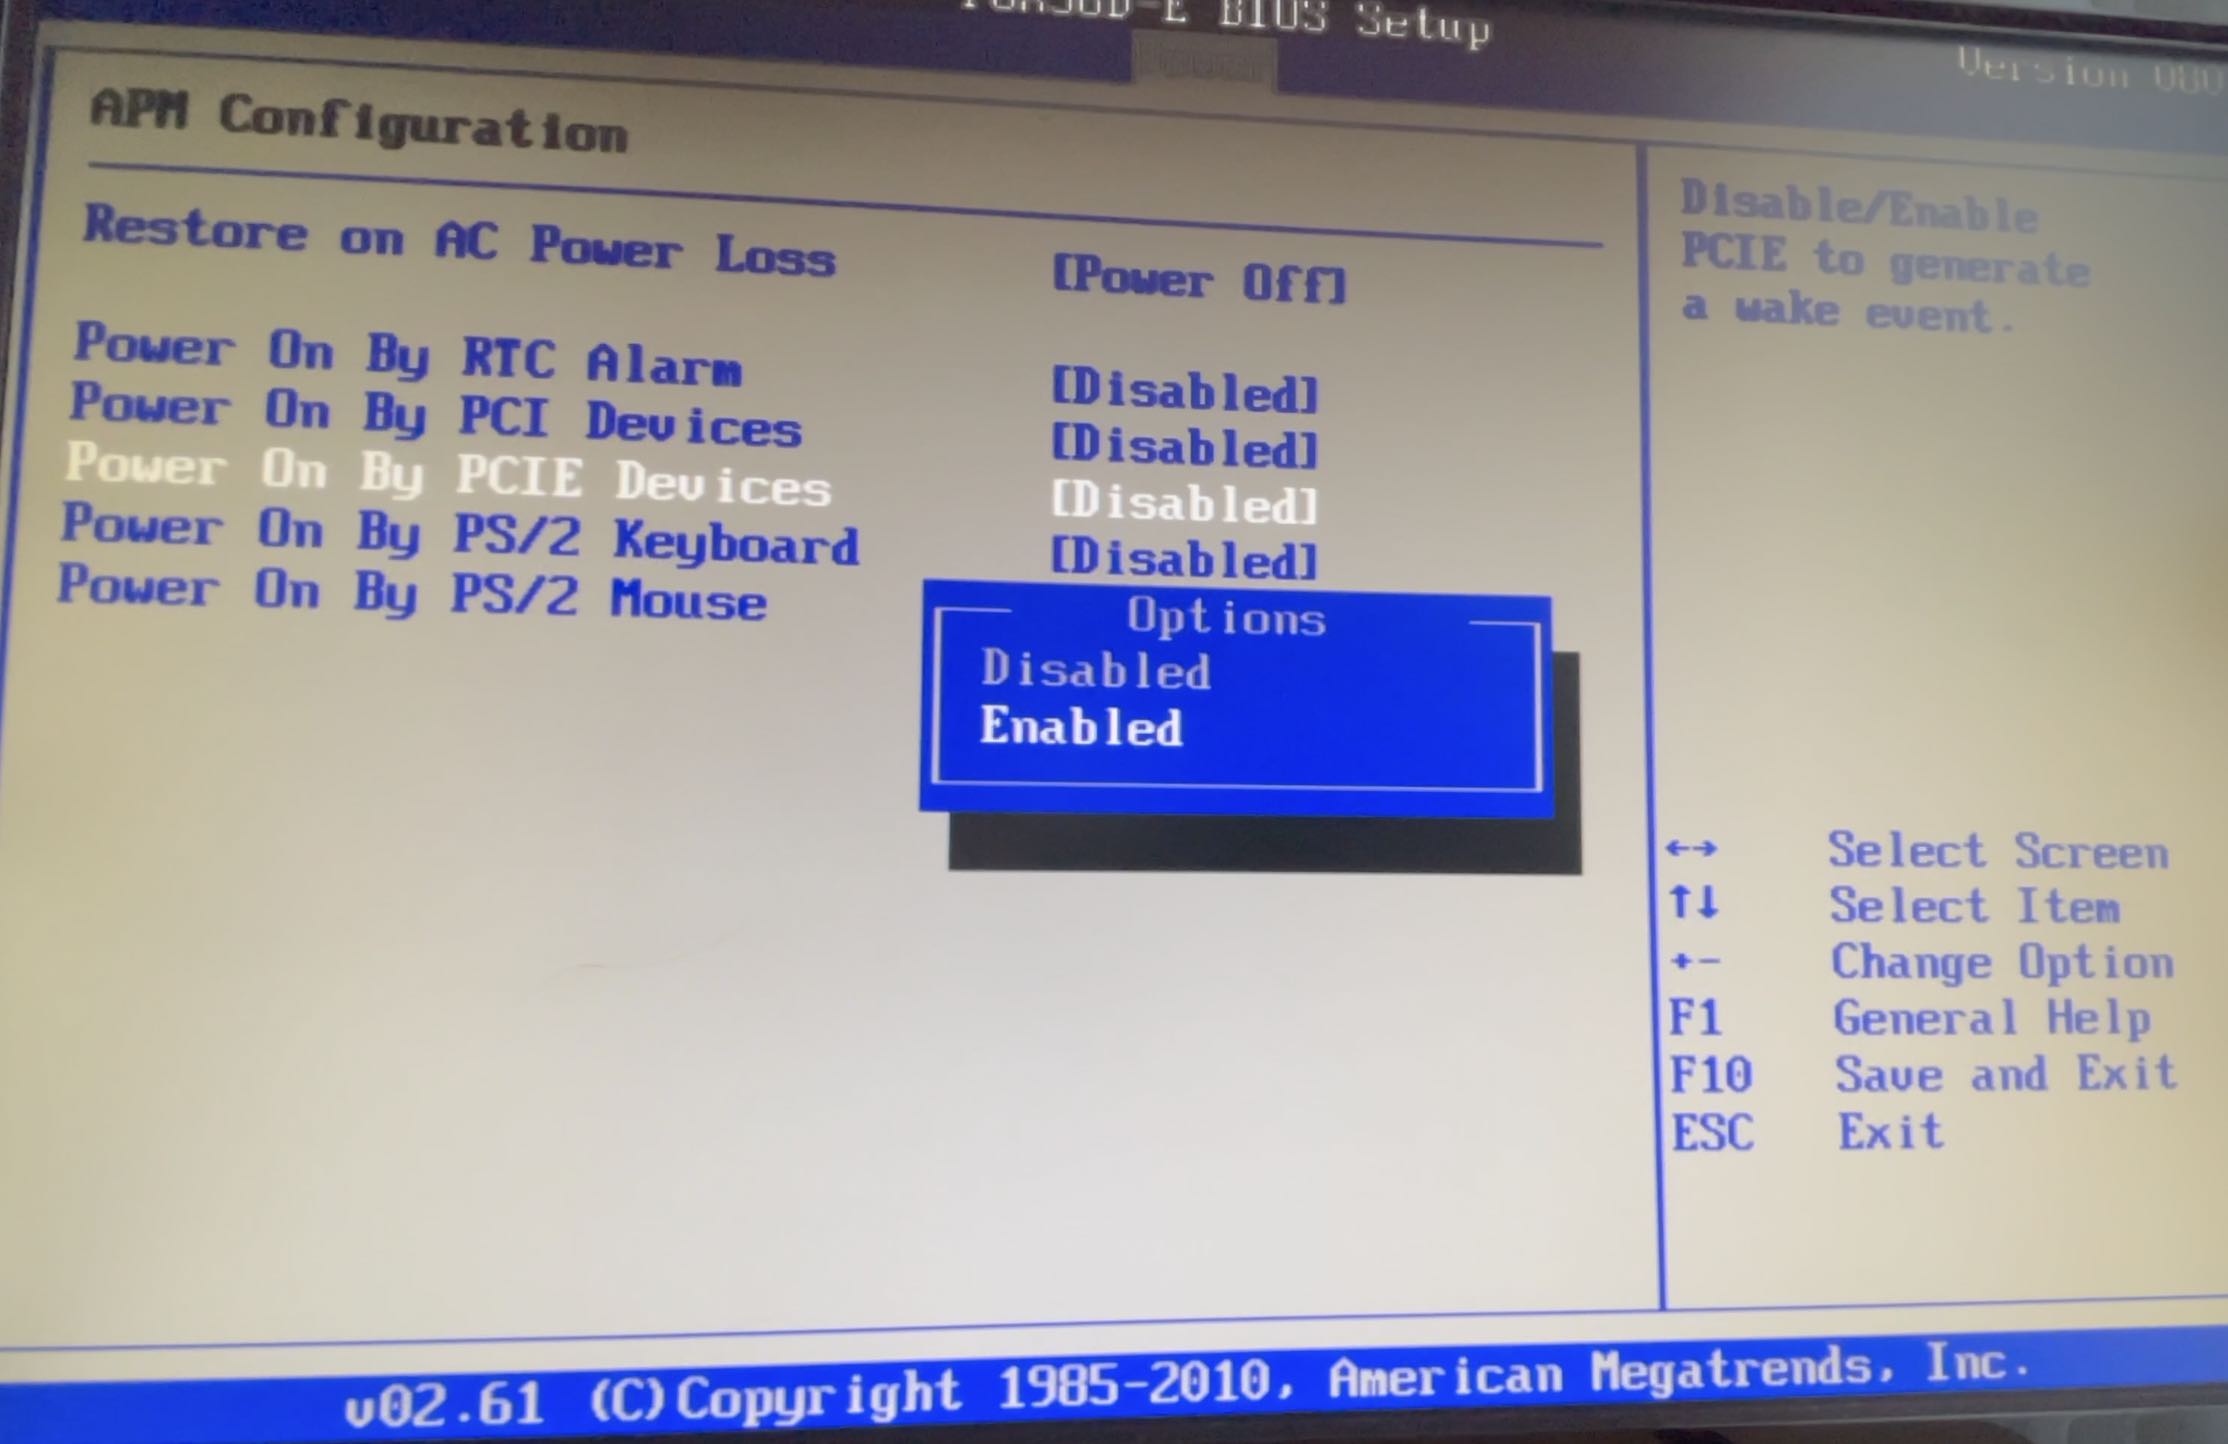
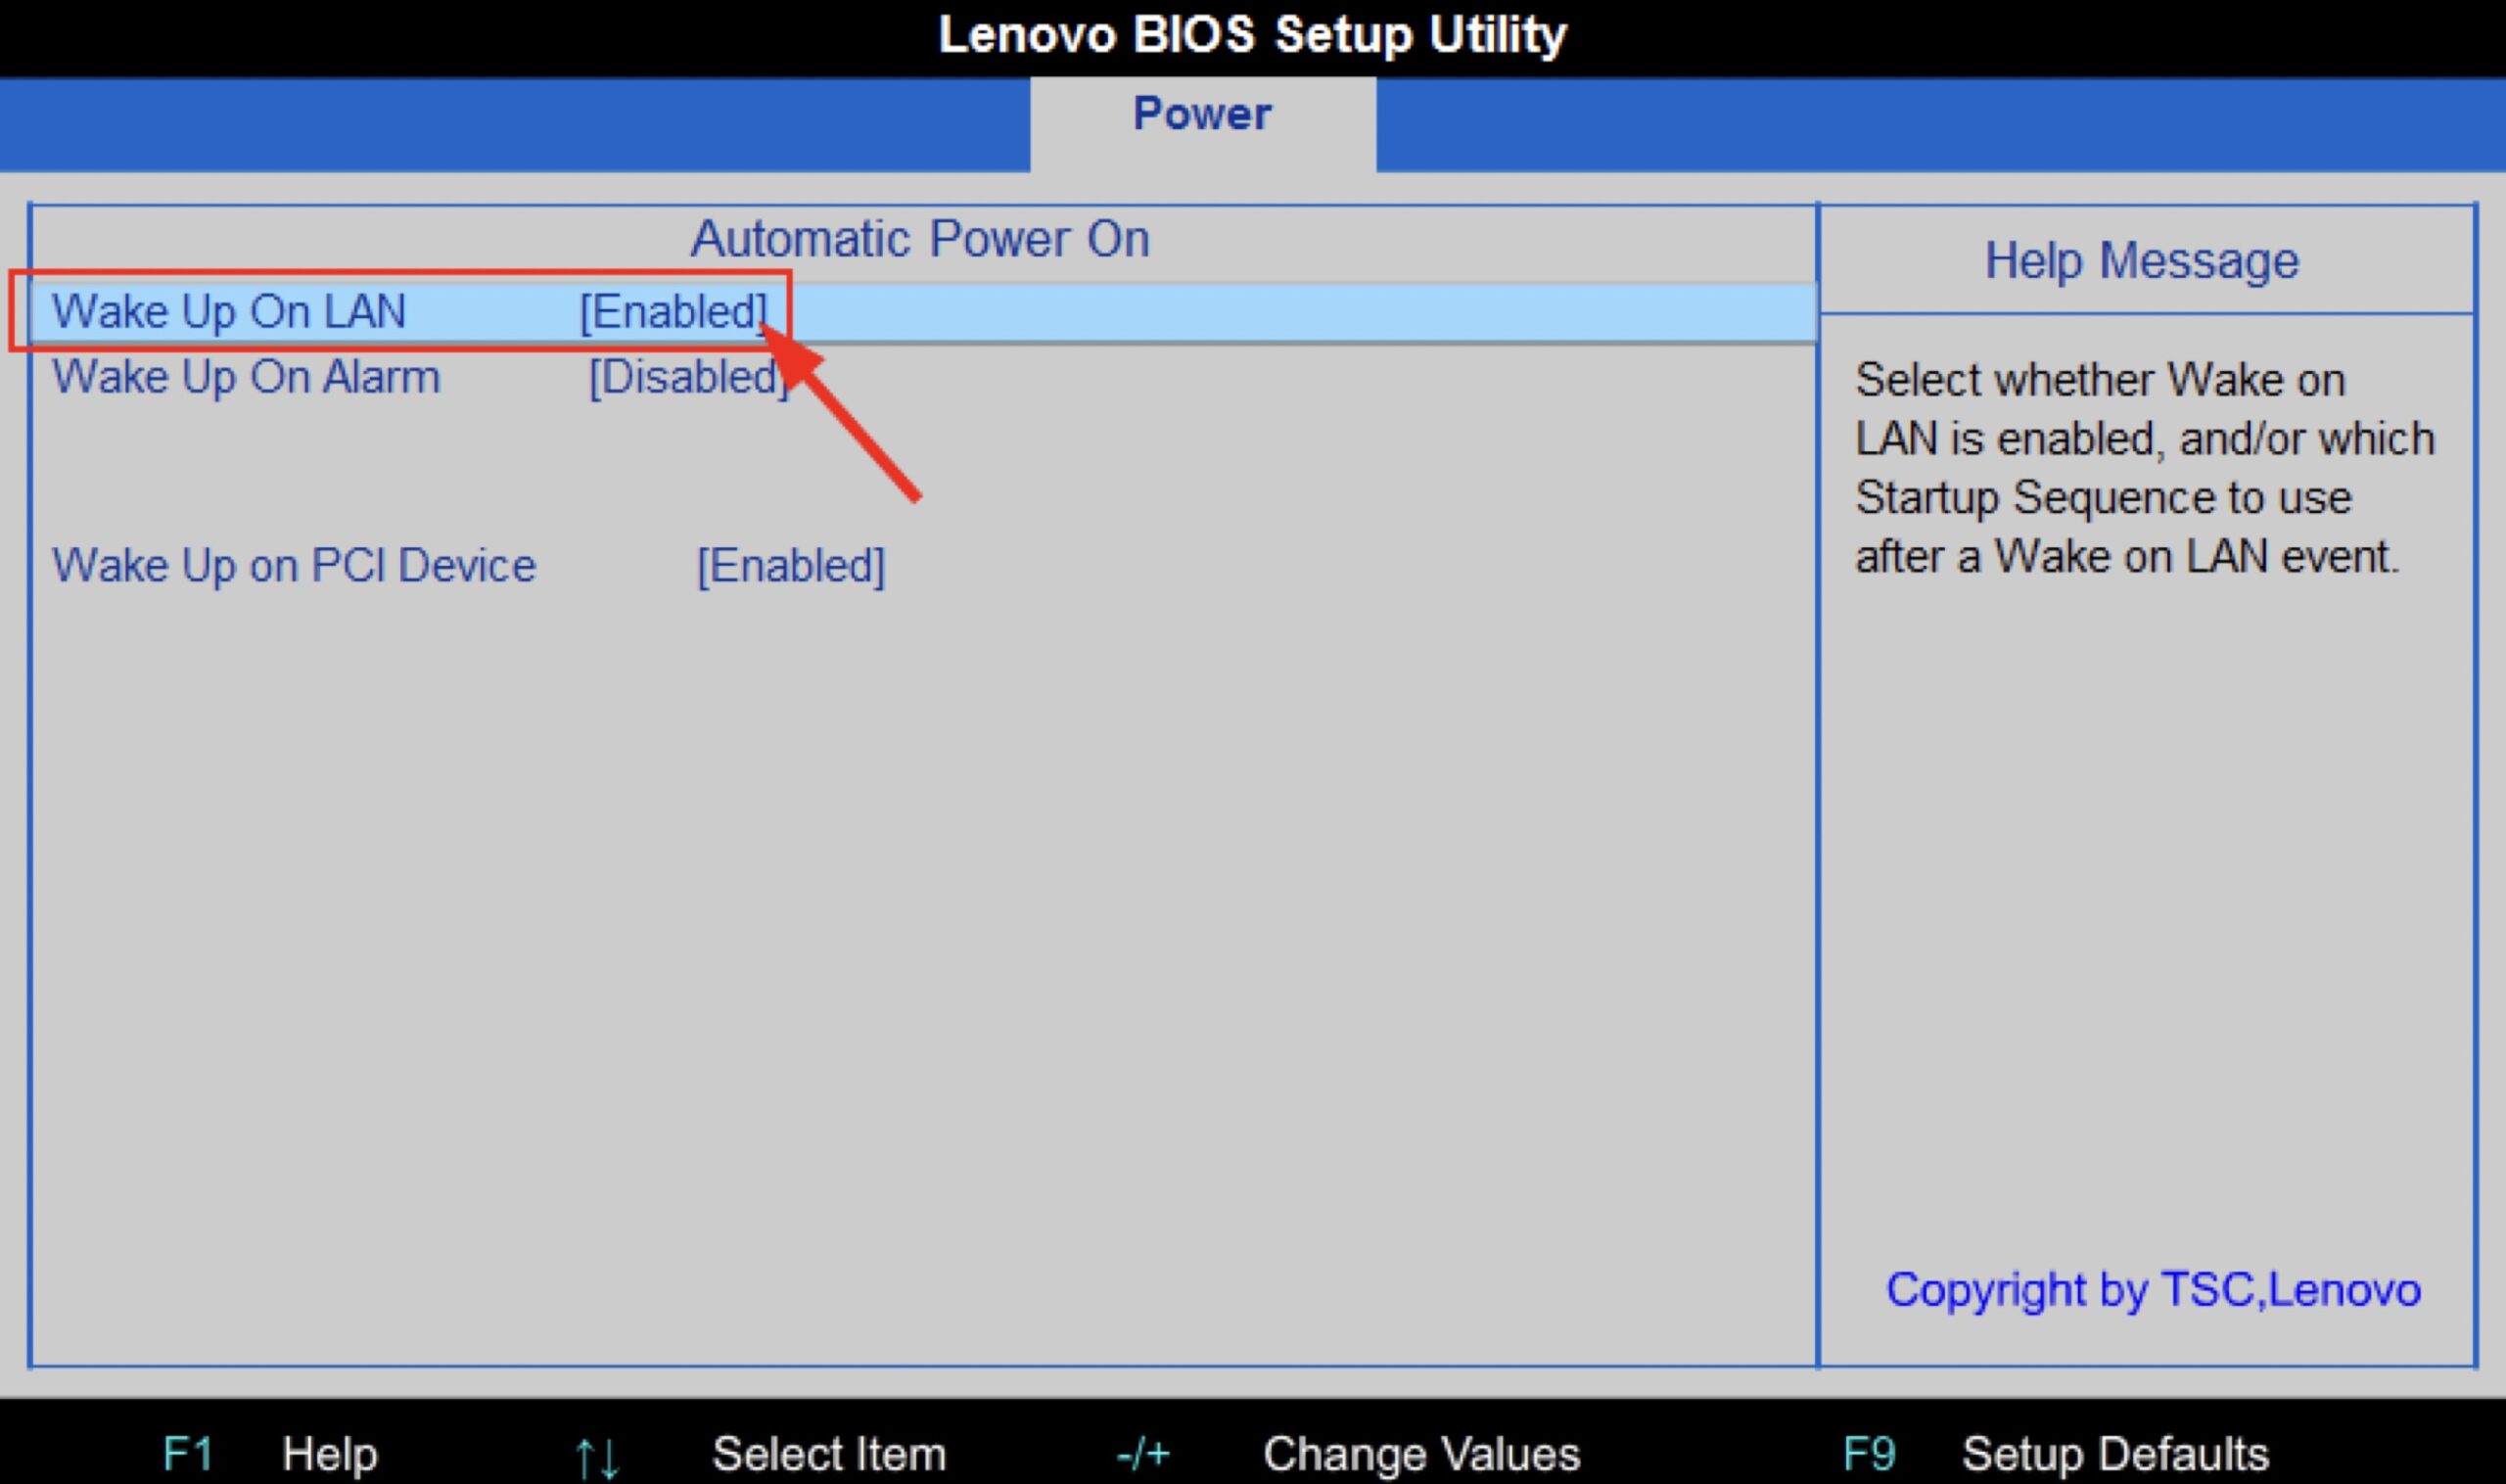
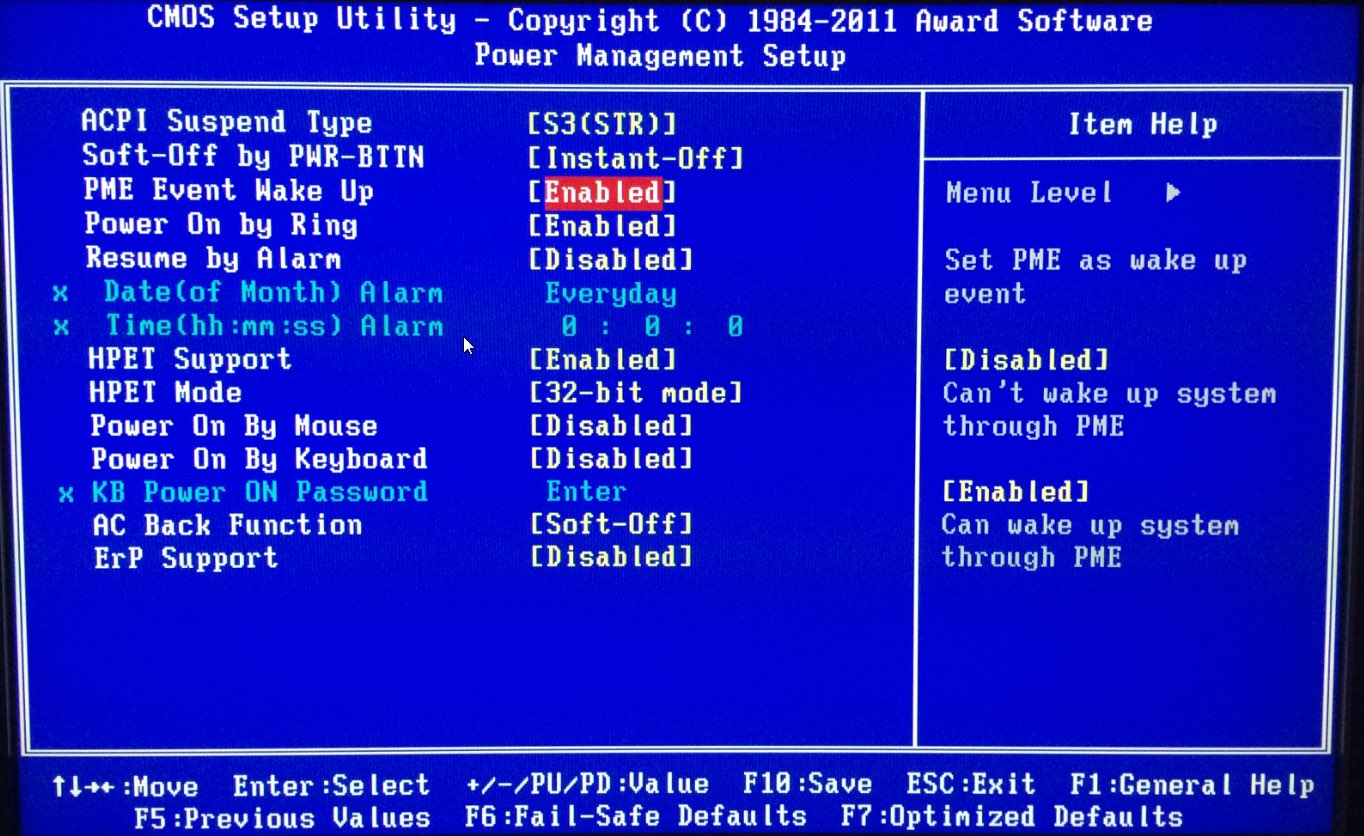
How to Enable Wake On Lan in BIOS?
First of all you have to check that the device that you want to turn on remotely support the Wake On Lan functionality. Check your motherboard manual or enter in the BIOS (usually by hitting the Del, button or a specific functions keys during the startup of your system).
Every motherboard vendor is having different place and even different wording for the Wake On Lan feature, so you’ll have to search for it a bit in the BIOS menus or in the manuals.
Enable Wake on Magic Packet in Windows 10
Sometimes it is necessary to enable wake on magic packet option on your network adapter in Windows and this is how I did it in Windows 10.
Right click on the Start menu > Device Manager > Network Adapters > right click on your network adapter and select Properties > Advanced > Wake on magic packet > Enabled.

It is time to add and configure the Home Assistant Wake on Lan integration.
Add the following text in configuration.yaml file and you will have the Wake on LAN platform enabled in your Home Assistant.
# configuration.yaml entry
wake_on_lan:
You will need to restart your Home Assistant before start using the Wake on LAN integration, but don’t do that yet. We will add the Home Assistant Wake On LAN switch in the next section and we will restart afterwards.
Add Home Assistant Wake on LAN switch
Only adding the things described in the above section in Home Assistant configuration is not enough. You may want to have a switch, script or automation in Home Assistant that will wake a specific PC or multiple PCs. This is what you can do for a Home Assistant Wake on LAN switch:
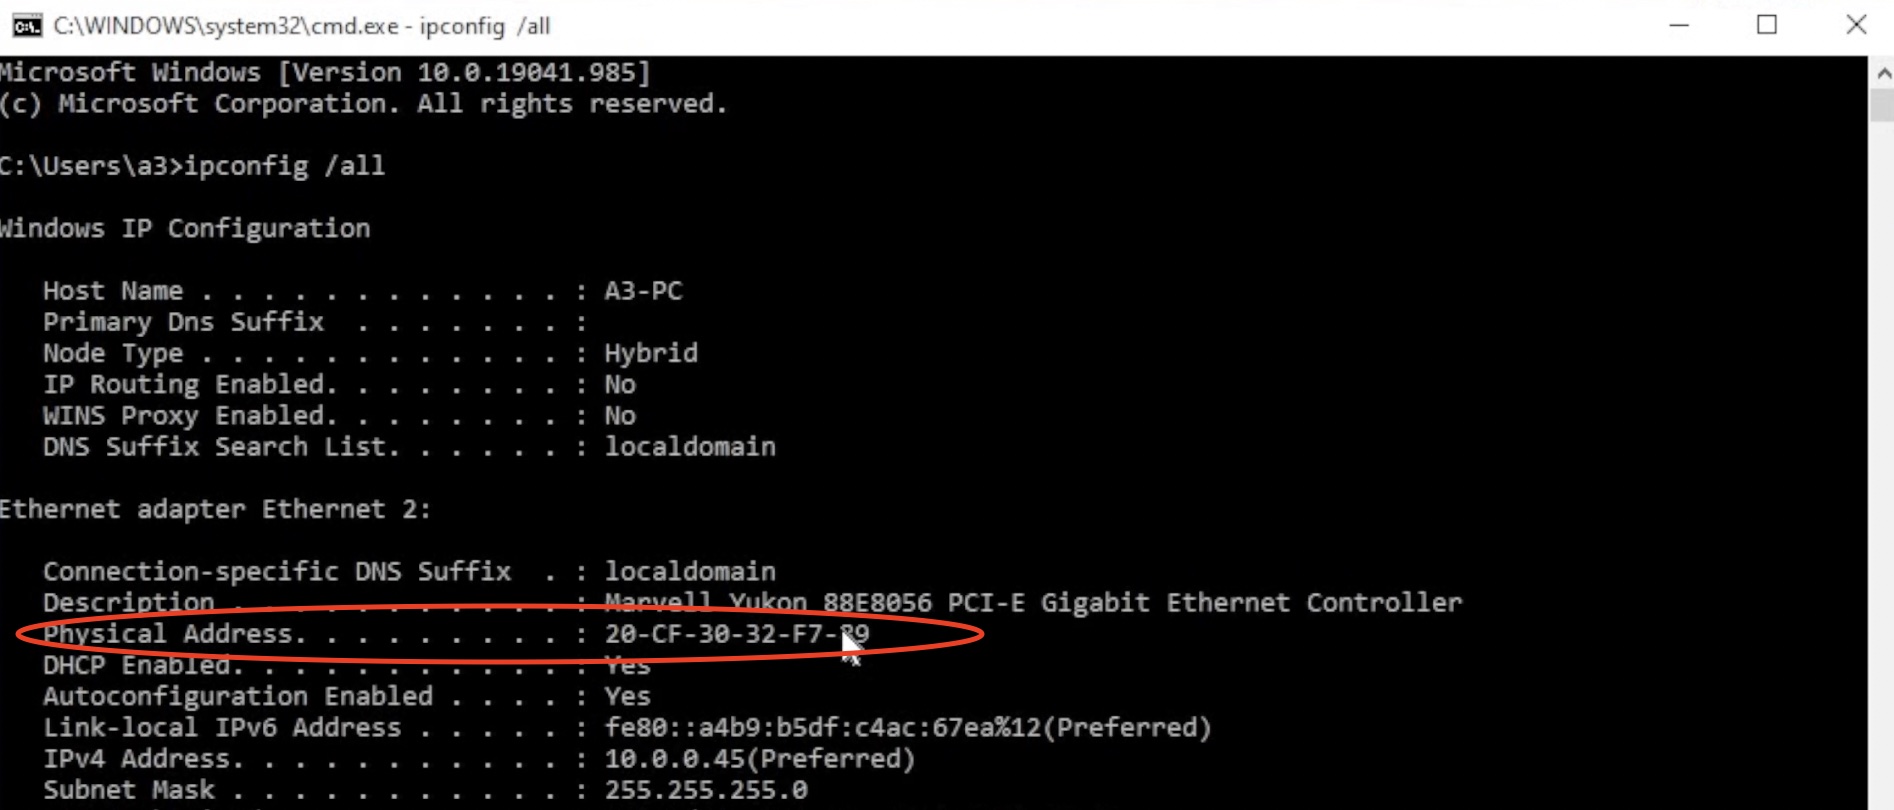
First, you will need the MAC address of the PC of your interest. You can get the MAC address either from your router interface or from the Windows command prompt using the ipconfig /all command.
Second, you have to add the following YAML in the configuration.yaml file using text editor or add-on like File Editor.
# configuration.yaml entry
switch:
  - platform: wake_on_lan
    mac: 20:cf:30:32:f7:89
    name: “a3-pc”
Make sure that you do the following things:
- If you already have switch: section in your configuration.yaml file add only the last 3 lines under your existing section.
- Change the mac: value with your MAC address.
- Change the name: to something meaningful for you (e.g. hostname of the device)
- Save the changes and restart Home Assistant.
Test the Home Assistant WoL switch
Let’s quickly test if the Home Assistant Wake on LAN switch can actually wake our PC.
You can add a button to the Home Assistant Lovelace UI by click on the three dot menu in the upper right corner > Edit Dashboard > Add Card > Button Card > as entity select your newly created switch (i.e. switch.a3_pc) > Save

Before the actual test you have to put your computer to sleep. If you shut it down the Wake on LAN may or may not work.
And now when your PC fell asleep 💤 and you have a Button card with your WoL switch in Home Assistant – you can just press it and your PC will rise from the dead. 🎉
Home Assistant RPC Shutdown add-on
Okay Wake on LAN Is working, but what if you want to turn off a Windows PC from Home Assistant? The Home Assistant RPC shutdown add-on available in the Home Assistant store will save the day. Let’s install it
Open your Home Assistant and press, the “c” button to invoke the search bar, type add-on and choose Navigate Add-On store. Then search for RPC Shutdown or save the hassle and click on the link below, which will lead you to the same place.
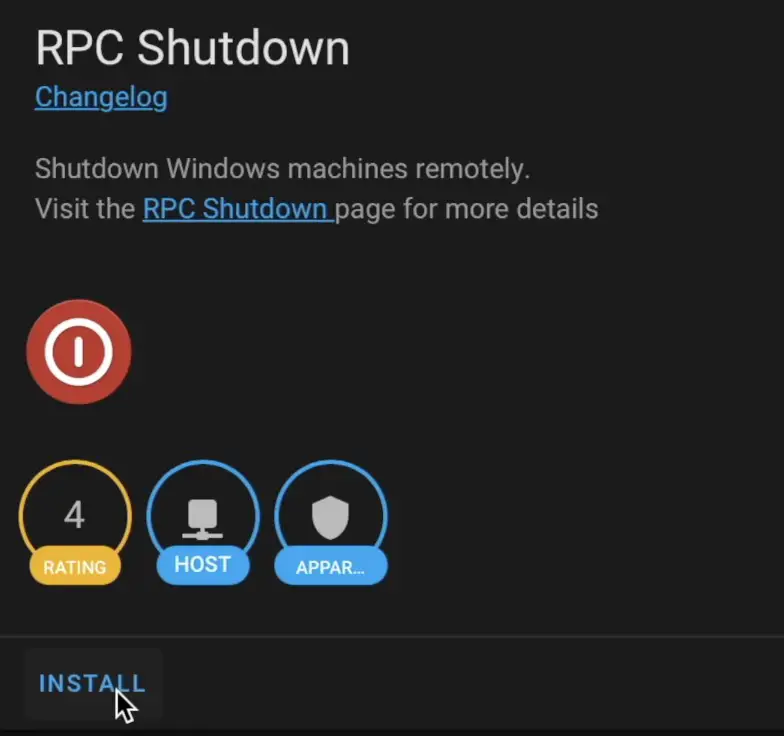
Click on the Install button to have your RPC Shutdown add-on.
After the installation we will need the IP, username and password of the windows machine to configure properly the RPC shutdown add-on. This is an example configuration for my Windows PC, of course you can add multiple computers as well (just add more aliases).
computers:
  - alias: a3-pc
    address: 10.0.0.45
    credentials: smash%thelike
    delay: 0
    message: >-
      Home Assistant is shutting down this PC. This cannot be canceled. Please
      save your work!
Make sure that you do the following changes under the Configuration tab in RPC shutdown add-on:
- Change the alias: with something meaningful for you (e.g. hostname of the device)
- Change the address: value with the IP address of the computer that you want to wake (Get it from your router interface or use again the ipconfig /all command from Windows command prompt)
- Change the credentials: values with your Windows user & pass (i.e. user%pass)
- Save the changes and start the RPC shutdown add-on from the Info tab.
Add Home Assistant RPC Shutdown switch
To test if the shutdown of a Windows PC from Home Assistant is working – we will edit our switch that we created in the Add Home Assistant Wake on LAN switch section above.
Go back to your configuration.yaml file and add another 6 lines under the existing WoL switch, so your code at the end should look similar to the one below.
# Example configuration.yaml entry
switch:
  - platform: wake_on_lan
    mac: 20:cf:30:32:f7:89
    name: “a3-pc”
    host: 10.0.0.45
    turn_off:
      service: hassio.addon_stdin
      data:
        addon: core_rpc_shutdown
        input: a3-pc
The things that you have to change here are the following:
- The value of the host: parameter with the IP of the machine that you want to shutdown.
- The value of the input: parameter, where the value should be exactly the same as the alias in the RPC shutdown configuration. In my case the value everywhere is my windows pc hostname (a3-pc).
- Save the changes and restart Home Assistant.
After Home Assistant has started – you can try to shutdown the Windows PC (a.k.a the victim) by pressing the same button that wake our PC earlier in the Home Assistant UI.
If your computer shut down correctly – you are done with this guide and you don’t have to do anything else, except you can show off in the comments section below.
If your computer doesn’t want to shutdown, check the RPC Shutdown Logs section and continue reading.
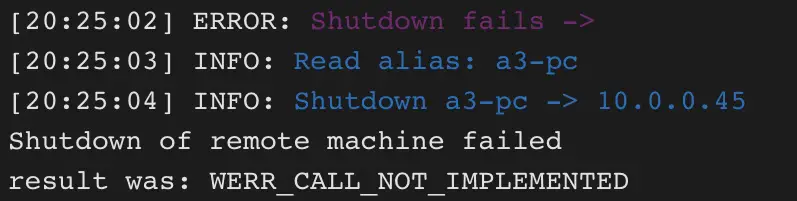
What If RPC shutdown is not working?
If you see any of the errors below in the RPC shutdown log section:
Could not initialise pipe winreg. Error was NT_STATUS_OBJECT_NAME_NOT_FOUND
Shutdown of remote machine failed result was: WERR_CALL_NOT_IMPLEMENTED

Also the Home Assistant RPC shutdown is not working – you have to do several extra steps. Namely to start a Remote Registry service, to create a WMI firewall rule and to add a local policy in your Windows registry.
Don’t worry it is easy, not that easy as subscribing to my newsletter, but I will show you all of the steps.
Start Remote Registry Service in Windows
Click on Start menu > select Run > Type services.msc and click OK > In the Services window search for Remote Registry service > Double click on it and set the Startup type: to Automatic > Click Apply > Finally start the service by click on Start button.
You can try again to shutdown your PC from Home Assistant after you start the Remote Registry service, but most probably you will fail, so keep reading.
Allow WMI in Windows Firewall
We have to create a simple Firewall Rule. Here is how:
Click on the Start button and type “allow” > Click on the Allow an app through Windows Firewall result > in the opened window scroll down until you see Windows Management Instrumentation (WMI) > Click on Change settings button and tick the checkbox under the Private column > finally click OK button.
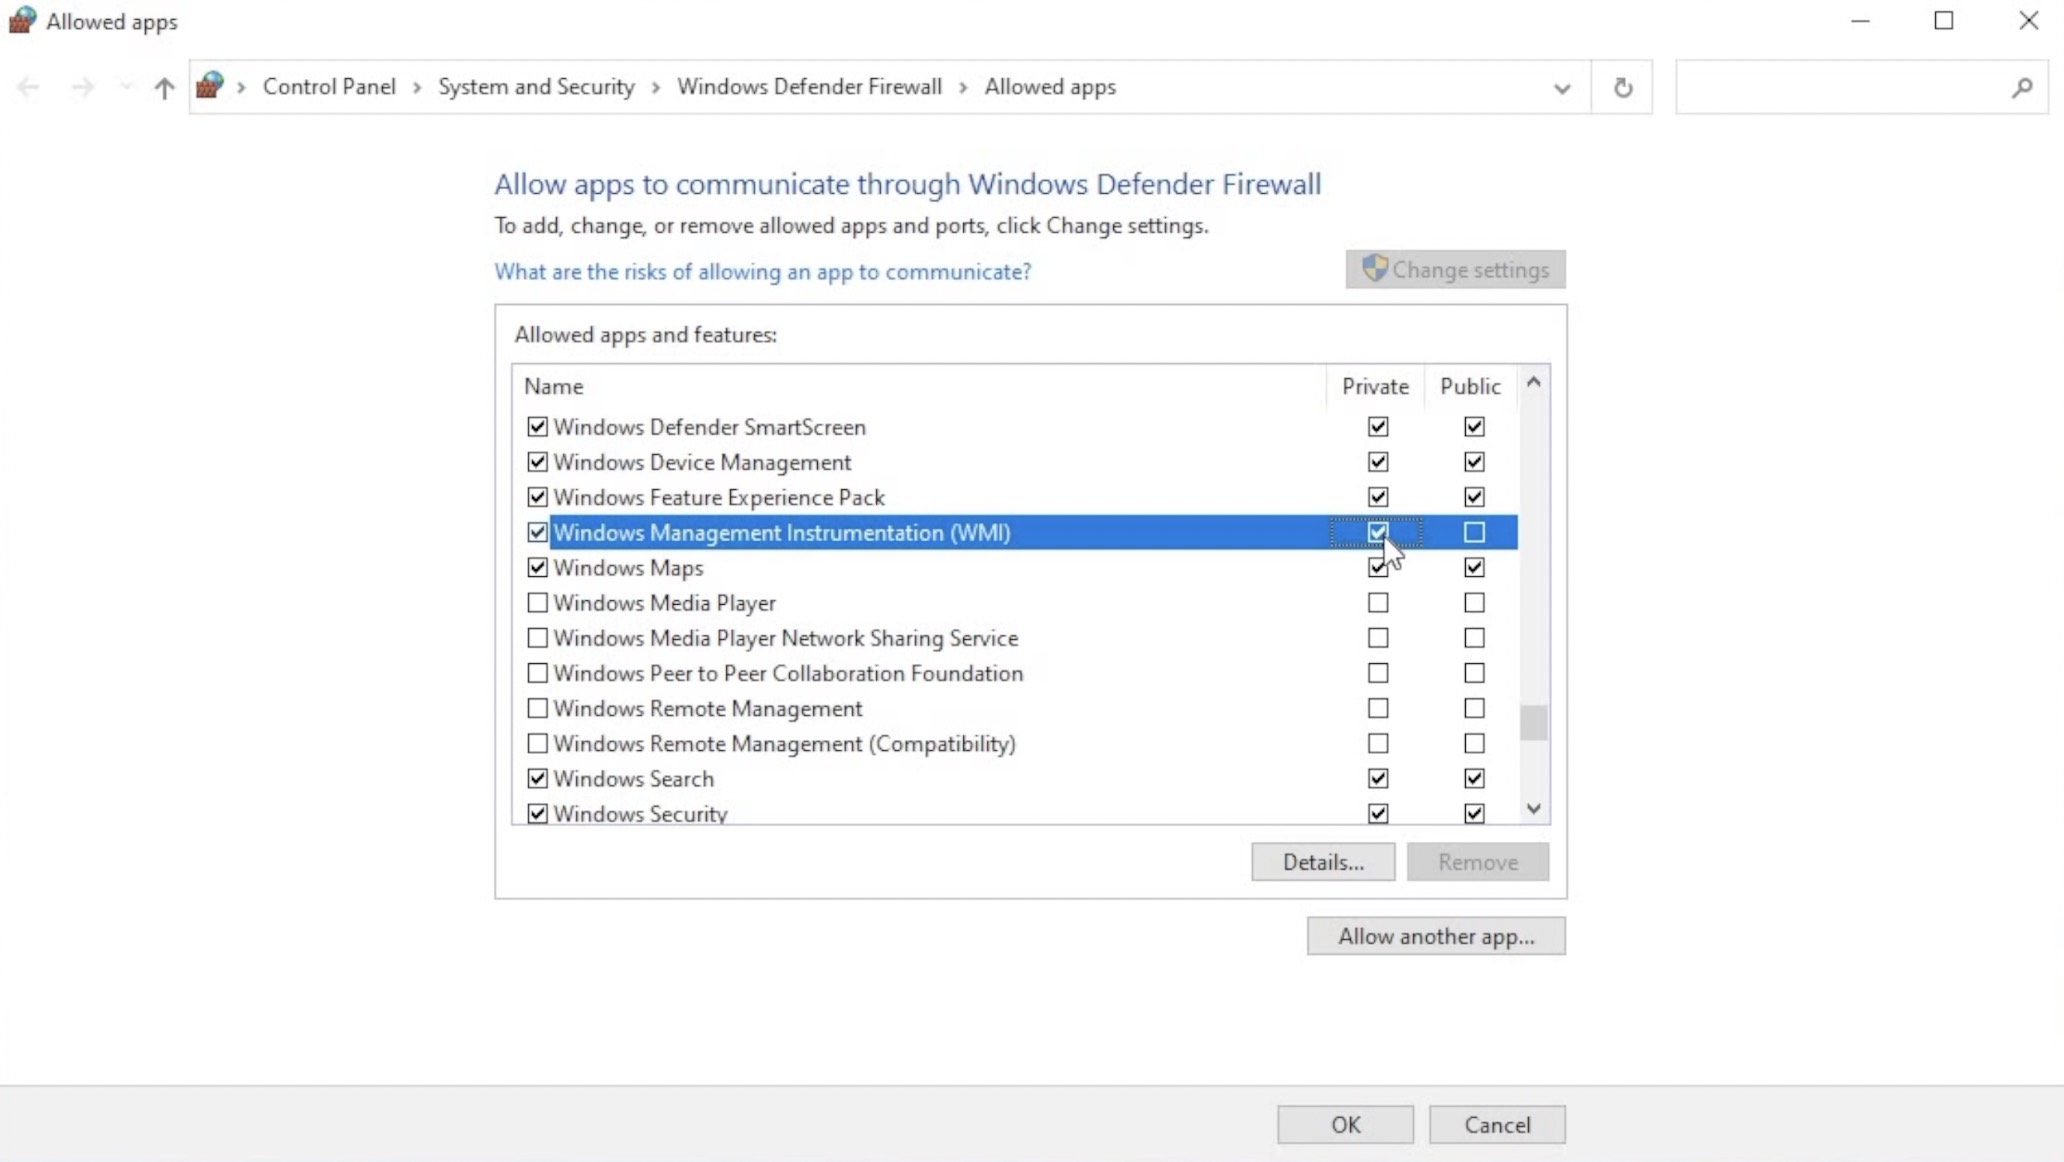
You can try again to shutdown your PC from Home Assistant after you allow the Windows Management Instrumentation (WMI) in the Windows Firewall, but most probably you will fail, so keep reading.
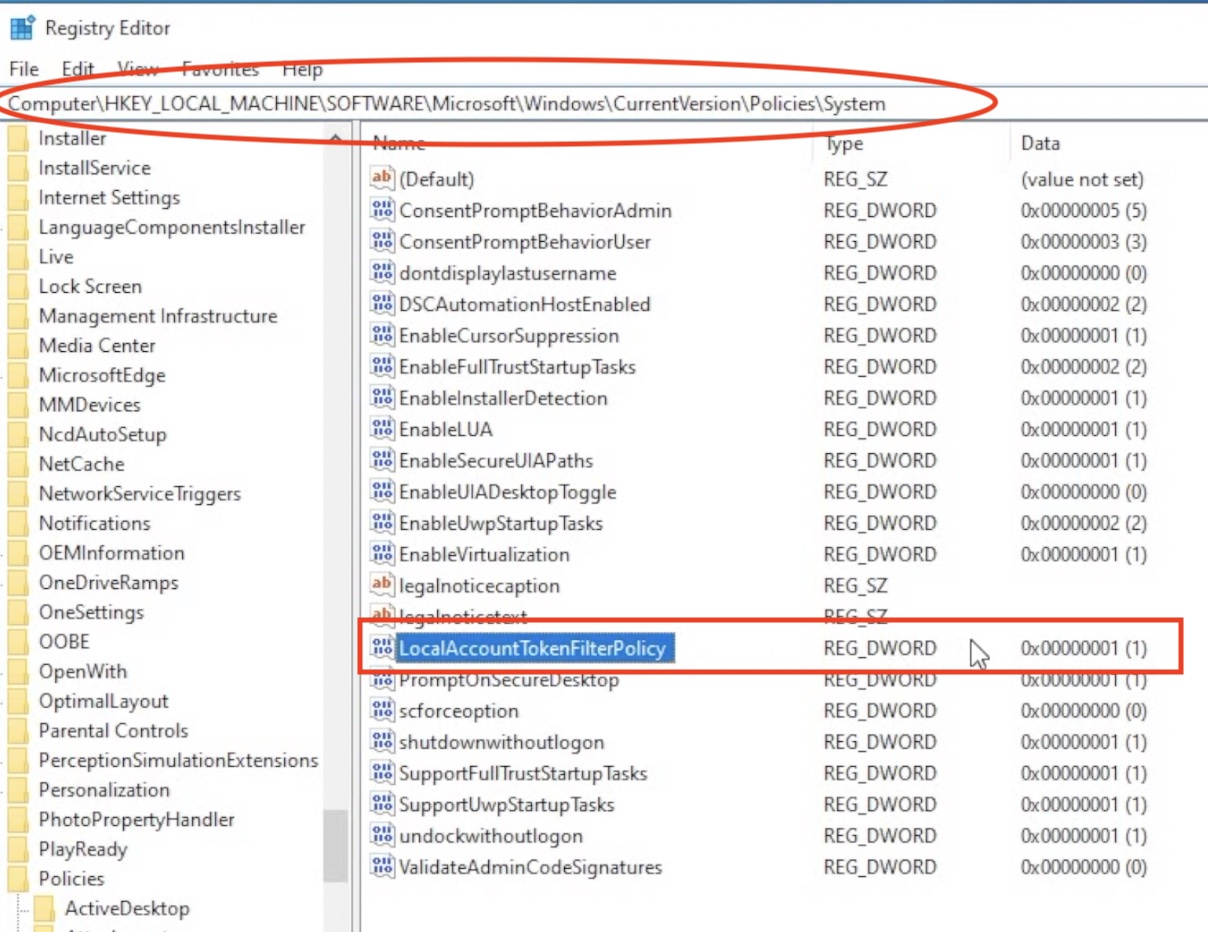
Adding Local Policy in Windows Registry
It is Time to edit the Windows registry just a little bit :
Add a 32-bit DWORD named “LocalAccountTokenFilterPolicy” with a value of “1” (without quotes) under the following path in the windows registry: HKEY_LOCAL_MACHINE/SOFTWARE/Microsoft/Windows/CurrentVersion/Policies/System
Or download and start the following LATFP.reg file that I made, which is doing the exact same thing 👉 LINK
After this last step you can try again the Home Assistant RPC Shutdown and this time it should work. Congratulations 🥂
Support My Work
If you want to secure this site existence you can become one of my Patreons where you will receive early access to my content, exclusive content and depending of the tier – free access to my paid Smart Home Guide.
Of course there are other support options available and you can check them here 👉 LINK
With that being said, stay safe and don’t forget – Home Smart, but not hard!
Thank you for watching and I will see you in my next article.