Из журнала событий Windows можно получить логи установки, обновления и удаления программ, а также определить конкретного пользователя, который запустил установку или удаление приложения.
Для просмотра журнала установки приложений:
- Откройте консоль журнала событий Event Viewer (
eventvwr.msc
) - Перейдите в раздел Windows Logs -> Application
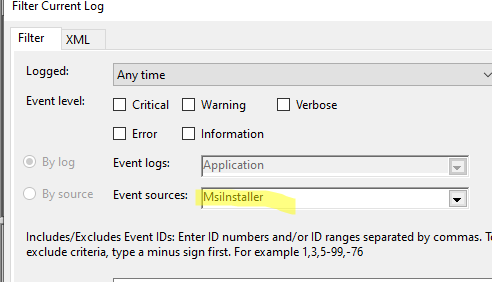
- Щелкните правой кнопкой по журналу и включите фильтр (Filter current log)
- В качестве источника событий выберите
MsiInstaller
.
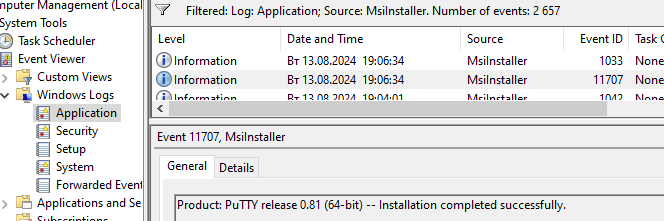
События с EventID 11707 содержат информацию об успешной установке программы (
Installation completed successfully
).
EventID 11724 – события успешного удаления пакета (
Removal completed successfully
).
В этом журнале будут фиксироваться только события установки приложений, упакованных в MSI/MSP пакеты (или в EXE файлы, которые фактически запускают установку MSI пакета с помощью
msiexec.exe
). Для установки MSI пакетов используется служба установки Windows Installer (
msiserver
), которая позволяет выполнить корректную установку удаление или откат установки приложения. Некоторые приложения, распространяемые через EXE файлы не используют службу msiserver и соответственно не пишут такие события. - Если вы хотите определить, какой конкретно пользователь удалил или установил программу, перейдите на вкладку Details в свойствах события. Переключитесь в режим XML view. SID пользователя указан в значении атрибута Security UserID. Скопируйте его.

- Чтобы конвертировать SID пользователя в имя учетной записи, выполните команду:
wmic useraccount where sid='S-1-5-21-506968642-4209078585-1781862235-1001' get name
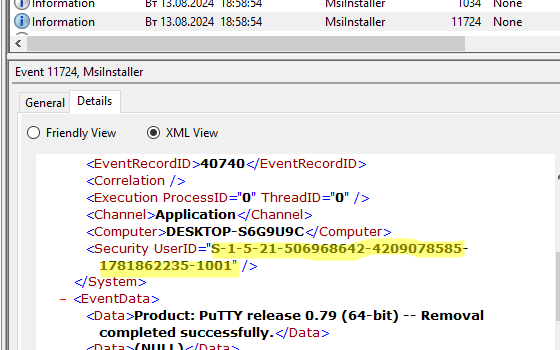
Команда вернет имя пользователя, который инициировал установку или удаление программы.

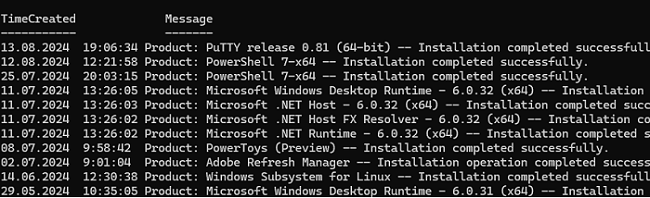
Если нужно извлечь события установки/удаления программ из журнала событий с помощью PoweShell, воспользуйтесь командлетом Get-WinEvent. Например, вывести журнал успешных установок программ:
Get-WinEvent -FilterHashtable @{LogName="Application";ID=11707;ProviderName='MsiInstaller'} | Select TimeCreated,Message
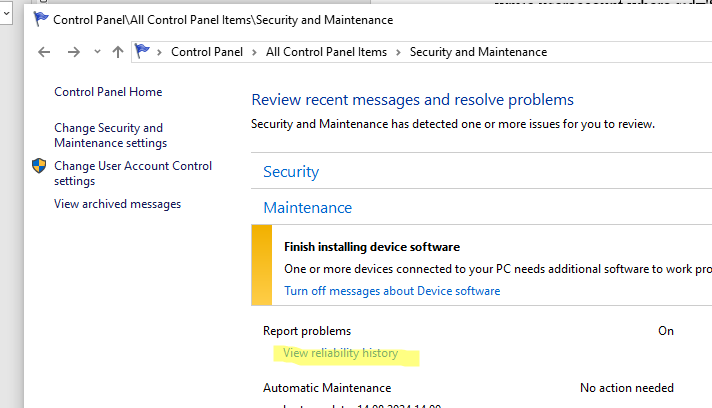
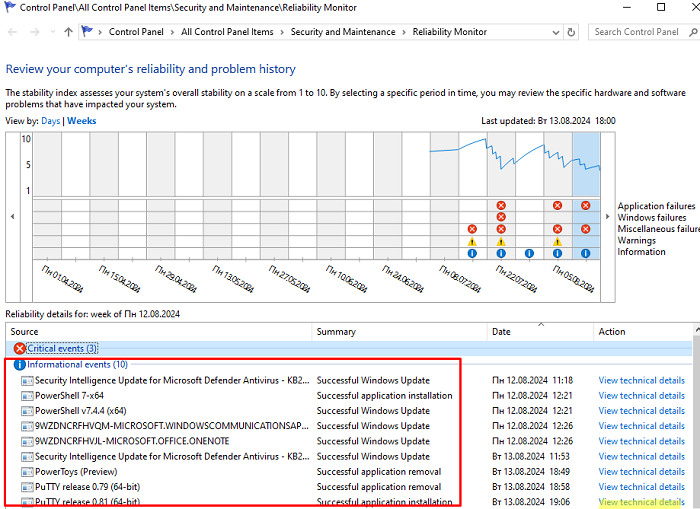
В Windows есть еще более удобный инструмент, который позволяет в одном окне показать историю установки/удаления/обновления программ, включай приложения Microsoft Store, а также историю установки обновлений Windows. Речь о Мониторе стабильности системы (Reliability Monitor).
Reliability Monitor – это отдельный апплет в классической панели управления Windows, который в графическом виде отображает индекс стабильности системы и подробные сведения о событиях, которые могли повлиять на стабильность ОС (сбои в программах, установка/удаление приложений и прочее).
Чтобы открыть Reliability Monitor, перейдите в панель управления -> Security and Maintenance, нажмите на ссылку View reliability history в разделе Maintenance (или просто выполните команду (
perfmon /rel
).
Здесь в разрезе по дням/неделям можно посмотреть какие обновления, программы и UWP приложения устанавливались или удалялись. Подробную информацию о событии можно получить, нажав на кнопку View technical retails.
Для построения отчетов об установке/удалении приложений из монитора стабильности можно использовать PowerShell. Следующий скрипт выведет в графическую таблицу Out-GridView все события установки, удаления и обновления программ, Windows Updates, APPX/MSIX на компьютере за последние
7
дней.
$DaysAgo = (Get-Date).AddDays(-7)
$RealiabilityFilter= "TimeGenerated > '$DaysAgo' and (SourceName='Microsoft-Windows-WindowsUpdateClient' or SourceName='MsiInstaller')"
Get-CimInstance -ClassName Win32_ReliabilityRecords -filter $RealiabilityFilter|Select TimeGenerated,ProductName,User,message |Out-GridView
С помощью встроенных фильтров Out-GridView можно отфильтровать все связанные события по конкретному приложению, определенному событию или пользователю.

Windows upgrades used to be something you only had to worry about every few years. But in the Windows 10 era, each twice-yearly feature update is essentially a full upgrade.
When an upgrade or feature update fails, Windows Setup typically doesn’t provide any obvious indication of the underlying problem. But it does keep detailed records of every activity as it works, and if you know how to read setup log files, you can often pinpoint the issue.
These log files are typically saved in a compressed folder called Panther. (The exact location of the Panther folder when an upgrade fails depends on what stage Setup was in when the failure occurred.) If Setup fails and rolls back to the previous Windows version, the log files are stored in a folder called $windows.~bt\Sources\Rollback.
Reading raw log files requires expert skills and specialized tools. A much simpler option is to use a new diagnostic utility, SetupDiag.exe, which is designed specifically to read log files and generate a report identifying the most likely problems.
You’ll find full instructions for using SetupDiag at this page, which also includes a download link.
Copy SetupDiag.exe to its own folder and double-click to identify setup problems on the current PC. The program is smart enough to look in locations where log files are commonly saved, so you don’t need to specify any command-line switches for the tool.
If you’re diagnosing a problem on a different PC, copy the folders containing the log files to a local folder. Then run SetupDiag using the /Mode:Offline switch and the /LogsPath:<folder> parameter, replacing <folder> with the name of the location where you copied the log files.
The output for SetupDiag is a plain text file that is saved in the same folder as the program file. You can open the results file in any text editor, including Notepad, to examine its output and figure out what to do next.
PREVIOUS AND RELATED CONTENT
Need more details about the right way to do a clean Windows 10 install? See these previous articles:
FAQ
Windows 10 tip: Create a recovery drive
If your Windows 10 PC is operating perfectly right now, great. Take advantage of the opportunity to create a recovery drive so you have a way to perform repairs if something ever goes wrong.
After Windows 10 upgrade, do these seven things immediately
You’ve just upgraded to the most recent version of Windows 10. Before you get back to work, use this checklist to ensure that your privacy and security settings are correct and that you’ve cut annoyances to a bare minimum.
How to install, reinstall, upgrade and activate Windows 10
Here’s everything you need to know before you repair, reinstall, or upgrade Windows 10, including details about activation and product keys.
Windows 10 tip: Repair your Windows 10 installation
Performing a clean install or a reset means you have to reinstall apps and desktop programs and start over with settings and preferences. If you suspect Windows has become damaged, there’s a less drastic solution: Run Setup to repair Windows. Here’s how.
Editorial standards
Windows includes a Registry-activated logging service to help diagnose Windows Installer issues. In today’s post, we will describe the steps on how to enable this Windows Installer logging service on Windows 11/10. Windows Installer is the standard Microsoft technology for deploying applications. It offers a format for packaging an application and an engine to unpack and install an application. MSI packages are used instead of proprietary installation systems, allowing your installer to run on any Windows platform from Windows 95 to Windows 11/10.
The Windows Installer, also known as Microsoft Installer, is a software component of the Windows operating system, that is used for the installation, maintenance, and removal of software. Sometimes installations fail because the Windows Installer is not able to do its job. Such Windows Installer issues can typically be caused by data corruption, corrupt installations, and so on. While Windows may roll back the installation, the issue would remain unresolved.
In case you face problems while installing programs on your Windows machine, you can refer to the logs which are maintained by Windows Installer. But for that, you have to enable logging first. After you have enabled Microsoft Installer logging, you can try to install the application again. Windows Installer will then track the progress and record all the data in a log file. These log files and events can help you troubleshoot installation issues and you can even share them with support professionals.
Verbose logging records more information in the logs generated by the Microsoft Installer. It tracks all changes and settings applied using Group Policy and its extension to the local computer and to users who log on to the computer. They are usually enabled if you need additional data. Such log files are usually found in C:\Debug and are typically large in size.
Windows Installer can use logging to help assist in troubleshooting issues with installing software packages. This logging is enabled by adding keys and values to the registry. After the entries have been added and enabled, you can retry the problem installation and Windows Installer will track the progress and post it to the Temp folder. The new log’s file name is random. However, the first letters are “Msi” and the file name has a “.log: extension. To locate the Temp folder, type the following line at a command prompt:
cd %temp%
When you enable Microsoft Installer logging, the error codes generated by Windows Installer are captured and stored in the log files. You can also contact Microsoft Support and pass on the error codes or log files to them.
These Windows Installer log names start with ‘msi’, followed by a bunch of alphanumeric characters, and are saved in the .log file format. They are normally stored in the following location, which is hidden:
C:\Documents and Settings\UserName\Local Settings\Temp\
Once you are done, you may disable Microsoft Installer logging
You can enable Windows Installer logging and Verbose logging manually, using any of these methods:
- Via Registry Editor
- Via Local Group Policy Editor
- Use Microsoft Fix-It
Now let’s take a look at both the procedures.
1] Enable Windows Installer logging via Registry Editor

Since this is a registry operation, it’s recommended you back up the registry or create a system restore point as a precautionary measure in case the procedure goes wrong.
Once you have done any of the above actions, you can now proceed as follows.
- Launch Registry Editor (press Windows key and type regedit, then hit Enter).
- Navigate to the following registry key:
HKEY_LOCAL_MACHINE\Software\Policies\Microsoft\Windows\Installer
If you don’t see a Installer key (folder) below the Windows folder, right-click the Windows folder and select New > Key. Name it Installer.
You can then create the following subkey and keys:
Type: Reg_SZ
Value: Logging
Data: voicewarmupx
Right-click the Installer key (folder) in the left pane and select New > String Value.
Name the value Logging.
Double-click the entry to edit it’s properties and set the Value data as voicewarmupx.
The letters in the value field can be in any order. Each letter turns on a different logging mode. Each letter’s actual function is as follows for MSI version 1.1:
- v – Verbose output
- o – Out-of-disk-space messages
- i – Status messages
- c – Initial UI parameters
- e – All error messages
- w – Non-fatal warnings
- a – Start up of actions
- r – Action-specific records
- m – Out-of-memory or fatal exit information
- u – User requests
- p – Terminal properties
- + – Append to existing file
- ! – Flush each line to the log
- x – Extra debugging information. The “x” flag is available only on Windows Server 2003 and later operating systems, and on the MSI redistributable version 3.0, and on later versions of the MSI redistributable.
- “*” – Wildcard: Log all information except the v and the x option. To include the v and the x option, specify “/l*vx”.
Click OK.
You can now exit Registry Editor and restart PC for changes to take effect.
Note: This change should be used only for troubleshooting and should not be left on because it will have adverse effects on system performance and disk space. Each time that you use the Add or Remove Programs item in Control Panel, a new Msi*.log file is created. To disable the logging, remove the Logging registry value.
Read: Enable Verbose or Highly Detailed Status Messages,
2] Enable Windows Installer logging via Group Policy Editor
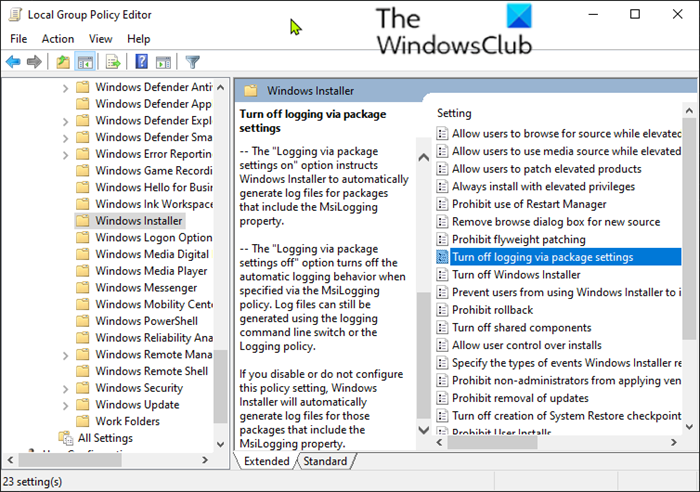
To enable Windows Installer logging on Windows 10 using Local Group Policy Editor (gpedit.msc), do the following;
- Launch the Local Group Policy Editor.
- Navigate to the following setting:
- Computer Configuration > Administrative Templates > Windows Components > Windows Installer
- Locate the Logging setting in the right pane and double-click on it to edit its properties.
- Click Enabled.
- In the Logging box, enter the options you want to log.
- The log file, Msi.log, appears in the Temp folder of the system volume.
- Click OK to save your changes.
Read: How to fix Microsoft Office installation errors
3] Use Microsoft Fix-It

To enable and collect the Windows Installer logs, download Microsoft Fix it 20095 and run it.
Once you are done, you may disable Microsoft Installer logging using Microsoft Fix it 20096.
This Fix it is for Windows 8 and Windows 7 users only.
[Update: This Fix-It has been taken down]
That’s it!
Read: Error opening Installation Log File in Windows.
How Do I Debug a Windows Installer Verbose Log File?
Understanding Microsoft Installer Logs
This article explains the main concepts of how to read and debug a
verbose log file created by the Windows Installer.
- 1. Summary test
- 2. Launch the package in debug mode from Advanced Installer
- 3. Analyzing the Windows Installer log file
- 4. Checking the Installation Status of Features and Components
- 5. Tips for the Windows Installer log reading
- 6. Check why an upgrade is not performed
- 6.1 Different UpgradesCode
- 6.2 Different Installation Type
- 7. Debugging tools
1. Summary test
During the installation, you may get errors that provide insufficient information
about what has occurred. In this case, it is very useful to create the MSI installer log to gather more information about the
installation process. This may allow you to resolve the problem yourself or provide vital
information to Advanced Installer Technical Support.
By default, logs will contain things such as:
- Errors that occur during the installation including internal Windows Installer
errors - All standard actions executed as well as any custom actions that were executed and
their return codes - Values of Windows Installer Properties, including details of any changes
- The source location of the setup
- If the installation was completed
- If the installation was rolled back
- Whether the user canceled the install
2. Launch the package in debug mode from Advanced Installer
Check the Show run Log option and press the [ Run ]
button to run the installer in debug mode. The resulting Windows Installer log will be shown
in the “Run Log” Panel.
In the bottom of your Advanced Installer project, the Run and Log
panel will be displayed. Useful information can be found as they are displayed in the
installation process.

After the installation process is complete you can navigate through the log file
using the left tree from the Summary panel.
Easily navigate through:
- Policies
- Per-User
- Per-Machine
- Resources States
- Feature
- Component
- File
- Properties
- Added
- Modified
- Deleted
When testing on other machines, for creating a verbose installation log, you can
use a command line which looks like this for MSI packages:
msiexec /i "C:\MyPackage\Example.msi" /L*V "C:\log\example.log"
and the following for .EXE packages:
mySetup.exe /L*V "C:\log\example.log"
Using the above command line option, the statement will be passed by the
bootstrapper to the MSI and the log will be created.
3. Analyzing the Windows Installer log file
The installation of an MSI file is a series of actions. These can be standard
actions or custom actions. Each action that is performed has an associated Return Value. The
possible return values are:
| Value | Meaning |
|---|---|
| 0 | Action not executed |
| 1 | Success |
| 2 | User canceled |
| 3 | Fatal error |
| 4 | Suspended, waiting for reboot |
Looking at the table above, you can see that a return value of 3 is useful. In
Notepad, use the Find command and search for value 3. There may be
multiple instances of return value 3 in the log file, so how do you determine
which caused the installation to abort? When return value 3 is found in the file, start
reading upwards from the error in the log file and see what actually cause this.
If a fatal error occurs and the installation aborts, the MSI package initiates a
rollback procedure. If the installation is unsuccessful, the installer automatically
performs a rollback installation that returns the system to its original state.
By manually searching through the log file, you may encounter a bunch of continuous
lines with FileRemove or ComponentUnregister.
The rollback
is important because the fatal error that caused the install to fail typically occurs right
before the rollback process begins. Also, you can simply search through the log for
Rollback.
So, for each standard action or custom action executed, its return value is
displayed in the log (e.g. Action ended 16:34:29: InstallFiles. Return value
1.).
In the example above, we see that the return value for the
InstallFiles standard action was 1 meaning the action completed successfully.
If this action failed and caused an error, a return value of 3 would have been returned and
would have caused the rest of the installation to stop and the rollback process would begin
which would return the system back to the same state before the installation
began.
When the language identifier for the current user is different than 1033 (non-English —
United States), you would see its corresponding translation (e.g. Aktion beendet um
16:23:32: InstallFiles. Rückgabewert 1. for UserLanguageID = 1031).
4. Checking the Installation Status of Features and Components
Having the log file you may need to verify that a particular feature, component or
file has been installed.
The verbose log includes an entry for each feature and component the installation
package may install. The log tells what the state of that feature or component was prior to
the installation, what state was requested by the installation, and in what state the
installer left the feature or component.
Features and components entries appear in
the log as in the following example:
    MSI (s) (C8:0C):   Feature:   myFeature; Installed: Absent;   Request: Local;   Action: Local
    MSI (s) (C8:0C): Component: myComponent; Installed: Absent;   Request: Local;   Action: Local
In the verbose log it can be seen that:
- The installation state of the feature and component was absent before running the
package - The installation package requested a local installation of these
- The feature and component were both installed locally
The following table summarizes the possible component or feature states that can
appear in the log:
| Log entry | Value | Description |
|---|---|---|
|
Installed |
Local
Source Advertise Absent |
Component or feature is currently installed to run locally.
Component Feature is Component or feature is not currently installed. |
|
Request |
Null
Absent Local Source Advertised Reinstall Current |
No request.
Installation requests component or feature be Installation requests component or feature be installed to Installation requests that component or feature be Installation requests feature be installed Installation requests feature be reinstalled. Installation requests feature be |
|
Action |
Null
Absent Local Source Advertised Reinstall Current FileAbsent |
No action is done.
The installer actually uninstalls component or The installer installs component or feature to run locally. The installer installs the component or feature to run from source. The installer installs the feature as an advertised feature. The installer reinstalls feature. The installer installs the feature in the default authored install state. The installer uninstalls component’s files and leaves all other |
In order to check for the features and components states, please search for the
InstallValidate standard action. After the standard action is marked as the
current action which is being executed, on the following lines in the log, the features and
components state is displayed.
5. Tips for the Windows Installer log reading
The verbose log can give you useful information about the installation process and
some explanation about this. For example:
Disallowing uninstallation of component: GUID's component since another client exists
Basically, this can happen if the same components are shared between multiple
packages installed on the same machine. Windows Installer keeps a refcount for the
components and does not allow removing them until all the applications that use them are
removed.
Also, this may happen if you duplicate the project file (saved under a different
name or used the «copy-paste» method). It is strongly recommended not to do this because the
created project will have the same GUIDs (Upgrade Code, Product Code, components ID) as the
source/original project. To avoid this, you must use the Save as template option.
If during an upgrade operation there are files missing from the installation
folder, then search through the log for the following message:
Disallowing installation of component: GUID's component since the same component with higher versioned keyfile exists
If you found it, then this is the reason why your file is not copied on the target
machine.
The upgrade process performs the following actions:
- Detect and completely remove older products. During this operation, the file
will be removed from the machine. - Install the new product. The file from the upgraded version will not be
installed since its component was not marked for installation.
To overcome this behavior, you can enable the Always overwrite existing
file option from the File Operations Tab
of the File Properties.
MSI (s): File: C:\MyApp\MyExe.exe; Won't Overwrite; Existing file is of an equal version
This indicates that the installation package will not overwrite the existing file
since is the same version as the one being installed.
6. Check why an upgrade is not performed
When performing an upgrade, you may encounter the case where the old installation
package is left behind and the new package is listed side by side with the old one in the
Programs and Features list.
This may happen if the previous version
of the installation package is not detected.
6.1 Different UpgradesCode
If an upgrade is not performed, the first step to start the investigation is to
see if the installation packages have the same UpgradeCode, as is mandatory to have it the
same.
The UpgradeCode is a GUID representing a related set of products. A
set of different versions of your application will have the same UpgradeCode. This enables
newer versions of your application to search and upgrade previous versions installed on
the same computer.
If the same UpgradeCode is used, then you can start searching through the log and
see if an older version is found. During the FindRelatedProducts standard
action, older or newer versions of the package are searched. If an older version is found,
its Product Code is placed in the «OLDPRODUCTS» property. In the log, it should be
something like:
FindRelatedProducts: Found application: {54737F41-13B0-4B98-9C70-F6C07F471E39}
MSI (c) (E0:4C) [17:14:09:576]: PROPERTY CHANGE: Adding OLDPRODUCTS property. Its value is '{54737F41-13B0-4B98-9C70-F6C07F471E39}'.
MSI (c) (E0:4C) [17:14:09:576]: PROPERTY CHANGE: Adding MIGRATE property. Its value is '{54737F41-13B0-4B98-9C70-F6C07F471E39}'.
The old installation package is removed during the
RemoveExistingProducts standard action. If the old installation package
is properly removed, then you should see something similar in the log:
Action start 17:14:13: RemoveExistingProducts.
RemoveExistingProducts: Application: {54737F41-13B0-4B98-9C70-F6C07F471E39}, Command line: UPGRADINGPRODUCTCODE={C64CA371-69F2-473C-83C1-82B8B313C846}  CLIENTUILEVEL=0 REMOVE=ALL
In order to search through the log for this case, use the following keywords:
- FindRelatedProducts
- RemoveExistingProducts
- OLDPRODUCTS
As a general rule, to check if the old installation package is identified search
for the OLDPRODUCTS property. If this property is set, there should be
something like that in the log:
Property(S): OLDPRODUCTS = {54737F41-13B0-4B98-9C70-F6C07F471E39}
6.2 Different Installation Type
A case when an upgrade is not performed is when the installation
type is different between two versions.
For example, if the old
installation package was installed per-machine and the new installation package have the
install type set to a per-user installation, the upgrade will not be performed and the two
programs will be listed side by side in the Programs and Features list from Control Panel.
Also, you should see something like that in the log:
Action start 16:24:46: FindRelatedProducts.
MSI (c) (10:FC) [16:24:46:131]: FindRelatedProducts: current install is per-user.  Related install for product '{8E38592C-391E-4212-BC31-376A37BB6968}' is per-machine.  Skipping...
A per-user installation cannot upgrade a per-machine installation and a per-machine
installation cannot upgrade a per-user installation.
If you are aware of this but you need to change the installation type, in order
to uninstall the old installation package, you can use the predefined uninstall previous versions
custom action. You can add this custom action in the Custom Actions page.
7. Debugging tools
- Using the Advanced Installer environment
- Utilities as Wilogutl
The Run and Log option from Advanced Installer can help you create a
verbose log and offer you the possibility of a dynamical walkthrough. However, when testing
on different machines, like test machines you get a log file. In this case, you can use the
Wilogutl.exe which can help you read the log.
Wilogutl.exe assists the analysis of log files from a Windows
Installer installation, and it displays suggested solutions to errors that are found in a
log file.
This tool is only available in the Windows SDK Components for Windows Installer Developers.
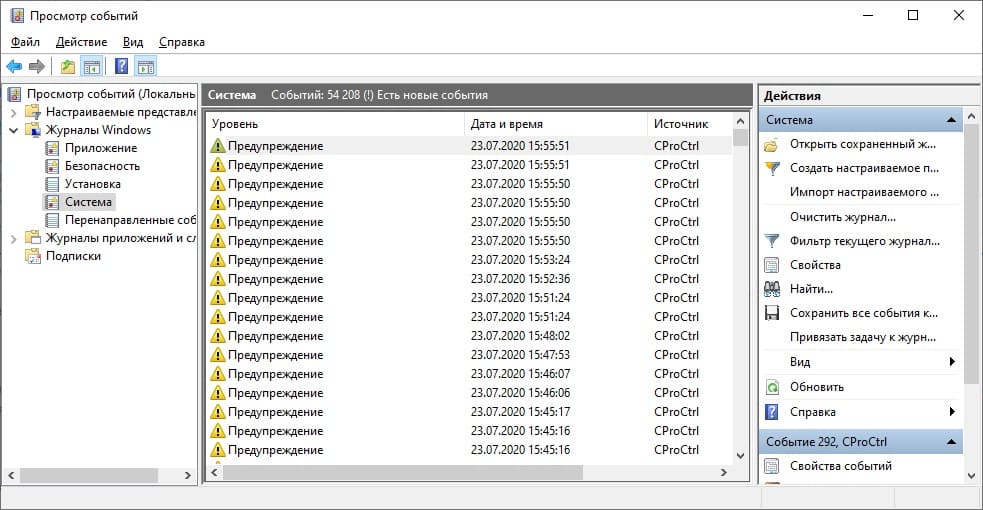
Если у Вас возникают какие-либо проблемы с системой, к примеру намертво зависает рабочий стол, либо перезагружается/выключается ПК, мы настоятельно рекомендуем не прибегать к кардинальной переустановке системы, а для начала посмотреть логи Windows, т.к журнал ошибок. Как это сделать? Рассмотрим в этой статье.
Данная инструкция актуальна для всех версий Windows, начиная от Windows 7 и более новые.
— Нажимаем горячие клавиши Win + R => Далее вводим в поле ввода eventvwr.msc
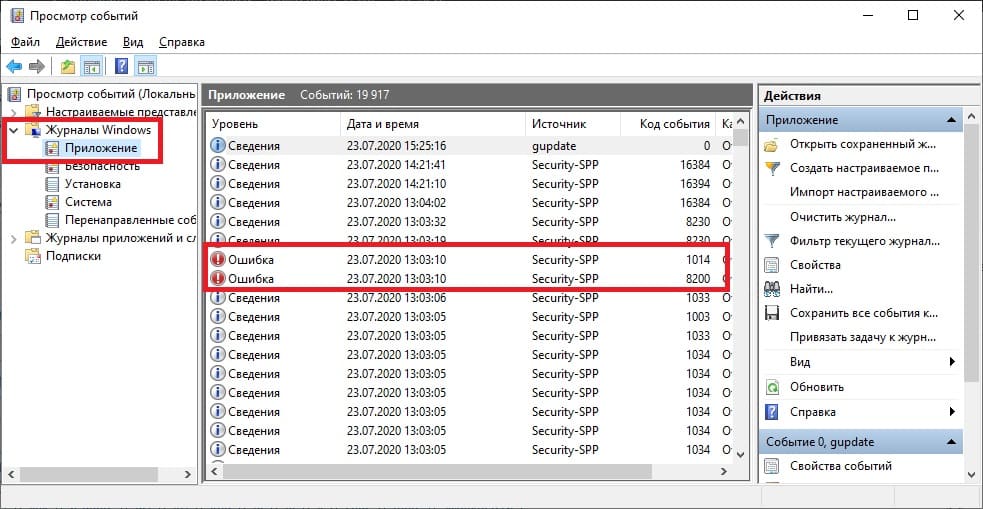
У Вас откроется окно, слева раскрываем дерево каталога — «Журналы Windows», к примеру в пункте «Приложение» у Вас откроется список всех открытий каких-либо программ на Вашем ПК, если была допущена ошибка при открытии, то она у Вас отобразится.
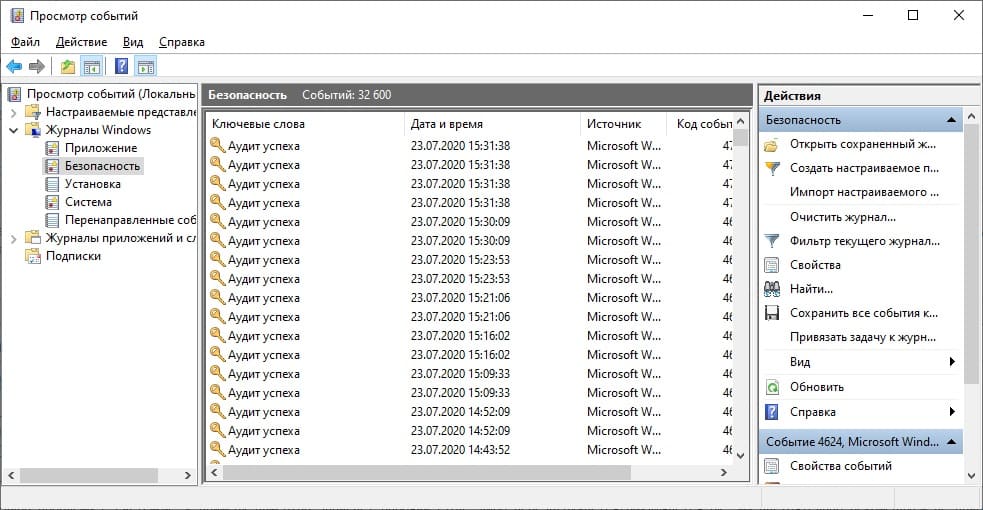
Вкладка «Безопасность», показывает аудит с информацией по доступу к Вашему ПК, т.е там будет указано, какой пользователь что-либо делал, и когда это было сделано.
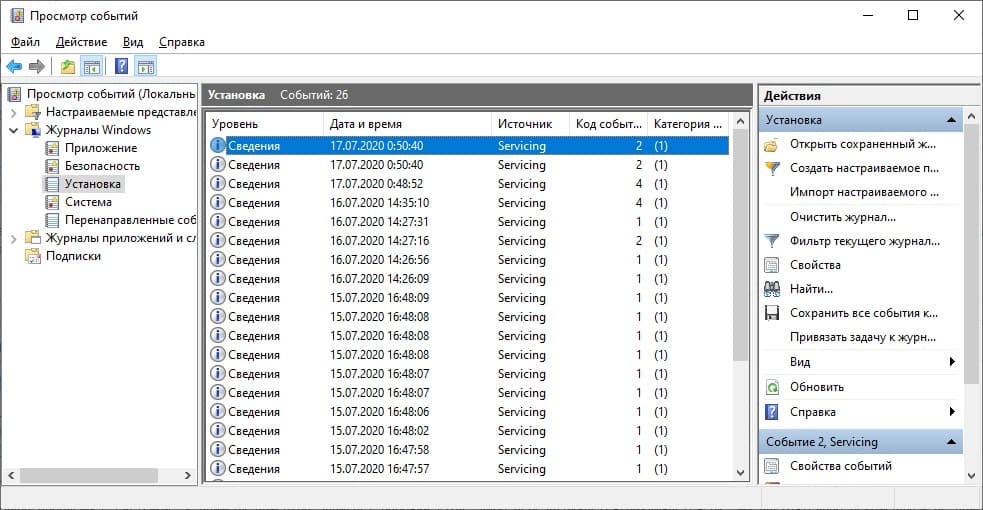
Во вкладке «Установка» Вы можете посмотреть логи Windows, например обновления системы.
Вкладка «Система» является наиболее важной, с помощью этого журнала Вы можете определить многие ошибки возникающие в Windows, либо ошибки которые связаны с железом Вашего ПК. Например неисправность видеокарты по причине которой возникает синий экран (BSOD).