
The lock screen is a standard security gate that keeps your system from unauthorized access, so every user needs to know how to configure the lock screen in Windows 10 and 11. Although the two operating systems differ significantly in terms of visuals, the lock screen-related features are the same. Therefore, this article applies to both Windows 10 and 11.
How to Set a Lock Screen Password in Windows 10 and 11?
- Launch the Settings app by right-clicking the Start menu button and selecting Settings. You can also press Win + I or use the All apps list.
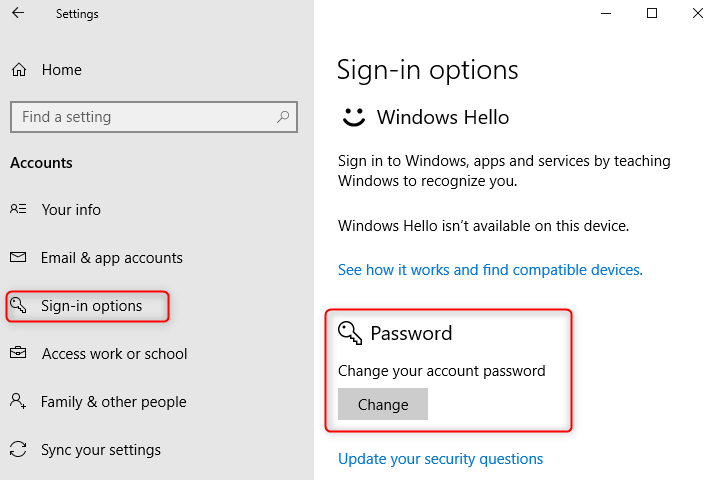
- Go to Settings > Accounts > Sign-in options.
- Click Password and select Add.

- If you use Microsoft Account to sign into your computer, Windows 10 and 11 will automatically assign your Microsoft Account password as the lock screen password. Still, you can use other options, such as Windows Hello or a PIN code.
- Once the password is set, try adding a PIN (a simpler four or six-digit combination) or leave everything as is.


How to Change the Lock Screen Background in Windows 10 and 11?
Important. You cannot change the lock screen background in Windows 10 and 11 if your operating system is not activated with a genuine key.
- Press Win + I and go to Personalization > Lock screen.
- Select Picture from the Background drop-down and select an image to use as the Windows 10 lock screen background.

- Also, you can select what apps can details more information on the lock screen. Unfortunately, very few apps can work with Windows 10’s lock screen, and Windows 11 does not support this feature at all. Therefore, you can leave everything as-is.
- If you want to keep the lock screen simpler, use the Show lock screen background picture option to opt for a simpler solid background instead of an image.

How to Disable Lock Screen in Windows 10 and 11?
There are scenarios when customers do not need the lock screen at all. Therefore, they need to know how to disable the lock screen in Windows 10 and 11. You can do that using two methods: Group Policy Editor and Registry Editor. The first option works on systems with Windows 10 Professional, and you cannot use it on Windows 10 and 11 Home. Customers of the latter should opt for the second variant involving Registry Editor.
Note. Both methods might place a message inside the Settings app that some settings are managed by your organization. That is okay.
Important. Disable all passwords, PIN, hardware, and biometric authentication before turning off the lock screen in Windows 10 or 11.
If you use Windows 10 or 11 Professional:
- Press Win + R and type gpedit.msc.
- Go to Computer Configuration > Administrative Templates > Control Panel > Personalization.
- Open the Do not display the lock screen rule.

- Set its status to Enabled or Disabled.

- Restart your computer.


If you use Windows 10 or 11 Home:
- Press Win + R and type regedit.
- Paste the following path into the address bar: HKLM\SOFTWARE\Policies\Microsoft\Windows
- Right-click the Windows folder and select New > Key.

- Rename the new key to Personalization.
- Right-click the Personalization key and select New > DWORD (32 bit) value.
- Rename the new value to NoLockScreen.
- Open the value and change its value data to 1. Setting the value to 0 will enable the lock screen once again.

- Restart your computer.


How to Set Password in Windows 10 Lock Screen
Setting a password on your Windows 10 lock screen is a crucial step to protect your personal data from unauthorized access. In just a few simple steps, you can secure your computer with a password. Follow this guide to learn how to set a password on your Windows 10 lock screen efficiently and effectively.
In this section, we’ll cover the detailed steps to set a password for your Windows 10 lock screen. Following these steps will ensure that your device is protected.
Step 1: Open Settings
First, open the Start menu and click on the «Settings» icon, which looks like a gear.
The Settings window is the control center for your computer. Here, you’ll find various options to customize and secure your device.
Step 2: Go to Accounts
Next, within the Settings menu, select «Accounts.»
The Accounts section allows you to manage user accounts, sign-in options, and other related settings.
Step 3: Click on Sign-in Options
In the Accounts menu, click on «Sign-in options» from the sidebar.
Sign-in options will let you choose various methods to log into your computer, including passwords, PINs, and biometric options.
Step 4: Add a Password
Under the Password section, click on «Add.»
If you already have a password, you will see the option to change it instead. Proceed to add a new password if there isn’t one already set.
Step 5: Create Your Password
Enter your new password in the designated fields, then confirm by re-entering it.
Make sure your password is strong but memorable. A mix of letters, numbers, and symbols can enhance security.
Step 6: Click Finish
Finally, click «Finish» to save your new password.
Your password is now set. This password will be required each time you log into your computer.
Once these steps are completed, your Windows 10 lock screen will display a password prompt whenever you try to sign in. This added layer of security helps protect your personal files and information from unauthorized access.
Tips for Setting a Password in Windows 10 Lock Screen
Here are some additional tips to help you set and manage your Windows 10 lock screen password:
- Use a combination of uppercase and lowercase letters, numbers, and special characters to create a strong password.
- Avoid using easily guessable passwords like «123456» or «password.»
- Change your password regularly to maintain security.
- Use a password manager to keep track of your passwords if you have trouble remembering them.
- Enable two-factor authentication for an extra layer of security.
Frequently Asked Questions
How do I reset my Windows 10 lock screen password if I forget it?
If you forget your password, you can reset it using your Microsoft account or a password reset disk. Follow the on-screen prompts for password recovery.
Can I use a PIN instead of a password?
Yes, Windows 10 allows you to set up a PIN as an alternative sign-in option under the «Sign-in options» menu.
What if I want to remove the password?
You can remove the password by going to «Sign-in options» and selecting «Remove» under the Password section. Note that this will reduce your device’s security.
Is it possible to use a picture password?
Yes, Windows 10 offers a picture password option where you can draw gestures over a picture to sign in. This can be set up in the «Sign-in options» menu.
How secure is a Windows 10 password?
A well-crafted password is quite secure, especially when combined with additional security measures like two-factor authentication.
Summary of Steps
- Open Settings.
- Go to Accounts.
- Click on Sign-in Options.
- Add a Password.
- Create Your Password.
- Click Finish.
Conclusion
By following the simple steps outlined above, you can set a password on your Windows 10 lock screen and significantly enhance your computer’s security. Remember, in today’s digital age, safeguarding your personal information is more important than ever. Setting a password is a straightforward yet effective way to protect your data.
For further reading, consider exploring additional security features such as two-factor authentication, biometric sign-in options, and advanced threat protection. Always stay informed about the latest security practices to keep your digital life secure. Happy computing!
Matt Jacobs has been working as an IT consultant for small businesses since receiving his Master’s degree in 2003. While he still does some consulting work, his primary focus now is on creating technology support content for SupportYourTech.com.
His work can be found on many websites and focuses on topics such as Microsoft Office, Apple devices, Android devices, Photoshop, and more.
18 May 2022 Senior Product Manager
Summary
Computer is the important tool in our daily life and work. For Windows 10 users, how can we set screen lock password to protect computer data security? In this essay, we will tell you how to do and how to remove the password at different situations.
Part 1: Reasons of Setting Screen Lock Password On Windows?
Screen lock is the first barrier of the personal computer. It can be used to prevent the computer from being logged in easily.
Anyone who desn’t know the password, he/she cannot get into the system. That can greatly protect your privacy and the device information in the computer.
Next, we will talk about how to set/remove screen lock password on Windows 10.
1. How to Set Screen Lock Password on Windows 10?
It is not difficult to set screen lock password on Windows 10. Here are the steps.
Step 1: Run Windows 10. Then, expand the Start menu and click at the Settings icon. Or, press the keys [Win + I] to open Windows Settings.
Step 2: Next, select [Accounts] – [Sign-in Options]. Then, click on [Add] under [Password]. Begin setting a login password.
Step 3: In the following window, set the screen lock password on Windows and follow the prompts to confirm the password.
2. How to Remove Screen Lock Password on Windows 10?
If you want to remove Windows login password, you can follow these steps.
Step 1: Press the keys [Win + I] to open Windows Settings. Then, select [Sign-in options]. Then, click on [Change] under [Password].
These methods are based on the fact that you know the lock screen password on Windows 10. However, when you forgot the password, you should use the professional system rescue software to remove the password.
Part 3: Use Renee PassNow to Remove Forgotten Screen Password
1. What is Renee PassNow?
Renee Passnow is the professional system rescue software which can help Windows users clear the lock-screen password, create new administrator account, restore the disk/SD card data, retrieve the formatted drive, transfer data from disk which can not boot and fix Windows problems. Besides, it can fix the MBR boot reocrd, the DBR error parameters, 0xc00000e, black screen and blue screen.
This multifunctional system rescue tool can perfectly be compatible with Windows 11/10/8.1/8/7/XP/Vista.
Renee Passnow – Professional Windows Password Remover
Remove Windows Login Password 3 steps for whole password remove process.
Enable/Create Administrator One click for creating new administrator and enable the disabled account.
Widely Use New version supports UEFI boot model, which can be used on more computers, laptops and even surfaces.
Multifuctional Data transfer, data recovery, bootable problem recovery can be run without system.
Highly compatible Windows 10/8.1/8/7/XP/Vista.
Remove Login Password 3 steps for whole password remove process.
Enable/Create Administrator One click for creating new administrator and enable the disabled account.
Easy to use No need of any professional knowledge or password reset disk.
2. How to Remove Screen Password with Renee PassNow?
It is easy for computer beginners to remove password with Renee PassNow. Here are the steps.
Step 1: First, download and install Renee PassNow in another computer. Insert CD/DVD. Then, run the software.
Steps 2: Select one option from [Crate a Live USB] and [Create a Live CD]. Then, select [x64] or [x86] according to your computer. Next, click on [Download Now] to download the licensed ISO. Remember to activate the software beforehand. After that, click on [Create USB] to create the boot media.

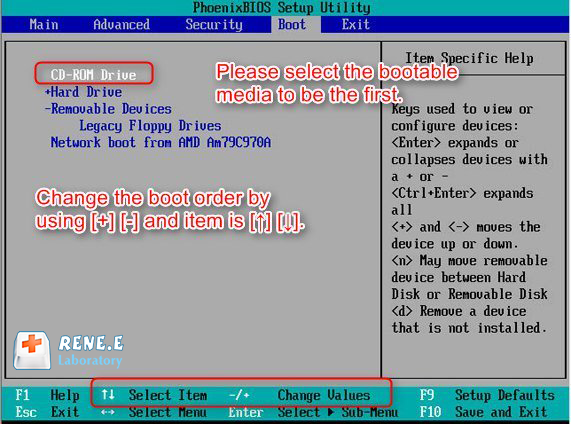
Step 3: Insert the PassNow-created recovery disk and start up the target computer. Press the key to get into BIOS/UEFI. Change the boot order as CD-ROM Drive.
Note: If the boot disk is a USB flash drive, select [Removable Devices] as the first boot option. If you use a CD, select [CD-ROM Drive].
Step 4: When Renee PassNow is loaded, select [PassNow!].
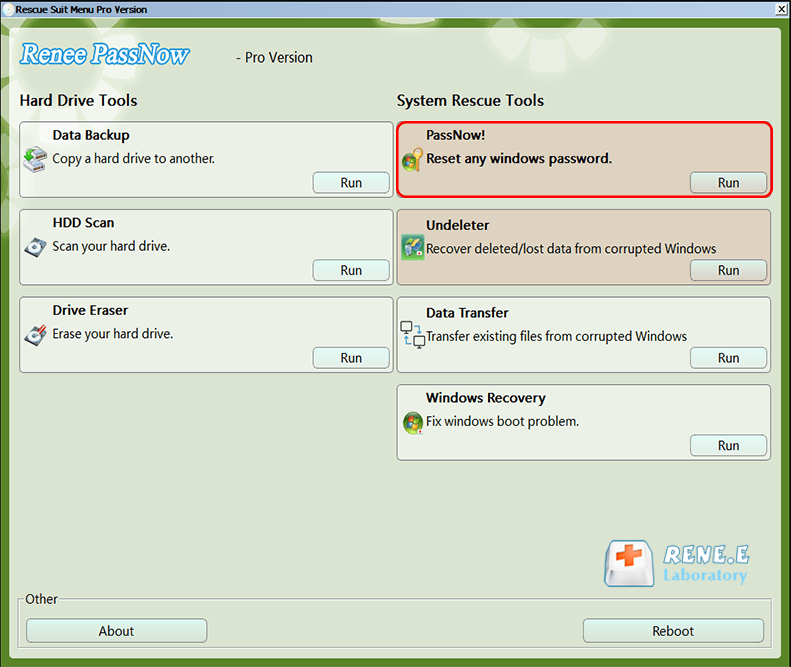
Step 5: Select the target account and then click on [Clear Password] to remove the login password. Then, eject the USB and get the computer restarted.
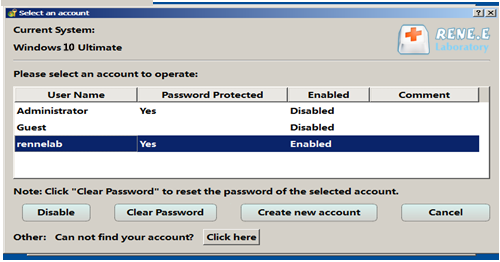
Besides, you can click [Create New Account] to create a new administrator account. Similarly, eject the USB flash drive and get the computer restarted. Use the new account to log in the system.

При установке Windows 10 с локальной учетной записью пользователя просят ввести пароль, который впоследствии используется для входа, но его можно оставить пустым — в этом случае запроса при входе в систему не будет. При создании учетной записи Майкрософт указание пароля обязательно, но некоторые пользователи отключают его запрос при входе: в такой ситуации его можно снова включить при необходимости.
В этой инструкции подробно о способах установить пароль для локальной учетной записи, а также дополнительные нюансы и информация на тему, которая может пригодиться, например, для тех, у кого используется учетная запись Майкрософт.
Установка пароля локальной учетной записи
Если у вас в системе используется локальная учетная запись Windows 10, но она не имеет пароля (например, вы не задали его при установке системы, либо его не было при обновлении с предыдущей версии ОС), вы можете поставить пароль для пользователя несколькими простыми способами.
Добавление пароля учетной записи в Параметрах
- Зайдите в Пуск — Параметры (иконка шестеренки в левой части меню пуск).
- Выберите пункт «Учетные записи», а затем — «Параметры входа».
- В разделе «Пароль», при его отсутствии, вы увидите сообщение о том, что «У вашей учетной записи нет пароля» (если же такое не указано, а предлагается изменить пароль — то вам подойдет следующий раздел этой инструкции).

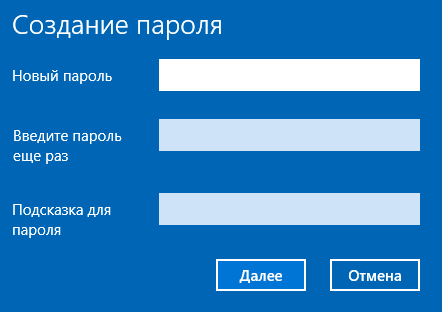
- Нажмите «Добавить», укажите новый пароль, повторите его и введите понятную вам, но не способную помочь посторонним, подсказку пароля. И нажмите «Далее».


После этого, пароль будет установлен и будет запрошен в следующий раз при входе в Windows 10, выходе системы из сна или при блокировке компьютера, что можно сделать клавишами Win+L (где Win — клавиша с эмблемой ОС на клавиатуре), либо через меню Пуск — клик по значку пользователя в левой части — «Заблокировать».
Если у вас используется локальная учётная запись и на неё пока не установлен пароль, вы можете использовать следующий простой метод его установки в последних версиях Windows 10:
- Нажмите клавиши Ctrl+Alt+Delete на клавиатуре.
- В появившемся меню выберите пункт «Изменить пароль»

- В следующем окне поле «Старый пароль» не заполняйте (если его нет), а задайте новый пароль и подтвердите его.
- Нажмите по стрелке справа от поля ввода подтверждения пароля.

Готово, теперь пароль на вход для вашего пользователя будет установлен.
Командная строка
Есть еще один способ установить пароль на локальную учетную запись Windows 10 — использовать командную строку. Для этого
- Запустите командную строку от имени администратора (используйте правый клик по кнопке «Пуск» и выбор нужного пункта меню).
- В командной строке введите net users и нажмите Enter. Вы увидите список активных и неактивных пользователей. Обратите внимание на имя того пользователя, для которого будет устанавливаться пароль.
- Введите команду
net user имя_пользователя пароль
Где имя_пользователя — значение из п.2, а пароль — желаемый пароль на вход в Windows 10 и нажмите Enter.

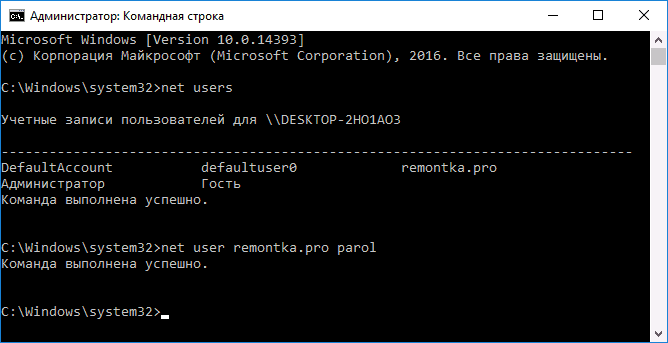
Готово, так же, как и в предыдущем способе, достаточно заблокировать систему или выйти из Windows 10, чтобы у вас запросили пароль.
Локальные пользователи и группы
Ещё одна возможность установки пароля — использование оснастки «Локальные пользователи и группы», но способ не следует использовать без необходимости: в некоторых случаях он может привести к проблемам с учетной записью. Способ работает только в версиях Windows 10 Pro и Enterprise.
Шаги будут следующими:
- Нажмите клавиши Win+R на клавиатуре, введите lusrmgr и нажмите Enter.
- Перейдите в раздел «Пользователи», нажмите правой кнопкой мыши по нужному пользователю и выберите пункт «Задать пароль».

- Прочтите предупреждение о возможных последствиях смены пароля и, если готовы, нажмите «Продолжить».
- Введите новый пароль и его подтверждение, нажмите «Ок».
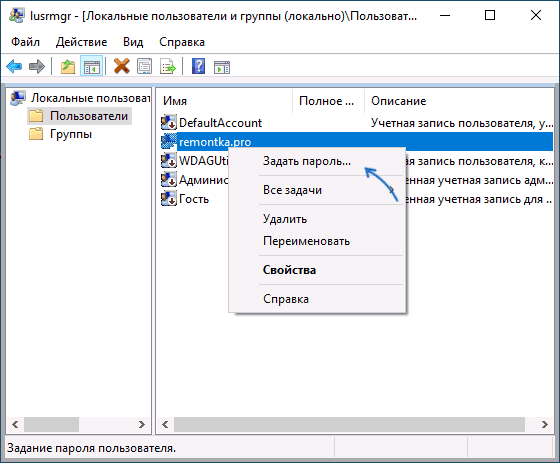
Готово, пароль пользователя был установлен.
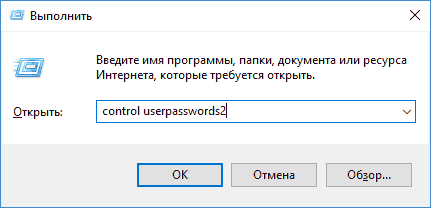
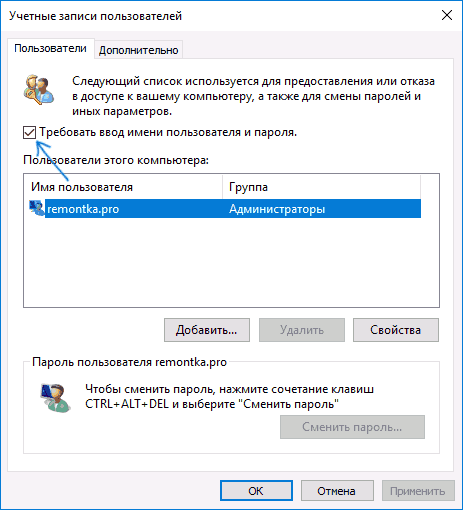
Как включить запрос пароля, если ранее он был отключен
В тех случаях, если вы используете учетную запись Майкрософт, или же при использовании локальной учетной записи на ней уже есть пароль, но он не запрашивается, можно предположить, что запрос пароля при входе в Windows 10 был отключен в настройках.
Чтобы снова включить его, выполните следующие шаги:
- Нажмите клавиши Win+R на клавиатуре, введите control userpasswords2 в диалоговое окно «Выполнить» и нажмите Enter.

- В окне управления учетными записями пользователей выберите вашего пользователя и отметьте пункт «Требовать ввод имени пользователя и пароля» и нажмите «Ок». Для подтверждения придется также ввести текущий пароль. Внимание: отдельная инструкция о том, что делать, если нет пункта Требовать ввод имени пользователя и пароля.

- Дополнительно, если был отключен запрос пароля при выходе из сна и его требуется включить, зайдите в Параметры — Учетные записи — Параметры входа и справа, в разделе «Требуется вход», выберите «Время выхода компьютера из спящего режима».
Дополнительно обратите внимание на следующий нюанс: последние версии Windows 10 при установке и обновлении могут предлагать задать ПИН-код и использовать его для входа вместо пароля. Здесь может пригодиться инструкция Как удалить ПИН-код Windows 10
В завершение — некоторые дополнительные нюансы, которые могут быть полезными в контексте рассмотренной темы:
- Если у вас в Windows 10 используется учетная запись с именем «Администратор» (не только с правами администратора, а именно с таким именем), которая не имеет пароля (и иногда вы видите сообщение о том, что какое-то приложение не может быть запущено с использованием встроенной учетной записи администратора), то правильным вариантом действий в вашем случае будет: Создать нового пользователя Windows 10 и дать ему права администратора, перенести важные данные из системных папок (рабочий стол, документы и прочие) в папки нового пользователя, а затем отключить встроенную учетную запись, о чем писалось в материале Встроенная учетная запись администратора Windows 10.
- Как отключить запрос пароля при входе в Windows 10 (тем же способом можно его включить вновь, если ранее он был отключен).
- Как поставить пароль в БИОС или UEFI
- Как включить шифрование BitLocker в Windows (с запросом пароля)
- Как сбросить пароль Windows 10
На этом всё, при входе в Windows 10 в будущем вы должны будете авторизоваться. Если же что-то не получается или ваш случай отличается от приведенных выше, опишите его в комментариях, постараюсь помочь. Также может заинтересовать: Как изменить пароль Windows 10.
Locking your Windows 10 computer with a password adds an extra layer of security and prevents unauthorized access to your files and personal information. In this tutorial, we will guide you through the process of setting up a password to lock your Windows 10 computer. Follow the steps below to get started:
Step 1: Press the «Windows Key» + «I» on your keyboard to open the Settings app. Alternatively, you can click on the «Start» menu and then select the «Settings» gear icon.
Step 2: In the Settings app, click on the «Accounts» option.
Step 3: From the left-hand side menu, click on «Sign-in options.«
Step 4: Scroll down to the «Password» section and click on the «Add» button under the «PIN» option.
Step 5: Click on the «Next» button to proceed.
Step 6: Enter your desired PIN in the provided field and click on the «OK» button.
Step 7: Re-enter your PIN to confirm and click on the «OK» button.
Congratulations! You have successfully set up a PIN as a password to lock your Windows 10 computer. From now on, whenever you want to unlock your computer, simply enter the PIN you have set.
| Pros | Cons |
|---|---|
| 1. Provides an additional layer of security. | 1. PINs may be easier to guess than complex passwords. |
| 2. Quick and convenient way to lock and unlock your computer. | 2. In case you forget your PIN, it can be challenging to recover. |
| 3. Can be used in conjunction with other security measures, like biometrics. | 3. PINs may be susceptible to keyloggers or other forms of password theft. |
Locking your Windows 10 computer with a password ensures that only authorized users gain access to your device. Although setting up a PIN as a password offers convenience and quick access, it’s crucial to use a secure and unique PIN to maximize your computer’s security.
Video Tutorial:What is the command for locking the screen?
How do I lock my computer with a password?
Securing your computer with a password is an essential step in protecting your data and privacy. Here’s a step-by-step guide on how to lock your computer with a password:
Step 1: Open the Start menu or click the Windows icon in the bottom left corner of your screen.
Step 2: Click on the «Settings» option, which resembles a gear icon. Alternatively, you can use the keyboard shortcut Win key + I.
Step 3: In the Settings window, select the «Accounts» category.
Step 4: Within the Accounts menu, choose the «Sign-in options» tab located on the left side of the screen.
Step 5: Scroll down until you find the «Password» section. If you already have a password set, it will be displayed here.
Step 6: To set a new password, click on the «Add» button. You may be prompted to verify your current password before making any changes.
Step 7: A new window will appear where you can create your new password. Enter your desired password and confirm it by typing it again in the confirmation box.
Step 8: Optionally, you can add a password hint that can help you remember your password if you forget it. It’s important to choose a hint that is not too obvious or easily guessed by others.
Step 9: Click on the «Next» button to save your settings.
Step 10: Your computer is now locked with the new password. To test it, press the Win key or click the Start button, and you’ll be prompted to enter the password before gaining access to your machine.
Remember, it’s advisable to select a strong password that includes a combination of letters, numbers, and special characters. Additionally, try to avoid using easily guessable information, such as birthdates or common words.
By following these steps, you can effectively lock your computer with a password, ensuring that only authorized individuals can access your files and personal information.
Why should you lock your desktop?
Locking your desktop is an important security measure that helps protect your personal and sensitive information. Here are several reasons why you should consider locking your desktop:
1. Prevent Unauthorized Access: Locking your desktop adds an extra layer of security to ensure that only authorized individuals can access your computer. By locking your desktop, you require a password or authentication method to gain access, making it difficult for unauthorized users to tamper with your data.
2. Protect Personal Information: Leaving your desktop unlocked can expose your personal information to anyone who gains physical access to your computer. This could include sensitive documents, financial information, login credentials, or personal files. By locking your desktop, you safeguard your privacy and minimize the risk of identity theft or unauthorized use of your personal data.
3. Maintain Confidentiality: Many individuals use their desktops for work-related tasks and may have sensitive business information saved on their computers. Locking your desktop acts as a safeguard to prevent unauthorized users, whether colleagues or outsiders, from accessing confidential company data or valuable intellectual property.
4. Secure Against Physical Threats: Locking your desktop can protect against physical threats such as theft or unauthorized use of your computer when you step away, momentarily leave your desk, or when working in public spaces like cafes, libraries, or co-working spaces. It acts as a deterrent, making it less convenient for someone else to quickly gain access to your computer and its contents.
5. Comply with Security Policies: In certain work environments, it may be mandatory to lock your desktop when leaving your workstation. Organizations often enforce security policies and protocols to protect sensitive company information, and failure to comply with these policies can result in disciplinary actions or compromise the security of the entire network.
To lock your desktop, follow these steps:
1. On Windows, press the Windows key + L or press Ctrl + Alt + Del and then select «Lock.«
2. On macOS, press Control + Command + Q or click on the Apple menu, then choose «Lock Screen.«
3. On Linux, it depends on the desktop environment, but commonly you can lock your desktop by pressing Ctrl + Alt + L.
In conclusion, locking your desktop is a simple yet effective way to enhance security and protect your personal and sensitive information from unauthorized access. By incorporating this habit into your computer usage, you can mitigate potential risks and maintain the confidentiality of your data.
How do I lock my computer without logging out Windows 10?
Locking your computer without logging out in Windows 10 is a useful feature when you want to secure your work or personal data without closing your applications or losing your unsaved progress. Here are the steps you can follow:
1. Press the Windows key + L on your keyboard simultaneously. This keyboard shortcut is the quickest way to lock your Windows 10 computer. The screen will instantly lock, and you’ll be prompted to enter your password or use Windows Hello if enabled.
2. Alternatively, you can use the Ctrl + Alt + Delete key combination and then click on «Lock» from the options shown on the screen. This method provides additional security as it brings up the secure authentication screen before locking the computer.
3. You can also create a desktop shortcut to lock your computer. Right-click on your desktop, select «New,» and choose «Shortcut.» In the location box, type «rundll32.exe user32.dll,LockWorkStation» (without quotes), and click «Next.» Give your shortcut a name, such as «Lock Computer,» and click «Finish.» Now, whenever you double-click this shortcut, your computer will be locked.
4. If you prefer using the Start menu, click on the Start button, then click on your user account picture or the small user icon at the top of the Start menu. From the options that appear, click on «Lock.» This method is useful for touch-enabled devices or when the keyboard shortcuts are not readily accessible.
Locking your computer without logging out is a convenient way to secure your system while keeping your applications and work intact. It ensures that your data remains protected from unauthorized access when you step away from your computer momentarily.
How can I lock my desktop computer?
Locking your desktop computer is an essential security measure to protect your personal data and prevent unauthorized access. Here’s a step-by-step guide to locking your desktop computer:
1. Windows OS: If you are using a Windows operating system, you can lock your computer by pressing the «Windows Key» + «L» simultaneously. This will immediately lock your desktop and require a password to unlock.
2. Mac OS: If you are using a macOS, you can lock your computer by clicking on the Apple menu located in the upper-left corner of your screen, then selecting «Lock Screen» or «Lock» from the drop-down menu. Alternatively, you can also use the keyboard shortcut «Control + Command + Q» to quickly lock your Mac.
3. Linux OS: The method to lock your desktop computer in Linux can vary depending on the distribution you are using. However, most Linux distributions provide a built-in lock screen option accessible either from the system tray or the main menu. You can also set a custom key combination to lock your computer through the system settings.
4. Password Protection: It is crucial to have a strong password to protect your computer effectively. Ensure that your password is unique and not easily guessable. Avoid using common words, birth dates, or sequential numbers. A strong password typically contains a mix of uppercase and lowercase letters, numbers, and special characters.
5. Automatic Locking: To add an extra layer of security, consider configuring your computer to automatically lock after a certain period of inactivity. This prevents unauthorized access if you accidentally leave your computer unattended. You can adjust the screen timeout settings in your system preferences or power options.
By following these steps, you can easily lock your desktop computer and safeguard your data from unauthorized access. It is important to make locking your computer a habit, especially when you step away from your desk, to ensure the security of your personal information.
How can I lock my Windows 10?
To lock your Windows 10, follow these steps:
1. Click on the Start button located at the bottom left corner of your screen, or press the Windows key on your keyboard.
2. In the Start menu, click on your user profile picture, which is typically located above the power options.
3. A drop-down menu will appear with various options. Towards the bottom, you will find the «Lock» option. Click on it.
Alternatively, you can use keyboard shortcuts to lock your Windows 10:
1. Press the Windows key + L on your keyboard simultaneously.
2. This will instantly lock your computer and display the lock screen.
Locking your Windows 10 computer is important for both security and privacy reasons. It helps prevent unauthorized access to your desktop and keeps your information safe in case you step away from your device. By following these steps, you can quickly and conveniently lock your Windows 10 system.