
Skip to content
If you switched to Windows 10 from Windows 7, you probably noticed the new bootloader of Windows 10. It looks completely different, acts completely different and performs an additional reboot every time you select Windows 7 in the boot menu if you have it in a dual boot configuration. Here is how to avoid the additional reboot and get rid of the new boot manager of Windows 10. In this article we will enable the legacy Windows 7-like boot menu in Windows 10.
Instead of the fancy new graphical bootloader, you can enable the classic text-based boot loader which shows a list of bootable OSes.
Follow these simple instructions to switch the new bootloader to classic mode.
- Open the command prompt as Administrator (an elevated instance). If you have no idea how to open an elevated command prompt, please refer to the following article: Do you know all these ways to open an elevated command prompt in Windows?
- Type the following in the elevated command prompt you just opened:
bcdedit /set "{current}" bootmenupolicy legacy

That’s it! To return to the default bootloader of Windows 10, type the following in the elevated command prompt:
bcdedit /set {default} bootmenupolicy standard
That’s it. You can use the same trick in Windows 8.1 and Windows 8.
Support us
Winaero greatly relies on your support. You can help the site keep bringing you interesting and useful content and software by using these options:
If you like this article, please share it using the buttons below. It won’t take a lot from you, but it will help us grow. Thanks for your support!
Anyone who has dual-booted Windows 10 with Windows 7 will know that Windows 10 has the modern graphical bootloader, not the classic text-based bootloader from Windows 7 that we all knew and loved. While the folks at Microsoft might think that the graphical bootloader is a step forward and is better than the text-based bootloader, most Windows users will agree that the graphical bootloader spruces things up a bit too much and, for lack of a better phrase, is just not what they are used to.
In addition, to top it all off, Windows 10’s graphical bootloader performs an additional reboot every single time you choose to boot into Windows 7 instead of Windows 10, and this can be pretty annoying and time-consuming. However, thankfully, anyone who dual boots Windows 10 with Windows 7 can save themselves from the menace that is the graphical bootloader by simply switching to the classic Windows 7 bootloader (or the Legacy bootloader). Yes, that’s right, it is entirely possible for you to switch to the beloved text-based bootloader from Windows 7 that provides you with a list of installed Operating Systems from which you can choose which OS you want to boot into.
Replacing Windows 10’s graphical boot manager with Windows 7’s Legacy bootloader is a pretty simple process, and the following are the exact steps that you need to perform in order to do so:
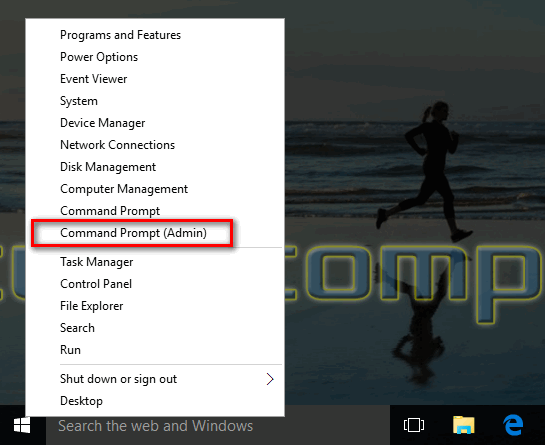
Right-click on the Start Menu button to open the WinX Menu or Hold the Windows Key and Press X
Click on Command Prompt (Admin) to launch an elevated Command Prompt.
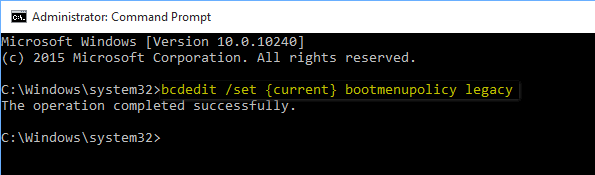
Type the following into the elevated Command Prompt and press Enter:
bcdedit /set “{current}” bootmenupolicy legacy
Exit the elevated Command Prompt.
When you reboot your computer, you will see that your bootloader has been switched to Windows 7’s Legacy
Note: To switch back to the graphical bootloader, simply repeat steps 1–4, but, this time, type the following into the elevated Command Prompt:
bcdedit /set {default} bootmenupolicy standard
Kevin Arrows
Kevin Arrows is a highly experienced and knowledgeable technology specialist with over a decade of industry experience. He holds a Microsoft Certified Technology Specialist (MCTS) certification and has a deep passion for staying up-to-date on the latest tech developments. Kevin has written extensively on a wide range of tech-related topics, showcasing his expertise and knowledge in areas such as software development, cybersecurity, and cloud computing. His contributions to the tech field have been widely recognized and respected by his peers, and he is highly regarded for his ability to explain complex technical concepts in a clear and concise manner.
Если у вас установлено более одной операционной системы, либо вы вручную добавляли дополнительные варианты загрузки системы, в Windows 11 и Windows 10 по умолчанию будет отображаться графическое меню выбора операционной системы. Но при желании его можно переключить и на классическое текстовое. Такое переключение может пригодиться и при единственной установленной ОС: например, для удобного доступа к режимам загрузки при нажатии клавиши F8 в новых ОС.
В этой простой инструкции подробно о переключении между двумя вариантами меню загрузки в Windows 11/10.
Изменение параметра BootMenuPolicy в BCDEDIT

Для того, чтобы переключиться с графического на текстовый вариант меню загрузки достаточно изменить значение параметра bootmenuploicy в конфигурации загрузки. Для этого выполните следующие шаги:
- Запустите командную строку от имени администратора. Примечание: требуется именно командная строка, а не PowerShell (например, если вы используете Терминал Windows, откройте в нём вкладку с классической командной строкой).
- Введите команду
bcdedit /set {default} bootmenupolicy legacyи нажмите Enter.

- На этом всё: при следующей загрузке будет использоваться классическое текстовое меню загрузки.


Даже если на компьютере установлена лишь одна ОС и меню загрузки не требуется, переключение на классический вариант может быть полезным.
В частности, это позволит использовать нажатие клавиши F8 при загрузке для входа в классические дополнительные варианты загрузки и удобного запуска Безопасного режима или иных режимов как в предыдущих версиях Windows:

Если в дальнейшем вам потребуется вернуться к изначальному, графическому варианту меню загрузки тем же способом используйте команду:
bcdedit /set {default} bootmenupolicy standard
Другие материалы на сайте, касающиеся меню выбора ОС при загрузке Windows 11 и 10:
- Выберите операционную систему при загрузке Windows — как убрать ненужные пункты или меню
- Как изменить имена и порядок пунктов в меню загрузки Windows
Contents
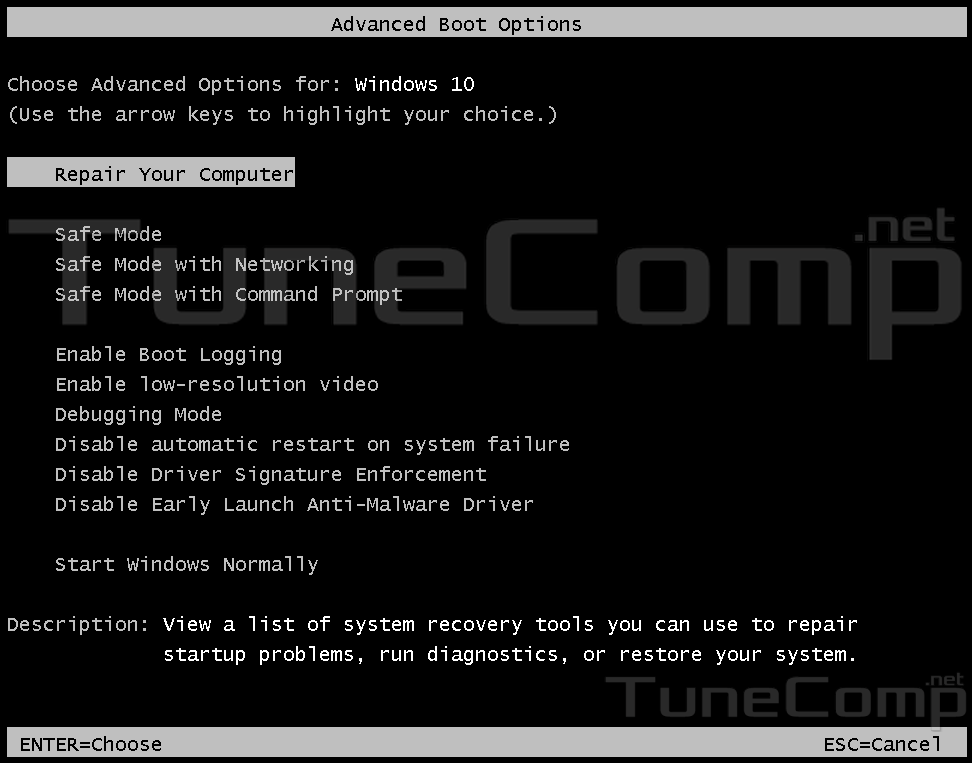
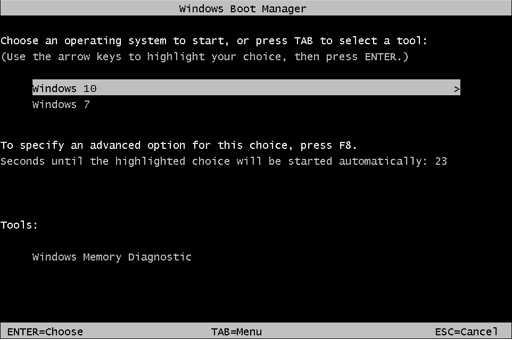
If Windows 10 crashes you need to use external bootable disk to diagnose PC: to enter the Safe Mode, reset or restore OS in particular. The F8 boot menu does not work anymore. Here some information about how to get it back in Windows 10.
How to enable legacy boot menu in Windows 10
1. Run command prompt as admin (how to):
2. Type
bcdedit /set {current} bootmenupolicy legacy
and press Enter:
Reboot your PC and press F8. Good old menu appears:
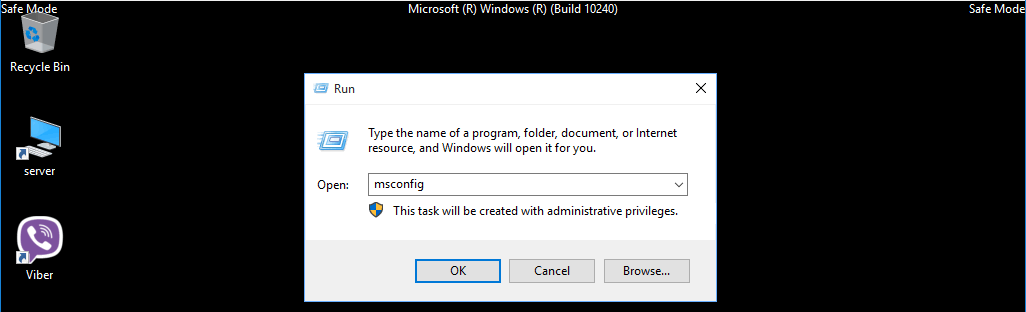
How to turn off the Safe Mode and start Windows 10 normally
While in Safe Mode:
1. Press Win+R.
2. Type
msconfig
3. Press Enter
On the Boot tab unset the checkbox Safe boot.
Press OK:
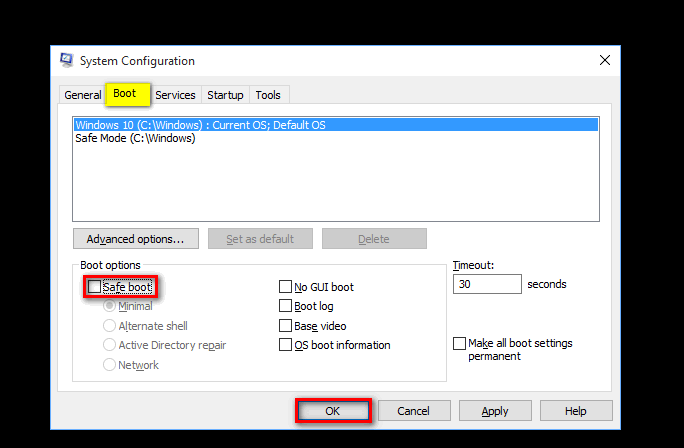
Reboot the PC. Now it will start normally.
Now you know how to easily bring back so useful F8 feature in the latest OS version. Please, tell us in the comments how often do you use it? Thank you in advance! Have a nice day!
Readers help support Windows Report. We may get a commission if you buy through our links.
Read our disclosure page to find out how can you help Windows Report sustain the editorial team. Read more
- Use bcdedit
- Use bootrec
Are you one of the Windows users who switch from Windows 7 to the Windows 10 operating system on your device?
Well seeing that the bootloader in Windows 10 looks completely different than the one you are used to in the Windows 7 operating system you can find out by reading the tutorial posted below how exactly you can enable the legacy Windows 7 boot menu in Windows 10 as well.
Windows 10 brought a new boot menu that is an improvement over the previous one. This boot menu is graphical, and it allows you to use your mouse, which is a major plus. In addition, it offers more options and it’s more user-friendly.
Despite the aforementioned improvements, some users still prefer the older textual boot menu. One of the main reasons is because the new boot menu will restart your PC if you’re using your PC in dual boot mode. This isn’t the case with the legacy boot menu, and instead of restarting, your PC will boot straight to the select operating system thus saving your time.
Learn more about enabling Legacy Boot in Windows 10 by reading this guide.
Use bcdedit
- Left click or tap on the search box situated in the Start menu of your Windows 10 operating system.
- In the search dialog box write the following: “cmd.exe” without the quotes.
- After the search has finished you should have an icon with Command Prompt.
- Right click or hold tap on the Command Prompt icon and from the menu that appears left click or tap on the “Run as administrator” feature.
Note: If you are prompt by a user account control window you will need to left click or tap on the “Yes” button to proceed. - Now in the “Elevated Command Prompt” window you just opened write the following: “bcdedit /set “{current}” bootmenupolicy legacy” without the start and end quotes.
Note: If you manually write the command above be very careful on the spaces in the line as the command will not work if you type something wrong. - After you wrote the command above press the Enter button on the keyboard.
- Now in the command prompt window write the following: “Exit” without the quotes.
- Press the Enter button on the keyboard.
- Reboot your Windows 10 operating system and check if the boot menu has switched to the Windows 7 like legacy.
Turn the Windows 10 boot menu on:
- If by any chance you wish to switch back to the Windows 10 boot menu go to the Start button again and in the search box write “Cmd.exe” as you did in the steps above.
- Right click again on the command prompt icon and select the “Run as administrator” feature.
- In the command prompt write the following line: “bcdedit /set {default} bootmenupolicy standard” without the quotes.
- Press the Enter button again in order for the command to execute.
- Close the command prompt window and reboot your operating system.
Read our detailed guide and learn to properly dual-boot Windows 10 with another OS.
Use bootrec
You can try to use bootrec feature in order to enable legacy Windows 7 boot menu on your Windows 10.
It will be the same as fixing Windows 7 boot, but you will arrive to open Windows 7 legacy boot menu with one condition – having your Windows 7 installation CD/DVD. Here’s how you do it:
- Boot from the original Windows 7 installation CD/DVD
- Select the language you prefer; click ‘Next’
- Select the operation System from the list (Windows 7) and then click ‘Next’
- When ‘System Recovery Options’ screen appears, click on ‘Command Prompt‘
- In Commander type the following command ‘bootrec /fixmbr’ (without the quotes) and press ‘Enter’
- Type ‘bootrec /fixboot’ (without the quotes) and press ‘Enter’
- Type ‘bootrec /ScanOs’ (without the quotes) and press ‘Enter’
- Type ‘bootrec /rebuildBcd’ (without quotes) and press ‘Enter’
- Eject Windows 7 installation CD/DVD
- Type ‘exit’, press ‘Enter’ and reboot your PC
And there you go, some quick methods on how to change the new boot menu in Windows 10 to the legacy Windows 7– like boot menu you are used to.
Also if you are having trouble doing the steps above you are welcomed to write us in the comments section situated a little bit below these lines and I will help you further as soon as possible.
Ivan Jenic
Windows Hardware Expert
Passionate about all elements related to Windows and combined with his innate curiosity, Ivan has delved deep into understanding this operating system, with a specialization in drivers and driver troubleshooting.
When he’s not tackling diverse driver-related problems, Ivan enjoys watching good movies and spending time hiking with his family and friends.