
В этой статье мы рассмотрим типовые причины ошибок при подключении к L2TP/IPSec VPN серверу с клиентов Windows 10/11 и Windows Server 2019/2016. Если вы не можете установить L2TP VPN подключение к Windows, внимательно посмотрите на код и описание ошибки. Там часто указывается причина ошибки.
Содержание:
- Не удается установить связь между компьютером и VPN сервером L2TP/IPScec
- Разрешить подключение к L2TP/IPSec VPN серверу за NAT
- Подключение L2TP не удалось из-за ошибки согласования безопасности
Не удается установить связь между компьютером и VPN сервером L2TP/IPScec
При попытке установить соединение из клиента Windows к L2TP VPN серверу появляется ошибка:
Can’t connect to ваше_L2TP_IPSec_VPN_подключение
The network connection between your computer and the VPN server could not be established because the remote server is not responding. This could be because one of the network devices (e.g. firewalls, NAT, routers, etc) between your computer and the remote server is not configured to allow VPN connections. Please contact your Administrator or your service provider to determine which device may be causing the problem.

Не удалось установить связь по сети между компьютером и VPN-сервером, так как удаленный сервер не отвечает. Возможная причина: одно из сетевых устройств (таких как брандмауэры, NAT, маршрутизаторы и т.п.) между компьютером и удаленным сервером не настроено для разрешения VPN-подключений. Чтобы определить, какое устройство вызывает эту проблему, обратитесь к администратору или поставщику услуг.
Чаще всего при этом появляются следующие коды ошибок: 800, 794 или 809.
Если появилась такая ошибка, нужно проверить что вы указали правильный адрес VPN сервера, VPN сервер доступен и в файерволах открыты все необходимые порты.
Для доступа к L2TP/IPsec VPN сервере должны быть открыты следующие порты:
- UDP порт 1701 (Layer 2 Forwarding Protocol (L2F) & Layer 2 Tunneling Protocol (L2TP))
- UDP порт 500 (IKE, для управления ключами шифрования)
- Протокол ESP 50 (Encapsulating Security Payload) для IPSec
- Если VPN сервер находится за NAT, нужно дополнительно открыть UDP порт 4500 (протокол NAT-T, IPSec Network Address Translator Traversal)
Для подключения к L2TP VPN серверу можно использовать встроенный VPN клиент Windows. Проверьте настройки вашего VPN подключения. Убедитесь, что для VPN подключения используется туннель L2tp и pre-shared key (PSK)/сертификат для аутентификации. Настройки VPN подключения можно вывести с помощью PowerShell:
Get-VpnConnection
Разрешить подключение к L2TP/IPSec VPN серверу за NAT
Если целевой L2TP VPN сервер находится за NAT, то с настройками по-умолчанию вы не сможете установить подключение к нему с компьютера Windows. Дело в том, что протокол IPsec не поддерживает NAT. Для обхода этого ограничения используется протокол NAT-T, который инкапсулирует пакеты IPsec в UDP/4500.
IPSec использует протокол ESP (Encapsulating Security Payload) для шифрования пакетов, а протокол ESP не поддерживает PAT/ Port Address Translation.
NAT-T включен по-умолчанию почти во всех операционных системах (iOS, Android, Linux), кроме Windows.
Если VPN сервер L2TP/IPsec находится за NAT, то для корректного подключения внешних клиентов через NAT необходимо как на сервере, так и на клиенте Windows внести изменение в реестр, разрешающее UDP инкапсуляцию пакетов для L2TP и поддержку (NAT-T) для IPsec.
- Откройте редактор реестра
regedit.exe
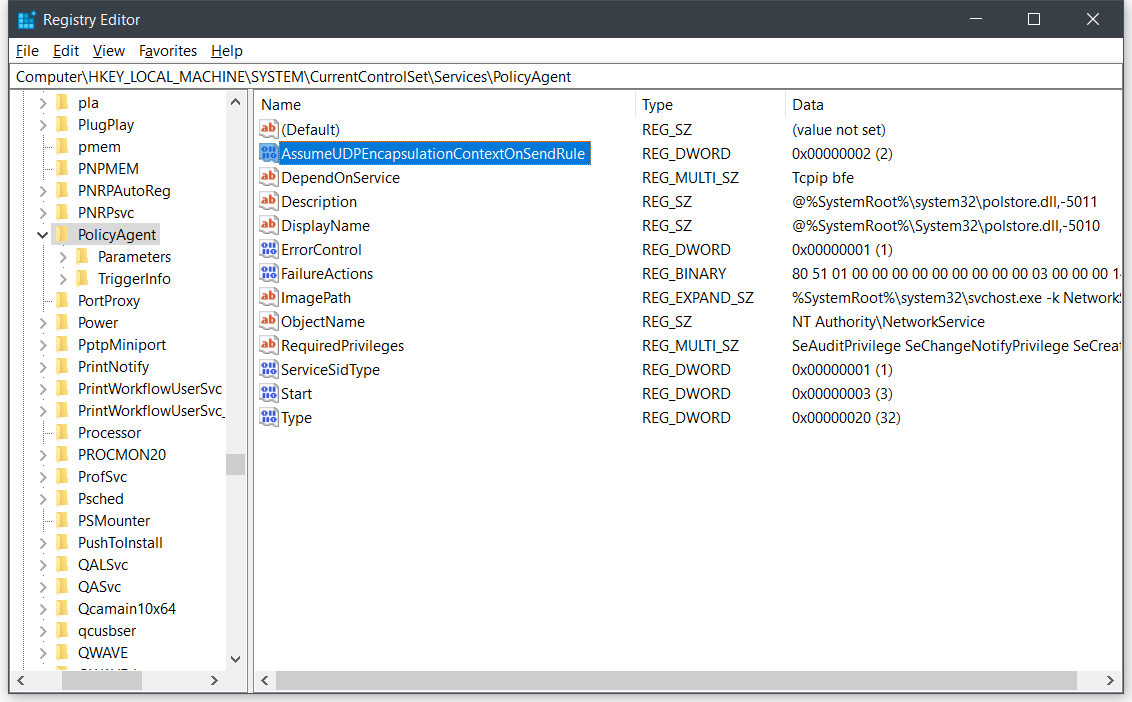
и перейдите в ветку:- Для Windows 10,8.1,7 и Windows Server 2016,2012R2,2008R2 — HKEY_LOCAL_MACHINE\SYSTEM\CurrentControlSet\Services\PolicyAgent
- Для Windows XP/Windows Server 2003 — HKEY_LOCAL_MACHINE\SYSTEM\CurrentControlSet\Services\IPSec
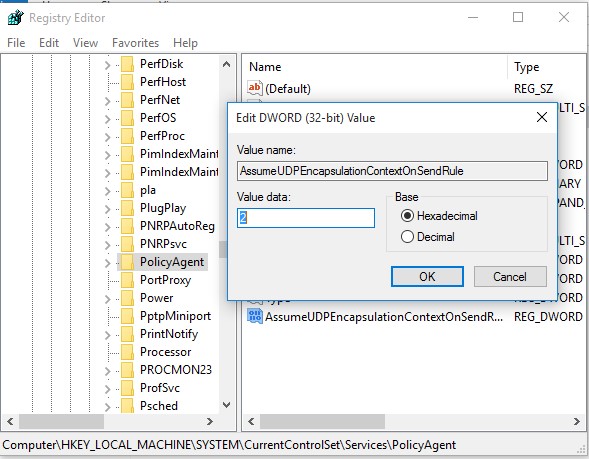
- Создайте DWORD параметр с именем AssumeUDPEncapsulationContextOnSendRule и значением 2;

Примечание. Возможные значения параметра AssumeUDPEncapsulationContextOnSendRule:
- 0 – (значение по-умолчанию), предполагается, что VPN сервер подключен к интернету без NAT;
- 1 – VPN сервер находится за NAT;
- 2 — и VPN сервер и клиент находятся за NAT.
- Осталось перезагрузить компьютер и убедиться, что VPN туннель успешно создается.
Если и Windows VPN сервер и клиент находятся за NAT, нужно изменить это параметре на обоих системах.
Можно использовать командлет PowerShell для внесения изменений в реестр:
Set-ItemProperty -Path "HKLM:SYSTEM\CurrentControlSet\Services\PolicyAgent" -Name "AssumeUDPEncapsulationContextOnSendRule" -Type DWORD -Value 2 –Force
После включения поддержки NAT-T, вы сможете успешно подключаться к VPN серверу с клиента через NAT (в том числе двойной NAT). В этом случае при установлении L2TP/IPsec подключения сначала создается зашифрованный IPsec-канал (используется протокол IKE: UDP/500 и NAT-T: UDP/4500). После этого уже внутри IPsec поднимается туннель L2TP на порт 1701 UDP. Это означает, что, если VPN сервер находится за NAT, вам не нужно пробрасывать на него порт 1701 UDP с внешнего роутера/маршрутизатора.
Подключение L2TP не удалось из-за ошибки согласования безопасности
Есть еще один интересный баг. Если в вашей локальной сети несколько Windows компьютеров, вы не сможете установить более одного одновременного подключения к внешнему L2TP/IPSec VPN серверу. Если при наличии активного VPN туннеля с одного клиента, вы попытаетесь подключиться к тому же самому VPN серверу с другого компьютера, появится ошибка с кодом 809 или 789:
Error 789: The L2TP connection attempt failed because the security layer encountered a processing error during initial negotiations with the remove computer.
Попытка L2TP-подключения не удалась из-за ошибки, произошедшей на уровне безопасности во время согласований с удаленным компьютером. (Ошибка 789)
Что интересно, эта проблема наблюдется только с Windows-устройствами. На устройствах с Linux/MacOS/Android в этой же локальной сети таких проблем нет. Можно без проблем одновременно подключиться к VPN L2TP серверу с нескольких устройств.
По информации на TechNet проблема связана с некорректной реализацией клиента L2TP/IPSec клиента в Windows (не исправляется уже много лет).
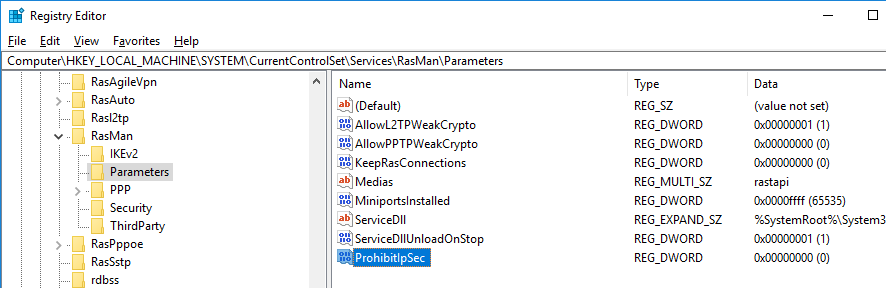
Для исправления этого бага нужно изменить два параметра реестра в ветке HKEY_LOCAL_MACHINE\SYSTEM\CurrentControlSet\Services\RasMan\Parameters и перезагрузите компьютре:
- AllowL2TPWeakCrypto – изменить на 00000001 (ослабляет уровень шифрования, для L2TP/IPSec используются алгоритмы MD5 и DES)
- ProhibitIPSec – изменить на 00000000 (включает шифрование IPsec, которое часто отключается некоторыми VPN клиентами или утилитами)
Для изменения этих параметров реестра достаточно выполнить команды:
reg add "HKEY_LOCAL_MACHINE\System\CurrentControlSet\Services\Rasman\Parameters" /v AllowL2TPWeakCrypto /t REG_DWORD /d 1 /f
reg add "HKEY_LOCAL_MACHINE\System\CurrentControlSet\Services\Rasman\Parameters" /v ProhibitIpSec /t REG_DWORD /d 0 /f
Это включает поддержку нескольких одновременных L2TP/IPSec-подключений в Windows через общий внешний IP адрес (работает на всех версиях, начиная с Windows XP и заканчивая Windows 10/11).
Еще несколько советов, которые помогут вам исправить проблему с L2TP VPN подключением в Windows
Problem:
Windows 2012 RRAS IPsec VPN does not support NAT-T out-of-the-box. By default, RRAS only works with public IP
addresses -no NAT. Windows 10 clients cannot connect with L2TP from outside the office. Windows 2016 does not support L2TP for any client from behind routers running NAT.
Solution:
Enable NAT-T on both Windows servers and the clients. NAT-T allows the
VPN server to serve clients (e.g., Windows 10, Android, Apple iOS) from behind the NAT device. Modify MTU.
Background:
Why NAT-T?
IPsec uses Encapsulating Security Payload (ESP) to encrypt packet headers
and payloads. By default, ESP is not
compatible with Port Address Translation (PAT). This is because TCP uses ports and ESP does not.
TCP and ESP are different Internet protocols. TCP uses protocol number 6. N.B., TCP protocol number 6 is not the same thing as TCP port 6. TCP ports are communication endpoints. For
example, TCP uses port 80 for web traffic.
ESP uses protocol (i.e., not port) number 50. ESP
is a protocol without ports. Network Address Translation (NAT) uses
port translation PAT to bind traffic flows with internal hosts. Therefore, ESP does not work with NAT.
NAT-T allows ESP to
work from behind NAT. It encapsulates
ESP protocol 50 inside User Datagram Protocol (UDP) 4500. N.B, NAT-T is not the same as IPsec over UDP.
Enable NAT-T
NAT-T is enabled on most operating systems (e.g., Android) -Windows is the exception. Fortunately, we can enable NAT-T on Windows 10 and Windows 2012 with a few simple changes.
Windows IPsec clients are supposed to work from any location. Therefore, only enable NAT-T on the 2012 RRAS
server.
Create a new
registry key to enable NAT-T.
- Edit Registry or create GPO:
HKLM\SYSTEM\CurrentControlSet\Services\PolicyAgent\Parameters\
- Create new DWORD value: AssumeUDPEncapsulationContextOnSendRule
- Modify DWORD value: 2
These changes will fix those pesky L2TP-NAT problem.
Troubleshooting Issues
Make sure clients use the latest edition of Windows 10. Early versions had quirks where clients simply would not connect via NAT-T.
NAT-T does not work with the following editions:
- version 10240
- version 1511 (i.e. November Update)
Unconfirmed (may or may not work):
- version 1607 (i.e., Anniversary Update)
Confirmed:
- version 1703 (i.e., Creators Update)
NAT-T works great with the registry fix and Creators Update.
Workarounds:
Some folks had to toggle the NAT-T registry value in order to connect (http://bit.ly/2r2CKnF). I assume this fix was for the November or Anniversary Update.
MTU
Don’t forget to adjust the Max Segment Size (MSS):
http://www.stevenjordan.net/2016/11/windows-ikev2-mtu.html.
That’s It!
Network Administration
VPN
Windows Server
Здравствуйте.
Суть задачи:
Два офиса, нужно создать L2TPтуннель между компьютером в сетке первого офиса до роутера второго.
Схема:
win10 (client) -> gateway (1ый офис) -> интернет -> ubiquite router (2ой офис, server)
Проблема:
На винде настроен интерфейс штатными средствами, при попытке выдаёт 809 ошибку. Ошибка распространена, были приняты меры в виде редактирования реестра:
HKEY_LOCAL_MACHINE\SYSTEM\CurrentControlSet\Services\PolicyAgent
добавлена опция AssumeUDPEncapsulationContextOnSendRule
значения 1 или 2
HKEY_LOCAL_MACHINE\SYSTEM\CurrentControlSet\Services\RasMan\Parameters
добавлена опция ProhibitIpSec
значение 1
изменена опция AllowL2TPWeakCrypto
значение 1
Без этого не уходят пакеты.
Замечу, что на других компьютерах (домашнем и удалённом в другом городе) операции с реестром не проводились и всё взлетело без нареканий.
Сниффил wireshark на win10 и tcpdump на принимающем ubiquite, всё что уходит всё приходит.
Нашёл костыль запуска, но это бред какой-то, дальше будет непонятная мне магия:
1. На win10 поднимаем виртуалку, в виртуалке win10 (пробовал с линухом, аналогичный успех).
2. На ВМ настраиваем интерфейс, реестр не трогаем.
3. Пытаемся соединиться — соединение успешно.
4. Отключаемся
5. Пытаемся соединиться уже на хостовой win10 — успешно
Если отключиться и через какое-то время попытаться опять, то опять 809 ошибка.
Видимо ESTABLISHED соединение позволяет приконектиться с хостовой винды, но почему без такого костыля не работает неясно.
Подскажите, пожалуйста, куда копать?
Может есть уточняющие вопросы?
UPD
Пользователи mac подключаются без нареканий.
Была переделана политика безопасности согласно статье: https://habr.com/ru/post/210410/
Теперь в логах vpn пишет, что соединение устанавливается, но win10 всё также возвращает 809:
Mar 29 09:29:42 15[IKE] <1> xxx.xxx.54.116 is initiating a Main Mode IKE_SA
Mar 29 09:29:42 06[IKE] <remote-access|1> IKE_SA remote-access[1] established between yyy.yyy.182.90[yyy.yyy.182.90]..xxx.xxx.54.116[192.168.3.122]
Mar 29 09:29:42 07[IKE] <remote-access|1> CHILD_SA remote-access{1} established with SPIs cd95951a_i f7801e3a_o and TS yyy.yyy.182.90/32[udp/l2f] === xxx.xxx.54.116/32[udp/l2f]Setting up a L2TP VPN on Windows 10 might seem daunting at first, but it’s quite manageable with a bit of guidance. Many of us are familiar with the myriad of VPN options available, but configuring L2TP on a Windows system is a reliable choice for those seeking a blend of security and simplicity. Here, we’ll walk through the steps to get your VPN up and running, ensuring you’re connected securely in no time.

Why Choose L2TP VPN for Windows 10?
Before diving into the setup, let’s ponder why L2TP is worth considering. L2TP (Layer 2 Tunneling Protocol) offers robust security by combining with IPsec for encryption, making it ideal for safeguarding your online activities. Plus, it’s natively supported by Windows 10, eliminating the need for third-party applications.
Step-by-Step Configuration of L2TP VPN in Windows 10
1. Accessing Network Settings
To get started, navigate to the Settings on your Windows 10 device. From here, select Network & Internet and then VPN. This is your gateway to adding a new VPN connection.
2. Adding a VPN Connection
- Click on Add a VPN Connection.
- Under VPN Provider, choose Windows (built-in).
- Fill in the Connection name for easy identification.
- Enter the Server name or address, which should be the WAN IP address of your firewall.
- Set VPN type to Layer 2 Tunneling Protocol with IPsec (L2TP/IPsec).
- Provide the User name and Password corresponding to your firewall’s allowed user credentials.
3. Configuring MS-CHAPv2 & Pre-Shared Key
- Open Control Panel > Network and Internet > Network Connections.
- Right-click and select Properties.
- Choose Layer 2 Tunneling Protocol with IPsec (L2TP/IPsec).
- For protocols, select MS-CHAPv2 or try PAP if issues arise.
- Under Security > Advanced settings, opt for Use pre-shared key for authentication.
4. Connecting to the L2TP VPN Tunnel
Once configured, navigate back to Network & Internet Settings and click Connect. If all goes well, you should see a successful connection.
5. Dealing with NAT Challenges
If your L2TP gateway is behind NAT, a specific registry key adjustment is necessary. This requires importing a registry key into your Windows client and rebooting. This tweak addresses Windows’ default settings hindering L2TP connections behind NAT.
Troubleshooting Common Issues
Even with the best preparations, hiccups can occur. Here are some common fixes:
- Connection Issues: Ensure your firewall is configured to allow L2TP/IPsec traffic.
- Authentication Failures: Double-check user credentials and the pre-shared key.
- Registry Tweaks: Verify the registry change has been correctly applied if using NAT.
ForestVPN: A Modern VPN Solution
While setting up L2TP offers manual control, consider the simplicity and efficiency of using a service like ForestVPN. It’s not just about privacy; it’s about seamless access and eco-friendly technology. With ForestVPN, you get the added peace of mind with UAE licensing, ensuring legality and safety.
User Testimonials
- “Switching to ForestVPN was a game-changer. The setup was a breeze compared to manual configurations.” – [User A]
- “The sustainability focus of ForestVPN aligns perfectly with my values.” – [User B]
Conclusion
Setting up an L2TP VPN on Windows 10 is straightforward when you follow these steps. However, for those seeking an easier path with additional benefits, ForestVPN stands out as a formidable choice. Whether you opt for manual setup or a service, securing your online presence is always a wise decision.
For more insights and support on VPN configurations, explore resources or reach out to communities that can offer personalized advice. Happy browsing!
To configure L2TP VPN in Windows 10, follow these steps:
- Open Settings: Go to Start > Settings > Network & Internet > VPN.
- Add VPN Connection:
– Click Add a VPN connection.
– Set VPN provider to Windows (built-in).
– Name your connection, input the server address, and select L2TP/IPsec.
– Enter your username and password. - Configure Security:
– Go to Network Connections, right-click your VPN, and select Properties.
– Under the Security tab, choose Require encryption and check MS-CHAPv2.
For a hassle-free experience and enhanced security, consider ForestVPN. Get started with ForestVPN today!
FAQs about Configuring L2TP VPN on Windows 10
What is L2TP VPN and why should I use it on Windows 10?
L2TP (Layer 2 Tunneling Protocol) is a VPN protocol that provides enhanced security by pairing with IPsec for encryption. It’s natively supported by Windows 10, allowing for easy setup without third-party applications.
How do I configure an L2TP VPN connection on Windows 10?
To configure an L2TP VPN connection, navigate to Settings > Network & Internet > VPN. Click on ‘Add a VPN connection’, fill in the required details such as VPN provider, connection name, server address, and user credentials, then save and connect.
What should I do if my L2TP VPN connection fails on Windows 10?
If the connection fails, ensure the firewall on your local PC is not blocking the VPN traffic. Also, double-check your user credentials and pre-shared key. If connecting through NAT, you may need to adjust a registry key as outlined in the configuration guide.
Why does L2TP work on iOS devices but not on Windows 10?
L2TP connections often work more smoothly on iOS and macOS due to built-in configurations that accommodate NAT. Windows 10 may require additional registry modifications to support L2TP connections behind NAT.
Is there an easier alternative to manually setting up L2TP on Windows 10?
Yes, services like ForestVPN provide a hassle-free setup, ensuring secure connections without the complexities of manual configuration. They also focus on sustainability and legality, making them an attractive option.

Windows
Normally Windows will fail to connect to an L2TP/IPSec VPN server if either or both the client machine and the server are behind some form of NAT – possibly for security reasons.
However, assuming the server is properly configured to accept connections even when behind NAT (necessary ports and protocol forwards are in place) it is possible to configure a Windows machine to allow such connections via a registry tweak.
Under the HKEY_LOCAL_MACHINE\SYSTEM\CurrentControlSet\Services\PolicyAgent key create a new DWORD (32bit) entry with the name AssumeUDPEncapsulationContextOnSendRule and one of the following values:
- 0 – do not accept NAT transversal
- 1 – allow connections to a server that is behind NAT
- 2 – allow connections when both the server and the client are behind NAT
Or use the following in an elevated command prompt:
REG ADD HKLM\SYSTEM\CurrentControlSet\Services\PolicyAgent /v AssumeUDPEncapsulationContextOnSendRule /t REG_DWORD /d 0x2 /f
A system restart is required for this change to take effect.
The procedure is valid for Windows 7, 8 and 10. The registry tweak also works on Windows Xp, but the entry needs to be added under the HKEY_LOCAL_MACHINE\SYSTEM\CurrentControlSet\Services\IPSec key instead.
Zed
Zedt.eu is the place where I collect technical info and tutorials so I don’t have to remember or search for later on. Don’t expect information here to be accurate, up to date or complete.