
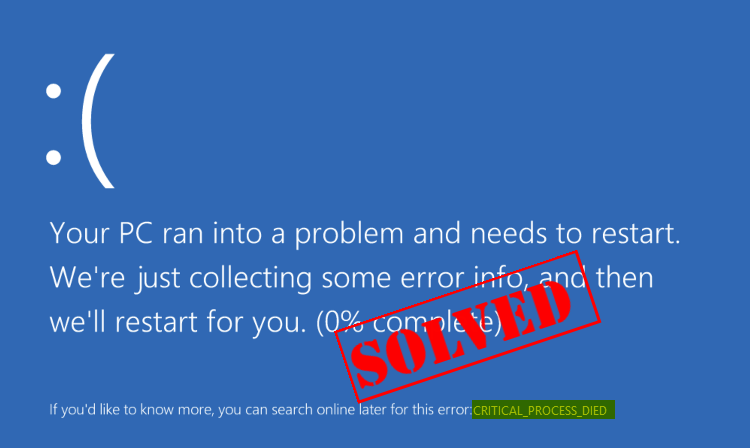
Одна из распространенных ошибок на компьютерах и ноутбуках с Windows 10 — синий экран с сообщением «На вашем ПК возникла проблема, и его необходимо перезагрузить» с кодом остановки (ошибки) CRITICAL PROCESS DIED — после ошибки, обычно происходит автоматическая перезагрузка компьютера, а затем, в зависимости от конкретных обстоятельств — либо снова появление того же окна с ошибкой или обычная работа системы до повторного возникновения ошибки.
В этой инструкции — подробно о том, что может являться причиной появления проблемы и как исправить ошибку CRITICAL PROCESS DIED в Windows 10 (также ошибка может отображаться как CRITICAL_PROCESS_DIED на синем экране в версиях Windows 10 до 1703).
Причины ошибки
В большинстве случаев причиной ошибки CRITICAL PROCESS DIED бывают драйверы устройств — в случаях, когда Windows 10 использует драйверы из Центра обновлений, а требуются оригинальные драйверы производителя, а также другие неправильно работающие драйверы.
Случаются и другие варианты — например, с синим экраном CRITICAL_PROCESS_DIED можно столкнуться после работы программ для очистки от ненужных файлов и реестра Windows, при наличии вредоносных программ на компьютере и в случае повреждения системных файлов ОС.
Как исправить ошибку CRITICAL_PROCESS_DIED
В случае, если вы получаете сообщение об ошибке сразу при включении компьютера или входе в Windows 10, для начала зайдите в безопасный режим. Сделать это можно различными способами, в том числе, когда система не загружается, подробно об этом в инструкции Безопасный режим Windows 10. Также использование чистой загрузки Windows 10 может временно помочь избавиться от ошибки CRITICAL PROCESS DIED и выполнить действия для полного ее устранения.

Способы исправления, если удается войти в Windows 10 в обычном или безопасном режиме
В первую очередь рассмотрим способы, которые могут помочь в ситуации, когда вход в Windows возможен. Начать рекомендую с просмотра сохраненных дампов памяти, которые создаются системой автоматически при критических сбоях (к сожалению, не всегда, иногда автоматическое создание дампов памяти отключено. См. Как включить создание дампов памяти при сбоях).
Для анализа удобно использовать бесплатную программу BlueScreenView, доступную для загрузки на странице разработчика https://www.nirsoft.net/utils/blue_screen_view.html (ссылки на загрузки находятся внизу страницы).
В очень упрощенном варианте для начинающих пользователей анализ может выглядеть следующим образом:
- Запустите программу BlueScreenView
- Просмотрите файлы .sys (обычно нужны именно они, хотя в списке часть могут присутствовать hal.dll и ntoskrnl.exe), которые отобразятся в верхней части таблицы в нижней панели программы с не пустым вторым столбцом «Address In Stack».

- Используя поиск в Интернете, выясните, что это за файл .sys и какой драйвер он представляет.

Примечание: также можно попробовать использовать бесплатную программу WhoCrashed, которая может сообщить точное наименование драйвера, вызвавшего ошибку.
Если шаги 1-3 удались, то далее останется лишь решить проблему с идентифицированным драйвером, обычно это один из следующих вариантов:
- Загрузить файл драйвера с официального сайта производителя ноутбука или материнской платы (для ПК) и установить его.
- Откатить драйвер, если он недавно обновлялся (в диспетчере устройств правый клик по устройству — «Свойства» — вкладка «Драйвер» — кнопка «Откатить»).
- Отключить устройство в диспетчере устройств, если оно не является критичным для работы.
Дополнительные методы исправления, которые могут помочь в данном сценарии:
- Ручная установка всех официальных драйверов (важно: некоторые пользователи ошибочно считают, что если диспетчер устройств сообщает, что драйвер не нуждается в обновлении и «устройство работает нормально», то все в порядке. Это часто не так. Официальные драйверы берем с сайта производителя вашего оборудования: например, аудио драйверы Realtek скачиваем не с Realtek, а сайта производителя материнской платы для вашей модели или с сайта производителя ноутбука, если у вас ноутбук).
- Использование точек восстановления, если они есть в наличии и если недавно ошибка не давала о себе знать. См. точки восстановления Windows 10.
- Проверка компьютера на наличие вредоносных программ (даже если у вас есть хороший антивирус), например, с помощью AdwCleaner или других средств удаления вредоносных программ.
- Выполните проверку целостности системных файлов Windows 10.
Как исправить ошибку CRITICAL PROCESS DIED, если Windows 10 не запускается
Более сложный вариант — когда синий экран с ошибкой появляется еще до входа в Windows 10 без возможности запустить особые варианты загрузки и безопасный режим (если такая возможность есть, то можно использовать предыдущие методы решения в безопасном режиме).
Примечание: если после нескольких неудачных загрузок у вас открывается меню среды восстановления, то создавать загрузочную флешку или диск, как описано далее, не нужно. Вы можете использовать средства восстановления из этого меню, в том числе — сброс системы в разделе «Дополнительные параметры».
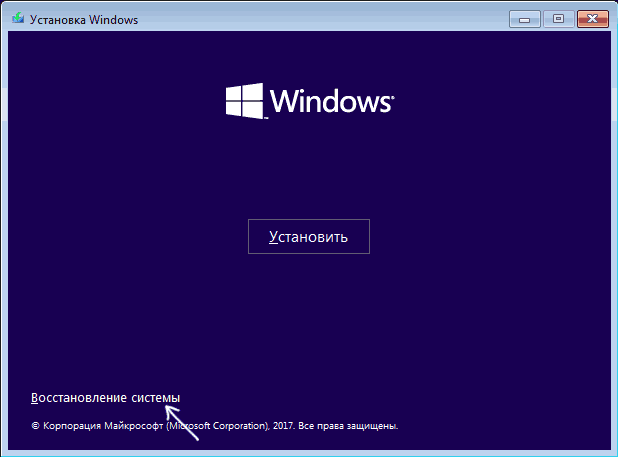
Здесь потребуется создать загрузочную флешку с Windows 10 (или диск восстановления) на другом компьютере (разрядность системы на накопителе должна совпадать с разрядность установленной системы на проблемном компьютере) и загрузиться с нее, например, используя Boot Menu. Далее порядок действий будет следующим (пример для загрузки с установочной флешки):
- На первом экране программы установки нажмите «Далее», а на втором, внизу слева — «Восстановление системы».

- В появившемся меню «Выбор действия» зайдите в «Поиск и устранение неисправностей» (может называться «Дополнительные параметры»).

- При наличии, попробуйте использовать точки восстановления системы (пункт «Восстановление системы»).
- При их отсутствии, попробуйте открыть командную строку и выполнить проверку целостности системных файлов с помощью sfc /scannow (как это сделать из среды восстановления, подробно в статье Как проверить целостность системных файлов Windows 10).

Дополнительные варианты решения проблемы
Если к текущему моменту никакие способы не помогают исправить ошибку, среди остающихся вариантов:
- Выполнить сброс Windows 10 (можно с сохранением данных). Если ошибка появляется после входа в систему, то сброс можно выполнить, нажав по кнопке питания, изображенной на экране блокировки, затем, удерживая Shift — Перезагрузка. Откроется меню среды восстановления, выберите «Поиск и устранение неисправностей» — «Вернуть компьютер в исходное состояние». Дополнительные варианты — Как сбросить Windows 10 или автоматическая переустановка ОС.
- Если проблема возникла после использования программ для очистки реестра или подобных, попробуйте восстановить реестр Windows 10.
При отсутствии решения могу рекомендовать лишь попробовать вспомнить, что предшествовало появлению ошибки, выявить закономерности и попробовать как-то отменить действия, которые привели к проблеме, а если это невозможно — выполнить установку системы повторно. Тут может помочь инструкция Установка Windows 10 с флешки.
If your Windows 10 computer suddenly goes into a blue screen, and it says you’re having a CRITICAL PROCESS DIED error, you’re not alone. But no need for you to worry about it, we’ve got your covered.
What is Critical Process Died?
Critical Process Died blue screen of death, with the error code 0x000000EF, means that a critical system process is your computer died. The process can be so critical that it could damage your hard disk, your memory or, even very rare, your processor. But no worries, we got you covered. Read on and locate the solutions to this problem.
If this is the very first time you have this problem, your computer will restart and it’ll be back to normal. But if you’ve seen this error message many times, you need to do something about your PC, since it indicates that a critical system process is at fault.
7 fixes for Critical Process Died
Here are 7 fixes for you to try to fix the Critical Process Died error. You may not have to try them all; just work your way down until you find the one works for you.
- What is Critical Process Died?
- 7 fixes for Critical Process Died
- 1. Run a virus scan
- 2. Update device drivers
- 3. Undo recent changes
- 4. Run SFC & DISM
- 4.1: Run SFC (System File Checker)
- 5: Update your BIOS or firmware
- 6: Check the crash logs
- Last Resort: Refresh or Reset your Windows
You’ll need to be logged into Windows on the problem computer to try any of these solutions. If you can’t log into Windows, power on and off your PC 3 times to perform a hard reboot and restart it in Safe Mode, then try these solutions.
1. Run a virus scan
The CRITICAL PROCESS DIED error could be caused by some spyware or malware. Even if they aren’t the dangerous kind, they could still cause the problem.
So before we go any deeper into solving this problem in other ways, you should scan your computer with a trusted antivirus program(s). If you find any malware-infected programs or files, uninstall and remove them completely.
2. Update device drivers
In most cases, buggy drivers could cause Critical Process Died blue screen of death error. You can try updating all the device drivers to the latest versions to fix it.
There are two ways you can get the right drivers for your video card and monitor: manually or automatically.
Manual driver update – You can update your device drivers manually by going to the manufacturer’s website for both all your devices, and searching for the most recent correct driver for each. Be sure to choose only drivers that are compatible with your variant of Windows 10.
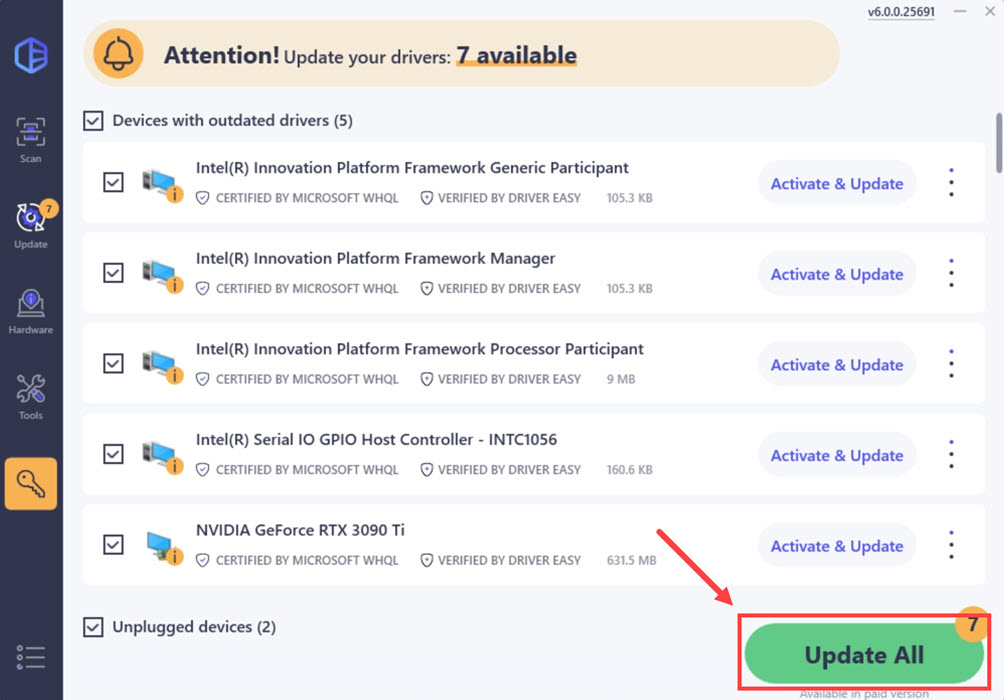
Automatic driver update – If you don’t have the time, patience or computer skills to update your device drivers manually, you can, instead, do it automatically with Driver Easy. Driver Easy will automatically recognize your system and find the correct drivers for your exact hardware devices, and your variant of Windows 10, and it will download and install them correctly.
You can update your drivers automatically with either the 7 days free trial or the Pro version of Driver Easy. It takes just 2 clicks, and you get full support and a 30-day money-back guarantee with the Pro version:
- Download and install Driver Easy.
- Run Driver Easy and click the Scan Now button. Driver Easy will then scan your computer and detect any problem drivers.

- Click the Activate & Update button next to the flagged device to automatically download and install the correct version of this driver.
Or click Update All to automatically download and install the correct version of all the drivers that are missing or out of date on your system (You’ll need the Pro version for this – when you select Update All, you’ll get a prompt to upgrade. If you’re not prepared to purchase the Pro version yet, Driver Easy provides a 7-day trial at no cost, granting access to all Pro features like fast downloads and easy installation. No charges will occur until after your 7-day trial period ends.)

- After updating, restart your computer to take effect.

If you need assistance, please contact Driver Easy’s support team at support@drivereasy.com.
3. Undo recent changes
Another big cause of Critical Process Died is faulty or buggy hardware or software programs installed. If you’ve recently installed some programs or hardware components, try upgrade them to the latest versions available or remove them completely from your PC.
4. Run SFC & DISM
If your hard drive or RAM is corrupted, a blue screen of death error such as Critical Process Died would pop up and force reboot your computer. This is your computer’s way of protecting itself from further damage. You can run two built-in checks to make sure that your disk and RAM are at a good state:
4.1: Run SFC (System File Checker)
1) On your keyboard, press the Windows logo key and R at the same time. Type cmd and press Ctrl+Shift+Enter at the same time to run Command Prompt as administrator.
Click Yes when prompted for permission to make changes to your device.
2) In the Command Prompt window, copy and paste the following command and hit Enter.
sfc /scannow
3) System File Checker will then scan all system files and repair any corrupted or missing ones it detected. This may take 3-5 minutes.
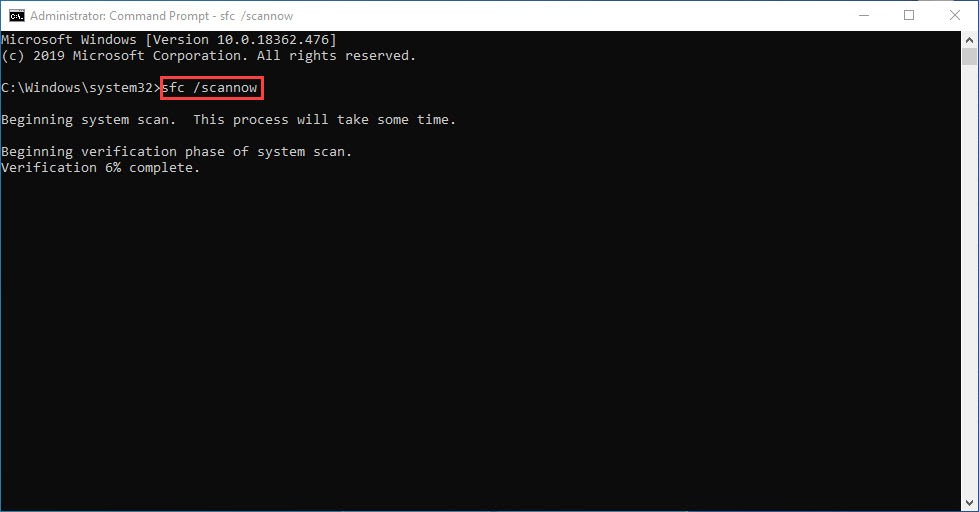
4) After the scan, see if the Critical Process Died blue screen problem still persists. If so, move on to the next test.
4.2: Run dism.exe
1) On your keyboard, press the Windows logo key and R at the same time. Type cmd and press Ctrl+Shift+Enter to run Command Prompt as administrator.
Click Yes when prompted for permission to make changes to your device.
2) In the Command Prompt window, copy and paste the following commands and hit Enter after each line:
dism.exe /online /cleanup-image /scanhealth
dism.exe /online /cleanup-image /restorehealth
2) When the process finishes:
- If the DISM tool gives you errors, you can always try this command line. This will take up to 2 hours.
dism /online /cleanup-image /startcomponentcleanup
- If you get Error: 0x800F081F, reboot your computer, then open Command Prompt as administrator again (step 1) and run this command line instead:
Dism.exe /Online /Cleanup-Image /AnalyzeComponentStore
When these tests are done, see if the Critical Process Died problem remains. If the problem still persists, please move on to the next fix.
5: Update your BIOS or firmware
If the above still doesn’t help to fix the Critical Process Died blue screen of death error on your computer, you may need to consider a BIOS and firmware update, as it could be a problem between your computer hardware and your Windows system. But you should always check your motherboard’s BIOS update release note to see if BSOD errors are mentioned.
If you’re up for a BIOS update, here’s a post on how you can do it manually: When & How to Safely Update BIOS [Quick Guide]
DO NOT attempt a BIOS update if you’re not 100% confident in knowing what you’re doing, as a faulty BIOS update could harm or even brick your computer.
6: Check the crash logs
If the Critical Process Died blue screen of death error still won’t go away, you can try to analyze the crash logs created by your computer when the blue screen happens: there are time stamps on the logs.
If you’re interested in knowing more about analyzing your crash logs files, please refer to method 4 in this post we have: View Crash Logs with Minidump Files
You should then find some error codes and/or error messages in your minidump files that might help to locate the culprit to the Critical Process Died blue screen of death error on your computer. The codes or messages you see might be unique in your case, so we don’t have more general fixes here to suggest. But if you do find such codes or error messages, you can always search them on our knowledge base here: https://www.drivereasy.com/knowledge/ for further troubleshooting tips.
Last Resort: Refresh or Reset your Windows
If you’ve tried all the above methods but still can’t solve your Critical Process Died problem, it’s time to refresh or reset your Windows 10.
If you need more help, go to the posts below for more detailed instructions: How to refresh or Reset Windows 10 Easily?
The Blue Screen of Death (BSOD) is a frustrating issue that can interrupt your work. While there are hundreds of BSOD error codes, one of the most common is CRITICAL_PROCESS_DIED.
Although BSODs happen less frequently in Windows 10 and 11 compared to older versions, they are still disruptive, often causing lost progress and unexpected system crashes. In this article on Outbyte we will give you a detailed guide how to fix the error.
Common Causes of Critical_Process_Died
The Critical_Process_Died error appears when Windows recognizes unauthorized changes to its core components or corrupted data and then stops the process to prevent more damage.
- Faulty Updates – Recent updates may cause issues.
- Corrupted System Files – Broken files can trigger this error.
- Incompatible Drivers – Outdated or bad drivers often cause errors.
This error can appear unexpectedly, even on new or well-maintained systems. If the cause isn’t clear, try multiple solutions from this guide. Test your system after each step to find what works.
Steps to Resolve Critical_Process_Died on Windows 10/11
If you’re stuck in a boot loop with a Blue Screen of Death, restart your computer in Safe Mode. Safe Mode runs Windows with minimal files, programs, and drivers, disabling extras to help troubleshoot issues. Running a scan with an Outbyte PC Repair tool can also help fix problems and prevent errors like Critical_Process_Died.
How to Boot into Safe Mode
If your computer is stuck in a “Critical Process Died” loop, booting into Safe Mode can isolate the problem. In Safe Mode, only essential processes run, making it easier to troubleshoot.
- Restart your PC and press F8 repeatedly during boot.
- Select Safe Mode with Networking from the options.
Fix #1: Use the Hardware and Device Troubleshooting Tool
Troubleshoot hardware problems with the native Windows troubleshooting utility. Not available any longer through the Settings menu, but quite easily reached through Command Prompt.
- Open the Command Prompt and type
msdt.exe -id DeviceDiagnostic, then press Enter. - Click Next in the next window, and Windows will look at your system for hardware issues.
- When it is done, it will pop up with a report with its conclusions.
Fix #2: Run the DISM Tool
If the issue continues, then Deployment Imaging and Servicing Management (DISM) will repair the damaged system image.
- Open the elevated Command Prompt. After that, execute the following command:
DISM /Online /Cleanup-Image /RestoreHealth. - This may take anywhere from 10 to 30 minutes; it’s all normal if the progress bar stuck at 20%.
- Once the scan completes, restart your computer.
Fix #3: Perform an SFC Scan
The System File Checker utility replaces corrupted or incorrectly changed system files.
- Run SFC from the elevated Command Prompt. In the Command Prompt window, type in
sfc /scannowand press Enter. - The scanning of problems will start and try to repair them automatically if found.
- After it finishes, check the results and restart your PC for applying changes.
Fix #4: Run a Full Malware Scan
Malware can damage critical system files, leading to this error. Use your antivirus or Windows Security to scan and remove threats.
Fix #5: Update Device Drivers
Outdated or incompatible drivers can interfere with system processes. To update drivers:
- Open Device Manager by pressing Windows + X.
- Locate devices with yellow warning icons, right-click, and select Update Driver.
Alternatively, use a reliable Outbyte Driver Updater tool to simplify the process.
In our Driver library you can find the most suitable System Drivers for your OS and a short guide on how to install it.
Read also about our popular Drivers:
NVIDIA GeForce GTX 1650 Driver
EPSON ET-2760 Series Driver
AMD Radeon RX 6600 driver: An Overview
NVIDIA GeForce RTX 3080 driver: Essential Information
Fix #6: Uninstall Recent Updates
If the error began after a recent update, use the following steps to roll it back: Go to Settings > Update & Security > View Update History. Click on Uninstall Updates and then remove the problematic update.
Fix #7: Perform a Clean Boot
A clean boot will help identify issues by starting your computer with minimal programs/drivers.
How to perform a clean boot:
- Open System Configuration from the Start menu.
- Under the Services tab, uncheck the box that says Hide all Microsoft Services, then click on Disable All.
- Click on the Startup tab and then click on Open Task Manager.
- In the Task Manager, beneath the Startup tab, disable all items.
- Now restart your computer.
The process below decreases active programs and services to isolate which the problem is coming from.
Fix #8: Perform a System Restore
A System Restore can revert your computer to a previous state when it worked correctly:
- In the search bar, type
Create a Restore Point, and press Enter. - Run System Restore then select your restore point and follow the wizard.
Fix #9: Reset Windows
When all else fails, a Windows reset offers a fresh start:
- Head to Settings > Update & Security > Recovery.
- Under Reset This PC, select Get Started.
- Select Keep My Files or Remove Everything, whichever works best.
People Also Ask
Read about common Windows BSOD Errors:
Blue Screen Error 0x0000185
PFN_LIST_CORRUPT error
UNEXPECTED KERNEL MODE TRAP Error
WHEA_UNCORRECTABLE_ERROR error
PAGE FAULT IN NONPAGED AREA Error
Blue Screen Error 0x0000185
Error Code 0xc0000001
FAQs
1. What is causing the Critical_Process_Died error in Windows 11?
The very common causes for this error are corrupted system files, bugs in drivers, or simply failing RAM.
2. Can I fix the error without reinstalling Windows?
You can try to use Safe Mode, the SFC tool, updating drivers, or System Restore before resorting to a reset.
3. Why does my computer continually stick on a loop in a Critical Process Died?
There is a problem with the hardware or software that requires advanced troubleshooting, which is the reason for continuously crashing of any critical system process.
4. How to Avoid This Error in the Future?
Keep your drivers up to date, regularly scan the system for issues, and do not install software from non-trusted sources.
5. Does Safe Mode fix this error permanently?
Safe Mode doesn’t fix the error but it diagnoses and locates the source of this error.
Whenever I try shutting down my HP Windows 10, I get Stop Code; the Critical Process died. I need to always force stop when it is 100% and then restart.
-Windows User

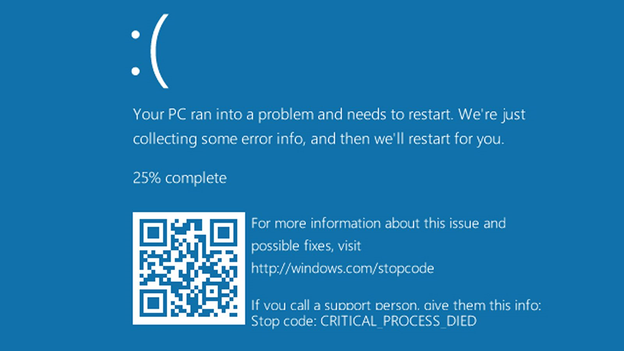
When a critical component of Windows can’t run properly, it may cause an error – “Critical Process DIED’ with a stop code 0x000000EF (See Image 1). This error appears with a blue screen, which may occur due to a faulty driver, malicious application/corrupt software or program installed on the system, and more. The critical process died Windows 10 error may cause the system stuck at a booting loop, even leading to a crash. It means eventually, you will end up losing the data stored on the PC. No need to worry. You can recover the lost data using a data recovery tool. Further, we share the most effective methods to help you get rid of the stop code Critical Process Died error.
Fix Critical Process Died Error
Every time you boot your system normally, this blue screen error may show up. Before troubleshooting the BSOD error, you need to boot Windows in Safe mode.
Boot Windows in Safe Mode
Follow these steps to boot Windows in Safe mode:
a. Use USB installation media to boot your system.
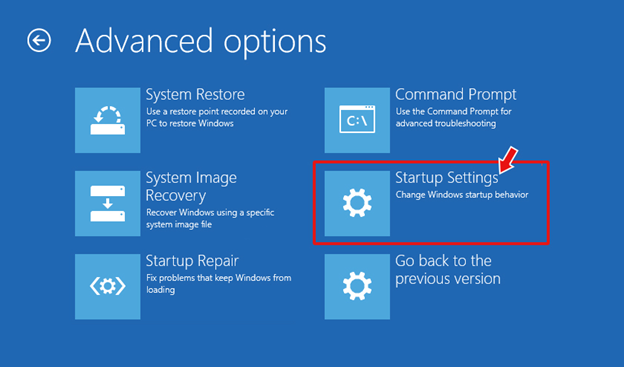
b. Click Repair your system computer and click Troubleshoot.
c. On the next prompt, click Advanced options. (See Image 2)
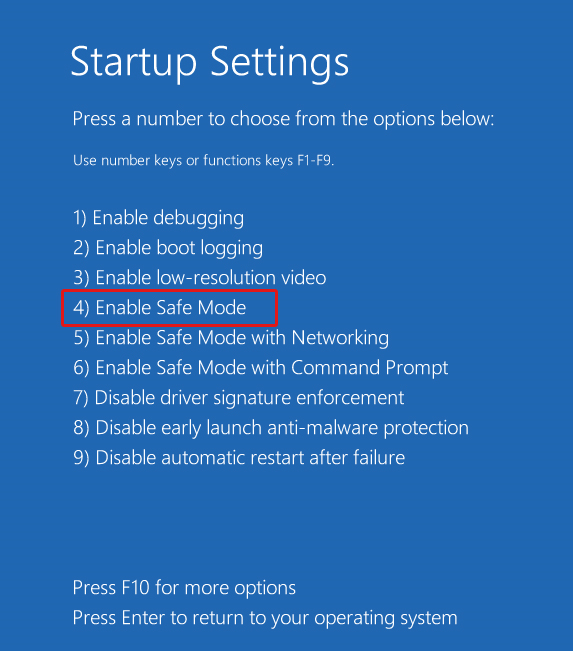
d. Then click Startup Setting. (See Image 3)
e. Click Restart and press F4 to enable the Safe Mode. (See Image 4)
f. Once you enter in Safe Mode, proceed with the given methods to fix Critical Process Died Error in Windows 10.
Method 1: Update System Drivers
In Safe Mode, try updating the driver using the following steps to fix the Critical Process Died Windows 10 error:
a. Press Windows + X and open Device Manager. (See Image 5)
Image 5: Open Device Manager
b. Check all the drivers. If any driver appears with a yellow exclamatory mark, the driver could be corrupt or faulty.
c. Follow the on-screen instructions to Update driver. (See Image 6)
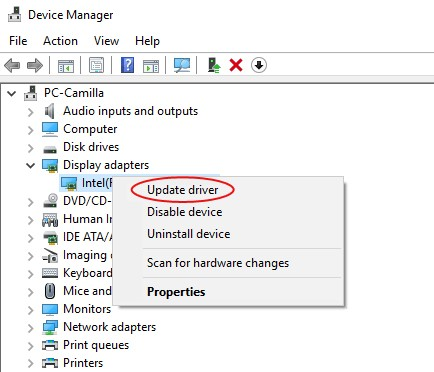
Image 6: Update Device Driver
d. Windows will Search automatically for updated driver software. (See Image 7)
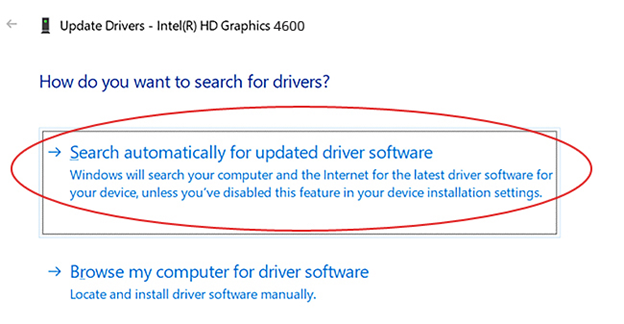
Image 7: Search automatically for updated driver software
e. If there is no updated driver available, uninstall the driver and then reinstall the compatible driver.
Method 2: Perform a Clean Boot
Corrupt system applications/software or programs may also cause the ‘critical process died’ error. You need to uninstall such applications following the given steps:
a. Open Run dialog box and type MSConfig to open System Configuration Utility. (See Image 8)
Image 8: Open System Configuration
b. Navigate to the Services tab, select Hide all Microsoft Services.
c. Click Disable all and proceed. (See Image 9)
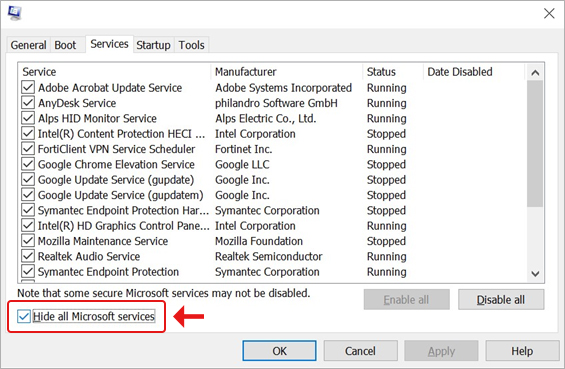
Image 9: Select ‘Hide all Microsoft services
d. Navigate to the Startup tab and click Open Task Manager. (See Image 10)
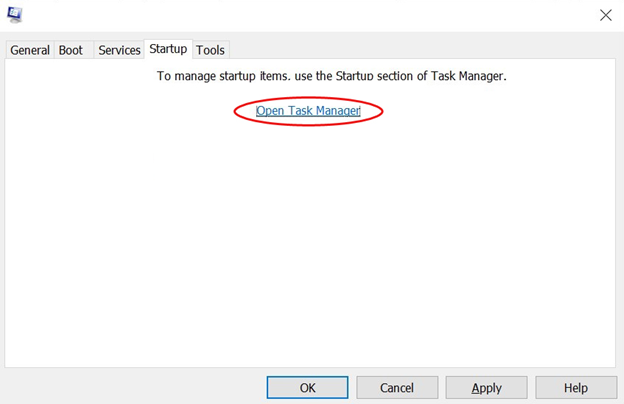
Image 10: Open Task Manager
e. Locate and select the faulty startup item from the screen, and click Disable. (See Image 11)
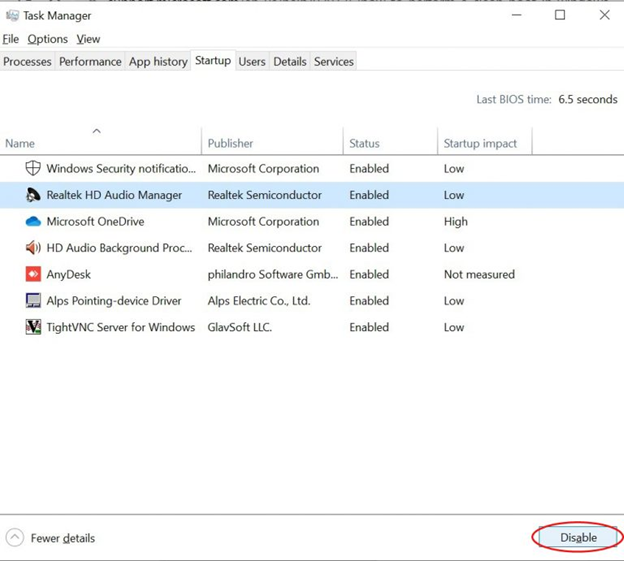
Image 11: Disable faulty startup item
f. Once done with the process, close the Task Manager, click OK and reboot the system in the clean boot environment.
g. Follow the on-screen instructions and uninstall the problematic app/program and then restart your system. These steps should clean boot Windows 10.
Method 3: Run SFC /Scannow Command
If you can’t boot your system due to this blue screen of death error, running SFC (System file checker) utility may help you scan and fix corrupt system files. Sometimes corrupt system files may also be the reason behind this error. Follow the given steps to use the system file checker:
a. Boot your system with a USB installer, created with Windows’ media creation tool, and change the BIOS setting and ensure to boot it from it.
b. When you reach into Automatic Repair setup, click Troubleshoot.
c. Follow Advanced Options > Command Prompt. (See Image 12)
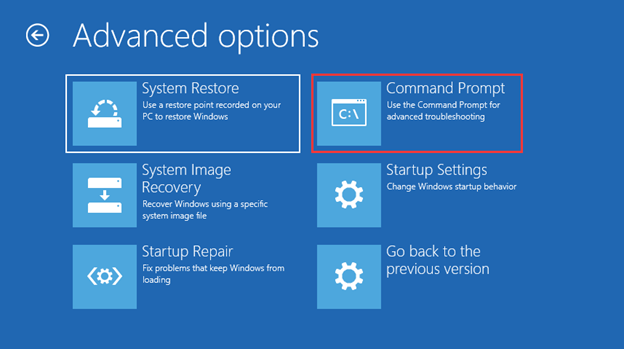
Image 12: Choose Command Prompt from Advanced option window
d. In the Command Prompt, type sfc /scannow and press Enter key. (See Image 13)
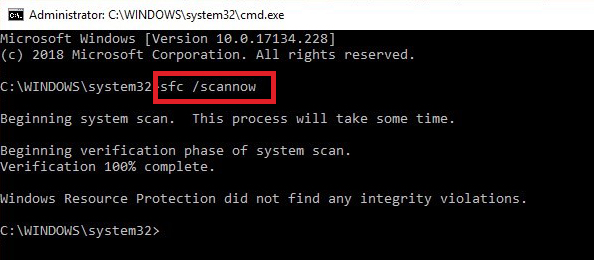
Image 13: Run SFC/Scannow Command
e. Wait until the system scan completes, and once it is done, close the Command Prompt and restart the system.
Method 4: Run DISM to Repair Corrupted System Image
If running the SFC command couldn’t fix the ‘Critical Process Died BSOD’ error in Windows 10, you may try fixing it with the help of DISM (Deployment Image Servicing and Management), as follows:
a. Open Command Prompt and click Run as administrator. Start typing the following commands separately:
Dism /Online /Cleanup-Image /CheckHealth
Dism /Online /Cleanup-Image /ScanHealth
Dism /Online /Cleanup-Image /RestoreHealth
(See Image 14)
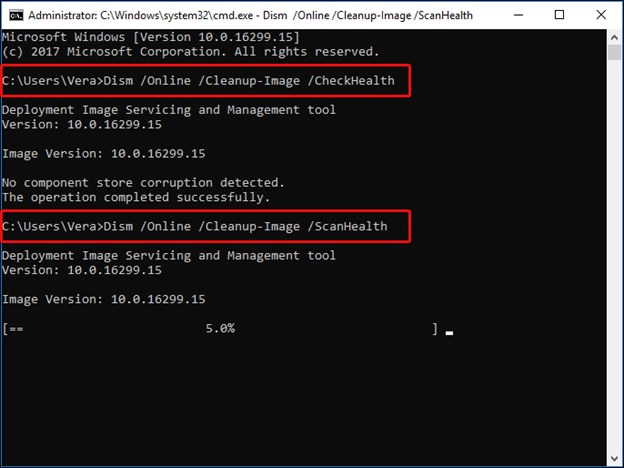
Image 14: Run DISM Command
Method 5: Uninstall Problematic Windows Update
If this ‘Critical Process Died BSOD’ error occurs after installing a specific Windows 10 update, try uninstalling it to get rid of the issue as follows:
a. Open Settings by pressing Windows + I and go to Update & Security.
b. Go to View update history.
c. Click Uninstall updates on the next prompt. (See Image 15)
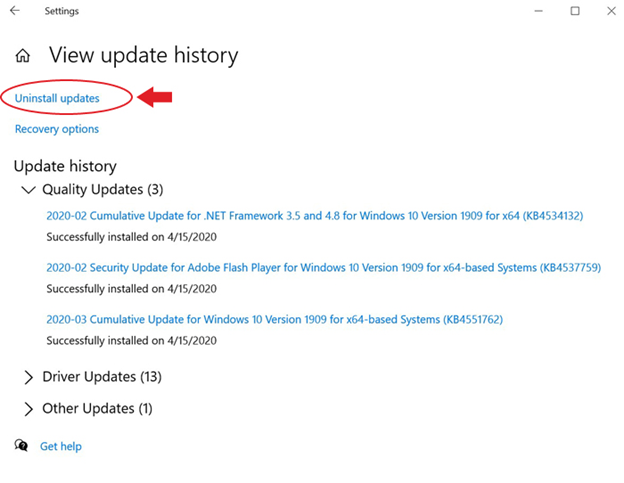
Image 15: Select Uninstall updates from View update history page
d. Find out the update you installed recently, which is causing the problem, right-click on it and click Uninstall. (See Image 16)
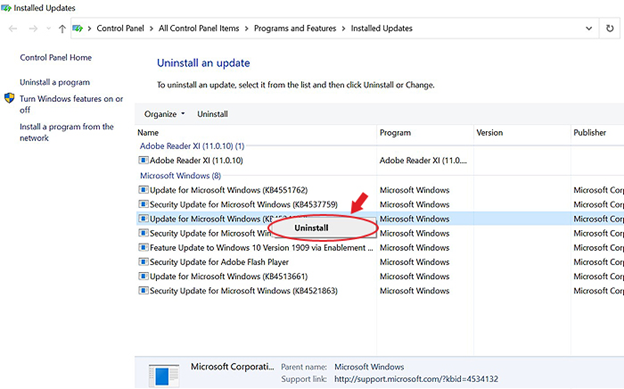
Image 16: Uninstall problematic Windows update
Method 6: Uninstall Third-Party Software
According to Microsoft support, the BSOD error might occur due to incompatibility of a recently installed third-party software such as an antivirus with the Windows device. In this situation, the error appears while using the device. You need to uninstall the software, after booting Windows in Safe mode, as follows:
- Press the Windows Start key, type Settings, and press Enter.
- Navigate to Apps > Apps & Features and sort the installed apps by Install Date.
- Select the third-party software you suspect as the cause of the ‘critical process died error’ in Windows.
- Uninstall the software and restart the system
Method 7: Rollback, Disable, or Uninstall Drivers
Like software, some third-party drivers installed on Windows 10 computers may also cause incompatibility issues and result in the stop code “critical process died”. So, you might need to identify such drives and then rollback, disable, or uninstall them, as follows:
Steps to rollback, disable, or uninstall third-party drivers
- Press the Windows Start key, type Device Manager, and press Enter.
- In Device Manager, expand the device for which you need to rollback, disable, or uninstall a driver.
- Right click the driver and click Properties.
- Select the Driver tab. Next, select Roll Back Driver & click Yes to rollback
- Or, you can click Disable Device or Uninstall Device for disabling or uninstalling the driver.
(See Image 17)
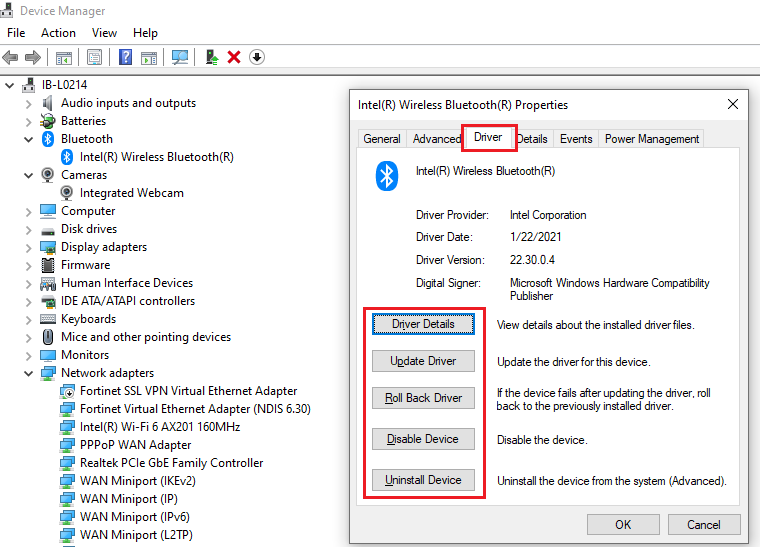
Image 17: Device Manager with options to rollback, disable, and uninstall a driver
Method 8: Run System Restore
Try performing System Restore to get rid of the error with the help of the following troubleshooting steps:
a. Use the USB installer to boot into your system. Click Repair your computer and follow Advanced options > Automatic Repair environment. (See Image 18)
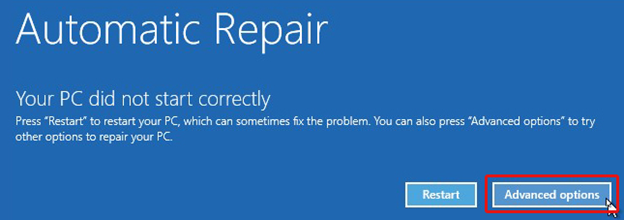
Image 18: Click Advanced option on Automatic Repair
b. Go to Troubleshoot > Advanced options.
c. On the next prompt, click System Restore. (See Image 19)
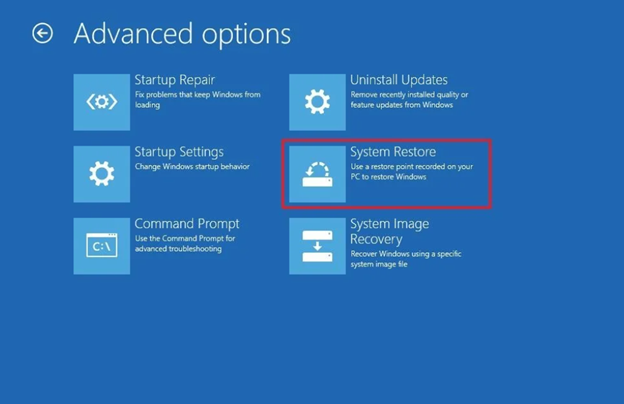
Image 19: Select System Restore
d. Click Next > Scan for affected programs.
e. On the creation of restore points, the applications will no longer be available. (See Image 20)
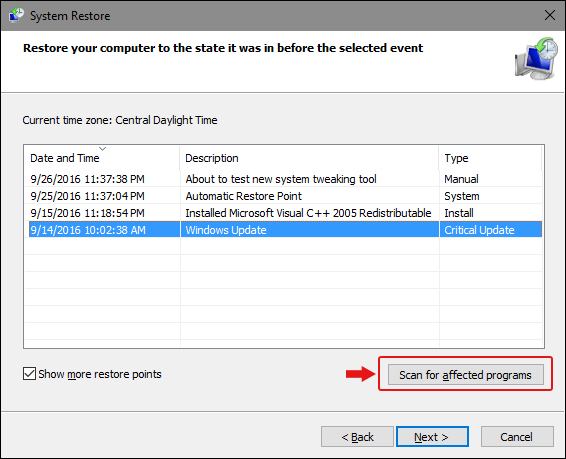
Image 20: Scan for affected programs
f. Then click Next and click Finish on the next prompt. Find if the PC is free from the error. (See Image 21)
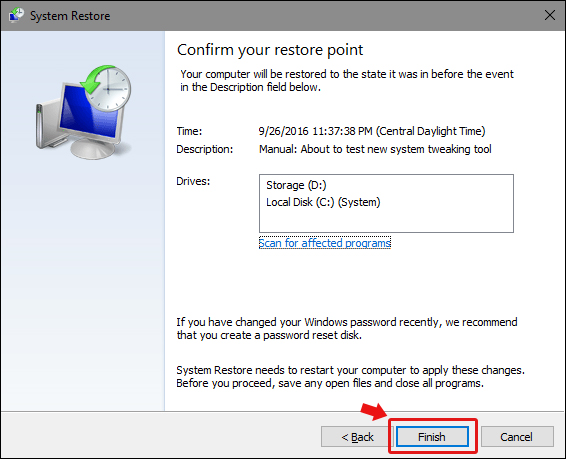
Image 21: Finish the process of system restore
Note: This method may cause data loss as it cleans up the entire system and wipes out the data stored on the system.
Therefore, it is advised to use an effective data recovery tool such as Stellar Data Recovery Professional. This DIY, easy-to-use software scans the formatted, corrupted or even crashed PC, extracts the data from it and lets you save the recovered files, folders, documents, photos and more. Not only you can recover data from Windows PCs, but also can get back your data from formatted, corrupted or even encrypted drives such as HDDs, SSD, SD, USB, and optical media as well. The tool can efficiently restore data from BSOD-affected systems. It features a ‘create recovery drive’ utility, which enables users to create a bootable media drive. Users may connect the bootable media drive to the unbootable system and retrieve the data effectively.
Method 9: Reset the PC
You can reset the PC to fix the error by removing software, programs, settings, apps, and drivers causing the error. However, you may select the files you want to keep while resetting the system. Follow the given steps:
a. Open Settings and go to Update & Security.
b. On the next prompt, click Recovery. (See Image 22)
Image 22: Click Recovery from Settings
c. Click Get Started under Reset this PC. (See Image 22)
Image 23: Get started with resetting the PC
d. Select Keep my files to save your data. (See Image 24)
Image 24: Select keep my files
e. However, it is recommended to choose ‘Remove everything’ for getting rid of faulty programs, drivers, apps, driver, etc. and cleaning up the entire PC.
f. Select ‘just remove my files’ and click Next. (See Image 25)

Image 25: Select just remove your files
g. Click Next on the warning message screen.
h. Click Reset and proceed. (See image 26)
Image 26: Click Reset to start the process
i. Click Continue on the next prompt and wait until the process is finished. (See Image 27)
Image 27: Click Continue
Method 10: Reinstall Windows 10
If all of the above methods fail to fix the ‘Critical Process Died Error’, you are left with nothing else but reinstalling Windows 10. While reinstalling Windows, you will end up losing the data stored on the system as the process will format the drives and will create new partitions in the PC.
Hence, if you have already recovered data using professional data recovery software such as Stellar Data Recovery Professional, you may reinstall the Windows without worrying about data loss.
Conclusion
No matter what the actual cause for ‘Critical Process Died’ error is, this blue screen of death error may cause your system to remain stuck at booting loop or even complete crash. The fixes mentioned in this post can help you get rid of the error. Though, if you don’t want to lose your important data, recover it with a data recovery tool such as Stellar Data Recovery Professional. This software can efficiently extract the data from BSOD-affected Windows PCs and storage devices.
Was this article helpful?
YES9
NO