
Applies ToWindows 11 Windows 10
Поддержка Windows 10 прекратится в октябре 2025 г.
После 14 октября 2025 г. корпорация Майкрософт больше не будет предоставлять бесплатные обновления программного обеспечения из Центра обновления Windows, техническую помощь и исправления безопасности для Windows 10. Ваш компьютер по-прежнему будет работать, но мы рекомендуем перейти на Windows 11.
Подробнее
Виртуализация позволяет устройству Windows эмулировать другую операционную систему, например Android или Linux. Включение виртуализации дает доступ к более крупной библиотеке приложений для использования и установки на устройстве. Если вы обновили устройство с Windows 10 до Windows 11, эти действия помогут включить виртуализацию.
Примечание: На многих устройствах Windows уже включена виртуализация, поэтому вам может не потребоваться выполнять эти действия.
Прежде чем приступить к работе, определите модель устройства и производителя. Эти сведения потребуются позже в процессе.
Перед началом работы рекомендуется открыть эту страницу на другом устройстве. Вот как получить UEFI из Windows:
-
В приложении «Настройки» на устройстве с Windows, выберите Восстановление системных > или используйте следующий ярлык:
Выздоровление
Примечание: В Windows 10 вы можете получить доступ к обновлению & Безопасность > Восстановление
-
В разделе Параметры восстановления рядом с пунктом Расширенный запуск выберите Перезапустить сейчас.
-
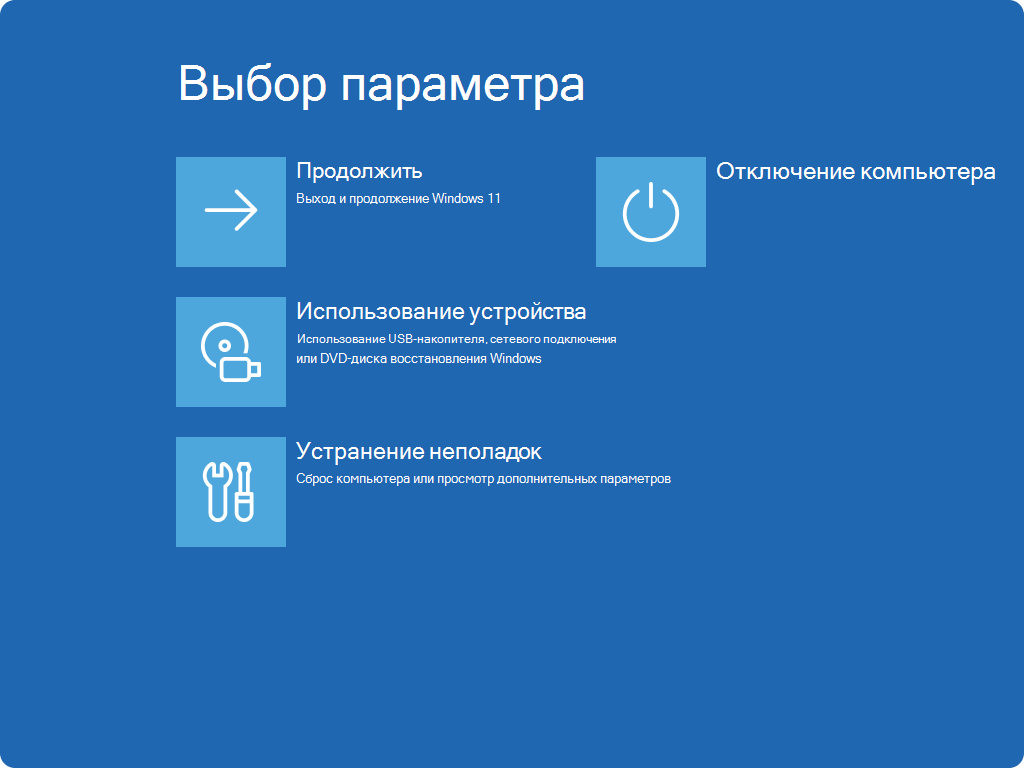
Компьютер перезагрузится в среде восстановления Windows. Выберите Устранение неполадок > Дополнительные параметры > параметры UEFI > перезапуск

-
Компьютер перезагрузится снова, и вы будете использовать служебную программу UEFI. На этом шаге на компьютере может появиться UEFI, который называется BIOS.
Примечание: Эти инструкции могут применяться, если вы обновили компьютер с Windows 10 до Windows 11.
-
Нажмите кнопку Пуск , введите компоненты Windows и выберите Включить или отключить компоненты Windows в списке результатов.
-
В открывшемся окне Компоненты Windows найдите платформу виртуальных машин и выберите ее.
-
Нажмите кнопку ОК. Возможно, потребуется перезагрузить компьютер
Нужна дополнительная помощь?
Нужны дополнительные параметры?
Изучите преимущества подписки, просмотрите учебные курсы, узнайте, как защитить свое устройство и т. д.
How to Enable Virtual Machine Platform in Windows 10
Enabling the Virtual Machine Platform in Windows 10 is a straightforward process that involves accessing the Windows Features menu and activating the required option. You can complete this task in just a few steps, which will allow you to run virtual machines and use hypervisors on your system. This guide will walk you through the entire process so you can get started with virtualization right away.
In this section, we’ll cover the steps needed to enable the Virtual Machine Platform on your Windows 10 computer. This platform is essential for running virtual machines efficiently.
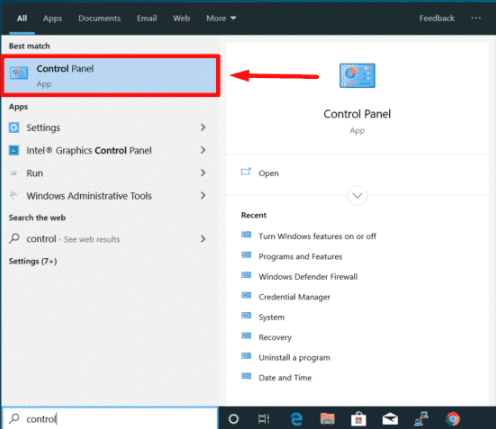
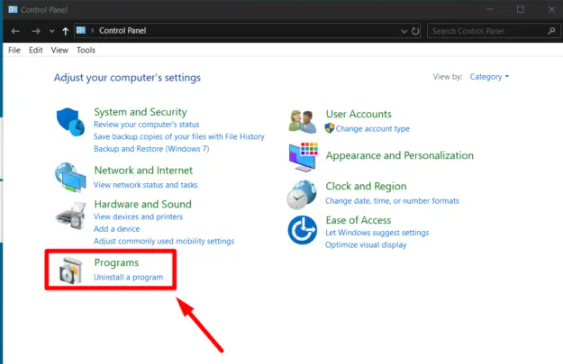
Step 1: Open Control Panel
First, open the Control Panel by searching for it in the Start Menu.
When you open the Start Menu and type «Control Panel,» you should see it pop up as one of the first options. Click on it to proceed.
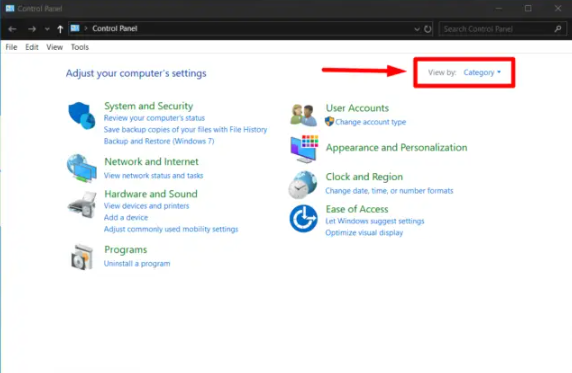
Step 2: Navigate to Programs
Next, navigate to the «Programs» section within the Control Panel.
In the Control Panel window, you’ll see a category labeled «Programs.» Click on this to access the next set of options.
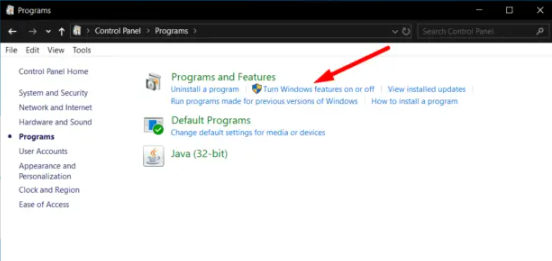
Step 3: Access Windows Features
Access the Windows Features menu by clicking on «Turn Windows features on or off.»
Within the Programs section, you’ll find an option that says «Turn Windows features on or off.» Clicking this will open a new window with a list of features.
Step 4: Enable Virtual Machine Platform
In the Windows Features window, scroll down and check the box next to «Virtual Machine Platform.»
Find «Virtual Machine Platform» in the list and click the checkbox next to it. This enables the feature.
Step 5: Restart Your Computer
Finally, click «OK» and restart your computer to apply the changes.
After enabling the Virtual Machine Platform, you’ll need to restart your system for the changes to take effect. Save any work before doing this.
After completing these steps, your Windows 10 PC will support virtual machines. You’ll be able to run virtualization software and create virtual environments with ease.
Tips for How to Enable Virtual Machine Platform in Windows 10
- Make sure your system meets the hardware requirements for virtualization.
- Keep your Windows 10 updated to ensure compatibility with the Virtual Machine Platform.
- You may also need to enable virtualization in your BIOS settings.
- Check for additional virtualization tools that might be beneficial for your specific needs.
- Ensure your antivirus software is compatible with virtualization features.
Frequently Asked Questions
What is the Virtual Machine Platform?
The Virtual Machine Platform is a feature that allows you to run virtual machines and use hypervisors on your Windows 10 system.
Do I need to enable virtualization in BIOS?
Yes, you may need to enable virtualization technology in your BIOS settings for the Virtual Machine Platform to work.
Can I use this feature on any version of Windows 10?
No, the Virtual Machine Platform is available in specific editions of Windows 10, such as Pro and Enterprise.
What if I can’t find the Virtual Machine Platform option?
Ensure your Windows is up to date and that your hardware supports virtualization.
Will enabling this feature affect my computer’s performance?
Enabling the Virtual Machine Platform should not significantly impact your computer’s performance. However, running multiple virtual machines may require more resources.
Summary
- Open Control Panel.
- Navigate to Programs.
- Access Windows Features.
- Enable Virtual Machine Platform.
- Restart Your Computer.
Conclusion
Enabling the Virtual Machine Platform on Windows 10 is a simple yet powerful step to dive into the world of virtualization. Whether you’re a developer testing different environments or a tech enthusiast experimenting with new systems, this feature provides the foundation you need. Remember to check your system’s requirements and update your software to avoid any hiccups along the way.
If you found this guide helpful, feel free to explore more about virtualization and how it can benefit your computing needs. Whether you’re managing complex workflows or just curious about new technology, enabling the Virtual Machine Platform is a gateway to numerous possibilities. Happy virtualizing!
Matthew Burleigh is the head writer at solveyourtech.com, where he covers topics like the iPhone, Microsoft Office, and Google apps. He has a Bachelor’s and Master’s degree in Computer Science and has over 15 years of IT experience.
He has been writing online since 2008 and has published thousands of articles that have been read millions of times.
You can read his full bio here.
Платформа виртуальной машины — данный компонент необходим для корректной работы Windows Sandbox (песочница).
Разбираемся
- Windows 10, а точнее версия 1903 и выше получила встроенную песочницу Sandbox. Необходима для создания изолированного окружения рабочего стола для безопасного запуска программ. Простыми словами — чтобы программы, если они опасные, например имеют вшитый вирусный код — не смогли навредить системе, они будут работать в изолированном пространстве (песочница).
- Данный компонент необходим для нормальной работы виртуализации Hyper-V.
- Еще компонент нужно включать, если планируете использовать VMware, VirtualBox, Hyper-V, WSL. Дополнительно необходимо активировать Hyper-V и Платформа низкоуровневой оболочки Windows.

На русском компонент называется Песочница Windows:

Надеюсь данная информация оказалась полезной. Удачи.
На главную!
10.09.2021
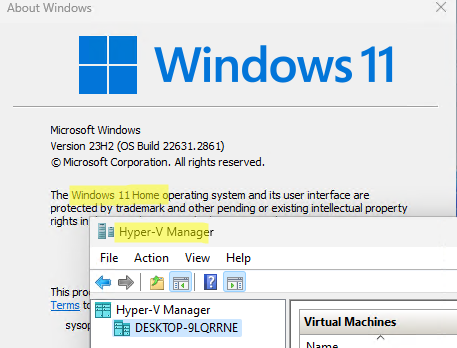
Платформа виртуализации Hyper-V доступна не только в Windows Server, но и в десктопных редакциях Windows 10 и 11. С помощью встроенного гипервизора Hyper-V пользователи могут создавать и запускать виртуальные машины. В этой статье мы рассмотрим, как включить компоненты Hyper-V в Windows 10 и 11.
Компоненты роли виртуализации Hyper-V можно установить в Pro и Enterprise редакциях Windows 10 и 11. Сначала, нужно проверить, поддерживает ли ваш компьютер виртуализацию Hyper-V. Откройте командную строку с правами администратор и выполните:
systeminfo
Промотайте в конец вывода и проверьте, что включены следующие компоненты в разделе Hyper-V Requirements:
VM Monitor Mode Extensions: Yes
Virtualization Enabled In Firmware: Yes
Second Level Address Translation: Yes
Data Execution Prevention Available: Yes

Если здесь указано Virtualization Enabled in Firmware: No, попробуйте включить аппаратную поддержку виртуализации в настройках BIOS/UEFI компьютера (может называться Intel VT-X или AMD-V).
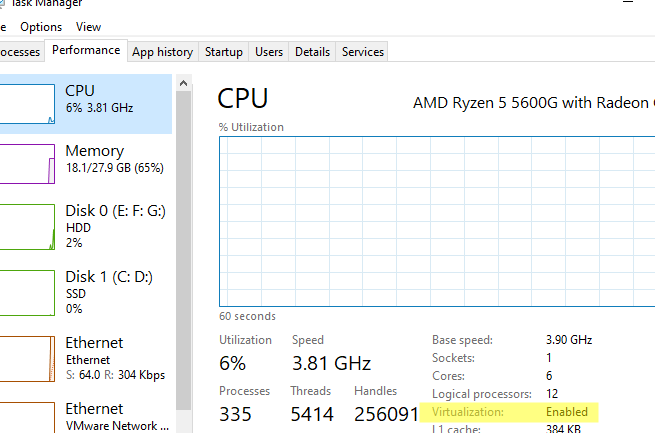
Также проверить совместимость вашего процессора можно на вкладке CPU в диспетчере задач Windows. Здесь должно быть указано
Virtualization: Enabled
.
Если тут указано
A hypervisor has been detected. Features required for Hyper-V will not be displayed
, значит компоненты Hyper-V уже установлены.
Включить роль Hyper-V в Windows 10 и 11 можно через панель управления компонентами Windows Features. Выполните команду
optionalfeatures
и выберите для установки компоненты Hyper-V Platform и Management Tools.
Также вы можете включить компоненты Hyper-V в Windows из командной строки. С помощью PowerShell команды:
Enable-WindowsOptionalFeature -Online -FeatureName Microsoft-Hyper-V -All
Или с помощью DISM:
dism.exe /Online /Enable-Feature:Microsoft-Hyper-V-All

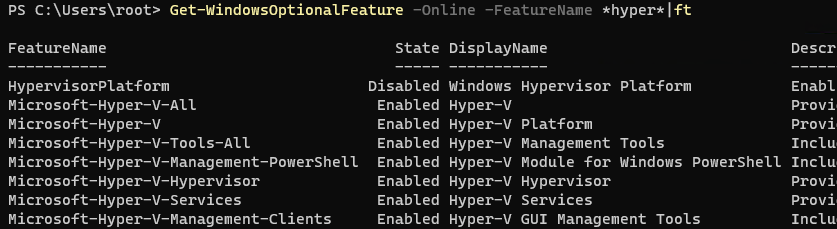
После завершения установки компонентов перезагрузите компьютер. Проверьте, что компоненты гипервизора установлены:
Get-WindowsOptionalFeature -Online -FeatureName *hyper*|ft
Включите автоматический запуск Hyper-V при загрузке:
bcdedit /set HypervisorLaunchType auto
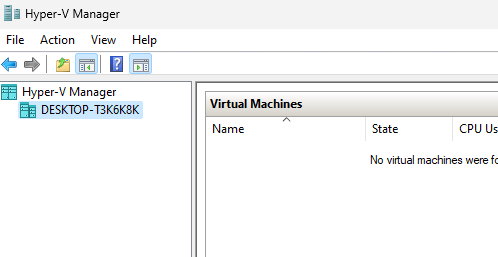
Для управления Hyper-V и виртуальными машинами используется графическая консоль Hyper-V Manager (
virtmgmt.msc
). Запустите ее и можете начать создавать виртуальные машины.
Также для управления гипервизором и ВМ можно использовать командлеты PowerShell из встроенного модуля Hyper-V.
Компонент виртуализации Hyper-V отсутствует в домашних (Home) редакциях Windows 10 и 11. Однако есть небольшой трюк, который позволяет установить роль Hyper-V из зранилища компонентов WinSxS даже в Home редакции Windows.
Создайте на рабочем столе файл enable-hyperv.bat с кодом
pushd "%~dp0"
dir /b %SystemRoot%\servicing\Packages\*Hyper-V*.mum >hyper-v.txt
for /f %%i in ('findstr /i . hyper-v.txt 2^>nul') do dism /online /norestart /add-package:"%SystemRoot%\servicing\Packages\%%i"
del hyper-v.txt
 Dism /online /enable-feature /featurename:Microsoft-Hyper-V -All /LimitAccess /ALL
pause
Запустите BAT файл с правами администратора.
После завершения установки компонентов, перезагрузите компьютер. Проверьте, что виртуализация Hyper-V теперь доступна в вашей Home редакции Windows.
indows 10 provides several features but we have collected few top features which make Windows 10 Unique and the awesome features are Cortana Integration, Universal Apps, Virtual Desktops, Microsoft Edge Web Browser & New Start Menu etc. The purpose behind writing this blog is highlighting one of the most important in-built features of Windows 10 and that is Virtual Machine Platform Windows 10.
As we have earlier mentioned that it’s an inbuilt feature of Windows 10 but it is not enabled by default we need to enable it manually. So we will also explain how to enable Virtual Machine Platform Windows 10. Whenever we talk about Virtual Machine Platform, we cannot forget Hyper- V. Keep reading this blog will explain everything about Virtual Machine Platform Windows feature & Hyper-V as well.
What is Virtual Machine Platform & Hyper-V and its uses?
Virtual Machine Platform is a copy of a system that is built virtually on a computer. It is used to make MSIX Application Packages for MSI or an App-V whereas Hyper-V (Microsoft’s Hypervisor) allows you to run full versions of other OS from Linux & Microsoft in your current machine. VM Platform is less powerful potent version of Hyper-V that still facilitates a hypervisor.
What is the need for Virtualization on Windows 10?
Virtualization on Windows 10 is the most effective and awesome feature to run multiple operating systems on a single machine.
How to Enable Virtual Machine Platform Windows 10 (workable steps)
In order to enable the Virtual Machine Platform Windows feature follow the below mention guidelines:
- Navigate to Start Menu & open Control Panel
- Then change the Control Panel view to Category
- Tap on Programs
- In the Programs & Features option, you will get “Turn Windows Features on or off” tap on it
- A Windows Features dialog box will be prompted
- From the appeared list locate Virtual Machine Platform and enable Tap on OK
- After that Windows will search the required files & apply the necessary modifications
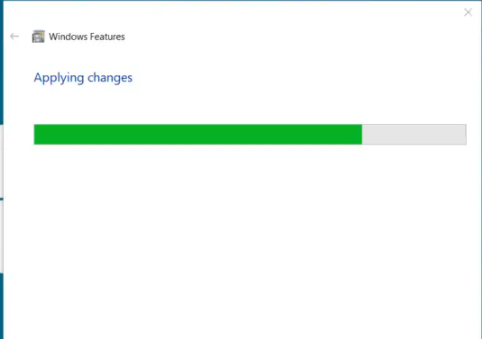
- Now you need to restart your computer to apply the changes
- Congratulations you have successfully enabled Virtual Machine Platform on Windows 10
Closure!!
That’s all about how to Virtual Machine Platform on Windows 10. I’m damn sure that you have successfully enabled the Virtual Machine Platform Windows feature.
Apart from this do write us on our Facebook & Twitter Page, if you have any further queries or concerns regarding this post. Thanks for Reading. Have a great day.