
Если вы удалили или заменили один, или несколько системных шрифтов в Windows, вы можете воспользоваться восстановления стандартных шрифтов и их настроек. Если в системных (и не только) диалоговых окнах вместо нормальных символов отображаются что-то непонятное или вообще нечитаемые символы (в нашем примере, это иероглифы и квадратики), скорее всего в Windows отсутствуют какие-то файлы системных шрифтов. Такая проблема может возникнуть после деинсталляции стороннего приложения, которое при удалении вместе с собой удалило несколько файлов системных шрифтов (вплоть до полной очистки каталога со шрифтами C:\Windows\Fonts). Также проблема с шрифтами может встречаться, когда некая программа при установке заменила один из стандартных шрифтов своим собственным файлов.
В этой статье мы разберем методику, позволяющую восстановить стандартные системные шрифты Windows 10 или Windows 11 к состоянию чистой системы.

Содержание:
- Встроенное средство восстановления шрифтов Windows
- Как извлечь файлы стандартных системных шрифтов из установочного образа Windows 10 или 11?
- Сброс кэша шрифтов Windows
- Готовые архивы со стандартными шрифтами для Windows 10, 11 и 8.1
Встроенное средство восстановления шрифтов Windows
В первую очередь стоит попробовать восстановить стандартные шрифты Windows 10/8.1 с помощью встроенного функционала. Для этого:
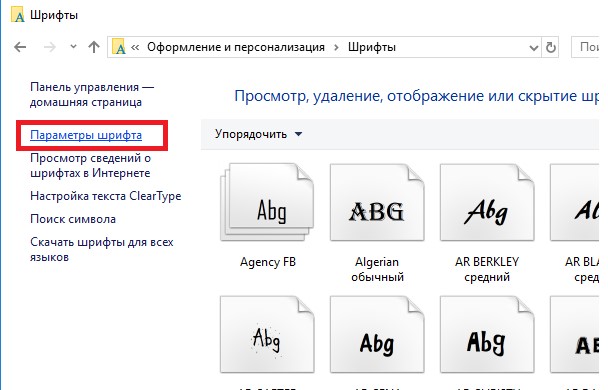
- Откройте Панель управления и перейдите в раздел Оформление и персонализация –> Шрифты (Control Panel -> Appearance and Personalization -> Fonts). Эту панель можно открыть, выполнив команду:
control fonts
; - В левой панели выберите пункт Параметры шрифта (Font settings);

- В открывшемся окне нажмите кнопку Восстановить параметры шрифтов по умолчанию (Restore default font settings);

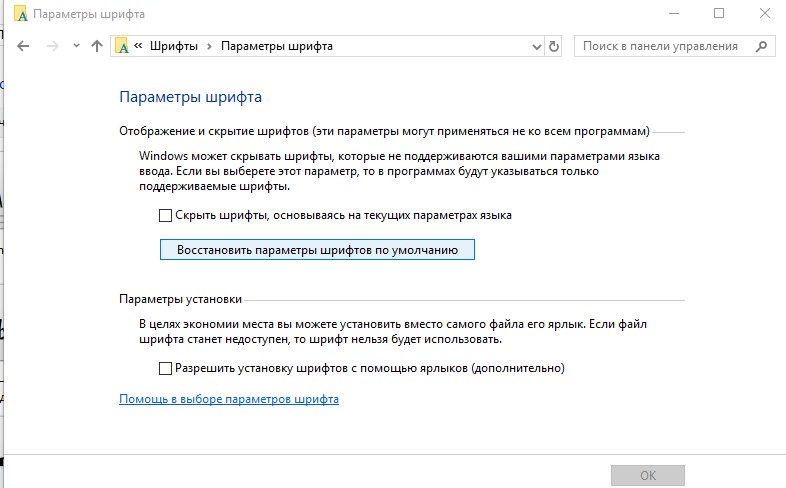
Данная опция позволяет удалить все сторонние шрифты, оставив только стандартные шрифты, поставляемые в дистрибутиве Windows. Однако, если файл нужного шрифта (*.fon или *.ttf) был удален или заменен, функция сброса не поможет.
В современных версиях Windows для отображения системного интерфейса по умолчанию используется шрифт Segoe UI. Убедитесь, что он есть в списке шрифтов в панели управления.
Чтобы вернуть нужный шрифт можно скопировать нужный файл из дистрибутива Windows (или с другого компьютера), скачав и установив файл шрифта вручную или через GPO (обратите внимание, что в Windows 10 есть функция блокировки установки сторонних шрифтов, которая может мешать установке новых шрифтов).
Совет. Установка большого количества шрифтов в Windows может привести к проблемам с производительностью системы и некоторых приложений (как правило, связанных с графикой и версткой).
Как извлечь файлы стандартных системных шрифтов из установочного образа Windows 10 или 11?
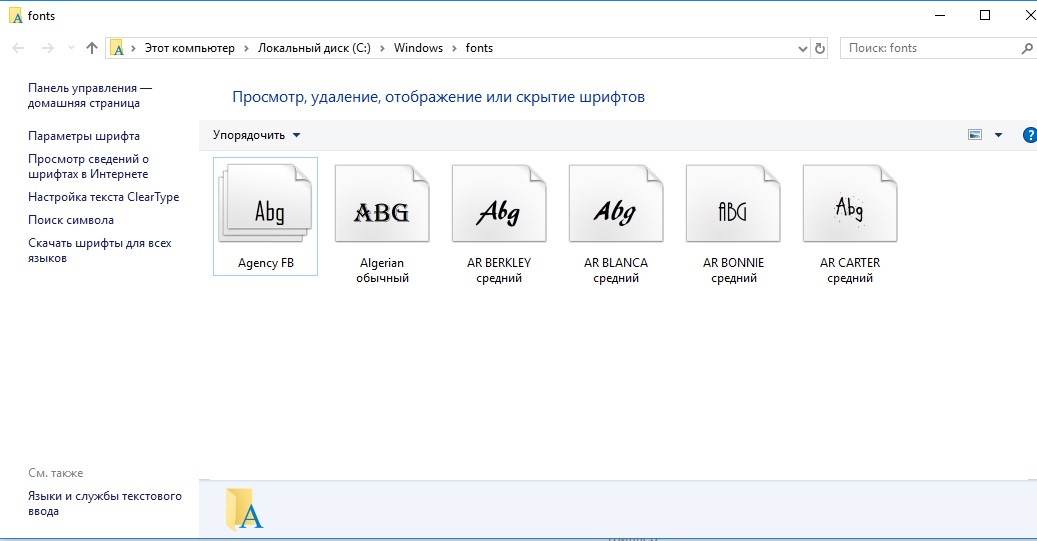
В Windows файлы шрифтов хранятся в каталоге C:\Windows\fonts. Попробуйте открыть ее в Проводнике File Explorer. Если в этом каталоге вы увидите только несколько файлов шрифтов с расширениями *.fon и *.ttf, значит, стандартные файлы шрифтов были удалены и их сброс встроенными средствами (как описано выше) не поможет.
Недостающие файлы шрифтов можно скопировать с любого компьютера с той же версией ОС, либо извлечь их из установочного диска или ISO/WIM образа Windows 10 (11). Рассмотрим второй случай.
Для этого нам понадобится установочный диск с Windows 10. Проще всего создать установочный ISO образ Windows с помощью утилиты Media CreationTool. Смонтируйте ISO образ в виртуальный привод (допустим, ему назначена буква диска H:).
Откройте командную строку PowerShell с административными правами и скопируйте файл H:\sources\install.wim или H:\sources\install.esd (подробнее про esd формат образа здесь) в каталог C:\Distr\.
Copy-Item D:\sources\install.wim C:\Distr\
Совет. Если в вашем дистрибутиве Windows есть только файл install.esd (подробнее про esd формат образа здесь), вы можете переконвертировать ESD файл в формат WIM с помощью команды:
dism /export-image /SourceImageFile:c:\distr\install.esd /SourceIndex:4 /DestinationImageFile: c:\distr\install.wim /Compress:max /CheckIntegrity
Смонтируйте файл установочного образа Windows 10 install.wim в каталог C:\Distr\wim:
dism /mount-wim /wimfile:C:\Distr\install.wim /index:1 /mountdir:C:\Distr\wim

Совет. Если команда DISM возвращает ошибку Error: 0xc1510111: You do not have permissions to mount and modify this image (
Ошибка: 0xc1510111: Отсутствуют разрешения на подключение и изменение образа
), проверьте, что в свойствах файла install.wim не установлен атрибут Read-Only.
Скопируйте оригинальные файлы шрифтов из каталога C:\Distr\wim\Windows\Fonts в системную папку C:\Windows\Fonts с заменой файлов в целевом каталоге. Воспользуйтесь такой командой PowerShell:
Copy-Item -path C:\Distr\wim\Windows\Fonts -Destination C:\Windows -recurse –container -force
Файлы шрифтов будут заменены оригинальными. Часть системных шрифтов, которые используются в текущий момент, заменить не удастся, об этом будет свидетельствовать ряд ошибок в окне консоли.
Теперь можно отключить WIM образ:
dism /unmount-wim /mountdir:C:\Distr\wim /discard
Перезагрузите компьютер и проверьте, исчезла ли проблема со шрифтами.
Сброс кэша шрифтов Windows
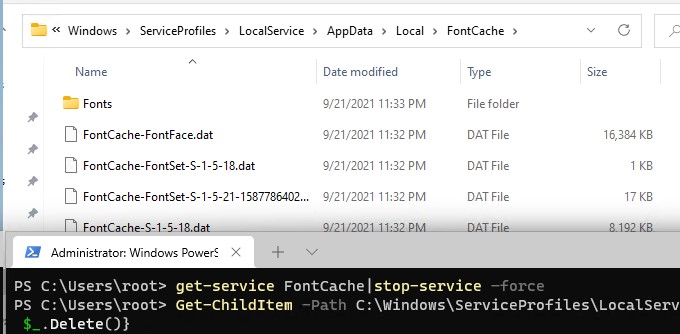
В Windows по-умолчанию включено кэширование шрифтов в каталоге
%WinDir%\ServiceProfiles\LocalService\AppData\Local\FontCache
(по аналогии с кэшем иконок). Это позволяет ускорить загрузку шрифтов в диалоговых окнах и приложения. Если кэш шрифтов поврежден, это также может вызвать проблемы с отображением шрифтов в Windows. Рекомендуем вручную сбросить текущий кэш шрифтов Windows.
Для этого нужно:
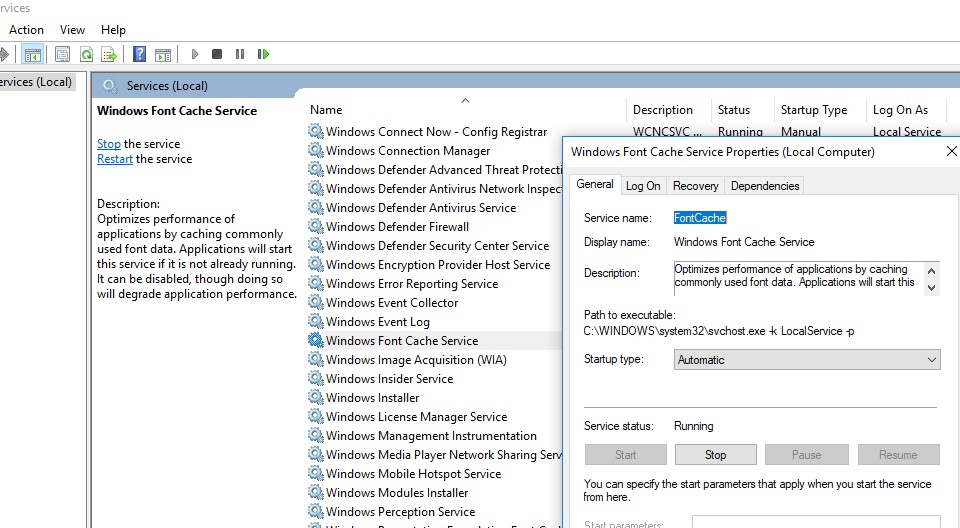
- Запустите консоль управления службами (
services.msc
); - Остановите службу Служба кэша шрифтов Windows (Windows Font Cache Service) в консоли или с помощью команды PowerShell:
get-service FontCache|stop-service –force
- Очистите каталог %WinDir%\ServiceProfiles\LocalService\AppData\Local\FontCache:
Get-ChildItem -Path C:\Windows\ServiceProfiles\LocalService\AppData\Local\FontCache -File | foreach { $_.Delete()}; - Удалите файл C:\Windows\System32\FNTCACHE.DAT: C:\Windows\System32\FNTCACHE.DAT:
Remove-Item c:\Windows\System32\FNTCACHE.DAT

- Запустите службу FontCache и перезагрузите компьютер.
Готовые архивы со стандартными шрифтами для Windows 10, 11 и 8.1
Для тех, у кого под рукой нет дистрибутива Windows 10 (Windows 11 b Windows 8.1), можно скопировать каталог с оригинальными шрифтами с другого компьютера с той же версий ОС, либо воспользоваться готовыми архивами со шрифтами. Вы можете скачать архивы по ссылкам ниже:
- Оригинальные шрифты для Windows 8.1 — OrigFontsWin8-1.zip (263 Мб);
- Оригинальные шрифты для Windows 10 21H1 (подойдет и для других билдов Windows 10) —OrigFonts-win10-21h1.zip (189 Мб)
- Оригинальные шрифты для Windows 11 — OrigFonts-win11.zip (190 Мб)
Скачайте и распакуйте архив для вашей версии Windows. Скопируйте содержимое архива в каталог C:\Windows\Fonts с заменой файлов.
Затем скачайте и примените reg файлы со стандартными настройками шрифтов в реестре для вашей версии Windows:
- Windows 10 — win10-default-fonts-reg.zip
- Windows 11 — win11-default-fonts-reg.zip
Каждый архив содержит три файла:
- win_10_fonts.reg содержит список стандартных шрифтов, зарегистрированных в реестре (HKLM\SOFTWARE\Microsoft\Windows NT\CurrentVersion\Fonts);
- win_10_FontSubstitutes.reg файл с настройками ассоциаций шрифтов (HKLM \SOFTWARE\Microsoft\Windows NT\CurrentVersion\FontSubstitutes);
- win_restore_default_user_font_settings.reg – восстанавливает стандартные настройки шрифтов в пользовательской ветке реестра (HKCU\Software\Microsoft\Windows NT\CurrentVersion\Font Management).
Распакуйте архив и примените (дважды щелкните) по каждому reg файлу.
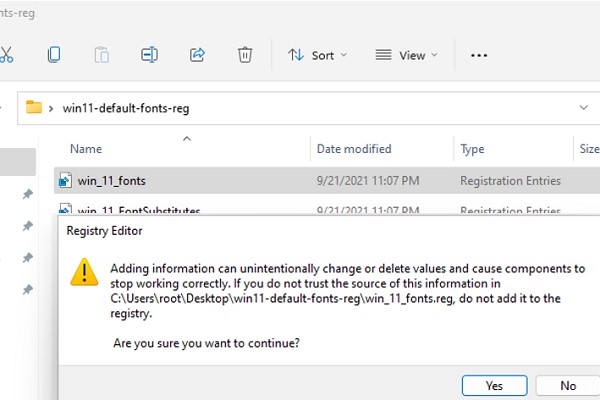
Перезагрузите компьютер, проблема со шрифтами должна пропасть!
Совет. Если проблема со шрифтами вызвана установкой нового шрифта, содержимое C:\Windows\Fonts перед заменой можно предварительно сбросить (используемые шрифты удалить не получится). Эта операция выполняется кнопкой в панели управления, о которой мы говорили выше.
Если ничего не помогает и шрифты отображаются некорректно, попробуйте проверить целостность вашего образа Windows с помощью команд:
sfc /scannow
DISM /Online /Cleanup-Image /RestoreHealth
If you’ve been using your Windows 10 PC for a while, you have probably made some changes to the way things work. For instance, one of the most common adjustments people make to their PCs is changing the font settings. While this may be a good idea for personalizing your Windows experience, at some point, you may want to restore your Windows font settings back to their defaults.
If you are wondering how to fix Windows 10 font problems, you are in the right place. Today, we will be looking into how to fix font issues on Windows 10.
First, we will check what the default font on Windows is. Second, we will show you how to change the default font on your system and what the consequences of that may be. Finally, we will give you two methods for restoring your Windows font settings to their defaults.
Let’s get started.
What is the default font for Windows?
The default font on Windows 10 is Segoe. It’s a pretty nice-looking font —but, of course, aesthetics are in the eye of the beholder. If you are not a fan of the Segoe font, you can easily change it. If you do, however, keep in mind that this will change the font on your whole system: it will affect your system’s icons, menus, title bar text, File Explorer, and more.
To check what font you are currently using as the default, do the following:
- On your keyboard, use the
Win + Ishortcut. - This will launch the Settings window.
- Here, go to Personalization and select Fonts.
- At the top of the screen, you should see the official name of the font currently set as default.
Before making changes to your font settings in Windows, it is strongly advised that you back up your Windows Registry. This way, if anything goes wrong, you will be able to restore your Registry settings easily.
Here’s how to change the default fonts on Windows 10:
- Launch Run by pressing the
Win and Rbuttons at the same time. - Type
regeditand press theEnterkey on your keyboard.Note
Make sure you are using Windows Registry Editor Version 5.00 for this.
- Navigate to File > Export…
- You will need to save the new Registry file somewhere on your hard drive.
- Launch Notepad.
- Copy the commands below and paste them into the new Notepad file:
[HKEY_LOCAL_MACHINE\SOFTWARE\Microsoft\Windows NT\CurrentVersion\Fonts]

"Segoe UI (TrueType)"=""

"Segoe UI (TrueType)"=""

"Segoe UI Black (TrueType)"=""

"Segoe UI Black Italic (TrueType)"=""

"Segoe UI Bold (TrueType)"=""

"Segoe UI Bold Italic (TrueType)"=""

"Segoe UI Historic (TrueType)"=""

"Segoe UI Italic (TrueType)"=""

"Segoe UI Light (TrueType)"=""

"Segoe UI Light Italic (TrueType)"=""

"Segoe UI Semibold (TrueType)"=""

"Segoe UI Semibold Italic (TrueType)"=""

"Segoe UI Semilight (TrueType)"=""

"Segoe UI Semilight Italic (TrueType)"=""

[HKEY_LOCAL_MACHINE\SOFTWARE\Microsoft\Windows NT\CurrentVersion\FontSubstitutes]

"Segoe UI"="Verdana"
In the last line, you will need to replace Verdana with the name of the font that you want to switch to. If you are not sure how the font is called, go to the Fonts folder (you can access it by searching for “fonts” in your Windows taskbar). Locate the font you want to use and note down its exact name. While experimenting with different fonts is definitely fun and can help you fully customize your experience, make sure you are not using fonts that can make your system unreadable (like Wingdings, which is too small) or hard to manage. Otherwise, you may have trouble navigating the interface and changing fonts again.
After you’ve changed the font name in the last line, go to File and click Save. Make sure that the file has the .reg extension. Other than that, you can give this file any name you want.
Next, double-click the Registry file that you have just created. You will be asked to allow the file to make changes to your system — agree and continue. Hold on for the confirmation that the changes have been made.
The final step will be to restart your PC to make sure all the new changes take effect.
Just don’t change the default font to something that can render your system completely unreadable.
How to change your Windows font back to default
Windows 10 features TrueType fonts and OpenType fonts installed out of the box. These files will have the TTF or OTF file extension. They also support scaling and look really good on modern displays.
OpenType is more flexible font software as it supports any writing script and comes with an advanced typographic “layout” feature that allows for the positioning and replacement of rendered glyphs.
There is a special section in the Settings app called Fonts — head to Personalization to find it. Here you can get access to all the new feature releases, like color fonts or variable fonts. This section has replaced the earlier Fonts Control Panel applet.
When you head to the dedicated Fonts page in Settings, you will be able to see a mini preview of each font family. These previews will give you a good idea of what each font will look like on your system and with the language you are using. If the said font comes with multi-color capabilities built into it, you will also see it in the preview.
Now, if you’ve explored new font customization features in Windows 10 and now want to go back to your default Windows font settings, here’s what you should do.
To restore the default font settings in Windows 10, do the following:
- First, head to the classic Control Panel app.
- Navigate to Control Panel\Appearance.
- Here, locate Personalization\Fonts.
- A folder will open, with all available fonts listed in alphabetical order.
- On the left, find the link that says “Font settings”.
- On the next page, press the button that says “Restore default font settings”.
- This will take your font settings to their originals — no matter how many changes you’ve made.
There is another way to restore your font settings to their defaults on a Windows 10 PC — you can do it via a simple Registry tweak.
How to change your Windows font back to default via the Registry
You can restore your font settings to their defaults using the method we’ve described above. However, you can also do it using the Registry. To make the changes, you will need Windows Registry Editor Version 5.00.
Note that while this is a rather simple tweak to make, it is still only recommended for users who are familiar with how the Registry works and have made similar changes before. Making a mistake while editing the Registry can lead to serious issues with your system — and it’s best to leave this method to more experienced users.
If you are an experienced Registry user, you can go ahead with the following steps:
- Open Windows Registry Editor Version 5.00.
- Create a REG file with the following contents:
[HKEY_CURRENT_USER\Software\Microsoft\Windows NT\CurrentVersion\Font Management]

"Auto Activation Mode"=dword:00000001

"InstallAsLink"=dword:00000000

"Inactive Fonts"=-

"Active Languages"=-

[-HKEY_CURRENT_USER\Software\Microsoft\Windows NT\CurrentVersion\Font Management\Auto Activation Languages]
- Save the file and double-click it to apply the changes.
If you don’t feel comfortable making Registry changes, you can find ready-made REG files for restoring your fonts on some Windows forums. In this case, you can simply download the file you need and double-click it to make the changes.
And there you have it. Above, we have covered how you can change fonts on Windows 10 and what you can do to restore the font settings back to their defaults. We hope this information has been helpful and you now have a better understanding of how fonts work on Windows.
Before you go, there is just one more thing we’d like to recommend. As you download files from the internet (for instance, the REG file we’ve suggested above), it is absolutely essential that you have proper security on board — this means you need anti-malware software that can detect even the newest and rarest threats. We recommend using Auslogics Anti-Malware. This program has been designed specifically for Windows and is able to timely detect almost any threat that could be affecting your system.
Download Auslogics Anti-Malware
Detects malware, spyware and viruses, then safely removes them from your PC to help keep it as secure as possible. The program is made to complement your main antivirus.
Auslogics Anti-Malware is very easy to use and can be installed in just a few steps. Once on board, the software will run automatic checks of your system, focusing on malicious programs running in the background, cookies that could be trying to gather your personal data, suspicious startup items, Registry entries, and browser extensions, and more. You can also personalize the way the program works. You can choose to run a quick scan (which will look into the main folders on your PC), a deep scan (which will look into the deepest corners of your system) and a custom scam (in this case, you define what areas of your system should be inspected).
Using Auslogics Anti-Malware can keep your PC safe and make your overall experience smooth and efficient — especially when downloading data from the web.
Кастомизация отображения текстов позволит повысить уровень комфорта работы и сделать интерфейс операционной системы более привычным. Например, похожим на оформление предыдущих версий системы.
Использование стандартных функций системы
Проще всего научиться изменять системный шрифт в Windows 10 с помощью встроенной в систему утилиты. Она называется редактором реестра и требует для настройки отображения текста выполнения следующих действий:
- Перейти к самой утилите: используйте комбинацию клавиш Win+R, а потом введите ввести regedit.
- Выбрать раздел Fonts, который расположен в ветке HKEY_LOCAL_MACHINE/SOFTWARE/Microsoft/Windows NT/CurrentVersion.
- Удалить все значения для тех шрифтов, имена которых совпадают со стандартным Segoe UI — кроме Emoji.
- В этой же ветке реестра найти раздел FontSubstitutes.
- Создать строковый параметр под названием Segoe UI и ввести в строку значения название нового шрифта, который будет установлен по умолчанию.
- Для завершения изменений следует выйти из реестра и из системы вообще. Затем снова зайти.
Название подходящего шрифта можно посмотреть в каталоге Windows\Fonts, расположенном системном разделе. А узнать, как будут отображаться после изменения отдельные буквы, поможет встроенная функция «Таблица символов» или текстовый редактор MS Word.
Изменение для последних обновлений системы
В современных версиях Windows 10 есть возможность установки новых размеров шрифтов без изменения масштаба других элементов. Его преимущество — отсутствие необходимости скачивать и устанавливать стороннее ПО. Для увеличения размера шрифта Windows 10 выполняют такие действия:
- Перейти к приложению «Параметры» (можно просто нажать Win + I).
- Открыть раздел специальных возможностей.
- Перейти к «Дисплею» и указать значения новых размеров текста, которые задаются в процентах от установленных по умолчанию.
- Применить выбранные и настройки подождать, пока они начнут действовать.
Величину символов можно попробовать изменить и с помощью установки новых настроек масштабирования. Для этого снова придется открыть приложение «Параметры», перейти сначала к «Системе», затем к «Дисплею» и, наконец, к разделу масштаба и разметки. Здесь можно выбрать, как будут масштабироваться элементы системы, вместе с которыми изменятся и размеры шрифтов.
Настройки для старых версий
Если версия системы сравнительно старая, до 1703, есть возможность изменения размера ее шрифтов путем выполнения таких шагов:
- Перейти к разделу «Дисплей» в приложении «Параметры».
- Выбрать дополнительные параметры экрана.
- Выбрать дополнительные изменения для элементов.
- Найти раздел, где можно изменять параметры только для текста, и внести изменения для отдельных элементов системы.
При желании в этом же окне можно увеличить или уменьшить размеры всех элементов, которые изменятся вместе с параметрами текста. Изменения будут приняты после нажатия на «Применить». Не понадобится даже выход из Виндоус, как при использовании других способов.
Возврат к стандартному отображению
Разобравшись с возможностями установки новых параметров текста, стоит познакомиться с тем, как вернуть стандартный шрифт в Windows 10. Для этого достаточно сделать следующее:
- Перейти к вкладке шрифтов системы.
- Открыть раздел параметров шрифта.
- Нажать по кнопке восстановления всех параметров.
После этого характеристики текста вернутся к значениям, установленным в системе по умолчанию. Возврат срабатывает в большинстве случаев. Хотя перед использованием реестра стоит создать «Точку восстановления» — или сохранить копию файла с помощью стороннего ПО типа CCleaner.
Программы для изменения шрифта в Windows 10
Среди способов сменить шрифт в Windows 10 — применение специально разработанных для этой цели программ.
Утилита Winaero Tweaker
Здесь порядок действий следующий:
- Открыть утилиту и перейти к расширенным (Advanced) настройкам.
- Выбрать вариант из имеющегося списка — для изменения доступны и текст в строке состояния, и заголовки, и даже подписи к иконкам.
- Нажать на Change font, выбрав начертание, размеры и стиль.
- Сохранить изменения (Apply changes), выйти из Виндовс и зайти обратно.
Все, что было изменено в программе, так же легко восстановить. Для сброса настроек следует выбрать в ее главном меню соответствующую кнопку (Reset). При ее нажатии настройки отображения текста станут такими же, как до использования утилиты.
Advanced System Font Changer
Еще один метод, который поможет поменять шрифт на компьютере Windows 10, заключается в использовании Advanced System Font Changer. Работать с утилитой несложно — достаточно выполнить такие действия:
- Зайти в утилиту и выбрать из списка шрифты, которые будут изменяться.
- Установить параметры текста. При использовании утилиты доступны изменения шрифтов заголовков, пунктов меню и панели статуса в окне.
- При необходимости, внести изменения в характеристики других элементов.
Пользоваться программой Advanced System Font Changer можно бесплатно, скачав ее с официального сайта разработчика. При необходимости сброса настроек можно использовать расположенную в основном окне утилиты кнопку Default.
System Font Size Changer
Утилита System Font Size Changer помогает изменять настройки шрифта Windows 10, внося изменения в реестр. Причем перед запуском программа предлагает сохранить reg-файл с текущими параметрами. Его следует открыть, когда понадобится вернуть стандартные настройки.
В окне программы можно настраивать размеры шрифта или сделать его полужирным (Bold). Для изменения доступны стандартные элементы системы — заголовки, меню, окна сообщений, подписи и названия панелей. В отличие от большинства похожих утилит, с этой меняется даже шрифт подсказок.
Читайте также:
- Как сделать бесплатный Wi-Fi безопасным: главные правила =«content_internal_link»>
- Как установить таймер выключения Windows=«content_internal_link»>
Редактор направлений «Мобильные устройства» и «Техника для дома»
The Windows default font these days is Segoe UI, a fairly simple and no-nonsense typeface that’s used across many of Microsoft’s products. However, though some like this subdued style, others look to change Windows font to something with a bit more personality.
Thankfully, Microsoft does let you change Windows fonts, but it doesn’t make it particularly easy. This is likely because doing so can have unintended consequences, such as causing issues with your system clock.
We’re going to show you safely change the font in Windows 10 while fixing issues with the clock. We’ll also be walking you through how to restore default fonts in Windows 10 if you don’t like the changes.
How to Change the Font in Windows 10 with a Registry Key
As mentioned earlier, a change of Windows font isn’t as easy as a settings switch, but it’s still not too technical. All it requires is a text editor such as notepad and a font you like. First, though, you need to discover the full name for its font family.
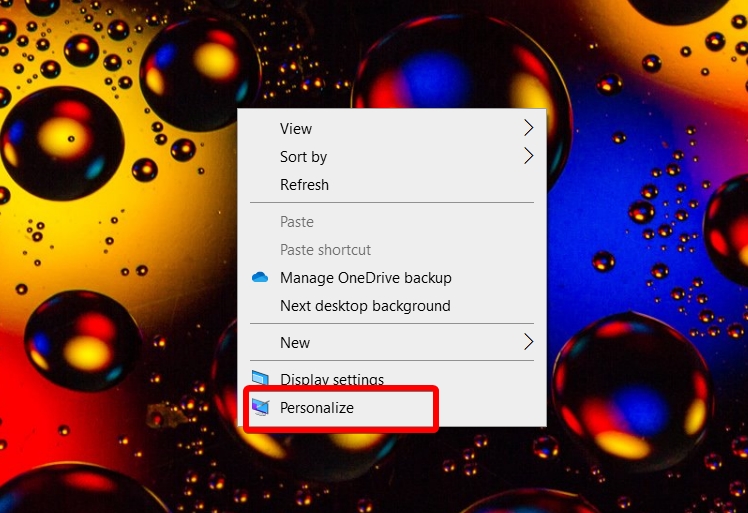
- Open personalization settings
Right-click on your desktop and choose “Personalize”.

- Click “Fonts” and check the list

- Note your font family name
Find the font you want to use in the settings interface and note its name in Windows, which will be indicated as below.

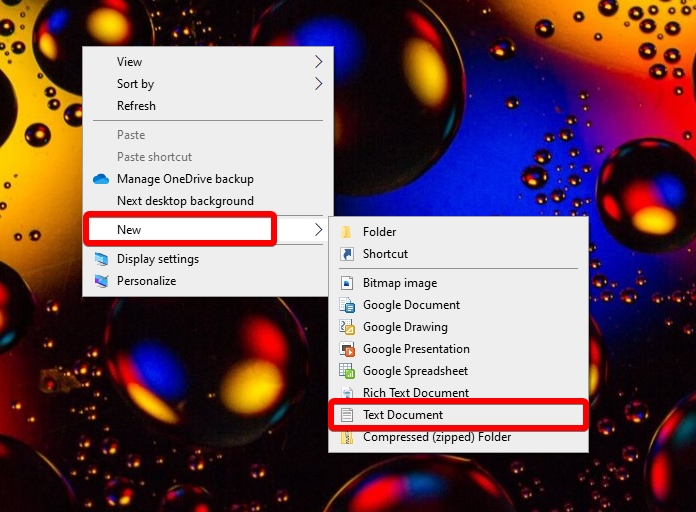
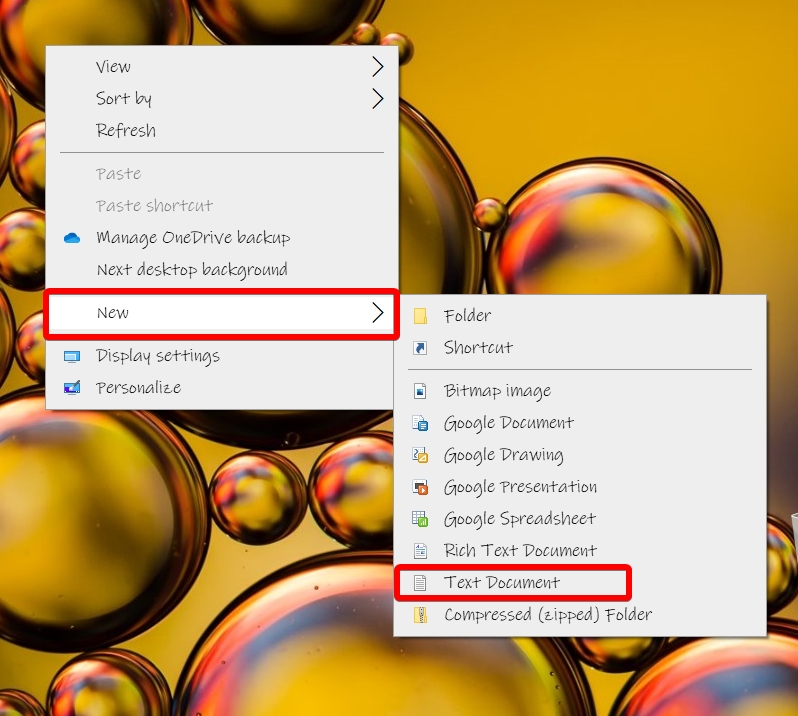
- Create a new text document
On your desktop, right-click and select “New > Text Document”.

- Rename it to “change-to-personal-font.reg”
Click away or press “Enter” to save the changes.

- Accept the file extension change
Windows will warn you that changing the file extension (from .txt to .reg) may cause it to become unusable. We know this isn’t the case, so you can safely click “Yes”.

- Edit the .reg file
Right-click the .reg file and select “Edit”.

- Add the change Windows font registry code
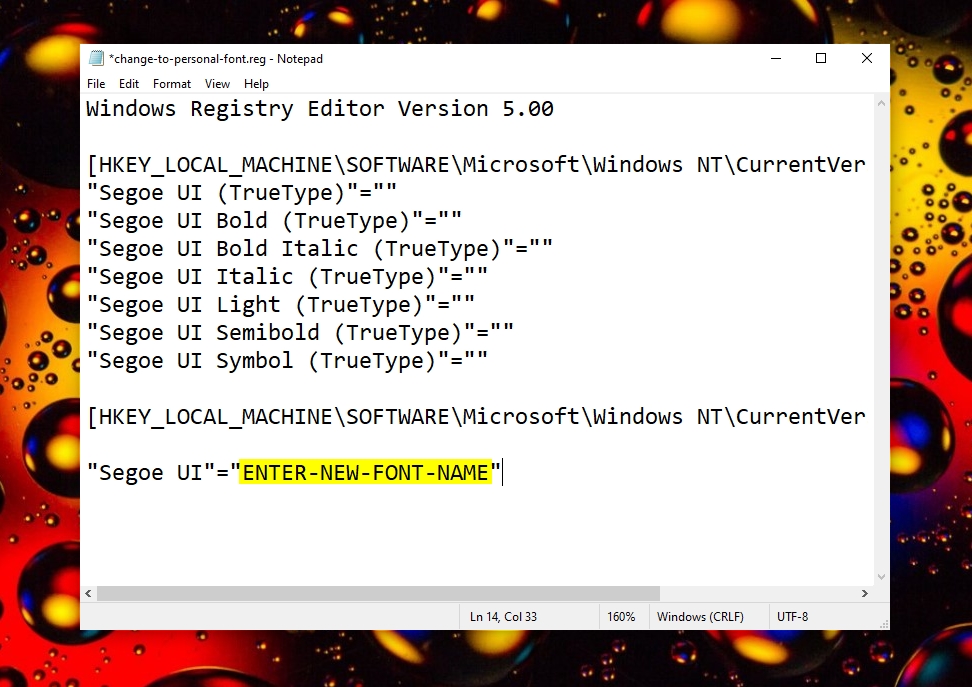
In your text document, paste the following:
Windows Registry Editor Version 5.00
[HKEY_LOCAL_MACHINE\SOFTWARE\Microsoft\Windows NT\CurrentVersion\Fonts]
"Segoe UI (TrueType)"=""
"Segoe UI Bold (TrueType)"=""
"Segoe UI Bold Italic (TrueType)"=""
"Segoe UI Italic (TrueType)"=""
"Segoe UI Light (TrueType)"=""
"Segoe UI Semibold (TrueType)"=""
"Segoe UI Symbol (TrueType)"=""
[HKEY_LOCAL_MACHINE\SOFTWARE\Microsoft\Windows NT\CurrentVersion\FontSubstitutes]
"Segoe UI"="ENTER-NEW-FONT-NAME"
Replace
ENTER-NEW-FONT-NAMEwith the font family you identified earlier.
- Add your new Windows font name

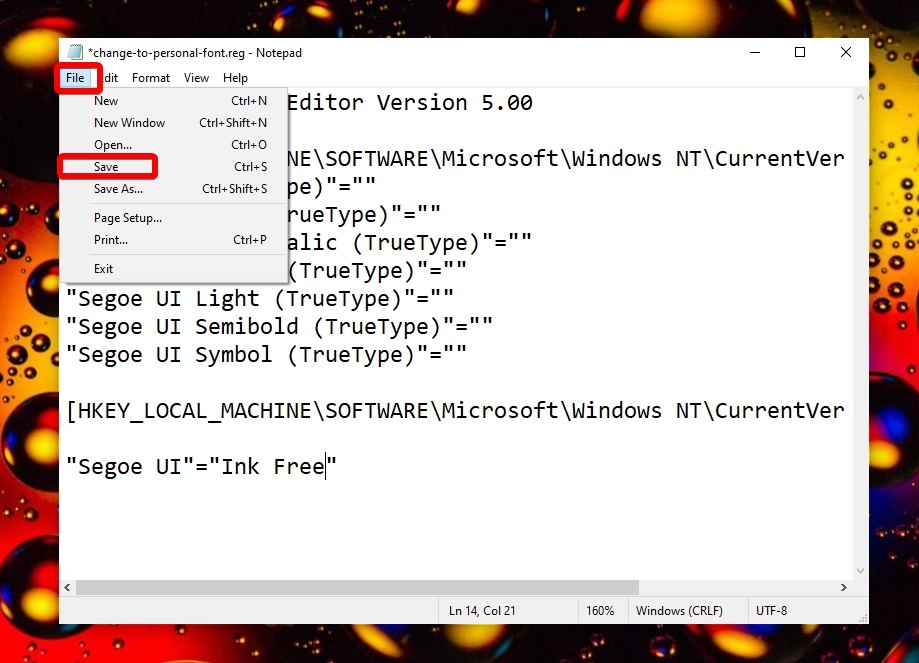
- Save the document
Click “File” from the top bar, then “Save”. You can close the document.

- Change Windows font
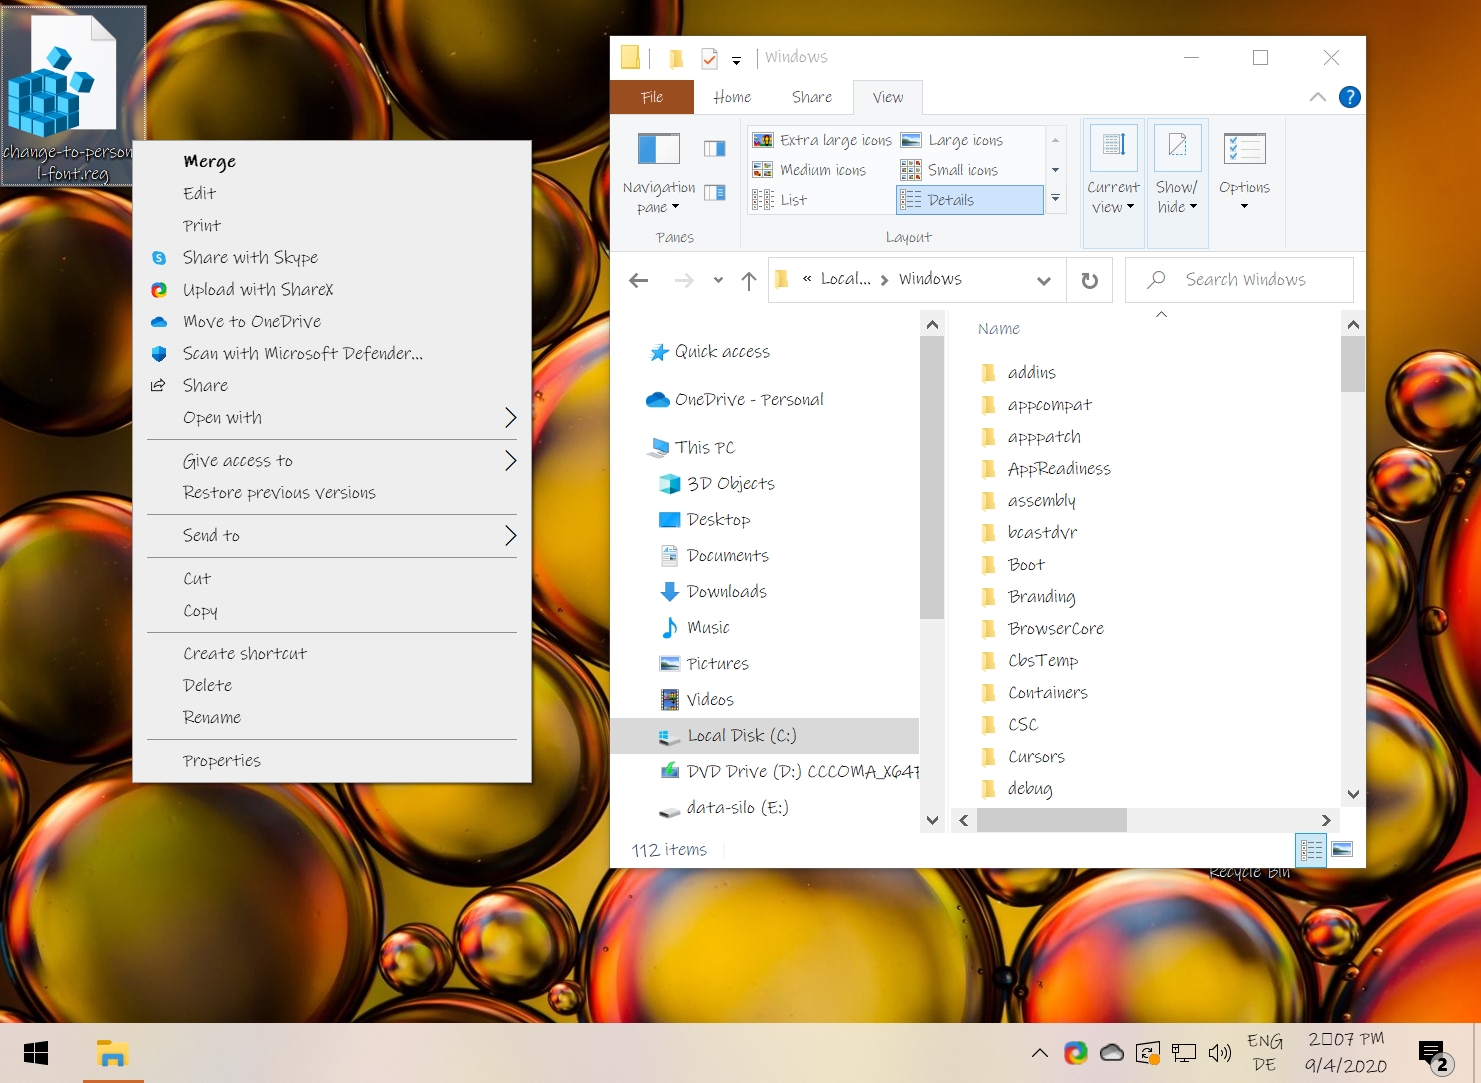
Make a registry backup, then Right-click the .reg file on your desktop and choose “Merge”.

- Accept the Windows font change
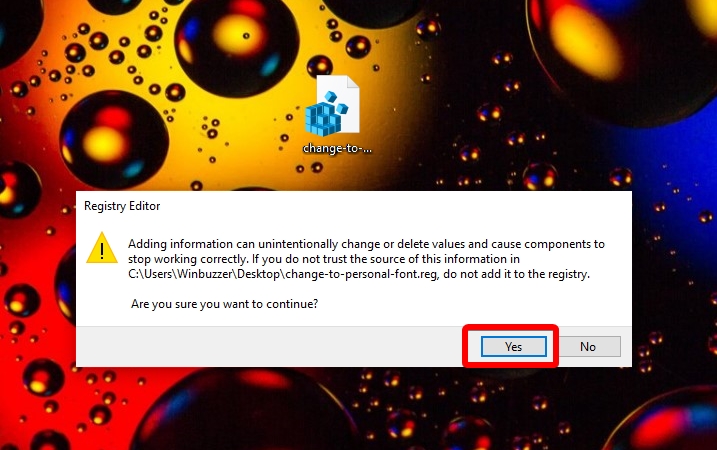
When the UAC Account Control prompt surfaces, click “Yes”.

- Agree to the registry change
In the registry editor pop-up, click “Yes”. Restart your PC.

- Check for your new Windows default font
If the changes were successful, you’ll notice a change to your font after restarting your PC. If you notice a square where your clock’s separator should be, edit your ssShortTime registry entry in
HKEY_Current_User\ControlPanel\Internationalto use?instead of the default colon symbol. Save the changes and restart.


How to Restore Default Fonts in Windows 10
As mentioned earlier, a change of Windows font isn’t as easy as a settings switch, but it’s still not too technical. All it requires is a text editor such as notepad and a font you like. First, though, you need to discover the full name for its font family.
- Create a text document
Right-click your desktop and then click “New > Text Document”.

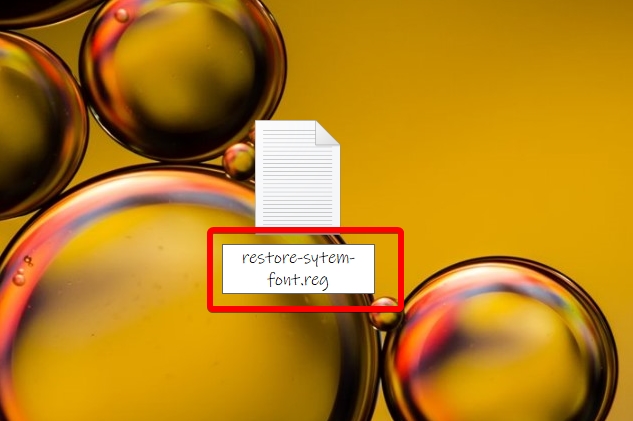
- Rename it to “restore-system-font.reg”
Click away to save the changes.

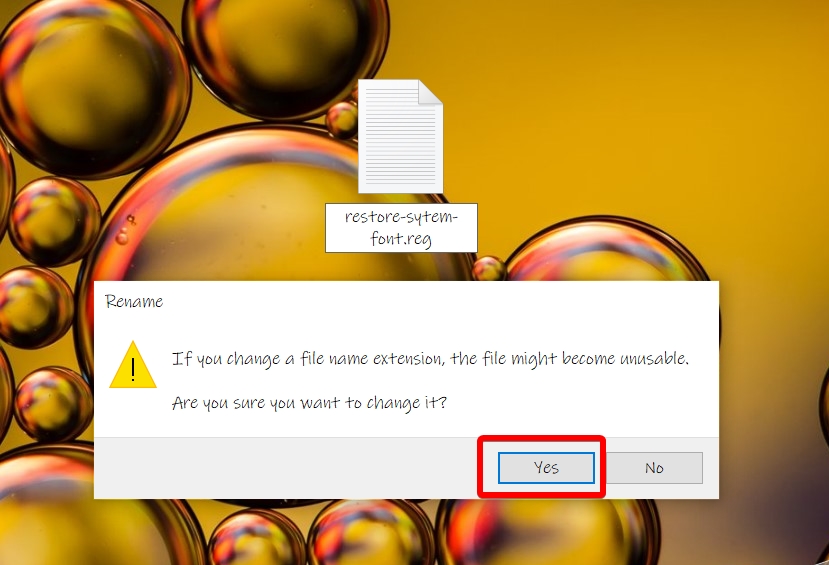
- Accept the extension change
Click “Yes” to save the extension change, as we can be sure we’ll be able to edit the file still.

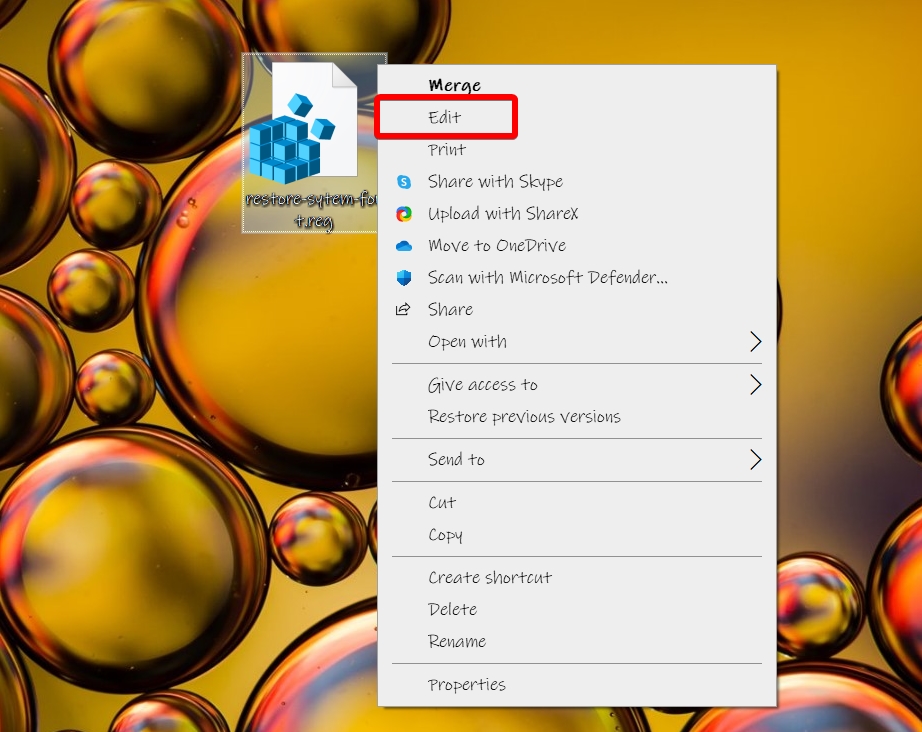
- Edit the .reg file
Right-click the .reg file and select “Edit”.

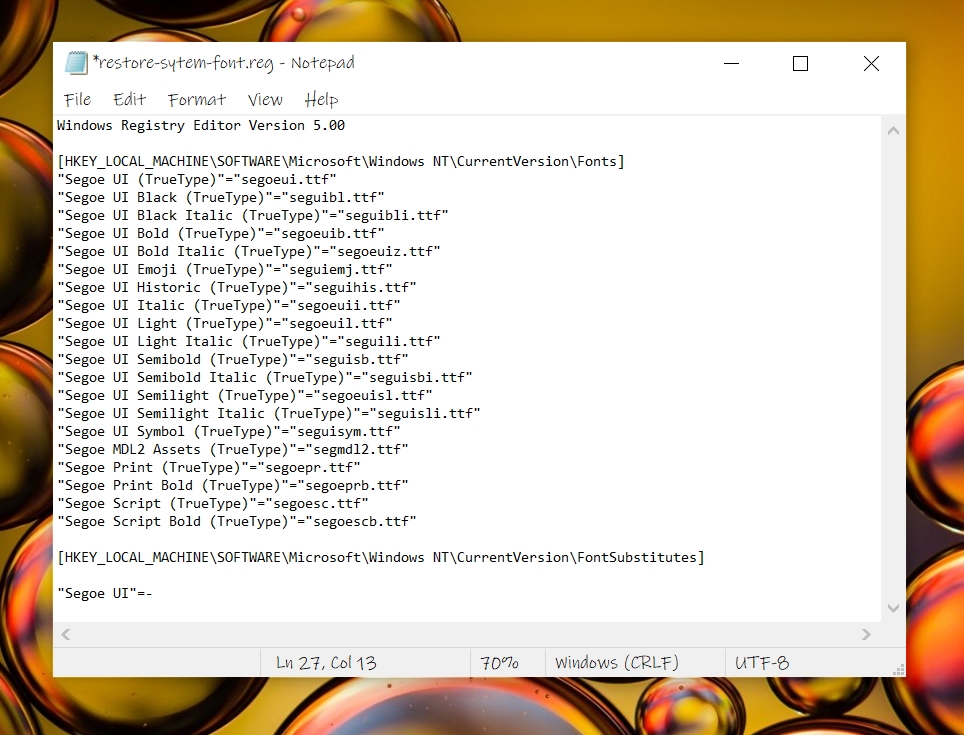
- Add the restore default fonts in Windows 10 registry instructions
In your text document, paste the following:
Windows Registry Editor Version 5.00
[HKEY_LOCAL_MACHINE\SOFTWARE\Microsoft\Windows NT\CurrentVersion\Fonts]
"Segoe UI (TrueType)"="segoeui.ttf"
"Segoe UI Black (TrueType)"="seguibl.ttf"
"Segoe UI Black Italic (TrueType)"="seguibli.ttf"
"Segoe UI Bold (TrueType)"="segoeuib.ttf"
"Segoe UI Bold Italic (TrueType)"="segoeuiz.ttf"
"Segoe UI Emoji (TrueType)"="seguiemj.ttf"
"Segoe UI Historic (TrueType)"="seguihis.ttf"
"Segoe UI Italic (TrueType)"="segoeuii.ttf"
"Segoe UI Light (TrueType)"="segoeuil.ttf"
"Segoe UI Light Italic (TrueType)"="seguili.ttf"
"Segoe UI Semibold (TrueType)"="seguisb.ttf"
"Segoe UI Semibold Italic (TrueType)"="seguisbi.ttf"
"Segoe UI Semilight (TrueType)"="segoeuisl.ttf"
"Segoe UI Semilight Italic (TrueType)"="seguisli.ttf"
"Segoe UI Symbol (TrueType)"="seguisym.ttf"
"Segoe MDL2 Assets (TrueType)"="segmdl2.ttf"
"Segoe Print (TrueType)"="segoepr.ttf"
"Segoe Print Bold (TrueType)"="segoeprb.ttf"
"Segoe Script (TrueType)"="segoesc.ttf"
"Segoe Script Bold (TrueType)"="segoescb.ttf"

[HKEY_LOCAL_MACHINE\SOFTWARE\Microsoft\Windows NT\CurrentVersion\FontSubstitutes] "Segoe UI"=-

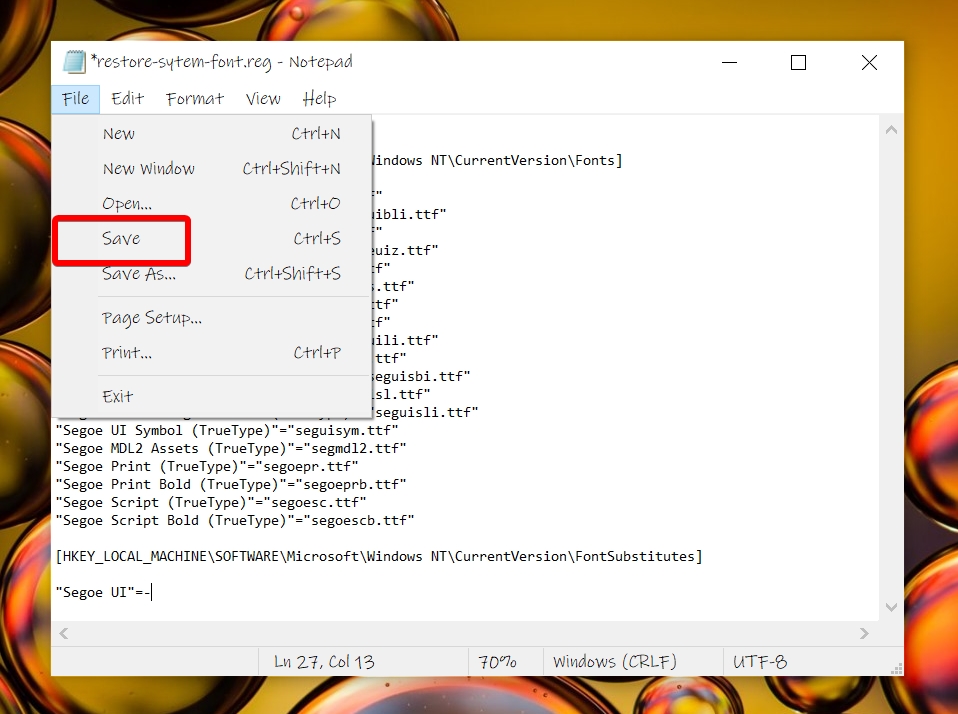
- Save the file
Click “File” from the top bar, then “Save”. Close the document.

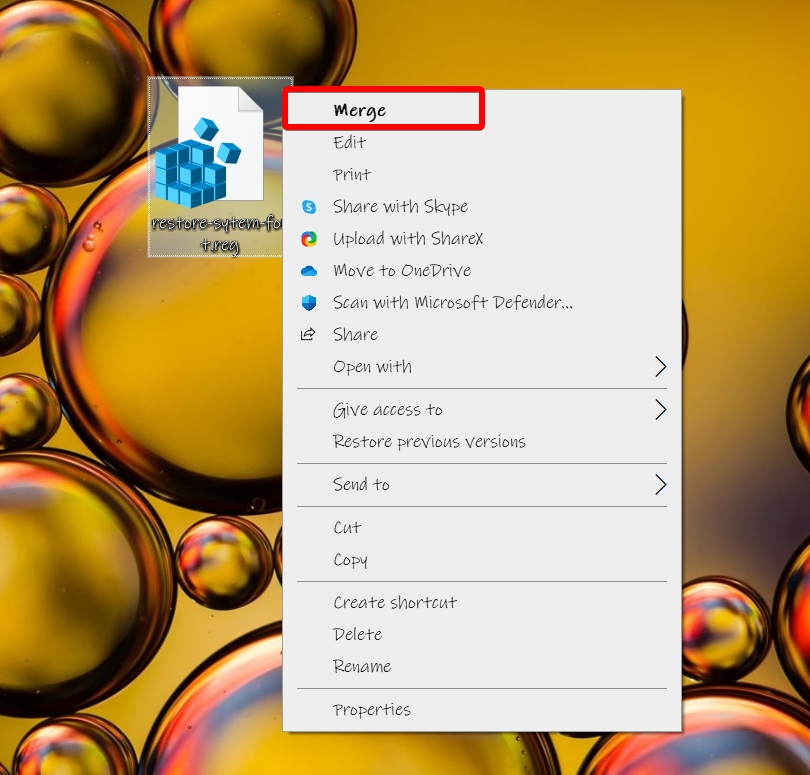
- Restore the default fonts in Windows 10
Right-click the .reg and choose “Merge”.

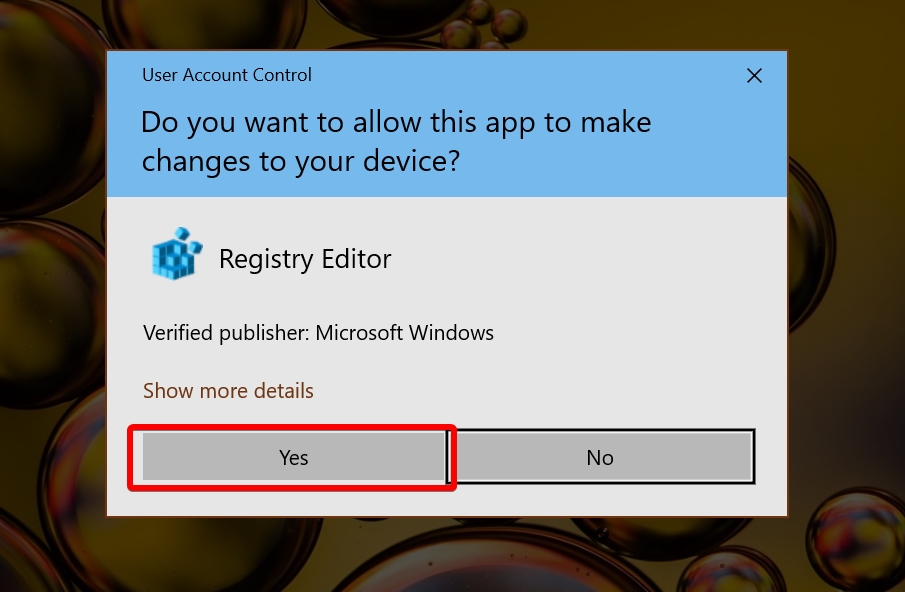
- Accept the Windows font change
Click “Yes” to the UAC prompt.

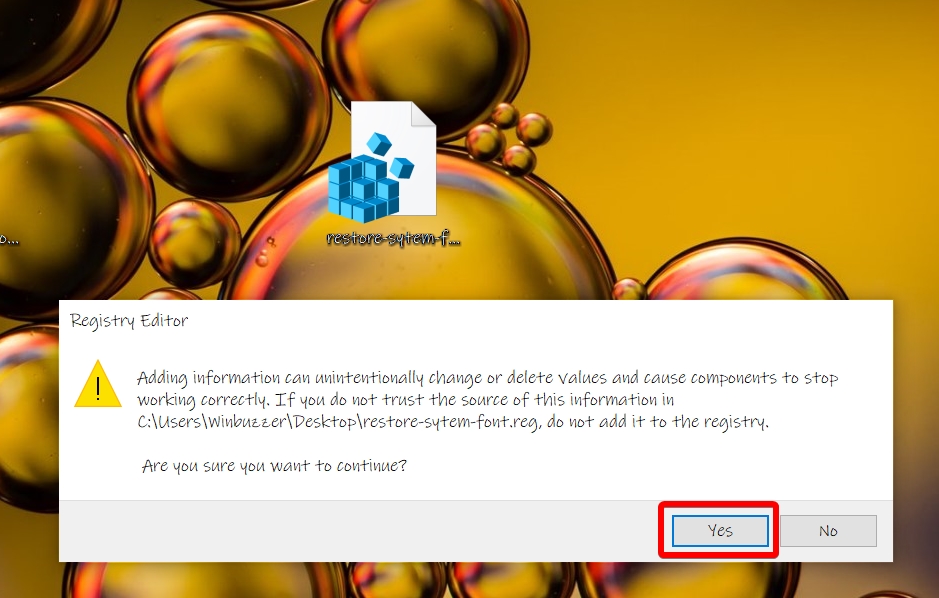
- Agree to the registry change
In the registry editor pop-up, click “Yes”. Restart your PC.

Last Updated on November 8, 2024 12:58 pm CET
Applies ToWindows 11 Windows 10
Support for Windows 10 will end in October 2025
After October 14, 2025, Microsoft will no longer provide free software updates from Windows Update, technical assistance, or security fixes for Windows 10. Your PC will still work, but we recommend moving to Windows 11.
Learn more
Fonts play a crucial role in the overall aesthetics and readability of your documents and presentations. Whether you’re a designer looking to add a unique touch to your work or simply someone who wants to expand their creative toolkit, knowing how to manage fonts in Windows is essential.
This article guides you through the steps to view, install, and remove fonts on your Windows device. You’ll learn how to explore the fonts currently available on your computer, add new ones to enhance your projects, and remove those you no longer need to keep your system organized and efficient.
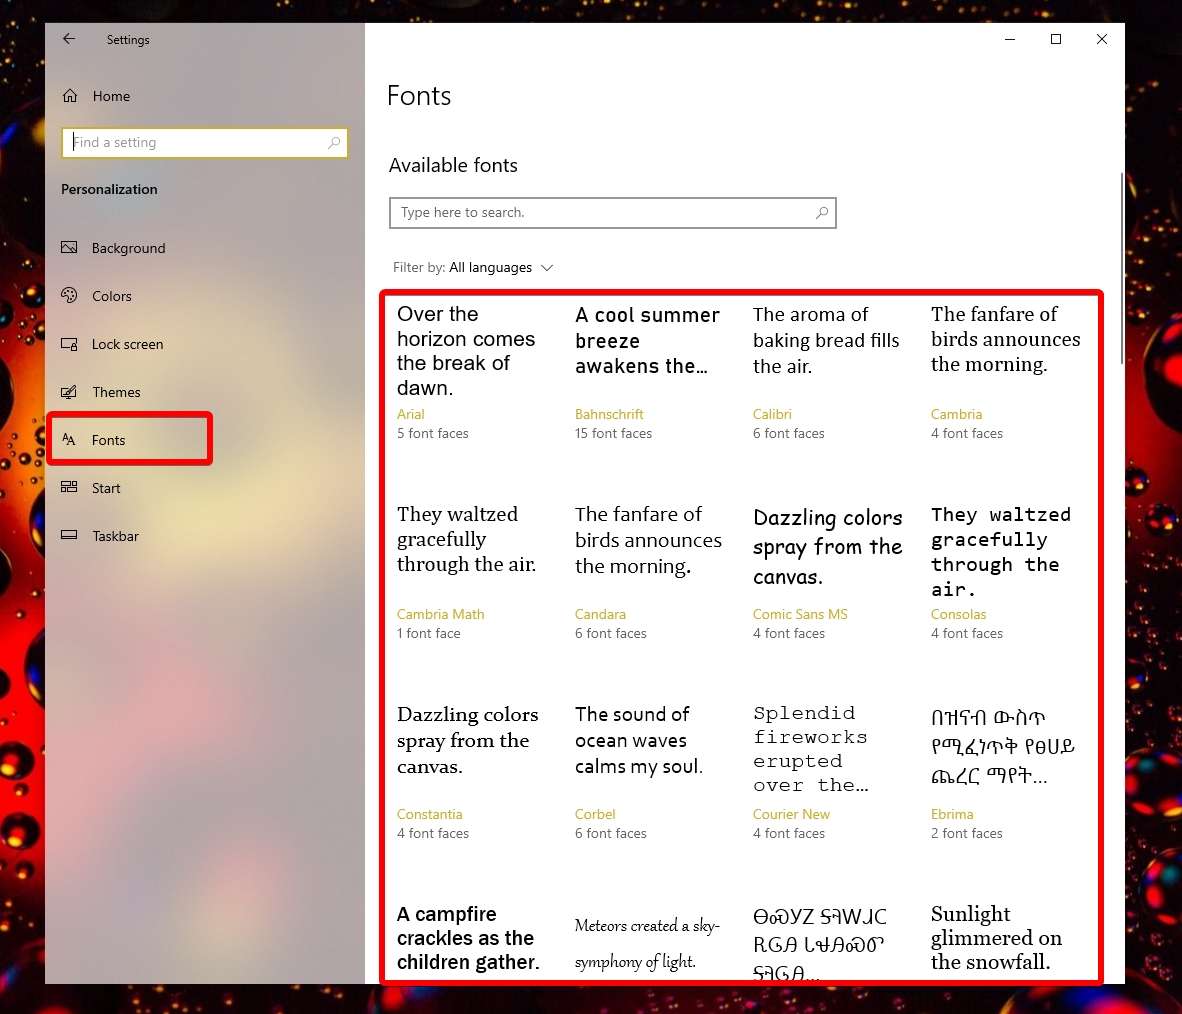
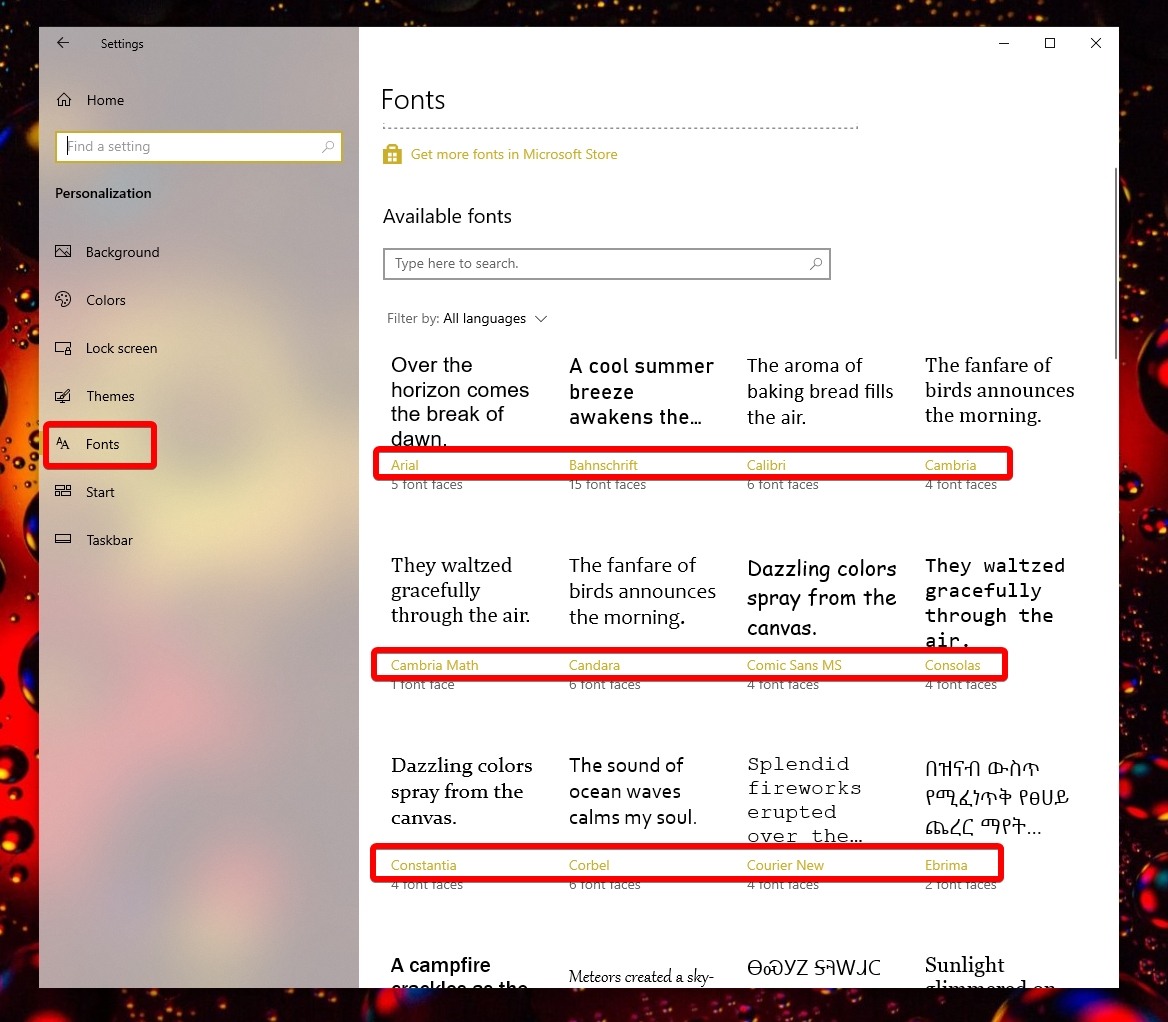
Check which fonts are available on your device
-
In the Settings app on your Windows device, select Personalization > Fonts or use the following shortcut:
Fonts
-
Fonts are listed under Available fonts
Note: Not all apps support custom fonts. If your font isn’t showing up in an app or program, try a different app to check and see if the font is installed and working properly.
The Available fonts section offers several options to help you manage your fonts effectively. Here are the key features available:
-
Search and filter: You can easily search for a specific font by typing its name in the search bar. This helps you quickly locate the font you need without scrolling through the entire list
-
View a preview: You can view a preview of each font, which includes different sizes and faces. This allows you to see how the font will look in various styles and sizes before you use it
-
Hide: If you have fonts that you don’t use frequently but don’t want to uninstall, you can hide them. This keeps your font list organized without permanently removing the fonts
-
Uninstall: You can uninstall fonts that you no longer need. This helps free up space and keeps your system tidy by removing unnecessary fonts
Common operations
Expand the following sections to learn more about common operations with fonts in Windows:
-
In the Settings app on your Windows device, select Personalization > Fonts or use the following shortcut:
Fonts
-
Select Get more fonts in Microsoft Store or use the following shortcut
Explore fonts in the Microsoft Store
-
Select the font you want to add, and then select Get or Buy. The font will download and install automatically
-
Obtain or download the font file, and make sure the file is a True Type (.ttf) or OpenType (.otf) file
-
If the file is compressed into a .zip file, right-click it and select Extract to extract the files
-
-
Right-click the font file, and then select Install. To install for all users on a computer, select Install for all users
-
If you’re asked to allow the program to make changes to your computer, make sure you trust the source of the downloaded file, and then select Yes
-
In the Settings app on your Windows device, select Personalization > Fonts or use the following shortcut:
Fonts
-
Select the font you want to remove
-
Select Uninstall
-
In the Settings app on your Windows device, select Personalization > Fonts or use the following shortcut:
Fonts
-
Under Related settings, select Download fornts for all languages and confirm by pressing OK
Need more help?
Want more options?
Explore subscription benefits, browse training courses, learn how to secure your device, and more.