
The Windows File Protection feature in Microsoft Windows prevents programs from replacing critical Windows system files. You may have to turn the feature on or off in certain configurations. You can enable or disable Windows File Protection in Microsoft Windows with a registry edit. Just use these steps.
Note: Windows File Protection is enabled by default in all versions of Microsoft Windows.
This post applies to Windows 10, 8, 7, and Vista.
- Hold the Windows Key and press “R” to bring up the Run dialog box.
- Type “regedit“, then select “OK“.
- The Registry Editor opens. Navigate to the following registry key:
- HKEY_LOCAL_MACHINE
- SOFTWARE
- Microsoft
- Windows NT
- CurrentVersion
- Winlogon
- Look for the key “SFCDisable“and double click on it. If it doesn’t exist, create it by right-clicking the “Winlogon” folder and choose “New” > “DWORD (32-bit value)“
- Set the value to one of the following:
- 1 – disabled, prompt at boot to re-enable
- 2 – disabled at next boot only, no prompt to re-enable
- 4 – enabled, with popups disabled
- ffffff9d – for completely disabled
- 0 – Enabled
- Restart Windows. You may receive a message at startup that says “Windows File Protection is not active on this system. Would you like to enable Windows File Protection now? This will enable Windows File Protection until the next system restart.” Choosing “Yes” will reactivate Windows File Protection and the message will appear at every login until “SFCDisable” is set to “0” again.
Contents
- 1 Windows File Protection on Windows 11
- 1.1 How to Remove Ownership of a File from TrustedInstaller
- 2 How to Use System File Checker Scan to Fix TrustedInstaller Issues
- 3 How to Disable TrustedInstaller Using Services
- 4 How to Disable TrustedIntaller Using System Configuration
- 4.1 Conclusion
With each Windows version, you get a lot of different features. Some features remain the same, while others get a new name. For example, you may have heard of Windows File Protection in previous Windows versions. But with Windows 11, it’s under a new name. Windows File Protection in Windows 11 is called Windows Resource Protection. You couldn’t find it if you’ve been trying to find it with the old name. Windows Resource Protection keeps registry folders and keys, including crucial system files, safe. It stops programs from replacing folders, essential system files, and registry keys that form part of the operating system.
You can only access WRP (Windows Resource Protection)-protected resources through the TrustedInstaller. TrustedInstaller is a process that forms part of Windows Modules Installer and works the same on Windows 10 and 11.
What it does is that it enables the modification, installation, or removal and Windows optional system components or updates. Also, it is not a good idea to disable this helpful tool since you risk not being able to install your Windows updates or remove them.
TrustedInstaller ensures the Windows updates are downloaded and installed correctly onto your computer. It would be best if you never wanted to eliminate TrustedInstaller since it keeps your computer stable, and you can enjoy the latest features included in the updates. It’s a necessary part of your OS since it handles complex operating within your device.
How to Remove Ownership of a File from TrustedInstaller
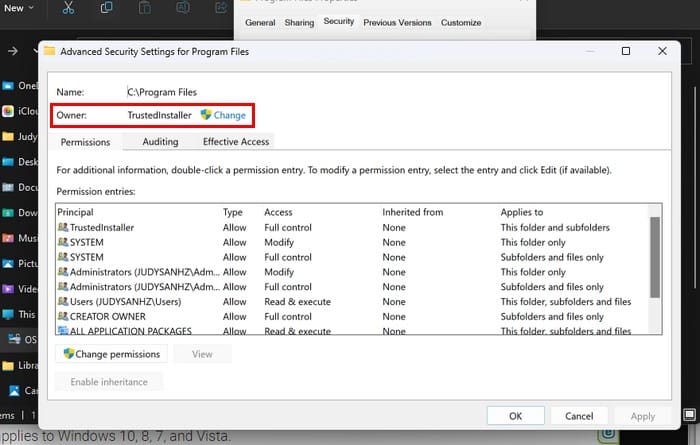
Suppose you’re confident that TrustedInstaller is responsible for a problem you’re experiencing, and you’re sure you can’t leave things as is. In that case, one thing you can do is remove the ownership of a file that is currently under the Ownership of TrustedInstaller. Taking ownership away from TrustedInstaller is not something that is also recommended since you’re dealing with essential system files and you run the risk of your computer crashing. That means that you’ll end up having to restore Windows 11. But if you want to run the risk, you can change the ownership of a file by going to the file, right-clicking on it, and going to Properties.
When the Program Files Properties window opens, click on the Security tab, followed by the Advanced button at the bottom right. At the top, you should see that the file’s owner will be TrustedInstaller. Click on the blue Change link to the right.
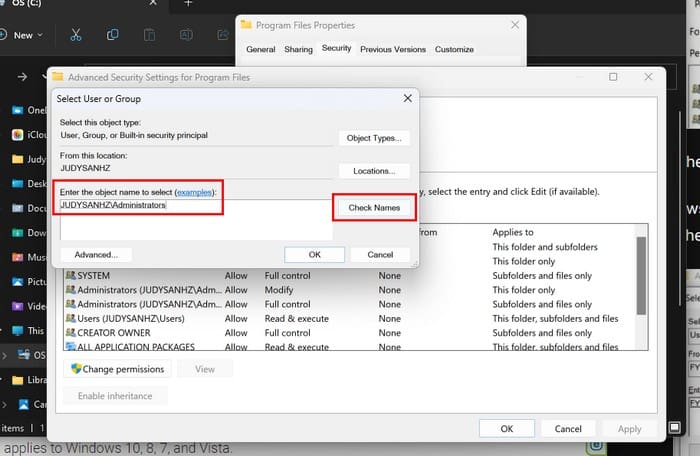
At the bottom, in the box for the option that says Enter the object name to select, type the word administrators, followed by the Check names box to the right. Windows will fill in the rest. Click OK to save the changes.
When the transfer is official, you’ll see your name where it once said TrustedInstaller. Below the new owner’s name, you’ll also see an option called replace owner on sub containers and objects. If you want the ownership change to apply to your files in that folder, click the option. Click Ok to go back to Properties.
In the Group or user names box, click on administrators and ensure that the Full Control option in the box for permissions for administrators is checked. Click Ok as needed, and if you ever want to give TrustedInstaller back the ownership, follow the same steps, but when you get to the text box where you typed administrators, add NT Service\TrustedInstaller.
How to Use System File Checker Scan to Fix TrustedInstaller Issues
Another reason why you may be experiencing issues is that you have some corrupted files that need repairing. Press the Windows + R keys, and the Run dialog box will open. Type cmd, press Ctrl + Shift + Enter, and it’ll open as an administrator. If it doesn’t open as an administrator, try again, but this time, ensure that you press all the buttons simultaneously. When it opens, type sfc /scannow and press Enter. Now would be an excellent time to get that cup of coffee.
How to Disable TrustedInstaller Using Services
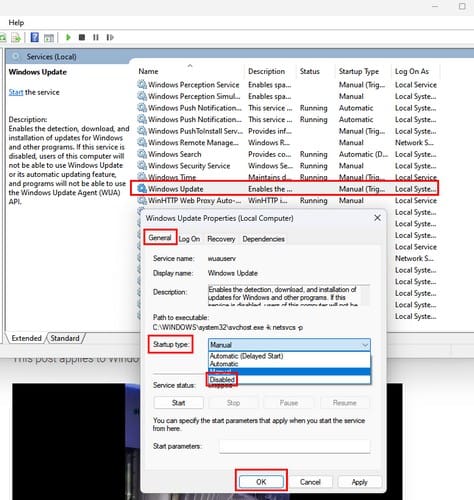
If nothing has changed and you still want to disable TrustedInstaller, you can do so through Services. To open Services, press the Windows + R keys and type services.msc when it opens. Remember to click OK. Scroll until you come across the Windows Update option and right-click to go to Properties. In the dropdown menu for the Startup type, choose Disabled. Click OK, and you’re good to go.
How to Disable TrustedIntaller Using System Configuration
You can also disable TrustedInstaller by going into System Configuration. To get there, open the Run box by pressing the Windows + R keys. Type msconfig and press enter. Click on the Services tab and ensure to uncheck the box for Windows Modules Installer. Click Ok to save your changes.

Conclusion
TrustedInstaller is an essential part of your Windows 11 computer. It’s always best to try to troubleshoot it rather than disable it. But if you know what you’re doing and it’s a must, it could cause serious problems. In Windows 10, it was called Windows File Protection, and now it’s called Windows Resource Protection—New Windows: a new name. How useful do you find TrustedInstaller? Let me know in the comments below, and don’t forget to share the article with others on social media.
December 7, 2018 updated by
Leave a reply »
EFS (Encrypting File System) is a feature built into the NTFS file system in Windows that lets you encrypt folders or files on the fly. Though it’s free, many users would like to use third-party alternatives like TrueCrypt, Lock My Folders. In this tutorial we’ll show you 3 ways to disable EFS in Windows 10 / 8 / 7.
Method 1: Disable EFS via Local Group Policy Editor
- Open the Local Group Policy Editor and navigate to:
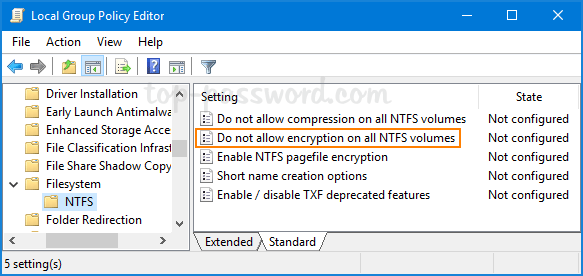
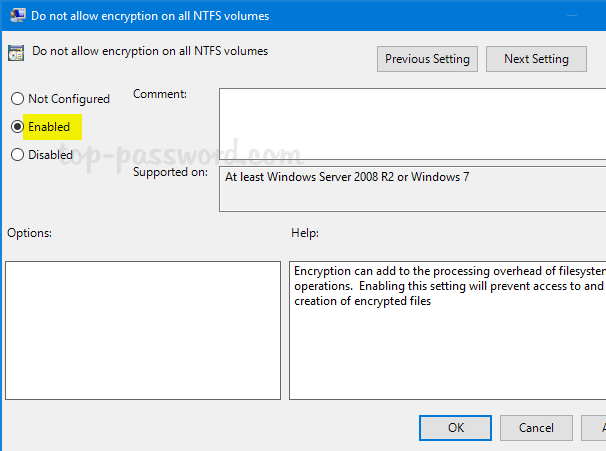
Computer Configuration\Administrative Templates\System\Filesystem\NTFS.In the right pane, double-click on the “Do not allow encryption on all NTFS volumes” policy to edit it.

- Select Enabled and click OK.

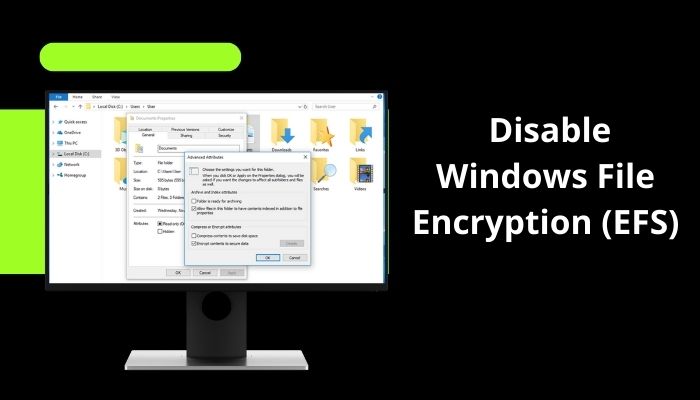
- Reboot your computer for the policy to take effect. The option “encrypt contents to secure data” should be greyed out and you’re unable to encrypt or decrypt folders/files with EFS.
You can also use Registry Editor to enable the “Do not allow encryption on all NTFS volumes” policy. Just navigate to the registry key: HKEY_LOCAL_MACHINE\SYSTEM\CurrentControlSet\Policies, create a 32-bit DWORD NtfsDisableEncryption and set its value to 1.
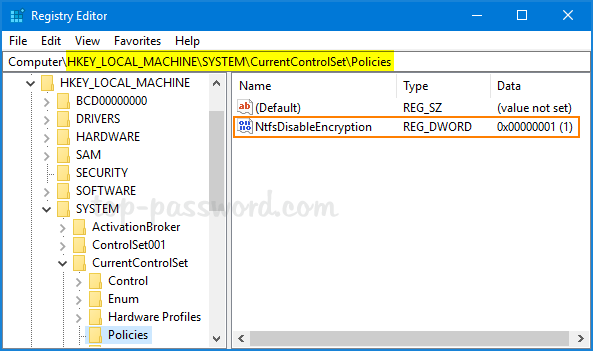
If you want to enable EFS encryption again, just set NtfsDisableEncryption to 0 and reboot your computer.
Method 2: Disable EFS via Command Prompt
Open the elevated Command Prompt, and run the following command to disable EFS:
fsutil behavior set disableencryption 1

If you ever want to turn on EFS again, execute this command:
fsutil behavior set disableencryption 0
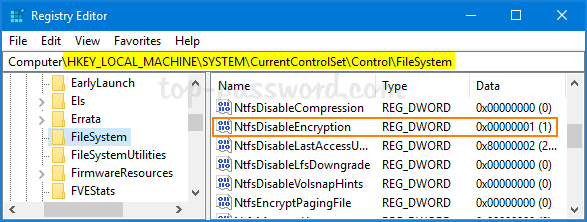
This task could also be done using a registry tweak. Just open Registry Editor and navigate to: HKEY_LOCAL_MACHINE\SYSTEM\CurrentControlSet\Control\FileSystem. Look for the 32-bit DWORD NtfsDisableEncryption and modify its value to 1.
Method 3: Disable EFS via Local Security Policy
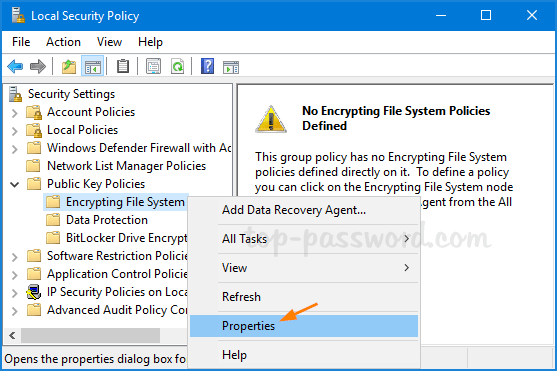
- Use the Windows key + R to open the Run command. Type secpol.msc and hit Enter to open the Local Security Policy.
- Navigate to: Security Settings -> Public Key Policies -> Encrypting File System. Right-click on “Encrypting File System” and select Properties.

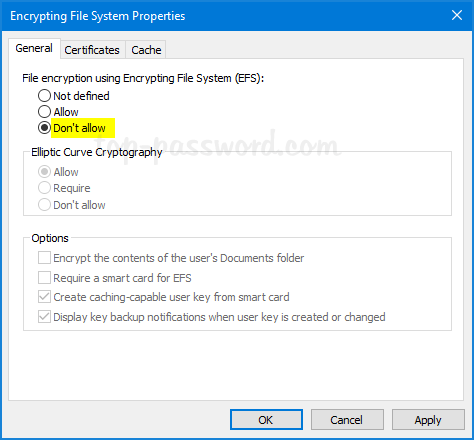
- Under the General tab, choose to not allow “File encryption Using Encrypting File System (EFS)”. Click OK and reboot your system.

- When you try to encrypt a folder/file, you’ll get the error message “This machine is disabled for file encryption“.
Revert the above change and you can get EFS encryption back to work.
- Previous Post: Auto Lock Windows 10 PC for All Users After Inactivity
- Next Post: EFS: Add Encrypt / Decrypt to Right-Click Context Menu in Windows 10
-
Home
-
News
- How to Enable/Disable Encrypting File System on Windows 11/10?
By Daisy | Follow |
Last Updated
This tutorial is about how to enable and disable the Encrypting File System (EFS) feature on Windows 11. Here are 5 ways for you and you can choose one of them based on your needs. Now, you can continue to read this post from MiniTool.
Encrypting File System
What is Encrypting File System? Encrypting File System is a feature on Windows, which allows you to easily encrypt and decrypt files on Windows NTFS drives. After you encrypt your files with this tool, other people cannot access them unless they know your password.
This feature allows you to encrypt specific folders instead of entire hard drive partitions. Besides, if you move a file to an EFS-encrypted folder, it will be automatically encrypted.
How to Enable/Disable Encrypting File System
How to enable or disable Encrypting File System on Windows 11/10? There are 5 ways for you.
Way 1: Via Command Prompt
Step 1: Type cmd in the Search box and choose Run as administrator.
Step 2: To enable the EFS feature, type the following command and press Enter:
fsutil behavior set disableencryption 0
Step 3: To disable the feature, type the following command and press Enter:
fsutil behavior set disableencryption 1
Way 2: Via Services
Step 1: Press the Windows + R keys to open the Run dialog box. Type services.msc and press Enter.
Step 2: Find and right-click the Encrypting File System (EFS) option to choose Start.
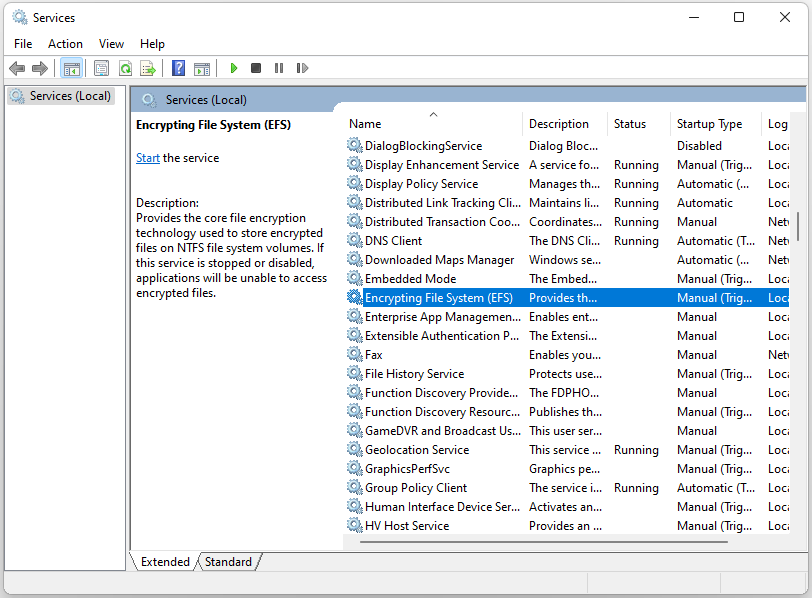
Step 3: Then, double-click it to open its properties. Click the Startup type drop-down menu to select Automatic. Click Apply and then click OK to save these changes.
To disable Encrypting File System, open Services again and select the Disabled option on the Startup type drop-down menu. Click Apply and OK to apply these changes.
Way 3: Via Registry Editor
Step 1: Press the Windows + R keys to open the Run dialog box. Type Regedit and click OK to open Registry Editor.
Step 2: Navigate to Computer > HKEY_LOCAL_MACHINE > SYSTEM > CurrentControlSet > Policies.

Step 3: Right-click on any space on the right-hand side and select New > DWORD (32-bit) Value.
Step 4: Name the DWORD value as NtfsDisableEncryption and press Enter.
To enable EFS, double-click the NtfsDisableEncryption value, set its Value data to 0, and click OK.
To disable EFS, double-click the NtfsDisableEncryption value, set its Value data to 1, and click OK.
Way 4: Via Local Group Policy Editor
Step 1: Press the Windows + R keys to open the Run dialog box. Type gpedit.msc and press Enter to open Local Group Policy Editor.
Step 2: Navigate to Computer Configuration > Administrative Templates > System > Filesystem > NTFS.
Step 3: On the right-hand side pane, double-click the Do not allow encryption on all NTFS volumes option.
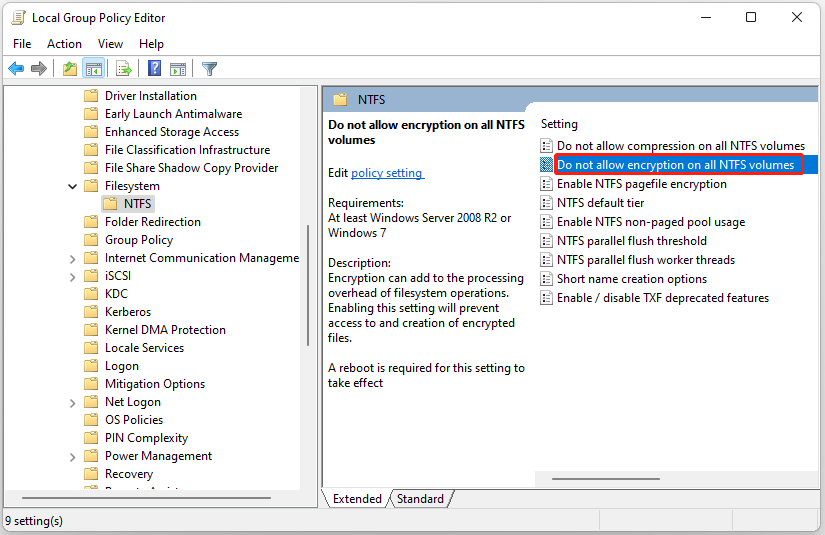
Step 4: To enable it, select Not Configured or Disabled. To disable it, select the Enable option.
Way 5: Via Local Security Policy
Step 1: Press the Windows + R keys to open the Run dialog box. Type secpol.msc and press Enter to open Local Security Policy.
Step 2: Navigate to Security Settings > Public Key Policies.
Step 3: Find and right-click Encrypting File System and select Properties.
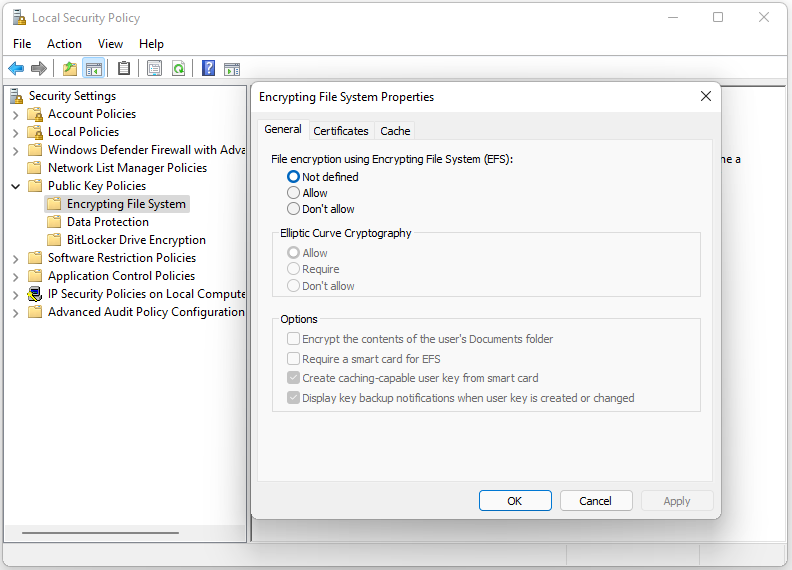
Step 4: Go to the General tab and select Allow under the File encryption using Encrypting File System (EFS) part. Click Apply and OK.
To disable the EFS tool, select Not defined or Don’t allow.
Tips:
Tip: To provide better protection for your data, it’s recommended to back up them regularly. To do that, you can try the PC backup software – MiniTool ShdowMaker. It allows you to add password protection to a specific backup. Three data encryption levels are provided for your choice: None, Normal, and AES128. Download it to see more details!
MiniTool ShadowMaker TrialClick to Download100%Clean & Safe
Final Words
How to enable or disable Encrypting File System on Windows 11? This post provides 5 ways and you can choose one of them based on your needs. I hope that this post can be useful to you.
About The Author
Position: Columnist
Having been an editor at MiniTool since graduating college as an English major, Daisy specializes in writing about data backups, disk cloning, and file syncing as well as general computer knowledge and issues. In her free time, Daisy enjoys running and going with friends to the amusement park.
EFS is a built-in security feature on your NTFS. If you look closely, this part of filesystem-level encryption surprisingly serves it’s purposes — adding a new layer of security to your files and folders. And not just in the recent OS versions, EFS has provided valuable service since Windows XP.
Anyway, this encryption system has some drawbacks. In recent times, thousands of Windows users discovered that the encrypt contents to secure data option is grayed out in NTFS EFS.
Disabling the file encryption system is the perfect solution if you are facing the same issue. But don’t know how to disable EFS?
This article is totally for you. Here, I’ll cover some basic information about the EFS and how you can easily enable/disable the encrypting file system.
So, let’s start.
What is Windows Encrypting File System?
EFS (encrypting file system) is simply an OS-based encryption system that allows you to encrypt/decrypt existing files on your computer. When you enable EFS, it adds a layer of security to your files so that other users can’t access sensitive files and folders.
EFS uses public key encryption technology to save intruders from reaching your file access. Before even that, EFS applies the Advanced Encryption Standard (AES) Cipher to build a robust cryptographical system. And this totally complicated system is free of cost.
Our computer system uses NTFS technology to store and recover files. When EFS is enabled, unauthorized users can’t join our file system. Hence, the protection remains active.
Though EFS is a built-in feature for Windows operating systems, some people find it ineffective. Also, most of them utilize better encryption systems (not free, obviously) to protect their file from anonymous hackers.
It’s totally up to you whether you want to enable/disable EFS on your Windows PC. Either way, check out the following section to know how to remove EFS encryption from files in Windows 10 and Windows 11.
Take note that EFS is not available on the home versions of Windows 10/11.
Check out the easiest way how to use Windows 11 installation Assistant.
How to Disable Windows Encrypting File System (EFS)
Open the Windows Services menu by searching services.msc in the search box. Find the Encrypting File System in that menu and double-click to modify the service > Click on the Startup Type dropdown menu and set it as disabled. That action will disable the encrypted content to secure data option.
Those are the initial steps you should follow to disable the NTFS EFS file in Windows 10/11. You can use different methods to remove EFS encryption from Windows.
Read the following section to find out those methods.
Here are the methods to disable Windows File Encryption:
1. Remove EFS from Windows using the Command Prompt
Using the command prompt is by far the most effective way to disable WIndows file encrypting system. Read the steps and work accordingly.
Here are the steps to turn off file encryption via command prompt:
That command line will disable the file encryption in Windows 11/10. To enable the encryption, type fsutil behavior set disableencryption 0 in the command prompt and press Enter.
If the EFS is still enabled, try the following solution.
Check out our separate post on 10 Best Free Widgets and Gadgets on Windows 11.
2. Disable File Encryption Windows via Local Group Policy Editor
Tweaking the local group policy editor is also an effective technique to disable automatic encryption from Windows. This method works for Windows 11/10 pro and professional plus.
Here are the steps to disable file encryption in Windows through the local group editor:
Restart the computer to activate the changes on your computer. After that, check whether the EFS is disabled or not. Implement the following solution if not.
Also, check out our separate post on how to Access iMessage on Windows 11/10.
3. Tweak Local security Policy to Disable File Encryption
Local security policy indicates the security system of a local computer. Changing some of the policies may help you to enable/disable file encryption.
Here’s the procedure to modify the security policy to remove EFS from Windows:
Note: Select Allow after the popup window appears to enable EFS in Windows 10/11.
This is a 100% working method to remove NTFS EFS from your computer. Also, you can try further solutions to remove encryption from all files in Windows.
You may also like to read: How to Quickly Create a Sleep Timer in Windows 11.
4. Use Windows Services to Enable/Disable EFS
The services tool helps you to modify the core settings of your Windows computer. Try the following procedure to deactivate EFS from Windows 10/11.
Here’s the process to disable automatic encryption from Windows using services:
In case this process couldn’t help you disable NTFS EFS, the following technique might. Check out the further method to enable/disable file encryption.
5. Modify Registry Editor to Disable/Enable NTFS File Encryption
Registry Editor is a graphical tool for changing the Windows registry. Changing registry editor values allow you to try different settings on the operating system.
Here are the steps to remove EFS encryption from files by tweaking the registry editor:
Note: When you set the value as 1, it will disable the EFS encryption. Set the value data to 0 if you want to enable the NTFS EFS system.
These are the solutions that helped me disable the NTFS file encryption in Windows 11. If you have further queries regarding EFS, read the further section to clear out your confusion.
Frequently Asked Questions
How do I disable encrypted contents to secure data?
Run the cmd as an admin > Copy this command in the prompt; fsutil behavior set disableencryption 1 > Press Enter.
How do I remove encryption from a file?
Right-click the encrypted file or folder you want to decrypt > click on Properties > Go to the General tab > click on Advanced > Untick encrypt contents > Ok.
How do I enable EFS in Windows 10?
Go to the registry editor > Navigate to HKEY_LOCAL_MACHINE > SYSTEM > CurrentControlSet > Policies > Double-click on NtfsDisableEncryption > Change the value to 1.
Wrapping Up
In this entire guide, I helped you provide valid information about the EFS system on Windows. And most importantly, the exact way to disable NTFS EFS in Windows.
To recap the methods, first, run a simple command in cmd, then tweak the local group policy editor a bit. Followed by some changes in the system registry editor. That’s the ultimate method to remove EFS.
However, if any of the methods seem difficult while taking action, my comment box is always open for you. Enjoy!
Статья обновлена: 20 марта 2023
ID: 3340
В Windows по умолчанию доступно восстановление системы после возникновения сбоев в работе. Однако в некоторых случаях может возникнуть необходимость ее временного отключения. Например, для удаления из папки _Restore зараженных файлов, обнаруженных приложением «Лаборатории Касперского».
Как отключить восстановление системных файлов в Windows 7, 8, 8.1 и 10
Как отключить восстановление системных файлов в Windows 11
Что делать после отключения восстановления системы
Спасибо за ваш отзыв, вы помогаете нам становиться лучше!
Спасибо за ваш отзыв, вы помогаете нам становиться лучше!