
Привет, друзья. В этой публикации предлагаю рассмотреть простейший способ создания загрузочной флешки, причём такой, что будет совместима и с режимом работы компьютера UEFI, и со старым Legacy. При этом нам не потребуется никаких сторонних программ, всё будет выполнено средствами самой Windows. Этим способом вы можете создать установочную флешку любой версии Windows или LiveUSB со средой WinPE для устранения проблем с операционной системой и решения иных задач.
Как создать загрузочную флешку, совместимую с Legacy и UEFI
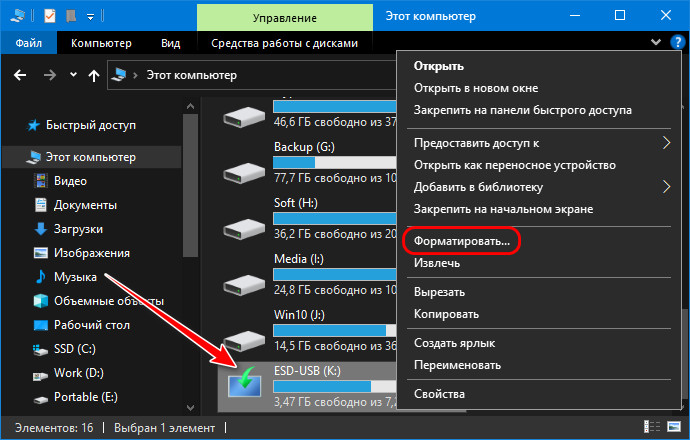
Итак, друзья, самый простой способ создания универсальной загрузочной флешки для установки на компьютеры с UEFI и обычным БИОСом Legacy. Совместимая UEFI/Legacy загрузочная флешка форматируется в файловую систему FAT32. В проводнике в контекстном меню на флешке жмём «Форматировать». Форматируем нашу флешку в FAT32.
Затем щёлкаем двойным щелчком левой клавишей мыши на ISO-образе Windows или WinPE, в нашем примере это образ установки Windows 10.
Образ у нас откроется в проводнике. Затем берём и копируем все файлы образа на флешку.

Все файлы образа скопированы на нашу флешку.

Уже сейчас эта флешка пригодна для загрузки на компьютерах с включенным интерфейсом UEFI. Но чтобы загружаться с ней ещё и на компьютерах со старым BIOS Legacy, нам нужно сделать единственный раздел на флешке активным. Открываем командную строку от имени администратора.
Вводим команды:
diskpart
lis vol (выводим в список разделы всех накопителей, подсоединённых к нашему компьютеру и видим нашу флешку, как Том 6)
sel vol 6 (данной командой мы выбираем нашу флешку)
activ (делаем её активной).

Вот и всё. Теперь с этой флешки мы можем загружаться на любых компьютерах — старых, новых, с UEFI, без UEFI. Такая универсальная флешка будет видна в меню загрузки BIOS компьютеров с включенным интерфейсом UEFI.

И также флешка будет видна в меню загрузки компьютеров с отключённым UEFI.

Примечание: друзья, вы также можете создать универсальную загрузочную флешку с любым загрузочным ПО, совместимую как с Legacy, так и UEFI, с помощью программ WinSetupFromUSB и Bootice.
C появлением BIOS UEFI загрузочные флешки стали делиться на типы — адаптированные под Legacy, старый режим BIOS, и под UEFI, современный режим BIOS, современный её формат. Многие программы для записи флешек могут создавать их адаптированными под оба режима BIOS, но немногие из них предлагают универсальное решение – создание флешек, совместимых и с Legacy, и с UEFI. А такая флешка пригодилась бы большинству опытных пользователей.
Многие из них работают не только с одним личным компьютерным устройством, а с несколькими. Многие решают различные вопросы с неполадками компьютеров в кругу своих близких. И им приходится сталкиваться с компьютерами, работающими как в режиме UEFI, так и в Legacy.
Как же создать универсальную загрузочную флешку для BIOS Legacy и UEFI?
***
Специфика флешек UEFI заключается в обязательности форматирования носителя в файловую систему FAT32. Флешки Legacy могут быть форматированы как в FAT32, так и в NTFS, однако для них принципиально важно наличие активного раздела на загрузочном носителе. Т.е. флешка должна быть инициализирована в MBR-стиле диска, а её раздел должен быть первичным (основным) и активным. Само же содержимое флешки копируется на неё обычным образом с ISO-образа самозагружаемого ПО – дистрибутива операционной системы, аварийного WinPE, прочего ПО. И, кстати, ISO-образ, дабы флешка могла загрузиться в режиме UEFI, должен содержать файлы, необходимые для EFI-загрузки. Все современные образы самозагружаемого ПО такие файлы содержат, а вот если у вас завалялись какие-то старые образы со времён 2000-х, с таких UEFI-компьютеры вы не загрузите.
MediaCreationTool для создания установочного носителя Windows 10
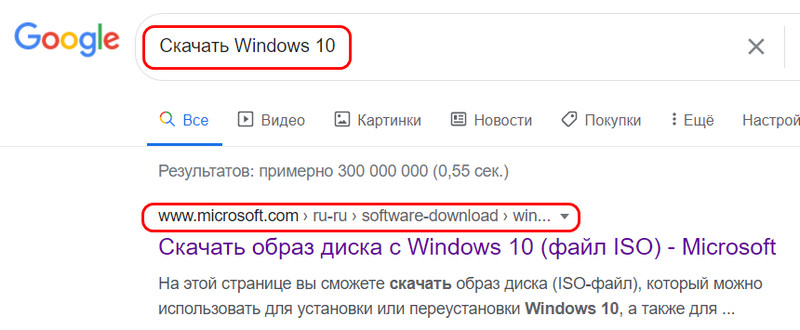
И вот чтобы обычные пользователи всеми этими тонкостями с режимами BIOS не заморачивались, компания Microsoft позаботилась о создании адаптированного и под Legacy, и под UEFI установочного флеш-носителя Windows 10. Компания на своём сайте предлагает утилиту MediaCreationTool, которая создаёт универсальную флешку, с которой мы гарантировано загрузим компьютер с любым режимом BIOS. Если вам нужно записать флешку с установочным процессом Windows 10, просто вводите в интернет-поисковик «скачать Windows 10», в числе первых результатов будет сайт Microsoft, заходите на него.
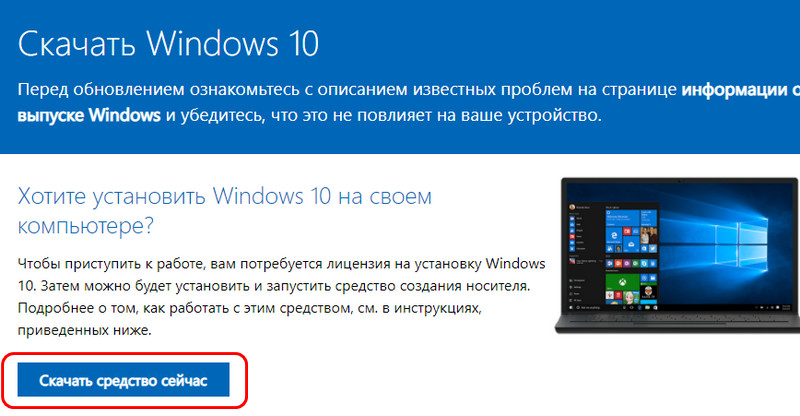
Жмите «Скачать средство сейчас».
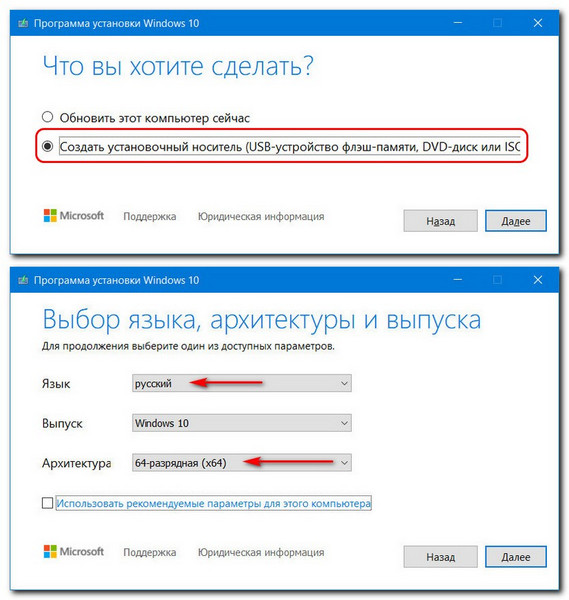
Запускайте скачанную утилиту. На первом этапе принимайте лицензионные условия. Далее выбирайте создание установочного носителя, указывайте параметры дистрибутива Windows 10 – язык и разрядность.
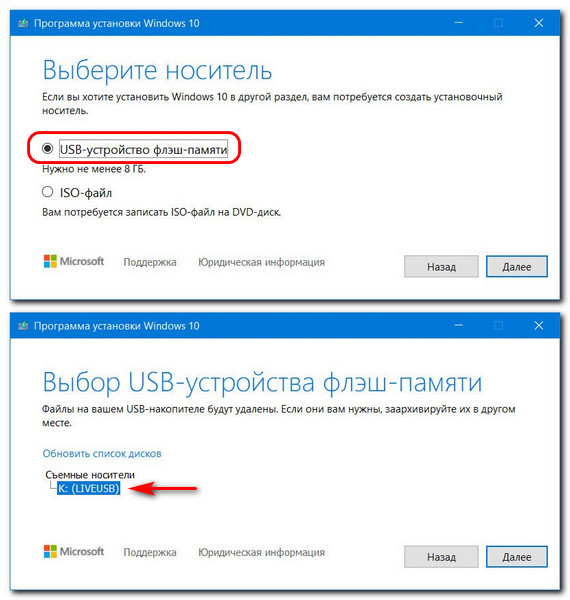
Затем выбирайте в качестве носителя USB-устройство флеш-памяти и указывайте конкретное устройство, если у вас их подключено несколько.
Ну и далее пойдёт уже процесс создания установочной флешки «Десятки». Давайте посмотрим на свойства загрузочной флешки, созданной утилитой Media Creation Tool, в системной консоли управления дисками. Видим, что раздел флешки – это основной раздел, он активен, следовательно, стиль разметки здесь MBR. Файловая система раздела – FAT32.
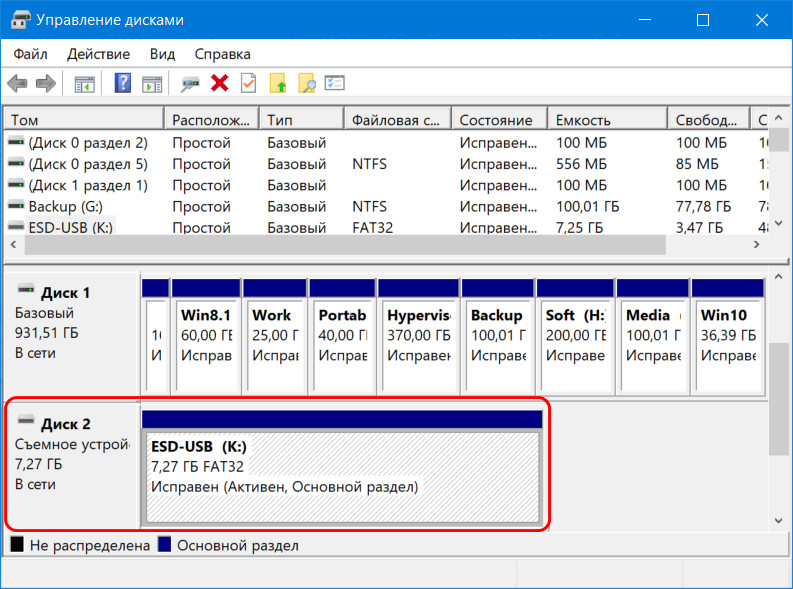
Вот такие свойства должны быть у универсальной загрузочной флешки, подходящей компьютерам и с BIOS Legacy, и с UEFI. И нам ничто не мешает самим создать такую флешку с нужным нам самозагружаемым ПО. Давайте же создадим.
Универсальная загрузочная флешка Legacy/UEFI
Форматируем флешку средствами Windows. В контекстном меню на флешке в проводнике выбираем «Форматировать».
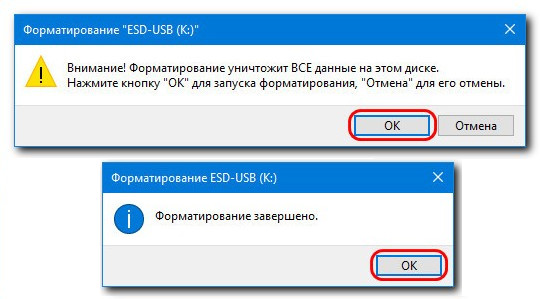
В графе файловой системы выставляем FAT32. Указываем метку тома, т.е. метку нашей загрузочной флешки. Остальное оставляем как есть. Жмём «Начать».
Подтверждаем форматирование. Дожидаемся его завершения.
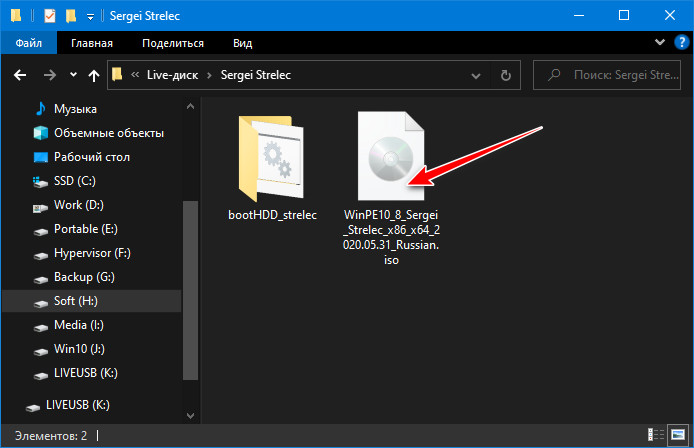
Теперь берём ISO-образ самозагружаемого ПО, в нашем случае это аварийный WinPE. Подключаем образ для отображения в проводнике Windows, в версиях системы 8.1 и 10 это делается обычным двойным кликом.
Выделяем всё содержимое подключённого ISO и копируем его на отформатированную флешку.

И вот копирование завершено, у нас готова загрузочная флешка для режима UEFI.

Но чтобы она подходила ещё и для режима Legacy, нужно адаптировать её. Для этого нам понадобится любая функциональная программа для разметки дискового пространства. В нашем случае мы будем использовать одну из старых версий MiniTool Partition Wizard. В окне программы смотрим карту нашей флешки и её табличное представление. Стиль разметки флешки у нас верный – MBR. Раздел флешки — первичный (основной), всё верно. А вот статуса активного этот раздел не имеет.
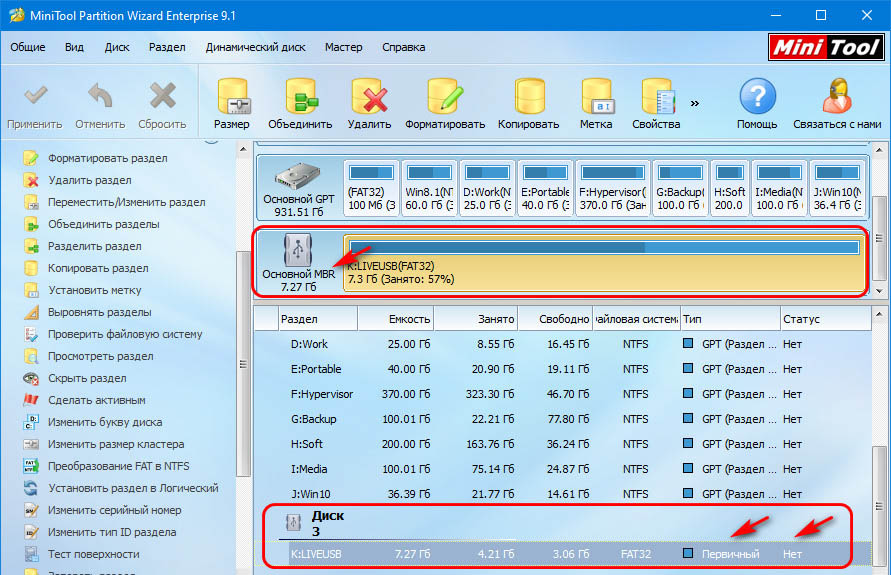
Выделяем раздел флешки и делаем его активным.

Применяем операцию.
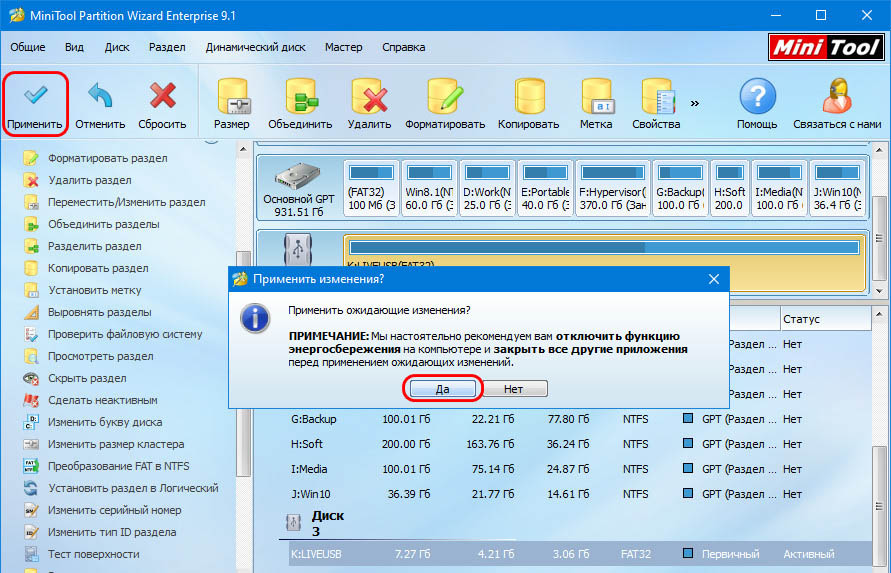
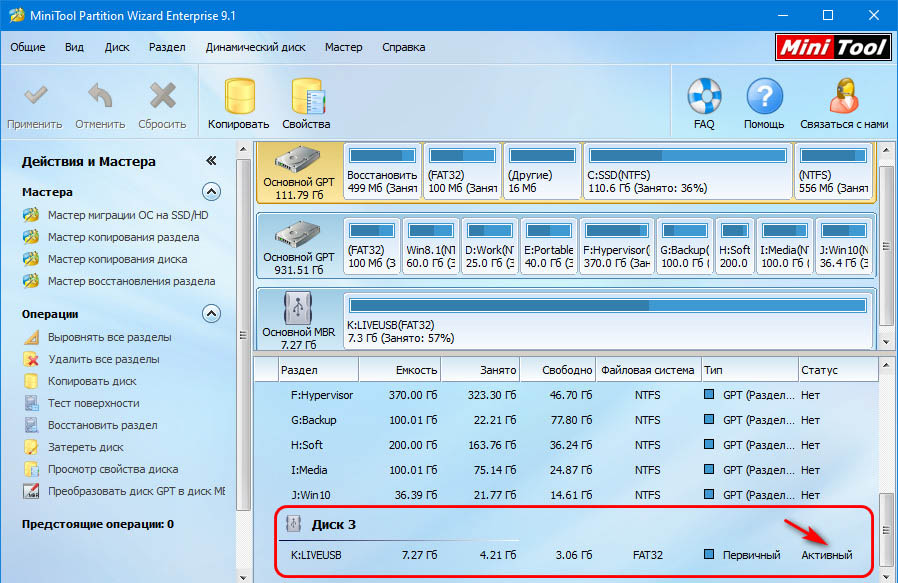
Теперь всё так, как надо.
Если у вас не соответствуют другие свойства флешки, вы меняете их. Т.е. если у вашей флешки стиль разметки GPT, вы его конвертируете в MBR и проверяете тип и статус её раздела, тип и статус должны быть, соответственно, первичным (основным) и активным.
Вот, собственно, и всё. И напоследок маленький лайфхак. Если у вас нет опыта работы с программами для разметки дискового пространства, если вы боитесь что-то сделать не то, если вам просто лень искать и устанавливать такую программу на компьютер, вы можете с помощью MediaCreationTool записать установочную фешку с Windows 10, утилита создаст её с нужными свойствами. Потом вы просто в проводнике удаляете всё содержимое флешки и копируете на флешку содержимое нужного вам ISO-образа.
January 14, 2016 updated by
Leave a reply »
New Windows 10 computers use UEFI firmware instead of the traditional BIOS. As you probably noticed when using a MBR-partitioned Windows installation USB drive on a new Windows 10 PC, UEFI will not recognize it as a boot media. UEFI-based computer can only boot from GPT-partitioned USB drive. Luckily, for backward compatibility most of the UEFI systems can also be configured to disable UEFI secure boot and instead revert to legacy BIOS boot mode. In this tutorial we’ll explain how you can easily create a UEFI or legacy bootable USB drive for Windows 10 Setup.
Requirements:
- A USB drive (a microSD, SD card or memory stick) with the minimum capacity 4 GB
- USB creation tool ISO2Disc
- Windows 10 ISO image, which can be downloaded from Microsoft’s website using its Media Creation Tool
How to Create UEFI or Legacy Bootable USB Drive for Windows 10 Setup
If you have the Windows 10 ISO image on your PC, you can choose to make a Windows 10 bootable USB drive with UEFI or legacy bootloader. 64-bit UEFI PC can only boot 64-bit version of Windows 10, while 32-bit UEFI PC can boot 32-bit OS only. So if you want to install Windows 10 with UEFI mode, you have to download a correct version of Windows 10 ISO image.
Before get started, make sure you backup all important files stored in your USB drive. The process of creating a bootable USB drive will erase all data and re-partition your USB drive.
- Insert the USB drive into the USB port of your computer.
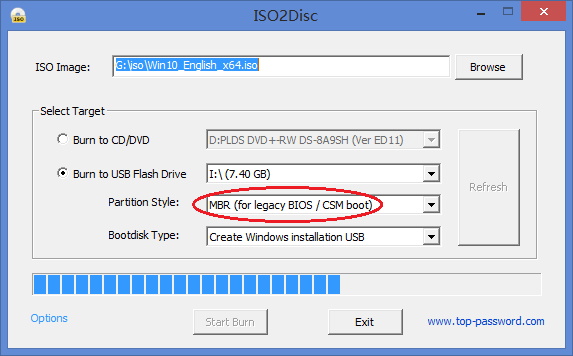
- Launch the ISO2Disc program. Click on Browse to select the Windows 10 ISO file.
- Now you have two options: make a bootable CD or USB drive. We’re explaining how to create a Windows 10 USB installer, so click on “Burn to USB Flash Drive” and select the drive letter of your USB disk from the list.
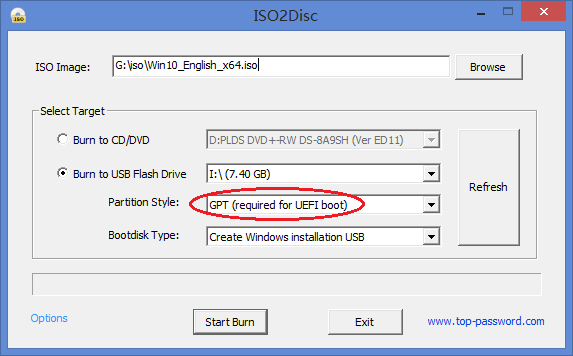
- Choose the partition style that is suitable for your target computer. If you want to install Windows 10 in UEFI mode on UEFI-based PC, choose the “GPT (required for UEFI boot)” option.

Otherwise choose “MBR (for legacy BIOS / CSM boot)” for BIOS-based PC, or UEFI computer running in legacy BIOS/CSM mode.
- Click on Start Burn. It will now create a Windows 10 USB installer. After creating, you’ll find out that a UEFI bootable USB drive was formatted as FAT32 because NTFS is not supported for external boot media under UEFI.
Of course, there are also some other USB creation tools available on the net, such as Rufus. It also allows you to create UEFI or legacy bootable USB installation drive from Windows 10 ISO image.
- Previous Post: How to Get Microsoft Edge Not to Save / Remember Passwords
- Next Post: Reset Windows 10 Lost Password on Acer Aspire Switch Laptop
No matter how technically-minded you are, it’s always smart to have a Windows 10 boot stick to hand. It takes just a few minutes to create a bootable Windows 10 USB, but it can save countless hours if your OS breaks down and you don’t have a spare PC to hand.
These days, a Windows 10 USB is the preferred method to perform a clean install of Microsoft’s operating system. With disk drives more or less dead, it’s often the only real choice on a completely new PC. Flash drives also don’t get scratched, are faster to write to, and take up less space.
Those wondering exactly how to make a bootable USB for Windows will be pleased to hear there are three generally accepted methods. One involves Microsoft’s Media Creation Tool, which greatly simplifies the experience, while third-party tool Rufus is best used to create a bootable USB from an iso. We’ll also be covering the creation of a boot stick from Windows 7, for the few of you still left on the outdated OS.
First, though, it’s worth noting that Windows machines generally have two BIOS types: Legacy or UEFI. You can read a full explanation on superuser here, but the general gist is that UEFI is supported on most modern PCs. If you’re unsure, take a look at your System Information app. Windows will list the type under ‘BIOS mode’.
How to Create a Windows 10 USB via the Media Creation Tool (UEFI or Legacy)
This is the Microsoft-recommended route to put Windows 10 on a USB drive, and for good reason. The Media Creation Tool cuts out some of the licensing annoyances in the setup process.
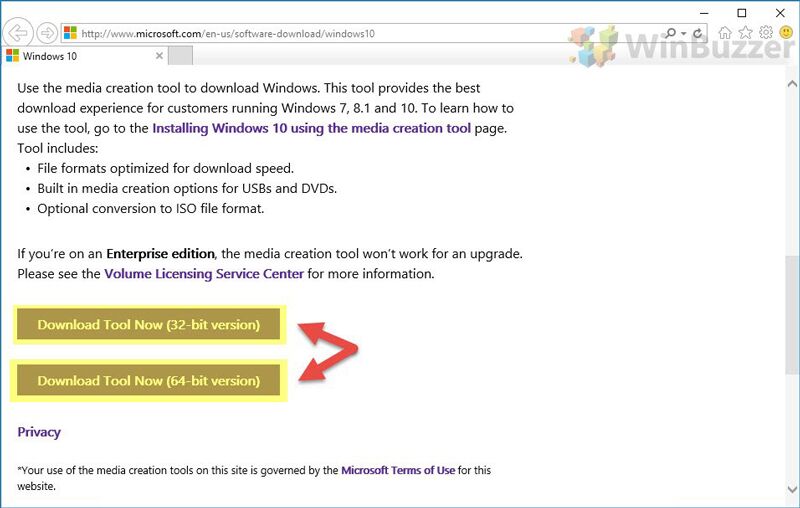
- Download the Windows 10 Media Creation Tool
The Windows 10 Media Creation Tool can be grabbed from Microsoft’s official site, and you shouldn’t obtain it from anywhere else. Once there, decide if you want your Windows 10 boot stick to install a 32 or 64-bit version of the OS (64-bit is a safe bet for most people). Click the relevant “Download tool now” button and open the file.

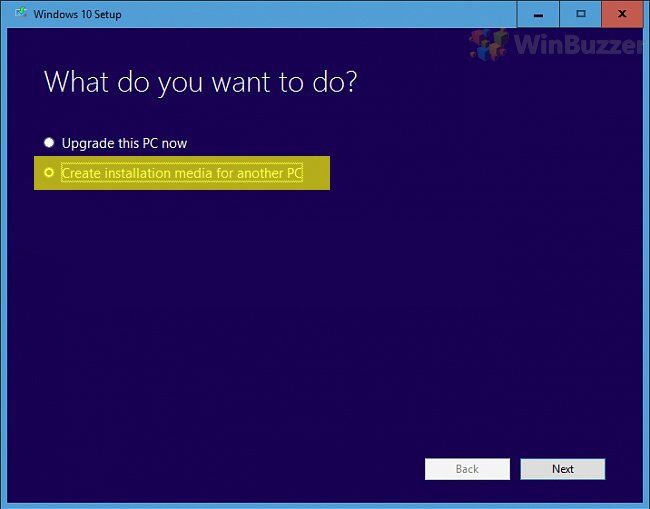
- Use the Windows 10 bootable USB tool to create media for another PC
When the Media Creation Tool boots, it’ll ask you to choose whether to create installation media this PC or another one. Click “Create installation media for another PC” and click “Next”.

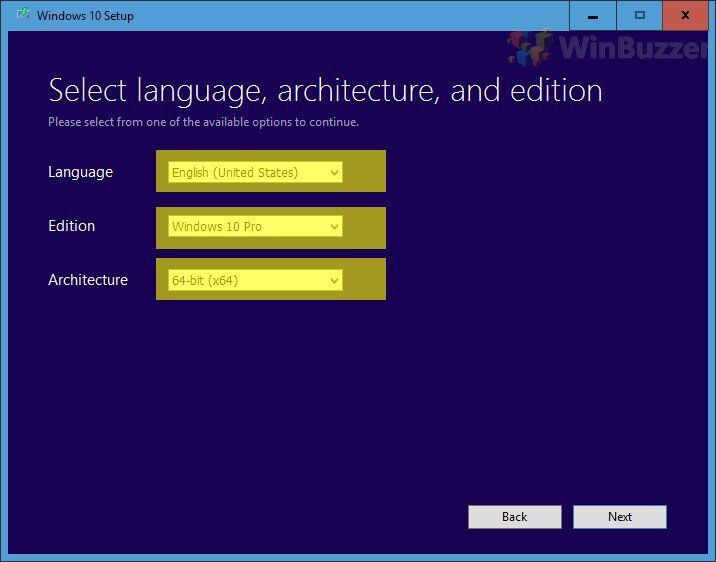
- Choose a system architecture for your Windows 10 USB
When you install Windows 10 to a USB, Microsoft asks you to choose the system’s architecture, language, and edition. Check your license key to see if you want a Windows 10 Home or Windows 10 Pro download, and select 64-bit or 32-bit. Again, you can find your architecture in your System Information app, but you can always choose both if you have the space on the USB drive. Once you’re done, click “Next”.

- Agree to install Windows 10 to a USB flash drive
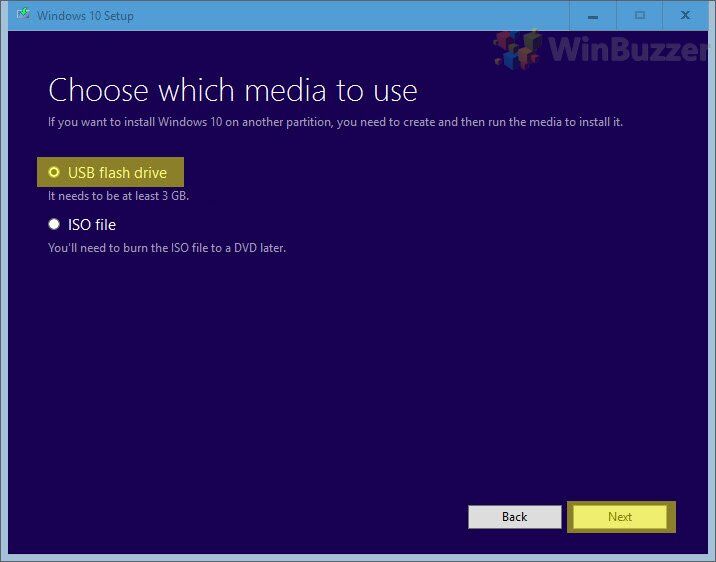
On the “Choose which media to use” screen, click “USB flash drive”. Click “Next”.
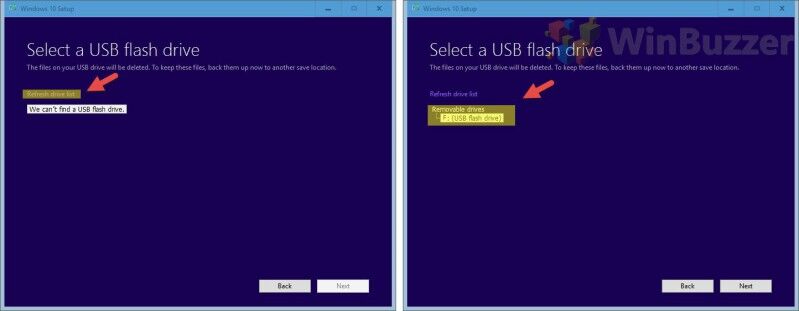
- Select your USB boot stick
Plug in your USB boot stick and click “Refresh drive list”. Select the USB drive and click “Next”.

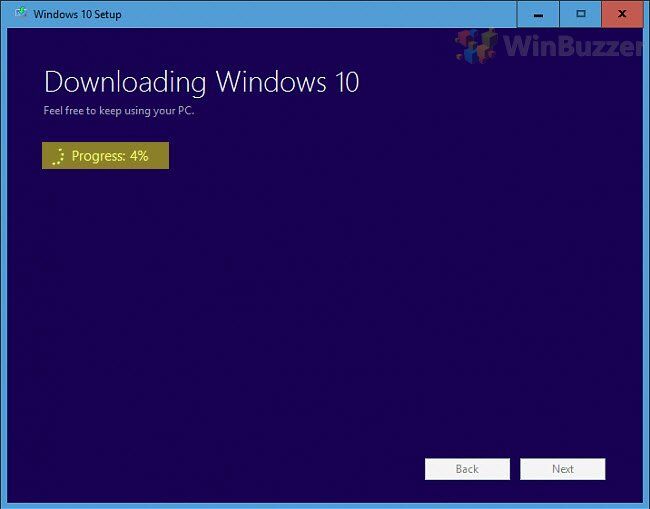
- Wait for the ISO to download and automatically create a bootable USB
The download may take some time, depending on your internet connection, the speed of your hard drive, and the speed of your USB stick.
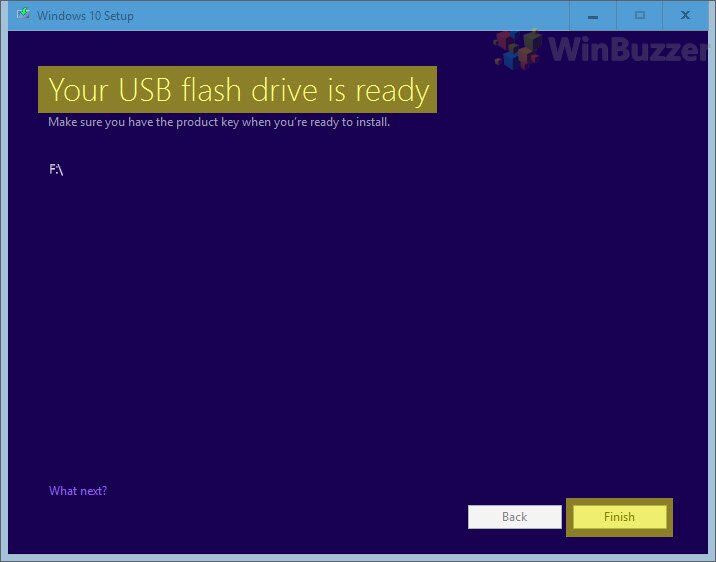
- Finish the Windows 10 USB creation
When everything has been written to the drive, the Media Creation Tool will display the message “Your USB flash drive is ready”. Click “Finish”.
How to Put Windows 10 on a USB Drive via ISO with Rufus (Legacy or UEFI)
The in-built Windows 10 download tool is good enough, but there are some instances where you might want to use third-party tool Rufus. For example, if you followed our how to download Windows 10 ISO files guide and have a disc image lying around already. It can also be better if you don’t have enough space on your C:/ drive for the Media Installation Tool to function.
- Download a Windows 10 ISO file
There are several ways you can obtain an ISO:
? Via the Media Creation Tool
? Directly from the Microsoft servers
? From an unofficial source (not recommended)
? By converting an official Windows Update ESD file into ISO format
? By slipstreaming all available updates into a Windows 10 ISO file - Grab the Rufus Windows 10 download
Download Rufus from the official website, either in regular or portable version. We choose Rufus because it’s free and tends to be faster than other alternatives like UNetbootin, Universal USB Installer, Windows 7 USB download tool, or WintoUSB.
- Plug in the USB Flash Drive and run Rufus
It should boot straight to the Rufus bootable usb screen without any extra fuss.
- Create a Windows 10 UEFI boot USB with Rufus
To create a UEFI boot USB, select the following options, and click Start:
? Device: Your USB drive
? Partition scheme and target system type: GPT partition scheme for UEFI
? File system: Fat32 (Default)
? Cluster size: 4096 bytes (Default)
? New volume label: Windows 10 UEFI
? Format Options:
✔ Quick format
✔ Create a bootable disk using: ISO image (here you need to select your 64-bit Windows 10 ISO file from your computer)
✔ Standard Windows installation
✔ Create extended label and icon filesOnce you’re done, click “Start”.
Accept the warning by clicking “OK”.

Rufus will now create a Windows 10 UEFI boot USB. This process may take some time.
- Create a Windows 10 Legacy Boot USB with Rufus
The settings for a Rufus bootable USB that’s compatible with Legacy BIOS versions are quite different. Select the following:
? Device: Your USB drive
? Partition Scheme and target system type: MBR partition scheme for BIOS or UEFI-CSM
? File system: NTFS
? Cluster size: 4096 bytes (Default)
? New volume label: Windows 10 Legacy Boot USB
? Format Options:
✔ Quick format
✔ Create a bootable disk using: ISO image (here you need to select your 64-bit Windows 10 ISO file)
✔ Standard Windows installation
✔ Create extended label and icon filesWhen you’re done, click “Start”.
Accept the warning by clicking “OK”.
Rufus will now create a Windows 10 USB in the legacy format. This may take some time.
How to Create a Windows 10 Bootable USB fro ISO via the Windows 7 USB/DVD Download Tool (Legacy)
If you want a legacy BIOS but want to stick to Microsoft’s official tool, the old Windows 7 USB/DVD tool is also a good choice.
- Download a Windows 10 ISO file
? Via the Media Creation Tool
? Directly from the Microsoft servers
? From an unofficial source (not recommended)
? By converting an official Windows Update ESD file into ISO format
? By slipstreaming all available updates into a Windows 10 ISO file - Download and Install the Windows 7 USB/DVD Download Tool
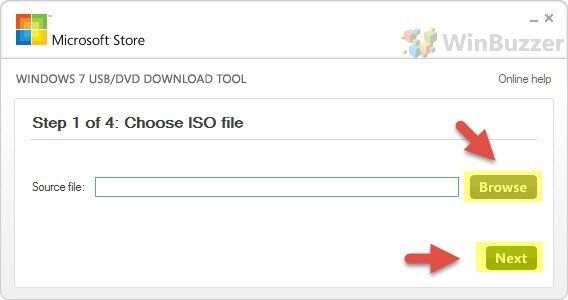
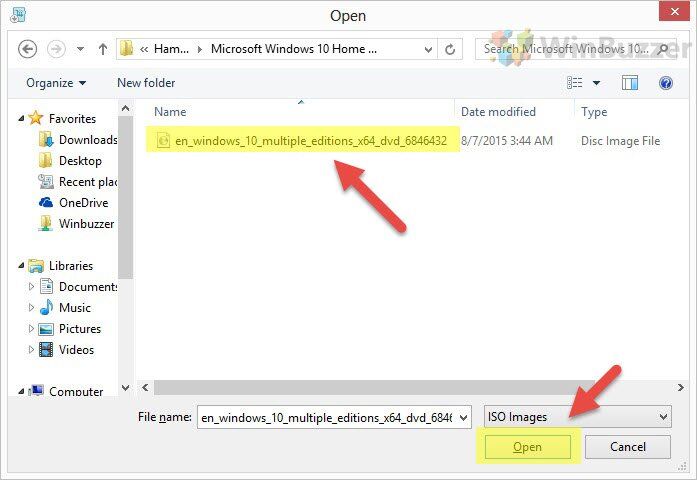
- Click “Browse”

- Select your Windows 10 ISO file and press “Open”

- Click “Next”
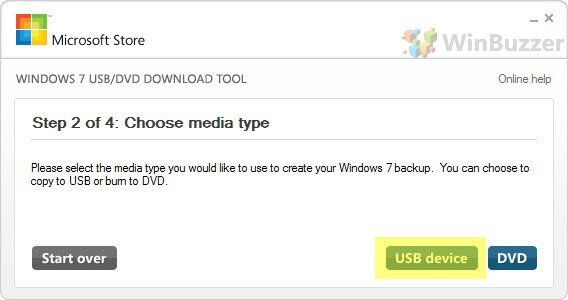
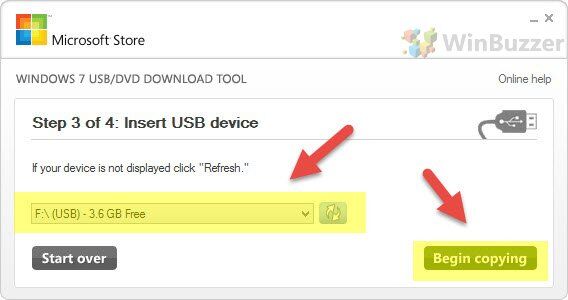
- Choose “USB device”
- Select the Windows 10 USB you want to make into a boot stick
If it doesn’t display immediately, ensure it’s plugged in correctly and press the refresh icon. Then click “Begin copying”.
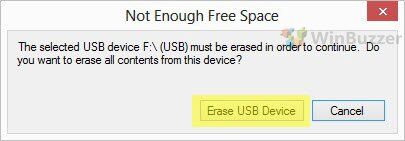
- Erase the USB drive

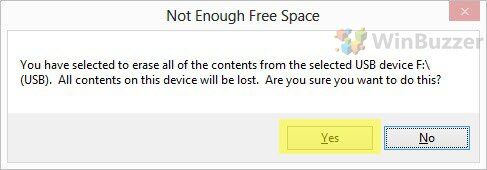
- Confirm the drive erase by clicking “Yes”

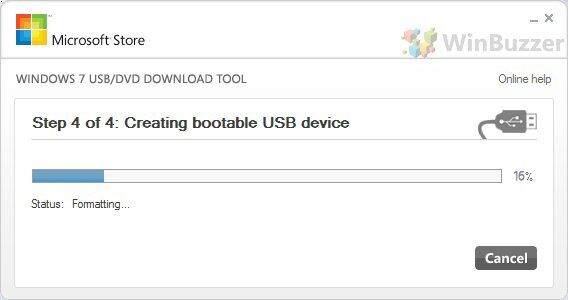
- Wait for the Windows 7 USB/DVD Download Tool to create a Windows 10 boot stick
Depending on your hard drive/USB speeds, this could take some time.
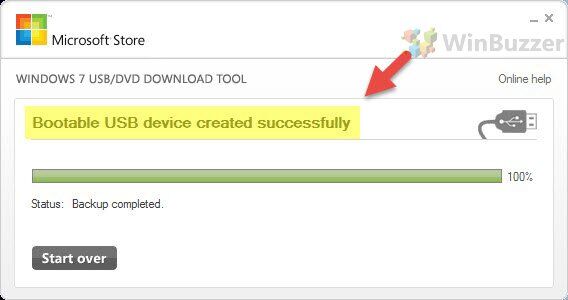
- Close the USB/DVD Download tool
When you see the “Bootable USB device created successfully” message, it’s safe to close.
Last Updated on August 14, 2020 8:25 pm CEST
Legacy boot mode is essential for older computers that utilize BIOS (Basic Input/Output System) rather than UEFI (Unified Extensible Firmware Interface) for booting. If you need to install or repair Windows 10 on a computer with legacy BIOS, creating a bootable USB drive is the way to go. Rufus is a powerful and user-friendly tool that simplifies this process. In this guide, we’ll walk you through the steps to make a legacy bootable USB for Windows 10 using Rufus.

Prerequisites
Before you start, ensure you have the following:
1. A USB Drive (8GB or Larger): This will serve as the storage medium for the Windows 10 installation files.
2. Windows 10 ISO File: Obtain a digital copy of the Windows 10 installation files by downloading the ISO from the official Microsoft website.
3. Rufus Software: Download and install Rufus from the official website (https://rufus.ie/).
Step-by-Step Guide
Follow these detailed steps to create a legacy bootable USB for Windows 10:
Step 1: Insert the USB Drive
Connect your USB drive to an available USB port on your computer.
Step 2: Launch Rufus
Open the Rufus application. Note that you might need administrator privileges, so if prompted, grant them.
Step 3: Select the USB Drive
In the Rufus window, the connected USB drive should be automatically recognized and selected under the “Device” section. Ensure you have the correct drive selected, especially if you have multiple drives connected.
Step 4: Load the Windows 10 ISO File
Click on the small disk icon next to the “Boot selection” option. This will open a file dialog. Browse your computer to find and select the Windows 10 ISO file you downloaded earlier.
Step 5: Choose the Partition Scheme and Target System
Under the “Partition scheme and target system type,” select “MBR” (Master Boot Record). This is essential for legacy boot mode.
Next, under “Target system,” choose “BIOS (or UEFI-CSM).” This option ensures compatibility with both legacy BIOS and newer UEFI systems.

Step 6: File System and Cluster Size
Leave the “File system” as “NTFS” and the “Cluster size” as “Default.”
Step 7: Volume Label (Optional)
You can give your USB drive a name in the “Volume label” field, but this is entirely optional.
Step 8: Start the Creation Process
Double-check all your settings to ensure they match the ones listed above. Once you’re satisfied, click the “Start” button.
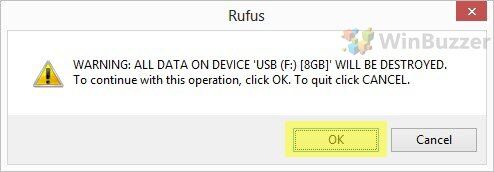
Step 9: Confirmation Prompt
A warning will pop up, stating that all data on the USB drive will be destroyed. Make sure you’ve backed up any important data from the USB drive, then click “OK” to proceed.
Step 10: Wait for the Process to Complete
Rufus will now start creating the bootable USB drive. This process may take some time, so be patient and let it finish.
Step 11: Completion
Once Rufus has finished, you’ll see a “READY” status in the lower left corner. You can now close Rufus and safely eject the USB drive from your computer.
Using the Bootable USB Drive
With your legacy bootable USB for Windows 10 created, you’re ready to use it. Follow these steps:
1. Insert the bootable USB drive into the computer you want to install or repair Windows on.
2. Turn on or restart the computer.
3. As the computer starts up, access the BIOS settings (usually by pressing a key like F2, F12, ESC, or DEL).
4. In the BIOS settings, navigate to the “Boot” or “Boot Order” section and set the USB drive as the first boot option.
5. Save the changes and exit the BIOS settings.
6. The computer will now boot from the USB drive. Follow the on-screen instructions to install or repair Windows.
Creating a legacy bootable USB for Windows 10 using Rufus empowers you to install or repair Windows on older hardware with ease. By meticulously following the steps outlined in this guide, you’ll have a functional bootable USB drive at your disposal. Remember to always back up important data from the USB drive. That is a crucial step before initiating the process, as it involves formatting. If you need assistance with any writing tasks during this setup, you can always ask professionals to write a paper for me with Writepaper, ensuring you get quality content while you focus on your technical projects.
I’m Antonia, a copywriter with over five years of experience in the industry. I find joy in exploring a wide array of topics through my writing. It’s my passion to create engaging and compelling content that resonates with readers.