
Перед обновлением ознакомьтесь с описанием известных проблем на странице информации о выпуске Windows и убедитесь, что это не повлияет на ваше устройство.
Обеспечивайте защиту благодаря ключевым обновлениям Windows. С 14 октября 2025 года вы перестанете получать бесплатные обновления ПО, техническую поддержку и исправления системы безопасности для Windows 10. Это означает, что ваш компьютер станет более уязвимым к угрозам и вредоносным приложениям. Выполните переход на Windows 11. Воспользуйтесь защитой, скоростью и инновациями, которые предлагает Windows 11 независимо от цены пакета. Перейдя на Windows 11, вы продолжите получать актуальные обновления системы безопасности, функции и техническую поддержку, которые будут гарантировать защиту и эффективную работу компьютера. Дополнительные сведения о завершении поддержки Windows 10 см. в записи блога Windows.
Создание установочного носителя Windows 10
Чтобы приступить к работе, потребуется лицензия на установку Windows 10. Затем вы сможете скачать и запустить средство создания носителя. Дополнительные сведения об использовании средства читайте в указаниях ниже.

-
Эти инструкции можно использовать в следующих случаях:
- У вас есть лицензия на установку Windows 10, и вы обновляете операционную систему компьютера с Windows 7 или Windows 8.1.
- Вам нужно переустановить Windows 10 на компьютере, где уже была успешно активирована эта ОС.
Если вы устанавливаете Windows 10 на компьютере с Windows XP или Windows Vista или вам нужно создать установочный носитель с Windows 10 на другом компьютере, ознакомьтесь с разделом Использование средства для создания установочного носителя (USB-устройства флэш-памяти, DVD-диска или ISO-файла) для установки Windows 10 на другом компьютере ниже.
Примечание. Прежде чем устанавливать Windows 10, убедитесь, что ваш компьютер соответствует системным требованиям для этой ОС. Кроме того, рекомендуем посетить веб-сайт производителя компьютера, чтобы получить дополнительные сведения об обновленных драйверах и совместимости оборудования.
- Нажмите Скачать средство, а затем — Запустить. Для запуска этого средства необходимы права администратора.
- Если вы согласны с условиями лицензионного соглашения на странице Условия лицензии, нажмите Принять.
- На странице Что вы хотите сделать? выберите Обновить этот компьютер сейчас, а затем нажмите Далее.
-
После скачивания и установки средство предоставит инструкции по настройке Windows 10 на компьютере. По ссылке Windows 10 доступны все версии Windows 10, кроме выпуска «Корпоративная». Дополнительную информацию о версии «Корпоративная» см. на портале Центр администрирования Microsoft 365.
- Если у вас нет лицензии на установку Windows 10 и вы еще не выполнили обновление до этой версии, можете приобрести копию здесь: get-windows-10
- Если вы уже обновили операционную систему на этом компьютере до Windows 10 и сейчас переустанавливаете ее, вам не нужно вводить ключ продукта. Ваша копия Windows 10 будет автоматически активирована позже с помощью цифровой лицензии.
- Когда Windows 10 будет готова к установке, вы увидите сведения о выбранных параметрах и о том, какие компоненты будут сохранены при обновлении. Нажмите Изменить выбранные для сохранения компоненты и выберите нужный вариант: Сохранить личные файлы и приложения, Сохранить только мои личные файлы или Ничего.
- Сохраните и закройте все открытые приложения и файлы, а когда вы будете готовы, нажмите кнопку Установить.
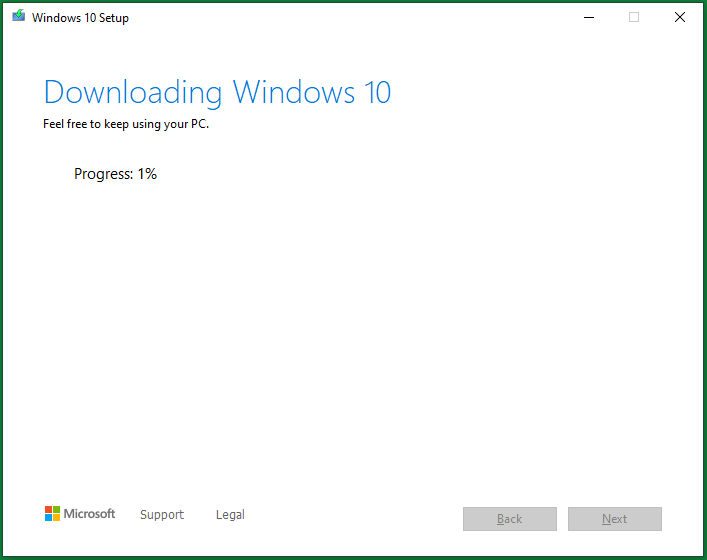
- Установка Windows 10 может занять некоторое время. В процессе компьютер несколько раз перезагрузится. Не выключайте компьютер.
-
Следуйте этим указаниям, чтобы создать установочный носитель (USB-накопитель или DVD-диск), с помощью которого можно установить новую копию Windows 10, выполнить чистую установку или переустановить Windows 10.
Прежде чем скачивать средство, убедитесь, что у вас есть:
- Подключение к Интернету (интернет-провайдер может взимать плату за услуги).
- Достаточно свободного места на диске компьютера, USB-накопителе или внешнем носителе.
- Пустой USB-накопитель объемом не менее 8 ГБ или чистый DVD-диск (а также устройство для записи DVD-дисков), если требуется создать носитель. Рекомендуем использовать пустой USB-накопитель или чистый DVD-диск, так как все их содержимое будет удалено.
- Если при записи ISO-файла на DVD-диск появится сообщение, что файл образа диска слишком большой, необходимо использовать двухслойный DVD-диск (DL).
Проверьте характеристики компьютера, на котором требуется установить Windows 10:
- Архитектура ЦП (64- или 32-разрядная). Вы создадите 64- или 32-разрядную версию Windows 10. Чтобы проверить эту характеристику, откройте раздел Сведения о компьютере в параметрах компьютера или Система на панели управления и посмотрите тип системы.
- Требования к системе. Убедитесь, что ваш компьютер соответствует системным требованиям для Windows 10. Кроме того, рекомендуем посетить веб-сайт производителя компьютера, чтобы получить дополнительные сведения об обновленных драйверах и совместимости оборудования.
- Язык Windows. Вам нужно выбрать тот же язык при установке Windows 10. Чтобы узнать, какой язык сейчас используется, откройте раздел Время и язык в параметрах компьютера или Регион на панели управления.
- Выпуск Windows. Вам также потребуется выбрать тот же выпуск Windows. Чтобы узнать, какой выпуск используется, откройте раздел Сведения о компьютере в параметрах компьютера или Система на панели управления и найдите пункт Выпуск Windows. Windows 10 Корпоративная недоступна в средстве создания носителя. Больше об этом можно узнать на портале Центр администрирования Microsoft 365.
- Продукты Microsoft Office. Если вы приобрели новое устройство с Office 365, рекомендуем активировать (установить) Office перед обновлением до Windows 10. Сведения об активации копии Office см. в статье Скачивание и установка Office 365 для дома, Office 365 персональный или Office 365 для студентов. Дополнительные сведения см. в статье Обновление до Windows 10 на новых устройствах с Office 365.
Создание установочного носителя с помощью средства:
- Нажмите Скачать средство, а затем — Запустить. Для запуска этого средства необходимы права администратора.
- Если вы согласны с условиями лицензионного соглашения, нажмите Принять.
- На странице Что вы хотите сделать? выберите параметр Создать установочный носитель для другого компьютера, а затем нажмите кнопку Далее.
-
Выберите для Windows 10 язык, выпуск и архитектуру (32- или 64-разрядная). Приведенная ниже таблица поможет вам решить, какой выпуск Windows 10 нужно установить.
Текущий выпуск Windows Выпуск Windows 10 Windows 7 Начальная
Windows 7 Домашняя базовая
Windows 7 Домашняя расширенная
Windows 7 Профессиональная
Windows 7 Максимальная
Windows 8/8.1
Windows 8.1 с Bing
Windows 8 Профессиональная
Windows 8.1 Профессиональная
Windows 8/8.1 Профессиональная с Media Center
Windows 8/8.1 для одного языка
Windows 8 для одного языка с Bing
Windows 10 Домашняя
Windows 10 ProWindows 10 Windows 8/8.1 для китайского языка
Windows 8 для китайского языка с BingWindows 10 Домашняя для Китая - Выберите нужный носитель:
- USB-накопитель . Подключите пустой USB-накопитель емкостью не менее 8 ГБ. Все содержимое накопителя будет удалено.
- Файл ISO. Сохраните ISO-файл на компьютере, чтобы создать DVD-диск. Скачав файл, вы можете открыть папку, в которой он сохранен, или выбрать команду Открыть устройство записи DVD-дисков и следовать указаниям по записи файла на DVD-диск. Дополнительные сведения об использовании ISO-файла читайте в разделе Дополнительные методы использования ISO-файла для установки Windows 10 ниже.
- Создав установочный носитель, следуйте приведенным ниже указаниям по его использованию.
-
После установки Windows 10, убедитесь в том, что на компьютере установлены все необходимые драйверы устройств. Чтобы проверить наличие обновлений, нажмите кнопку «Пуск», выберите «Параметры» > Обновление и безопасность > Центр обновления Windows. Затем нажмите «Проверить наличие обновлений». Вы также можете посетить сайт поддержки изготовителя своего устройства, чтобы загрузить дополнительные необходимые драйверы.
Примечание. Драйверы для устройств Surface доступны на этой странице.
Использование созданного установочного носителя (нажмите, чтобы показать или скрыть дополнительные сведения)
Прежде чем устанавливать Windows 10, рекомендуется сохранить все необходимые данные и создать резервную копию компьютера. Если вы скачали ISO-файл для Windows 10 с помощью средства создания носителя, необходимо записать его на DVD-диск, прежде чем следовать приведенным ниже указаниям.
- Подключите USB-накопитель или вставьте DVD-диск в компьютер, на котором требуется установить Windows 10.
- Перезапустите компьютер.
Если компьютер не загрузится автоматически с USB-накопителя или DVD-диска, может потребоваться открыть меню загрузки или изменить порядок загрузки в настройках BIOS или UEFI. Чтобы открыть это меню загрузки или изменить порядок загрузки, обычно необходимо нажать клавишу (например, F2, F12, Delete или Esc) сразу после включения питания компьютера. Инструкции о доступе к меню загрузки или изменении порядка загрузки см. в документации, входящей в комплект компьютера, или на сайте производителя. Если в списке вариантов загрузки отсутствует USB-накопитель или DVD-диск, вам может потребоваться обратиться к производителю компьютера за инструкциями по временному отключению режима безопасной загрузки в настройках BIOS.
Если изменение меню или порядка загрузки не работает, а компьютер сразу загружает операционную систему, которую вы хотите заменить, возможно, что компьютер не был полностью выключен. Чтобы полностью выключить компьютер, нажмите кнопку питания на экране входа или в меню «Пуск» и выберите «Завершение работы».
- На странице Установка Windows выберите параметры языка, времени и клавиатуры, а затем нажмите кнопку Далее.
- Выберите Установить Windows.
Дополнительные методы использования ISO-файла для установки Windows 10 (нажмите, чтобы показать или скрыть дополнительные сведения)
Если вы скачали ISO-файл для Windows 10, он сохранен в указанной вами папке на локальном компьютере. Если на компьютере установлена сторонняя программа для записи DVD-дисков, которую вы хотите использовать для создания установочного DVD-диска, откройте папку, в которой сохранен файл и дважды щелкните ISO-файл или щелкните его правой кнопкой мыши, выберите команду Открыть с помощью, а затем выберите предпочитаемую программу.
Чтобы создать установочный DVD-диск с помощью средства записи образов Windows, откройте папку, в которой сохранен ISO-файл. Щелкните ISO-файл правой кнопкой мыши и выберите Свойства. На вкладке «Общие» нажмите Изменить и выберите проводник Windows в качестве программы для открытия ISO-файлов, а затем нажмите кнопку Применить. Затем щелкните ISO-файл правой кнопкой мыши и выберите команду Записать образ диска.
Чтобы установить Windows 10 непосредственно из ISO-файла, не используя DVD-диск или накопитель, вы можете подключить ISO-файл. При этом текущая операционная система будет обновлена до Windows 10.
Подключение ISO-файла:
- Откройте папку, в которой сохранен ISO-файл, щелкните его правой кнопкой мыши и выберите Свойства.
- На вкладке «Общие» нажмите Изменить и выберите проводник Windows в качестве программы для открытия ISO-файлов, а затем нажмите кнопку Применить.
- Щелкните ISO-файл правой кнопкой мыши и выберите команду Подключить.
- Дважды щелкните ISO-файл, чтобы просмотреть включенные в него файлы. Дважды щелкните файл setup.exe, чтобы начать установку Windows 10.
СКАЧАТЬ
Описание
Отзывы
Выберите вариант загрузки:
- скачать с сервера SoftPortal (для Windows 10, установочный exe-файл)
- скачать с сервера SoftPortal (для Windows 11, установочный exe-файл)
- скачать с официального сайта (для Windows 10, установочный exe-файл)
- скачать с официального сайта (для Windows 11, установочный exe-файл)
Media Creation Tool — бесплатный инструмент от компании Microsoft с помощью которого можно легко установить и переустановить Windows 10/11 создавать загрузочные образы ОС Windows, а также использовать его в качестве альтернативного способа обновлений (полное описание…)

Рекомендуем популярное
Media Creation Tool 22H2 Win10 / 24H2 Win11
Media Creation Tool — бесплатный инструмент от компании Microsoft с помощью которого можно легко…
Windows XP Service Pack 3 (iso-образ)
Microsoft Windows XP Service Pack 3 — официальный пакет обновления 3 (SP3) для Windows XP содержит все ранее…
Microsoft Office 2007 Service Pack 2 (SP2)
Microsoft Office 2007 Service Pack 2 — первый пакет обновлений (SP2) для Microsoft Office 2007, содержащий улучшения,…
Win Updates Disabler 1.4
Win Updates Disabler — бесплатный и простой в использовании инструмент для управления…
Windows Update MiniTool 07.01.2020
Windows Update MiniTool — альтернатива стандартному Windows Update. С ее помощью вы в любой момент сможете…
ASUS BIOS Update 7.18.03
ASUS BIOS Live Update — Фирменная утилита для обновления BIOS материнских плат ASUS через интернет…
This article published by MiniTool corporation teaches you three methods to convert Windows existing installation into portable ISO. It also introduces you to how to make use of the created ISO file and the benefits of using an ISO file.
About Create Windows 10/11 ISO Image from Existing Installation
ISO image here is a file that contains all operating system-related items. It includes everything that needed to boot up a computer or install the OS. To create a Win10/11 ISO image from the existing installation means to make a system image file based on the current Windows 10/11 OS.
Then, how to create Windows 10 ISO from existing installation? There are several methods.
Usually, you have to rely on a professional and powerful tool to create a system ISO. Such tools can pick up everything needed to build an image file from your computer and make sure the created ISO image is bootable. Below will take MiniTool ShadowMaker for example to show you how to make a bootable iso of existing windows installation.
MiniTool ShadowMaker TrialClick to Download100%Clean & Safe
Step 1. Download, install, and launch MiniTool ShadowMaker on your computer. If it pops up asking you for purchase, click Keep Trial to keep using it freely.
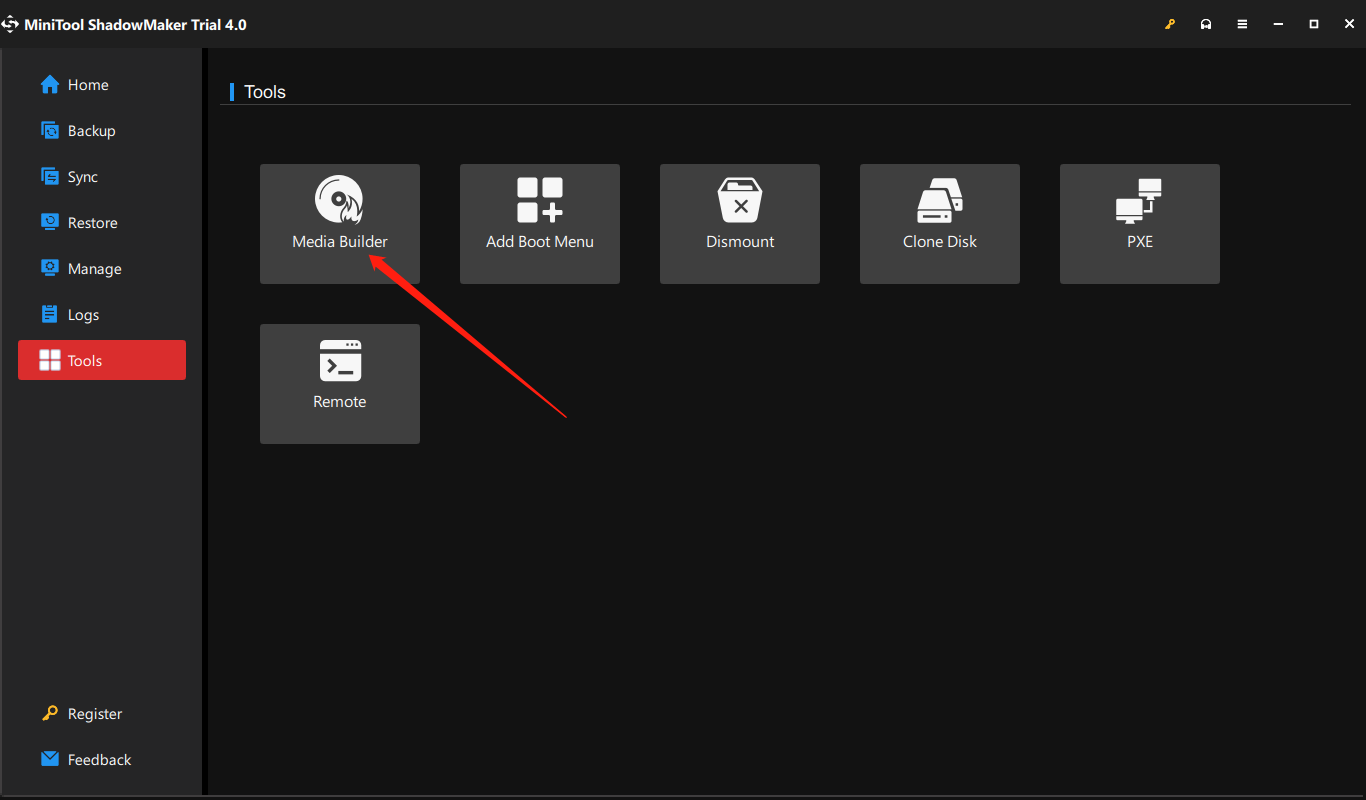
Step 2. When entering the main interface of the program, select the Tools option.
Step 3. In the Tools tab, choose Media Builder.
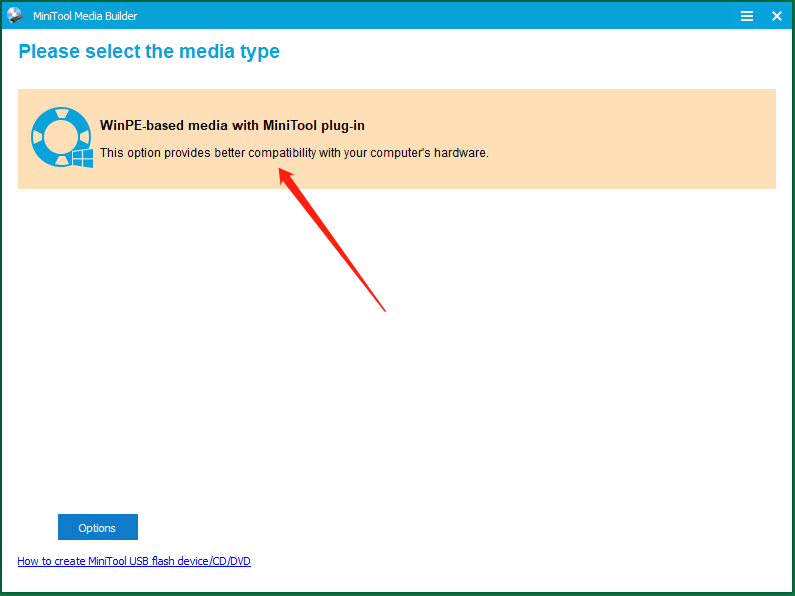
Step 4. In the pop-up new window named MiniTool Media Builder, click on WinPE-based media with MiniTool plug-in to select it.
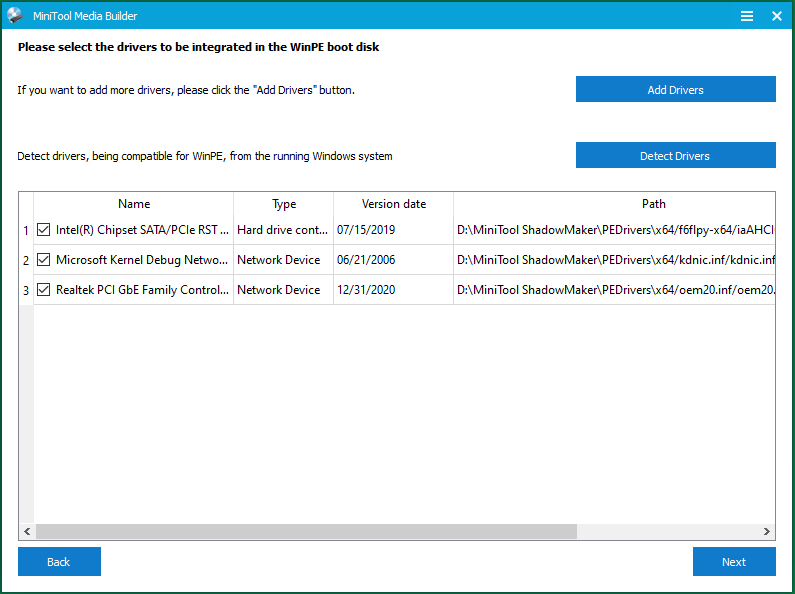
Step 5. There is an Options button in the lower-left for you to specify which drivers to be included in the Windows 10/11 ISO image.
Add Drivers – To manually add drivers on your computer into the upcoming ISO file.
Detect Drivers – To automatically detect drivers that are compatible with WinPE from the running Windows.
Step 6. Next, select ISO File and choose a local location to save the ISO. It will start to create the Windows ISO immediately after you pick up a storage address.
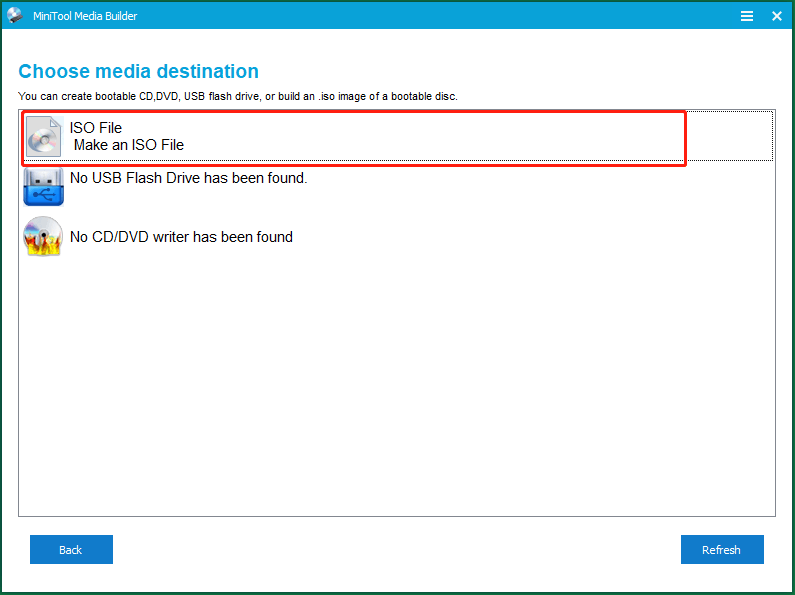
Besides creating ISO files, MiniTool ShadowMaker also allows you to create bootable USB flash drives, CDs, or DVDs.
Step 7. Wait until the process finishes. It won’t take too long (usually within 10 minutes). Or, you can do your other business during the task is processing.
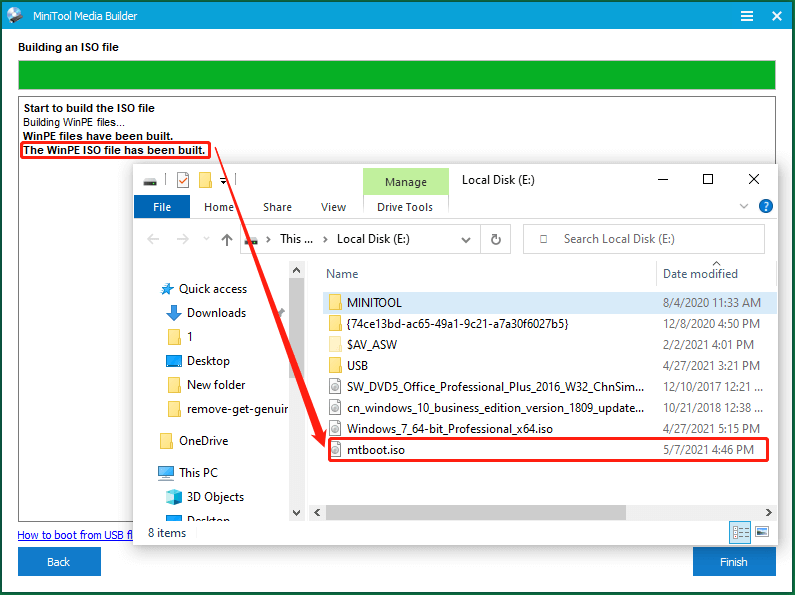
Finally, you can see the crated Windows 10/11 ISO image in the location you choose.
Besides creating a Windows ISO image from the existing installation, MiniTool ShadowMaker also enables you to back up files/folders, partitions/volumes, system, and hard disk drives. Actually, MiniTool ShadowMaker is more a data backup app than a bootable media creator.
The Windows Media Creation Tool is specially designed for building installation media or upgrading the system to Windows 10/11. As for the installation media, you can use it to install Windows 10/11 on a different PC, a new copy, a clean installation, or just reinstallation.
Before starting, you are required to have a license to install Windows 10/11 with the Windows media you are going to create. Then, you can firstly download Windows Media Creation Tool on your computer.
Step 1. Click on the downloaded MediaCreationTool20H2.exe file to run it.
Step 2. Select Accept to agree to the applicable notices and license terms to continue.
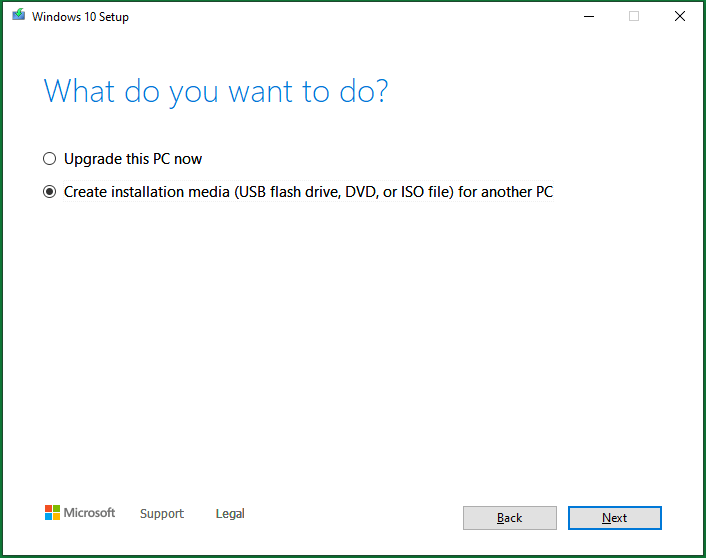
Step 3. Choose to Create installation media (USB flash drive, DVD, or ISO file) for another PC in the What do you want to do screen.
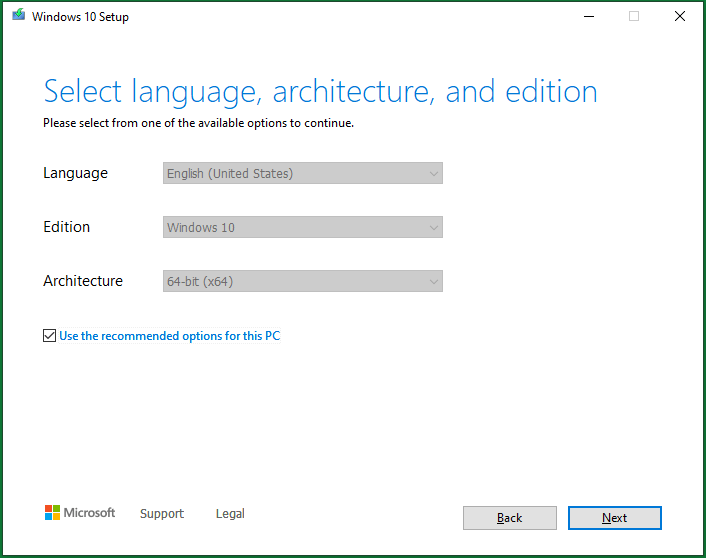
Step 4. Select language, architecture, and edition for the Windows media. It will detect your current settings and select them as default for you. If you would like to change those options, just uncheck the Use the recommended options for this PC and specify new settings for the Windows media.
Step5. Choose ISO file in the Choose which media to use screen. Then, click Next to select a location on your local machine to save the Windows 10/11 ISO image.
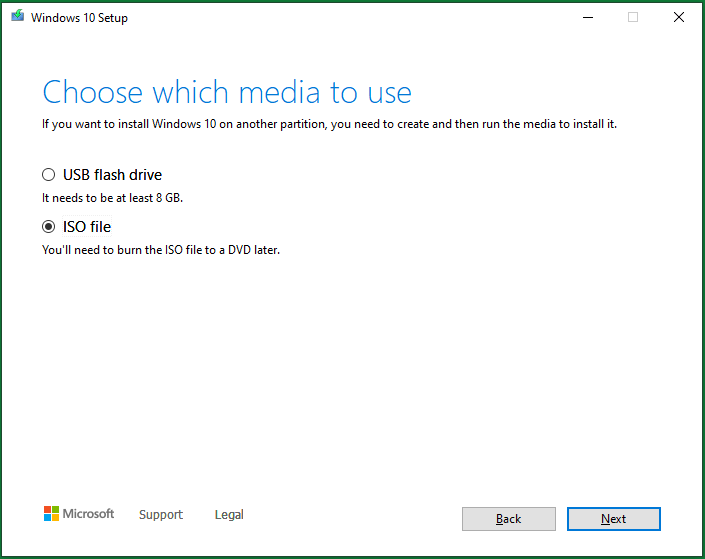
You will need to burn the ISO file to a DVD later before making use of it to install the system.
Step 6. Wait until the system image creation completes. It will take a certain period of time depending on the different versions of Windows 10/11. For me, it costs me about 35 minutes to finish the task. Yet, you can work on your other business during the task with only a slower computer performance.
When it finishes, you can continue to use this tool to burn the created ISO file to a DVD. The detailed guide will be described below.
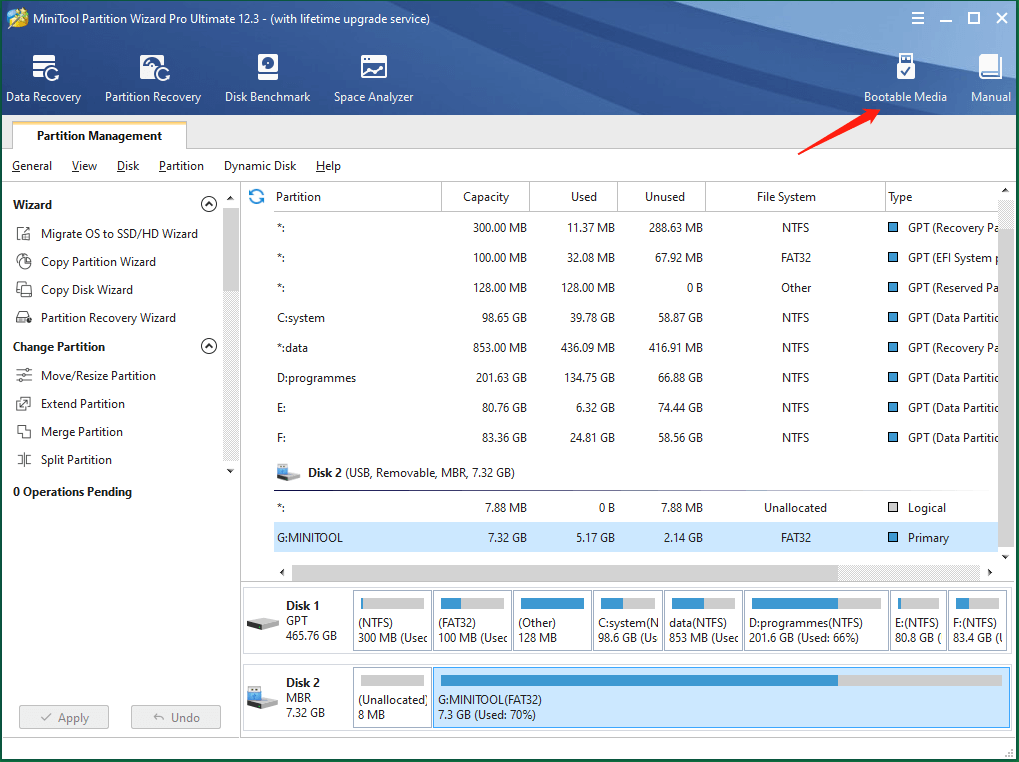
Besides the MiniTool ShadowMaker mentioned above, the MiniTool Media Builder is also embedded in MiniTool Partition Wizard. Therefore, you can also rely on MiniTool Partition Wizard to build Windows 10/11 ISO images from an existing installation.
MiniTool Partition Wizard DemoClick to Download100%Clean & Safe
The way to make system ISO on MiniTool Partition Wizard is similar to that of with MiniTool ShadowMaker. First of all, download and install MiniTool Partition Wizard on your computer. Next, open the program and click the Bootable Media icon on the upper right. Then, the MiniTool Media Builder window will pop up and just follow the guide in Way 1.
Wonderful, I have learned all 3 ways to build Windows 10/11 ISO images from existing installation! All of them are easy to operate and workable!Click to tweet
Use the Windows 10/11 ISO Image Created from Existing Installation
In general, there are two ways you can make use of the Win10/11 ISO image file.
Case 1. Burn ISO file into CD/DVD/USB
No matter in which way you create the Win10/11 ISO, you can burn it into a CD, DVD, or USB and then rely on the DVD, CD, or USB to install Windows 10/11 or something like that.
You will need a professional ISO burner. The Windows Media Creation Tool itself is also an ISO burner. So, you can continue to use it to burn the created Windows 10/11 ISO to a DVD or USB.
For the first place, insert a USB or DVD into your machine. The target disc will be overwritten and the data on it will be deleted. So, make sure you have moved out all important files before using it to store the ISO image. A blank disc is recommended here.
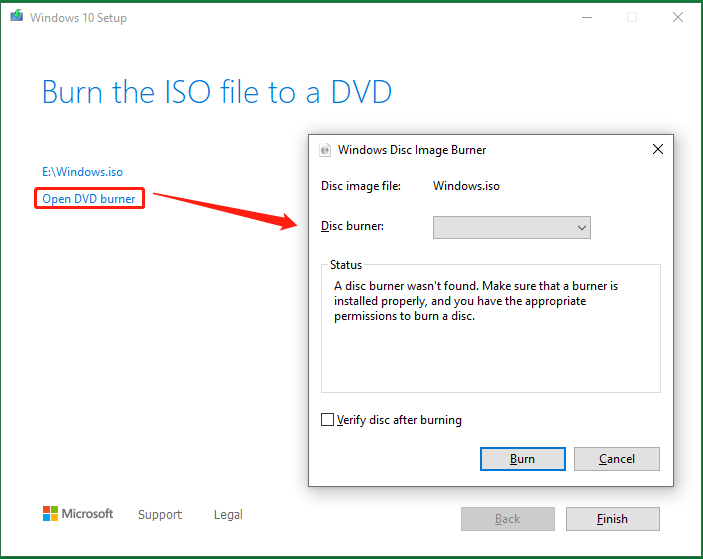
Actually, when the media creation task completes, Windows Media Creation Tool will provide you two options, one for opening the location where the created ISO is stored and one for launching the DVD burner. Just click the Open DVD burner option, select the target disc in the new Windows Disc Image Burner window, and click Burn to start the task.
Tip:
- You can check the integrity of the burned disc by ticking the Verify disc after burning.
- If you are informed that the disc image file is too large while burning a DVD from an ISO file, you will need to use Dual Layer (DL) DVD Media.
You can also access the Windows Disc Image Burner by right-clicking on the created Windows ISO file in its saved location and select Burn disc image. If you cannot see the option, you should first go to the ISO file Properties, and change the Open with app of the ISO file to Windows Explorer in the General tab. You need to click Apply to save the changes.
You can also use other applications to burn the created Windows ISO to CD/DVD such as UltraISO. Also, you are able to burn the ISO image into a USB disk with third-party tools like Rufus.
After burning the bootable disc, you need to change computer boot order settings to switch from the current boot disk to the new burned media, restart your computer to boot it from the bootable media, and enter the Windows installation. In the Install Windows screen, personalize your language, time, and keyboard preferences, select Next, and click Install Windows.
Case 2. Mount Windows 10/11 ISO Image
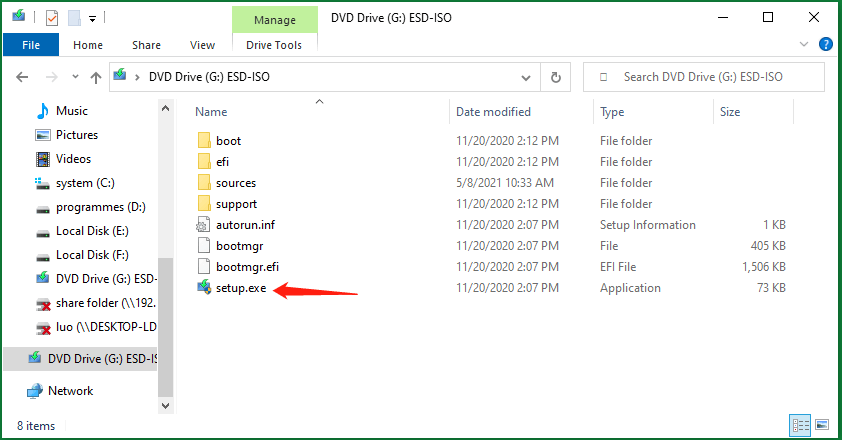
Besides, you can directly make use of the created system ISO. Easily, right-click on the ISO file and choose Mount. Within the mounted DVD drive, double-click the setup.exe to trigger the Windows 10/11 Setup. Then, follow the on-screen guidance to finish upgrading to Windows 10/11.
Actually, you can directly create a bootable CD/DVD/USB with the software above. Doing that, you do not need to further burn the ISO image into a physical disc or USB.
Why Need to Create Windows 10/11 ISO Image from Existing Installation?
Just as mentioned in the above content, the Windows ISO image file can be used to install a system or boot up dead computers. Compared with the bootable USBs, CDs, or DVDs, which has the same function as the ISO files, ISO images have the following advantages.
- No need for extra devices like CD, DVD, or USB.
- You can view its contents by mounting it as a virtual drive.
- You can run the ISO file on a virtual machine.
To install Windows 10/11, you can also make a system backup image and restore it to its original location (reinstallation) or another computer (clean installation) with MiniTool ShadowMaker. Yet, an ISO file is better than a backup image file for:
- Easier to be deployed on any computer.
- You can view its contents by mounting it as a virtual drive.
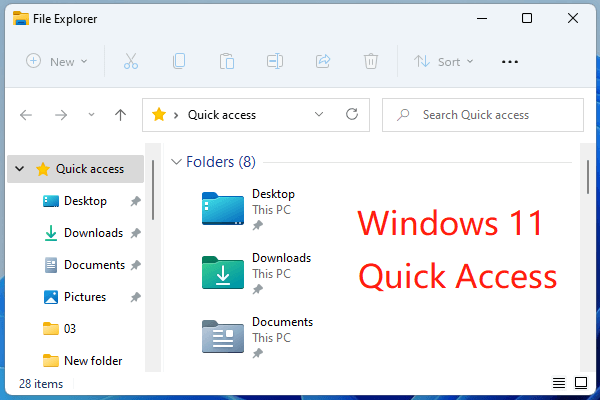
Remove, Disable, Clear, Turn off, Unpin, Stop Quick Access Windows 11
What’s quick access in Win1? How to remove, disable, clear, turn off, unpin, or stop quick access? How to add, enable, turn on, pin, or start quick access?
Read More
OK, that is all I want to share about creating ISO images from Windows build. If you have other methods that can achieve the same purpose, please share them with our readers. Or, if you have anything want to say about this topic, feel free to leave a message in the below comment zone. And, if you encounter any problem while using MiniTool products, just contact our support team at [email protected].
PS: Most of the contents of this article apply to Windows 7, Windows 8, and Windows 8.1. Surely, you can create Windows 7 ISO image from existing installation by MiniTool ShadowMaker or MiniTool Partition Wizard.
Readers help support Windows Report. We may get a commission if you buy through our links.
Read our disclosure page to find out how can you help Windows Report sustain the editorial team. Read more
When Microsoft releases a new Windows 10 build to Insiders on the Fast ring, it is usually only available through Windows Update.
This means you can’t find an ISO file of that build, and install it manually while it’s still available on the Fast ring only.
Microsoft usually releases Windows 10 ISO files for commercial versions, or when a certain build enters the Slow ring.
You can download official ISO files for the Anniversary Updates, and for different Windows builds, but you can’t download an ISO file of the latest build released.
However, if you can’t wait for Microsoft to officially release an ISO file, and have a good reason to download it, and create an installation media, it’s actually possible to do that.
There’s a way to create a ISO file of basically any Windows 10 Preview build you want, but it’s not an official way, approved by Microsoft. So, here’s what you need to do.
ISO files, also called ISO images, represent a single file of an entire DVD or CD. In other words, it is a virtual version of a disc.
This is why ISO files are very useful, eliminating the need to carry data on a piece of hardware. Also, for Windows 10 builds, the ISO format may play an important role.
It is easier for Microsoft to release ISO files for updates, but it happens that you can’t download the official ISO file of the latest build.
How to create an ISO file of your current Windows 10 build
When you need to install a new version of Windows 10, or download a new build, Microsoft delivers it to you through a new ESD (Electronic Software Delivery) image format.
This image is known as install.ESD, and Windows 10 downloads it on your computer, every time you install a new Windows 10 release.
To create our custom ISO file, we’re going to take advantage of the install.ESD file. This file is usually stored the hidden $WINDOWS.~BT folder, there’s an easy way to find.
Once you’ve found the install.ESD file, you’re going to need a program called ESD Decrypter, to create your own ISO file.
But first, we have to mention that this utility is a third-party program, so you’ll be using it on your own risk.
-
1. Download the ESD Decrypter and extract it anywhere on your computer.
-
2. Press the Windows + I keys simultaneously to open the Settings app.
-
3. Navigate to Updates & security.
-
4. Click on Check for updates.

-
5. Wait for Windows Update to download and install the new build.

-
6. Once the build is installed, DON’T restart your computer.
-
7. Instead, go to File Explorer and then navigate to This PC.
-
8. Open a partition on which your system is installed (usually C:)
-
9. Click the View tab on File Explorer, and check Hidden items option.
-
10. The $WINDOWS.~BT folder will now be visible. Open it.
-
11. Look for the Sources folder inside $WINDOWS.~BT.
-
12. Inside the Sources folder, right click on the Install.ESD file, and choose Copy.
-
13. Paste the Install.ESD file in the folder where you extracted the ESD Decrypter utility files.

-
14. Right-click the decrypt.cmd file, and select Run as Administrator.
-
15. In the ESD Decrypter Script user interface, type 2 to select the Create full ISO with Compressed install.esd option.
-
16. Press Enter to begin the process.

-
17. Once the process completes, the ISO file will be created, and ready for mounting.
In order to create an ISO file from an existing Windows 10 installation, you need to use the ESD Decrypter tool on your install.ESD file. This file contains a copy of the current installation of the OS on your PC.


That’s pretty much it, once you’ve created a ISO file using this method, you can mount it on a USB flash drive, using a tool like Rufus, and install it on your PC, or a virtual machine.
If you have an old USB flash drive and do not know what to do with it, check out our article to find out our recommendations.
If you have any questions, and comments, please let us know in the comment section below.
RELATED STORIES YOU NEED TO CHECK OUT:
- How to Burn ISO Files in Windows 10, 8.1
- 5 best software to create and open ISO files
- How to download Windows 7 and 8.1 ISO files
- What to do if Windows standalone updater got stuck
- Best DVD copy protection software in 2022
- Can’t update Windows 10 due to error 0x800706ba? Try these solutions
Ivan Jenic
Windows Hardware Expert
Passionate about all elements related to Windows and combined with his innate curiosity, Ivan has delved deep into understanding this operating system, with a specialization in drivers and driver troubleshooting.
When he’s not tackling diverse driver-related problems, Ivan enjoys watching good movies and spending time hiking with his family and friends.
Производитель: Microsoft Corporation
Редакция: 22H2
Размер:Rus — x64 6,4 Гб, x32 4,4 Гб; Eng — x64 5,7 Гб, x32 4,0 Гб
Язык интерфейса: Все языки
Разрядность Системы: x32/x64
Минимальные системные требования:
Процессор: 1 ГГц или больше
ОЗУ: 1 ГБ (32-бит) или 2 ГБ (64-бит)
Место на диске:16 ГБ свободного пространства (32-бит) или 32 ГБ (64-бит)
Графика:поддержка DirectX 9 с драйверами WDDM 1.0 или выше
Разрешение экрана: от 800×600
Криптопроцессор:удовлетворяющий требованиям спецификации TPM