Если вам нужно поменять разрешение экрана в Windows 10, почти всегда сделать это очень просто, а необходимые шаги описывались в материале Как изменить разрешение экрана Windows 10. Однако, в некоторых случаях возможна проблема — разрешение не меняется, пункт для его смены в параметрах не активен, равно как и не работают дополнительные методы изменения.
В этой инструкции подробно о том, что делать, если не меняется разрешение экрана Windows 10, способах исправить проблему и вернуть возможность настройки разрешение на компьютере и ноутбуке, если это возможно.
Почему нельзя изменить разрешение экрана
Стандартно, изменить разрешение в Windows 10 вы можете в параметрах, нажав правой кнопкой мыши в пустом месте рабочего стола, выбрав пункт «Параметры экрана» (или в Параметры — Система — Дисплей). Однако, иногда выбор разрешения не активен или в списке разрешений присутствует только один вариант выбора (также возможен вариант, когда список присутствует, но в нем нет правильного разрешения).
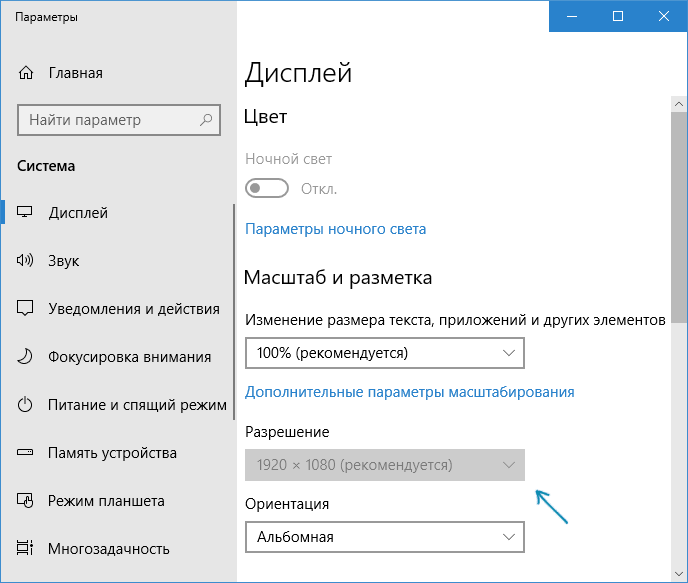
Существует несколько основных причин, по которым может не меняться разрешение экрана в Windows 10, которые будут рассмотрены подробнее далее.
- Отсутствие необходимого драйвера видеокарты. При этом, если вы нажимали «Обновить драйвер» в диспетчере устройств и получали сообщение о том, что наиболее подходящие драйверы для данного устройства уже установлены — это не говорит о том, что у вас есть и установлен правильный драйвер.
- Сбои в работе драйвера видеокарты.
- Использование некачественных или поврежденных кабелей, переходников, конвертеров для подключения монитора к компьютеру.
Возможны и другие варианты, но указанные встречаются чаще других. Перейдем к способам исправления ситуации.
Как исправить проблему
Теперь по пунктам о различных способах исправить ситуацию, когда нельзя изменить разрешение экрана. Первый шаг — проверить, всё ли в порядке с драйверами.
- Зайдите в диспетчер устройств Windows 10 (для этого можно нажать правой кнопкой мыши по кнопке «Пуск» и выбрать нужный пункт контекстного меню).
- В диспетчере устройств откройте раздел «Видеоадаптеры» и посмотрите, что там указано. Если это «Базовый видеоадаптер (Майкрософт)» или раздел «Видеоадаптеры» отсутствует, но зато в разделе «Другие устройства» есть «Видеоконтроллер (VGA-совместимый)», драйвер видеокарты не установлен. Если указана правильная видеокарта (NVIDIA, AMD, Intel), всё равно стоит выполнить дальнейшие шаги.
- Всегда помните (не только в этой ситуации), что правый клик по устройству в диспетчере устройств и выбор пункта «Обновить драйвер» и последующее сообщение, что драйверы для данного устройства уже установлены говорят лишь о том, что на серверах Майкрософт и у вас в Windows нет других драйверов, а не о том, что у вас установлен правильный драйвер.
- Установите «родной» драйвер. Для дискретной видеокарты на ПК — с сайта NVIDIA или AMD. Для ПК с интегрированной видеокартой — с сайта производителя материнской платы для вашей модели МП. Для ноутбука — с сайта производителя ноутбука для вашей модели. При этом для двух последних случаев, установите драйвер даже если на официальном сайте он не самый новый и нет драйвера для Windows 10 (устанавливаем для Windows 7 или 8, если не устанавливается — пробуем запустить установщик в режиме совместимости).
- Если установка не проходит успешно, а какой-то драйвер уже установлен (т.е. не базовый видеоадаптер и не видеоконтроллер VGA-совместимый), попробуйте предварительно полностью удалить имеющийся драйвер видеокарты, см. Как полностью удалить драйвер видеокарты.
В результате, если всё прошло гладко, вы должны получить правильный установленный драйвер видеокарты, а также возможность изменения разрешения.
Чаще всего дело именно в драйверах видео, однако возможны и другие варианты, а соответственно и способы исправления:
- Если монитор подключен через какой-либо адаптер или вы недавно приобрели новый кабель для подключения, дело может быть в них. Стоит попробовать другие варианты подключения. Если есть какой-то дополнительный монитор с другим интерфейсом подключения, можно провести эксперимент на нем: если при работе с ним выбор разрешения возможен, то дело явно в кабелях или переходниках (реже — в разъеме на мониторе).
- Проверьте, а появляется ли выбор разрешения после перезагрузки Windows 10 (важно выполнить именно перезагрузку, а не завершение работы и включение). Если да, установите с официального сайта все драйверы чипсета. Если проблема не решится, попробуйте отключить быстрый запуск Windows 10.
- Если проблема появляется спонтанно (например, после какой-либо игры), есть способ перезапуска драйверов видеокарты с помощью сочетания клавиш Win + Ctrl + Shift + B (однако можно в результате остаться с черным экраном до принудительной перезагрузки).
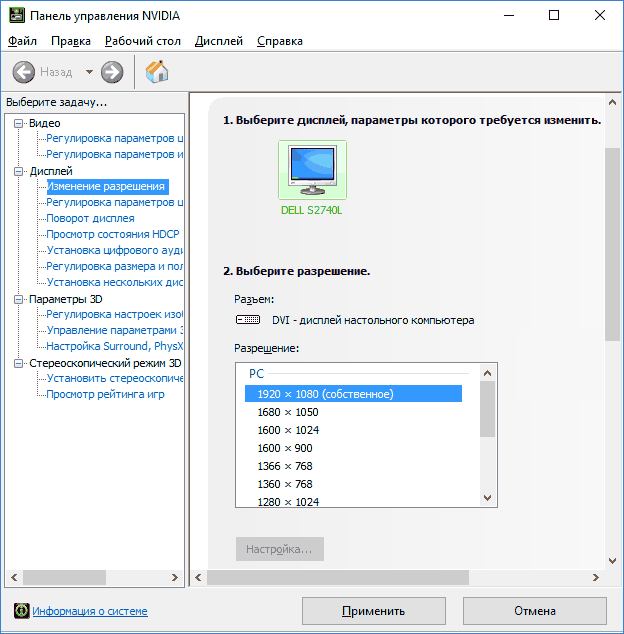
- Если проблема никак не решается, загляните в Панель управления NVIDIA, AMD Catalyst или Панель управления Intel HD (графической системы Intel) и проверьте, а возможно ли изменение разрешения экрана там.
Надеюсь, руководство оказалось полезным и один из способов поможет вам вернуть возможность изменения разрешения экрана Windows 10.
Если у вас есть внешние дисплеи, подключенные к компьютеру, до начала работы не забудьте выбрать, какие дисплеи нужно изменить.
-
Выберите Пуск > Параметры > Системный > Дисплей и просмотрите раздел, в котором отображаются ваши дисплеи.
-
Выберите дисплей, который необходимо изменить. После этого следуйте приведенным ниже инструкциям.
«Изменение размера текста, приложений и прочих элементов»
-
Оставайтесь на экране или откройте параметры дисплея.Откройте параметры дисплея
-
Прокрутите до раздела Масштаб и макет.
-
Выберите Масштаб, а затем выберите параметр. Как правило, лучше всего выбрать один из помеченных как (Рекомендуется).
Изменение разрешения дисплея
-
Оставайтесь на экране или откройте параметры дисплея.Откройте параметры дисплея
-
В строке Разрешение экрана выберите список и параметр. Как правило, лучше всего использовать тот, который помечен (рекомендуется). Мониторы могут поддерживать разрешение ниже основного, но в этом случае текст будет менее четким, а изображение может занимать не весь экран, быть растянутым или располагаться по центру черного экрана.
Примечание: Если в разрешении экрана есть непредвиденные изменения, возможно, потребуется обновить графический драйвер. Чтобы просмотреть и установить доступные обновления, выберите Пуск > Параметры > Центр обновления Windows > Проверить наличие обновлений.
Изменение ориентации дисплея
Нажмите кнопку Пуск и введите параметры. Выберите Параметры > Системный > Дисплей и выберите ориентацию экрана в раскрывающемся списке рядом с пунктом Ориентация экрана.
Windows порекомендует ориентацию для вашего экрана. Если вы измените ориентацию монитора, вам также потребуется физически повернуть экран. Например, вам нужно будет повернуть свой внешний монитор, чтобы использовать его в книжной ориентации вместо альбомной.
Изменение ориентации экрана
Whether you’ve plugged in a new monitor or trying to improve the video performance, tweaking your screen resolution to the right settings is the key to a better viewing experience. However, if you’re unable to modify the screen resolution, then you’re not alone. Several users have reported about the display resolution option being greyed out after a Windows update or installing a new graphics card.
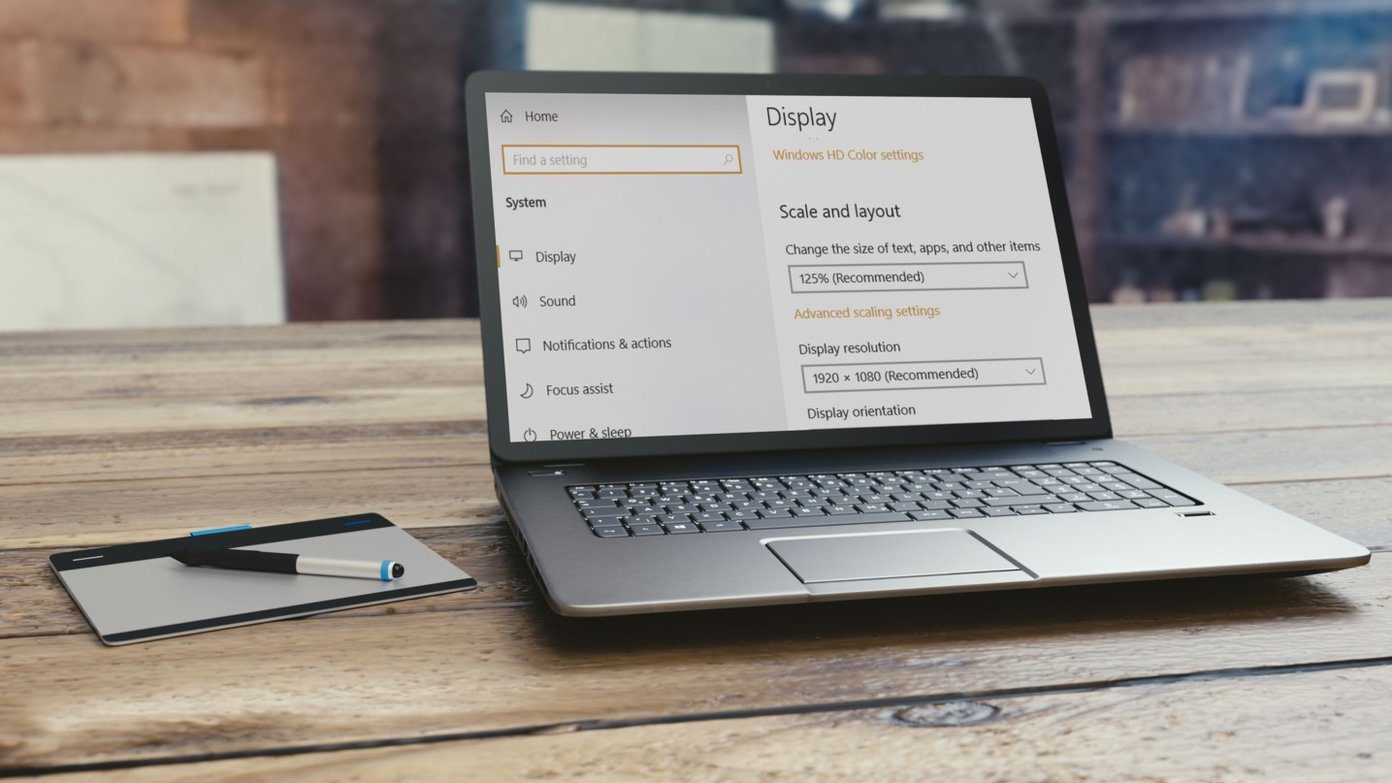
For screen resolution problems, the cause could range anywhere from a hardware issue to minor configuration issues. If you’ve only encountered the issue after installing an app, game, or software, then try changing the resolution after doing a clean boot first.
However, if that’s not the case, check out all the top 5 ways to fix screen resolution problems on Windows 10.
1. Update Windows OS
Before diving deep into the display settings, you should make sure that your Windows 10 PC is up to date. Here’s how.
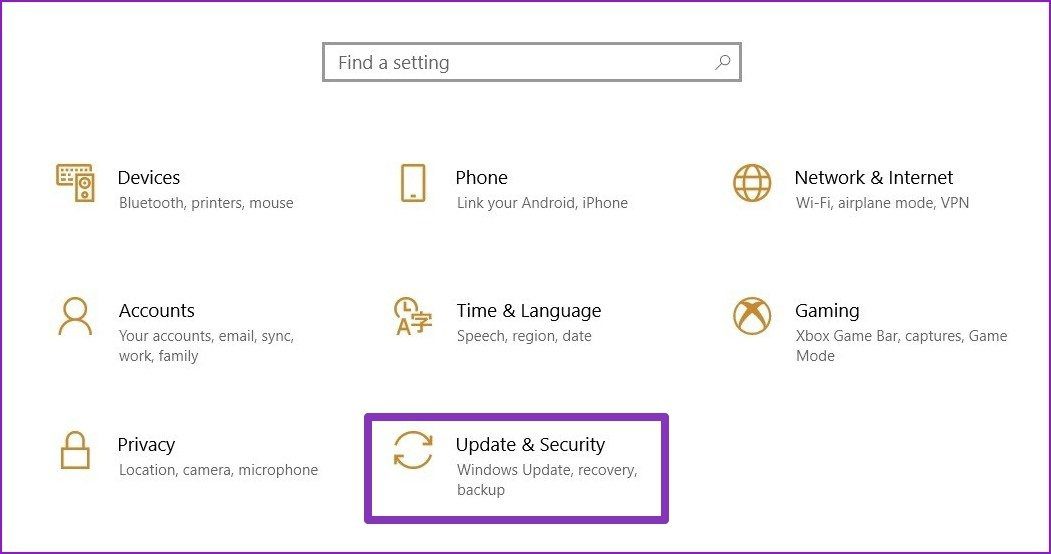
Step 1: Press Windows key + I to open Settings and select Update & Security. Now click on ‘Check for updates’ to see if there are any new updates.
Step 2: If there’s any update, go ahead and download it first and install it by rebooting your PC.
In most cases, updating your PC will solve the screen resolution problem that you’re facing. If not, chances are, it has something to do with the display drivers installed on your PC.
2. Update Display Driver
If updating the Windows doesn’t work, then try updating the display driver on your PC as they might be corrupted or not compatible anymore. Let’s see how.
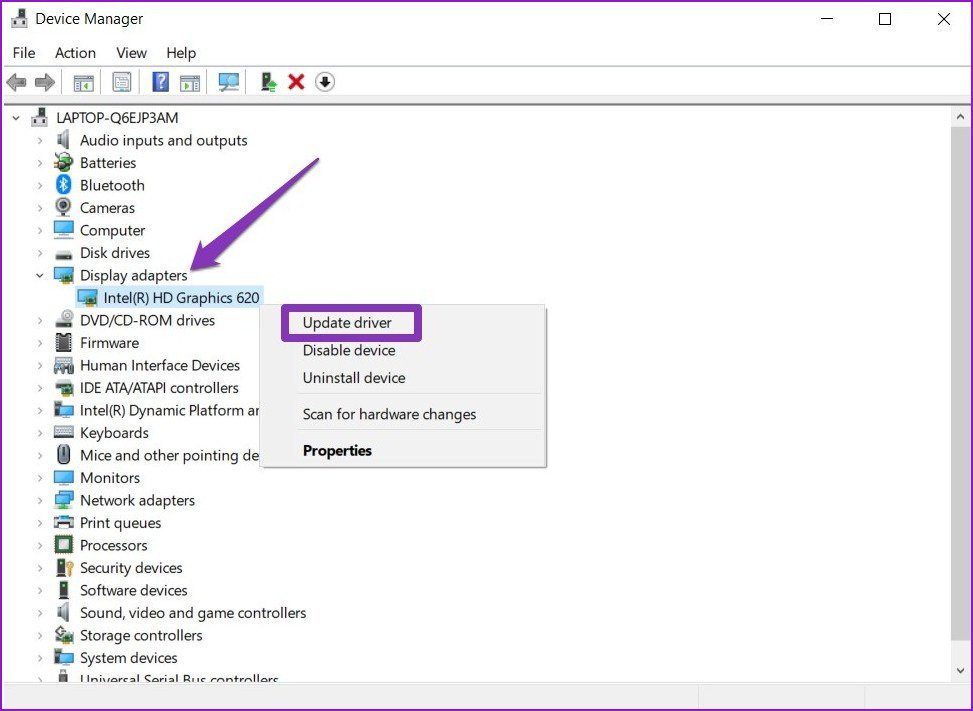
Step 1: Press Windows key + X and select Device Manager from the list. Now expand ‘Display adapters’ from the list. Then right-click on the graphics card’s name and select ‘Update driver’.
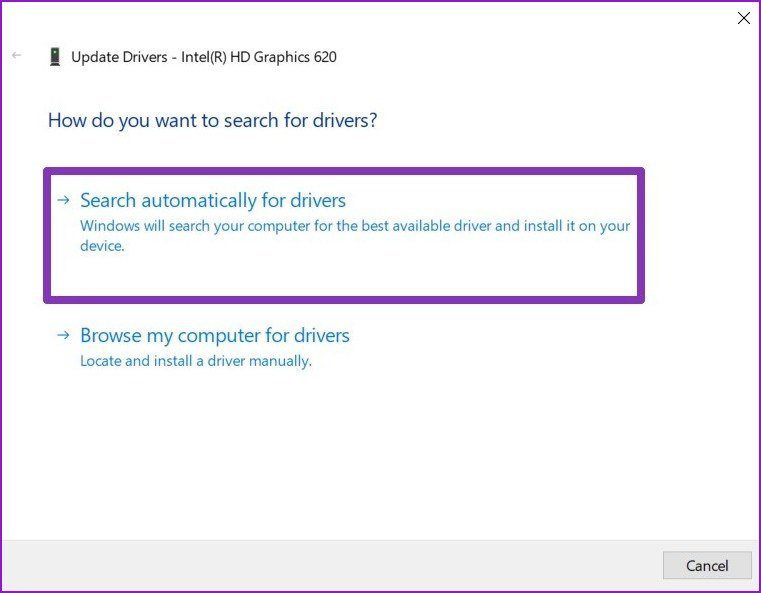
Step 2: Select ‘Search automatically for drivers’ and wait for the process to complete.
Now reboot your PC to see if the issue is resolved. If not, then you can try installing the display driver manually.
3. Install Display Drivers Manually
Another way to update drivers is to manually download and install the graphics driver from the manufacturer’s website.
Step 1: First, you need to know what graphics hardware you currently have. For that, press Windows key + R to open the Run dialog. Type in dxdiag and press Enter.

Step 2: Go to the Display tab and note down the name of the driver used for your display.
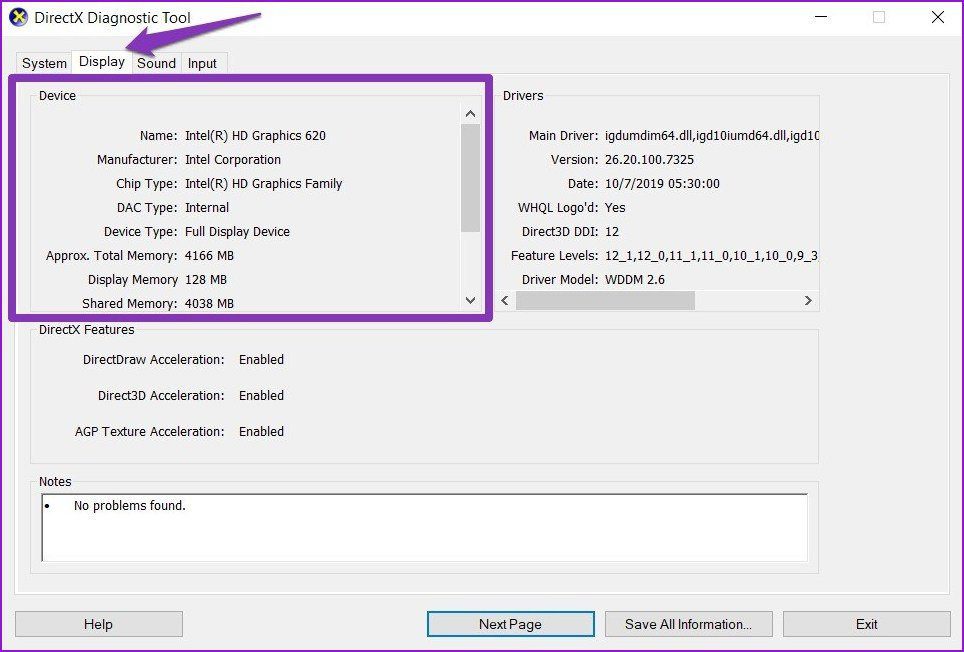
Step 3: Now head over to the manufacturer’s website and fill in the OEM, Model no, etc. to download and install the latest compatible display driver for your PC.
Download Intel HD Graphics Driver
Download NVIDIA GeForce Drivers
4. Install the Drivers in Compatibility Mode
If the above method of installing the driver manually fails, there might be a compatibility issue between your driver and your operating system. That usually happens if you’re using an older computer. Here’s how to solve it.
Step 1: Right-click on the driver setup file which you just downloaded and click on Properties. Now switch to the Compatibility tab and mark the check box that says ‘Run this program in compatibility mode for’ and select Windows 7 or 8 from the drop-down list.

Step 2: Click on Apply and then OK. Now again right-click on the setup file and choose ‘Run as administrator’ to start the installation. Once the installation is complete, reboot your PC.
Now go ahead and check if you can change the resolution by going to Settings > System > Display > Display Resolution.
5. Install Microsoft Display Driver
If you’re still unable to change resolution on your PC, then try switching to Microsoft Display Driver by following the steps mentioned below.
Step 1: Press Windows key + X or right-click on the Start button, and select Device Manager from the list. Now expand ‘Display adapters’ from the list, and right-click on the name of the graphics card’s to select Update driver.
Step 2: Select the ‘Browse my computer for drivers’ option and click the ‘Let me pick from a list of available drivers on my computer’ option.
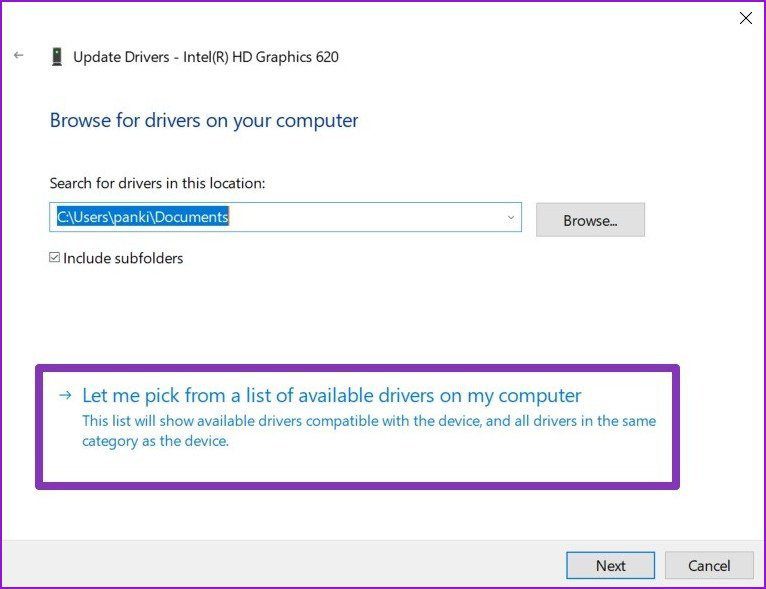
Step 3: Now, select Microsoft Display Driver from the list and hit Next.

Wait for Windows to install the drivers and then reboot your PC to see if the issue is resolved.
A New Point of View
That should do it. In most cases, updating Windows or the display drivers will do the trick. If not, you can try out other methods listed above as well. However, if every method fails, it’s likely that the issue is hardware related and you’re better off consulting an expert for that.
Now that the issue is resolved, how about improving your productivity game by using a split-screen on Windows 10?
Was this helpful?
Thanks for your feedback!
The article above may contain affiliate links which help support Guiding Tech. The content remains unbiased and authentic and will never affect our editorial integrity.
You can connect an external monitor to your desktop computer or laptop through an HDMI or a VGA cable. Depending on the number of HDMI and VGA ports your system has, you can connect multiple monitors to it. After connecting an external monitor to your desktop computer or laptop, you can play games, watch movies, and do your work on a screen larger than your laptop’s built-in display. Windows also lets you set different screen resolutions and scaling levels for different monitors or displays. Sometimes the screen resolution settings do not work as expected when you connect an external monitor. Such screen resolution problems in Windows 11/10 devices ruin the users’ experience. It is not necessary that the screen resolution problem occurs only on the external display, you may also experience the same on the built-in display of your laptop. In this article, we will see how to fix screen resolution problems in Windows 11/10.
Some common causes of Screen Resolution issues in Windows 11/10
Before talking about the solutions to fix screen resolution problems in Windows 11/10, let’s see some common causes of screen resolution issues on WIndows 11/10 devices.
- Incorrect settings: Incorrect display resolution and scaling settings are the primary cause of screen resolution problems. After connecting an external display or monitor, it is necessary to configure its settings properly. If you have made any mistakes while configuring your display resolution and scaling settings, you will not get the desired resolution on your display.
- Windows Update: Sometimes, the latest Windows Update causes problems on a Windows device. If you are experiencing screen resolution issues after updating your system, it is possible that the latest update might have disturbed your screen resolution settings. In such cases, rolling back to the previous version of Windows can fix the issue.
- Corrupted or outdated driver: Every hardware device that we connect to our computer requires a dedicated driver to function properly. Outdated and corrupted display drivers can also cause screen resolution problems on a Windows device.
- Hardware issues: If you have an old display, you should check whether it is working properly. For this, connect it to another computer. This will let you know if the problem is associated with hardware or software.
If you are experiencing screen resolution problems in Windows 11/10, here are some suggestions that may help you get rid of this issue.
- Check for Windows Update
- Update or reinstall your Display driver
- Install the display driver in compatibility mode
- Select the recommended Display resolution
- Run Hardware and Devices troubleshooter
- Roll Back the display driver or uninstall the latest Windows Update
- Adjust the display scaling
- Check your Multiple Displays setting
- Adjust the screen resolution and scaling using your graphics card’s control panel
- Change your TV’s aspect ratio and resolution (if you have connected your TV to your PC)
Let’s see all these fixes in detail.
1] Check for Windows Update
The first thing that you should do to fix the display resolution problems on your Windows 11/10 device is to install the latest Windows Updates (if available). Open the Windows Update page on your Windows device and see if any Windows update is available. If no update is shown there, you can check for Windows Updates manually. If an update is available, install it and see if this fixes the problem.
2] Update or reinstall your display driver
As we have described above, a corrupted or outdated display driver is one of the causes of display resolution problems in Window 11/10. Therefore, you should also try updating your display driver. If an update is available for your display driver, it will be shown on the Windows Optional Updates page. Open the Windows Optional Updates page in Windows 11/10 Settings and update your display driver (if any update is available).
If updating the display driver does not fix the issue, uninstall the display driver from the Device Manager. Don’t worry, you will not lose your display. After uninstalling the display driver, Windows will use the standard VGA driver or another default display driver. Now, restart your computer. After restarting your device, Windows will detect the hardware changes and install the latest version of your display driver automatically. Now, check if the issue persists.
If the issue still persists, visit the official website of your display manufacturer and download the latest version of your display driver. If the driver is downloaded in the zip format, extract the folder and then run the installer file to install the driver manually. Before you install the driver, it is important that you uninstall the currently installed display driver.
3] Install the display driver in compatibility mode
If the above solution did not fix your problem, install the downloaded display driver in compatibility mode and see if it brings any changes. The steps to do this are as follows:
- Right-click on the driver installer file and select Properties.
- Click on the Compatibility tab.
- Under Compatibility mode, select the “Run this program in compatibility mode for” checkbox.
- Select Windows 8 in the drop-down.
- Click Apply and then click OK.
Now, run the installer file and follow the on-screen wizard to install the driver under compatibility mode.
4] Select the recommended display resolution
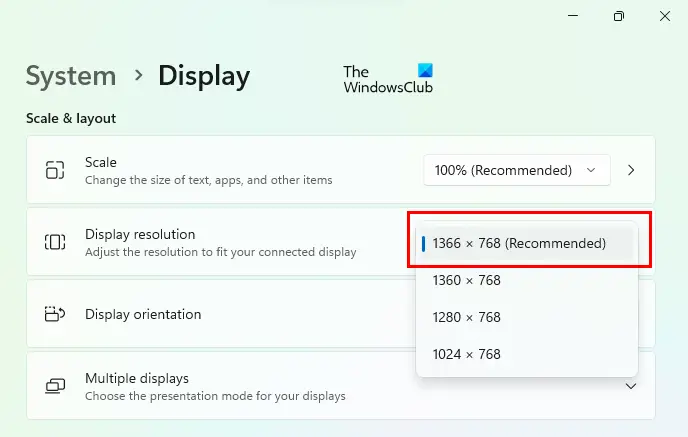
One of the display resolution problems that users have experienced on their display is automatically switching to the wrong resolution. Some of the causes of this problem are incorrect power settings and malfunctioned display or graphics card driver. If such a problem occurs on your computer, open the Display settings and select the recommended display resolution. The steps to do this are written below:
-
- Open Windows 11/10 Settings.
- Go to “System > Display.”
- Click on Display Resolution and select the recommended resolution.
If this does not fix the problem, you can try running the appropriate troubleshooter or rolling back the Windows update. These methods are described below.
5] Run Hardware and Devices troubleshooter
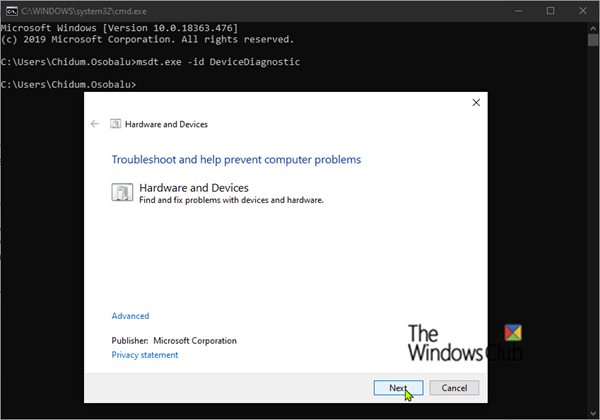
Previously, there was a tool named Display Quality Troubleshooter on Windows computers. Microsoft developed it to troubleshoot display-related issues. But later, Microsoft deprecated it. Now, you can run the Hardware and Devices troubleshooter to fix the display-related problems. You can run the Hardware and Devices troubleshooter from the elevated command prompt by executing the following command:
msdt.exe -id DeviceDiagnostic
6] Roll Back the display driver or uninstall the latest Windows Update
If the screen resolution problems started occurring after installing a certain Windows Update, we suggest you roll back your display driver. Follow the steps below:

- Open the Device Manager.
- Right-click on your display driver and select Properties.
- Select the Driver tab.
- See if the Roll Back Driver button is clickable. If yes, click on it.
The above process will install the previous version of your display driver. This should fix the problem. If not, we suggest you uninstall the latest Windows Update.
Read: Fix Resolution not supported Monitor error on Windows PC.
7] Adjust the display scaling
Sometimes, you may experience a zoom-in effect on your external monitor. This stretches the entire display due to which the icons appear larger and images appear distorted. This usually occurs if you have selected the incorrect scaling for your display. According to the users, the 125% scaling level caused this problem.
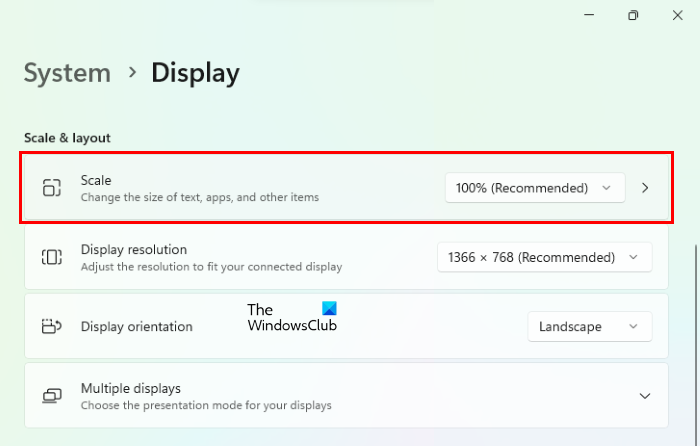
If you experience such a problem on your display, change the scaling level from 125% to 100%. The steps to do this are as follows:
- Open WIndows 11/10 Settings.
- Go to “System > Display.”
- Click on the Scale drop-down and select the 100% scaling option or select the one that is recommended by Windows for your display.
8] Check your Multiple Displays setting
If you have connected multiple monitors to your Windows computer and you are experiencing screen resolution problems on one of all of them, check your Multiple Displays setting. The following instructions will help you check your Multiple Displays setting.
- Open Windows 11/10 Settings.
- Go to “System > Display.”
- There, you will find a setting named Multiple Displays.
- If the Duplicate these displays is selected in the drop-down, change it to Extend these displays.
The “Duplicate these displays” setting copies the resolution of the primary monitor to all the monitors. If you want to set a different screen resolution for all your displays, you have to change this setting.
9] Adjust the screen resolution and scaling using your graphics card’s control panel
If you are unable to change your display resolution via the Windows 11/10 Settings, try to change the resolution and scaling via your graphics card’s control panel. We have explained the steps for some of the graphics cards.
Change the display resolution and scaling via Intel HD Graphics Control Panel
Follow the steps written below to change your display resolution and scaling via the Intel HD Graphics Control Panel.
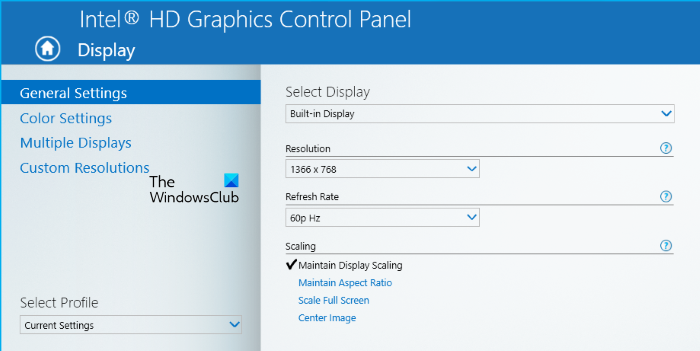
- Right-click on the empty space on your desktop and select Intel Graphics Settings. If you are a Windows 11 user, first select Show more options in the right-click context menu, then click Intel Graphics Settings.
- When the Intel HD Graphics Control Panel opens up, select Display.
- Now, select your display from the Select Display drop-down and change its resolution.
If an option to change the display scaling is available, change it accordingly.
Change the display resolution and scaling via AMD Catalyst Control Center
If your system has an AMD graphics card, you can change the display resolution via the AMD Catalyst Control Center. The steps for the same are written below:
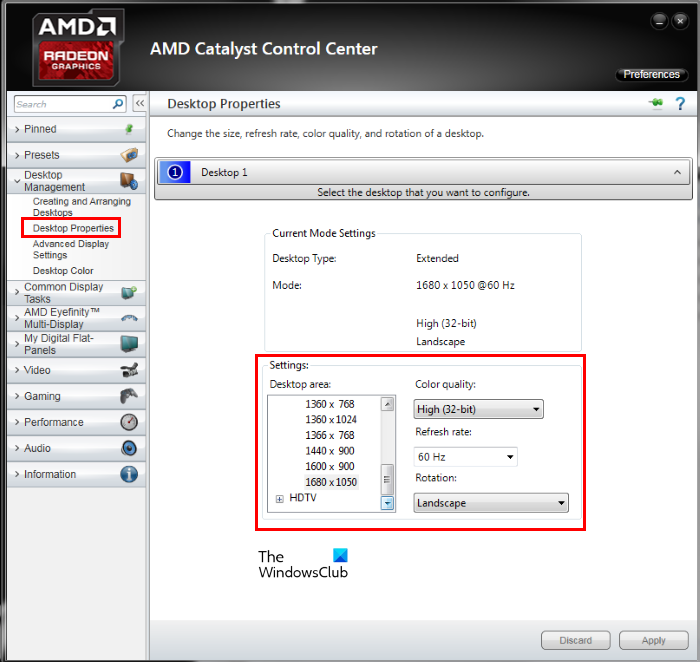
- Open AMD Catalyst Control Center.
- Expand the Display Management tab on the left side.
- Select Display Properties.
- Select the display resolution from the list shown on the right side.
- Click Apply.
Similarly, you can also change the display scaling. To do so, expand the My Display Flat-Panels tab on the left side and select Scaling Options (Digital Flat-Panel). You will see a slider on the right side. Move it to adjust the display scaling. According to the feedback of most users, 5% scaling fixed the display resolution problems on Windows 11/10.
Change the display resolution and scaling in NVIDIA Control Panel
If you have an NVIDIA graphics card, you can change the display resolution by following the steps below:
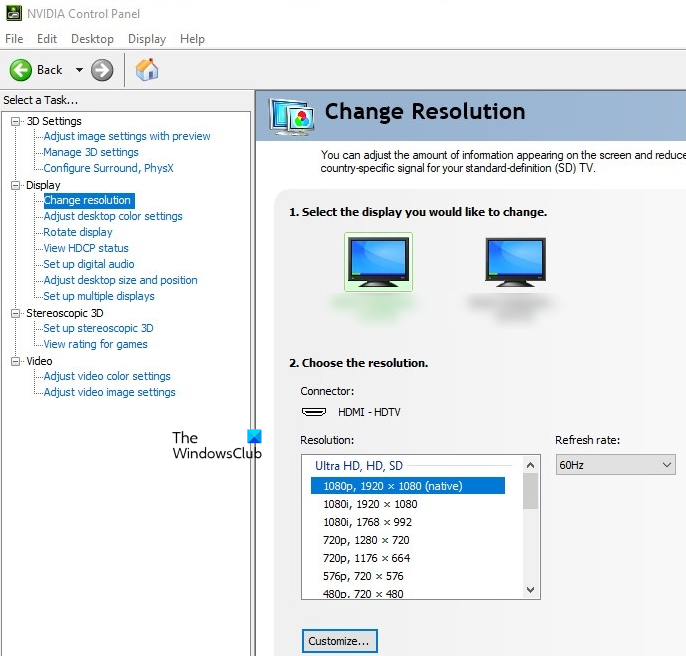
- Open NVIDIA Control Panel.
- Expand the Display node on the left side.
- Select Change resolution.
- Now, select the display resolution on the right side.
10] Change your TV’s aspect ratio and resolution (if you have connected your TV to your PC)
If you have connected your TV to your computer in place of a monitor, the problem might be associated with your TV display settings. We suggest you change the aspect ratio and screen resolution of your TV. You will find different aspect ratios and screen resolutions. Therefore, you have to use the hit and trial method to select the resolution that fits best to your TV screen.
Read: How to change Display Resolution in Windows 11/10.
Why can’t I change the screen resolution in Windows 11?
If you cannot change the screen resolution on your Windows 11 PC, the problem might be associated with your display driver. Update your display driver and check if this fixes the problem. If the problem started occurring after a certain Windows update, you can try rolling back the display driver or uninstalling the latest Windows update. If you are unable to change the screen resolution via Windows 11/10 Settings, you can try the same by using your graphics card’s control panel.
How do I get a 1920×1080 resolution on a 1366×768 screen on Windows 11?
To get a 1920×1080 resolution on a 1366×768 screen in Windows 11/10, change the display resolution in Windows 11 Settings. Open the Windows 11 Settings app and then go to “System > Display.” There you will see an option to change the display resolution. Click on the drop-down menu and select the desired screen resolution. If the 1920×1080 screen resolution is not available in Windows 11 Settings, your system might have outdated display drivers. To fix this issue, update your display driver.
Hope this helps.
Read next: How to create and set Custom Resolution on Windows 11/10.


