
With the release of the Raspberry Pi 2, Microsoft had announced they will provide a version of Windows 10 for the Pi. This has happened now. According to Microsoft, this is only possible with the PC version of Win 10, but it also works on Windows 8.1, as I show in this tutorial.
Windows 10 IoT is not a classic Windows version, but an embedded developer version running on both display and non-display devices. “IoT” stands for “Internet of Things” and describes the increasingly common devices with Internet access (no computers) – in some coffee machines.
Required Hardware Parts
- Raspberry Pi
- microSD card (at least 8GB, optimal Class10)
- optimal: CardReader (often Windows 8.1 /10 does not recognize the microSD cards of the internal CardReader)
- Ethernet cable (allegedly also works with a wireless stick, I tried two, none of which was detected)
Download image and install software
First, you have to download the ISO file (around 500MB), which is here: http://go.microsoft.com/fwlink/?LinkId=616847
You have to mount this file (IOT Core RPi.ISO) (Win 8.1/10 does it automatically with a double-click). Inside is the installer Windows_10_IoT_Core_RPi2.msi, which you perform and follow the steps. After installation, you can unmount the ISO file.
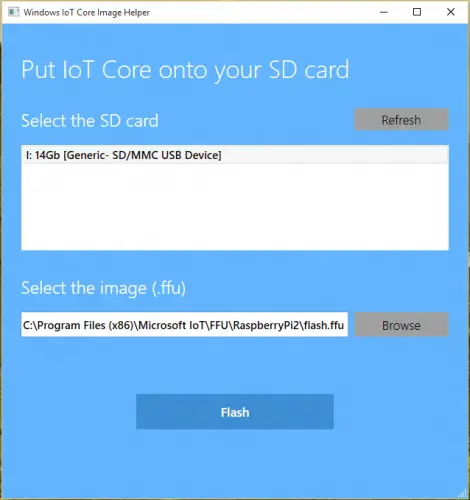
Now you have to search for and open IoTCoreImageHelper.exe via the Windows Start Search. There you select the SD card and the path to flash.ffu (this is located under C:\Program Files (x86)\Microsoft IoT\FFU\RaspberryPi2)
After flashing, you can remove the SD card. It is strongly recommended to do this by using the “Safely Remove Hardware” tool (in the taskbar, at the bottom right).
Windows 10 IoT booting
After the microSD card is in the Pi and the monitor, network cable and mouse are connected, you can start it. After a short setup you will be shown the language options, after which you will be on the main screen:

Your PC should be on the same network as the Pi. At the top of Tutorials are a few short introductions to Windows IoT and a sample tool how to make an LED blink. Since this Windows version, as I said, has no other graphical interface, it is completely controlled by Visual Studio. The easiest way is to follow the indicated steps on the Pi.
According to Microsoft, every Windows 10 app that is compiled for ARM platforms will also be usable on Windows IoT and vice versa. Keep in mind that most devices do not have GPIOs, so the benefits are rather dubious. However, the speech recognition from Microsoft could be interesting in any case. Microsoft presented some sample projects here.
© Images: Microsoft
Привет, Хабр.
Наверное каждый разработчик на определенном этапе задумывался о собственном IoT-проекте. Internet of Things сейчас поистине вездесущ и многим из нас хочется попробовать свои силы. Но не все знают, с чего начать и за что браться в первую очередь. Сегодня давайте посмотрим, как легко и непринужденно запустить свой собственный IoT-проект под Raspberry Pi 2, используя Windows 10 IoT Core и DeviceHive.
Деплоим Windows 10 приложения на Raspberry Pi 2
Для начала давайте установим Windows 10 IoT Core на Raspberry Pi. Для этого нам потребуется Windows 10 IoT Core Dashboard, который можно взять вот здесь. Там же можно при желании скачать отдельно ISO-образ, но особого смысла в этом нет — инструмент сделает это за вас.
Затем мы загружаем образ на misroSD-флешку.

Подключаем флешку к Raspberry и включаем. Первую загрузку ОС придется подождать, мгновенной она, конечно, не будет. Когда устройство «оживет» — подключаем Raspberry к локальной сети по Ethernet. Снова открываем Windows 10 IoT Core Dashboard и видим в списке «Мои устройства» заветную строчку. К слову, можно обойтись и без проводного подключения – список WiFi-донглов, поддерживаемых Windows 10 IoT Core, находится тут.
Далее нам понадобится Visual Studio 2015. Если она у вас все еще не установлена (хотя вы бы вряд ли читали эту статью в таком случае), можно скачать Community Edition.
Создаем новый или же открываем существующий Windows Universal проект. Кстати, если в проекте не нужен UI, можно создать Headless Application, выбрав тип проекта Windows IoT Core Background Application.

Выбираем деплой на Remote Machine.

Вводим адрес Raspberry. Посмотреть его можно на стартовом экране Win10 IoT Core или в Windows 10 IoT Core Dashboard.
Собственно, Internet of Things
Раз уж у нас статья о embedded — «моргать светодиодами» придется в любом случае. Хорошо, что мы имеем дело с DeviceHive, у которого заготовлены инструменты на все случаи жизни и все платформы. Поэтому светодиод будет виртуальный и тоже на .NET.
Клонируем master-ветку DeviceHive.NET репозитория с GitHub. На момент написания статьи рабочие примеры для Win10 IoT были именно там.
Открываем solution DeviceHive.Device и в файле Program.cs проекта VirtualLed настраиваем доступ к песочнице DeviceHive.
using (var service = new RestfulDeviceService("http://playground.devicehive.com/api/rest"))
{
    // create a DeviceHive network where our device will reside
    var network = new Network("Network WPNBEP", "Playground Network", "%NETWORK_KEY%");

    //...
}
Если вы интересуетесь IoT, но по какой-то немыслимой причине еще не обзавелись DeviceHive Playground – это можно сделать здесь.

А управлять нашим «светодиодом» будет… Нет, пока не Raspberry, а клиент виртуального светодиода. Пример находится в проекте VirtualLedClient солюшена DeviceHive.Client. Его тоже нужно настроить в файле Program.cs:
var connectionInfo = new DeviceHiveConnectionInfo("http://playground.devicehive.com/api/rest", "%ACCESS_KEY%");
Самое интересное
Наше приложение на Raspberry Pi будет не просто кнопочкой включения/выключения светодиода, а практически полноценной админкой всех IoT-устройств нашей DeviceHive-сети. При желании, конечно, можно упростить его до той самой «кнопочки» или наоборот расширить, например, до клиента, управляющего роботом телеприсутствия.
Готовое приложение находится в том же репозитории, в solution DeviceHive.WindowsManager.Universal. Не будем останавливаться на нюансах гайдлайнов Win10 – корни приложения растут еще из Win8. Не будет тут и MVVM – все и так знают, как его применять. Давайте сосредоточимся на главном: нам нужна консоль мониторинга и управления устройствами, подключенными к DeviceHive, под Windows 10 на Raspberry Pi2.

Для DeviceHive реализовано три клиентских библиотеки:
- DeviceHive.Client – для «большого» .NET 4.5 и выше. Использует WebSocket4Net.
- DeviceHive.Client.Portable – для Windows 8.1 и Windows Phone 8.1. Использует нативные WebSockets.
- DeviceHive.Client.Universal – для всех редакций Windows 10, в том числе для Win10 IoT Core. Именно она используется в нашем приложении.
Наследуем ClientService от DeviceHiveClient и инициализируем его сеттингами:
DeviceHiveConnectionInfo connInfo;
if (!String.IsNullOrEmpty(Settings.Instance.CloudAccessKey))
{
    connInfo = new DeviceHiveConnectionInfo(Settings.Instance.CloudServerUrl, Settings.Instance.CloudAccessKey);
}
else
{
    connInfo = new DeviceHiveConnectionInfo(Settings.Instance.CloudServerUrl, Settings.Instance.CloudUsername, Settings.Instance.CloudPassword);
}
current = new ClientService(connInfo, new RestClient(connInfo));
А также указываем не использовать LongPolling, а только WebSocket, дабы не упираться в лимит одновременных HTTP-запросов:
SetAvailableChannels(new Channel[] {
    new WebSocketChannel(connectionInfo, restClient)
});

Загружаем список девайсов и группируем их по сетям в MainPage:
var deviceList = await ClientService.Current.GetDevicesAsync();
var networkList = (await ClientService.Current.GetNetworksAsync()).FindAll(n => n.Id != null);
foreach (Network network in networkList)
{
    var devices = deviceList.FindAll(d => d.Network?.Id == network.Id);
    if (devices.Count > 0)
    {
        networkWithDevicesList.Add(new NetworkViewModel(network) { Devices = devices });
    }
}
А вот и наш виртуальный светодиод:

Переходим на DevicePage, подгружаем информацию о нем:
Device = await ClientService.Current.GetDeviceAsync(deviceId);

Переключаемся на вкладку с уведомлениями. Уведомления отправляются от управляемого устройства к управляющему устройству. В нашем случае – от VirtualLedClient к VirtualLed.
Инициализируем автоподгружающийся список с «бесконечным» скроллом:
NotificationFilter filter = new NotificationFilter()
{
    End = filterNotificationsEnd,
    Start = filterNotificationsStart,
    SortOrder = SortOrder.DESC
};
var list = new IncrementalLoadingCollection<Notification>(async (take, skip) =>
{
    filter.Skip = (int)skip;
    filter.Take = (int)take;
    return await ClientService.Current.GetNotificationsAsync(deviceId, filter);
}, 20);
Если не определена конечная дата фильтрации списка нотификаций, подписываемся на новые уведомления, которые будут приходить через вебсокет:
notificationsSubscription = await ClientService.Current.AddNotificationSubscriptionAsync(new[] { deviceId }, null, async (notificationReceived) =>
{
    await Dispatcher.RunAsync(CoreDispatcherPriority.Normal, () =>
    {
        lock (NotificationsObservable)
        {
            if (!NotificationsObservable.Any(c => c.Id == notificationReceived.Notification.Id))
            {
                NotificationsObservable.Insert(0, notificationReceived.Notification);
            }
        }
    });
});
Если попробовать переключать наш виртуальный светодиод, то уведомления о его новом состоянии тут же отобразятся в списке.

Если поменять настройки фильтрации, то автоподгружающийся список заново инициализируется с новым фильтром.

Теперь пришла очередь вкладки команд. Команды похожи на нотификации, но направлены от управляющего устройства к управляемому, а также могут иметь статус и результат выполнения.
CommandFilter filter = new CommandFilter()
{
    End = filterCommandsEnd,
    Start = filterCommandsStart,
    SortOrder = SortOrder.DESC
};
var list = new IncrementalLoadingCollection<Command>(async (take, skip) =>
{
    filter.Skip = (int)skip;
    filter.Take = (int)take;
    return await ClientService.Current.GetCommandsAsync(deviceId, filter);
}, 20);
Аналогично подписываемся на новые команды:
commandsSubscription = await ClientService.Current.AddCommandSubscriptionAsync(new[] { deviceId }, null, async (commandReceived) =>
{
    await Dispatcher.RunAsync(CoreDispatcherPriority.Normal, () =>
    {
        lock (CommandsObservable)
        {
            if (!CommandsObservable.Any(c => c.Id == commandReceived.Command.Id))
            {
                CommandsObservable.Insert(0, commandReceived.Command);
            }
        }
    });
});

Поскольку мы делаем инструмент не только для мониторинга, но и для управления устройствами в DeviceHive сети, нужно реализовать возможность отправки команд:
var parameters = commandParams.Text != "" ? JObject.Parse(commandParams.Text) : null;
var command = new Command(commandName.Text, parameters);
await ClientService.Current.SendCommandAsync(deviceId, command, CommandResultCallback);
При отправке команды мы подписались на ее обновление методом CommandResultCallback. Обрабатываем результат выполнения команды:
foreach (Command cmd in CommandsObservable)
{
  if (command.Id == cmd.Id)
  {
        // Command class doesn't implement INotifyPropertyChanded to update its result,
        // so old command is replaced by command with result:
        var index = commandsObservable.IndexOf(cmd);
        commandsObservable.RemoveAt(index);
        commandsObservable.Insert(index, command);
        break;
    }
}

Чтобы не копировать команды вручную, нужно предусмотреть клонирование команд. Выделяем, клонируем, если нужно – редактируем, отправляем.

Задача выполнена! Как видите, Raspberry Pi 2 c Windows 10 IoT Core и DeviceHive – отличное решение для практически любой задачи в контексте Internet of Things. Прикрутите пару кнопок, dashboard и подключите Raspberry Pi к телевизору в гостиной – мониторинг и управление умным домом готово. Купили лишних Raspberry? Не вопрос, библиотека DeviceHive.Client умеет работать не только в качестве управляющего клиента, но и в качестве управляемого девайса – реализуем Headless Application, подключаем датчики/реле и устанавливаем Raspberry Pi по дому. Ограничивает вас лишь ваша фантазия.
Заключение
Появление Windows 10 IoT Core – это именно то, чего ждали embedded-разработчики. Когда ресурсов даже самого мощного микроконтроллера на .NET Micro Framework (для которого, кстати, тоже есть реализация DeviceHive) не хватает, а ставить полноценный компьютер на Windows – все равно, что стрелять из пушки по воробьям, то Windows 10 IoT Core – настоящее спасение. И пусть пока есть нюансы с аппаратным ускорением графики и недостатком драйверов для некоторых USB-устройств – это всё простительно. Ведь еще недавно мы только мечтали, чтобы Windows-приложения, работающие на настольных ПК и планшетах запускались не только на телефонах, но и на микрокомпьютерах. А теперь – это реальность, добро пожаловать в «сегодня».

Об авторе
Антон Седышев — Senior .NET-разработчик «DataArt »
В IT работает с далекого 2003, к команде DataArt присоединился в 2012. Ранее занимался разработкой веб- и мобильных проектов, автоматизицией логистических процессов на складах крупной международной компании. Сейчас выступает в роли ведущего .NET-разработчика и идеолога Microsoft-сообщества DataArt. Занимается разработкой приложений на Windows Phone и Windows 10, сервисом DeviceHive и embedded-технологиями вообще. В свободное время работает над собственным OpenSource embedded-проектом по интеграции .NET Micro Framework устройства в автомобили BMW.
With the recent release of the Raspberry Pi 4, people are once again flocking to the single-board computer. It’s still just as small as it has always been, but it’s more capable than it has ever been before.
Most people opt to install a Linux distribution on a Raspberry Pi, especially since this is what the Raspberry Pi Foundation itself recommends. That said, if you’re going to be using the Raspberry Pi for projects in a Windows environment, you may prefer to install Windows 10 IoT Core instead.
A Word of Warning
Windows 10 IoT Core doesn’t officially support the Raspberry Pi 4, or even the previous Raspberry Pi 3 Model B+ for that matter. Given the similarities of the hardware, you should be able to install the software on the newer hardware the same way, but you can’t guarantee that it will run perfectly.
For the following steps, you’ll need a standard Windows 10 installation running on a desktop or laptop. You’ll also need to be a Microsoft Insider.
First, you’ll need to download Windows IoT Core from the Microsoft website. We’re going to be using the Windows IoT Core Image Helper app.
Right-click the downloaded file to mount the image, then double-click on the .msi installer. Make sure the SD card you plan to use with your Raspberry Pi is inserted and ready to write.
Run the app and select the folder where the downloaded image with the .ffu extension is located. You’ll see a dialog showing the progress of writing to the SD card. Once this is successful, it’s time to boot the Raspberry Pi for the first time.
Boot the Image on Your Raspberry Pi
Insert the SD card into your Raspberry Pi and power it on. Make sure you have a wired Ethernet connection. This is a slow process, so be prepared to wait for ten minutes. Once it powers on, you’re technically running, but you may have boot problems, and you won’t have Wi-Fi or Bluetooth.
Fixing the Installation
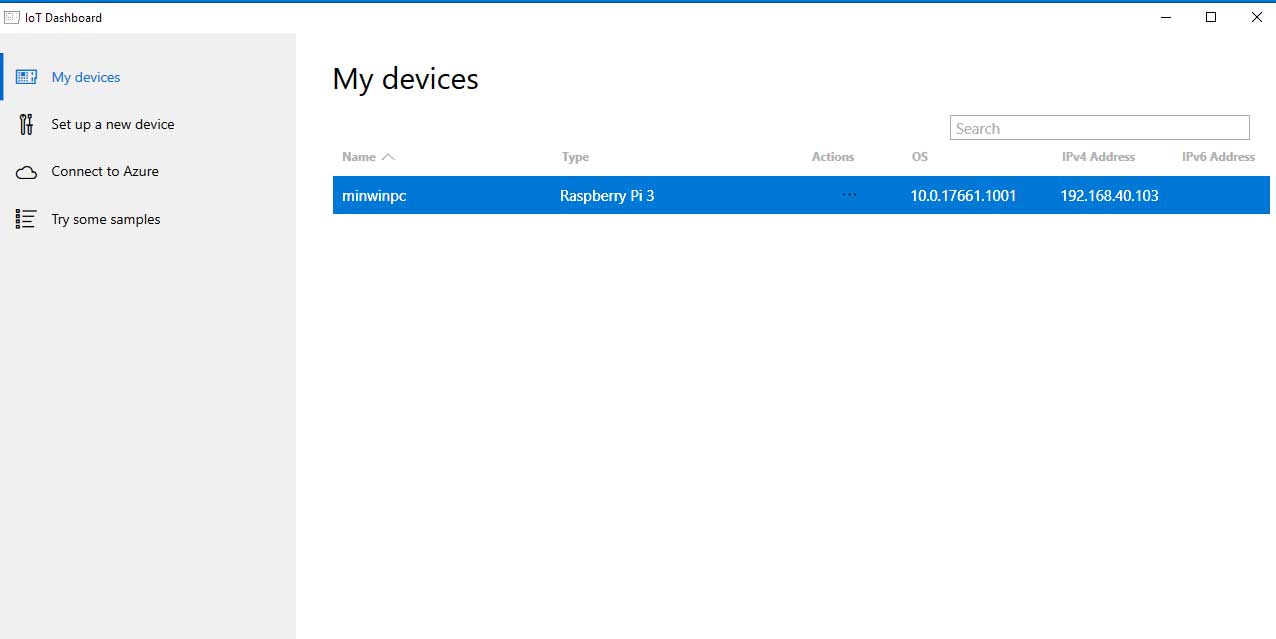
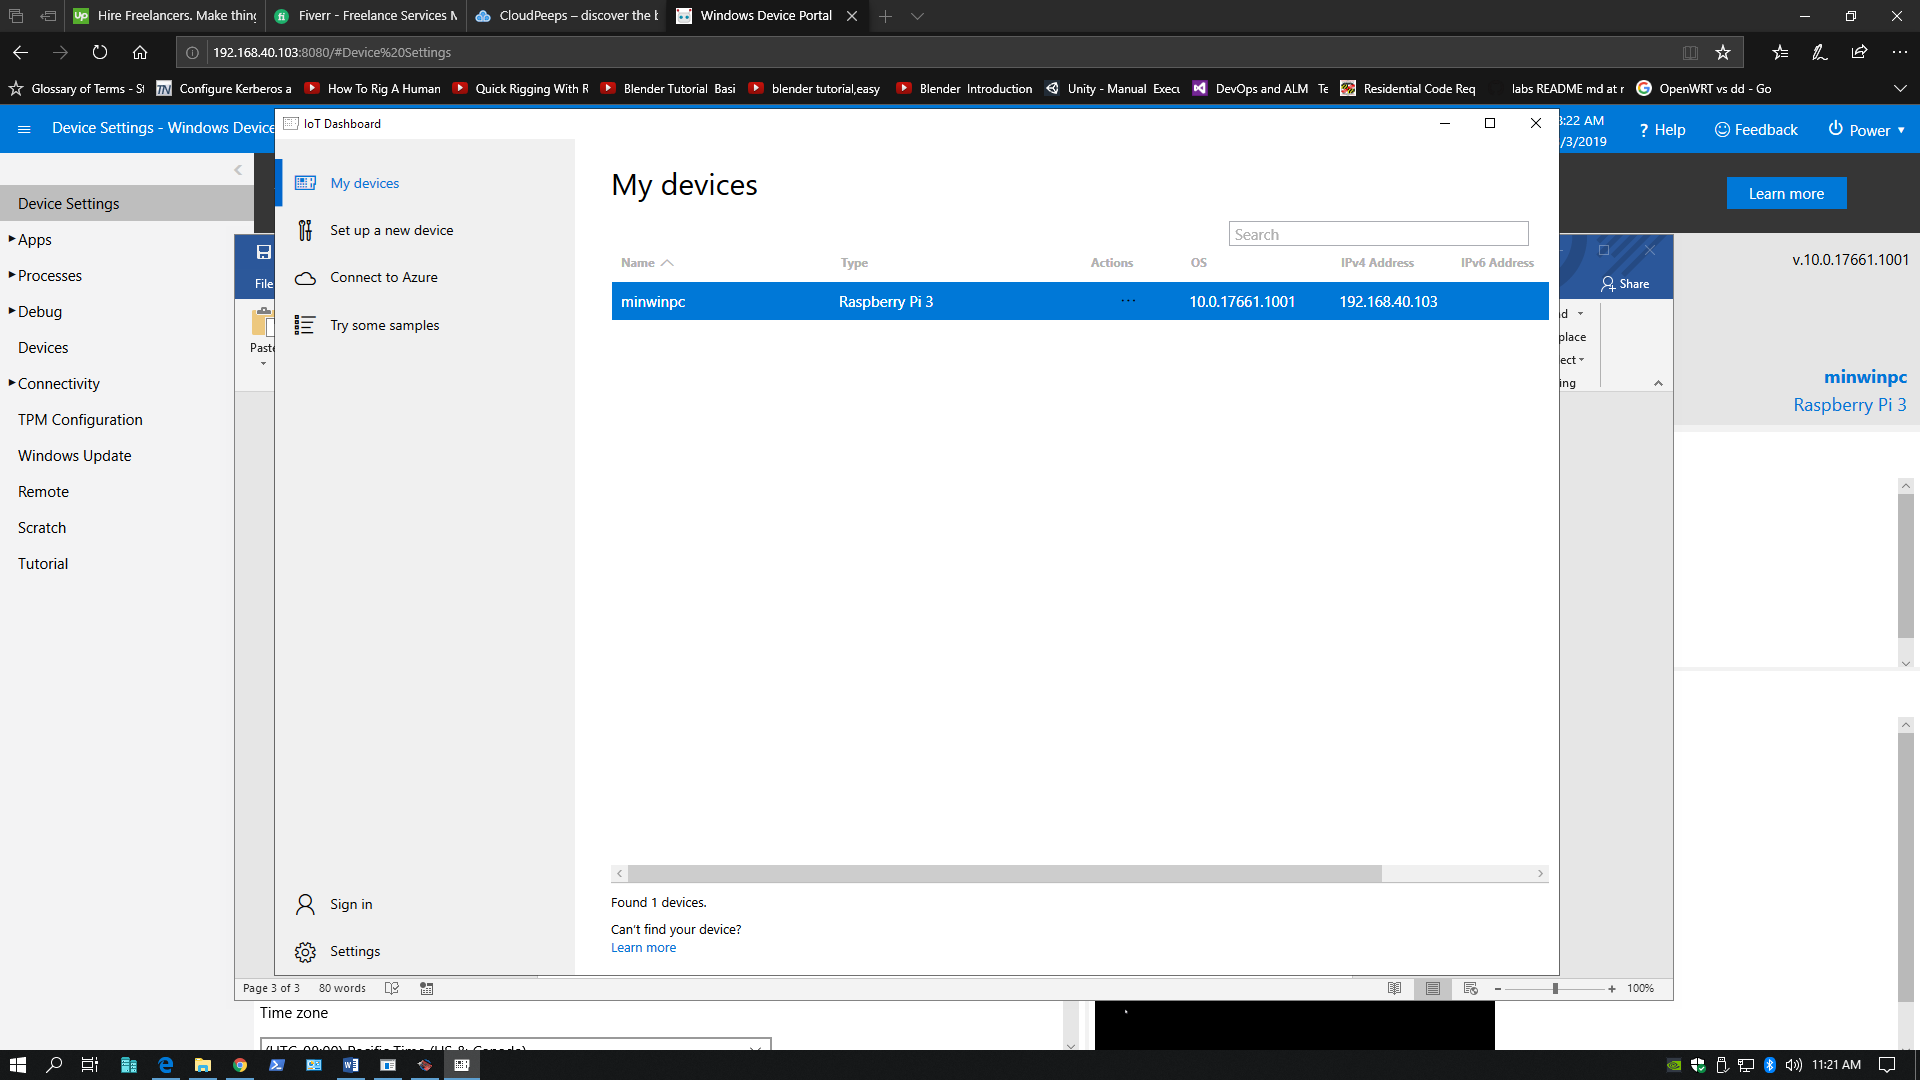
Back on the standard Windows 10 installation you used to download the image, you’ll now want to download and run the Windows IoT Dashboard. When it boots, you should see a list of the Windows 10 IoT devices connected to the network, and this should include your Raspberry Pi.
Double-click the device once you see it to go to its Properties page, then click the link to the device portal at the bottom. This will launch the Windows Device Portal for the Pi.
From here, click on Apps, then Apps Manager, then Check for Updates. The device will download and apply updates. You’ll want to repeat this process until there are no updates remaining.
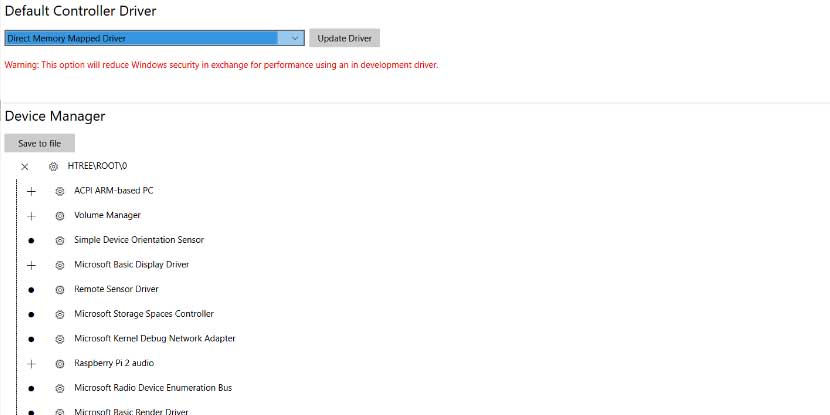
Once this is finished, you’ll want to change the default controller driver to improve performance. Click Devices on the left side of the Device Portal, select “Direct Memory Mapped Driver,” then click “Update Driver.” The device should reboot, and you’ll have a much better time using it.
Looking for Project Ideas?
Now it’s time to get started building a project. You can either consult Microsoft’s documentation or just get started building, depending on whether you know what you want to do.
The DIY community has built plenty of interesting projects on the Raspberry Pi. Many of them were built on top of Linux, but not all. If you’re looking for somewhere to start, take a look at out recent rundown of three interesting IoT projects, one of which is built using Windows 10 IoT Core.
Kris Wouk
Kris Wouk is a writer, musician, and whatever it’s called when someone makes videos for the web.
Cloud Solution Architects
In this post, App Dev Manager, Robert Schumann shows how to get started with Windows 10 IoT Core with Raspberry Bi 3 B+.
Jumping right in, let’s get a few matters out of the way upfront.
- This article specifically uses the Raspberry Pi 3 model B+
- If you’re not sure what model of Pi you’re running then review how-to details here: https://www.raspberrypi-spy.co.uk/2012/09/checking-your-raspberry-pi-board-version/
- Topics covered should take about 30 minutes to complete provided everything you need is readily available.
- Disclaimers
- At present, there is no supported version of Windows 10 IoT Core specifically for the Raspberry Pi 3 model B+. This article demonstrates an unsupported technical preview for a Raspberry Pi 3 B+.
- I love Pi. For me it’s been a faithful hacker/maker companion for years from which I’ve learned a lot.
- I work for Microsoft as a Senior Premier Application Development Manager. As such I often, and increasingly, support non-Windows platforms and open source projects, including cloud-based.
Everything you need (to complete this article)
- Laptop or desktop running Windows 10
- Raspberry Pi 3 model B+
- 5V 2A microUSB power supply for Pi
- 8GB or larger Class 10 microSD, with ability to read/write from standard Windows 10 laptop or desktop
- Ethernet cable
- HDMI cable
- USB or proprietary wireless Keyboard for Pi
- USB or proprietary wireless Mouse for Pi
You will need the HDMI cable to connect the Pi to a monitor for checking installation status. Likewise, having a USB keyboard and mouse for installation is suggested in case they’re needed for troubleshooting. Technically speaking, a lot of functionality can be accomplished through the browser or remote connection once the OS is installed.
Install Windows 10 IoT Core on Raspberry Pi 3 B+
At date of writing, there is no supported version of Windows 10 IoT Core for the Pi 3 B+ model we need to take a somewhat non-linear installation path. We simply need to make one extra download and complete one out-of-band task. Beyound that, all steps are the same.
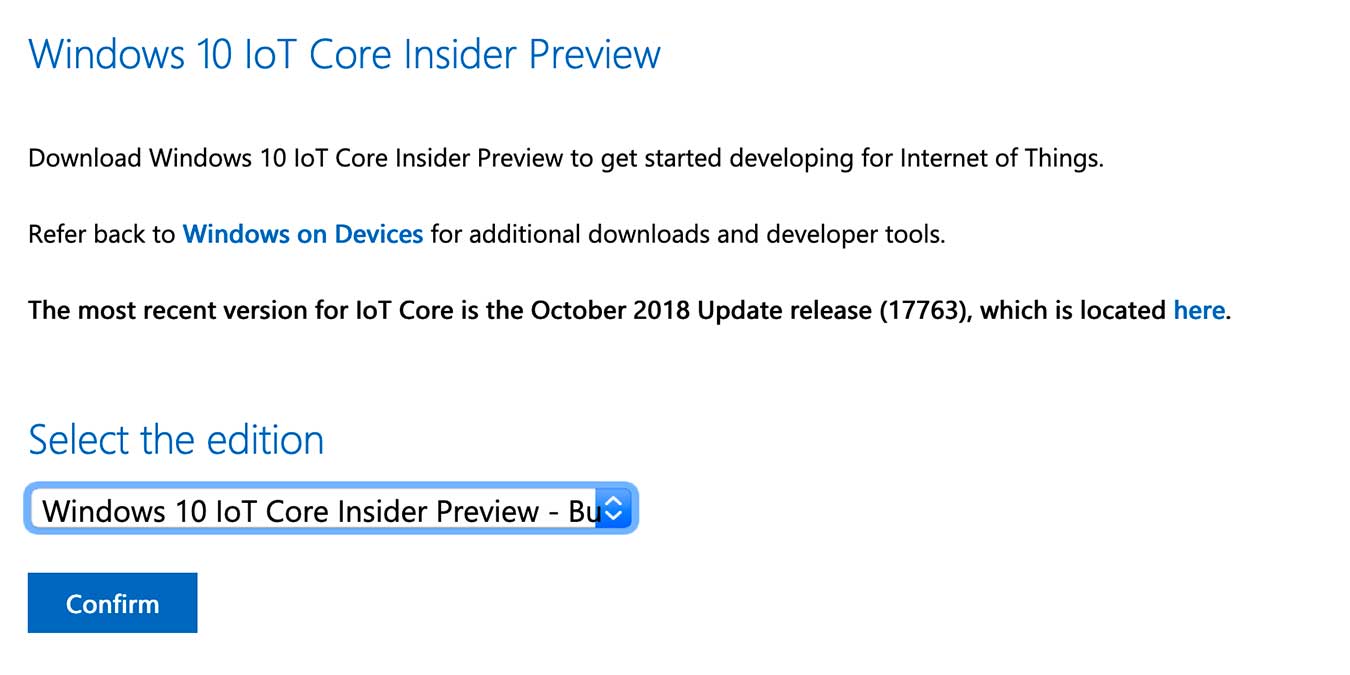
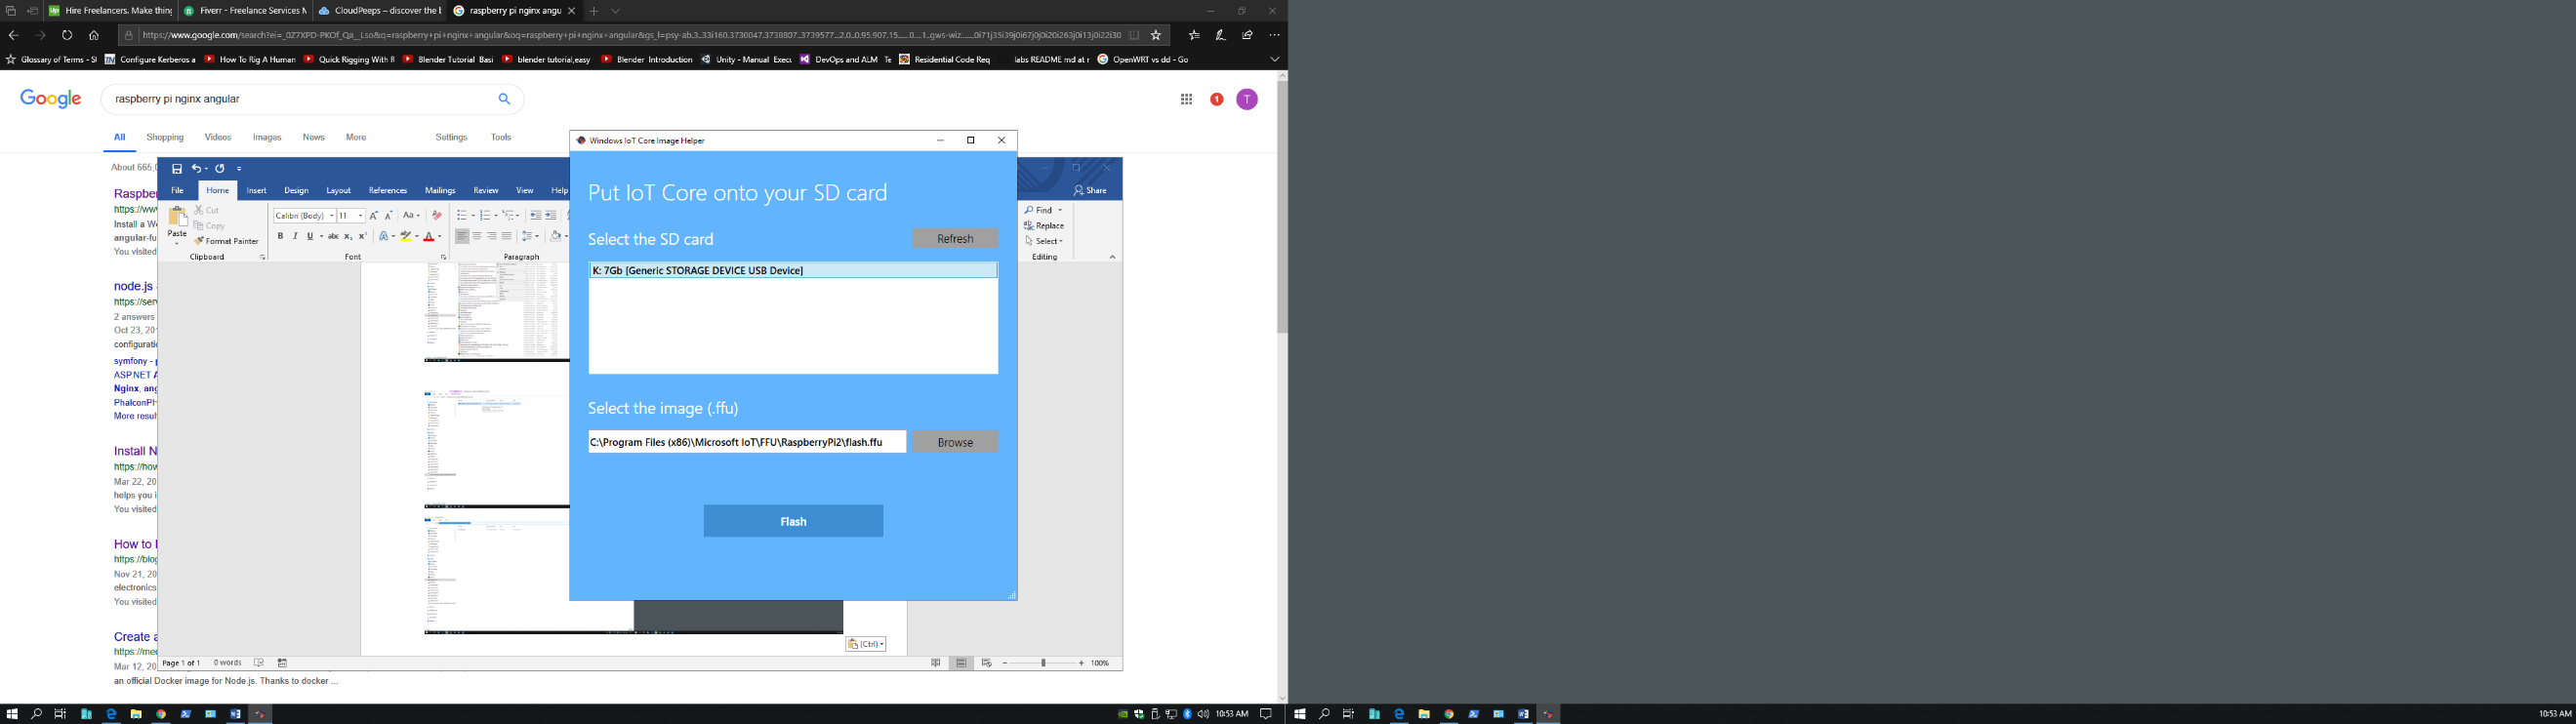
Using a standard Windows 10 laptop or desktop, start by downloading a preview build from here: https://www.microsoft.com/en-us/software-download/windowsiot
I’m using the latest ISO build version 17661 for this article. Once download is complete, right-click to mount the image and access the .msi installer. Because the supported IoT Dashboard cannot be used to setup the Raspberry Pi 3 B+, this “Windows IoT Core Image Helper” app is used instead. Double-click the .msi to launch the installer and follow directions, this process is straight forward and self-explanatory. By default, the image helper is installed to path C:\Program Files (x86)\Microsoft IoT.
Before launching the image helper app, make sure the microSD card being used for the Pi is read/write accessible to the laptop or desktop app host system. Then, start the Windows IoT Core Image Helper app. Once started, select the correct SD card. As for the required .ffu file that is located under the application folder in the FFU directory. Confirm the correct SD card is selected and the ffu file is identified then click Flash button. Flash will spawn a command dialog that provides percentage completion output. Once finished, a notification pops up with overall status. If successful then remove the microSD from the app host system and insert into Pi. Make sure all Pi hardware is good-to-go (monitor, power, mouse, keyboard), then power on the Pi.
And wait….

Comment: At least for me boots are slow even with the understanding this is a Pi. I tried several different microSD cards of varying vendors, sizes, and specs. Restarts from the box tended to hang so much so that out of impatience or frustration, I found myself pulling Pi power. Oddly, restarting remotely from the Windows IoT Dashboard worked better than directly on the system.
The initial boot is painfully slow; you’ll get the win logo and spinning donut for about the first 2 minutes, then just a spinning donut for about another 3-4 minutes. (Think taking away the logo was meant to be a distraction, like an attempted offset or rest to the “why is this taking so long” personal timer.) Once the system initially boots, and loads, things get better depending on where work is being managed. I found performance directly on the Raspberry Pi to be frustrating. Luckily there are alternatives…
So at this point, a preview version of Windows 10 IoT Core was flashed to a microSD, subsequently inserted into a Raspberry Pi 3 B+, which was then turned on, successfully boots, and is now running. The image helper app is no longer needed, and can be uninstalled if desired. In case you’ve not read any existing documentation, here’s a link that outlines known issues: https://docs.microsoft.com/en-us/windows/iot-core/troubleshooting
Of note:
- No Pi WiFi
- No Pi Bluetooth
- May experience boot problems
That’s quite a bunch of “OTB awesomeness”! Pressing forward, however, things look promising…
Windows IoT Dashboard
We can now use the supported dashboard found here: https://docs.microsoft.com/windows/iot-core/downloads

Example: 192.168.1.3:8080
| Default User Name: administrator
Default Password: p@ssw0rd |
TIP: If your Pi is not listed under My Devices try the following:
|
When the dashboard runs it should display a list of (Windows) IoT devices connected to the network. Your newly implemented Raspberry Pi 3 B+ should show. It likely contains default properties such as name and logon account. Double-click the listed Windows IoT Pi device to go to its properties page. From there you can change the device name and see the default account. Notice the link to the device portal at bottom, click that link. A browser should pop up the Windows Device Portal for the selected device using an network subnet address at port 8080.
All things considered, the device portal has a decent amount of capabilities and performance. There might be a couple matters to tend to first, such as applying updates and tweaking performance.
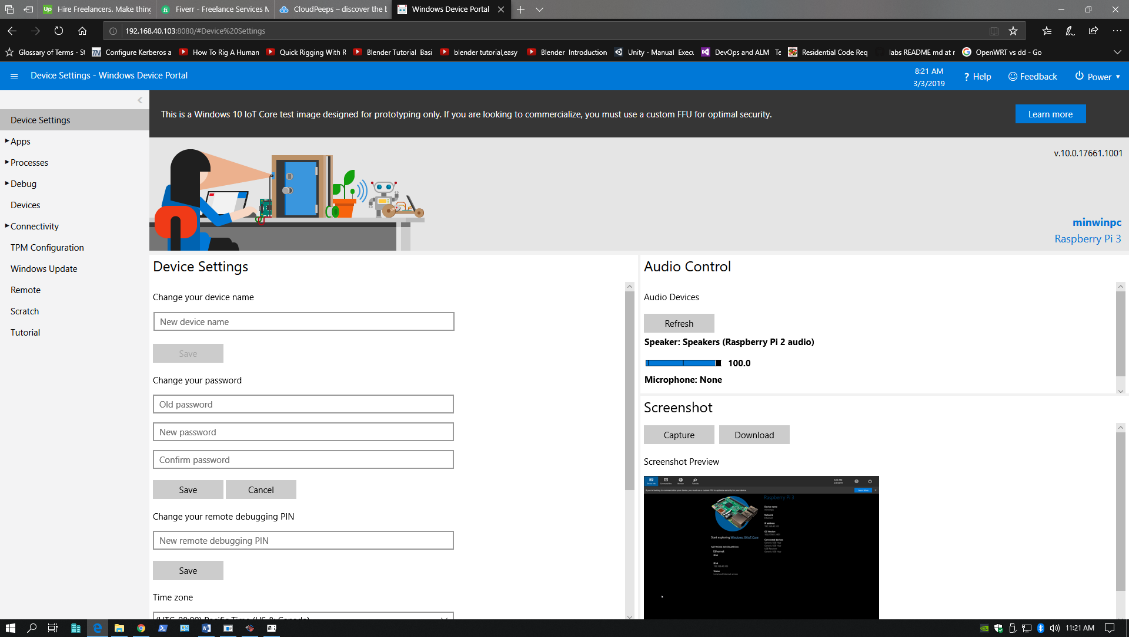
From the device portal page, expand Apps, click Apps Manager, then click Check for Updates. A prompt will display for any outstanding updates, click Ok. Reboots may be required. Rinse repeat until fully updated in which case the prompt with say 0 updates found.
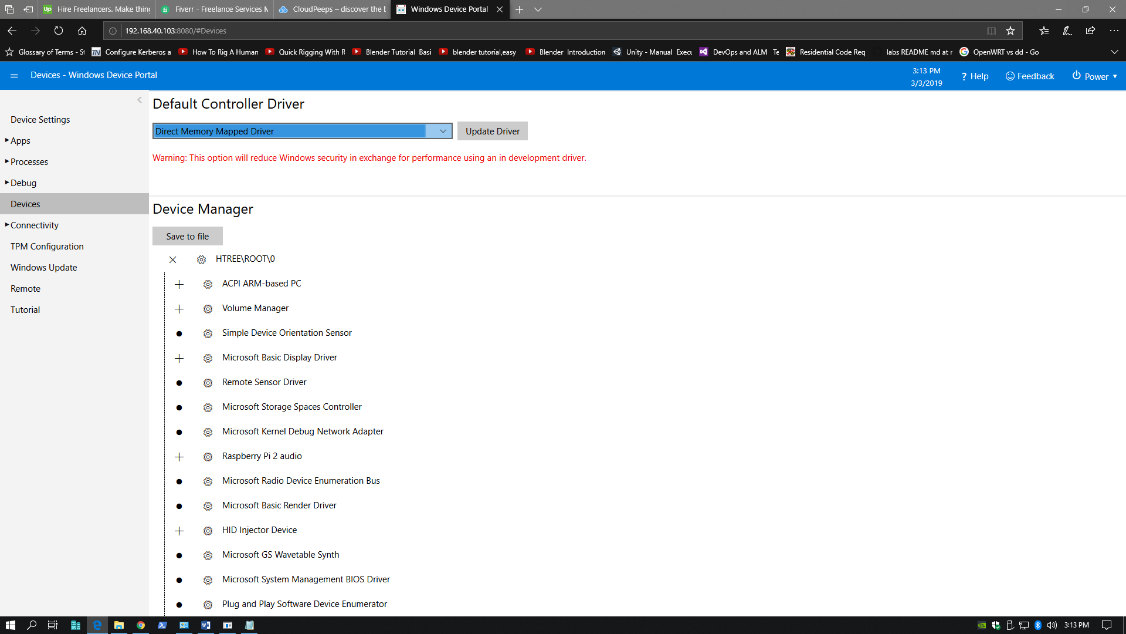
If you’re more concerned about performance than security then change the default controller driver. Click Devices left, then on right from the dropdown select Direct Memory Mapped Driver, click Update Driver. Reboot required.
Remote Connection
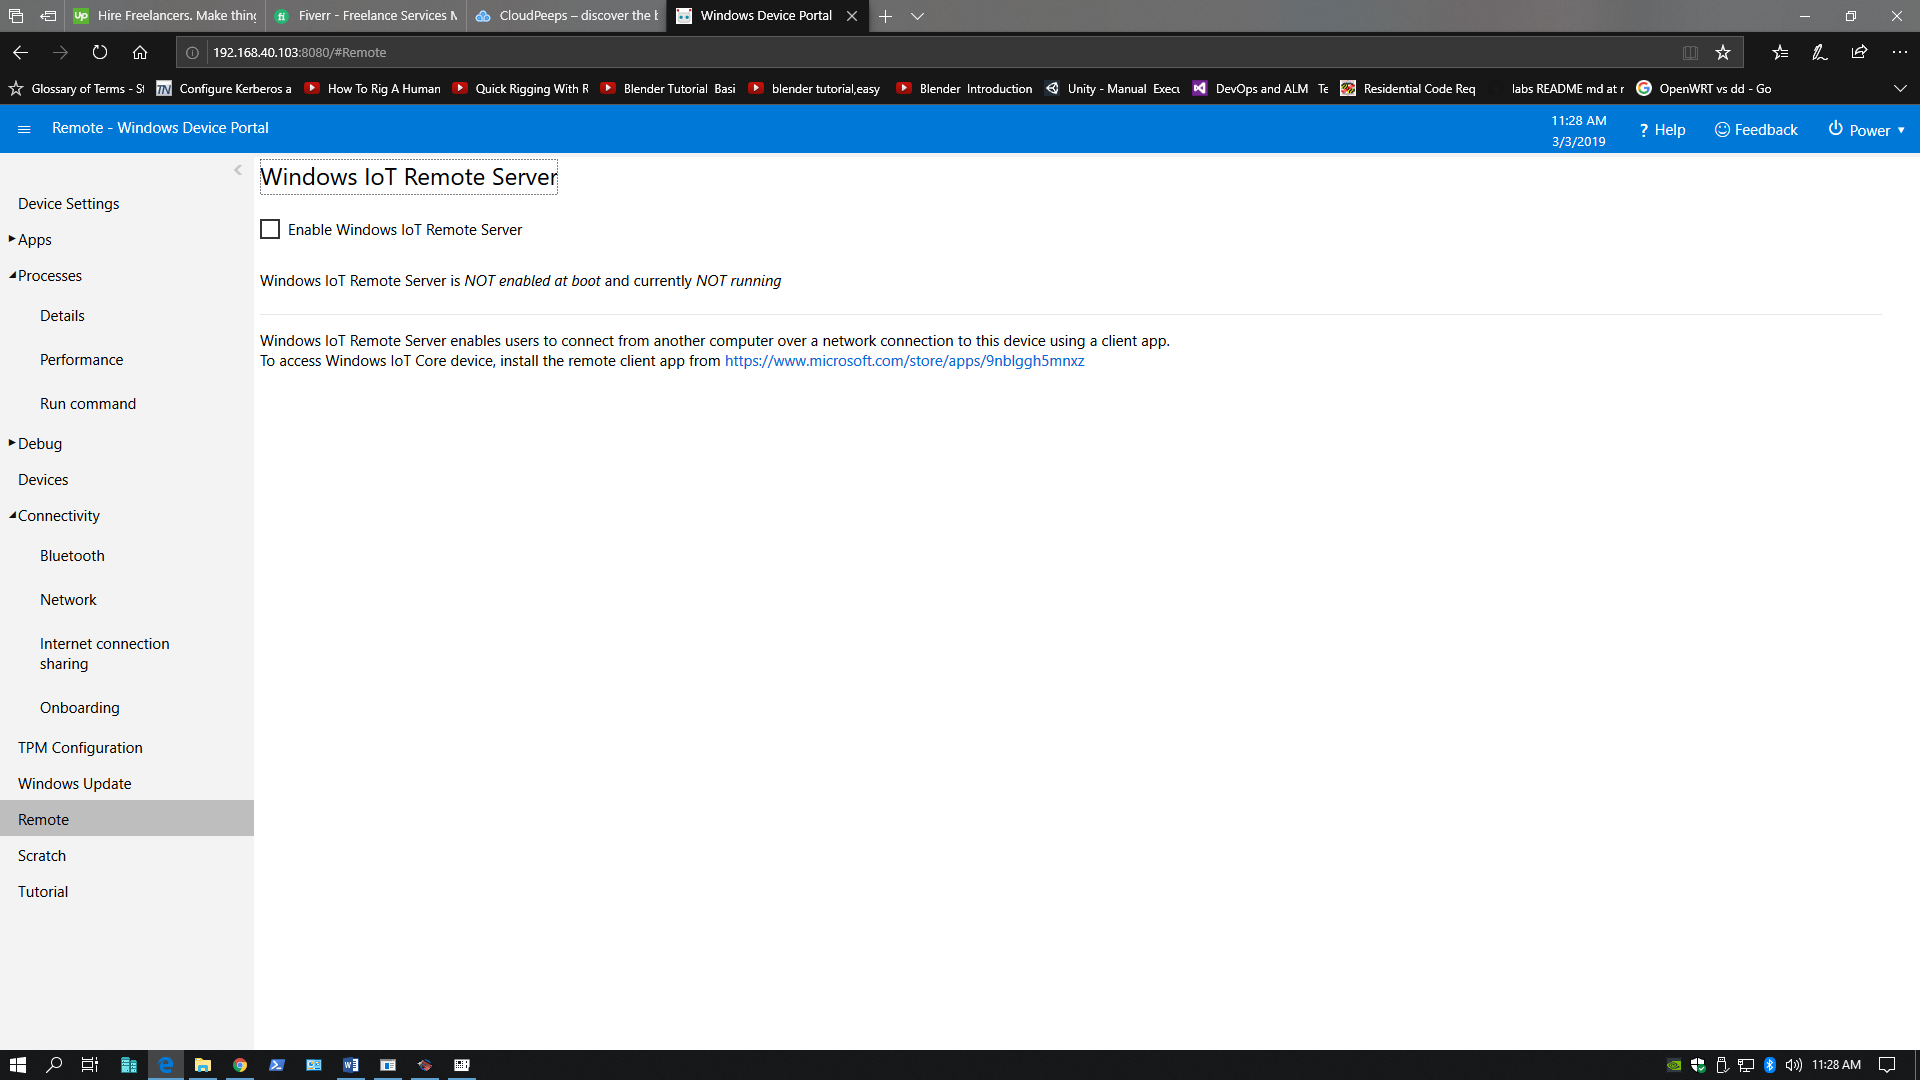
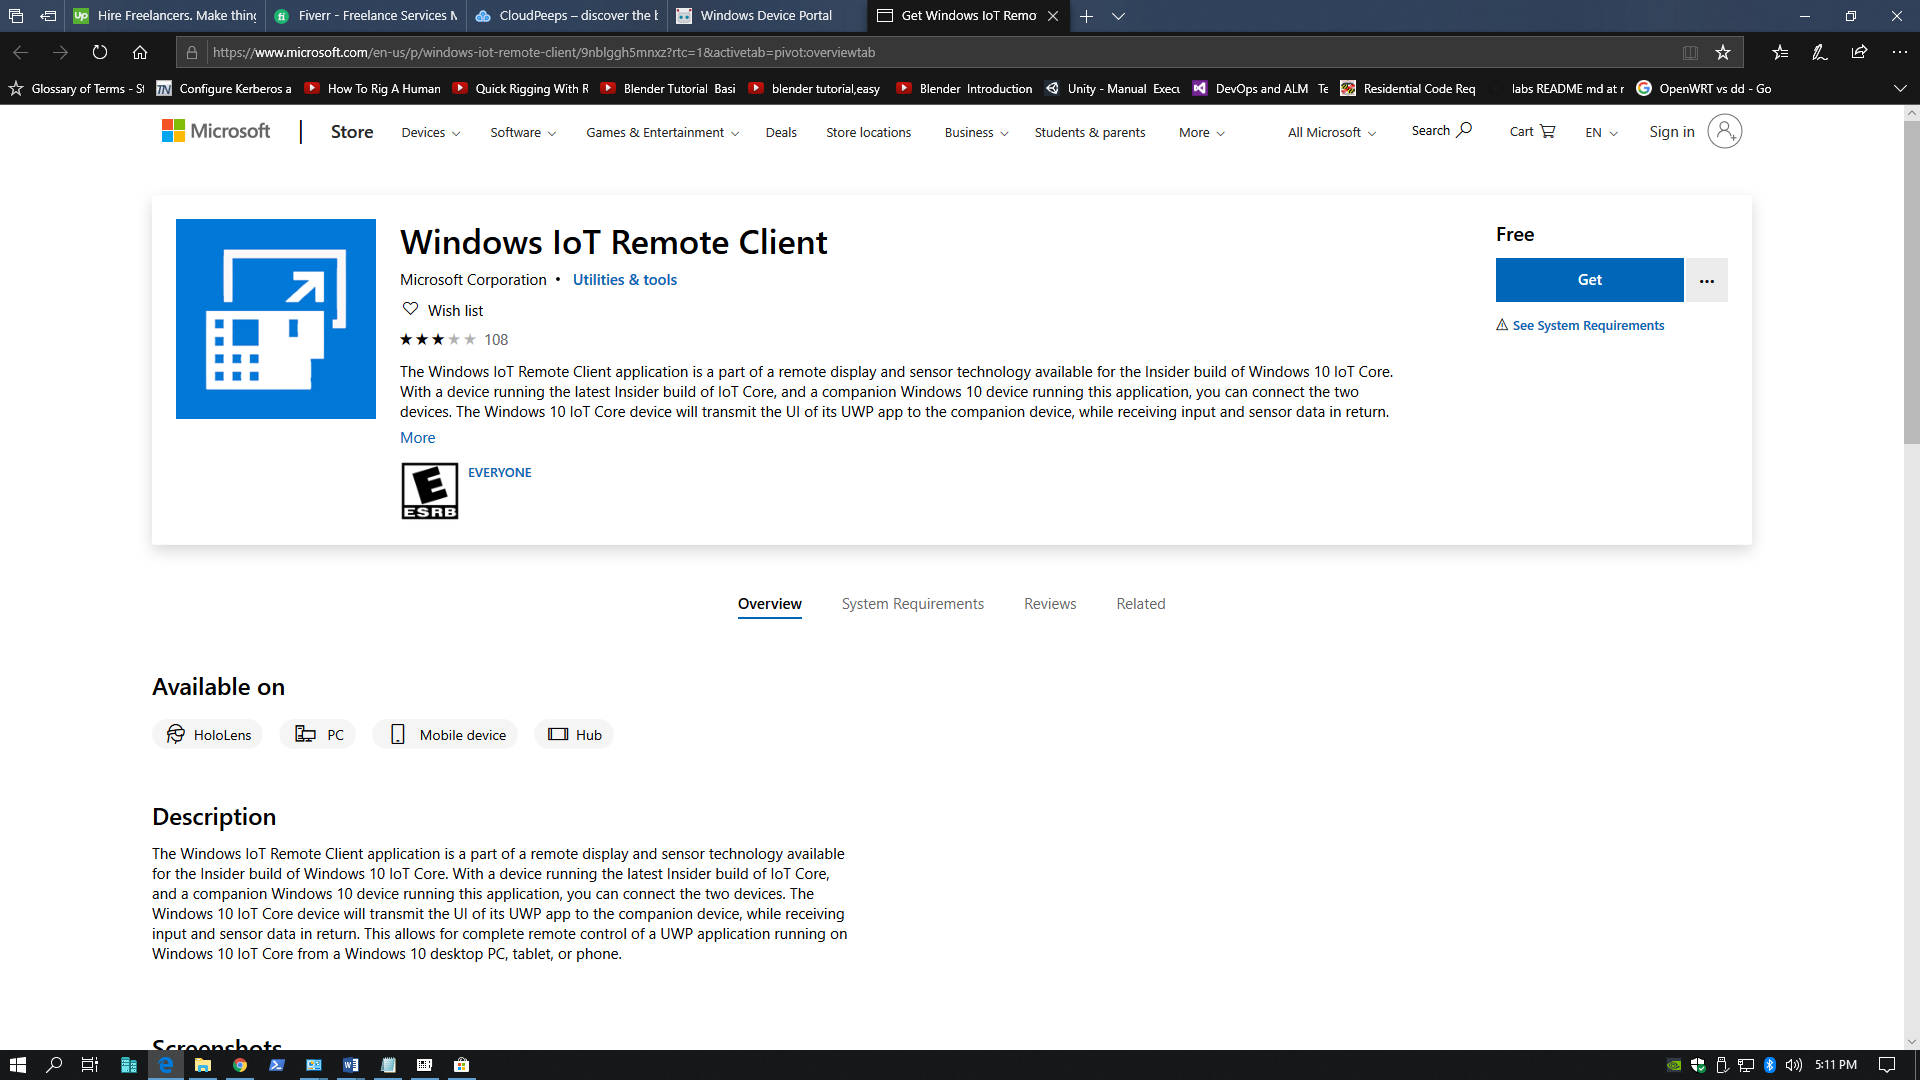
Another way to connect to the Pi is through the Windows Remote IoT Client application from Microsoft Store. Recommend reading the application’s description. Essentially what this app does is receive UI data from the Pi and sends sensor and input data to remotely manipulate the device. Somewhat of a different twist on establishing a remote “connection”.
Conclusion
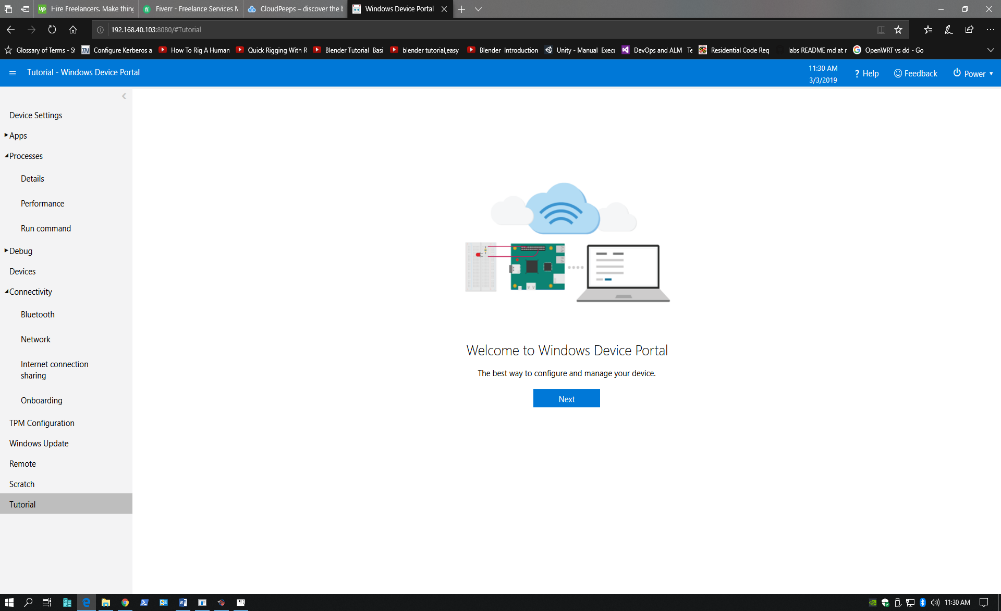
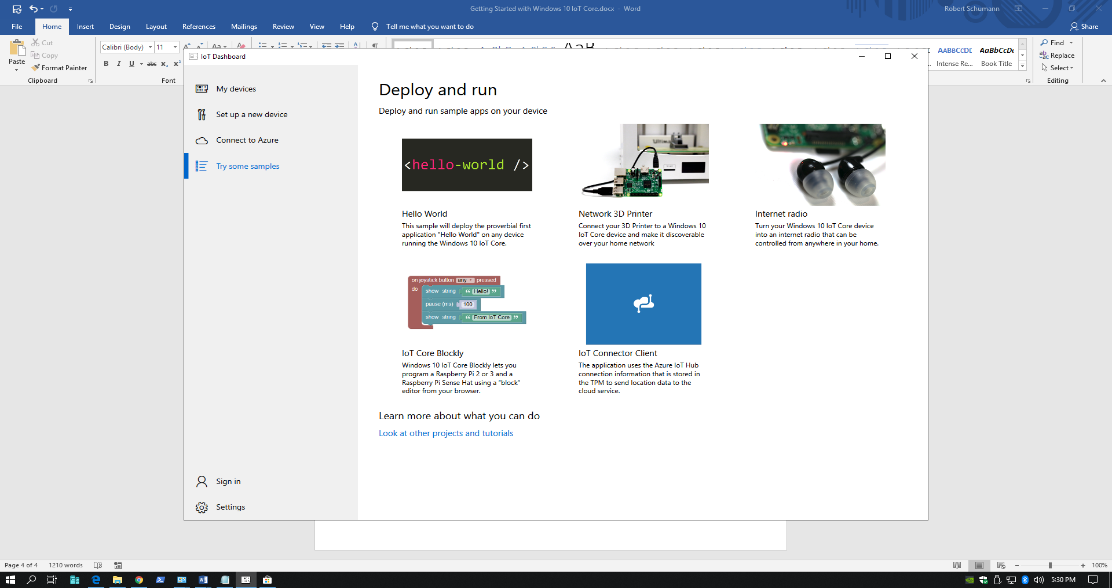
There are may more features in Windows 10 IoT Core to explore. Recommend starting with the device portal Tutorials option, lower left, to help get up-to-speed with navigating. There is also the dashboard Connect to Azure and Try some samples for development.
Overall, I like being able to repurpose my Raspberry Pi 3 B+. It makes sense that Microsoft wants to enable and optimize edge devices. Extending the Windows ecosystem via Windows 10 IoT Core and being able to run it on an expanded list of devices certainly helps. Like most emerging technology, Windows 10 IoT Core is evolving, and I look forward to future enhancements and capabilities.
Author
Cloud Solution Architects
Microsoft Developer Support helps software developers rapidly build and deploy quality applications for Microsoft platforms.
В связи с бурным развитием в последнее время технологий интернета вещей (IoT-технологий) многие компании стали разрабатывать операционные системы (ОС), специально «заточенные» для применения в IoT-технологиях. Одной из таких компаний является Microsoft, которая специально для этих целей выпустила операционную систему Windows 10 IoT core, которая уже успела полюбиться многим энтузиастам в мире электроники. В данной статье мы рассмотрим как установить Windows 10 IoT Core на плату Raspberry Pi и запустить на ней тестовое приложение.

Windows 10 IoT core – это самая маленькая версия операционной системы Windows, разработанная для применения в приложениях интернета вещей (IoT).
Для установки Windows 10 IoT core необходима специальная плата прототипирования, в нашем случае ее роль будет выполнять плата Raspberry Pi с установленной в нее SD картой. Для работы с Windows 10 IoT core понадобится всего лишь подать питание на плату Raspberry Pi, внешних монитора и клавиатуры не понадобятся. Windows 10 IoT core можно скачать и установить на ваш компьютер (мы это рассмотрим далее в статье). После установки Windows 10 IoT core необходимо просто подать питание на плату Raspberry Pi и она автоматически соединится к вашей сети и к вашему компьютеру на Windows. Вы можете писать код программы на Visual Studio и после этого перебрасывать код этой программы удаленно на плату, также вы можете удаленно производить отладку этой программы.
Операционная система Windows 10 IoT имеет сформировавшееся «живое» сообщество пользователей, которое разработало уже достаточно много кодов и проектов в рамках данной системы, среди которых вы легко можете найти прототип для проектируемого вами устройства. Windows 10 IoT core отличается хорошей устойчивостью и стабильностью работы, безопасностью и хорошей масштабируемостью. Для работы с Windows 10 IoT core доступно достаточно большое количество разнообразных электронных плат.
Необходимые компоненты
- Плата Raspberry Pi 2 или выше (купить на AliExpress) (Реклама: ООО «АЛИБАБА.КОМ (РУ)» ИНН: 7703380158).
- SD карта объемом не менее 8 Гб.
- Модуль чтения SD карт (или компьютер с таким ридером).
- HDMI кабель.
- Источник питания 5V 2A с разъемом microUSB.
- Монитор с HDMI.
- Мышка и USB клавиатура (опционально).
Установка Windows 10 IoT Core на Raspberry Pi
1. Вначале вам необходимо скачать панель инструментов Windows 10 IoT core на свой компьютер или ноутбук. Мы будем устанавливать эту операционную систему на SD карту с помощью данной панели инструментов. Скачать эту панель инструментов вы можете по следующей ссылке. После скачивания установите ее на свой компьютер.
2. Теперь нам необходимо установить наше устройство в этой панели. Для этого откройте панель инструментов (Dashboard) и нажмите в левой ее части на ссылку Set up a new device (установить новое устройство). Если у вас есть аккаунт Microsoft, то войдите в него, если нет – то нажмите Skip this step (пропустить данный шаг).

3. Вставьте SD карту в модуль чтения SD карт и вставьте его в ваш компьютер. В следующем окне панели инструментов выберите тип устройства (Device type) – Broadcomm, сборку ОС (OS build) – Windows 10 Iot core. Затем выберите свою SD карту, введите имя устройства (device name) и пароль (на свое усмотрение) как показано на приведенном ниже рисунке.
После этого нажмите кнопку Download and install (скачать и установить). Установка займет некоторое время, зависящее от скорости вашего интернет соединения.

После нажатия кнопки Download and install вы увидите прогресс скачивания дистрибутива Windows 10 Iot core и запись его на вашу SD карту.
4. После того как запись Windows 10 Iot core на SD карту будет закончена, выньте SD карту из вашего компьютера и вставьте ее в вашу плату Raspberry Pi. Подключите плату Raspberry Pi к монитору с помощью HDMI кабеля и подайте питание на плату. Установка Windows 10 Iot займет несколько минут. Следуйте инструкциям, которые будут появляться на экране монитора.
5. После этого вы увидите на экране домашнюю страницу Windows 10 IoT Core. На этой странице вы найдете некоторую полезную информацию: IP адрес вашей платы Raspberry Pi, подключенные устройства и т.д.

В левой панели главной страницы Windows 10 IoT Core будет 4 вкладки: Device info (информация об устройствах), Command line (командная строка), Browser (браузер) и Tutorials (обучающие материалы). Также в левом нижнем углу будет кнопка для открытия меню настроек (Settings menu).
На этом установка Windows 10 IoT Core на вашу плату Raspberry Pi будет закончена. Теперь вы сможете управлять работой вашей платы Raspberry Pi из панели настроек Windows 10 IoT на вашем компьютере.
Подключение к Raspberry Pi из панели инструментов Windows 10 IoT на компьютере
1. Откройте панель инструментов Windows 10 IoT на вашем компьютере и выберите в ней вкладку My devices (мои устройства). После этого вы увидите свою плату Raspberry Pi в списке устройств. Убедитесь в том, что плата Raspberry Pi и ваш компьютер подключены к одной и той же Wi-Fi.

Если вы не видите свою плату Raspberry Pi в списке устройств, перезагрузите плату и обновите список устройств в панели настроек Windows 10 IoT.
2. В списке устройств сделайте двойной клик мышкой и откройте окно с устройствами (Open windows device portal) в вашем браузере.

3. Вкладка, которая откроется в вашем браузере, попросит у вас сертификат (credentials) вашей платы Raspberry Pi. Введите в качестве имени пользователя (Username) слово Administrator и пароль, который вы ввели ранее (в процессе установки ОС).
После этого вы увидите окно, показанное на следующем рисунке, на котором будет представлен весь функционал (возможности) по управлению Raspberry Pi с помощью Windows 10 IoT.

4. Вы можете запустить на выполнение демо приложение с помощью встроенного примера кода. Для этого нажмите на Quick-run samples в пункте Apps как показано на рисунке ниже. Вы увидите 4 проекта с доступными для них фрагментами кода.

5. В данной статье мы рассмотрим пример «Hello world». Кликните на иконку этого проекта и затем на кнопку Deploy and run. После этого на экране монитора у вас появится следующая картинка:

Вы можете протестировать работу и других представленных примеров. Для более подробной информации по созданию приложений с помощью Windows 10 IoT core вы можете обратиться к официальной документации компании Microsoft по следующей ссылке.
Видео, демонстрирующее работу проекта
Загрузка…
2 044 просмотров