
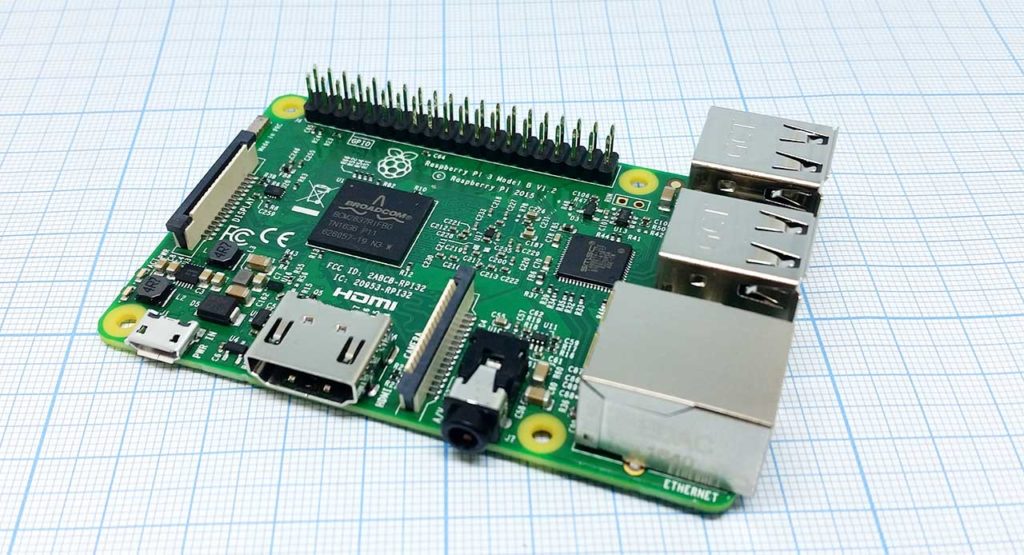
Плата микрокомпьютера Raspberry Pi 3
Честно говоря, идея опробовать одноплатный компьютер Raspberry пришла ко мне неожиданно. Опыт по Arduino и прочим ESP имеется, с «большими» ПК и серверами тоже. А вот промежуточный вариант, представленный сонмой разнокалиберных устройств, мной как-то совсем не изучен. А еще мне хотелось опробовать в деле, что же такое Windows IoT и для чего можно применить новинку от Microsoft. Выбор устройства оказался совсем очевидным: Raspberry Pi 3 с 1 Гб ОЗУ на борту, самое что ни на есть популярнейшее устройство. Конечно, различные Pine64 поджимают, но тут популярность играет на руку. Чем выше популярность, тем меньше проблем совместимости.
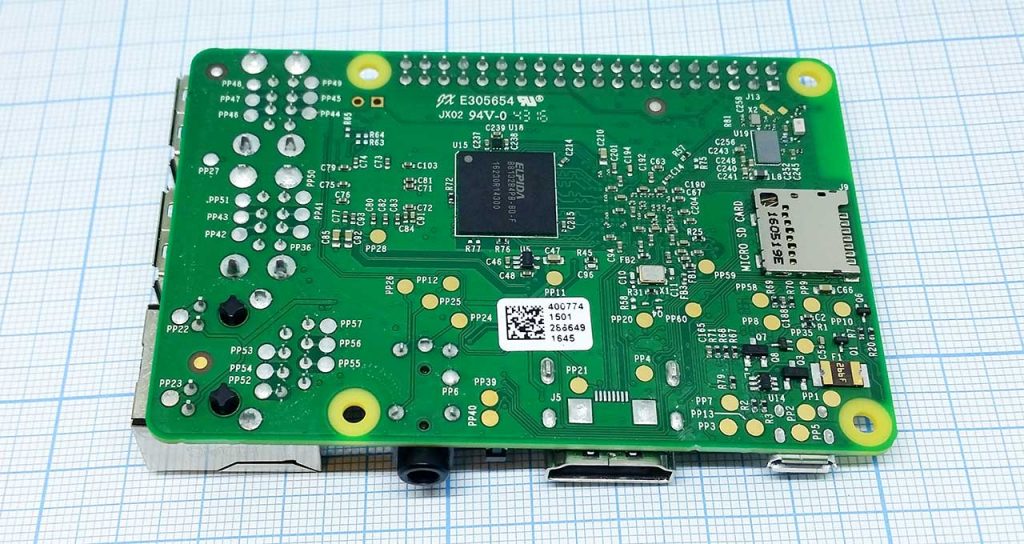
Обратная сторона Raspberry Pi 3. Виден чип ОЗУ.
И вот, спустя месяц ожидания, хорошо упакованная коробчонка с Raspberry обосновалась на моем столе. Я сразу же взял полный комплект: плата, мощный блок питания, радиаторы для чипов и пластиковый корпус. Придраться к комплектации и качеству изготовления сможет только самый мерзкий и дотошный критик. Все оборудование сделано на совесть. Плата с отмытым флюсом, пайка надежная, USB-порты на месте все, как и должно быть. Блок питания не свистит и не греется с избытком. Радиаторы чистые, с комплектным скотчем 3M для приклейки их к чипам. Корпус из пластика, хоть и маркий, но удобный в использовании. Если требуется, его можно открыть и протереть плату тряпочкой. А через многочисленные отверстия отлично подключаются кабеля для внешних устройств. Ладно, хватит описывать то, что давно всем известно. Настало время установки Windows.
Я еще помню времена, когда Windows устанавливался с дискетки. Потом уже операционка поставлялась на CD-диске, затем на DVD. А сейчас же все делается посредством простых «флешек». С Windows IoT и Raspberry все немного иначе.

Микрокомпьютер Raspberry Pi 3 в пластиковом блестящем корпусе и с установленными радиаторами
Существует как минимум два способа установки Windows IoT на Raspberry. Первый способ — воспользоваться услугами официального сайта Raspberry и скачать либо готовый образ Windows IoT, либо загрузить его через специализированный установщик NOOBS. Второй способ изобретен Microsoft. Он немного хитрее и именно им я и воспользуюсь. Да, способ применим только если на вашем рабочем компьютере используется зарегистрированная версия Windows 10. Иначе путь может быть осилен только первым способом.
Шаг 1. Скачиваем Windows IoT Dashboard
Dashboard — специальная утилита, позволяющая подготавливать носители, а в случае Raspberry Pi 3 это MicroSD, для запуска Windows IoT. Скачать утилиту можно с сайта Microsoft. Для бесплатной загрузки и использования доступны только две версии Windows IoT: Core и Insider Preview. Различий между ними не так много. Core — стабильная система, подходящая для большинства разработчиков, а Insider Preview позволят энтузиастам испытывать легкое волнение от новых «фич» и «багов».
Для версии Core существует одно, не очень существенное ограничение. Тут можно запускать только одно приложение UWP (Universal Windows Platform). Вернее, запускать их можно несколько, но активным в один момент времени будет только одно. Аналогичным образом работает и Insider Preview. В общем-то обе эти системы ориентированы на устройства с ограниченными ресурсами, к которым относится и Raspberry. Поэтому ограничение вполне разумное. А если хочется большего, то придется приобретать версию Enterprise.
Шаг 2. Подготавливаем карту памяти, устанавливаем на нее систему
Все делается в том же Dashboard. Выбираем тип платы, вставляем карту памяти, вводим сетевое имя устройства, меняем пароль. Кстати, по умолчанию, а иногда пароль, введенный на стадии подготовки карты не срабатывает, используется связка Administrator/p@ssw0rd в качестве пары логина и пароля. Тут же можно прописать и подключение к вашей Wi-Fi сети.
Если выбранный дистрибутив не был ранее скачен на компьютер, то Dashboard автоматически его скачивает. Далее происходит запись на карту памяти.
Шаг 3. Первый запуск Raspberry с Windows IoT на борту
После установки карты памяти, можно смело подключать плату к сети Ethernet (или не подключать, если настроен Wi-Fi), да подавать питание. Первая загрузка происходит дольше, чем все последующие, поскольку происходит первичное развертывание операционной системы. В моем случае первичная загрузка заняла минуты три или четыре. Первичная настройка может производиться в полностью Headless режиме, нет необходимости подключать дисплей или клавиатуру. Что, согласитесь, очень удобно, особенно если устройство у вас уже физически интегрировано куда-нибудь в подвал и приварено стальной арматурой к бетонному блоку, чтобы вандалы не уволокли.
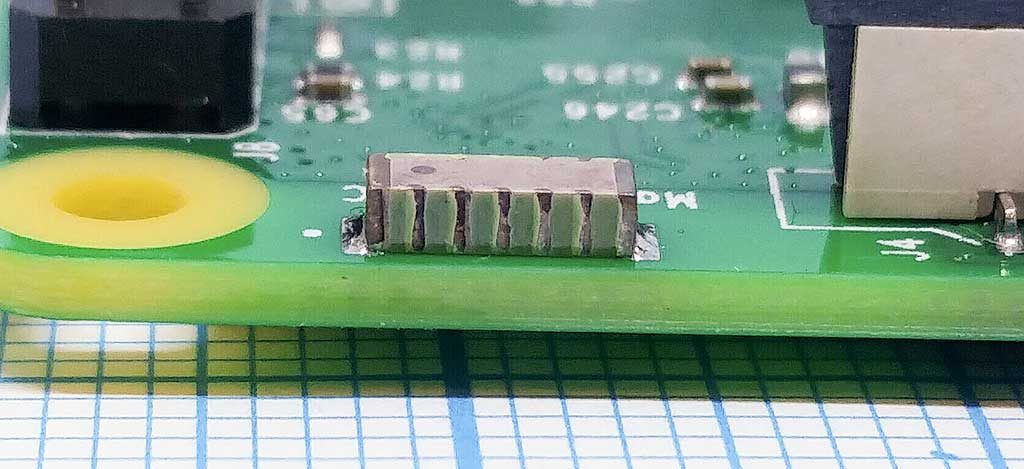
Антенна с поддержкой Wi-Fi и Bluetooth на чипе у Raspberry Pi 3
Кстати, на Raspberry 3 есть два светодиода. Красный сигнализирует, что питание на плату подается. А зеленый горит, когда есть обращения к карте памяти. С Windows IoT зеленый светодиод бесполезен, по крайней мере в текущей редакции системы. Он ничего не сигнализирует, просто не горит и все.
Шаг 4. Дальнейшая настройка
После прохождения первоначальной настройки к устройству уже можно обращаться по сети и использовать его на полную. Если же в сети его, по каким-то причинам, не видно. То тогда придется подключить монитор и клавиатуру, а затем выполнить настройку сети через интерфейс Windows IoT.
Если же с сетью все в порядке, то основным способом настройки системы является Web-интерфейс. Попасть в него можно через тот же Dashboard. В разделе My Devices отображаются все ваши Windows IoT устройства доступные в вашей сети. Жмакаем правой кнопкой и выбираем панель управления устройством.
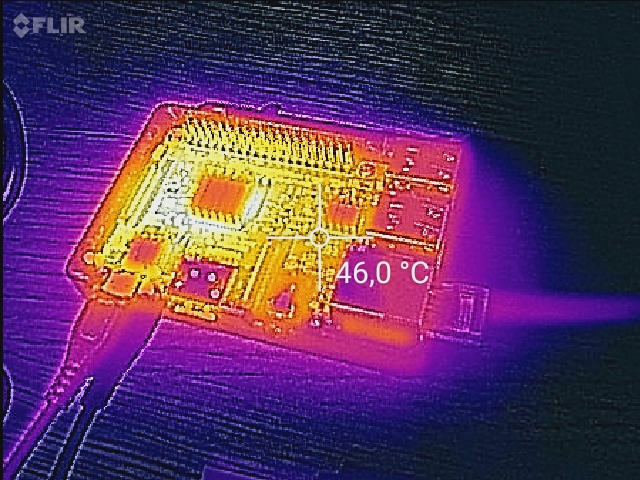
Под нагрузкой (установка апдейтов) плата греется до существенных значений. Радиаторы холоднее, чем сама плата, видимо используемый скотч 3M не очень здорово проводит тепло. Необходимо отклеить радиаторы от чипов, заменить скотч на нормальный термоинтерфейс.
Кстати, на удивление, отрабатывает Web-сервер в Windows IoT куда быстрее, чем даже на моем микросервере. Через интерфейс можно настроить все, что положено настраивать обычному пользователю, включая пароль доступа, пин-код для удаленной отладки и прочее вкусности. Не обойдены стороной и любимые Microsoft обновления для системы. Да, Windows IoT обновляется аналогично своим собратьям для больших ПК. Процесс обновления кстати не быстрый, а железо раскаляется от нагрузки.
Отдельно хочу упомянуть про мониторинг нагрузки на плату. На соответствующей вкладке доступны различные показометры, что вполне удобно, хотя бы с целью определения нагрузки на плату самой операционной системой. Графики наглядны и отображают сведения в режиме реального времени.
Что еще? Я заметил, что Dashboard хитро подготавливает карту памяти для записи. Вне зависимости от ее объема он ее форматирует как карту на 64 Гб. Возможно, что такой подход нужен для установки Windows IoT, но вот после, когда передумаете использовать Windows IoT, стоит не забыть и переформатировать карту под ее истинный размер. Иначе могут возникать различные коллизии, например, операционная система видит, что на карте осталось еще куча места, поэтому не ограничивает себя и пишет множество данных на карту, не стирая старое. А потом бац и система становится нестабильной, вплоть до невозможности ее загрузки.
Как управлять Raspberry с установленной Windows IoT
Вариантов тут несколько. Самое первое и самое простое, что может прийти в голову — использование монитора и клавиатуры. Подключаем и попадаем в интерфейс Windows IoT. Тут же можно слегка подшаманить сетевые настройки, перезагрузить плату, запустить установленные приложения.
Если вариант прямого управления не подходит, то можно (и даже нужно) управлять платой по сети. В настоящее время для этих целей присутствует целых три способа. Можно управлять Windows IoT через штатное средство Windows PowerShell. Легче всего подключиться к удаленной системе все через тот же Dashboard. Либо можно воспользоваться подключением по SSH. Тут уж подключаться можно вообще с любой системы, хоть из-под Windows, хоть с Android, а в Linux SSH так вообще стандартное средство. Даю наводку, для Windows можно использовать сверхпопулярный терминал PutTTY.
Но к плате можно подключиться и иным способом. Прямиком в графический интерфейс. Для этого необходимо включить удаленный доступ на плате, лучше всего это сделать через веб-интерфейс (самая нижняя вкладка). А затем скачать через Windows Store приложение для доступа к Windows IoT. Его вызов возможен так же через Dashboard. К моему стыду, мне так и не удалось подключиться к плате при помощи графического интерфейса. Приложение просто отказывалось подключаться и все, а все советы по поводу модификации конфигурационного файла не помогали, т.к. в актуальной версии Windows IoT эти советы уже внедрены в конфигурацию. Тем не менее, такая возможность существует.
Что можно запускать на Windows IoT?
Самый интересный для меня вопрос. На текущий момент (начало весны 2017), Windows IoT очень стремительно развивается и постоянно модернизируется. Но выбор ПО, вернее программных платформ, для системы ограничен. Microsoft делает ставку исключительно на UWP, как на новую парадигму ПО, работающего одинаково на всех устройства экосистемы Windows. Поэтому приложения UWP должны работать на Windows IoT Core почти без вопросов. Другое дело, что они будут так работать, но на текущий момент могут наблюдаться несовместимости, связанные с неполноценной поддержкой всех API доступных в UWP. Кроме UWP можно попробовать запустить Win32 приложения, по слухам от очевидцев, работать нормально с ними все равно не выйдет. Никакого ввода-вывода от приложений Win32 добиться не выйдет, только доступ извне, например, по сети на каком-то порту.
Для чего и выводы
Эксперимент по скрещиванию продукции Microsoft и крошечного компьютера Raspberry можно считать успешным. Связка работает, обновления ставятся, в сети видно. Вот только совсем непонятно для чего его использовать. Запустить нужное мне ПО под Windows IoT не представляется возможным. Тот же SoftEther VPN или FAR даже и не установить на плате. Нужных мне UWP приложений под рукой тоже нет. Остается только заниматься разработкой. А вот тут у Microsoft запасен такой козырь в рукаве, против которого мало кто сдюжит. Разрабатывать приложения, на множестве языков, для Windows IoT можно с использованием среды Visual Studio. С использованием всей ее мощи, включая развитые средства профилирования и отладки.
Но и тут есть одно, небольшое «но». Да, Raspberry обладает хорошо развитым интерфейсом связи с внешним миром. К плате можно подключить, хоть черта лысого. Да и производительности предостаточно. Но на мой взгляд, при наличии копеечных плат ESP8266 делающий все тоже самое, только куда дешевле и немного проще, целесообразность использования почти полноценного компьютера с реальной операционной системой и чрезмерной производительностью, излишне. Для реализации простых проектов по автоматизации ресурсов ESP8266 более чем достаточно. Впрочем, наверняка найдутся задачи, в которых Windows IoT вкупе с платами типа Raspberry придутся как нельзя кстати, но произойдет сие скорее всего в корпоративном секторе, например, некоторые банкоматы, наконец-то перейдут с уже устаревшей OS/2 на современную платформу.
Если же попытаться сформулировать вывод, например, для чего мне нужна плата Raspberry, то очень быстро приходишь к выводу, что в принципе ни для чего. Все, что мне нужно запрограммировать в плане автоматизации или поумневшего дома, отлично реализуется на чипах ESP и куда дешевле. Делать из Raspberry какой-то Hub при наличии полноценных серверов — тоже смысла не много. Разве что только установить на Raspberry операционную систему семейства Linux и организовать очередной серверок? Кстати, именно так я и поступлю.
Полезные ссылки:
Официальный FAQ по Windows IoT от Raspberry
Официальный сайт Microsoft по Windows IoT
Официальные образы операционных система для Raspberry и загрузчик NOOBS.
How to install Windows 10 IoT on the Raspberry Pi 3 Go to the Windows 10 developer center{. Click Get Windows 10 IoT Core Dashboard to download the necessary application.Install the application and open it.Select set up a new device from the sidebar.Select the options as shown in the image below.
Herein,can you install windows on raspberry pi 3?
Raspberry Pi 4 and Pi 3 officially support the IoT Core version of Windows 10, which is not same as the version of Windows 10 that runs on a desktop but is a stripped-back release for low-power computer board. For example, Windows 10 IoT Core won’t let you run the traditional Win32 apps or even boot into the desktop.
Beside above,how do i install windows on a raspberry pi? Installation Process Download and install the Windows on Raspberry imager to your Windows 10 host machine. Run the Windows on Raspberry interactive setup process to flash your MicroSD card. Insert the flashed MicroSD card into the Raspberry Pi. Boot Windows 10 to complete the setup.
Also question is,is windows 10 iot core free?
The Windows 10 IoT Core operating system remains royalty-free[3]. Windows 10 IoT Core Services is a paid offering that can easily be added depending on the scenario. Businesses and solution integrators can purchase IoT Core Services through an Azure subscription.
Can I install Windows IoT on PC?
Download the Windows 10 IoT Core Dashboard here. Once downloaded, open the Dashboard and click on set up a new device and insert an SD card into your computer. Fill out all of the fields as indicated. Accept the software license terms and click Download and install.Oct 2, 2020
Things to consider
Below are some things to consider when trying to figure out how to install windows iot on raspberry pi 3.
What can Windows IoT do?
What is Windows 10 IoT Core? Windows 10 IoT Core is a version of Windows 10 that is optimized for smaller devices with or without a display that run on both ARM and x86/x64 devices. The Windows IoT Core documentation provides information on connecting, managing, updating, securing your devices, and more.
Can the Raspberry Pi 400 run Windows? Can you run Windows on the Raspberry Pi? In short, yes. It’s possible to both install a native Windows image for the Pi and emulate older editions of Windows.
How To Install Windows 10 IoT on a Raspberry Pi 3
How do I download Windows 10 on my Raspberry Pi 3?
How to install Windows 10 IoT on the Raspberry Pi 3
- Go to the Windows 10 developer center{.
- Click Get Windows 10 IoT Core Dashboard to download the necessary application.
- Install the application and open it.
- Select set up a new device from the sidebar.
- Select the options as shown in the image below.
How do I download Windows 10 with IoT enterprise? Downloading Windows 10 IoT Enterprise 2019 LTSC
- Go to support.dell.com.
- Enter the Service Tag.
- Click Drivers & Downloads tab.
- Select Operating System.
- Select Windows 10 64-Bit LTSC 2019. Download the Windows 10 IoT Enterprise 2019 LTSC Unified Build 10.04.
Will there be a Windows 11?
Windows 11 is here, and if you own a PC, you might be wondering whether it’s time to upgrade your operating system. After all, you are likely to get this new software free. Microsoft first revealed its new operating system in June, its first major software upgrade in six years.
Does Windows 10 IoT have a GUI? Windows 10 IoT Core is an oddity in that while it does have a GUI stack, it is limited to Microsoft’s Universal App Platform (UAP), though note that this includes DirectX as well as XAML (Microsoft’s presentation language for UAP) and HTML. This means that there is no Windows desktop, nor even a command prompt.
Is Windows IoT still supported?
Those currently using and building for Windows 10 IoT Core will be able to continue to use the Windows 10 IoT Core Services, which are supported until January 2029, officials said this week.
How do I activate IoT for Windows 10? All Windows 10 IoT Enterprise devices must be enabled for activation. Device activation may be completed by having devices contact Microsoft activation verification servers directly through an Internet connection or indirectly via a proxy tool.
What does IoT stand for?
The Internet of Things (IoT) describes the network of physical objects—“things”—that are embedded with sensors, software, and other technologies for the purpose of connecting and exchanging data with other devices and systems over the internet.
How do I know if my windows is Internet of things? Click/tap on About on the left side. Under PC on the right side, look to see what your Edition is. IoT – this edition is designed for low-cost devices like Raspberry Pi and specialized machines, like robots, ATMs, POS terminals, barcode scanners and so on.
How do I run Windows programs on Raspbian?
Installer.exe and click through the setup program to install Notepad++. Once setup is complete, NotePad++ will now be accessible via the main menu in Raspbian. Just click on the Raspberry icon in the top left-hand corner, click on the Wine icon, click through the folders and hit the Notepad++ icon to run the program.
Is there a Raspberry Pi 5? Performance and Efficiency. Raspberry Pi 5, we can expect, will begin with a new system-on-chip design that boosts performance or efficiency – or both. The Raspberry Pi 4’s BCM2711 chip has four Arm Cortex-A72 cores running at 1.5GHz.
Is IoT a Ltsc?
Windows 10 IoT Enterprise LTSC 2021 is the latest operating system designed for embedded and IoT devices with a 10-year support lifecycle.
What is the difference between Windows 10 and Windows IoT? Windows 10 IoT comes in two editions. Windows 10 IoT Core is the smallest member of the Windows 10 operating system family. By contrast, Windows 10 IoT Enterprise is a full version of Windows 10 with specialized features to create dedicated devices locked down to a specific set of applications and peripherals.
What is IoT dashboard?
An IoT dashboard is the user interface within an IoT platform that enables users to monitor and interact with connected devices though graphs, charts and other tools and UI elements. Integrated Open Distro dashboards enable advanced IoT analytics visualization, analytics rules, and smart alerts.
When did Windows 11 come out? After months under testing, Microsoft’s Windows 11 operating system (OS) started rolling out to mainstream personal computers (PCs) on 5 October.
Can a Raspberry Pi run Roblox?
Roblox is not supported on the Raspberry Pi. iOS and Android, to Mac, PC, Xbox One, Oculus Rift, and HTC Vive.
How do I get Windows 10 on my Raspberry Pi? To install Windows 10 on Raspberry Pi 4, use these steps:
- Open the UUPDump website and select the release type.
- For stability, “Latest Public Release build” is recommended.
- Click on the arm64 option next to the release type.
- Select your language and Windows 10 edition.
- Click on the “Create download package” option.
Can I load Windows 10 on a Raspberry Pi?
The WoR project (Windows on Raspberry Pi) develops a tool to flash an ARM image of Windows 10 to an SD card (or SSD drive), that can boot on Raspberry Pi. So, it’s now possible to use Windows 10 full version on Raspberry Pi. In this step-by-step tutorial, I’ll guide you through the installation process.
Can you install Windows 7 on Raspberry Pi? Can small Raspberry pi computers run windows? No, Windows 7 is not made for ARM processors. So the Pi will simply never be able to run that.
Привет, Хабр.
Наверное каждый разработчик на определенном этапе задумывался о собственном IoT-проекте. Internet of Things сейчас поистине вездесущ и многим из нас хочется попробовать свои силы. Но не все знают, с чего начать и за что браться в первую очередь. Сегодня давайте посмотрим, как легко и непринужденно запустить свой собственный IoT-проект под Raspberry Pi 2, используя Windows 10 IoT Core и DeviceHive.
Деплоим Windows 10 приложения на Raspberry Pi 2
Для начала давайте установим Windows 10 IoT Core на Raspberry Pi. Для этого нам потребуется Windows 10 IoT Core Dashboard, который можно взять вот здесь. Там же можно при желании скачать отдельно ISO-образ, но особого смысла в этом нет — инструмент сделает это за вас.
Затем мы загружаем образ на misroSD-флешку.

Подключаем флешку к Raspberry и включаем. Первую загрузку ОС придется подождать, мгновенной она, конечно, не будет. Когда устройство «оживет» — подключаем Raspberry к локальной сети по Ethernet. Снова открываем Windows 10 IoT Core Dashboard и видим в списке «Мои устройства» заветную строчку. К слову, можно обойтись и без проводного подключения – список WiFi-донглов, поддерживаемых Windows 10 IoT Core, находится тут.
Далее нам понадобится Visual Studio 2015. Если она у вас все еще не установлена (хотя вы бы вряд ли читали эту статью в таком случае), можно скачать Community Edition.
Создаем новый или же открываем существующий Windows Universal проект. Кстати, если в проекте не нужен UI, можно создать Headless Application, выбрав тип проекта Windows IoT Core Background Application.

Выбираем деплой на Remote Machine.

Вводим адрес Raspberry. Посмотреть его можно на стартовом экране Win10 IoT Core или в Windows 10 IoT Core Dashboard.
Собственно, Internet of Things
Раз уж у нас статья о embedded — «моргать светодиодами» придется в любом случае. Хорошо, что мы имеем дело с DeviceHive, у которого заготовлены инструменты на все случаи жизни и все платформы. Поэтому светодиод будет виртуальный и тоже на .NET.
Клонируем master-ветку DeviceHive.NET репозитория с GitHub. На момент написания статьи рабочие примеры для Win10 IoT были именно там.
Открываем solution DeviceHive.Device и в файле Program.cs проекта VirtualLed настраиваем доступ к песочнице DeviceHive.
using (var service = new RestfulDeviceService("http://playground.devicehive.com/api/rest"))
{
    // create a DeviceHive network where our device will reside
    var network = new Network("Network WPNBEP", "Playground Network", "%NETWORK_KEY%");

    //...
}
Если вы интересуетесь IoT, но по какой-то немыслимой причине еще не обзавелись DeviceHive Playground – это можно сделать здесь.

А управлять нашим «светодиодом» будет… Нет, пока не Raspberry, а клиент виртуального светодиода. Пример находится в проекте VirtualLedClient солюшена DeviceHive.Client. Его тоже нужно настроить в файле Program.cs:
var connectionInfo = new DeviceHiveConnectionInfo("http://playground.devicehive.com/api/rest", "%ACCESS_KEY%");
Самое интересное
Наше приложение на Raspberry Pi будет не просто кнопочкой включения/выключения светодиода, а практически полноценной админкой всех IoT-устройств нашей DeviceHive-сети. При желании, конечно, можно упростить его до той самой «кнопочки» или наоборот расширить, например, до клиента, управляющего роботом телеприсутствия.
Готовое приложение находится в том же репозитории, в solution DeviceHive.WindowsManager.Universal. Не будем останавливаться на нюансах гайдлайнов Win10 – корни приложения растут еще из Win8. Не будет тут и MVVM – все и так знают, как его применять. Давайте сосредоточимся на главном: нам нужна консоль мониторинга и управления устройствами, подключенными к DeviceHive, под Windows 10 на Raspberry Pi2.

Для DeviceHive реализовано три клиентских библиотеки:
- DeviceHive.Client – для «большого» .NET 4.5 и выше. Использует WebSocket4Net.
- DeviceHive.Client.Portable – для Windows 8.1 и Windows Phone 8.1. Использует нативные WebSockets.
- DeviceHive.Client.Universal – для всех редакций Windows 10, в том числе для Win10 IoT Core. Именно она используется в нашем приложении.
Наследуем ClientService от DeviceHiveClient и инициализируем его сеттингами:
DeviceHiveConnectionInfo connInfo;
if (!String.IsNullOrEmpty(Settings.Instance.CloudAccessKey))
{
    connInfo = new DeviceHiveConnectionInfo(Settings.Instance.CloudServerUrl, Settings.Instance.CloudAccessKey);
}
else
{
    connInfo = new DeviceHiveConnectionInfo(Settings.Instance.CloudServerUrl, Settings.Instance.CloudUsername, Settings.Instance.CloudPassword);
}
current = new ClientService(connInfo, new RestClient(connInfo));
А также указываем не использовать LongPolling, а только WebSocket, дабы не упираться в лимит одновременных HTTP-запросов:
SetAvailableChannels(new Channel[] {
    new WebSocketChannel(connectionInfo, restClient)
});

Загружаем список девайсов и группируем их по сетям в MainPage:
var deviceList = await ClientService.Current.GetDevicesAsync();
var networkList = (await ClientService.Current.GetNetworksAsync()).FindAll(n => n.Id != null);
foreach (Network network in networkList)
{
    var devices = deviceList.FindAll(d => d.Network?.Id == network.Id);
    if (devices.Count > 0)
    {
        networkWithDevicesList.Add(new NetworkViewModel(network) { Devices = devices });
    }
}
А вот и наш виртуальный светодиод:

Переходим на DevicePage, подгружаем информацию о нем:
Device = await ClientService.Current.GetDeviceAsync(deviceId);

Переключаемся на вкладку с уведомлениями. Уведомления отправляются от управляемого устройства к управляющему устройству. В нашем случае – от VirtualLedClient к VirtualLed.
Инициализируем автоподгружающийся список с «бесконечным» скроллом:
NotificationFilter filter = new NotificationFilter()
{
    End = filterNotificationsEnd,
    Start = filterNotificationsStart,
    SortOrder = SortOrder.DESC
};
var list = new IncrementalLoadingCollection<Notification>(async (take, skip) =>
{
    filter.Skip = (int)skip;
    filter.Take = (int)take;
    return await ClientService.Current.GetNotificationsAsync(deviceId, filter);
}, 20);
Если не определена конечная дата фильтрации списка нотификаций, подписываемся на новые уведомления, которые будут приходить через вебсокет:
notificationsSubscription = await ClientService.Current.AddNotificationSubscriptionAsync(new[] { deviceId }, null, async (notificationReceived) =>
{
    await Dispatcher.RunAsync(CoreDispatcherPriority.Normal, () =>
    {
        lock (NotificationsObservable)
        {
            if (!NotificationsObservable.Any(c => c.Id == notificationReceived.Notification.Id))
            {
                NotificationsObservable.Insert(0, notificationReceived.Notification);
            }
        }
    });
});
Если попробовать переключать наш виртуальный светодиод, то уведомления о его новом состоянии тут же отобразятся в списке.

Если поменять настройки фильтрации, то автоподгружающийся список заново инициализируется с новым фильтром.

Теперь пришла очередь вкладки команд. Команды похожи на нотификации, но направлены от управляющего устройства к управляемому, а также могут иметь статус и результат выполнения.
CommandFilter filter = new CommandFilter()
{
    End = filterCommandsEnd,
    Start = filterCommandsStart,
    SortOrder = SortOrder.DESC
};
var list = new IncrementalLoadingCollection<Command>(async (take, skip) =>
{
    filter.Skip = (int)skip;
    filter.Take = (int)take;
    return await ClientService.Current.GetCommandsAsync(deviceId, filter);
}, 20);
Аналогично подписываемся на новые команды:
commandsSubscription = await ClientService.Current.AddCommandSubscriptionAsync(new[] { deviceId }, null, async (commandReceived) =>
{
    await Dispatcher.RunAsync(CoreDispatcherPriority.Normal, () =>
    {
        lock (CommandsObservable)
        {
            if (!CommandsObservable.Any(c => c.Id == commandReceived.Command.Id))
            {
                CommandsObservable.Insert(0, commandReceived.Command);
            }
        }
    });
});

Поскольку мы делаем инструмент не только для мониторинга, но и для управления устройствами в DeviceHive сети, нужно реализовать возможность отправки команд:
var parameters = commandParams.Text != "" ? JObject.Parse(commandParams.Text) : null;
var command = new Command(commandName.Text, parameters);
await ClientService.Current.SendCommandAsync(deviceId, command, CommandResultCallback);
При отправке команды мы подписались на ее обновление методом CommandResultCallback. Обрабатываем результат выполнения команды:
foreach (Command cmd in CommandsObservable)
{
  if (command.Id == cmd.Id)
  {
        // Command class doesn't implement INotifyPropertyChanded to update its result,
        // so old command is replaced by command with result:
        var index = commandsObservable.IndexOf(cmd);
        commandsObservable.RemoveAt(index);
        commandsObservable.Insert(index, command);
        break;
    }
}

Чтобы не копировать команды вручную, нужно предусмотреть клонирование команд. Выделяем, клонируем, если нужно – редактируем, отправляем.

Задача выполнена! Как видите, Raspberry Pi 2 c Windows 10 IoT Core и DeviceHive – отличное решение для практически любой задачи в контексте Internet of Things. Прикрутите пару кнопок, dashboard и подключите Raspberry Pi к телевизору в гостиной – мониторинг и управление умным домом готово. Купили лишних Raspberry? Не вопрос, библиотека DeviceHive.Client умеет работать не только в качестве управляющего клиента, но и в качестве управляемого девайса – реализуем Headless Application, подключаем датчики/реле и устанавливаем Raspberry Pi по дому. Ограничивает вас лишь ваша фантазия.
Заключение
Появление Windows 10 IoT Core – это именно то, чего ждали embedded-разработчики. Когда ресурсов даже самого мощного микроконтроллера на .NET Micro Framework (для которого, кстати, тоже есть реализация DeviceHive) не хватает, а ставить полноценный компьютер на Windows – все равно, что стрелять из пушки по воробьям, то Windows 10 IoT Core – настоящее спасение. И пусть пока есть нюансы с аппаратным ускорением графики и недостатком драйверов для некоторых USB-устройств – это всё простительно. Ведь еще недавно мы только мечтали, чтобы Windows-приложения, работающие на настольных ПК и планшетах запускались не только на телефонах, но и на микрокомпьютерах. А теперь – это реальность, добро пожаловать в «сегодня».

Об авторе
Антон Седышев — Senior .NET-разработчик «DataArt »
В IT работает с далекого 2003, к команде DataArt присоединился в 2012. Ранее занимался разработкой веб- и мобильных проектов, автоматизицией логистических процессов на складах крупной международной компании. Сейчас выступает в роли ведущего .NET-разработчика и идеолога Microsoft-сообщества DataArt. Занимается разработкой приложений на Windows Phone и Windows 10, сервисом DeviceHive и embedded-технологиями вообще. В свободное время работает над собственным OpenSource embedded-проектом по интеграции .NET Micro Framework устройства в автомобили BMW.
Windows 10 IoT Core is Microsoft’s version of the Windows 10 operating system being built to run Internet of Things (IoT) devices. There are a few hardware IoT devices that Windows 10 IoT Core supports and can run on. One of these devices is the Raspberry Pi; specifically the Raspberry Pi 2 and Raspberry Pi 3. This article lists out the steps necessary to load Windows 10 IoT Core onto a MicroSD Card that can be inserted into a Raspberry Pi to run Windows 10 IoT Core as the operating system.
Flash Windows 10 IoT Core to MicroSD Card
In order to boot Windows 10 IoT Core from a Raspberry Pi, you must first flash the Windows 10 IoT Core operating system to an SD Card that can be used to boot the Raspberry Pi from. To do this you need to use a Windows PC and the IoT Dashboard utility.
Step 1: Using a Windows PC, download and install the Windows 10 IoT Core Dashboard.
Step 2: Insert your Micro SD Card into your PC.
Note: Before you start, you’ll want to make sure you have an MicroSD Card that is supported by Windows 10 IoT Core. It’s important to be aware that NOT all MicroSD Cards are supported, with the primary restriction that they are at minimum a Class 10 SD Card.
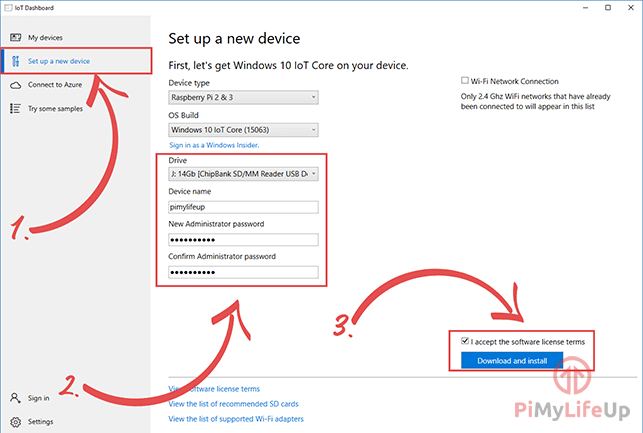
Step 3: Run the IoT Dashboard app, and click on the “Set up a new device” button.

Step 4: Select the “Raspberry Pi 2 & 3” device type, and fill in the necessary configuration values, then accept the software license terms and click the “Download and install” button.

Something to note on the Wi-Fi Network Connection setting is that it will pull from the Wifi Profiles on your local PC. This means that you will be able to easily configure your device to connect to the same Wifi network your Windows PC is connected to once it boots up from the SD Card. You won’t need to plugin a display, keyboard, or mouse in order to configure anything, so long as you select the correct Wifi network.
Step 5: When prompted to erase the SD Card, you need to click Continue. Just make sure you are aware that this will essentially format the SD Card before copying the Windows 10 IoT Core image, so you will lose any data that’s existing on the SD Card.

Step 6: The tool will continue by downloading the latest release of Windows 10 IoT Core. This ensures that you always have the latest version that you’re flashing.

Step 7: After the download completes, the dism.exe command-line tool will then automatically kick off to flash the downloaded Windows 10 IoT Core image to the SD Card.

Step 8: Once the flashing is completed, the IoT Dashboard will show a message stating that “Your SD card is ready.”

Step 9: You can now safely remove the SD Card from your PC and plug it into the Raspberry Pi and power it on.
Connect to the Windows 10 Device Portal
One of the features of Windows 10 IoT Core that makes it easier to manage, especially with headless devices, is the Windows Device Portal. This is a web interface that is hosted on the Windows 10 IoT Core device by default. This interface allows you to perform some remote monitoring, configuration, and deployment options for Windows 10 IoT Core.
Step 1: Once you’ve booted up a device with Windows 10 IoT Core you can then use the “My devices” option of the IoT Dashboard to easily discover what Windows 10 IoT Core devices are connected to the network that your PC is connected to. To view some details about the specific device, you can double-click on the device in the list.

Step 10: On the info for the specific Windows 10 IoT Core device, you can click on the “Open Windows Device Portal in browser” link to open up a new browser window navigating to the Windows Device Portal for that device.

Step 11: When the browser opens up and connects to the Windows Device Portal, it’ll prompt you to login. The Username you need to use will be Administrator, and the Password will be the password you configured when you flashed Windows 10 IoT Core to the SD Card.
Step 12: Once authenticated, you will be logged in and able to access the Windows Device Portal.

Overall the tools from Microsoft, including the IoT Dashboard, are extremely easy to use. You don’t need to use any command-line tools or open any configuration files to install Windows 10 IoT Core to an SD Card. You can then simply insert the SD Card into your device and boot it up to get it running.

Original Article Source: Setup Raspberry Pi with Windows 10 IoT Core written by Chris Pietschmann (If you’re reading this somewhere other than Build5Nines.com, it was republished without permission.)
In this tutorial, I will be going through the process of installing and setting up Windows 10 IoT Core for the Raspberry Pi.
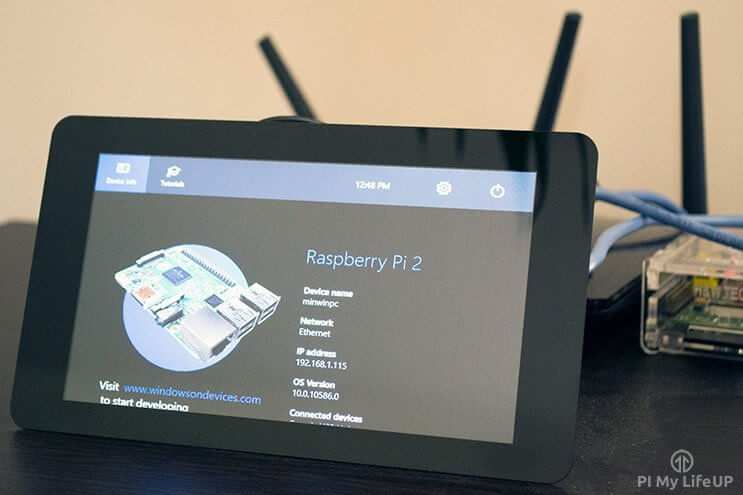
For those who don’t know Windows 10 IoT Core is a version of the Windows 10 operating system built just for IoT devices such as the Raspberry Pi. It is very useful if you plan on utilizing something like UWP to write your application, it also gives you access to Windows 10’s core and its wide variety of features.
I very briefly go into coding and pushing applications to the device. If you need to learn more about how to do things, then I highly recommend looking at some of Microsoft’s documentation as it is extensive.
Please note to complete this tutorial you will need either a Raspberry Pi 2 or a Raspberry Pi 3. This operating system is unsupported on other versions of the Raspberry Pi.
The software this tutorial relies on is no longer actively maintained. This tutorial is left online for archive purposes only.
Equipment
To be able to install Windows 10 IoT on the Raspberry Pi correctly you will need the following pieces of equipment.
Recommended
- Raspberry Pi Amazon 2 or 3
- Micro SD Card Amazon
- Ethernet Cable Amazon
Optional
- Raspberry Pi Case Amazon
- USB Keyboard Amazon
- USB Mouse Amazon
You will also need a computer running Windows 10 to be able to complete the following process.
Installing Windows 10 IoT on your Raspberry Pi
Please note, the software this tutorial relies on is no longer actively maintained. This tutorial is left online for archive purposes only.
1. To begin, we will first need to download and install the Windows 10 IoT Core Dashboard. To download this, we need to go to the Windows 10 IoT website here.
This piece of software is what will download the correct system for our Raspberry Pi and format it.
2. Insert your SD card into the computer or laptop’s SD card reader and check the drive letter allocated to it, e.g. G:/. You will need to know this to ensure that you are formatting the correct drive, as you don’t want to be doing this to any important data.
3. Now that you have inserted your SD Card into your computer/laptop, we will need to run the “Windows 10 IoT Core Dashboard” software. If you can’t find this easily after installing it, then try running a search.
With the software loaded up, we need to go into the “Set up a new device” (1.) screen as shown below.
On here you will want to set your “Device name” and set the “New Administration password“. Make sure that you set the password to something you can remember easily, but is secure, as this password is what you will use to connect to your Raspberry Pi (2.) remotely.
Before we continue, make sure that “Drive” is set to the correct drive, make sure that the drive letter is the same as the SD Card that you inserted in step 2.
When you have filled in your information, tick the “I accept the software license terms” and then press the “Download and install” button (3.).
4. Once the software has finished downloading and installing Windows 10 IoT Core for the Raspberry Pi, we can proceed on with this tutorial. Now safely to out your Micro SD card from your computer so you can put it into your Raspberry Pi.
Booting and setting up your Windows 10 IoT device
1. Now that we have successfully downloaded and written the image to our Raspberry Pi’s Micro SD card we can insert the SD Card back into the Raspberry Pi.
2. Before we power back on the device, make sure that you plug in an HDMI cable and a mouse and keyboard, we will need all 3 of these if you intend on utilizing Wi-Fi on your Raspberry Pi Windows 10 IoT device.
Once done you can plug your Raspberry Pi back into power and allow it to start booting up.
3. Now is the long wait for your Raspberry Pi to start up, when I did this it took a fair while for the Raspberry Pi to start up on boot, don’t be afraid if you think it may have frozen, it takes some serious time to do the initial setup and startup.
4. Once it has finished starting up, you should be greeted with a screen like below. Now to set up a WiFi connection, we need to click the cog in the top right-hand corner.
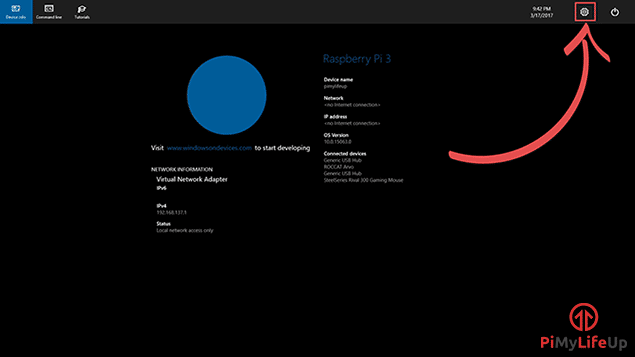
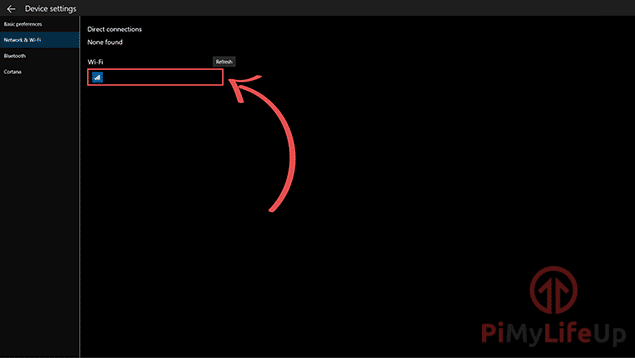
5. Now in the next menu, we need to go to “WiFi and Network“, and select the WiFi access point you want to connect to, you will receive a prompt asking you to enter your network password.
Once you have connected to your WiFi network, you can return to the main screen to grab your Raspberry Pi’s IP Address, as we will need this further along in the tutorial.
Connecting to Your Device
Now there are three ways you’re able to connect to your Raspberry Pi Windows 10 IoT device. I will quickly mention each method now.
Web Browser
First off is utilizing your web browser to talk with the Raspberry Pi, it is probably the easiest out of the three main ways to deal with. All you simply need to do is point your Web Browser to your Raspberry Pi’s IP Address on port 8080.
For example, my Raspberry Pi’s local IP address is 192.168.0.143, so in my favorite web browser I would type in http://192.168.0.43:8080
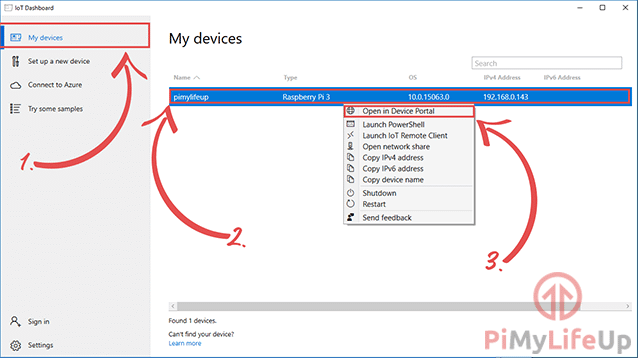
You can also use the “Windows 10 IoT Core Dashboard” tool, to be able to click to get to the devices web page as well. Simply load up the application, go to the “My Devices” (1.) tab in the left sidebar, right-click (2.) on the device you want to connect to and click “Open in Device Portal” (3.).
Upon either going to your Raspberry Pi’s IP Address or using the Windows 10 IoT Core Dashboard tool, you will be first asked to log in. Make sure you use administrator as the username, and the password you set at the beginning of this tutorial as the password.
Upon successfully logging in you should be greeted with the screen below. We recommend exploring around as the web tool does offer a fair bit of access and incite to your device. You can debug and see real-time performance through this interface which is incredibly helpful to see what you Raspberry Pi is doing.

PowerShell
PowerShell is not a tool that many will be too familiar with, but it is Microsoft’s more advanced version of command prompt giving you access to a wealth of tools including the ability to administer remote systems, a feature we will be making use of shortly.
PowerShell makes it rather simple to interact with your Raspberry Pi Windows 10 IoT device as we will show shortly. There are two ways of connecting to your device through PowerShell. The easier way relies on the “Windows 10 IoT Core Dashboard” tool (Steps 1a+), the other way is utilizing PowerShell to do everything (Steps 1b+).
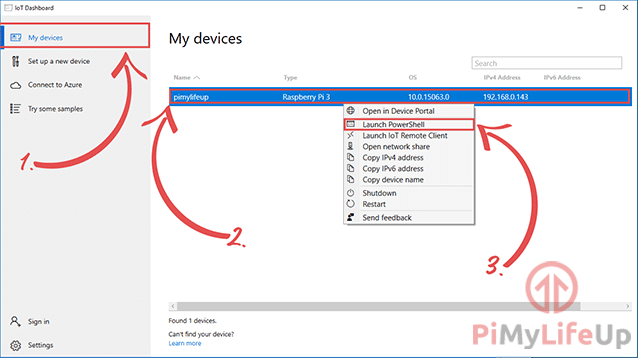
1a. First off, we will explain the simple way, first load up the “Windows 10 IoT Core Dashboard” tool. With the application open, go to the “My Devices” (1.) tab in the sidebar, right-click (2.) on the device you want to connect to and click “Launch PowerShell” (3.).
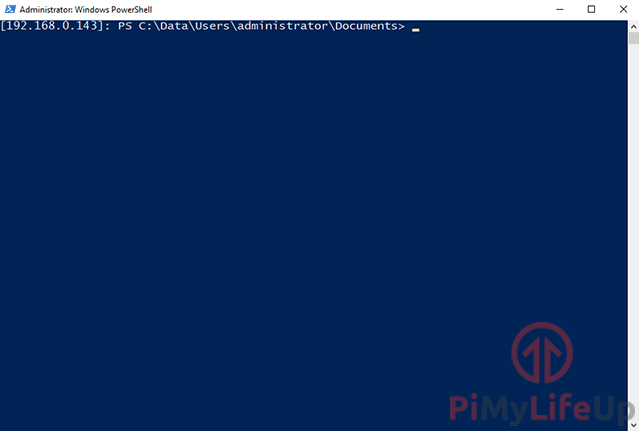
2a. This process will launch a PowerShell session that will automatically begin to connect to your Raspberry Pi. When prompted enter the password we set at the start of this tutorial. You should be greeted with a PowerShell window like shown below when you have been successfully connected.
1b. The second way of connecting to your Raspberry Pi is slightly more complicated and utilizes PowerShell completely. To open PowerShell on Windows 10, right-click the windows Icon and select “Windows Powershell (Admin)“.
2b. In here we want to type in the following command, this adds our Raspberry Pi as a trusted device for PowerShell to connect to. Make sure you replace [YOUR _PI_IP_ADDRESS] with your Raspberry Pi’s local IP address.
Copy
3b. With that done, we can now start a PowerShell session with our Raspberry Pi Windows 10 IoT device. To do this enter the command below into PowerShell, making sure you replace [YOUR _PI_IP_ADDRESS] with your Raspberry Pi’s local IP address.
Copy
4b. You will be asked to enter the password you set earlier in this tutorial. Enter that to continue.
5b. After about 30 seconds, PowerShell should have now successfully made the connection, and you should see a screen like below.
SSH
The third main way of interacting with your Raspberry Pi Windows 10 IoT device is to utilize SSH. The main advantage of this is that it is a widely available protocol and is something most users of the Raspberry Pi will be thoroughly familiar with.
You can also follow the SSH instructions below to use SSH to connect to your device.
1. To start off make sure you have an SSH client installed, on Windows I highly recommend using either Putty or MobaXterm.
2. Now in your SSH Client connect to your Raspberry Pi’s IP address on port 22 (The default SSH port).
3. When asked to enter the username you want to log in with, make sure you use administrator, as this is the default login username for Windows 10 IoT Core.
4. You will now be asked to enter the password associated with the account, the password you want to use is the one you would have set within the Windows 10 IoT Core Dashboard at the start of this tutorial.
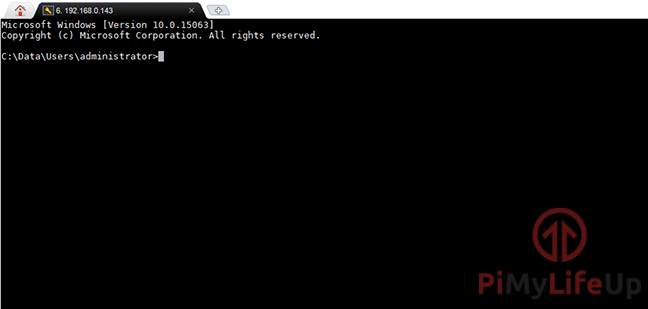
5. You should now be successfully logged into your Raspberry Pi Windows 10 IoT Core device and should be greeted with a screen like what is shown below.
If you want to learn more about utilizing SSH and some of the commands you can use within the session then make sure you take a look at Microsoft’s own IoT documentation here.
Setting up Visual Studio for Windows 10 IOT Core
Lastly, you are most likely going to want to setup Visual Studio Community. The reason for this is so that you can start developing your own applications for Windows 10 IoT Core.
Installation
1. First, we must download and install Visual Studio Community, and luckily this is easily available on Microsoft’s website, you can find Visual Studio Community by going to the visual studio community.
Be warned that the download and installation of Visual Studio Community can take some time especially on slow internet connections.
2. Once the installation process has completed, you can continue this with the tutorial. Start by launching up Visual Studio Community. It will ask you to do some configuration, and it should be fine to use the default settings.
3. You will notice that there aren’t any IoT templates in the default installation. Click on the here link next to install Windows 10 IOT core project templates back on the page linked back.
4. Now one of the things you will find that is currently missing is any project templates for Windows 10 IoT Core. We can grab and install these by going to the Visual Studio marketplace.
5. Once you have downloaded and installed the templates, close and re-open Visual Studio, you need to do this for Visual Studio to load them in.
6. Upon creating the new project, you will be prompted to activate developer mode on your Windows 10 device. Simply follow the prompts provided to activate it.
7. Everything should now be ready for you to code your new application. You can find documentation on certain features of Windows 10 IoT Core by going to their documentation page. You can also find a document that explains how to utilize the GPIO pins from within Windows 10 IoT by going to their GPIO documentation.
Pushing Code to the Device
1. Once you have your new application in a state in which you want to deploy it to your Raspberry Pi Windows 10 IoT device, go up to the tab that has a green arrow in it.
2. Click the black drop-down arrow, and select “remote machine”.
3. Now in here, you should be able to select your Raspberry Pi underneath automatic configuration. However, in some cases, this will not function correctly, and you will have to enter the IP of your Raspberry Pi manually.
4. You should now be able to push code/applications to your Windows 10 IoT Raspberry Pi.
I hope you now have learned how to install Windows 10 IoT core for the Raspberry Pi. If I have missed anything, or if you are having troubles or anything else you would like to share then be sure to drop a comment below.