
Все способы:
- Способ 1: Изменение вида значков
- Способ 2: Включение показа эскизов
- Способ 3. Включение области предпросмотра
- Способ 4: Сторонние программы
- Вопросы и ответы: 3
Способ 1: Изменение вида значков
Windows 10 поддерживает предпросмотр изображений популярных форматов средствами «Проводника», если вместо миниатюры фото в папке вы видите стандартный значок, проверьте режим вида значков. Здесь все очень просто: кликните правой кнопкой мыши по пустому пространству в «Проводника» и выберите один из этих режимов: огромные значки или крупные значки.
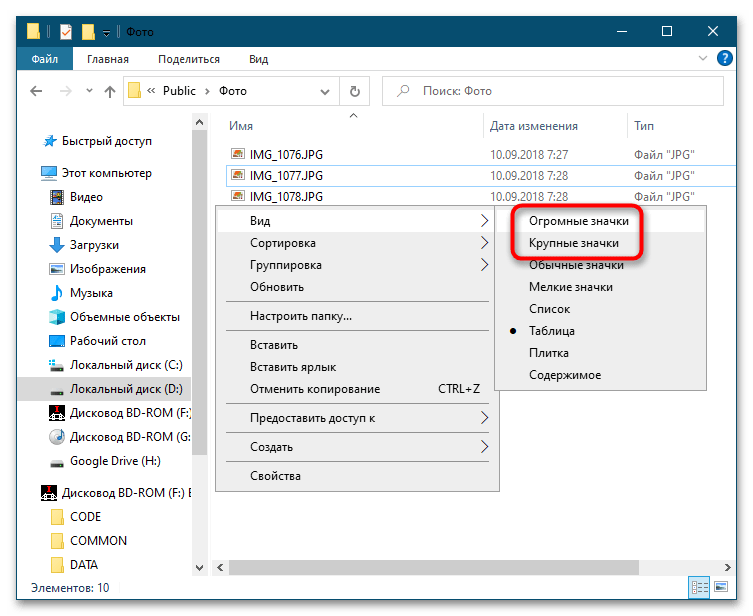
Предпросмотр также поддерживается режимами «Обычные значки», «Мелкие значки», «Плитка» и «Содержимое», но в этом случае превью будут слишком мелкими, чтобы их можно было рассмотреть.
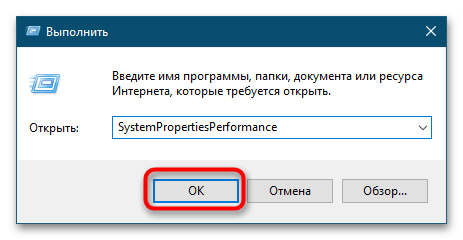
Способ 2: Включение показа эскизов
Если миниатюры не отображаются, вероятно, в вашей Windows 10 отключен показ эскизов. Активируйте его следующим образом:
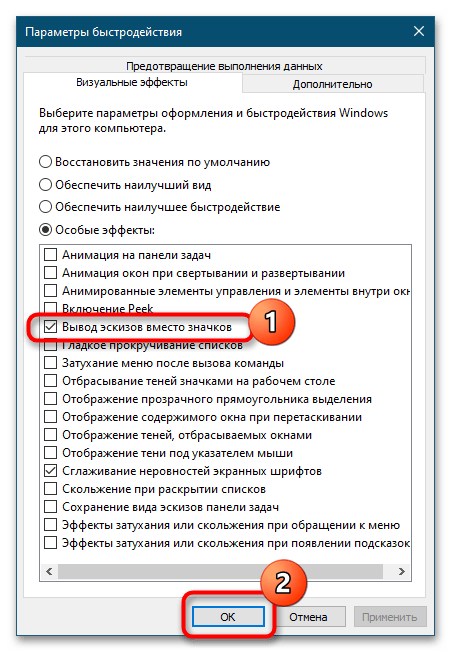
- Откройте «Параметры быстродействия» — для этого выполните команду
systempropertiesperformanceв вызванном нажатием клавиш Win + R диалоговом окошке. - Переключитесь на вкладку «Визуальные эффекты» и найдите в списке опцию «Вывод эскизов вместо значков», отметьте ее флажком и сохраните настройки.
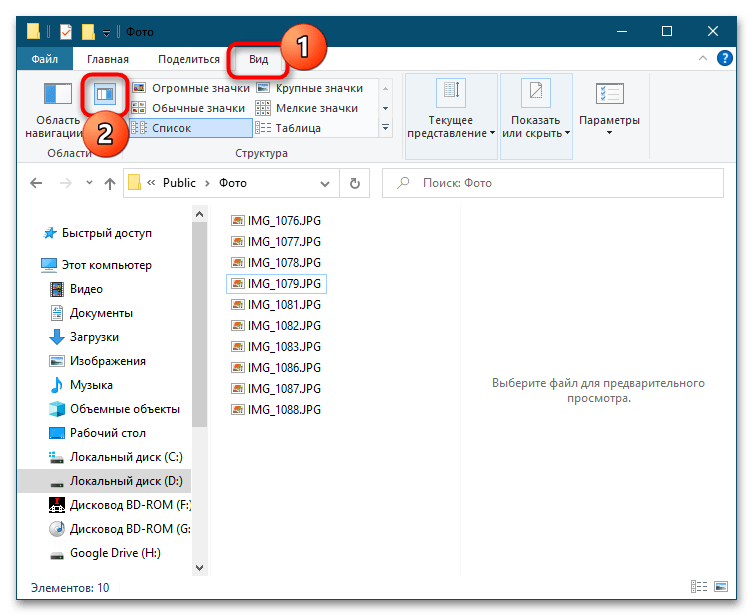
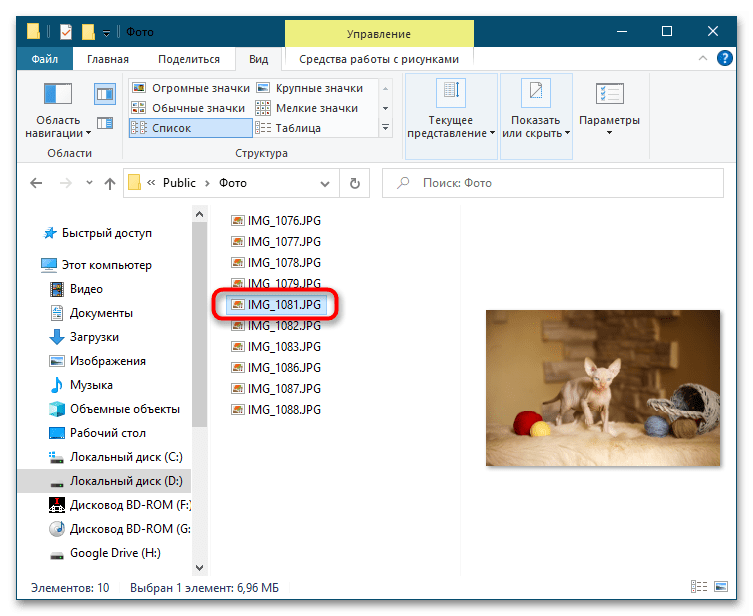
Способ 3. Включение области предпросмотра
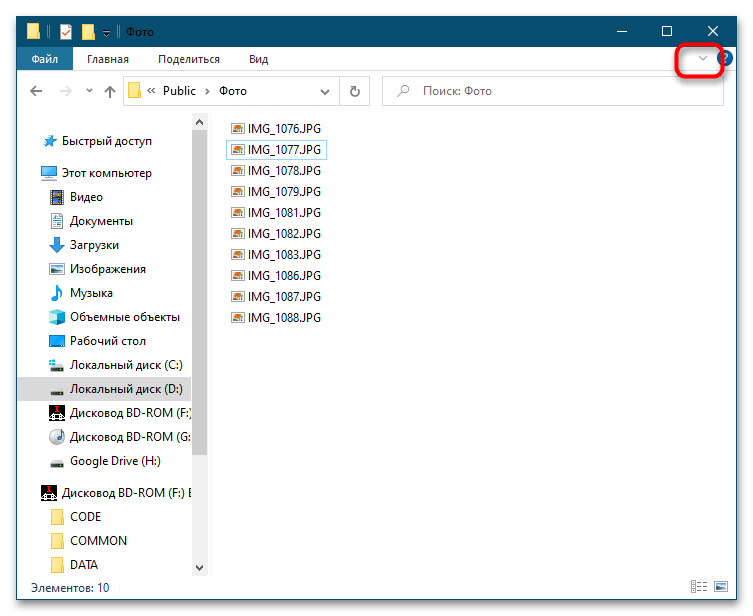
Также в «Проводнике» Windows 10 вы можете включить показ специальной панели предпросмотра, позволяющей просматривать фото. Примечательно, что такой предпросмотр работает независимо от вида значков.
- Откройте ленту «Проводника», для чего кликните по стрелке, расположенной в правом верхнем углу окна.
- Переключитесь на вкладку «Вид» и нажмите значок «Область просмотра» в блоке «Области». В результате в правой части окна «Проводника» появится панель с предложением выбрать файл. Также включить показ этой панели вы можете нажатием комбинации клавиш Alt + P.
- Выберите любое фото в папке, и его эскиз тут же появится в области предпросмотра.
Способ 4: Сторонние программы
Альтернативным решением может стать использование сторонних программ, так называемых быстрых вьюверов, позволяющих просматривать изображения во всплывающем окне. Примером такой программы является бесплатный универсальный просмотрщик растровой графики QuickLook.
Скачать QuickLook с официального сайта
Работает QuickLook примерно так же, как штатная утилита предварительного просмотра изображений в MacOS. Чтобы просмотреть фото, выделите его мышкой или выберите клавишами-стрелками и нажмите клавишу пробела. В результате фото будет открыто в среднего размера масштабируемом окошке, закрыть которое можно нажатием того же пробела.
QuickLook поддерживает большинство популярных графических форматов, включая JPG, PNG, TIFF, GIF и BMP, также с его помощью можно просматривать содержимое текстовых файлов PDF и TXT, но только на английском языке.
Наша группа в TelegramПолезные советы и помощь
Download Article
See picture previews and thumbnails for all photos in a folder
Download Article
- Windows 10
- Windows 11
- Fixing Corrupted Previews
- Video
- Q&A
- Tips
|
|
|
|
|
Do you want to see thumbnail previews of pictures in folders without having to open the files? While photo previews are usually enabled in Windows 10 and 11 by default, you may need to enable them manually. Fortunately, it’s quite easy to enable all types of file previews, including image previews, from your File Explorer’s settings—we’ll show you how!
Quick Steps
- Open a folder that contains photos in File Explorer.
- Click the View menu and select Options.
- Click the View tab.
- Uncheck «Always show icons, never thumbnails» and click OK.
- Select Extra large icons, Large icons, or another preview mode.
-

Open File Explorer

. Click the folder icon at the bottom of the screen, or press the Windows key + E key on your keyboard at the same time.
-
You’ll need to enable image previews for folders individually. Using the File Explorer’s left-hand column of folders, navigate to the folder in which you want to enable image previews.
Advertisement
-
It’s on the upper-left side of the File Explorer window. A toolbar will drop down from the top of the window.
-
This icon is in the toolbar at the upper-right corner of the window.
-
It’s at the top of the pop-up window.
-
You’ll find this in the «Files and Folders» section near the bottom of the window.
- If you don’t see this box, double-click the «Files and Folders» heading to make it appear.
- If this box is already unchecked, you may have to fix the corrupted thumbnail cache.
-
Both options are at the bottom of the window. Doing so will apply your settings and close the window.
-
To see image thumbnail previews, your folder must display files and folders using a supported viewing option (e.g., Extra large icons). To change the current view setting, do the following:
- Click the View tab.
- Click one of the following «Layout» options: Extra large icons, Large icons, Medium icons, Tiles, or Content.
- If you cannot see image previews after following these steps, you’ll need to fix the corrupted thumbnail cache.


Advertisement
-
To do so, click the folder icon in the taskbar at the bottom of the screen, or press Windows key + E on your keyboard.
-
For example, to enable image previews in your Pictures folder, click Pictures in the left panel. If the photos are in a different location, click This PC in the left panel, then navigate to that location.
-
It’s at the top of the File Explorer window.
-
Choose any of these options to display image previews in the folder: Extra large icons, Large icons, Medium icons, Tiles, or Content.
- If you cannot see image previews after following these steps, you’ll need to fix the corrupted thumbnail cache.
-
If you just want to see small previews in the folder, you can skip this step. If you want to see a larger preview in a separate panel without opening the image, click the View menu and select Preview pane.
- This will also allow you to see previews of non-photo files, including DOCX and PDF formats.
-
If you want to quickly enable image previews for all folders within an existing folder, select the parent folder, then follow these steps:
- Click the three horizontal dots at the top of the window.
- Click Properties.
- Click the Customize tab.
- Select Pictures from the «Optimize this folder for» menu.
- Check the box next to «Also apply this template to all subfolders.»
- Click OK to save your changes.


Advertisement
-
Windows 10 keeps a cache of thumbnails for every one of your computer’s files. If this cache becomes corrupted, your folders’ image previews won’t display properly. If you’ve tried enabling image previews already, clearing the thumbnail cache may solve your problem.[1]
-
Press the Windows key, type disk cleanup, then click Disk Cleanup when it appears at the top of the menu.
-
You can uncheck every other box in the main window, but the «Thumbnails» box must be checked.
-
It’s at the bottom of the window.
-
Doing so will prompt Disk Cleanup to delete your computer’s thumbnails from the cache.
- This can take several minutes, especially if you’ve never deleted thumbnails before. Once the pop-up window disappears, you can proceed.
-
Go to the folder in which you wanted thumbnails to appear. After a moment of refreshing, your pictures’ previews should appear.
- If thumbnails still aren’t showing, you may need to disable the «Always show icons, never thumbnails» setting in Windows 10 or Windows 11 and ensure that your folder is using the proper viewing option.


Advertisement
Add New Question
-
Question
How do I make the pictures of the stuff in the folder show up when I change to large icons?
The first 2 items in the folder are the ones that show up on the folder icon. There’s no way to change it directly, but since files are ordered alphabetically by default, you can just rename the files you want in front so they are the first two of the folder in alphabetical order.
-
Question
What happens to my pictures after clicking the delete files button?
Curiousguy033
Community Answer
They will be deleted from the folder in which they are located and then moved to the «trash bin». There you can always renew it and use it, but if you don’t need the pictures you can also delete them from the bin and they will be deleted from the entire computer. You cant renew them after that, so be careful.
-
Question
Tried doing this but the folder is already unchecked. Does it make it a difference if its a compressed folder from WhatsApp?
No preview assets are generated when files are in a .zip file and they aren’t yet uncompressed. To solve this, just uncompress the folder.
See more answers
Ask a Question
200 characters left
Include your email address to get a message when this question is answered.
Submit
Advertisement
-
These steps will also display image previews for video files.
-
Corrupted thumbnail caches can occur due to anything from a system update to a virus.
Thanks for submitting a tip for review!
Advertisement
References
About This Article
Article SummaryX
1. Open File Explorer.
2. Open your folder.
3. Click the View tab.
4. Click Options.
5. Click the view tab.
6. Uncheck «Always show icons, never thumbnails» box.
7. Click Apply and then OK.
8. Click View.
9. Select a layout option.
Did this summary help you?
Thanks to all authors for creating a page that has been read 958,201 times.
Reader Success Stories
-
«I’ve been having a problem with not seeing the thumbnails for a long time, it used to take me lots of time to…» more
Is this article up to date?
-
Quick Links:
- Introduction
- Understanding Image Previews
- How to Enable Image Previews in Windows 10
- How to Enable Image Previews in Windows 11
- Troubleshooting Image Previews
- Using Third-Party Tools for Image Previews
- Case Studies
- Expert Insights
- Conclusion
- FAQs
Introduction
In today’s digital world, we often deal with a plethora of images, whether for personal use or professional projects. Being able to see image previews in Windows 10 and 11 can significantly enhance your workflow, making it easier to locate and manage your files. This comprehensive guide will walk you through the steps to enable image previews, troubleshoot any issues, and explore third-party tools that enhance this functionality.
Understanding Image Previews
Image previews allow users to see a thumbnail of the image without having to open it. This feature is incredibly useful for organizing and managing large collections of photos and graphics. It helps in quickly identifying files and enhances productivity.
How to Enable Image Previews in Windows 10
Enabling image previews in Windows 10 is a straightforward process. Here’s a step-by-step guide:
Step 1: Open File Explorer
Press Windows + E to open File Explorer.
Step 2: Access the View Menu
Navigate to the top menu and click on the View tab.
Step 3: Select Thumbnails
In the Layout section, select Medium icons or Large icons. This will display image previews in your folders.
Step 4: Configure Folder Options
1. Click on the View tab again.
2. Select Options on the right.
3. In the Folder Options window, click on the View tab.
4. Make sure the box next to Always show icons, never thumbnails is unchecked.
How to Enable Image Previews in Windows 11
Windows 11 follows a similar procedure with slight adjustments in the interface:
Step 1: Open File Explorer
Press Windows + E to launch File Explorer.
Step 2: Use the View Menu
Click on the View option in the command bar.
Step 3: Choose Your Icon Size
Select Medium icons or Large icons to enable previews.
Step 4: Folder Options Adjustment
1. Click on the three dots in the command bar and select Options.
2. In the Folder Options window, navigate to the View tab.
3. Ensure the Always show icons, never thumbnails checkbox is unchecked.
Troubleshooting Image Previews
If you still cannot see image previews after following the steps above, consider the following troubleshooting tips:
- Restart File Explorer: Right-click on the taskbar, select Task Manager, find Windows Explorer, and click Restart.
- Check for Updates: Go to Settings > Update & Security > Check for updates.
- Clear Thumbnail Cache: Open Disk Cleanup, select Thumbnails, and click OK.
- Check File Format: Ensure the images are in supported formats (like JPG, PNG, etc.).
- Reset Folder Views: In File Explorer, go to View > Options > View tab > Reset Folders.
Sometimes, Windows’ built-in features might not suffice for your image management needs. Here are some popular third-party tools:
1. IrfanView
A lightweight image viewer that supports a wide range of formats and offers thumbnail previews.
2. FastStone Image Viewer
FastStone is known for its user-friendly interface and powerful batch processing features.
3. XnView MP
This tool supports over 500 image formats and offers extensive organizational features.
Case Studies
To illustrate the effectiveness of enabling image previews, let’s consider a few scenarios:
Case Study 1: A Photographer’s Workflow
John, a professional photographer, manages thousands of images. By enabling previews, he can quickly sort through files, selecting the best shots for editing without opening each one individually.
Case Study 2: Graphic Designer’s Efficiency
Sarah, a graphic designer, works with multiple file types. Using third-party tools like IrfanView allows her to preview and organize her graphics seamlessly, enhancing her productivity.
Expert Insights
We consulted industry experts on the importance of image previews in workflow optimization:
«Image previews save time and reduce the frustration of searching for files. They are essential for any professional working with visuals.» — Jane Doe, Professional Digital Organizer.
Conclusion
Enabling image previews in Windows 10 and 11 can greatly enhance your efficiency and productivity when managing images. By following the steps outlined in this guide, troubleshooting potential issues, and exploring third-party tools, you can streamline your workflow and easily access your visual files.
FAQs
1. Why can’t I see image previews in Windows 10/11?
Ensure that the option to show thumbnails is enabled in Folder Options and check that your file formats are supported.
2. How do I clear the thumbnail cache in Windows?
Use Disk Cleanup to clear the thumbnail cache by selecting the Thumbnails option.
3. Are third-party tools necessary for image previews?
While Windows provides basic functionality, third-party tools can offer enhanced features and support for more file formats.
4. Can I see previews for RAW image files?
You may need to install specific codecs or use third-party software to view RAW image files as previews.
5. What formats are supported for image previews?
Common formats include JPG, PNG, BMP, GIF, and TIFF. Some third-party tools support additional formats.
6. Is there a way to change thumbnail size in Windows?
Yes, you can change thumbnail sizes in the View menu of File Explorer by selecting your preferred icon size.
7. How can I set a default image viewer?
Right-click on an image file, choose Open with, select your preferred viewer, and check Always use this app.
8. Can I enable previews for videos?
Windows also supports video previews, similar to images, as long as the appropriate codecs are installed.
9. What should I do if previews are slow to load?
Check your system performance, ensure your drivers are updated, and consider clearing the thumbnail cache.
10. Is it possible to customize thumbnail settings further?
Advanced settings can be adjusted via third-party software that allows for more detailed customization of thumbnail displays.
Random Reads
- How to search
- How to seam granite countertops
- How to treat woodworm
- How to troubleshoot a dryer that smells like burning
- Iphone ghost touch fixes
- Install oracle java jre ubuntu linux
- How to caulking shower enclosures
- How to make a dispenser in minecraft
- How to test potentiometer
- How to test voltage with a multimeter
You are here:
Home » Windows 10 » Fix: Image Preview Option Is Missing From Context Menu In Windows 10
About a week ago, a PC user who recently upgraded to Windows 10 from Windows 8.1 asked us if there is a way out there to restore the Preview option that shows up for images in the File Explorer context menu. This guide will discuss why the Preview option is missing from the context menu and how to restore the same in Windows 10.

In Windows 10, by default, the Photos app is the default picture viewer. The Preview option for images in the context menu shows up only when the Windows Photo Viewer is the default for a specific image type. So, if the Preview option is not showing up, it could be either because the Windows Photo Viewer is not enabled (disabled by default in Windows 10) or is not the default picture for the image file type you are trying to preview.
The Preview option is a feature offered by the Windows Photo Viewer program. So, when you enable and set it as the default, the Preview option appears in the context menu for image file types.
In short, to see the Preview option for images, you need to enable and set Windows Photo Viewer as the default for photos in Windows 10.
Tip: There is a much better third-party app called Quick Look (free), which brings macOS style preview function to image and many other file types.
Enable Windows Photo Viewer in Windows 10
Although Windows Photo Viewer has not been removed from Windows 10, the classic Windows Photo Viewer has been disabled to favor the new Photos app. You need to edit the Windows Registry to enable the same. Do not worry! You just need to download a registry file and run it to enable the Photo Viewer.
Please refer to our how to enable the Windows Photo Viewer in Windows 10 guide for step-by-step directions.

Set Windows Photo Viewer as default for images
As said earlier, the Preview option shows up only for picture file types, for which the Windows Photo Viewer is the default picture viewer. For example, if you have set Windows Photo Viewer as the default for JPEG files, the Preview option only shows up when you right-click on JPEG images. So, you need to set it as the default if it is not already.
To set Windows Photo Viewer as the default for a specific image type:
Step 1: Right-click on the image file type (for example, JPEG), click Open with, click Choose another app (even if Windows Photo Viewer shows up in the list), select Windows Photo Viewer from the list, and then select Always use this app to open this type of files option and then click the OK button.
You should now get the Preview option in the context menu whenever you click on that type of images. Or, if you prefer to set Windows Photo Viewer as the default for all types of images, refer to our how to set Windows Photo Viewer as the default in Windows 10 guide.


About This Article
- Open File Explorer.
- Open your folder.
- Click the View tab.
- Click Options.
- Click the view tab.
- Uncheck «Always show icons, never thumbnails» box.
- Click Apply and then OK.
- Click View.
- Why can’t I see image previews in Windows 10?
- How can I preview pictures in Windows 10?
- Why is my computer not showing image previews?
- How do I get Windows to show preview?
- Why are my image icons not showing pictures?
- How do I turn on the Preview pane in Windows 10?
- How do I Preview a JPEG in Windows 11?
- How do I view my pictures in a folder as a slideshow?
- Why is Preview pane not working?
- Why is my File Explorer not showing Preview?
- How do I view images in File Explorer?
- Why can’t I see the thumbnails of my pictures Windows 11?
Why can’t I see image previews in Windows 10?
This is rather simple and you can do it by following these steps: Press Windows Key + S and enter folder options. Select File Explorer Options from the menu. After File Explorer Options window opens, go to View tab and make sure that Always show icons, never thumbnails option is unchecked.
How can I preview pictures in Windows 10?
Right-click on an image file and you should now see an Image Preview command in the popup menu. Click that command to view the image in Windows Photo Viewer (Figure D). Photo Viewer instantly pops up. Click the magnifying glass icon and move the slider to zoom in or out of the image.
Why is my computer not showing image previews?
Method 1: Change File Explorer settings
In the search box, type File Explorer Options. Select File Explorer Options from the menu. In the File Explorer Options window, click on the View tab. Uncheck Always show icons, never thumbnails option.
How do I get Windows to show preview?
First, let’s check out the preview pane in File Explorer. Open File Explorer in Windows 10, click the View tab, and select Preview pane. Click a file you wish to view, such as a Word document, Excel sheet, PowerPoint presentation, PDF, or image.
Why are my image icons not showing pictures?
Step 1: Open Control Panel and view the items in large icons. Step 2: Click System and Advanced system settings. Step 3: Under the Advanced tab, click Settings from the Performance section. Step 4: Make sure the Show thumbnails instead of icons option is checked.
How do I turn on the Preview pane in Windows 10?
In the menu bar at the top of the File Explorer window, click “View.” Find “Preview pane” in the upper-left region of the toolbar and click on it. The Preview pane is now activated. Navigate File Explorer to a folder that has documents you’d like to preview.
How do I Preview a JPEG in Windows 11?
Step 1: Press Windows key + S to open Windows Search, type file explorer options, and press Enter. Step 2: In the following window, switch to the View tab and uncheck the ‘Always show icons, never thumbnails’ box. Then, click on Apply followed by OK.
How do I view my pictures in a folder as a slideshow?
Navigate to the folder storing your pictures and single-click on any image to select it. The “Manage” tab appears along with the “Picture Tools” option on the toolbar. Click this new “Picture Tools” entry followed by the “Slideshow” button on the resulting drop-down menu.
Why is Preview pane not working?
Here’s what you need to check: Verify that Show preview handlers in preview pane checkbox is checked. Make sure the checkbox Always show icons, never thumbnails is unchecked. In the Open File Explorer to dropdown under the General tab, choose This PC instead of Quick Access.
Why is my File Explorer not showing Preview?
Enable Preview Pane
For that, open File Explorer using the Windows key + E keyboard shortcut and maximize it to take the full screen. Click on the View tab at the top. Check if the Preview Pane option appears highlighted to ensure it is enabled. In case it’s not, click on the Preview pane option to enable it.
How do I view images in File Explorer?
Open File Explorer, go to the View tab and select Preview pane. When you select a file in File Explorer you can preview it in the preview pane.
Why can’t I see the thumbnails of my pictures Windows 11?
Windows 11 no longer includes thumbnail previews for multimedia folder icons by default. Instead, a little white stripe on the folder icons confirms the folder has content. If you often work with coordinated image groups, this tiny detail may sometimes slow down your productivity.