-
Windows
-
IIS
Интересует если подниму веб-сервер не на серверной винде, сколько максимум соединений принимает веб-сервер? можно снять ограничения? сервер где стоит 10-ка очень мощный.
-
Вопрос задан
-
513 просмотров
2
комментария
Подписаться
1
Средний
2
комментария
-
Saboteur
@saboteur_kiev Куратор тега Windows
Вроде пишут, что лицензионное ограничение — 20 соединений для IIS на десктопной Windows 10.
-
Решения вопроса 1
@mindtester Куратор тега Windows
http://iczin.su/hexagram_48
Пригласить эксперта
Ваш ответ на вопрос
Войдите, чтобы написать ответ
Похожие вопросы
-
Показать ещё
Загружается…
Минуточку внимания
Войдите на сайт
Чтобы задать вопрос и получить на него квалифицированный ответ.
Реклама
Часто в 1С пользователи публикуют базы. Иногда количество пользователей мы не можем отследить. Как же ограничить количество одновременных подключений к серверу?
Рассмотрим примеры, для Web серверов IIS. В связке с 1С они используются чаще.
Web сервисы IIS
Существует несколько способов ограничить количество подключений к веб серверу:
-
- через конфигурацию IIS;
- через редактирование файла конфигурации.
Редактирования через конфигурацию IIS
Пользователю необходимо запустить диспетчер IIS, ниже приведены примеры, где его можно найти:
-
-
- Зайти в
Панель управления\Все элементы панели управления\Администрирование
Выбрать ярлык Диспетчер служб IIS. - Зайти по пути
%windir%\system32\inetsrv\InetMgr.exe
- Зайти в
-
Далее настраиваем сами ограничения на количество одновременных подключений.
Как правило, базы 1С публикуют в отдельном пуле приложений, привязанного к конкретному сайту.
Чтобы ограничить весь сайт по количеству подключений, раскрываем каталог сайтов. Выбираем необходимый нам сайт.
-
-
- Первый вариант
-
Справой стороны окна находим дополнительные параметры.

Находим свернутую группу ограничения, разворачиваем. Нужный нам параметр Максимальное число параллельных подключений [maxConnections]. Меняем параметр по умолчанию 4294967295, на то, которое нам необходимо: например 50, нажимаем ОК.

Перезапускаем пул, выбирая: “Пулы приложений -> Наш пул – > правой кнопкой мыши -> Перезапуск”.

-
-
- Второй вариант
- Второй вариант
-
Справой стороны окна, находим Настроить -> Ограничения.

Ставим галочку максимальное число подключений, вписываем количество 50, нажимаем ОК.

Перезапускаем пул.
Выбирая пулы приложений -> Наш пул – > правой кнопкой мыши -> Перезапуск.
Редактирования через файл конфигураций IIS
Необходимо зайти по пути:
%SystemRoot%\system32\inetsrv\config\ , найти там файл "applicationHost.config"

Открыть его в NotePad++, с правами администратора,
дойти до раздела < system.webServer>.

Добавить или изменить параметры:
< serverRuntime maxConcurrentRequestsPerCPU="50" /> либо < applicationPool maxConcurrentRequestsPerCPU="50" />
Сохраняем, перезапускаем пул или сервер IIS.
Чтобы избежать проблем со стабильностью 1С — арендуйте готовый выделенный сервер 1С с веб-доступом, тонким клиентом или RDP.
IIS — Limiting concurrent connections
IIS — Limiting concurrent connections
Would you like to learn how to limit the number of concurrent connections from the same IP address to the IIS server? In this tutorial, we will configure the IIS server to limit the number of concurrent requests and concurrent connections from the same IP address.
• Windows 2012 R2
• Windows 2016
• Windows 2019
Equipment list
The following section presents the list of equipment used to create this tutorial.
As an Amazon Associate, I earn from qualifying purchases.
Windows Tutorial:
On this page, we offer quick access to a list of Windows tutorials.
Tutorial IIS — Limiting concurrent connections
On the server manager, enable the IIS security feature named IP and domain restrictions.

Start the application named: IIS Manager.
On the IIS Manager application, select your website.
On the right part of the screen, access the option named: IP address and domain restrictions.

On the top right part of the screen, click on the option named Edit dynamic restriction settings.

On the dynamic IP restriction screen, perform the following configuration:
• Deny IP address based on the number of concurrent requests — Yes.
• Maximum number of concurrent requests — Enter the desired number.
• Deny IP address based on the number of requests over a period of time — Yes.
• Maximum number of requests — Enter the desired number.
• Time period in milliseconds — Enter the desired time interval.
Click on the OK button.

Optionally, use the command-line to restrict access from an IP address.
In our example, we restricted the number of concurrent connections from the same IP address to 5.
In our example, we restricted the maximum number of requests from the same IP address to 20 every 200 milliseconds.
Congratulations! You limited the number of concurrent connections and requests from the same IP address.
VirtualCoin CISSP, PMP, CCNP, MCSE, LPIC22021-01-31T14:21:17-03:00
Related Posts
Page load link
Ok
In this post we’ll deal with one of the most undervalued and semi-unknown features of Internet Information Services, better known as IIS, the web server shipped with most Windows client and servers distributions — from Windows 95 to Windows 10 and Windows Server 2019: the IP and Domain Restrictions role service, which allows the system administrator to allow or deny access to the web server, web sites, folders, or files through various rules that can be configured for remote IP addresses or based on the domain name.
Such feature has been added since IIS 7.0, shipped with Windows Vista and Windows Server 2008, and is available since then… even if most administrator don’t know it does exist. The reason for that is simple: it’s not included in the default Windows Server installation, the one you get when you click «OK» various times without actually looking at the screen. Even if you choose to install IIS, the IP and Domain Restrictions option won’t be enabled by default: you’ll have to install it manually using the Server Manager by following the steps described below.
Installing
Luckily enough, installing the IP and Domain Restrictions role service feature is rather trivial:
- Open the Server Manager by selecting Start > Administrative Tools > Server Manager.
- On the next screen, select Role-based or feature-based, then select your server and click Next.
- Click the Add Role Services link to add the required role.
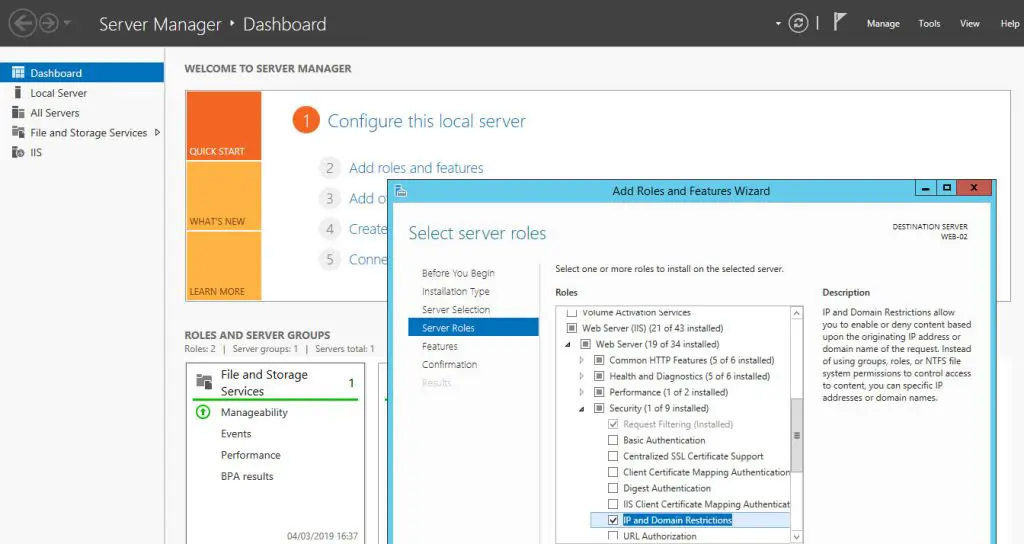
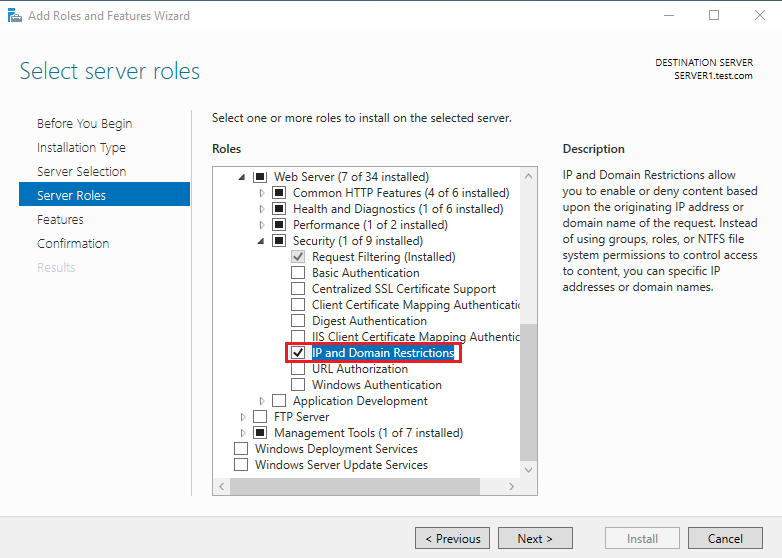
- From the Select Role Services screen, navigate to Web Server (IIS) > Web Server > Security.
- Check the IP and Domain Restrictions check box and click Next to continue.
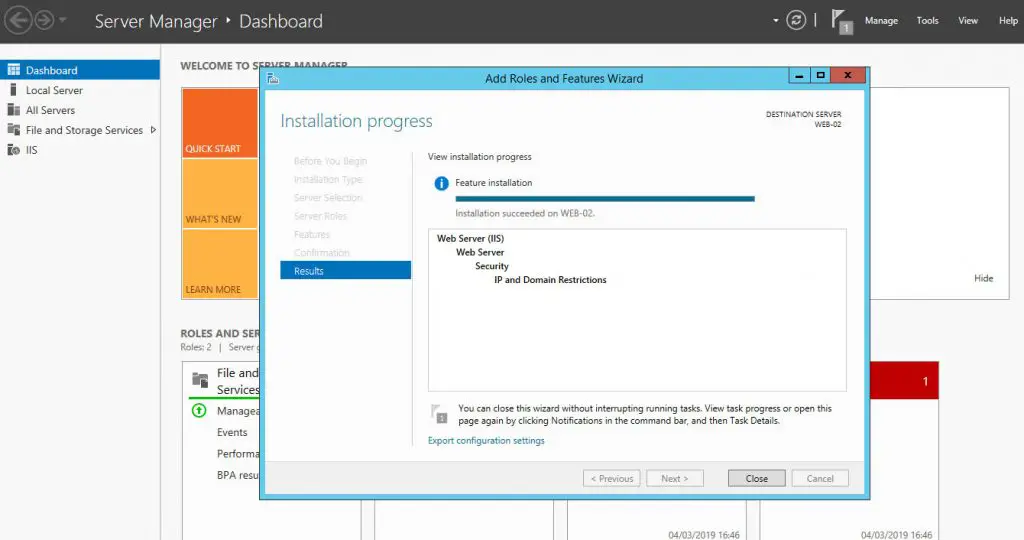
- From the Confirm Installation Selections screen, click Install to add the IP and Domain Restrictions role service.
Here are some screenshots depicting the selection & installation phases:
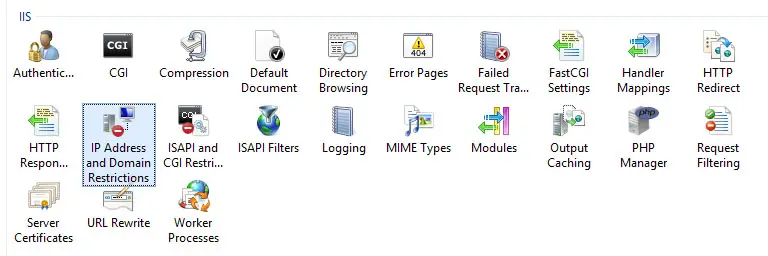
Configuring
After adding the IP and Domain Restrictions role service, a new icon will be added to IIS Manager GUI interface: by clicking on such icon, you’ll be able to configure IP and domain restrictions as shown below:
The configuration interface is quite straight-forward, and similar to all other IIS Manager services: you’ll be able to add Allow Entries and/or Deny Entries, thus allowing or blocking specific IP addresses, IP address ranges, IP masks and even domain names.
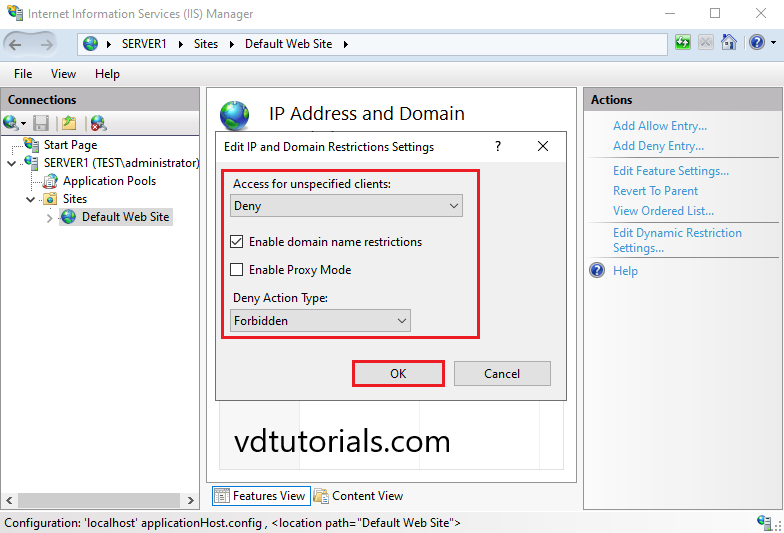
Needless to say, you’ll also be able to set a default behaviour for unspecified clients using the Edit Feature Settings link available on the right column:
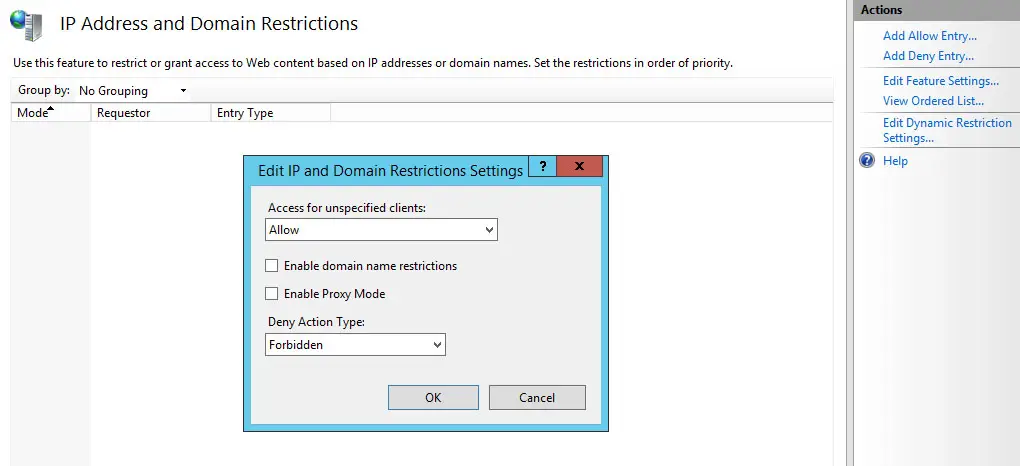
IMPORTANT: it’s worth noting that configuring Allow or Deny restrictions using a domain name require a reverse DNS look up every time a request arrives the server.: performing these kinds of rDNS lookups is a rather expensive tasks that can have a serious impact on your IIS server performances.
Also, keep in mind that — if your website is behind a reverse proxy — you might not be able to see the caller IP address unless the reverse proxy is properly configured to set it accordingly. If that’s so, you’ll just have to check the Enable Proxy Mode optional boolean attribute: such option, if checked, tells IIS to not only to block requests from a client IP that is seen by IIS, but also to block requests from IP addresses that are received in the x-forwarded-for HTTP header. This header enables you to identify the originating IP address of a client that connects through an HTTP proxy or load balancer: this is referred to as proxy mode.
Result
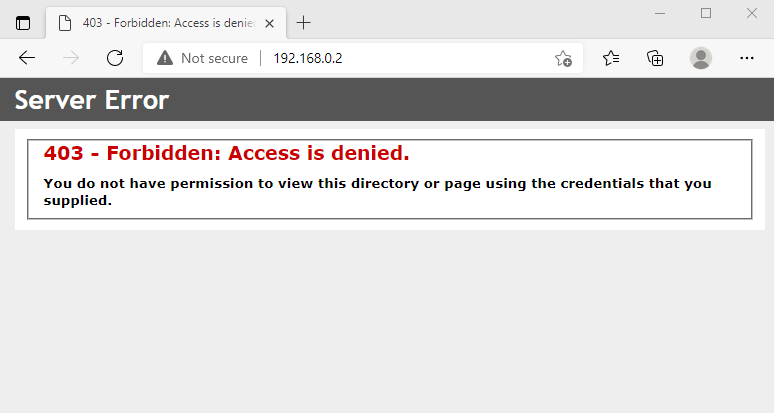
When a remote client that is not permitted access requests a resource and a deny rule is hit, the following errors will appear depending on the Deny Action Type rule specified through the Edit Feature Settings window:
403.6 — Forbidden: IP address of the client has been rejected
403.8 — DNS name of the client is rejected
The HTTP error will be also recorded within the Internet Information Services (IIS) logs.
Conclusion
That’s it, at least for now: I definitely hope that this small tutorial guide will help many web administrators to selectively allow or block traffic on their web sites.
UPDATE: If you want to implement the IP Address and Domain Name Restrictions built-in feature directly from the configuration files, such as the (server-wide) applicationHost.config file and/or the (website-specific) web.config file, check out this post.
This Windows Server 2022 Tutorial covers how to Configure IP Address and Domain Restrictions in IIS Web Server. IP address and domain name restrictions in Internet Information Services allow you to deny access to the web server, websites, folders, or files. Rules can be configured for remote IP addresses or based on the Domain name. Internet Information Services (IIS) is a web server created by Microsoft, IIS web server accepts requests from remote client computers and returns the appropriate response.
Table of Contents
- Configure IP Address Restriction
- Configure Domain Restriction
Prerequisite Required
- Install Internet Information Services(IIS)
Demo environment
- Computer Name: server1.test.com
- Operating System: Windows Server 2022 Datacenter
- IP Address: 192.168.0.2
Configure IP Address Restriction
1. Install IP and Domain Restrictions Service.
IP and Domain Restrictions option is not enabled by default when you install Internet Information Services. We can enable the IP and Domain Restrictions option by adding the above Role Service as shown below.
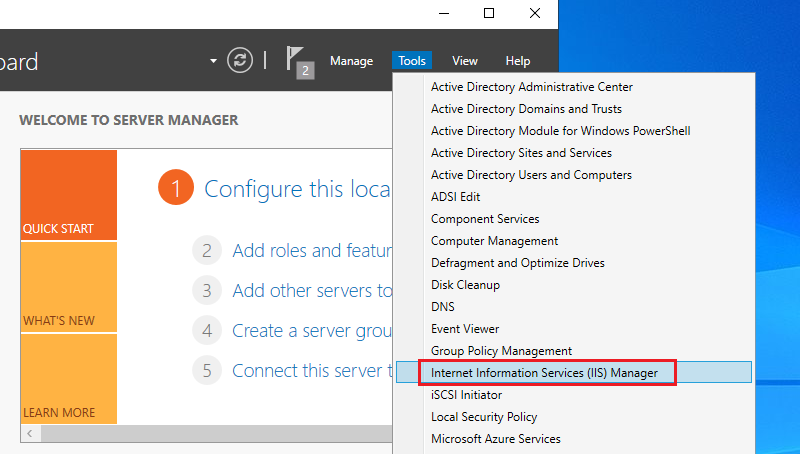
2. Open the Server Manager dashboard, click Tools, and select Internet Information Services (IIS) Manager.
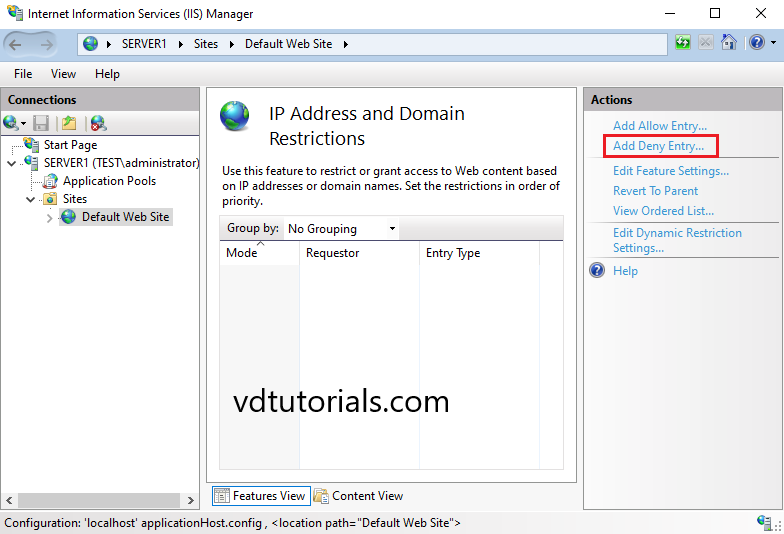
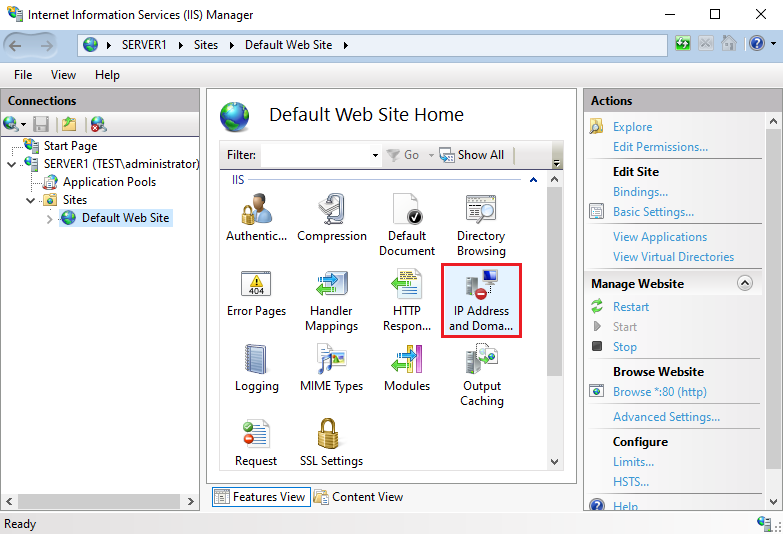
3. Select the website and open IP Address and Domain Restrictions.

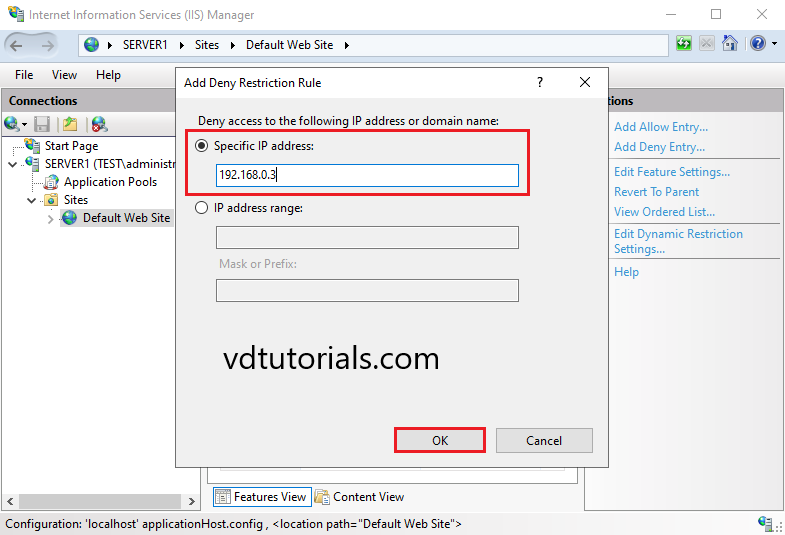
4. By default setting is Allow all, click Add Deny Entry.
5. Input an IP address on a Specific IP address field or IP address range on the IP address range.
In this tutorial, we choose a Specific IP address (192.168.0.3).
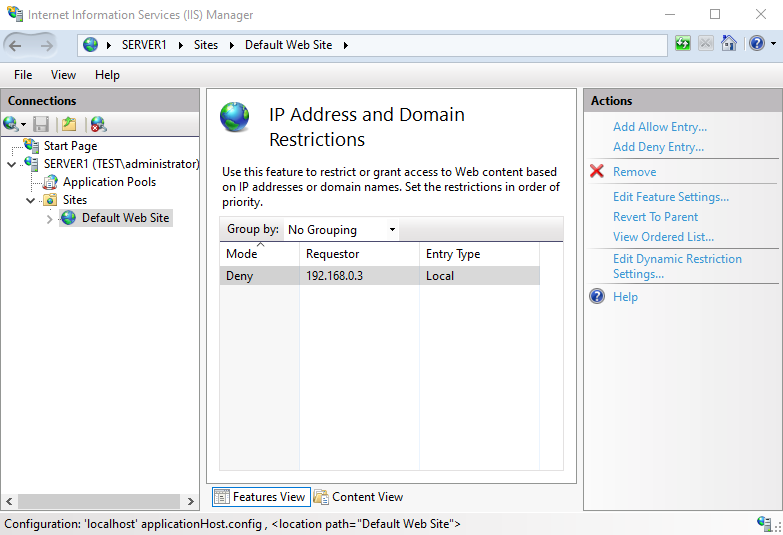
6. Restriction Rule has been added.
7. Verify the Restriction.
Configure Domain Restriction
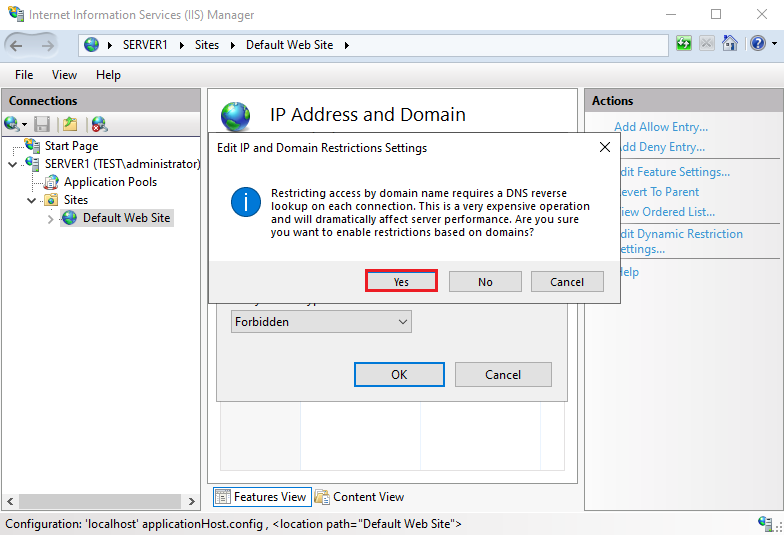
Configure Domain Restriction is not recommended, Restricting access by domain name requires a DNS reverse lookup on each connection. This is a very expensive operation and will dramatically affect server performance.
8. Open Information Services (IIS) Manager, select the website, and open IP Address and Domain Restrictions.
9. Click Edit Feature Settings.
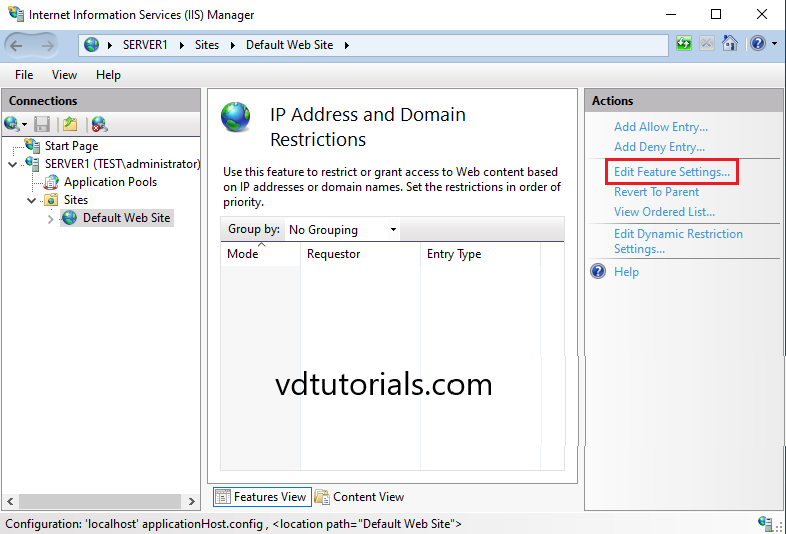
10. Configure Domain Restriction Settings.
11. In Edit and Domain Restriction Settings, Click Yes.