

19.07.2023
Содержание
- 1 Проверка прав доступа
- 2 Отключение защиты: изменение настроек безопасности
- 3 Редактирование файла в командной строке
- 4 Применение специализированных инструментов
- 5 Проблемы со стороны используемых антивирусов
Невозможность успешно сохранить файл hosts Windows 10 – одна из самых распространенных проблем, с которой может столкнуться каждый пользователь. Под таким файлом принято рассматривать текстовый документ, в котором собрана вся актуальная информация о домене, IP-адресе, что ему соответствует.
Проблемы с сохранением возникают по причине особенностей данного документа, блокировки такого процесса установленными антивирусными программами. Иногда причина заключается в том, что пользователь не до конца понимает всю суть, специфику проведения запланированного процесса.
Проверка прав доступа
Для сохранения и дальнейшего редактирования файлов важно иметь соответствующий доступ. Такой файл «спрятан» в установочном каталоге ОС, а потому надежно защищен от несанкционированного доступа. По этой причине пользователю потребуется получить доступ для выполнения запланированных действий.
В первую очередь нужно произвести запуск «Блокнота» от имени администратора, воспользовавшись известной комбинацией «Windows Key + S». Если файл c:\windows\system32\drivers\etc\hosts недоступен для записи, нужно выбрать хосты, нажимая кнопку «Открыть». После этого происходит внесение определенных изменений с последующим их сохранением.
Отключение защиты: изменение настроек безопасности
Принимая решение купить лицензионную Windows 10, пользователь может столкнуться с проблемой, когда у него отсутствует контроль над файлом hosts. Для это следует выполнить несколько шагов с целью изменить настройки безопасности:
- Заходим в C: \ Windows \ System32 \ drivers \ etc.
- Нужно отыскать файл hosts, кликнув на пункт «Свойства».
- Нас интересует вкладка «Безопасность», где потребуется нажать «Изменить».
- На экране высвечивается список всех, кто имеет доступ к данному файлу. Если вы нашли в этом списке свое имя, нажимаем и проверяем наличие установки «Полных прав доступа». Если ваше имя отсутствует, нажимаем «Добавить».
- Вручную вводим необходимое имя, нажимая «Проверить имена», а после подтверждаем свои действия с помощью «Ок».
Таким образом, будут внесены существенные изменения в форму безопасности, а потому происходит автоматическое отключение защиты для вашего имени.
Редактирование файла в командной строке
Если были замечены проблемы, что не сохраняется hosts, нет возможности вносить изменения, потребуется воспользоваться командной строкой, введя «net user Администратор /active:yes». По завершению необходимо нажать «Enter», чтобы на экране появился отчет, свидетельствующий об успешном выполнении заданной команды.
Войти можно с помощью созданной админзаписи, которая позволяет вносить абсолютно любые изменения в любе время дня и ночи в файл hosts. Кроме того, такие изменения будут сразу же сохраняться.
Применение специализированных инструментов
Разобравшись с тем, где файл hosts находится, возникает необходимость в его редактировании. С этой целью часто используют специализированные утилиты, текстовые редакторы и прочие инструменты.
Рассмотрим сразу несколько проверенных вариантов:
- Micro Hosts Editor – популярный программный продукт, который по своему интерфейсу немного напоминает «Блокнот». Но отличие заключается в применении инструментов по изменению таблиц.
- Online Solutions Hosts Editor – еще одно уникальное приложение, в основе которого используется расширенный мастер восстановления файлов.
В зависимости от поставленной задачи перед пользователем, удастся сделать правильный выбор в сторону того или иного приложения.
Проблемы со стороны используемых антивирусов
Во многих антивирусных программах изначально предусмотрена опция запрета редактирования файла hosts, а потому возникает необходимость в предварительном отключении антивируса на ПК или лэптопе.
Для этого следуем инструкции:
- В меню «Пуск» выбираем «Средства администрирования».
- В открывшемся окошке кликаем «Конфигурация системы».
- Ищем вкладки «Службы» и «Автозагрузка», где нужно отыскать собственный антивирус, возле которого убираем установленные галочки.
- Нажимаем «Применить», чтобы сохранить все внесенные изменения.
По завершению всех действий система осуществит запрос на перезагрузку компьютера, по завершению которой антивирус не помешает редактировать файл hosts. Но после редактирования, стоит снова проделать вышеперечисленные действия, чтобы активировать антивирусную защиту.
Одна из главных ошибок каждого пользователя – несоблюдение инструкции, что приводит к нарушению правил редактирования данного файла. По этой причине следует быть внимательным и выполнять все действия шаг за шагом, не упуская важные моменты.
Readers help support Windows Report. We may get a commission if you buy through our links.
Read our disclosure page to find out how can you help Windows Report sustain the editorial team. Read more
Sometimes in order to fix a certain problem or to block a certain website on your Windows 10 PC, you have to edit the hosts file. Editing hosts file is a relatively advanced procedure, and a number of users reported Access denied message while trying to edit the hosts file on Windows 10.
The hosts file is located in your Windows 10 installation directory, and it’s protected from unauthorized access, but if you need to edit the hosts file, you can avoid “Access denied” message by following one of our solutions.
What can I do if I have no permission to edit hosts file?
1. Run Notepad as administrator
- Press Windows key + S, enter Notepad. Right-click Notepad from the list of results and choose Run as administrator.
- Once Notepad opens, choose File > Open.
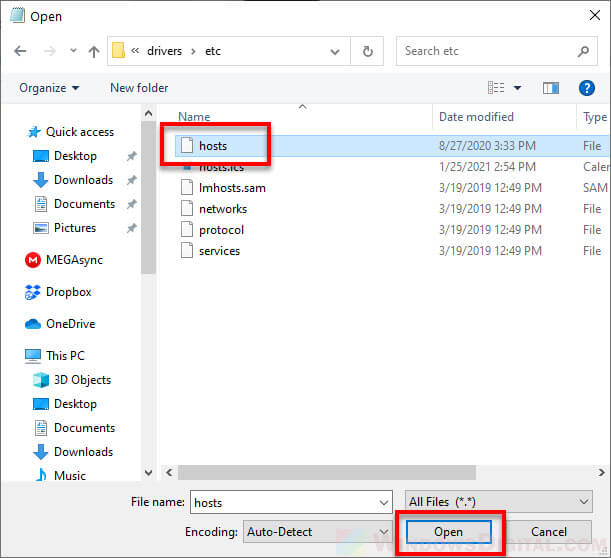
- Navigate to C:\Windows\System32\drivers\etc folder and make sure to change Text Documents (*.txt) to All Files. Select hosts and click Open.

- Make the changes you want and save them.

If you use Notepad as your text editor, you need to run it as administrator before you can edit the hosts file. To run Notepad as administrator and to edit the hosts file, do the following:
We have to mention that this solution should work with any other text editor, so if you don’t use Notepad, just run your desired text editor as administrator and you should be able to edit hosts file without any problems.
Alternatively, you can start Command Prompt as administrator and use it to start Notepad and edit the hosts file. To do that, follow these instructions:
- Click the Start button, type cmd and select Run as administrator from the results.
- Once the Command Prompt opens, enter the following lines and press Enter after each line:
- cd C:\Windows\System32\drivers\etc
- notepad hosts

- Notepad will now open the hosts file, and you should be able to make the necessary changes.

2. Copy the hosts file to a different location
- Go to C:\Windows\System32\drivers\etc and locate hosts file.
- Copy it to your Desktop, or any other folder that you can easily access.
- Open the hosts file on your Desktop with Notepad or any other text editor.
- Make the necessary changes and move the hosts file back to C:\Windows\System32\drivers\etc directory.
3. Make sure hosts isn’t set to Read-only
- Go to C:\Windows\System32\drivers\etc.
- Locate the hosts file, right-click it and choose Properties from the menu.
- Go to the Attributes section and make sure the Read-only option isn’t checked.
- Click Apply and OK to save changes.
Now you should be able to make the necessary changes to the hosts file. After you’re finished, it might be a good idea to set hosts file back to Read-only mode again.
Sometimes, all your documents are read-only, including your hosts file. If you want to change them properly, you can find more info about that in this quick guide.
4. Change the security settings for hosts
- Press Win + E to open File Manager and navigate to C:\Windows\System32\drivers\etc.
- Locate hosts file, right-click it and choose Properties.
- Navigate to the Security tab and click the Edit button.
- You should see the list of users and groups on your PC that have access to the hosts file. If your user name or group is on the list, click it and make sure that it has Permissions set to Full control. If your user name isn’t on the list, click the Add button.
- Enter the user name or the group name in the Enter the object names to select the field and click Check Names and OK.

- A new user or group will be added to the list. Now you need to select the newly added group or user and check the Full control option below.
- Click Apply and OK to save changes.

5. Use the hidden administrator account
- Click the Start button, type cmd and select Run as administrator from the results.
- When Command Prompt opens, enter net user administrator /active:yes and press Enter. This will activate the hidden administrator account.

- After you have activated the administrator account, you can switch to it, and try editing the hosts file.

Most system files are protected, therefore you need an administrator account in order to make changes to them. Since hosts are one of the system files, it requires an administrator account in order to edit it.
If you don’t use an administrator account, you can enable a hidden administrator account and use it to make the changes to the hosts file.
After you made the changes to the hosts file, you can come back to your original account, start Command Prompt as administrator again and enter net user administrator /active:no to disable the hidden administrator account.
Here are some more examples of this problem:
- Can’t edit hosts file Windows 10 – If you can’t edit the hosts file in Windows 10, it’s probably because you don’t have required permissions. We’ll explore that problem here
- Hosts file being used by another process – This is another common issue that prevents users from editing the host file.
- Don’t have permission to save hosts file Windows 10 – This is the same case as the first error message.
The hosts file is a system file, so it’s protected, and usually, it’s not advised that you edit it, but if you decide to do so, it’s always good to know how to reset hosts file to default in Windows 10 in case anything goes wrong.
If you have any more questions, feel free to leave them in the comments section below.
Milan Stanojevic
Windows Toubleshooting Expert
Milan has been enthusiastic about technology ever since his childhood days, and this led him to take interest in all PC-related technologies. He’s a PC enthusiast and he spends most of his time learning about computers and technology.
Before joining WindowsReport, he worked as a front-end web developer. Now, he’s one of the Troubleshooting experts in our worldwide team, specializing in Windows errors & software issues.
In Windows 11 and Windows 10, there is a specific file in the system folder called “hosts”. This file allows mappings of IP addresses to host names. For example, if you would like the host name abc.example.com to resolve to the IP address 127.0.0.1, you can add the mapping to the hosts file. So when any application tries to access abc.example.com, it would go to the IP address 127.0.0.1.
The hosts file is mostly used to block certain programs or software from being able to reach a certain host name or to redirect the host name request to another IP address. It is also often used to block (or redirect) certain websites you don’t want anyone who has access to the same computer (or any of your programs) to be able to reach the host name upon request.
See also: How to Block a Website Such As YouTube in Windows 11
If you’re told to edit the hosts file to block or redirect a certain host name to an IP address, this guide will show you where the location of the hosts file is, how to correctly edit the hosts file in Windows 11 and Windows 10, and why you were unable to save the hosts file after editing.
How to Edit Hosts File in Windows 10
Note: Edit the hosts file with caution and at your own risk. Adding and remapping any crucial host name would possibly cause some software to fail or render some features unavailable should a host name they need to connect to be inaccessible or invalid due to remap of the host name in the hosts file.
To edit or add an entry to the hosts file in Windows 11 and Windows 10, follow the steps below.
- On the Windows 11 or Windows 10 search bar, search for Notepad. Right-click Notepad from the search result and then select “Run as administrator“.
- In the Notepad, click on File, then select Open.
- In the “Open” window, click on the drop-down menu that shows Text Documents (.txt) at the bottom of the window, and then select All Files. Doing this will allow you to see all files instead of only txt files.

- Next, navigate to C:\Windows\System32\drivers\etc (Change the C: drive if your Windows is in another drive). Select the file named “hosts” then click on Open.
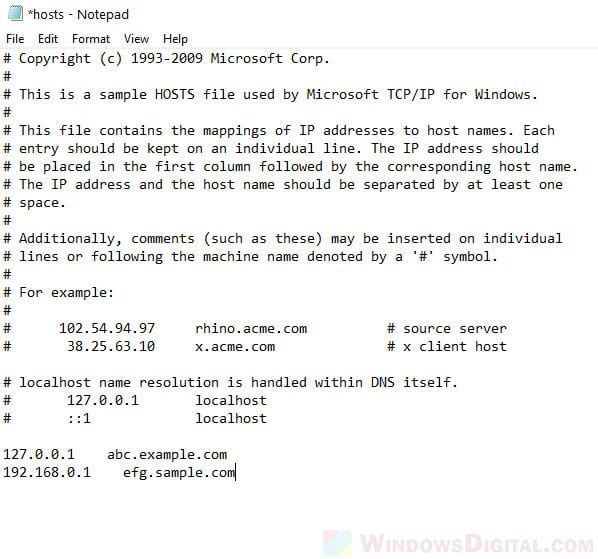
- To resolve a host name to a specific IP address, on a new line, enter the IP address (e.g. 127.0.0.1), followed by a space (or TAB), and then enter the host name (e.g. abc.example.com).

- When you’ve done editing, press CTRL + S keys (or File > Save) to save the changes.

What are the rules for editing the hosts file?
You can add as many mappings as you want. Make sure there is only one mapping per line. Also, make sure there is no # symbol at the beginning of the line where you add your mapping as # (commenting) means to ignore the line.
Additionally, the hosts file does not have an extension and must not have one. Thus, it cannot be opened normally by double-clicking it. You need to open it with Notepad or other text editor. We recommend Notepad as it’s the easiest to use.
Useful tip: How to Block Websites on Chrome Without Extension
Unable to save hosts file because access denied?
This is a common error users receive when they try to edit the hosts file without admin rights and cannot save the hosts file after editing. What you need to do is to get permission to edit the hosts file in Windows 11 and Windows 10.
This can be done by running Notepad as administrator first, then navigate to and open the hosts file from within Notepad. If Notepad has admin rights, you should be able to save the hosts file normally by pressing CTRL + S.
What IP address should I use in the hosts file?
If you have no idea what you are about to do, please do not add any mapping in the hosts file as it may brick some software that needs access to the host name. It will also block you from accessing the mapped host name or website address.
However, if you already have a set of mappings that you’ve decided to add beforehand, just follow the steps above to add them into the hosts file.
If you simply want to block a website or host name so that no program or software can access it, you can use the address 127.0.0.1 followed by the host name or website you want to block. This will resolve the host name or website address to the IP address 127.0.0.1, which is usually inaccessible.
Файл хостов важен для подключения компьютеров к сети. Это похоже на карту, которая помогает сопоставлять названия веб-сайтов с конкретными номерами на вашем компьютере. Если вы недавно редактировали файл хостов в своей Windows и все работает не так, не волнуйтесь. Эта статья покажет вам простые способы исправить файл hosts, который не работает в Windows.
Независимо от того, пытаетесь ли вы заблокировать доступ к определенным веб-сайтам, перенаправить трафик или управлять разрешениями локальных доменов, устранение неполадок файла хостов может стать необходимым. От проблем с разрешениями до синтаксических ошибок — определение основной причины неисправности файла хостов может оказаться сложной задачей. Итак, следуйте инструкциям, чтобы устранить проблему.
1. Очистить DNS-кеш
В кэше DNS хранится информация о ранее посещенных веб-сайтах, и если эти данные устаревают или повреждаются, это может привести к конфликтам с записями файла хостов. Очищая кэш DNS, вы очищаете эту сохраненную информацию и заставляете систему повторно запрашивать и обновлять записи DNS.
Кроме того, это также гарантирует, что операционная система извлекает самую актуальную информацию из файла хостов, что позволяет ей точно сопоставлять имена хостов с IP-адресами, как указано в файле. Вот как это сделать на вашем устройстве:
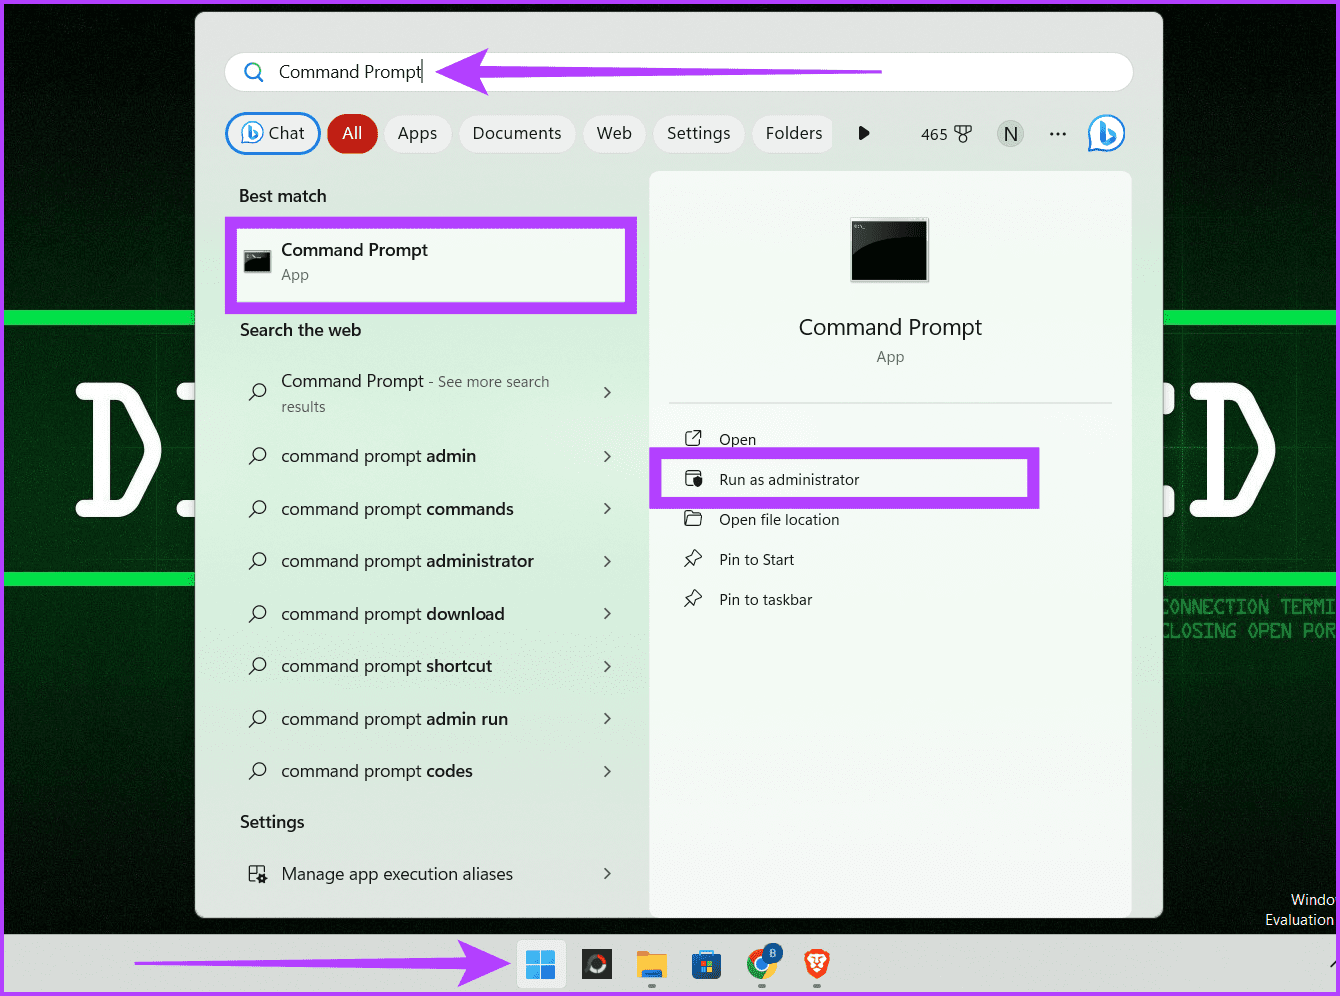
Шаг 1. Нажмите Windows+S на клавиатуре и введите «Командная строка». Нажмите «Запуск от имени администратора» и нажмите «Да», когда увидите приглашение.
Шаг 2. Введите указанную ниже команду в окне командной строки и нажмите Enter.
ipconfig /flushdns
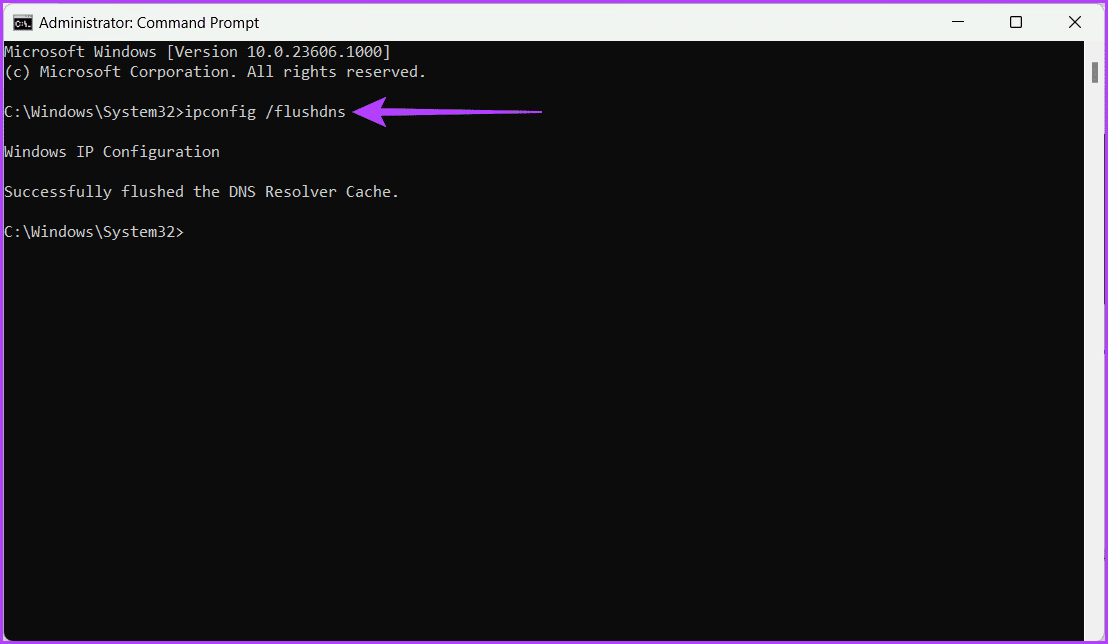
Теперь вы можете увидеть сообщение с подтверждением: «Вы успешно очистили DNS». Как только вы увидите это, перезагрузите устройство, чтобы применить изменения и проверить, устранена ли проблема.
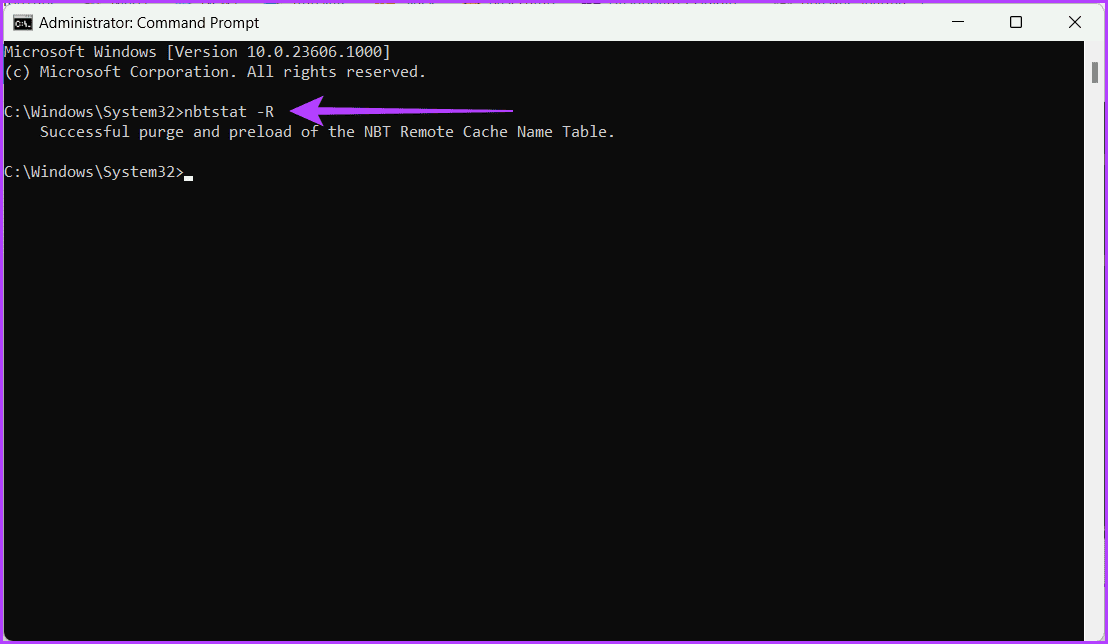
2. Сброс кэша NetBIOS.
Если у вас возникли проблемы с тем, что файл хостов работает неправильно, может помочь сброс кэша NetBIOS. Кэш NetBIOS похож на место хранения имен и соответствующих им IP-адресов. Если это хранилище засорится, то могут возникнуть проблемы с поиском адресов, что влияет на файл хостов.
Сброс кеша NetBIOS заставляет систему собрать его заново, исправляя, что файл хостов не работает в Windows. Это гарантирует, что файл хостов сможет правильно сопоставлять имена с IP-адресами. Выполните следующие действия, чтобы сбросить кэш NetBIOS на вашем устройстве Windows и исправить файл хостов Windows:
Шаг 1. Щелкните значок Windows и введите «Командная строка» в поле поиска. Выберите «Запуск от имени администратора» и при появлении запроса выберите «Да».
Шаг 2: Введите указанное ниже в окне CMD и нажмите Enter.
nbtstat -R
3. Отключите DNS через HTTPS (DoH).
Протокол DoH шифрует DNS-запросы, потенциально обходя локальные конфигурации DNS, например те, которые указаны в файле хостов. Это шифрование может помешать системе разрешать доменные имена в соответствии с записями в файле хостов.
Отключив DoH, пользователи могут гарантировать, что DNS-запросы соответствуют настройкам файла хостов, что обеспечивает точное и настраиваемое разрешение доменных имен. Вот как это можно сделать в браузере Chrome:
Примечание. Действия такие же, как и для других веб-браузеров, таких как Firefox.
Шаг 1. Запустите браузер Chrome. Нажмите значок с тремя точками и выберите «Настройки».
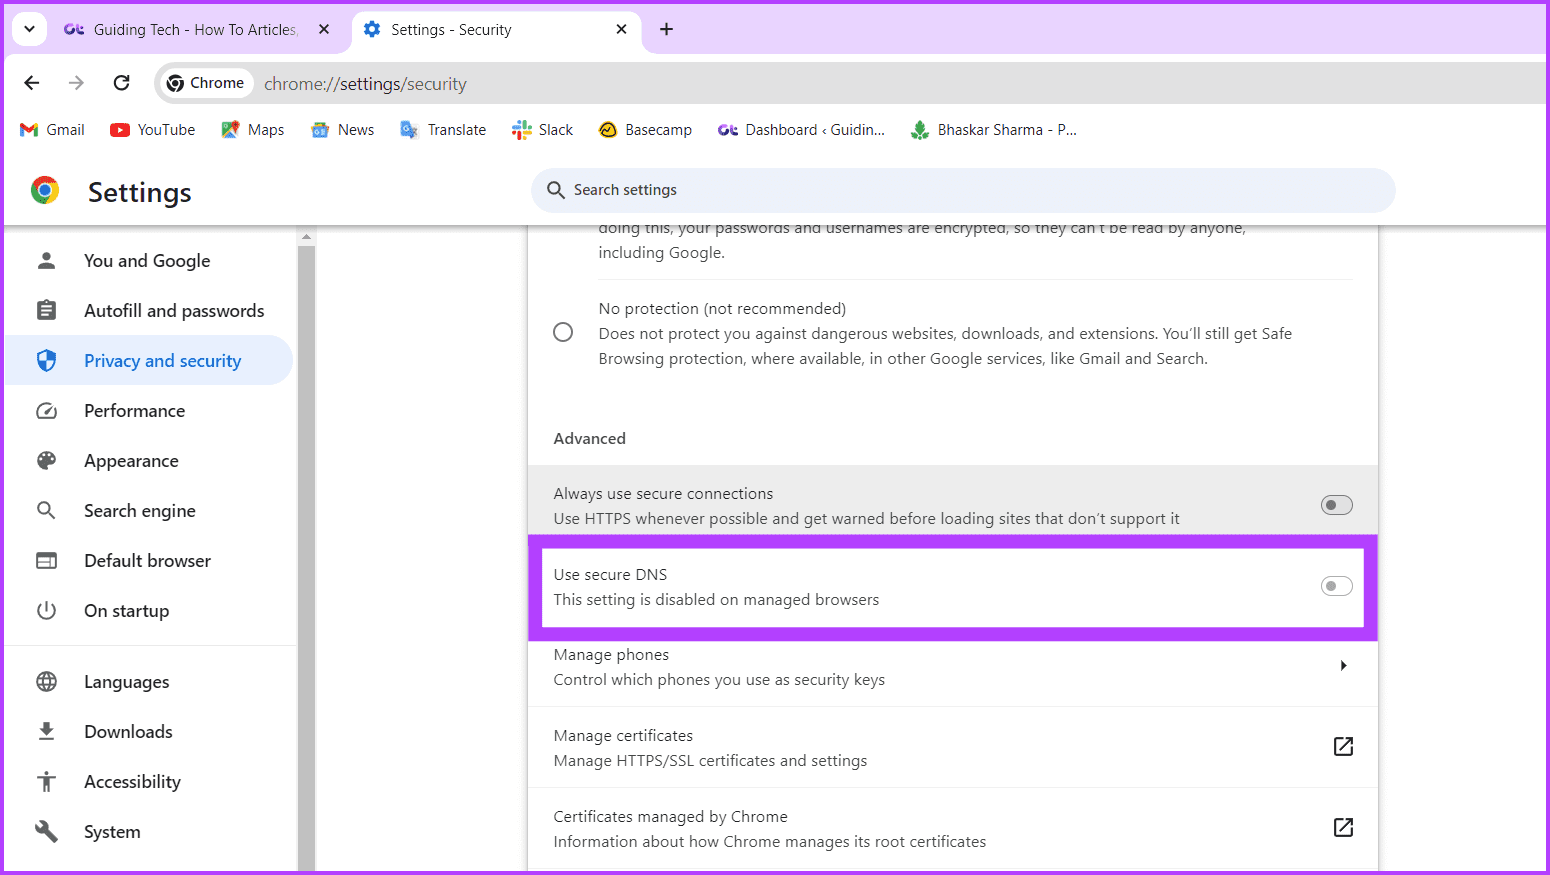
Шаг 2. Перейдите к разделу «Конфиденциальность и безопасность» слева и выберите «Безопасность» справа.
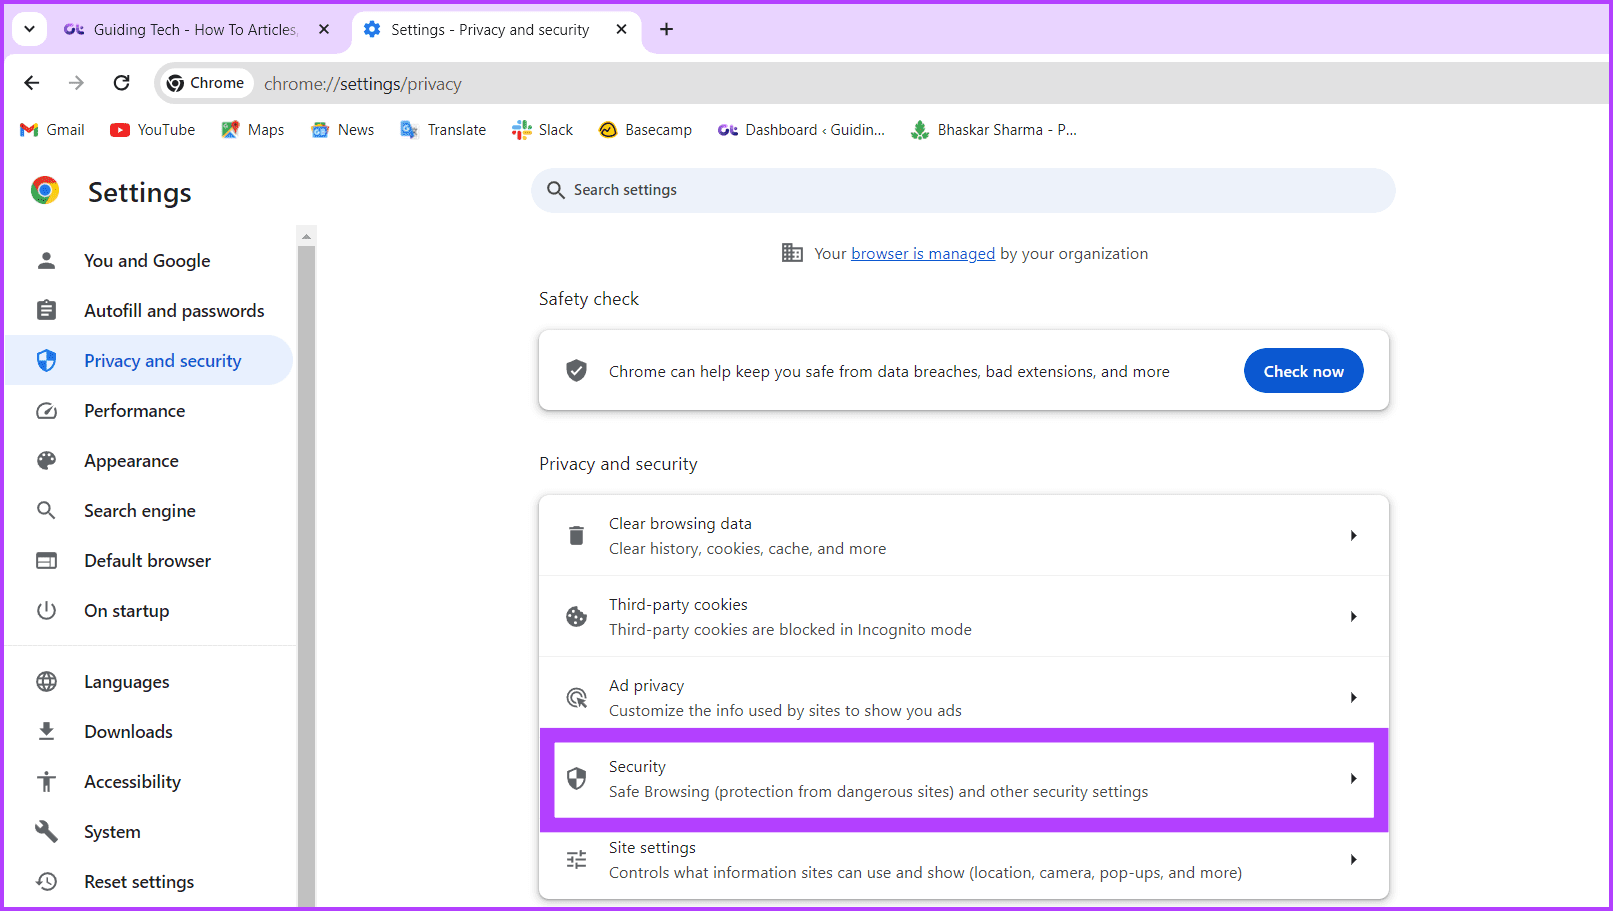
Шаг 3. Прокрутите вниз и отключите параметр «Использовать безопасный DNS».
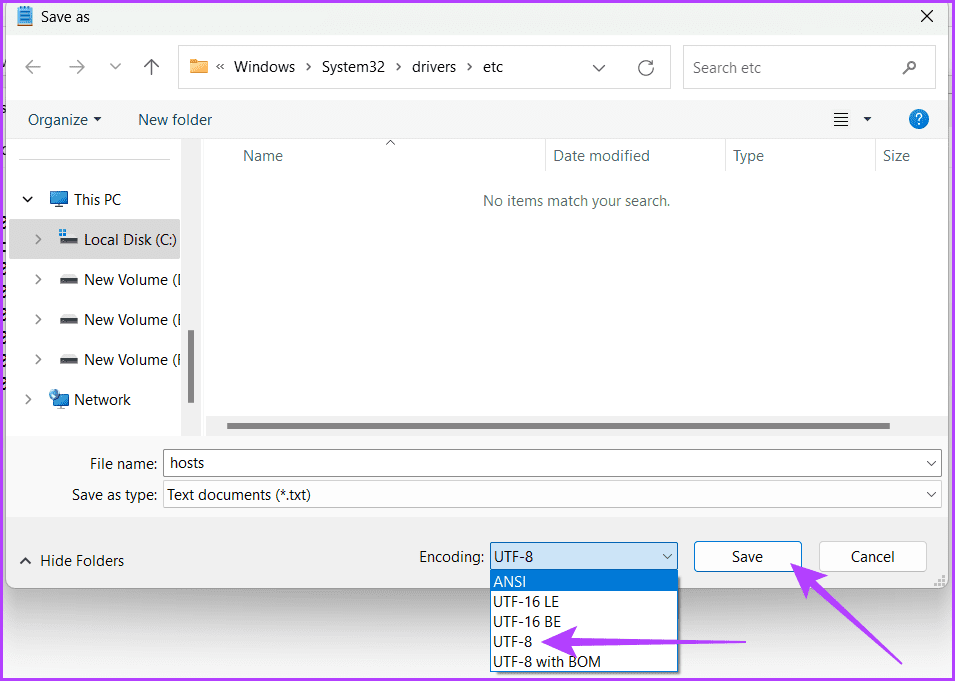
4. Проверьте формат кодировки файла хостов.
Проверка формата кодировки файла хостов является важным шагом по устранению неполадок при возникновении проблем с восстановлением файлов хоста. Если файл хостов неправильно закодирован в формате ANSI или UTF-8, это может привести к ошибкам, что сделает файл хостов неэффективным. Чтобы проверить формат кодировки, выполните действия, описанные ниже:
Примечание. Рекомендуемой кодировкой является UTF-8, поддерживающая более широкий диапазон символов.
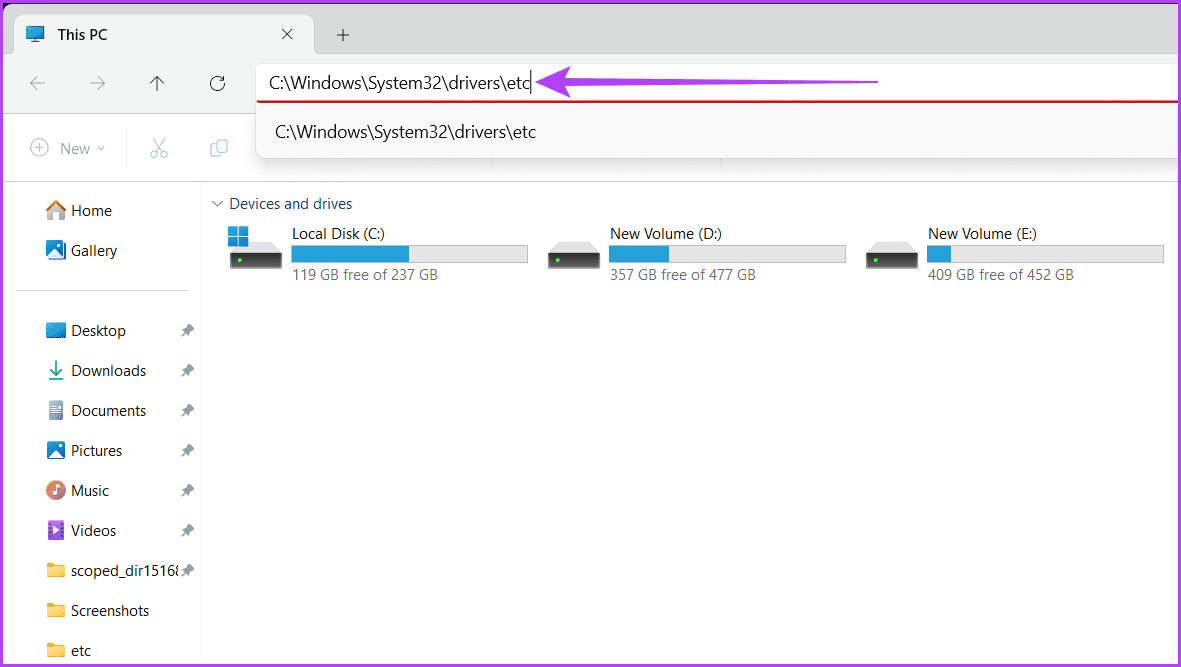
Шаг 1. Нажмите клавишу Windows+S на клавиатуре. Введите «Этот компьютер» в поле поиска и нажмите «Открыть».
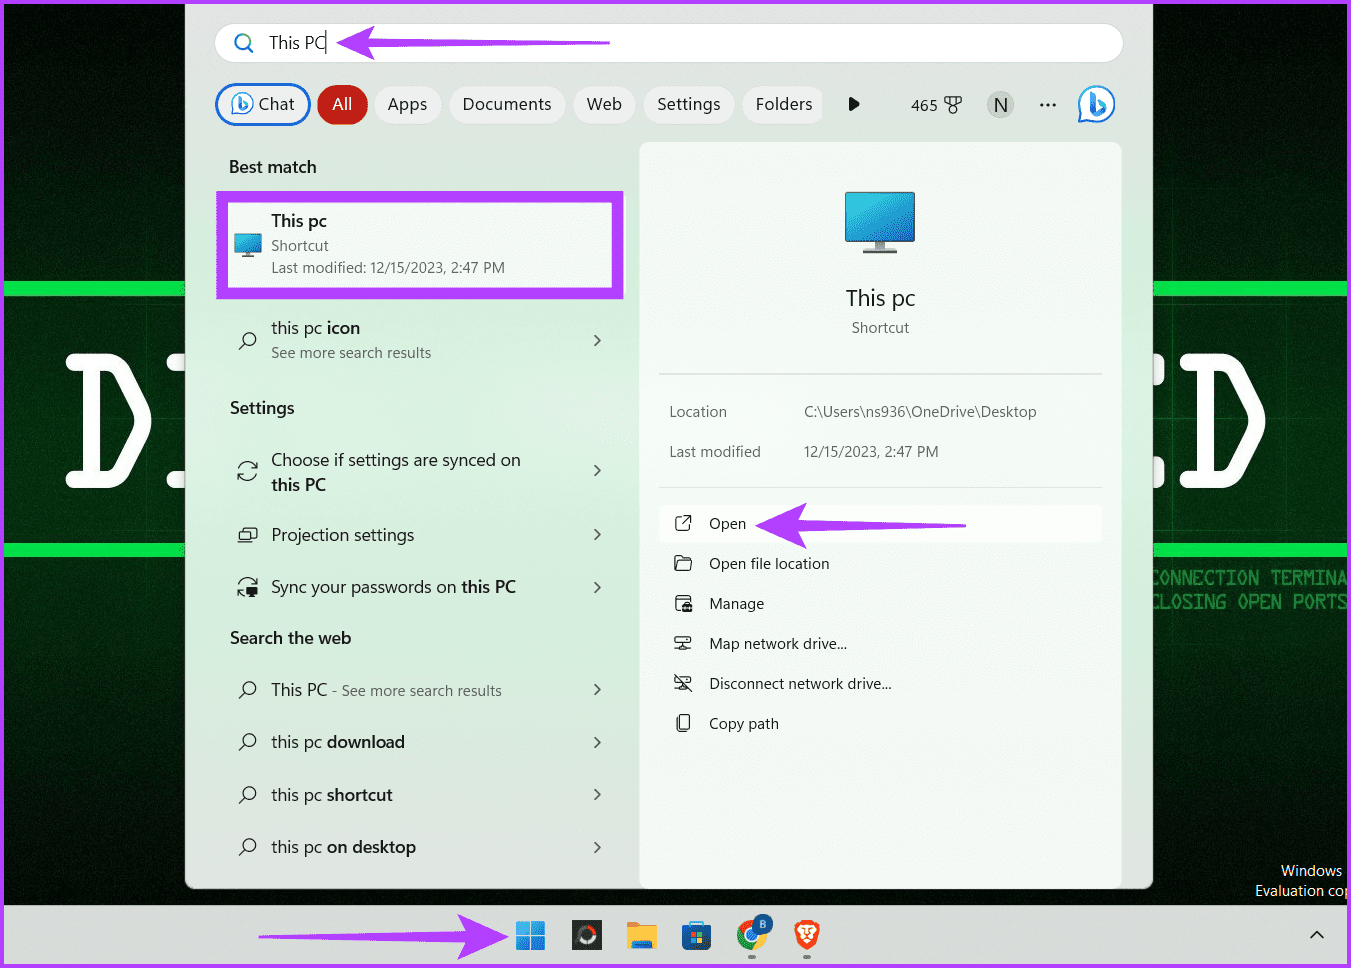
Шаг 2. Вставьте указанное ниже в адресную строку и нажмите Enter:
C:\Windows\System32\drivers\etc
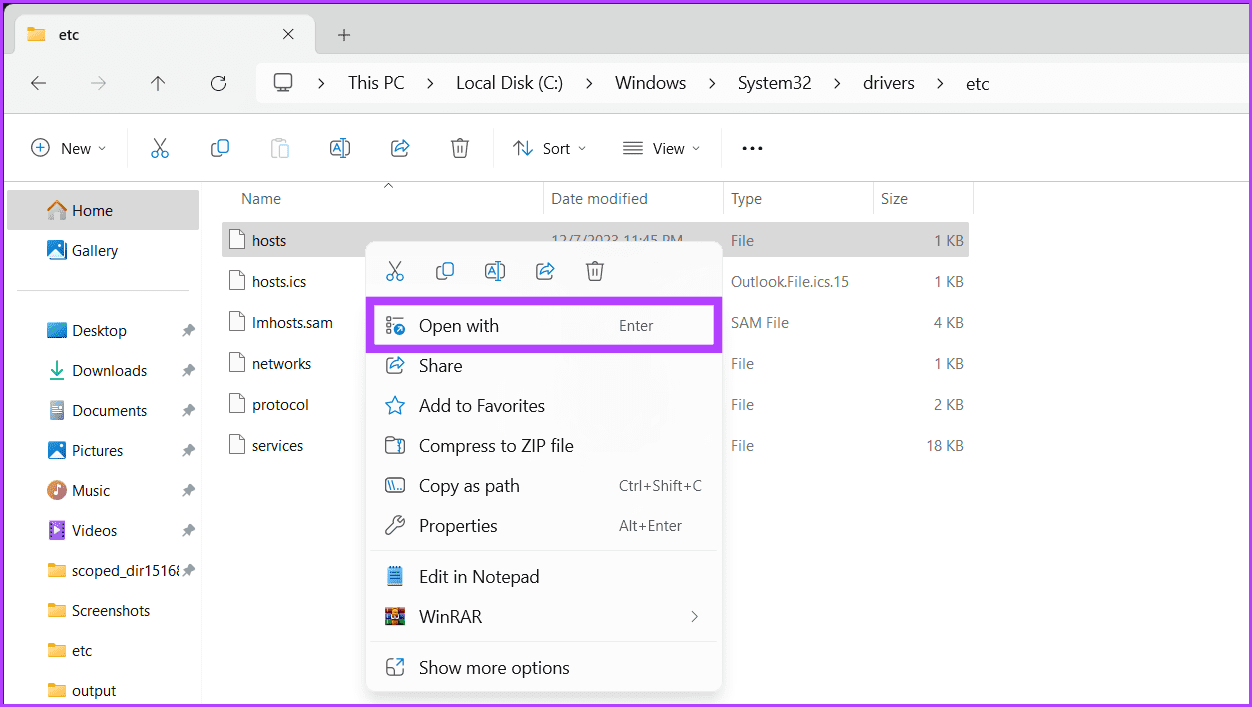
Шаг 3: Найдите файл хостов. Щелкните его правой кнопкой мыши и выберите «Открыть с помощью».
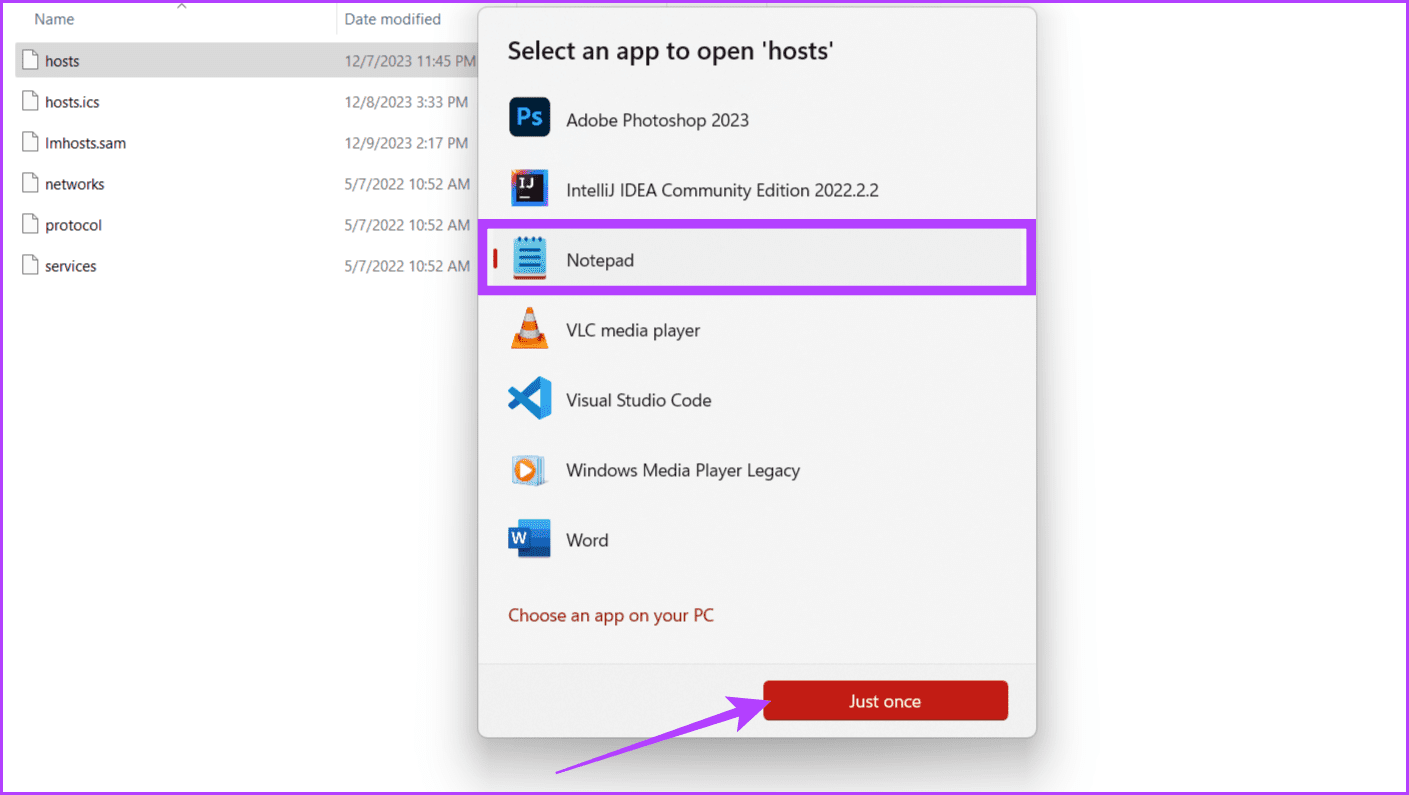
Шаг 4. Выберите «Блокнот» во всплывающем окне и нажмите «Только один раз».
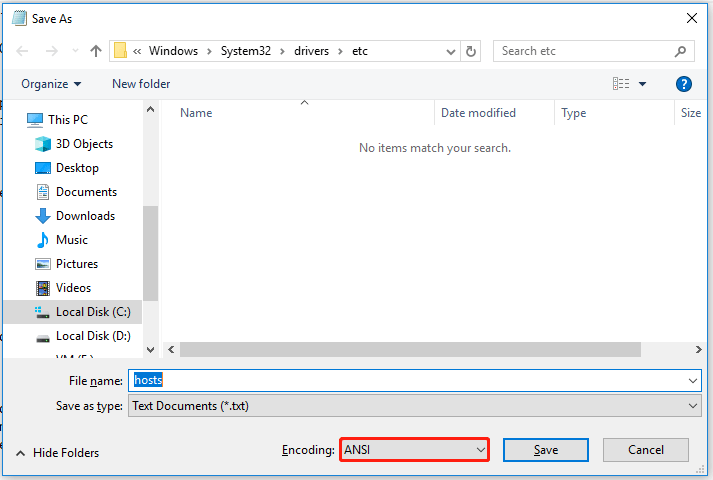
Шаг 5: Теперь нажмите «Файл» и выберите «Сохранить как».
Совет: Вы также можете нажать Ctrl+Shift+S.
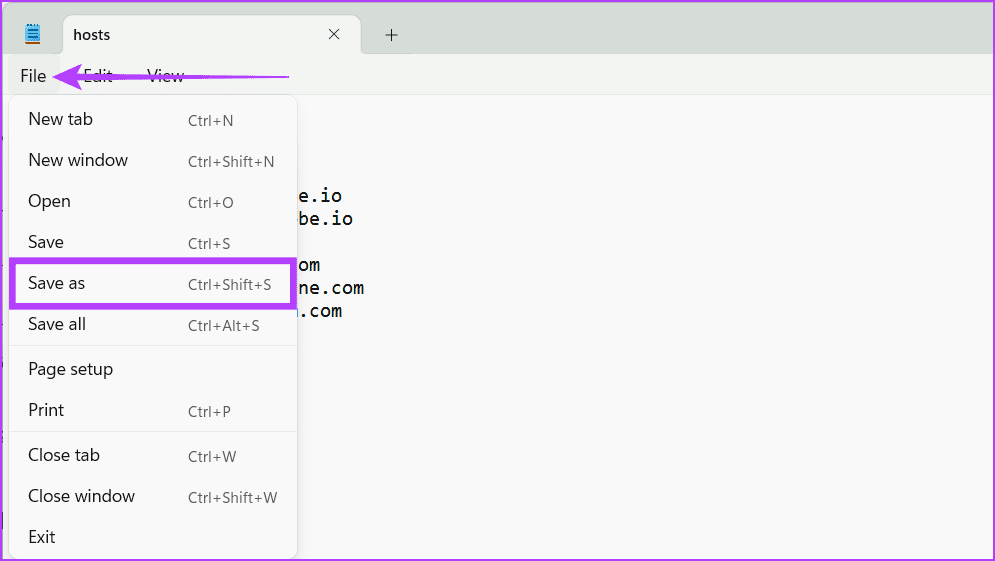
Шаг 6. Убедитесь, что используется кодировка UTF-8 или ANSI, и нажмите «Сохранить».
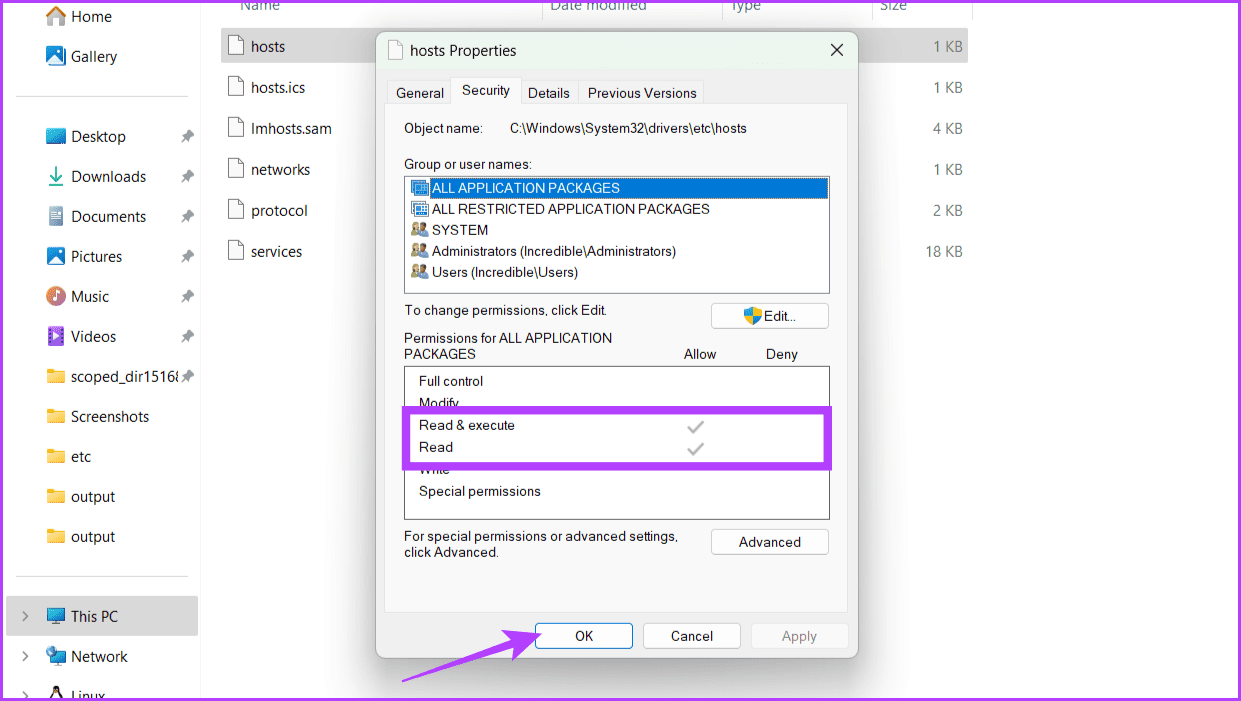
5. Проверьте наличие проблем с разрешениями
Полезно проверить проблемы, связанные с разрешениями, если файл хостов на вашем устройстве не работает должным образом. Для оптимальной работы файла хостов необходимы разрешения «Чтение» и «Чтение и выполнение». Давайте углубимся в простые шаги по проверке разрешения для файла хостов:
Шаг 1: Щелкните значок Windows. Найдите «Этот компьютер» и нажмите «Открыть».
Шаг 2: Вставьте указанное ниже в адресную строку и нажмите клавишу Enter.
C:\Windows\System32\drivers\etc
Шаг 3: Щелкните правой кнопкой мыши файл хостов и выберите «Свойства».
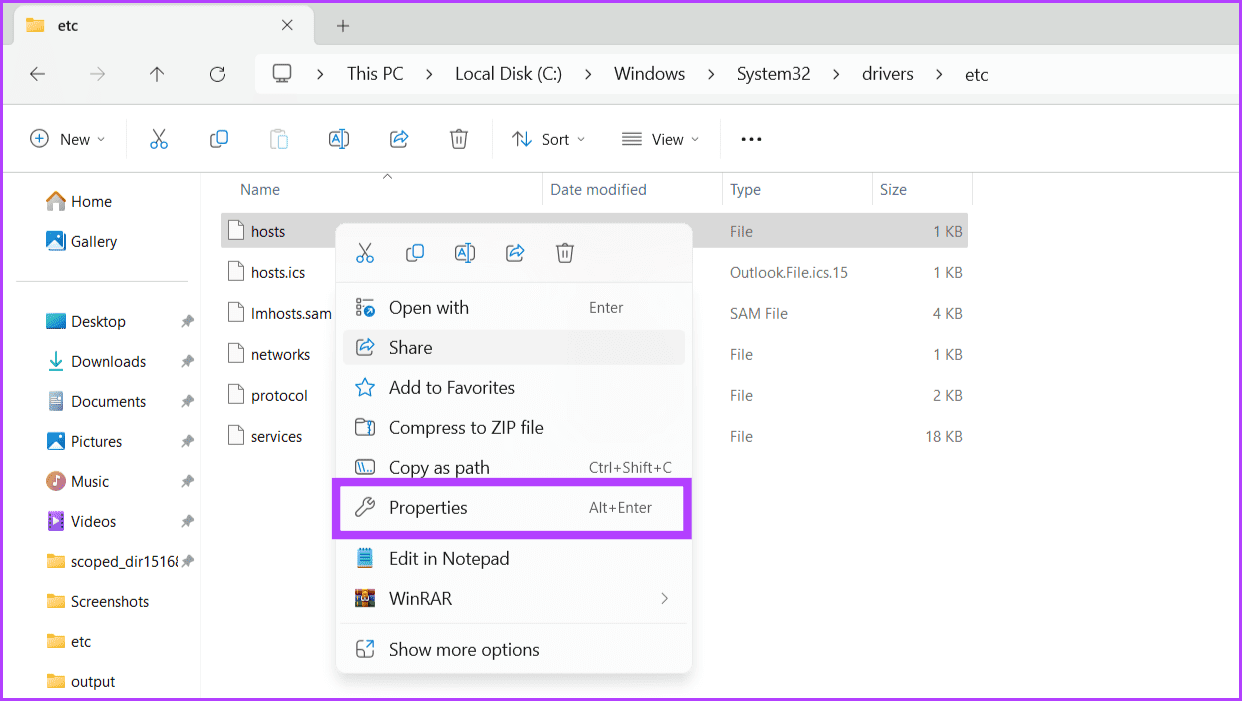
Шаг 4. Перейдите на вкладку «Безопасность» и убедитесь, что отмечены флажки «Чтение и выполнение» и «Чтение». Теперь нажмите ОК.
6. Сбросьте файл хостов.
Файл хостов отвечает за сопоставление имен хостов с IP-адресами, и если он будет поврежден или неправильно настроен с течением времени, это может привести к проблемам с подключением. Одним из жизнеспособных решений при возникновении проблем с его функциональностью является сброс файла хостов. Вот как это можно сделать:
Шаг 1: Нажмите клавишу Windows на клавиатуре. В поле поиска введите «Этот компьютер» и нажмите «Открыть».
Шаг 2. Чтобы найти файл хостов, введите указанное ниже местоположение в адресной строке и нажмите Enter.
C:\Windows\System32\drivers\etc
Шаг 3: Щелкните правой кнопкой мыши файл хостов и выберите значок «Удалить».
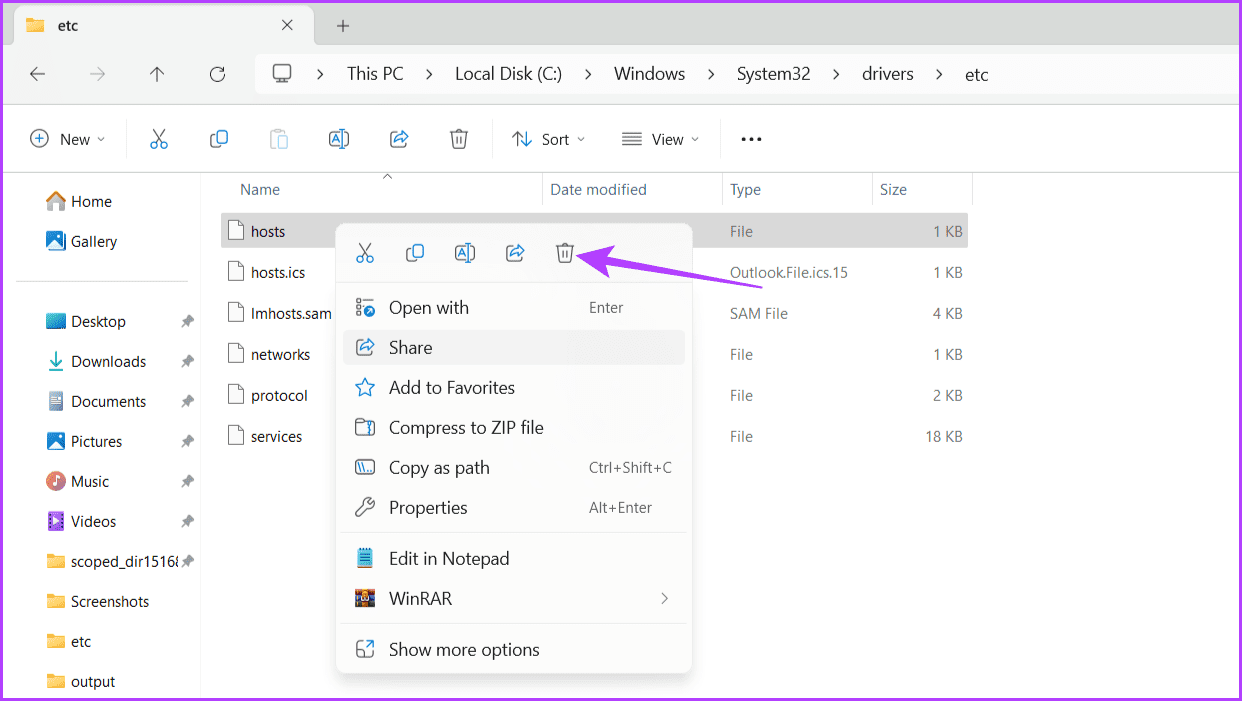
Шаг 4: Нажмите «Продолжить» во всплывающем окне и выберите «Да» в командной строке.
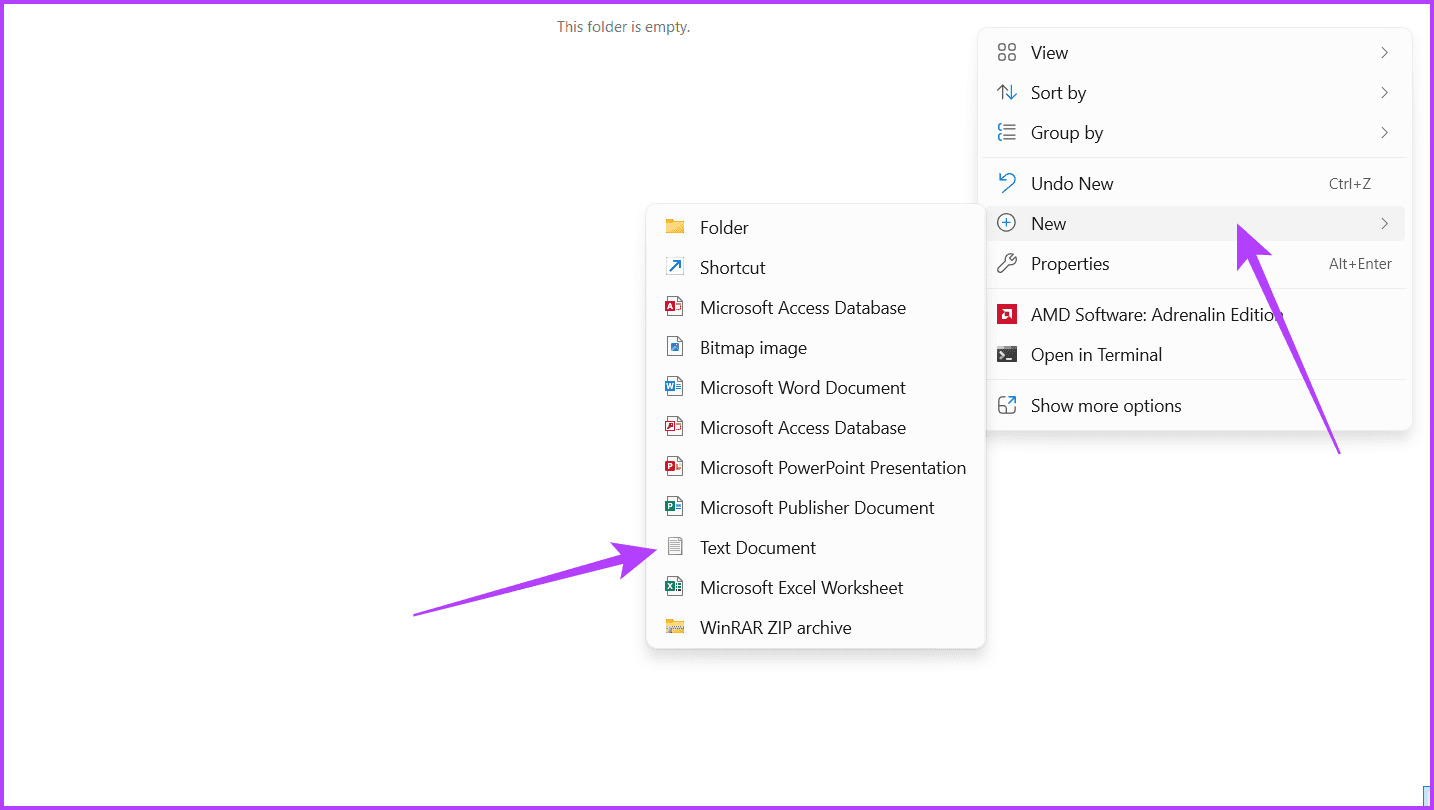
Шаг 5: Теперь перейдите в новую папку. Щелкните правой кнопкой мыши пустую область, выберите «Создать» и выберите «Текстовый документ».
Шаг 6: Откройте файл и вставьте в него приведенную ниже информацию.
#127.0.0.1 localhost::1 localhost127.0.0.1 3ca52znvmj.adobe.io127.0.0.1 cc-api-data.adobe.io127.0.0.1 ic.adobe.io127.0.0.1 genuine.adobe.com127.0.0.1 prod.adobegenuine.com127.0.0.1 assets.adobedtm.com
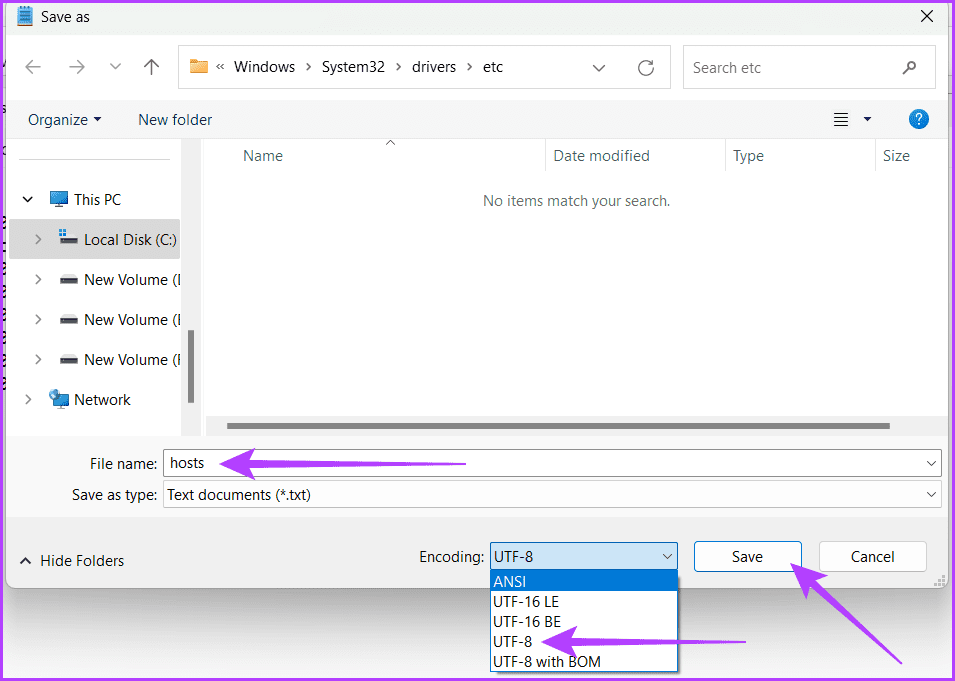
Шаг 7: Нажмите «Файл» и выберите «Сохранить как».
Шаг 8: Переименуйте файл в hosts. Убедитесь, что кодировка — UTF-8, и нажмите «Сохранить».
Шаг 9: Теперь скопируйте файл хостов и вставьте его в папку и т. д.
Предоставьте необходимые разрешения и перезагрузите устройство. Это должно исправить ваш файл хостов Windows. Если это все еще не работает, следуйте следующему методу.
7. Отключите прокси.
Отключение прокси-сервера позволяет системе напрямую использовать файл хостов. Это означает, что он может находить адреса веб-сайтов на основе информации в файле хостов. Это полезно, если вам нужен точный контроль над разрешением доменных имен. Это гарантирует, что информация в файле хостов используется в первую очередь, чтобы система могла находить адреса более надежно и точно. Вот как это можно сделать:
Шаг 1. Нажмите клавиши Windows+I и откройте приложение «Настройки».
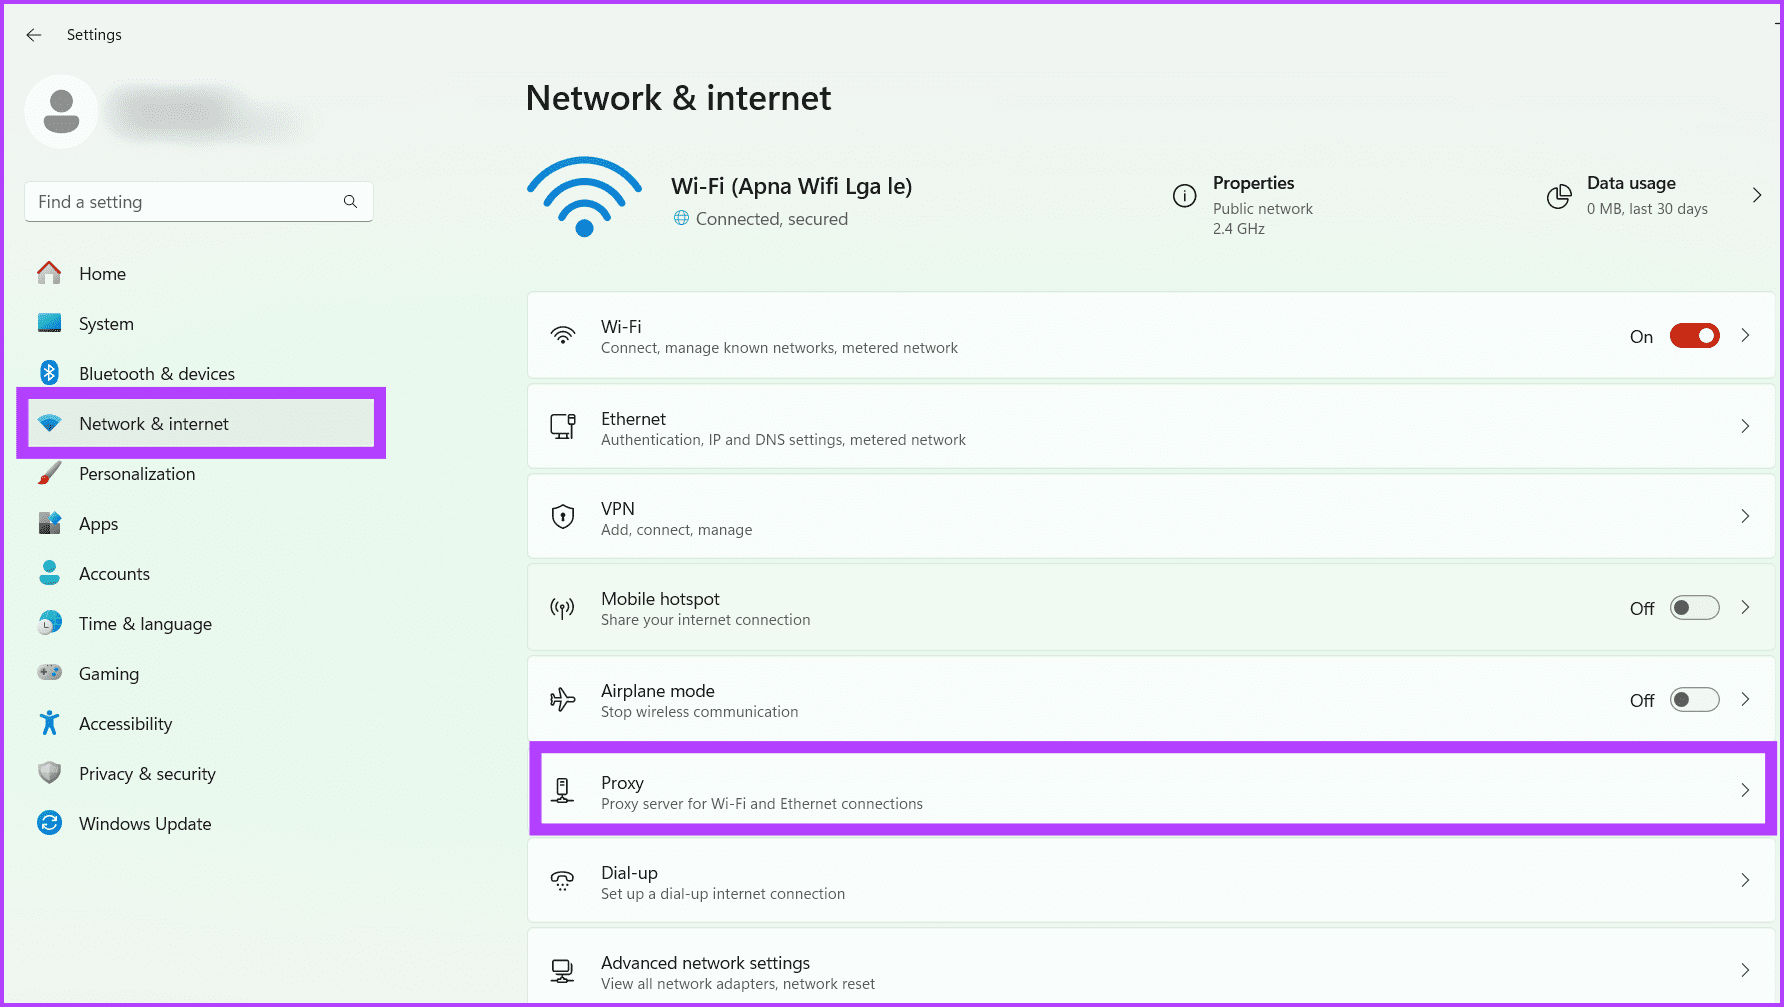
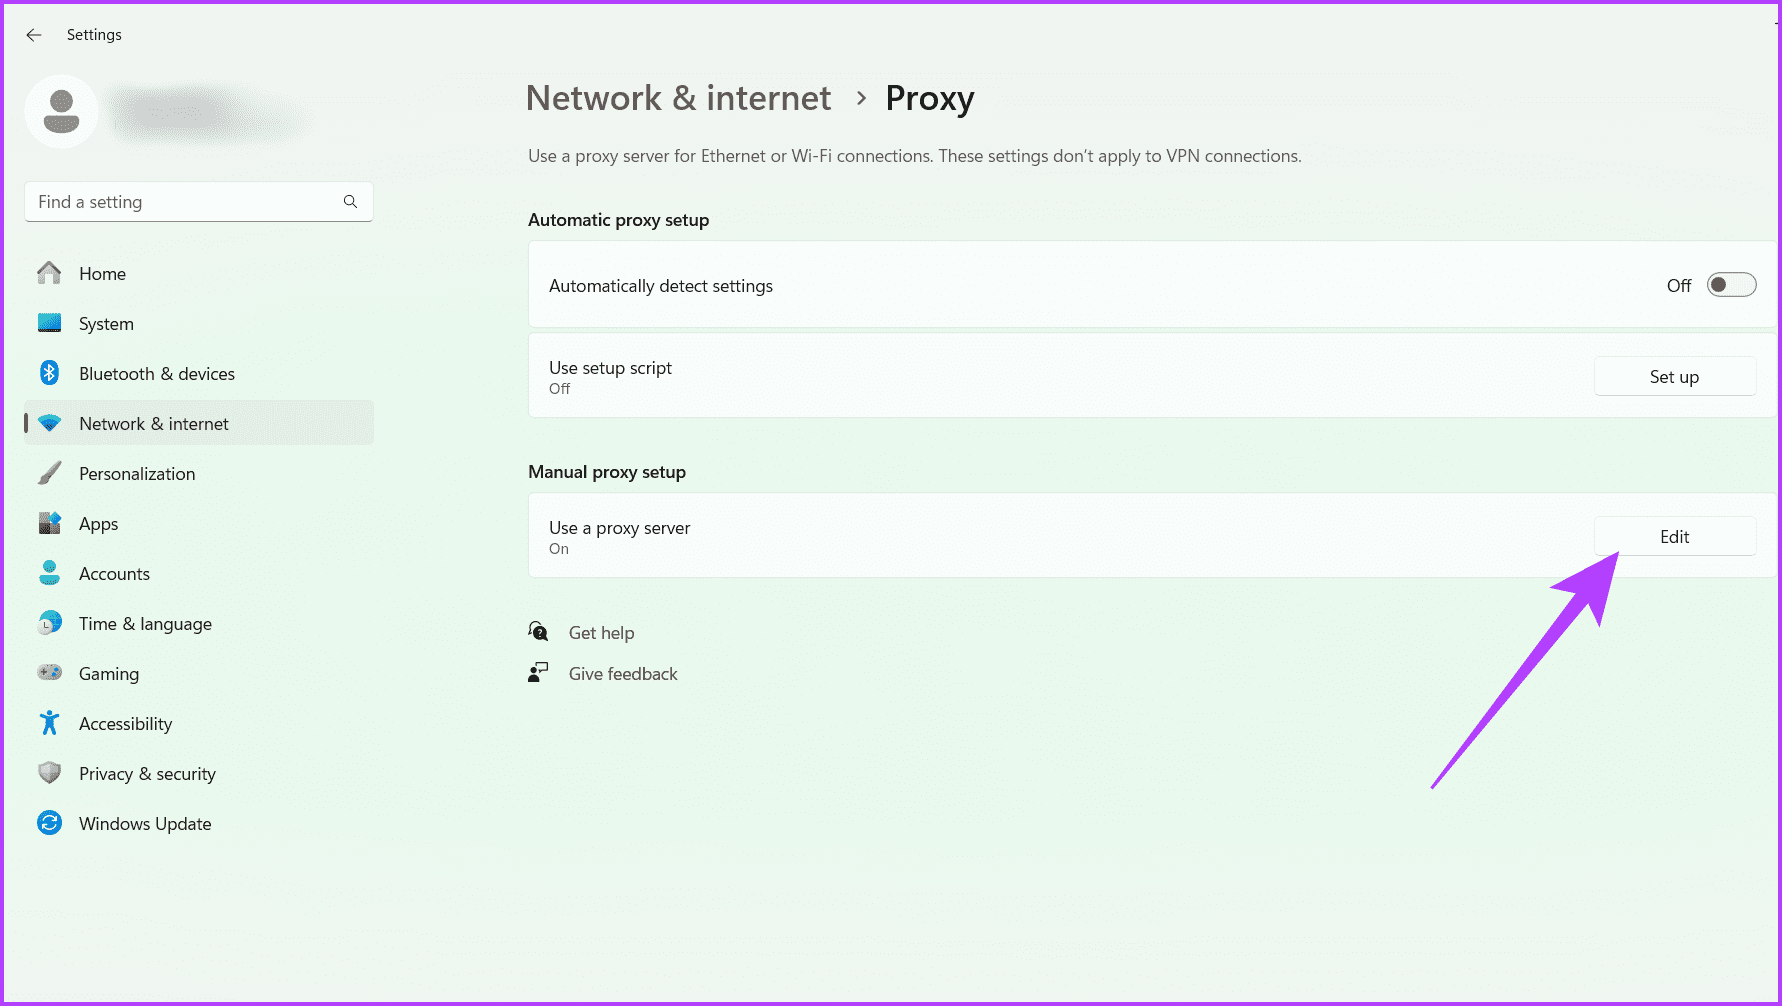
Шаг 2. Перейдите в раздел «Сеть и Интернет» и выберите «Прокси».
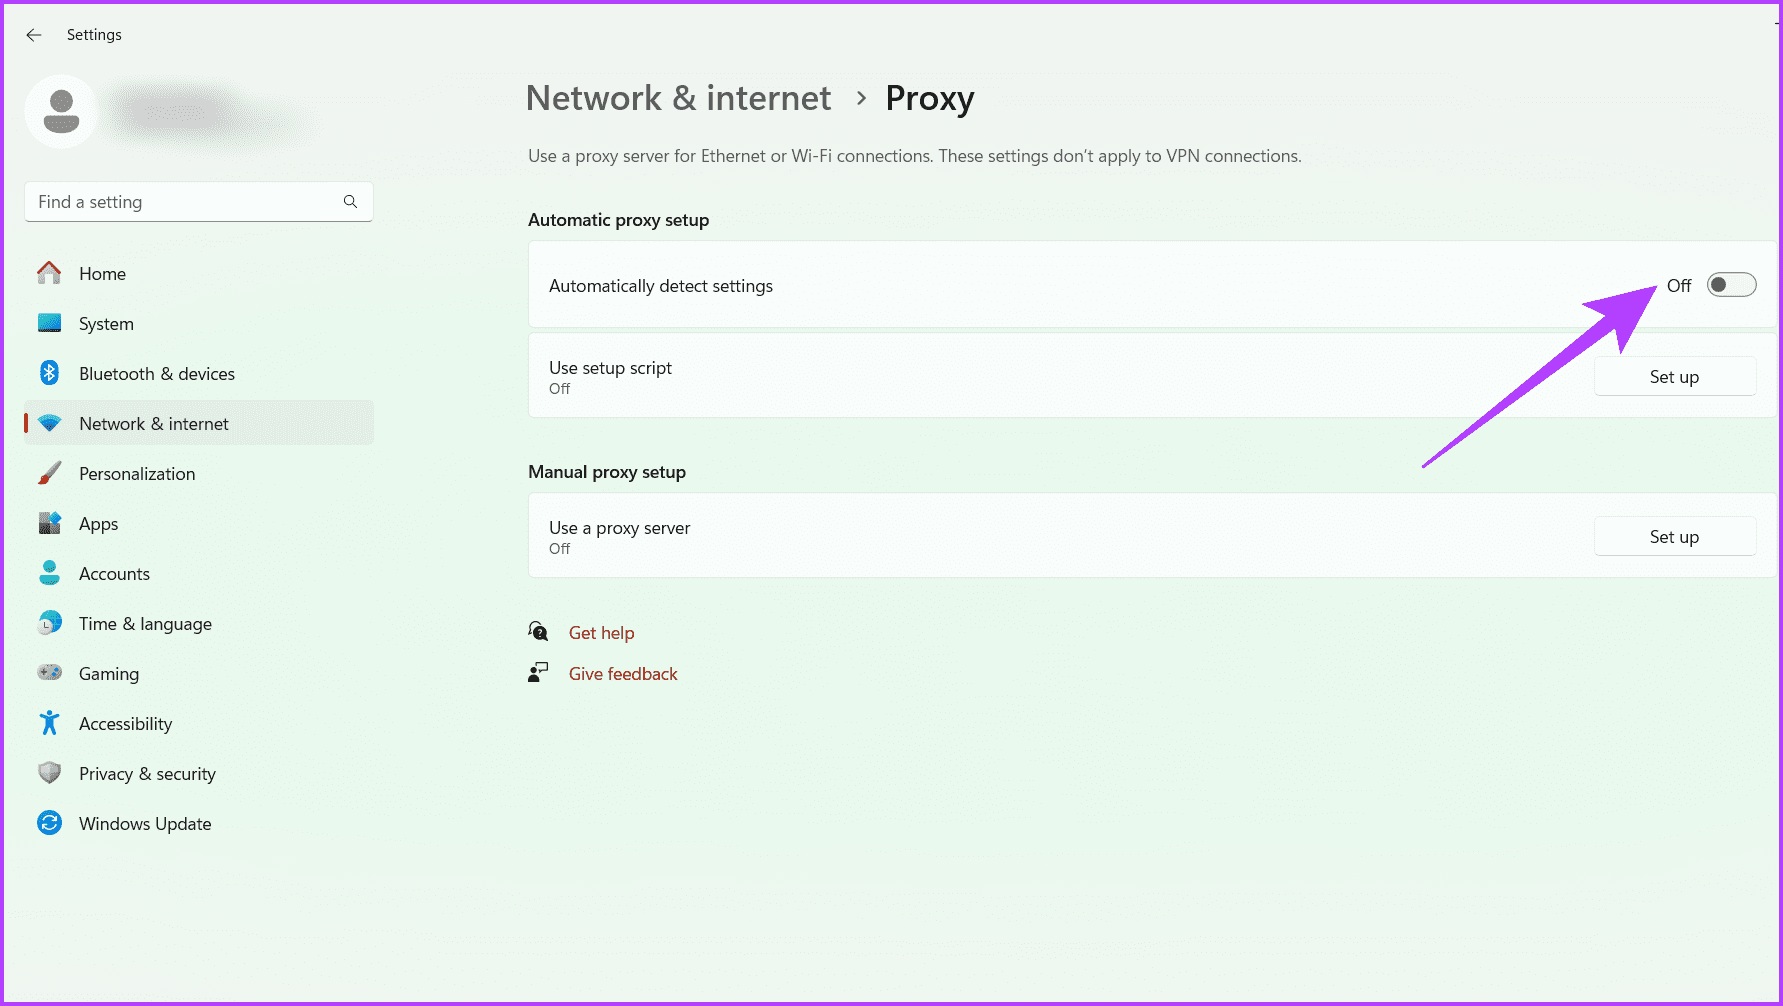
Шаг 3. В разделе «Автоматическая настройка прокси» отключите переключатель «Автоматически определять настройки».
Шаг 4. Нажмите «Изменить» рядом с пунктом «Использовать прокси-сервер» в разделе «Настройка прокси вручную».
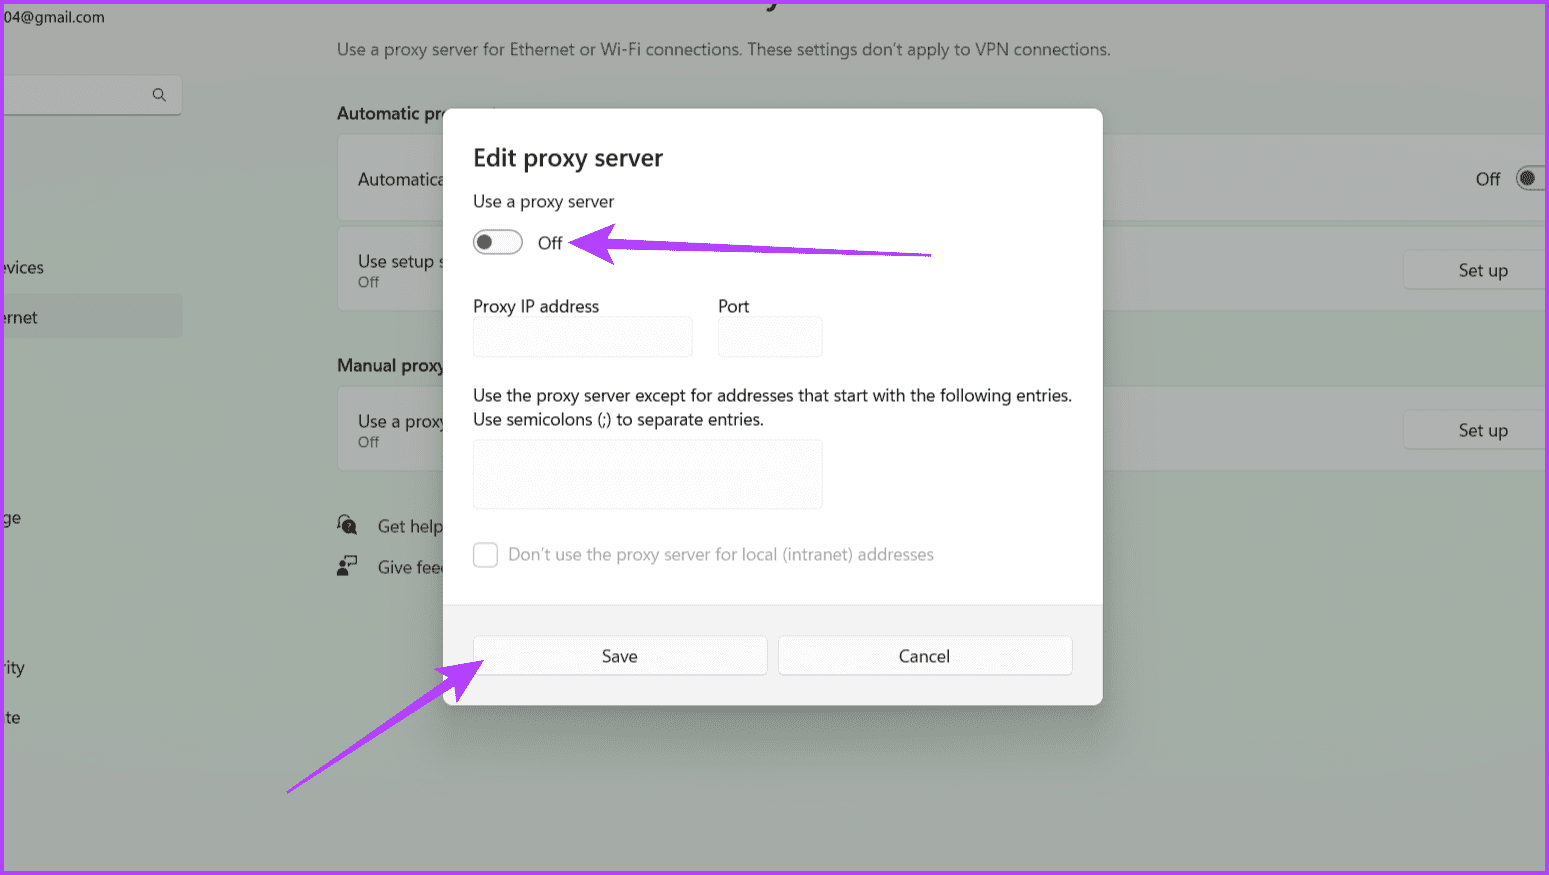
Шаг 5. Отключите переключатель «Использовать прокси-сервер» и нажмите «Сохранить».
8. Очистка пулов сокетов в Chrome
Chrome, как и многие браузеры, использует пулы сокетов для оптимизации производительности. Эти пулы поддерживают открытые соединения с часто посещаемыми веб-сайтами, повышая скорость и эффективность. Однако кэшированная информация в этих пулах иногда может конфликтовать с недавними обновлениями файла хостов, что приводит к несогласованности.
Очистка пулов сокетов заставляет Chrome отбрасывать все кэшированные данные подключений и инициировать новые подключения к веб-сайтам. Этот процесс гарантирует, что Chrome будет придерживаться обновленных записей файла хостов, устраняя несоответствия. Вот как это можно сделать:
Шаг 1. Запустите браузер Chrome.
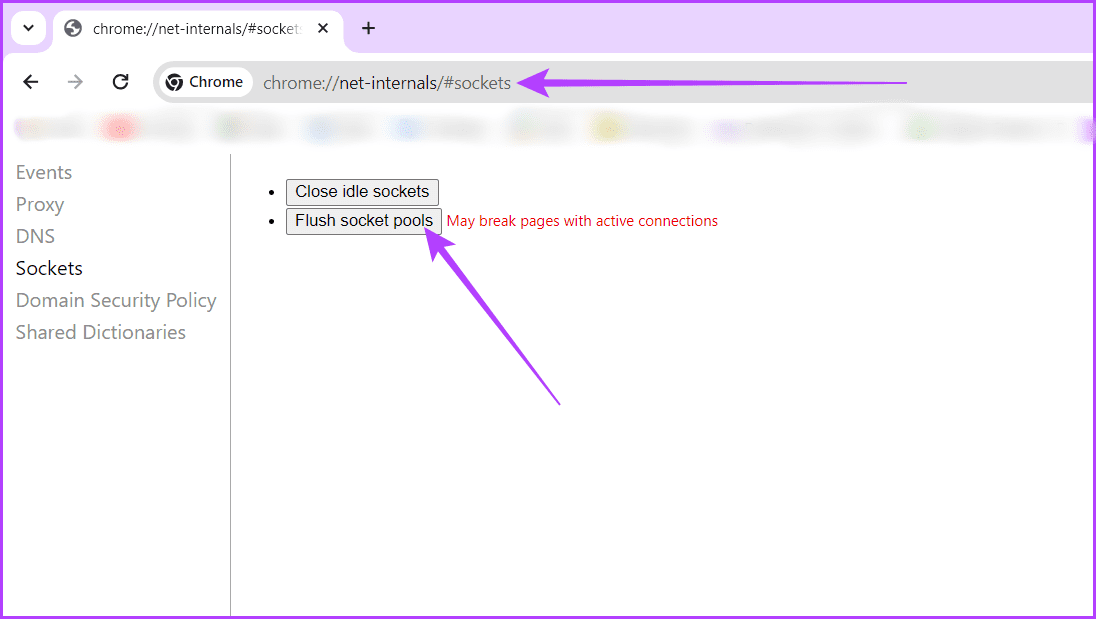
Шаг 2. Перейдите к местоположению файла хостов, введя приведенный ниже текст в адресную строку Chrome и нажмите Enter.
chrome://net-internals/#sockets
Шаг 3. Нажмите кнопку «Очистить пулы сокетов».
Шаг 4. Теперь перезапустите браузер Chrome, чтобы изменения вступили в силу.
Файл хостов найден
Файл хостов, не работающий на вашем устройстве Windows, может расстраивать. Мы надеемся, что предложенные ранее решения помогли вам решить проблему. Сообщите нам, какое из вышеперечисленных исправлений помогло вам.
Просмотров: 2 498
-
Home
-
News
- How to Fix Windows Hosts File Not Working? [Step-by-Step Guide]
How to Fix Windows Hosts File Not Working? [Step-by-Step Guide]
By Vega | Follow |
Last Updated
Sometimes, some people may encounter the hosts file not working problem. If you are also bothered by this problem, this post is what you need. MiniTool Partition Wizard will offer several feasible ways for this issue.
Hosts files are files that contain specific IP addresses and domain names. It is used for testing purposes to override DNS (Domain Name System) so that web browsers can be redirected to specific IP addresses. Usually, it is located at C:WindowsSystem32driversetc. However, some users found that the Hosts file not working on Windows 11/10.
There could be a number of reasons why the hosts file not working on your Windows PC. You might be using the wrong format in your hosts file. In addition, the permission problem of the Hosts file is also one of the reasons.
If something like this happens to you, you can try the solutions presented in this article to fix the problem. Before you try the solutions below, make sure you are using the correct format in your Hosts file to redirect sites in your web browser. If you add your site in the wrong format, the Hosts file will not work. The correct format is as follows: IP Address www.abcd.com.
# 1. Flush the DNS Cache
Some people report that they have solved the hosts file not working issue by flushing the DNS cache. The steps are as follows:
Step 1: Search for cmd using Windows Search. Then right-click on the result and select Run as administrator. Click Yes if you see the User Account Control.
Step 2: In the Command Prompt window, type ipconfig /flushdns and press Enter.
Once done, restart your PC and check if the problem is solved.
# 2. Reset NetBios Cache
If flushing the DNS cache does not resolve your issue, resetting the NetBios cache may help. Open Command Prompt as an administrator, type the following command, and press Enter.
nbtstat -R
Now, check if the problem still exists.
# 3. Check for Permission Issues
The problem may occur due to permission issues. The Hosts file should have both read and read and execute permissions. To check this, follow the steps listed below:
Step 1: Find the location of the hosts file in the File Explorer. Then right-click on the hosts file and select Properties.
Step 2: When the Properties window appears, select the Security tab.
Step 3: Select Users in the Group or user name box.
Step 4: Both the Read and Read & execute permissions should have checkmarks under the Allow column. If not, allow both permissions to the hosts file by clicking the Edit button.
# 4. Check the Encoding Format of the Hosts File
Hosts files should have any of the following encoding formats: ANSI; UTF-8. Therefore, if you encounter the hosts file not working problem, you should check the encoding format of the Hosts file.
Step 1: Right-click the hosts file and choose Open With > Notepad. If the Notepad option is not there, open Notepad and press the Ctrl + O keys. Select the Hosts file to open it.
Step 2: Go to File > Save As. Notepad will show you the same encoding format as the hosts file.
# 5. Create a New Hosts File
Create a new hosts file and replace the existing one with it. Before you create a new Hosts file, we recommend that you follow the steps below and see if the issue is resolved.
- Go to the default location where the Hosts file is located.
- Copy the Hosts file and paste it into another location.
- Delete the hosts file from its original location.
- Now, go to where you copied the hosts file and move it to the original location.
The above steps solved the problem for some users. If that doesn’t help, create a new Hosts file. To do this, follow these steps:
- Open the default location for the Hosts file.
- Right-click on the hosts file and select Rename.
- Name it old and press Enter. You should log in to your computer as an administrator to rename the Hosts file.
- Now, open Notepad. Go to File > Save As.
- In the File name field, type host under the quotation marks.
- Make sure Encoding is set to UTF-8 or ANSI.
- Click Save.
- Move this Hosts file to the default location on the C drive (if you saved it elsewhere).
If you accidentally delete the file on your computer, don’t worry. You can use the Data Recovery feature of MiniTool Partition Wizard to recover lost data. Besides, this software enables you to do more operations about disks and partitions, such as create/delete/wipe/format/extend/resize partitions, disk benchmark, etc.
MiniTool Partition Wizard DemoClick to Download100%Clean & Safe
About The Author
Position: Columnist
Vega joined MiniTool as an editor after graduation. She enjoys helping people with computer problems, including disk management, data recovery, and more. She is constantly expanding her knowledge in related fields. And she will continue to bring more easy-to-understand professional articles to help people solve various problems on the PC. In her daily life, Vega enjoys hanging out with friends, shopping online and listening to music. She is someone who knows how to enjoy life.