
When your keyboard experiences problems, it can disrupt your workflow significantly. Whether you’re encountering unresponsive keys, unexpected typos, or your keyboard doesn’t work entirely, often the issue lies with your keyboard drivers. These drivers are essential pieces of software that allow the operating system to communicate effectively with your hardware. In this guide, we will walk you through the detailed process of reinstalling keyboard drivers in both Windows 11 and Windows 10, helping you resolve any keyboard-related issues.
Understanding Keyboard Drivers
Before we delve into the reinstallation process, let’s clarify what keyboard drivers are. Drivers are specialized programs that facilitate communication between your operating system and hardware devices. In simple terms, they act as interpreters to ensure that the operating system can understand signals from a keyboard.
If drivers are outdated, corrupted, or incompatible, they may cause keyboard functionality issues. Symptoms can include non-responsiveness, keys that do not register on-screen, or incorrect characters being typed. Reinstalling the keyboard drivers can often resolve these headaches.
Preparing for Reinstallation
Before proceeding with the reinstallation, it is essential to take a few preliminary steps:
-
Backup Your Data: Always keep backups of your important data, as uninstalling drivers can sometimes lead to unexpected software behavior.
-
Check for Hardware Issues: Ensure that your keyboard is functioning correctly. If possible, test it on another computer. If it fails to work elsewhere, it may require physical repairs or replacement.
-
Identify Your Keyboard: Take note of the keyboard model before uninstallation so you can download the correct drivers later if necessary.
-
Administrative Access: You will need administrative privileges to uninstall and reinstall drivers.
-
Connect to the Internet: Make sure your device is connected to the internet, as you may need to download drivers.
Now that you’re prepared, let’s proceed with the reinstallation process.
Step 1: Uninstall the Current Keyboard Driver
Using Device Manager in Windows 10/11
-
Access Device Manager:
- Right-click on the Start Menu or press Windows + X to open the Quick Access menu.
- Select Device Manager from the list.
-
Locate Your Keyboard:
- In the Device Manager window, expand the section labeled Keyboards. Here, you will see your keyboard listed. It’s usually displayed as “Standard PS/2 Keyboard,” “HID Keyboard Device,” or something similar.
-
Uninstall the Driver:
- Right-click on your keyboard entry and select Uninstall device.
- A confirmation dialog will appear. Check the box that says Delete the driver software for this device (if applicable), and then click Uninstall.
-
Restart Your Computer:
- After the uninstallation process completes, restart your computer. Windows will automatically recognize the keyboard and attempt to reinstall the default drivers.
Step 2: Installing Keyboard Drivers
Automatic Driver Installation
Often, Windows will automatically reinstall the drivers for your keyboard during the restart process. If the drivers are not installed automatically, follow these steps:
-
Access Device Manager Again:
- As before, open Device Manager.
-
Scan for Hardware Changes:
- At the top of Device Manager, click on Action and select Scan for hardware changes. This command will prompt Windows to detect and install the keyboard drivers automatically.
-
Check Driver Installation:
- After the scan is complete, you should see your keyboard under the Keyboards section. If installed properly, Windows will have reinstalled the default drivers.
Manual Driver Installation
If Windows fails to reinstall the drivers or if you want to install specific drivers from the manufacturer, follow these steps:
-
Visit the Keyboard Manufacturer’s Website:
- Go to the official website of your keyboard manufacturer (e.g., Logitech, Razer, Corsair).
-
Navigate to Support or Downloads:
- Look for a section labeled Support or Downloads.
-
Find Your Keyboard Model:
- Search for your keyboard model in the support section.
-
Download the Drivers:
- Download the appropriate driver compatible with Windows 11 or Windows 10.
-
Install the Drivers:
- Locate the downloaded files in your Downloads folder.
- Double-click the installer and follow the on-screen instructions to install the drivers.
-
Restart Your Computer:
- Once installation is complete, restart your computer to apply the changes and finalize the installation.
Step 3: Troubleshooting
If your keyboard is still not working correctly after reinstalling the drivers, consider the following troubleshooting steps:
1. Run Windows Troubleshooter
Windows has a built-in troubleshooter specifically designed to fix hardware issues.
- Go to Settings (Windows + I).
- Click on Update & Security, then select Troubleshoot from the left sidebar.
- Choose Additional troubleshooters.
- Click on Keyboard, then select Run the troubleshooter. Follow any on-screen prompts.
2. Check Keyboard Settings
Sometimes the issue may stem from the operating system settings:
- Open Settings (Windows + I).
- Navigate to Devices > Typing.
- Ensure that settings such as autocorrect and key repeat delay are configured correctly.
3. Update Windows
Ensuring that your Windows operating system is up-to-date can often resolve compatibility issues:
- Go to Settings > Update & Security.
- Click on Check for updates. Install any available updates and restart your computer.
4. Check for Malware
Malware can interfere with your keyboard functionality. It’s essential to perform a full system scan:
- Use Windows Defender or install any reputable antivirus software.
- Run a full system scan and remove any detected threats.
5. Test Another Keyboard
If you have a spare keyboard, plug it in to see if the problem persists. This can help determine if the issue is hardware-related or software-related.
6. Restore System
If none of the above steps work, you may consider performing a system restore to revert your computer to a previous state when the keyboard was functioning properly:
- Type Create a restore point in the Windows search bar and select it from the results.
- Under System Properties, click the System Restore button.
- Follow the prompts to select a restore point and begin the restoration process.
Conclusion
Reinstalling keyboard drivers in Windows 10 and Windows 11 can help resolve various issues associated with keyboard functionality. By following the outlined steps—including uninstallation, reinstallation, and troubleshooting—you can often restore your keyboard to full working condition. If issues persist, you may need to consider hardware repairs or replacement options.
Regularly updating your system and drivers, along with maintaining good cybersecurity practices, can help prevent similar keyboard issues in the future. Whether you’re typing away on important documents or gaming, ensuring your keyboard is functioning correctly is vital for an enjoyable computing experience.
If your laptop keyboard is not functioning properly, then you would probably need to update your keyboard drivers on your Windows 10/11 system. If “how to update keyboard driver” is one of the most pertinent questions on your mind, then your search has brought you to the right page.
Usually, users have reported encountering keyboard errors after upgrading their OS to Windows 10. Some users also experienced trouble with their Windows 10 keyboards after installing the infamous KB4074588 patch update. The error could also be triggered by bad keyboards drivers.
So, this article will help you look at the ways to update and reinstall the keyboard drivers. We will also look at some easy ways to fix the problem besides telling you how to perform some preliminary checks to determine the cause of the error.

If you are thinking about how to update keyboard drivers of your Windows 10 system, then read ahead to find out the most effective solutions.
Solution 1: Perform a Few Checks and Try the Below Suggested Hacks
Below mentioned are a few methods of checking the keyboard to detect problems as well as their possible countermeasures before opting to update the keyboard drivers.
1: Check if Your Keyboard is Damaged
At times, if the keyboard is physically damaged, then it might lead to malfunctions and errors such as if some liquid is spilled on the keyboard, then you might need to replace it totally.
2: Check the Keyboard Connections
Before updating the keyboard drivers, check if the keyboard connections are proper. This is because if the keyboard is not connected properly, then the drivers won’t load correctly.
- You can check the keyboard wire connection if you have a desktop.
- You should also verify if the keyboard is connected to the proper USB port. Try changing the USB port to see if that resolves the issue.
- If you have wireless keyboards then consider replacing the batteries.
3: Check the Driver Software
Some keyboards need proprietary drivers based on Windows to access and perform advanced features and functions such as hot keys and media controls functions.
Proprietary software usually can be installed simultaneously with the driver installation. You can find it from the manufacturer’s website.
Solution 2: Run the Hardware and Devices Troubleshooter
Using the Windows in-built troubleshooter, you can try to fix keyboard malfunctions before considering updating the keyboard drivers.
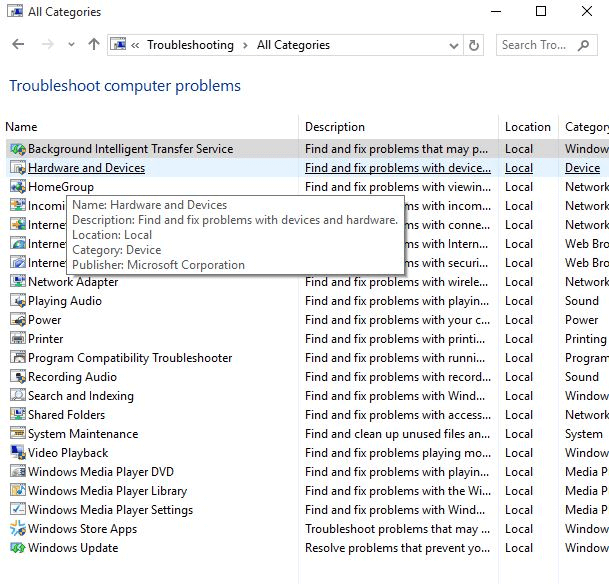
- Launch the Control Panel and then click on Troubleshooting.
- Choose View all from the side panel.
- Then, click on the Hardware and devices troubleshooter.
- After this, follow the on-screen instructions and wait till the troubleshooting completes.
Solution 3: Reinstall the Keyboard Drivers
If the above mentioned preliminary solutions did not seem to resolve the keyboard malfunction issue, then you can consider reinstalling the keyboard drivers to get rid of the keyboard problems.
You can easily reinstall keyboard drivers from the manufacturer’s website or else you can try to do it from the Device Manager alone. Before going for re-installation, you will need to uninstall the existing keyboard drivers. So, we will first see how to uninstall the keyboard drivers and then reinstall them.
- Launch the Device Manager and scroll to find the keyboard section.
- Then, click on the Keyboards section to expand it.
- After this, right-click on the Standard PS/2 Keyboard and choose the Uninstall option from the drop-down menu.
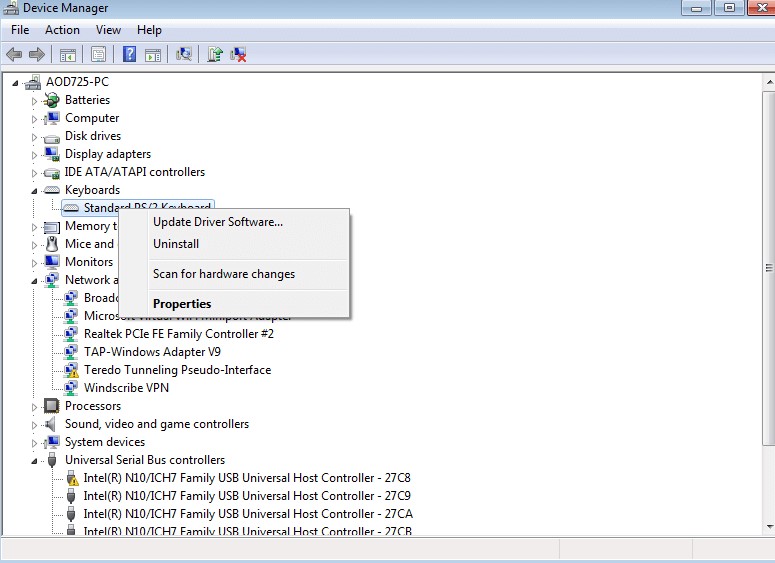
- Further click OK to confirm the action.
- Wait for some time, till the uninstallation completes.
- Then, restart your system.
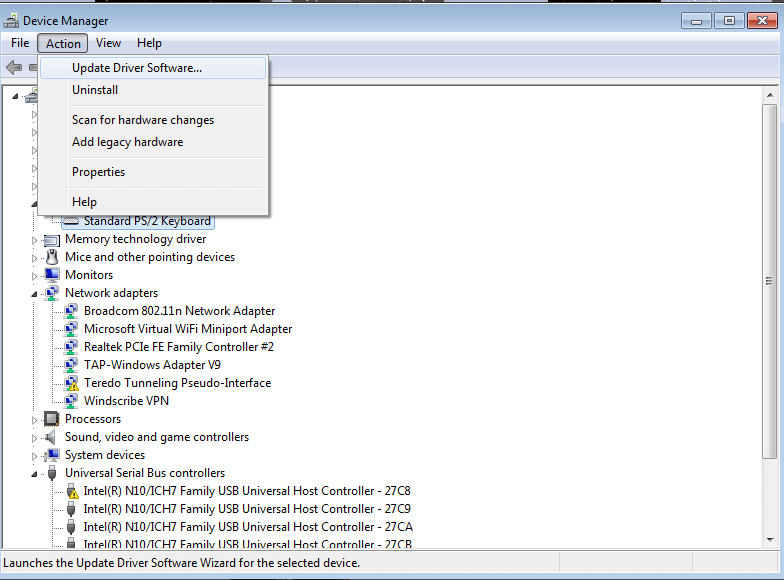
- Further, click on Action and then select the Scan for hardware changes option.
- This will prompt Windows to detect the changes made and then it will search for the keyboard drivers online.
- You can then reinstall the keyboard drivers and restart the system.
Solution 4: Update the Keyboard Drivers
Updating the keyboard drivers can be the last resort to end your troubles with the keyboard devices. If the above methods failed to sort the keyboard-related problems, then you can try updating your keyboard drivers to the latest available manufacturer-recommended versions.
There are basically three ways through which you can find and replace outdated keyboard drivers on a PC.
Way 1: Update Keyboard Drivers Manually
You can try using the Windows Device Manager to download and install the latest driver for your keyboard device. Here’s how to run this tool in Windows to update your out-of-date keyboard driver.
- In the Windows Search box, type device manager and then open the application from the results.
- Once Device Manager appears on your screen, go to the keyboard category and click on it to expand the same.
- Right-click on your keyboard device and click on “Update driver” from the list of options.
- On the subsequent prompt, select the first option, i.e., “Search automatically for updated driver software.”
- Now, just wait patiently until Windows finds and installs the most updated version of the keyboard driver on your computer.
- Lastly, restart your computer.
See, how easy it is to perform Windows 10 keyboard driver download using Device Manager.
Way 2: Update Keyboard Drivers Automatically (Recommended)
Updating drivers manually requires a great deal of time and technical expertise. Hence, if you are not entirely familiar or confident playing around with system drivers, you can do it automatically with the aid of the best free driver updater tool like Bit Driver Updater.
Bit Driver Updater not only installs the latest and rectified version of the keyboard driver automatically with a single mouse click but also helps make your computer run faster and smoother. Below is how to use this exceptional utility to install the latest keyboard driver updates.
Way 4: Run Windows Updates to Install Keyboard Drivers
Last but not least, you can also try Windows Update to find and automatically install the available driver updates. In addition to installing the latest keyboard drivers for Windows 10, and Windows 11, Windows Updates also brings the latest system updates, new features, bugs fixes, and performance improvements. To use this method, follow the steps outlined below:
- On your keyboard, altogether press the Win logo and I keys. This will take you to the Windows Settings.
- Choose Update & Security.
- In the next prompt, be sure Windows Update is selected from the left menu pane.
- After that, click on Check For Updates.
Now, sit back and wait until Windows finds and installs the latest version of keyboard drivers on your device. Once everything is done, reboot your computer to save the recently made changes.
Keyboard Drivers: Frequently Asked Questions (FAQs)
Q1. What are keyboard drivers?
Keyboard driver is a group of files that provides an interface between your computer’s operating system and the keyboard device you’re using. Without a proper keyboard driver, the computer would not be able to process the input data sent by the attached keyboard device.
Q2. How to download keyboard driver for Windows 10?
The quickest and safest way to download keyboard drivers on Windows 10 is by using a renowned automatic driver update utility. However, if you wish to do it manually, then you can either go to the official manufacturer’s website or you can use Windows built-in tool called Device Manager. Keep in mind that the manual process is time-consuming and requires a certain level of computer skills.
Q3. What will happen if I uninstall keyboard driver?
Uninstalling the keyboard driver from your PC may render your keyboard device inoperable. In order to make it work again, you can reboot your computer, and then Windows will automatically install the missing keyboard driver.
Q4. How do I fix my keyboard driver Windows 10?
In order to fix keyboard driver issues on Windows 10, you can try updating or reinstalling the keyboard driver using the methods shared in the article above.
Q5. Is there any Driver for the Keyboard?
Some keyboards need proprietary Windows-based drivers in order to access advanced and full features of the keyboard like hotkeys and media controls. These drivers are available on the CD that accompanied your keyboard. Although, you can also get them from the official support page of the manufacturer.
Q6. How Do I Fix Keyboard Driver Problems?
The simplest and most workable way to resolve all the keyboard driver problems is to update the driver software for your keyboard. Hit Windows and X keyboard keys together and click Device Manager. Expand the Keyboards category by double clicking on it. Click right on your keyboard driver and choose Update Driver Software.
Lastly, click Search Automatically for your Driver. Wait for Windows to find and install keyboard driver Windows 10, once it’s done, reboot your system to implement the new changes.
Q7. How Do I Reinstall Keyboard Drivers in Windows 11?
To reinstalling the keyboard drivers in Windows 11, you will first need to uninstall the currently installed keyboard drivers on your computer. Once existing keyboard drivers are uninstalled, then you can reinstall the corresponding drivers either from the official website of the manufacturer or using Windows default tool Device Manager.
Concluding Words: Reinstall & Update Keyboard Drivers in Windows 10
So, this is how you can update and reinstall your keyboard drivers on your PC. We have given some hacks to try before considering updating and reinstalling the keyboard drivers.
If those preliminary fixes don’t seem to fix the keyboard problems, then you can go for reinstalling the keyboard drivers from the Device Manager or else update the keyboard drivers with the help of an effective driver updater tool.
Does your Keyboard not working perfectly? Then, it is happening so due to the outdated Keyboard driver. So, try out the below-mentioned methods to update Keyboard driver.
Undoubtedly, Keyboard is the utmost crucial part of our system. But, do you ever wonder what if, when it lags in doing the work that it is supposed to do. Of course, you’ll be depressed to no end. Isn’t so? And, even it is an irony too that you can’t use your system without the Mouse and Keyboard. So, now think about how you can keep your Keyboard always on board. Well, if you are new to this, then we explain to you how you can do so. Drivers are the heart of the device that establishes an effective connection between the device and the operating system of your Windows.
Hence, by updating the Keyboard drivers you can keep your Keyboard stable for long ages. But, many individuals have reported that after updating the drivers still the issue isn’t fixed. If you are one of them, then we advise you to first uninstall the drivers and then reinstall it again.
To do so within the least time and effort, you can use a powerful updater tool, such as Win Riser by the maker of Bit Driver Updater. This program performs automatic driver updates in a single mouse click, thereby eliminating the need to manually search for the correct drivers yourself. Win Riser includes many more features to keep your PC performance smooth.
Our aim behind this write-up is to explain to you how to update keyboard driver on Windows 10. But, before reinstalling the Keyboard drivers try simple hacks in order to fix the issue. Below, we’ve shared them. Without more baffling, let’s jump to the next section!
Simple Tips To Fix the Issues Before Reinstalling the Keyboard Driver
Sometimes, simple solutions can also fix the biggest issues. So, here are a few easy tips that you can use before reinstalling the keyboard driver, in order to fix the keyboard issues.
Tip 1: Inspect the Keyboard for Damages
Currently, we are working from home, right so we have gone into our comfort zone. Isn’t it the same as you do? And, many users have the habit of taking coffee or some snacks while working. But, what if, when unknowingly it spills on your Keyboard. Obviously, your Keyboard gets damaged and stops working. That is what we want to explain to you that ensures your Keyboard may not be damaged. If it is then repair the damages as soon as possible. If, after repairing it still doesn’t work as it used to, then replace it with another or new one.
Tip 2: Make Sure Keyboard is Connected Correctly
The next tip is that you must have to pay proper attention and which is to make sure that Keyboard may be adequately connected to your system. If it is not connected accurately, then it lags to load the drivers. Plus, check the USB ports too, if there is any fault in them, and change it instantly. Those who are using the wireless keyboards, change the batteries frequently to ensure the accurate working of the Keyboard.
Tip 3: Run Windows Troubleshooter
Windows comes up with the in-built apparatus i.e., Windows Troubleshooter that detects the issues and fixed them too. Moreover, it boosts the performance level of your system too by resolving the issues that hamper the effectiveness. In order to fix the issues, you can run the Windows Troubleshooter. We’ve listed down the steps below for the very same!
Step 1:- Type Troubleshooting in the search bar of your Windows.
Step 2:- Then, click on the best match from search results.
Step 3:- After this, from the left-pane side click on the View All option.
Step 4:- Now, a list will show up on the screen then, locate Hardware and Devices from the list and click on it.
Next, to finish the troubleshooting process follow the on-screen results.
Read More: Fix Laptop Keyboard Not Working on Windows 10
Tip 4: Look to Driver Software
Want to use the advanced Keyboard features? Then, you need to have the proprietary Keyboard driver introduced to your system. If they are not present then you can download and install it from the official website of the Keyboard manufacturer.
So, these all are the simple tricks by which you can easily fix the Keyboard issues. If after trying above all the tricks, still the issue is not solved. Then, you need to update Keyboard drivers. Below is everything that you should know about the same.
How to Download & Install Keyboard Driver on Windows 10
This section of our write-up explains to you how you can download Keyboard driver, when it is not present on your PC. From the official website of the manufacturer, you can do so. Steps to download & install the Keyboard driver via the official website of the manufacturer.
Step 1:- Visit the official support page of the Keyboard manufacturer.
Step 2:- Then, switch to the Support & Download tab.
Step 3:- Next, search for the compatible driver according to your Keyboard model.
Step 4:- After this, download the driver file and unzip it.
Step 5:- Now to move forward, follow the on-screen steps.
That’s it! you need to do to download & install Keyboard drivers from the official website of the manufacturer.
Read More: Fix Mouse Double Clicks Issues On Windows 10
How to Uninstall & Reinstall Keyboard Driver on Windows 10
Maybe, after updating the Keyboard driver still, you have to face the Keyboard related issues. Well, it might be possible because of the wrong installation Keyboard driver. In this situation, you need to reinstall the keyboard drivers. Don’t know how to do it, no worries, we’ve shared the steps to reinstall Keyboard drivers on windows 10.
Step 1:- Press the Win and R key at a time from your Keyboard.
Step 2:- This will open up the Run Dialog box, then type devmgmt.msc and hit the enter key.

Step 3:- Now, you will land at your destination i.e., Device Manager. Locate Keyboards and expand the category.
Step 4:- Thereafter, click right on the Standard PS/2 Keyboard and choose Uninstall from the drop-down menu list.

Step 5:- Then, a confirmation box asks you to make your final choice hence, click on Ok.

And, here you go, you’ve uninstalled the Keyboard driver successfully. After this, to reinstall Keyboard driver on Windows 10 do not forget to restart the PC. After doing so, still, your issues haven’t solved then you have to update your Keyboard drivers.
Read More: Update Network Adapter Driver on Windows 10, 8, 7
How to Update Keyboard Driver on Windows 10
You may have two ways to update Keyboard drivers on Windows 10 either it is through the Windows Update or via the driver updater tool. We understand that updating drivers is nothing but a daunting task, especially for newbies. Isn’t it? But, here we are going to explain to you how you can do so quite easily. Below, we’ve shared the steps to both of the ways. Let’s read them!
Way 1: Check for Windows Update
Windows operating system provides you the facility to update drivers by running Windows Updates. So, below are the steps that you are required to follow!
Step 1:- Go to the Start icon and click on it.
Step 2:- Now, select Settings from the available options and click on it.
Step 3:- This will trigger the Windows Settings. Now, locate Windows Update & Security and click on it.
Step 4:- Thereafter, select Windows Update from the left side and then click on Check for Updates option.
If there are new updates available then Windows will download it automatically. However, sometimes Windows Update lags in updating the drivers. That is the only reason, we advise you to use the driver updater tool which we’ve referenced below. Scroll down, and read!
Way 2: Use Bit Driver Updater to Update Keyboard Drivers
Bit Driver Updater is an ideal driver updater tool that automatically updates the new drivers. Plus, it enhances the overall performance of the system. And, surprisingly, it allows you to update all the drivers in one click. Sounds quite-cool! String with the below steps to know how it works!
Step 1:- Launch Bit Driver Updater on your system.
Step 2:- Now, automatic scanning will start on its own. If it doesn’t start then you need to click on the Scan option on the left side.
Step 3:- After this, review the list of drivers wisely.
Step 4:- Lastly, hit the Update Now option and if you want to update all the drivers at once then click on the Update All option.

That’s all what you need to do to update Keyboard drivers via Bit Driver Updater. It is the most facile method to update drivers. So, download Bit Driver Updater from the given download tab below!
Bonus Tip: Roll Back Driver to its Previous Version
If updating or reinstalling driver software didn’t solve your keyboard problems, you can try restoring the previous driver version by using the rollback option that’s available within the Device Manager tool in Microsoft Windows. Here’re the detailed instructions on how to roll back the keyboard driver to its previous version in Windows 10:
- Right-click on the Start button and click on Device Manager to launch the tool.
- Expand the Keyboards category in Device Manager.
- Right-click on the keyboard driver and select the ‘Properties’ option from the pop-up menu.
- Go to the ‘Driver’ tab and click on the ‘Roll Back Driver’ button.
- Click the OK/Yes button on the confirmation window.
Frequently Asked Questions: Keyboard Drivers on Windows
For all your queries related to the keyboard driver, we have brought together the most frequently asked questions below and answered them for your reference.
Q.1 What is a keyboard driver?
Just like the name suggests, a keyboard driver is a set of files or data that allows the keyboard to run on your system with ease. The driver defines how a device, in this case, the keyboard, will respond to your commands as a user.
Q.2 If I uninstall the keyboard driver, what will happen?
If you uninstall the keyboard driver, you may not be able to use the keyboard anymore. When you try to use the keyboard after uninstalling the driver, the system may also fail or crash.
Q.3 What is the method to fix the Windows 10 keyboard driver?
The best method to fix the keyboard driver on Windows 10/11 is to take the help of Bit Driver Updater. This is a free tool that allows you to download and install any driver, including the keyboard one, even if the driver is corrupted, faulty, damaged, outdated, or missing.
Q.4 Is a keyboard driver available?
Yes, for every keyboard, there is a specific keyboard driver available to help you. This driver will allow you to run the specific keyboard with ease.
Q.5 How can I download the keyboard driver on Windows 10 PC?
There are multiple methods to download the keyboard driver including the official manufacturer’s website, the Device Manager as well as the Bit Driver Updater. You can take the help of any of these methods to download the driver. Refer to the descriptions of the tools provided above for a detailed explanation.
Update and Reinstall Keyboard Drivers on Windows 10 [Done]
That’s all for now, expecting that now you could be able to bring back the effective performance of your Keyboard. As of now, you are familiar with the tips and hacks that you needed to know for the very same.
If you are satisfied with our post then do subscribe to our Newsletter for more such latest tech updates. And, do share your views on this through the comment box below. We will be so happy to hear you out. We know it’s hard to say bye-bye, but don’t worry we’ll back shortly with yet another engaging but helpful article. Till then, stay tuned with us. And, Type Wisely!
Все способы:
- Вариант 1: Программные неполадки
- Способ 1: Обновление/переустановка драйвера
- Способ 2: Удаление драйвера
- Способ 3: Установка драйвера чипсета
- Способ 4: Встроенное средство устранения неполадок
- Способ 5: «Планировщик заданий»
- Способ 6: Запуск CTF-загрузчика
- Способ 7: Деактивация «Быстрого запуска»
- Способ 8: Корректное подключение беспроводной клавиатуры
- Вариант 2: Аппаратные неисправности
- Способ 1: Решение проблем с контактами шлейфа клавиатуры (для ноутбуков)
- Способ 2: Повреждение/загрязнение портов подключения
- Способ 3: Поломка внешней клавиатуры
- Вопросы и ответы: 2
Для реализации некоторых способов из нашей статьи может потребоваться ввод текста, поэтому вам на время понадобится включить экранную клавиатуру.
Подробнее: Вызов экранной клавиатуры в Windows 10
Вариант 1: Программные неполадки
Чаще всего причиной, почему клавиатура не определяется в Windows 10, являются программные неисправности, включая проблемы с драйверами, вмешательство стороннего софта или средств самой системы, различные ошибки. Разберем наиболее распространенные неполадки.
Способ 1: Обновление/переустановка драйвера
Внешняя периферия, как правило, работает сразу же после подключения к компьютеру, не требуя самостоятельной установки драйвера — за это отвечает универсальная его версия. На ноутбуках программное обеспечение для клавиатуры установлено автоматически, и максимум, что может сделать пользователь в обоих случаях, – это обновить или переустановить программное обеспечение.
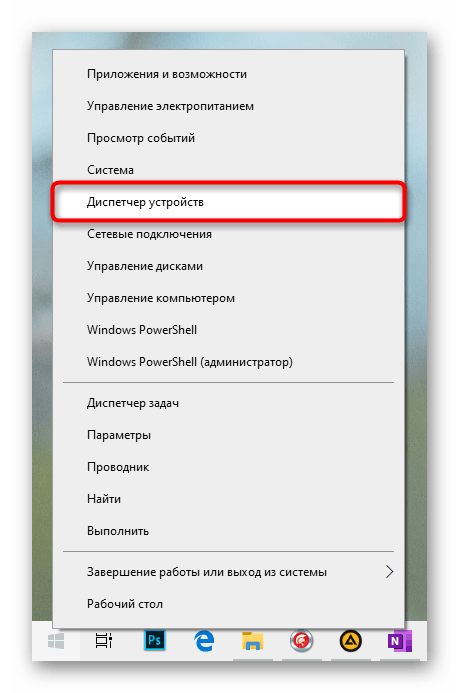
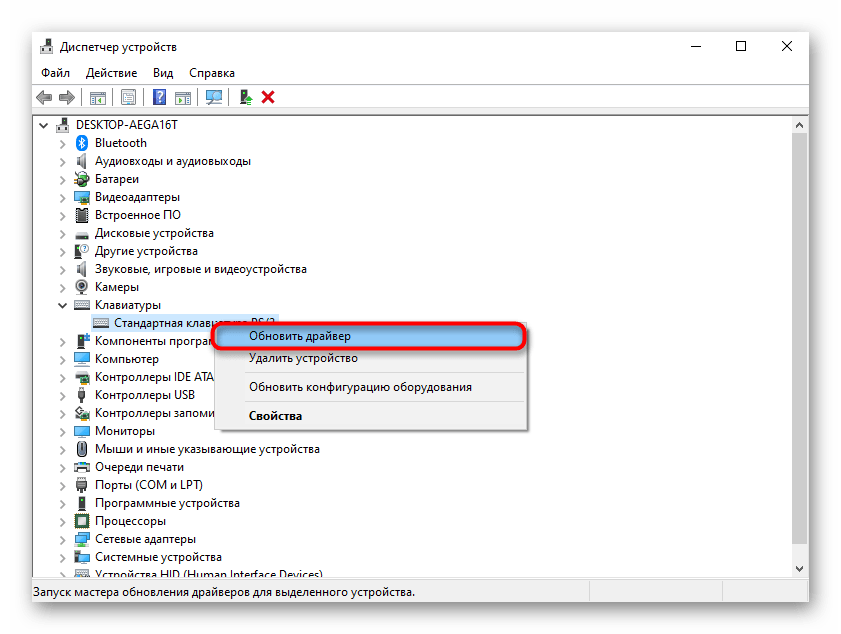
- Сделать это можно через встроенный «Диспетчер устройств»: запустите его, кликнув ПКМ по кнопке «Пуск» и выбрав соответствующий вариант.
- Разверните категорию «Клавиатуры», просмотрите список, и если увидите около одного из пунктов значок с предупреждением (желтый или красный), значит, компьютер клавиатуру все же видит, но по каким-то причинам она не работает. При отсутствии проблемных устройств выбирайте вариант «Стандартная клавиатура PS/2».
- Первым делом попробуйте просто «Обновить драйвер», вызвав для этого контекстное меню выделенной строчки.
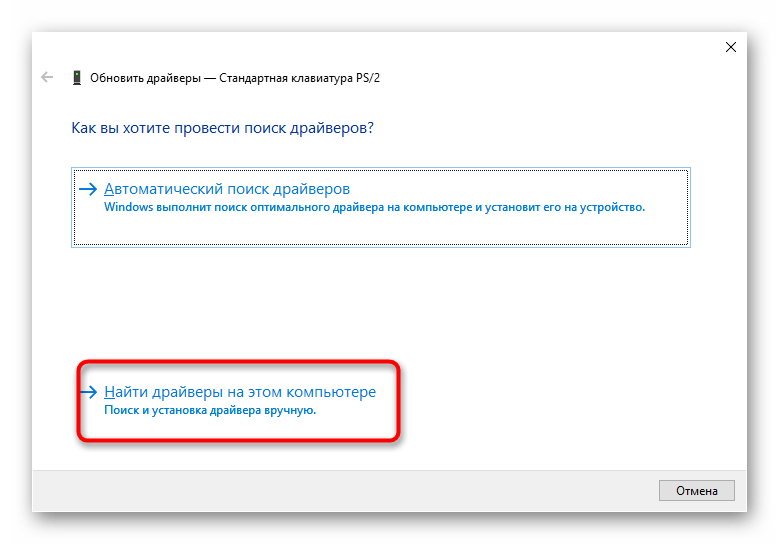
- В новом окне укажите «Автоматический поиск обновленных драйверов» и дождитесь окончания процедуры.
- В результате драйвер может установиться, и тогда достаточно будет перезагрузить ПК и проверить, заработала ли она. В противном случае переустановите драйвер (как уже было сказано выше, сейчас речь идет об универсальном драйвере от Microsoft). Для этого снова вызовите окно «Обновить драйвер», но на этот раз воспользуйтесь вариантом «Найти драйверы на этом компьютере».
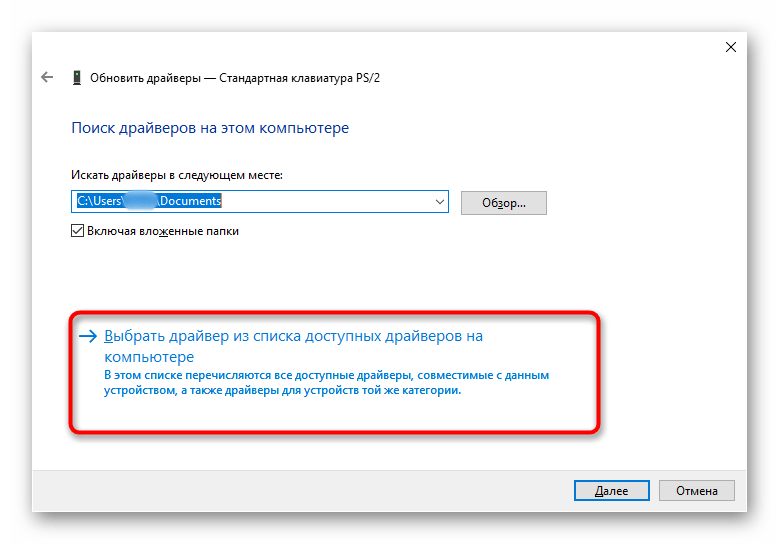
- Теперь, не меняя путь поиска, сразу же нажмите по «Выбрать драйвер из списка доступных драйверов на компьютере».
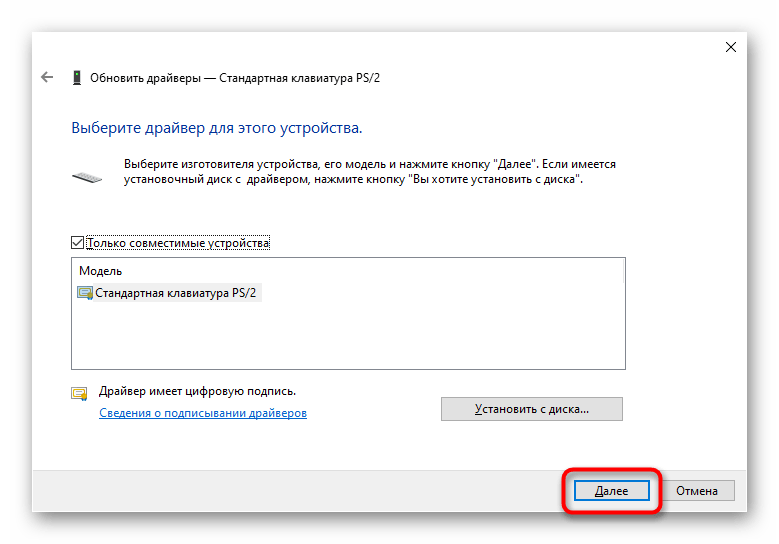
- Тут вам нужно выбрать вариант «Стандартная клавиатура PS/2», выделить его мышкой и перейти «Далее».
- Установка займет несколько секунд, и по ее окончании вы получите уведомление о завершении и необходимости перезагрузить ПК, что и сделайте.


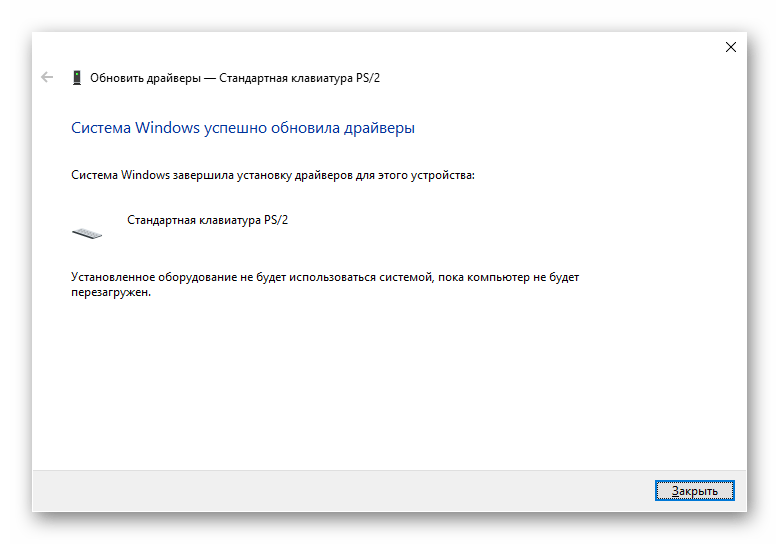
Драйвер клавиатуры так же может установиться/обновиться вместе с обновлением самой Windows 10.
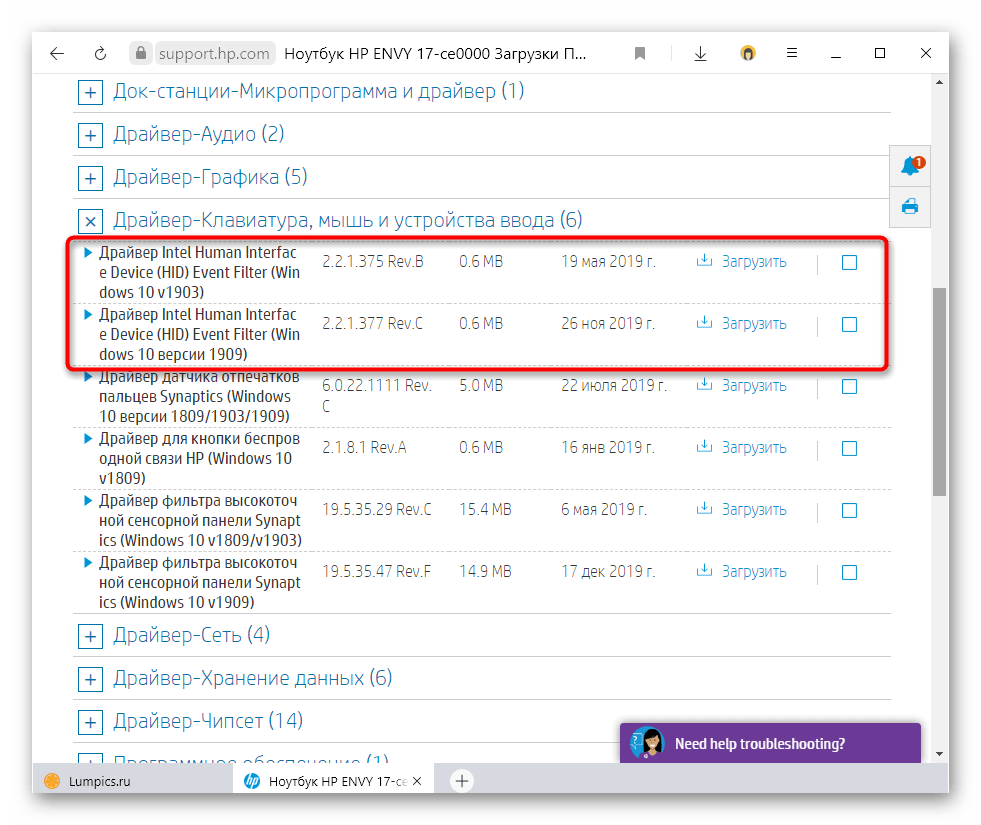
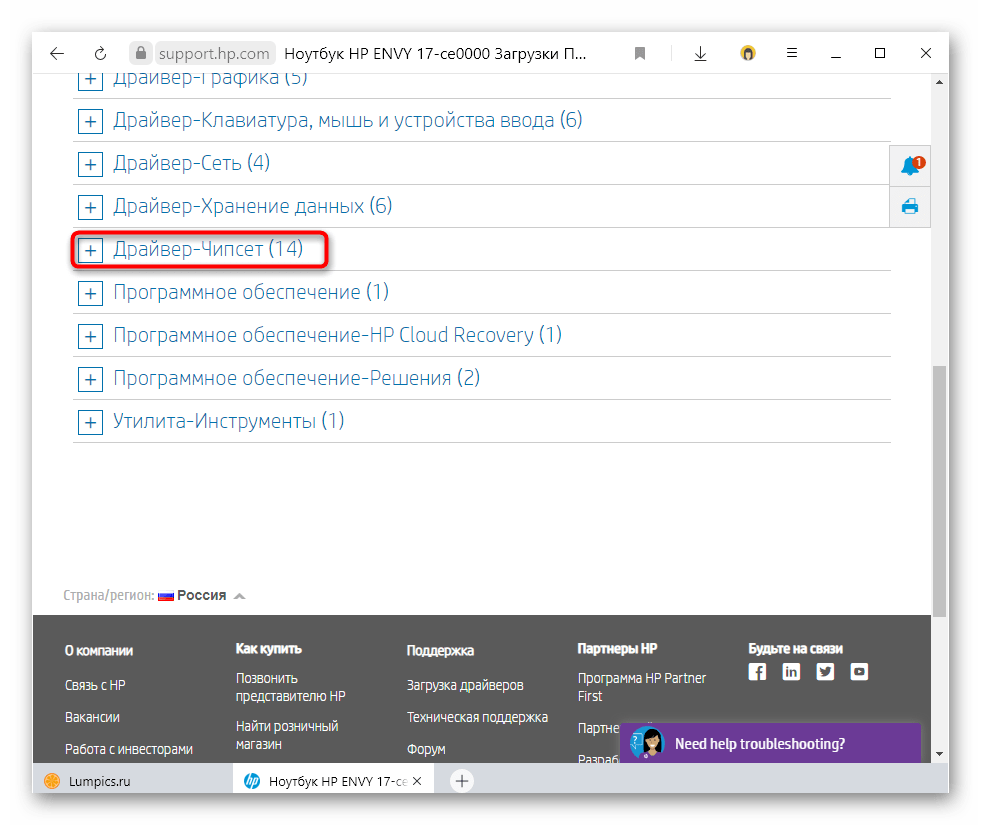
Обладатели некоторых ноутбуков также могут скачать драйвер с официального сайта производителя. Откройте его, перейдите в раздел скачивания драйверов (он называется «Загрузки», «Поддержка», «Downloads», «Support», «Драйверы» и т. п.) и поищите нужную категорию. К примеру, для многих HP есть раздел «Драйвер-Клавиатура, мышь и устройство ввода», где предлагается скачать HID-драйверы, нужные как раз для клавиатуры. При отсутствии такого поищите раздел «Другое» или «Other».
Способ 2: Удаление драйвера
Когда обновление или переустановка не помогают, попробуйте удалить драйвер, и тогда Виндовс при следующем включении системы автоматически установит недостающий компонент.
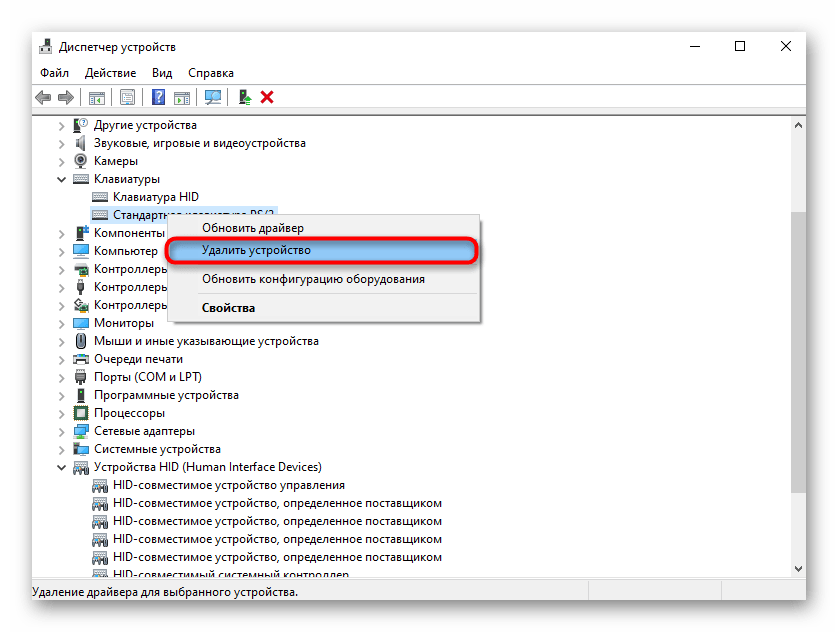
- Операция, как и предыдущие, выполняется через «Диспетчер устройств» (см. шаги 1-2 выше), но из контекстного меню выбирайте «Удалить устройство».
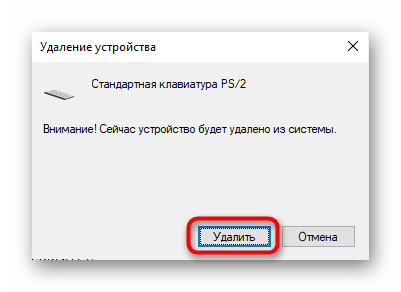
- В окне с предупреждением поставьте галочку, если таковая будет, и нажмите «Удалить».
- Перезагрузите ПК и подождите пару минут.
Способ 3: Установка драйвера чипсета
Старая или неудачно обновленная (обычно через программы для обновления драйверов) версия чипсета может повлечь за собой появление разных неполадок, в том числе связанных с работой клавиатуры. Попробуйте установить его вручную, скачав с сайта производителя ноутбука или материнской платы. Для этого на сайтах, в разделе загрузки драйверов, часто есть отдельный раздел с названием «Чипсет» либо «Chipset».
Способ 4: Встроенное средство устранения неполадок
В «десятку» встроены специальные средства, которые позволяют в автоматическом режиме найти и устранить неисправности, связанные с различными программными компонентами. Можно воспользоваться этим инструментом и в случае неопределяемой Windows 10 клавиатурой:
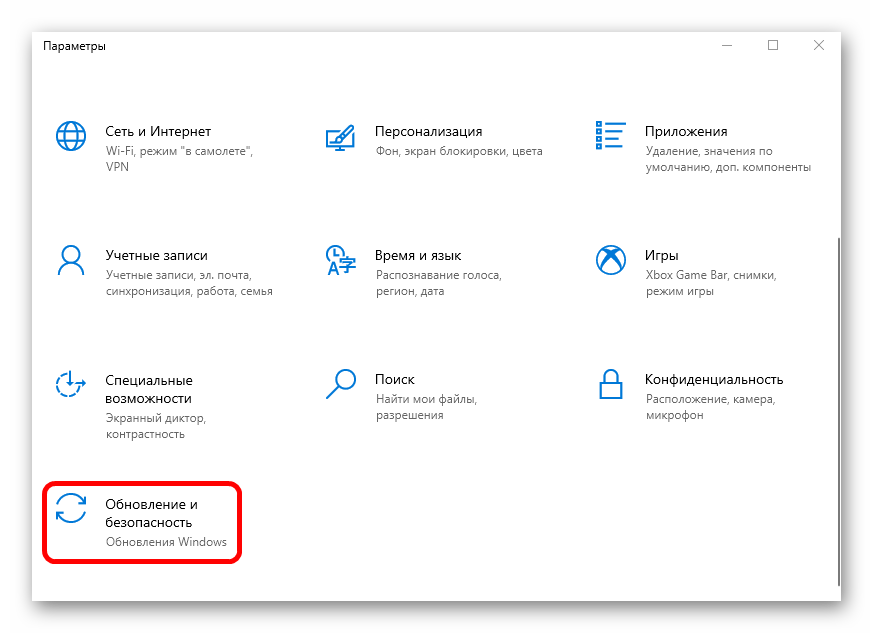
- Кликните по кнопке «Пуск» и перейдите в «Параметры».
- Нажмите на раздел «Обновление и безопасность».
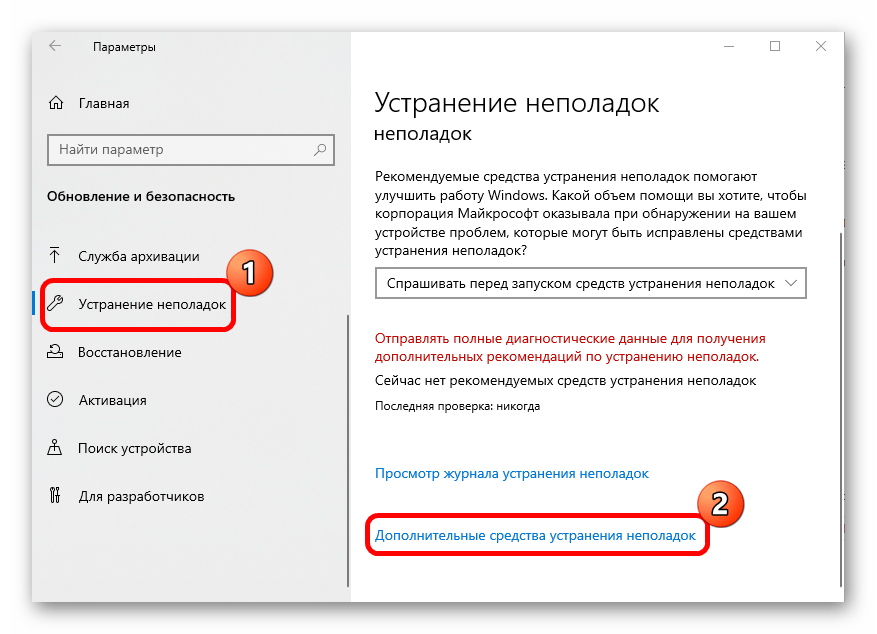
- Кликните по вкладке «Устранение неполадок» слева, затем в центральной частик окна выберите переход к дополнительным средствам.
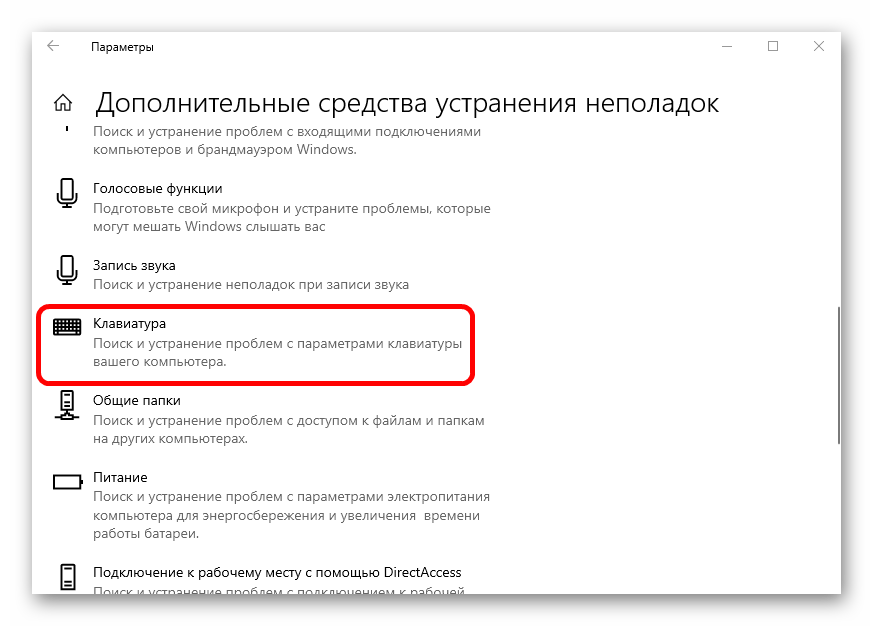
- В перечне нажмите на «Клавиатура».
- Появится дополнительная кнопка, запускающая средство устранения неполадок. Чтобы проверить клавиатуру, нажмите на нее.
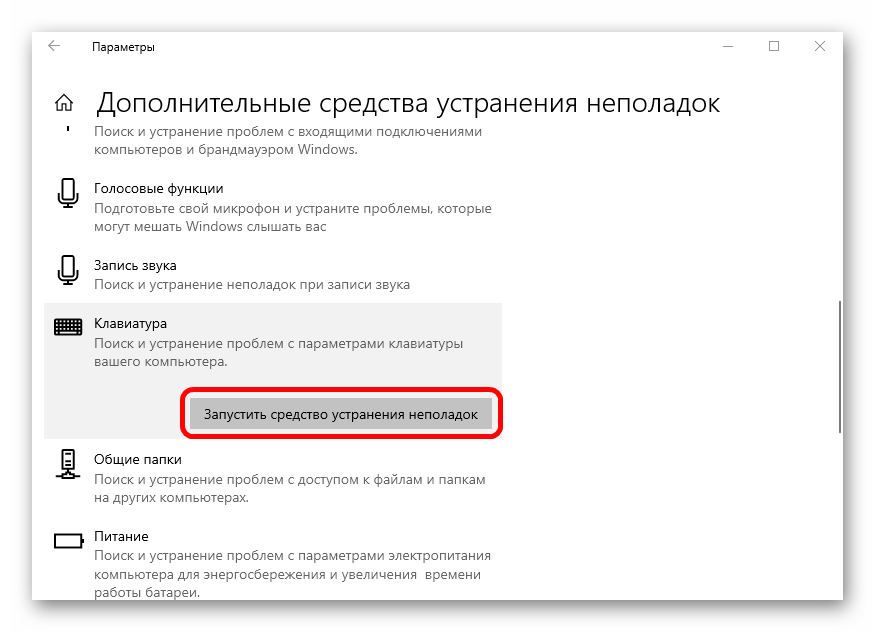
Отобразится окно с процессом проверки. Если неисправности будут выявлены, средство сообщит об этом и предложит инструкции по исправлению.
Способ 5: «Планировщик заданий»
Как ни странно, но рассматриваемая проблема может появляться тогда, когда вследствие различных причин задача, отвечающая за работу клавиатуры, отключена. В этом случае потребуется ее самостоятельно активировать:
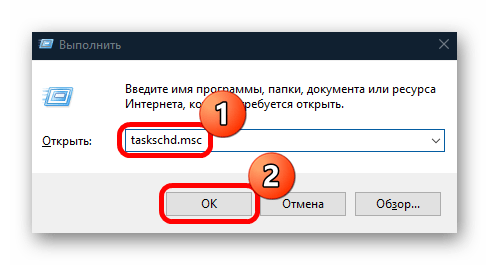
- Запустите «Планировщик заданий». Для этого нажмите на клавиши «Win + R», чтобы вызвать оснастку «Выполнить», затем в поле вставьте
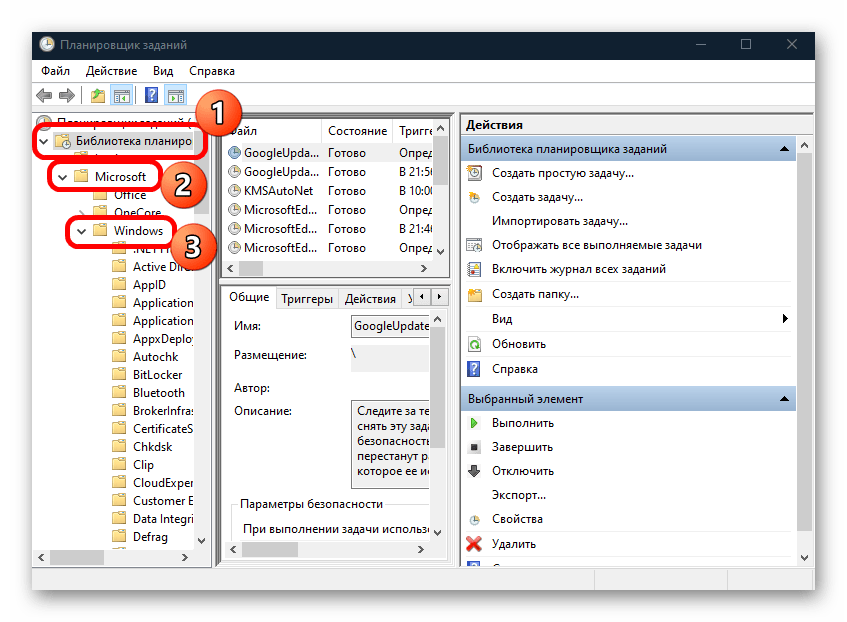
taskschd.mscи нажмите на кнопку «ОК». - На панели слева разверните список «Библиотека планировщика заданий», затем «Microsoft» и «Windows».
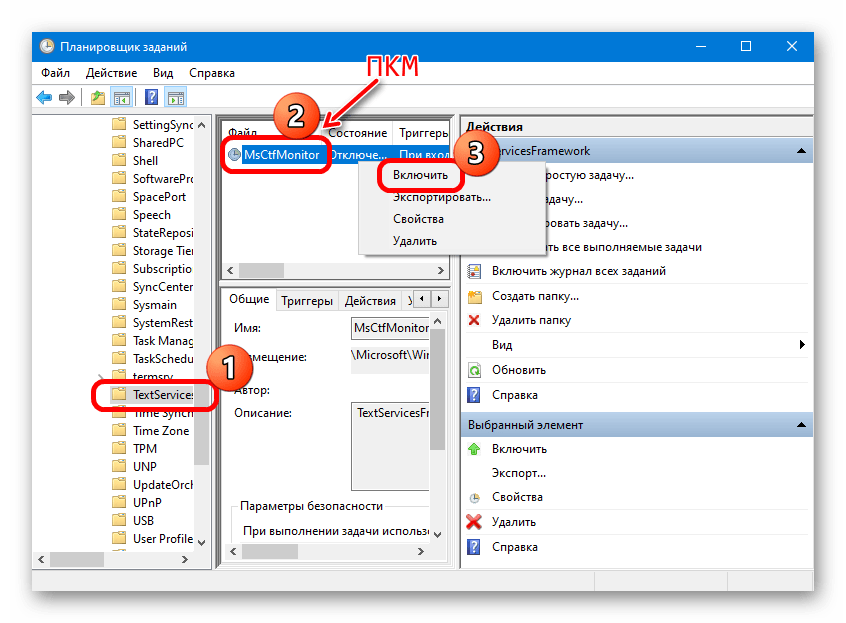
- В подразделе «Windows» нужно отыскать «TextServicesFramework». Нажмите на него, тогда в центральной части окна отобразится запланированная задача. В столбце «Состояние» можно посмотреть, активна ли она. Если нет, щелкните по названию правой кнопкой мыши и из контекстного меню выберите опцию запуска.
Способ 6: Запуск CTF-загрузчика
В операционке есть специальный процесс, который отвечает за работу устройства, – «ctfmon.exe». Он должен запускаться самостоятельно, но иногда этого не происходит. Если причина в нем, то его нужно не только активировать, но и сделать так, чтобы в будущем он включался автоматически. Для начала проверьте, работает ли приложение. Это сделать несложно:
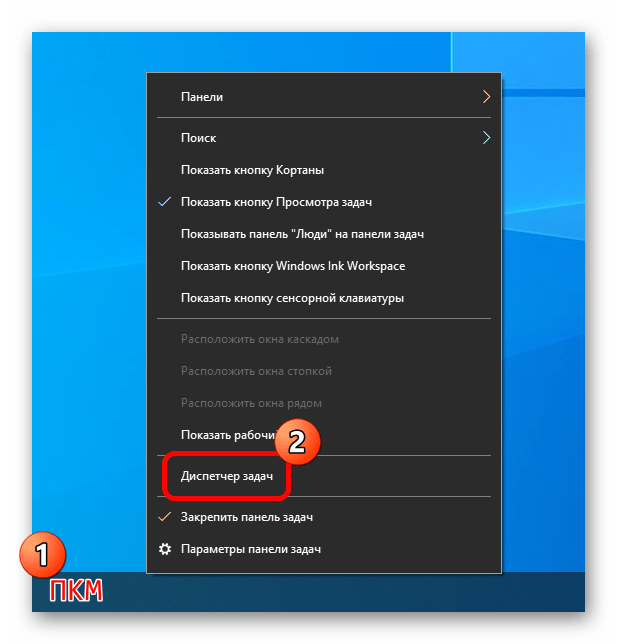
- Кликните правой кнопкой мыши по нижней рабочей панели и выберите запуск «Диспетчера задач».
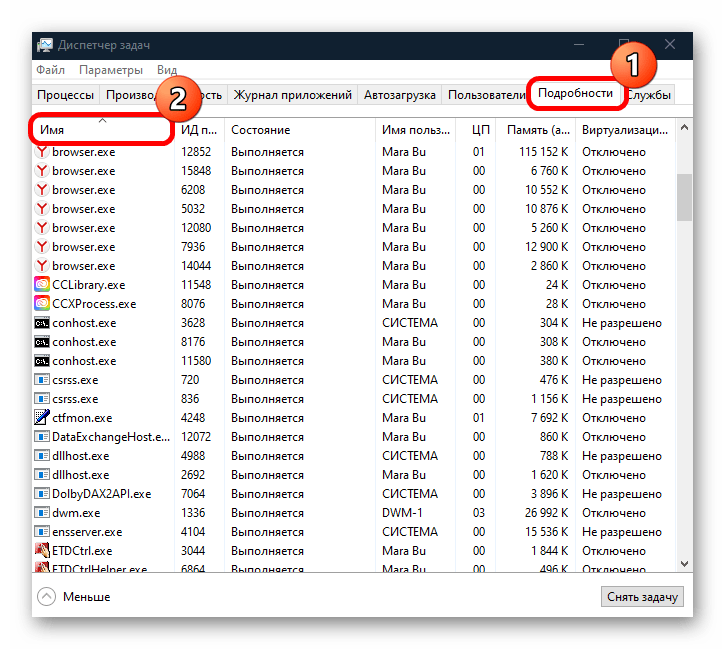
- Перейдите на вкладку «Подробности». В списке процессов останется отыскать «ctfmon.exe». Для удобства можно отсортировать их по алфавиту, нажав на название столбца «Имя».
Если процесс работает, то переходите к другим способам в нашей статье. А если же вы не нашли его, придется активировать и настроить его вручную. В этом случае надо будет редактировать реестр, чтобы добавить процесс в автозагрузку, заставив его тем самым запускаться вместе с операционной системой.
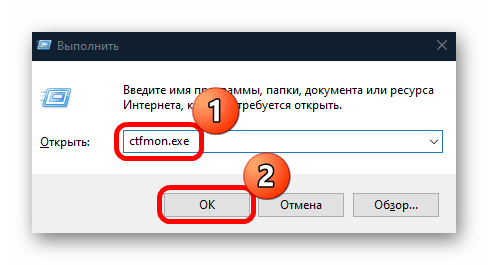
- Самый простой способ запустить процесс – это использование оснастки «Выполнить». Нажмите по «Пуску» правой кнопкой мыши, выберите соответствующий пункт, в открывшееся окно вставьте команду
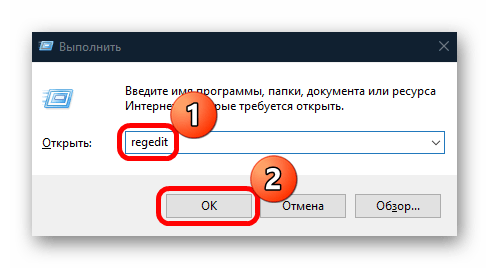
ctfmon.exeи нажмите на кнопку «ОК». - Далее останется добавить его в автозагрузку, чтобы не запускать каждый раз вручную. Через ту же оснастку запустите «Редактор реестра», выполнив команду
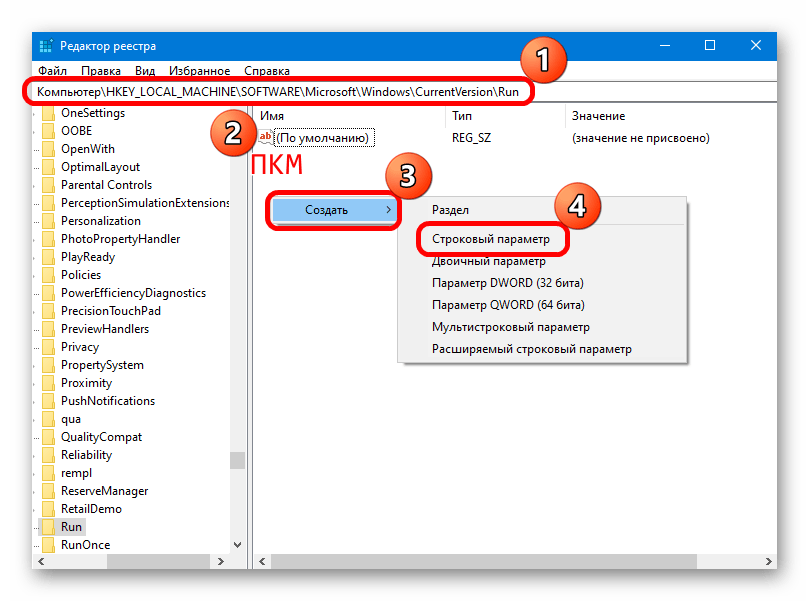
regedit. - Перейдите по пути
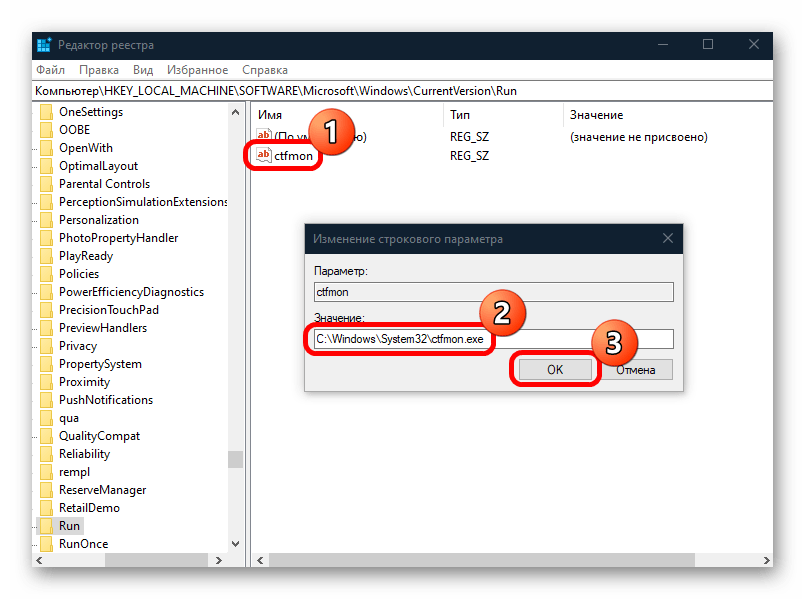
HKEY_LOCAL_MACHINE\SOFTWARE\Microsoft\Windows\CurrentVersion\Run. В центральной части окна кликните правой кнопкой мыши по свободной области и в контекстном меню наведите курсор на пункт «Создать», затем выберите «Строковый параметр». - Задайте имя созданному ключу «ctfmon», дважды кликните по нему и в новом окне в поле «Значение» укажите путь к исполняемому файлу —
C:\Windows\System32\ctfmon.exe. Нажмите на кнопку «ОК», чтобы сохранить настройки.
Чтобы новые параметры реестра были зафиксированы системой, перезагрузите компьютер.
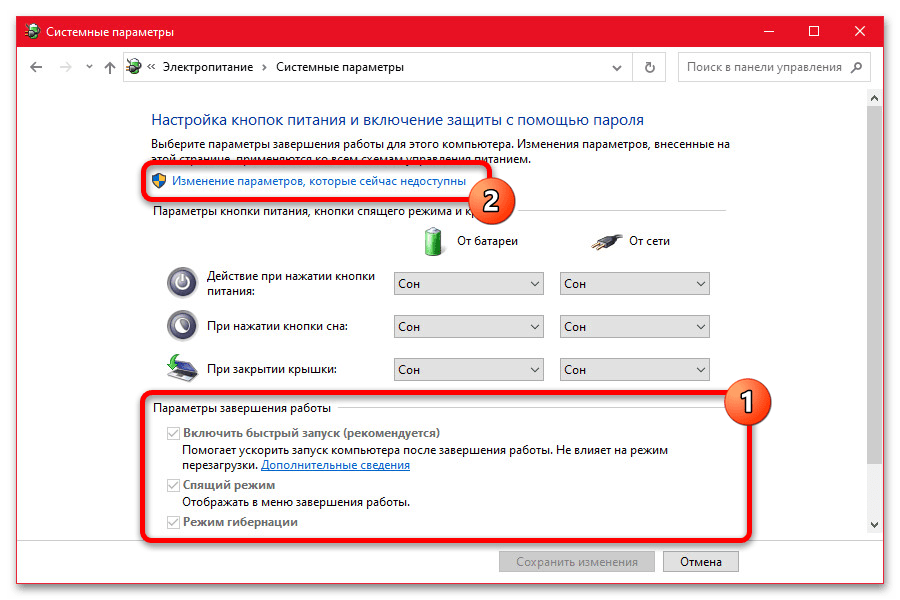
Способ 7: Деактивация «Быстрого запуска»
Несмотря на то, что «Быстрый запуск» полезная функция, которая позволяет системе загружаться более оперативно, часто многие ошибки в Windows 10 связаны именно с ней, например определение такой периферии, как клавиатура. Попробуйте отключить данную функцию, чтобы исправить неполадку. Есть несколько способов сделать это, о чем мы ранее писали более детально.
Подробнее: Отключение быстрого запуска в Windows 10
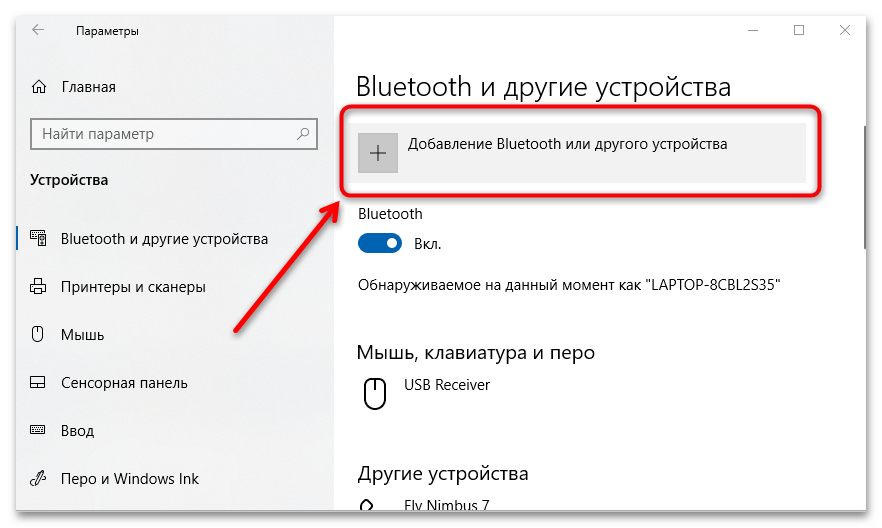
Способ 8: Корректное подключение беспроводной клавиатуры
Если вы используете беспроводную клавиатуру, то проверьте правильность подключения устройства. Скорее всего, в случае с таким девайсом Windows 10 не может определить его потому, что не была соблюдена инструкция по подсоединению. Обратите внимание на то, что на компьютере или ноутбуке должен быть активирован модуль Bluetooth. Если необходимо, воспользуйтесь нашими отдельными руководствами на эту тему:
Подробнее: Подключаем беспроводную клавиатуру к ноутбуку / к компьютеру
Вариант 2: Аппаратные неисправности
Если предыдущие способы не помогли исправить неполадку, есть вероятность, что дело в аппаратных поломках.
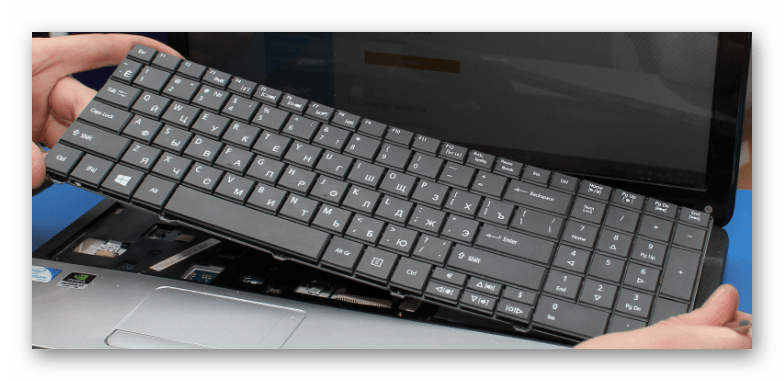
Способ 1: Решение проблем с контактами шлейфа клавиатуры (для ноутбуков)
Контакты шлейфов со временем могут окисляться или отходить, что, соответственно, может привести либо просто к неработоспособности клавиатуры, либо к тому, что она вообще не будет видна как устройство. Особенно часто с таким сталкиваются те, кто ранее проливал на ноутбук жидкость, разбирал и собирал его самостоятельно или если он просто уже давно эксплуатируется. Провести диагностику можно, разобрав ноут и проверив подключение клавиатуры к материнской плате. Лучше всего обратиться в сервисный центр, где специалист не только сможет грамотно разобрать лэптоп, но и попробовать подключить другую клавиатуру для проверки. При наличии знаний и возможности самостоятельной замены вы можете выполнить эту процедуру и самостоятельно.
Читайте также: Как починить клавиатуру на ноутбуке
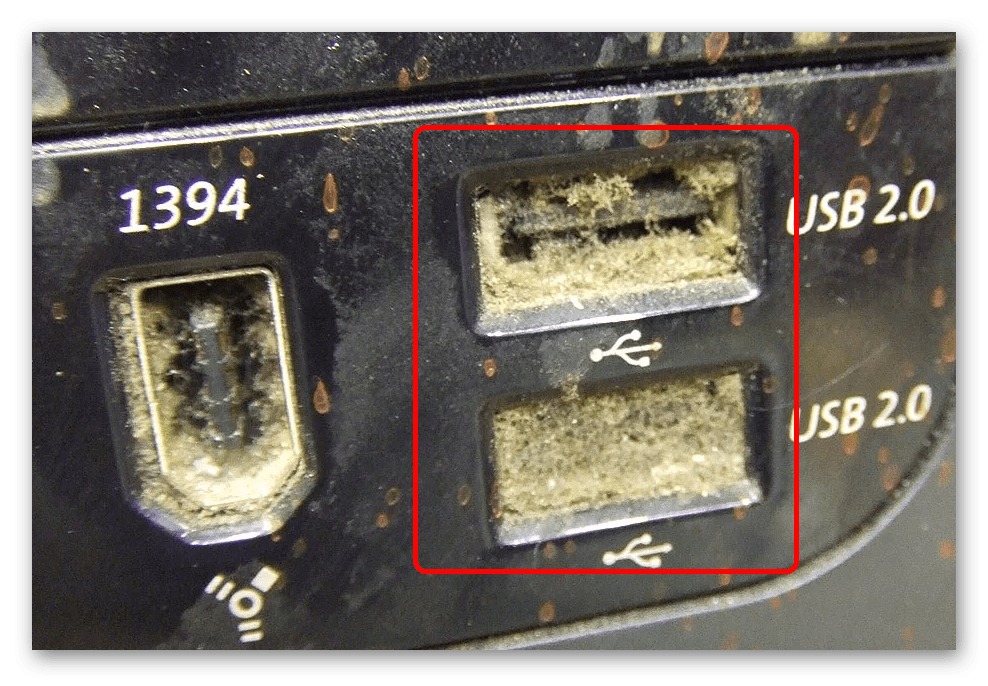
Способ 2: Повреждение/загрязнение портов подключения
Если вы подключаете клавиатуру через USB или PS/2 (в случае со старыми системниками), то проверьте порты. Вероятно, полного контакта со штекером устройства не происходит из-за загрязненного пылью или грязью разъема. Попробуйте аккуратно продуть порты или очистить их с помощью длинного предмета, но действовать необходимо аккуратно, чтобы не повредить контакты.
Нередки и механические поломки USB-портов. Проверить это легко: подсоедините клавиатуру к аналогичному разъему или другому устройству. Если она определяется, то, скорее всего, у вас нерабочий USB. Тогда он «не увидит» и любое другое подключенное оборудование.
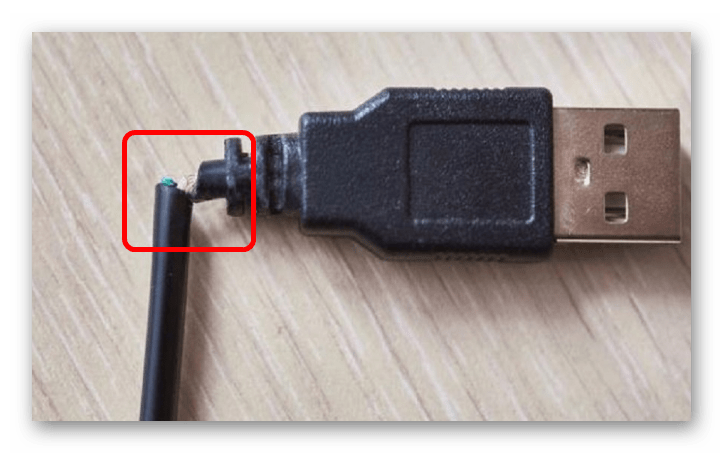
Способ 3: Поломка внешней клавиатуры
Если используется внешняя периферия, то есть вероятность, что проблема заключается именно в ней. Проверьте работоспособность, подключив ее к другому устройству. Также внимательно осмотрите провод и штекер на наличие повреждений. Даже небольшие заломы на шнуре могут стать причиной рассматриваемой неполадки. Сломанную клавиатуру придется заменить.
В случае с беспроводными клавиатурами проверьте, не разряжены ли батарейки. Попробуйте заменить их или зарядить аккумулятор, если он встроенный.
Наша группа в TelegramПолезные советы и помощь
- Home
- Windows Tips
- Install custom keyboard windows 10
Windows 10 has a long list of keyboard layouts that a user can add to their system. These layouts cater to multiple languages including Mandarin and Arabic, and they are available for all types of keyboards.
Installing a keyboard layout on Windows 10 is easy; all you have to do is select one from a list and it will be added. Users can switch between keyboard layouts on the fly with a keyboard shortcut (Ctrl+Shift).
Note that Windows 10 keyboard layouts are all preset and they cannot be edited. In order to get a custom keyboard layout, you either have to download it or create one yourself.
Creating a keyboard layout is easy but time-consuming since every single key has to be mapped and assigned individually. Try to find a ready-made keyboard layout if you can. If a ready-made keyboard layout isn’t available, you’ll have to make the layout yourself.
See our video tutorial on how create a custom keyboard layout on Windows 10 or follow the step-by-step guide below:
Video Tutorial
Step-by-Step Guide
- Download the Microsoft Keyboard Layout Creator.
- Open the app and notice the blank visual keyboard.
You’ll get a basic keyboard layout without a dedicated numpad. The keys are color coded. All white keys can be assigned whereas the dark grey ones cannot. The dark grey keys represent keys like Tab, Shift, Caps, etc.
- Tap a key on the visual keyboard and select the character / key you want to assign to it, one-by-one.
Click inside an assignable key, and in the box that opens, enter what key/character you want to enter when that particular key is pressed. This will enter the default character for that key. If you want to record the shift state character for a key, click the All button on this same box.Recording a Shift key is just as easy as recording the default state key but it isn’t compulsory. You can skip it if you want. You can also couple keys with Ctrl and Alt keys.
- Map the entire keyboard.
- Go to Project>Build DLL and Setup Package.
When you’re done, go to Project>Build DLL and Setup Package. You’ll see a prompt asking if you want to check the properties of the keyboard layout you’re creating and you definitely should. That’s where you can give the keyboard layout a proper name and description.It will create an MSI file and an EXE, either one of which you can run to install your custom keyboard layout. I created a basic one that types in all Caps and named it angry. Once installed, it allowed me to type in all Caps without holding down the Shift key. For more complicated keyboard layouts, it’s going to take more time to create but the tool is still just as easy to use!
- Save the layout.
Install custom keyboard layout
A keyboard layout, whether it’s custom made with the Microsoft Keyboard Layout Creator or if you’ve downloaded it yourself, is going to be an executable file or an installer file. Installing it is as easy as installing any app.
- Open File Explorer and navigate to the EXE or MSI file for the keyboard layout.
- Run the file.
- Grant the app admin permission to install (The keyboard is installed for the current language).
- Open the Settings app.
- Go to Time & Language.
- Select the Language tab.
- Select the current language.
- Click the keyboard button under it.
- The current and new keyboard layout will be listed. Remove the one you do not want to use.
Conclusion
Keyboard layouts for commonly spoken languages like English are more common. If you need to type in a language that doesn’t have many layouts available, or you need to set the keys up in a layout that you can’t find in any configuration, a custom layout is the best alternative.
It’s worth mentioning that if you only need to change one or two keys, you can do with remapping them instead of creating a custom layout. Remapping tools like AutoHotKey and PowerToys are good options. If you remove the layout at any point, you can still use the MSI or the EXE file for it to install it again.

Fatima Wahab
Fatima has been writing for AddictiveTips for six years. She began as a junior writer and has been working as the Editor in Chief since 2014.
Fatima gets an adrenaline rush from figuring out how technology works, and how to manipulate it. A well-designed app, something that solves a common everyday problem and looks