
When you combine the Windows key with other keys, you can quickly do common tasks. The following list includes many common keyboard shortcuts that use the Windows key.
|
Press this key: |
To do this action: |
|---|---|
|
Windows key |
Open or close the Start menu. |
|
Windows key + A |
Open the Windows 11 action center. |
|
Windows key + Alt + B |
Turn high dynamic range (HDR) on or off. For more information, see What is HDR in Windows?. |
|
Windows key + C |
Open Microsoft Copilot or Microsoft 365 Copilot (available in preview through the Windows Insider Program). Tip: To customize what happens when you press the Windows key + C shortcut, go to Settings > Personalization > Text input > Customize Copilot key on keyboard. |
|
Windows key + C (when Copilot is not available or disabled) |
Open or close Windows search. |
|
Windows key + Alt + D |
Display and hide the date and time on the desktop. |
|
Windows key + Alt + Down arrow |
Snap the active window to the bottom half of the screen. |
|
Windows key + Alt + H |
When voice typing is open, set the focus to the keyboard. |
|
Windows key + Alt + K |
Mute or unmute the microphone in supported apps. |
|
Windows key + Alt + Up arrow |
Snap the active window to the top half of the screen. |
|
Windows key + comma (,) |
Temporarily peek at the desktop. |
|
Windows key + Ctrl + C |
If turned on in settings, enable or disable color filters. Open the Settings app |
|
Windows key + Ctrl + Enter |
Open Narrator. |
|
Windows key + Ctrl + F |
Search for devices on a network. |
|
Windows key + Ctrl + Q |
Open Quick Assist. |
|
Windows key + Ctrl + Shift + B |
Wake up the device when the screen is blank or black. |
|
Windows key + Ctrl + Spacebar |
Change to a previously selected input option. |
|
Windows key + Ctrl + V |
Open the sound output page of quick settings, which includes settings for the output device, spatial sound, and the volume mixer. |
|
Windows key + D |
Display and hide the desktop. |
|
Windows key + Down arrow |
Minimize the active window. |
|
Windows key + E |
Open File Explorer. |
|
Windows key + Esc |
Close Magnifier. |
|
Windows key + F |
Open Feedback Hub. |
|
Windows key + forward slash (/) |
Start input method editor (IME) reconversion. |
|
Windows key + G |
Open the Game Bar. For more information, see Keyboard shortcuts for Game Bar. |
|
Windows key + H |
Open voice dictation. |
|
Windows key + Home |
Minimize or restore all windows except the active window. |
|
Windows key + I |
Open Settings. |
|
Windows key + J |
Set focus to a Windows tip when one is available. When a Windows tip appears, bring focus to the tip. Press the keys again to bring focus to the element on the screen to which the Windows tip is anchored. |
|
Windows key + K |
Open Cast from Quick Settings to connect to a display. For more information, see Screen mirroring and projecting to your PC or wireless display. |
|
Windows key + L |
Lock the computer. |
|
Windows key + Left arrow |
Snap the window to the left side of the screen. |
|
Windows key + M |
Minimize all windows. |
|
Windows key + Minus (-) |
Zoom out in Magnifier. |
|
Windows key + N |
Open notification center and calendar. |
|
Windows key + O |
Lock the device orientation. |
|
Windows key + P |
Open project settings to choose a presentation display mode. |
|
Windows key + Pause |
Opens the Settings app to the System > About page. |
|
Windows key + Period (.) |
Open the emoji panel. |
|
Windows key + Plus (+) |
Zoom in with the Magnifier. |
|
Windows key + PrtScn |
Capture a full screen screenshot and save it to a file in the Screenshots subfolder of the Pictures folder. |
|
Windows key + Q |
Open search. |
|
Windows key + R |
Open the Run dialog box. |
|
Windows key + Right arrow |
Snap the window to the right side of the screen. |
|
Windows key + S |
Open search. |
|
Windows key + Shift + Down arrow |
If a window is snapped or maximized, restore it. |
|
Windows key + Shift + Enter |
If the active window is a Universal Windows Platform (UWP) app, make it full screen. |
|
Windows key + Shift + Left arrow |
Move the active window to the monitor on the left. |
|
Windows key + Shift + M |
Restore minimized windows. |
|
Windows key + Shift + R |
Select a region of the screen to record a video. It then opens the screen recording in the Snipping Tool. By default, this screen recording is automatically saved as an MP4 file in the Screen Recordings subfolder of your Videos folder. |
|
Windows key + Shift + Right arrow |
Move the active window to the monitor on the right. |
|
Windows key + Shift + S |
Select a region of the screen to capture a screenshot to the clipboard. You can then open the Snipping Tool to share or markup the image. |
|
Windows key + Shift + Spacebar |
Switch backward through input languages and keyboard layouts. |
|
Windows key + Shift + Up arrow |
Stretch the desktop window to the top and bottom of the screen. |
|
Windows key + Shift + V |
Cycle through notifications. |
|
Windows key + Spacebar |
Switch forward through input languages and keyboard layouts. |
|
Windows key + Tab |
Open Task View. |
|
Windows key + U |
Open the Settings app to the Accessibility section. |
|
Windows key + Up arrow |
Maximize the active window. |
|
Windows key + V |
Open the clipboard history. Note: Clipboard history isn’t turned on by default. To turn it on, use this keyboard shortcut and then select the prompt to turn on history. You can also turn it on in the Settings app > System > Clipboard , and set Clipboard history to On. Open the Settings app |
|
Windows key + W |
Open Widgets. |
|
Windows key + X |
Open the Quick Link menu. This shortcut is the same action as right-click on the Start menu. |
|
Windows key + Y |
Switch input between Windows Mixed Reality and your desktop. |
|
Windows key + Z |
Open the snap layouts. |
Changing keyboard shortcuts in Windows 10 can be a game-changer for your productivity. It’s quite simple and only involves a few steps. By the end of this guide, you’ll know how to customize your shortcuts to better suit your needs.
This section will walk you through the step-by-step process of changing keyboard shortcuts in Windows 10. By following these steps, you’ll be able to tailor your shortcuts to be more intuitive and efficient for your daily use.
Step 1: Open the Settings Menu
First, open the Settings menu by pressing the Windows key and the ‘I’ key simultaneously.
This will bring up the Settings window where you can customize various aspects of your system, including keyboard shortcuts.
Step 2: Click on ‘Devices’
Next, click on the ‘Devices’ option in the Settings menu.
This section allows you to manage devices connected to your computer, including keyboards, mice, and other peripherals.
Step 3: Select ‘Typing’
In the ‘Devices’ menu, select ‘Typing’ from the left sidebar.
The ‘Typing’ section is where you can manage and customize options related to your keyboard.
Step 4: Scroll Down to ‘Advanced Keyboard Settings’
Scroll down the ‘Typing’ section until you find the ‘Advanced Keyboard Settings’ link and click on it.
This area provides advanced options for configuring your keyboard, including shortcut customization.
Step 5: Click on ‘Input Language Hotkeys’
In the ‘Advanced Keyboard Settings’ window, click on the ‘Input Language Hotkeys’ link.
This will open a new window where you can change the keyboard shortcuts for different input languages.
Step 6: Select ‘Change Key Sequence’
In the ‘Text Services and Input Languages’ window, click on the ‘Change Key Sequence’ button.
This allows you to modify the key combinations for switching between input languages and keyboard layouts.
Step 7: Customize Your Shortcuts
Finally, select the new key sequence you prefer and click ‘OK’ to save your changes.
This final step lets you set custom shortcuts that are more convenient for you.
Once you’ve completed these steps, your new keyboard shortcuts will be active immediately. You can now switch between languages and keyboard layouts with ease.
Tips for Changing Keyboard Shortcuts Windows 10
- Test your new shortcuts immediately to ensure they work as expected.
- Write down your custom shortcuts somewhere handy for easy reference.
- Be mindful of existing shortcuts to avoid conflicts.
- Use simple key combinations that are easy to remember.
- Customize shortcuts based on your most frequent tasks for maximum efficiency.
Frequently Asked Questions
Can I change shortcuts for all applications?
No, some applications have their own shortcut settings that can’t be changed through Windows Settings.
What should I do if my new shortcut doesn’t work?
Double-check that the key combination isn’t already in use by another application or Windows function.
Are there any limitations to which keys I can use?
Yes, some key combinations are reserved by the system and can’t be changed.
Can I reset the shortcuts to default?
Yes, you can always go back into the settings and restore the default shortcuts.
Do these changes apply to all user profiles?
No, you need to change the shortcuts individually for each user profile.
Summary
- Open Settings menu.
- Click on Devices.
- Select Typing.
- Scroll to Advanced Keyboard Settings.
- Click on Input Language Hotkeys.
- Select Change Key Sequence.
- Customize your shortcuts.
Conclusion
Changing keyboard shortcuts in Windows 10 is a straightforward way to enhance your computer’s usability. Whether you’re a heavy typist, a gamer, or just someone looking to make things more convenient, customizing your shortcuts can save you a lot of time and effort.
By following the steps outlined above, you can easily tailor your keyboard shortcuts to fit your unique workflow. Remember, the key to getting the most out of this customization is to choose combinations that are easy to remember and don’t conflict with existing shortcuts.
If you find that your new shortcuts aren’t as efficient as you’d hoped, feel free to revisit the settings and make further adjustments. The beauty of Windows 10 is its flexibility, allowing you to continually tweak your settings until they are perfect for you.
For more tips and tricks on optimizing your Windows 10 experience, be sure to explore other customization options available in the Settings menu. Happy shortcutting!
Kermit Matthews is a freelance writer based in Philadelphia, Pennsylvania with more than a decade of experience writing technology guides. He has a Bachelor’s and Master’s degree in Computer Science and has spent much of his professional career in IT management.
He specializes in writing content about iPhones, Android devices, Microsoft Office, and many other popular applications and devices.
Read his full bio here.
Last Updated :
21 Apr, 2025
Keyboard shortcuts are a game-changer for boosting productivity on Windows think Ctrl+C to copy or Alt+Tab to switch apps in a flash. But what if they’re getting in your way, triggering accidentally, or conflicting with your favorite programs? Whether you’re a shortcut enthusiast looking to customize your setup or someone who wants to turn them off entirely, knowing how to enable and disable keyboard shortcuts in Windows can make your computing life smoother.
In this guide, we’ll explore simple steps to tweak these handy (or pesky) key combos, giving you full control over your keyboard experience.
How to Enable Keyboard Shortcuts in Windows?
If you are not able to use the shortcuts keys in Windows, then follow the below keyboard troubleshooting to enable the keyboard shortcuts in Windows.
Method 1: Enable Keyboard Shortcuts on Windows by Running the Keyboard Troubleshooter
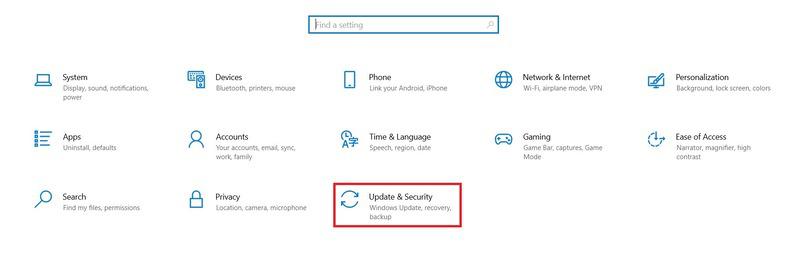
Step 1: Go to Settings
- Click on Start Menu > Select Settings > Tap on System > then Update & Security.
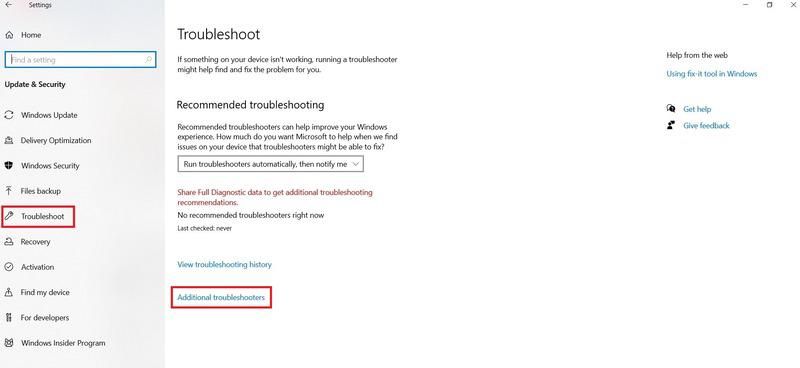
Step 2: Go to Troubleshoot
- Click on Troubleshoot > Additional Troubleshooter
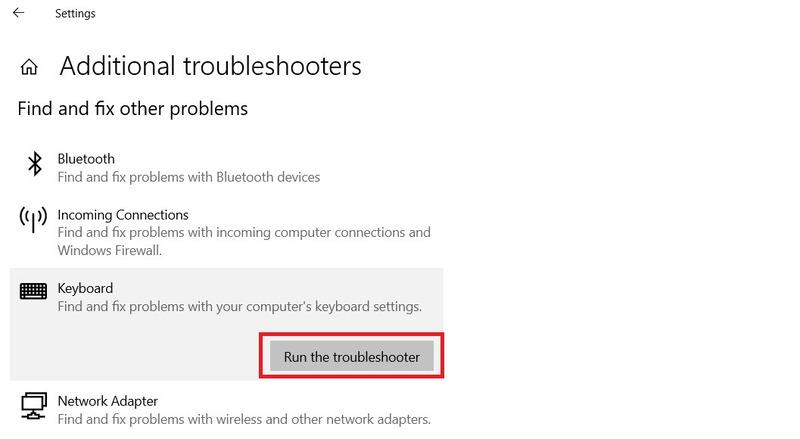
Step 3: Run Troubleshooter
- Under Find and Fix problems > Select Keyboard > Tap on Run the Troubleshooter
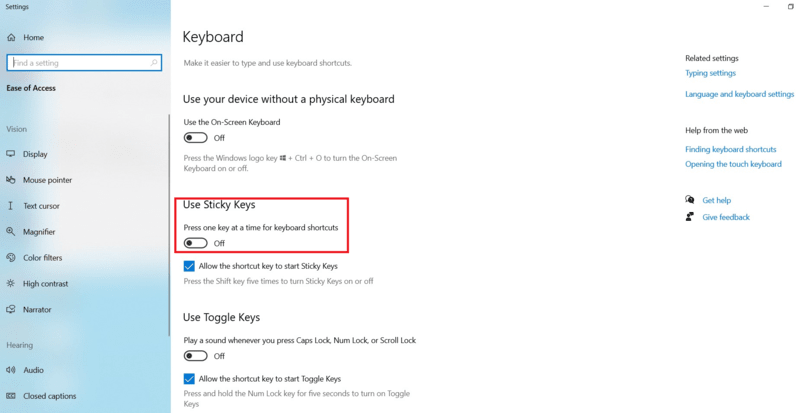
Method 2: Enable Keyboard Shortcuts on Windows by Sticky Keys
Note: Keyboard shortcuts sometimes fail to process if users can’t press the shortcut keys simultaneously. Users need to enable the Static Keys to work with shortcut keys in Windows.
Step 1: Go to Settings
- Click on Start Menu > Settings > Select Ease of Access.
Step 2: Choose Keyboard
- Go to the Interaction section > Select Keyboard.
Step 3: Select Sticky Keys
- Turn on the toggle which shows «Use Sticky Keys«
Method 3: Enable Keyboard Shortcuts on Windows by Turning on Hotkeys
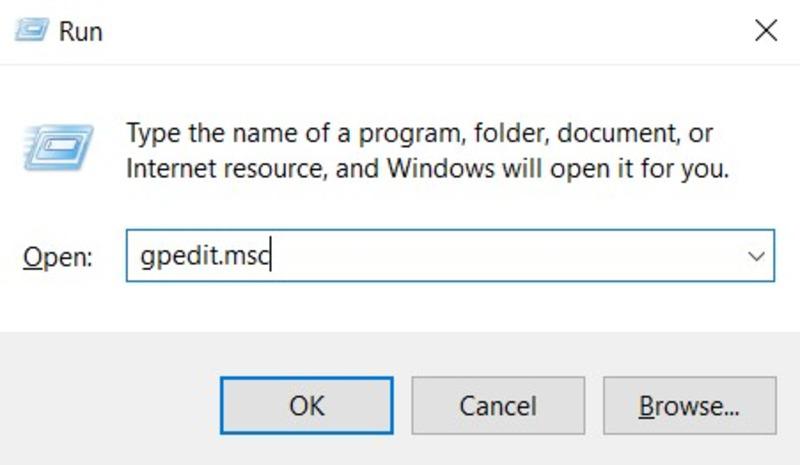
Step 1: Go to gpedit.msc
- Press Windows Key + R > type gpedit.msc into the dialog box > Press Enter.
Step 2: Choose Configration
- Press User Configuration > Administrative Templates > Windows Components > File Explorer
Step 3: Choose Disabled
- Open Turn off Windows keys hotkeys > Select Disabled or Not Configured > Click on Apply.
How to Disable Keyboard Shortcuts in Windows?
Just like the Enable Process of Windows Keyboard Shortcuts, there are three different methods present to Disable Keyboard Shorcuts in Windows. Let us start with the Windows Group Policy Editor.
Method 1: Disable Keyboard Shortcuts in Windows by Local Group Policy Editor
Note: Users can troubleshoot the internal system and resolve the system settings. Now we can see how to disable Windows shortcut keys using the Local Group Policy Editor.
Step 1: Go to Edit Group Policy
- Go to the Start menu > Type Edit Group Policy > Right-click on Best Match > Select Run as administrator
Step 2: Choose File Explorer
- Navigate to User Configuration > Tap on Administrative Templates> Click on Windows Components > File Explorer button.
Step 3: Turn Off Windows Key Hotkeys
- Double-click on Turn off Windows Key Hotkeys.

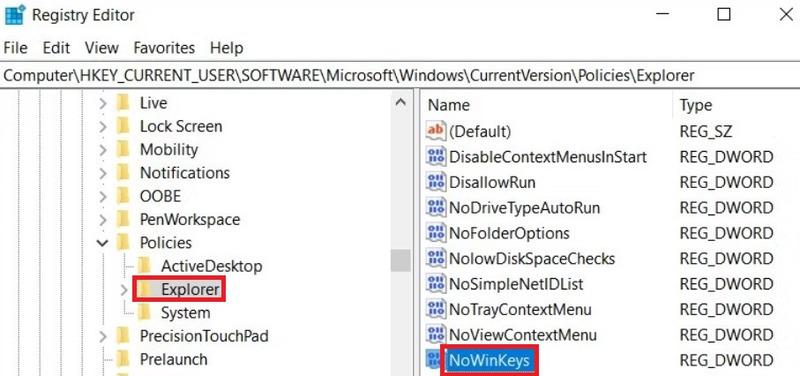
Method 2: Disable Keyboard Shortcuts in Windows by Registry Editor
Step 1: Open Registry Editor
- Go to the Search Menu > Type Registry Editor
Step 2: Open as Administrator
- Right-click on the Best Match result > Select Run as administrator
Step 3: Enter Below Command
- Now, copy and paste the below command into the address bar > Enter.
HKEY_CURRENT_USER\Software\Microsoft\Windows\CurrentVersion\Policies
Step 4: Enter Value of NoWinKeys
- Click on Explorer key > Right-click on a blank space > Select New > DWORD (32-bit) Value > Name this value NoWinKeys > Press Enter.
Method 3: Disable Keyboard Shortcuts in Windows By System Settings (for Certain Hotkeys)
Step 1: Go to Settings
- Go to the Search Menu > Type Allow the shortcut key to start Filter Keys > Tap on Best Match
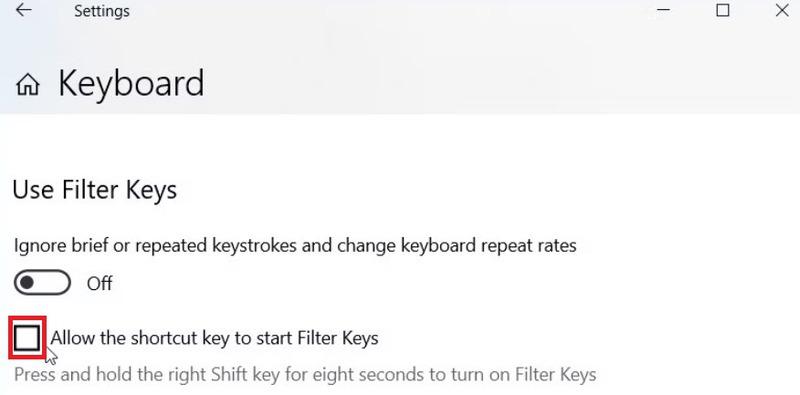
Step 2: Uncheck Allow the Shortcut Key
- Uncheck the Allow the shortcut key to start Filter Keys > Locate Use Sticky Keys > Uncheck Allow the shortcut key to start Sticky Keys
Step 3: Go to Toggle Key Option
- Scroll down to the Use Toggle Keys option > Uncheck the Allow the shortcut key to start Toggle Keys option.
Step 4: Use the PrtScn Button
- Scroll down to the Print screen shortcut option > Turn off Use the PrtScn button to open the disabling snipping button.
Conclusion
Users can access multiple types of Windows System Settings by using proper Keyboard Shortcuts or Hotkeys. By Disabling Keyboard Shortcuts on Windows, users can improve their overall computing experience and prevent effective accidental actions. By following all the mentioned methods and steps, we can Enable and Disable Keyboard Shortcuts on Windows properly.
Also Read
- How to Create Keyboard Shortcuts in Windows 10?
- Top 100+ Computer Keyboard Shortcut Keys List (A to Z), PDF Available
- Keyboard Shortcuts that Work on Both Windows 11 & Windows 10
One of the most powerful features in Windows 10 is the ability to set up your own custom hotkeys. The OS is certainly known for customizations, making the user experience more personalized, like the ability to add new shortcuts in the context menu.
Using various hotkeys lets you start programs, load websites, and do many other tasks with a keystroke. There are several built-in keyboard shortcut options in Windows 10, and there are also powerful third-party tools that will give you access to more options.
In this article, you’ll find helpful information on using both approaches to create customized Windows 10 hotkeys.
Adding Hotkeys to Program and Website Desktop Shortcuts
First, let’s try one of the most basic approaches to adding hotkeys. You can add a hotkey to any software or website shortcut on the desktop.
- Right-click the desktop shortcut and select Properties from the menu.
- Click the Shortcut tab.
- Click the Shortcut key box and enter a new keyboard shortcut for the program or web page. Just enter a letter there to set up the new hotkey. Note that the shortcut will be the letter combined with Ctrl + Alt. So if you type “I,” then the keyboard shortcut would be Ctrl + Alt + I. You can also enter one of the function keys (F1 through F12 on most keyboards).
- Select Apply and then click OK to close the window.
- Press your new hotkey to test it out, and it should open the program or web page you specified.
Set up Shutdown, Restart, and Logoff Keyboard Shortcuts
You can also create shutdown, logoff, and reboot hotkeys in Windows 10 without using third-party packages.
- Create a Desktop shortcut for the desired function. To do this, right-click the Desktop and then select New > Shortcut.

- In the Type the location of the item: box, type “shutdown.exe -s -t 00” to set up a shortcut that shuts down Windows 10. Type “shutdown -r -t 00” for a shortcut that restarts Windows 10. Type “shutdown.exe –L” to sign out of Windows 10.
- Press Next and type a suitable title for the shortcut. For example, you can name the shortcut “shutdown” if the shortcut shuts down Windows.
- Press Finish in order to exit the Create Shortcut configuration. That adds the shortcut to the desktop, as shown below.
- Give the shortcut a hotkey.
- Select OK to exit the window.
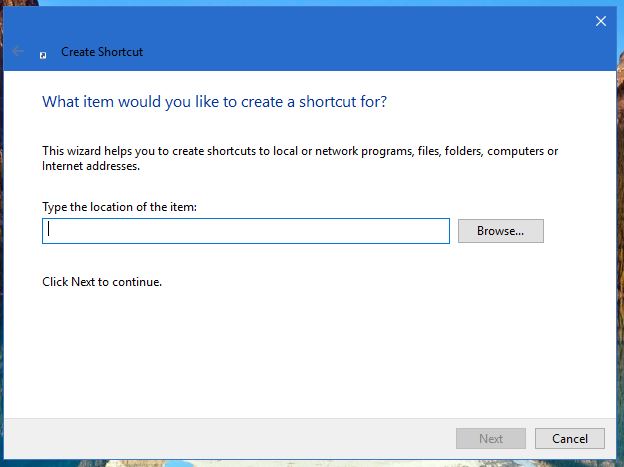

Now, pressing that key and Ctrl + Alt will shut down, restart, or log you out of Windows 10, depending on what you entered in the first text box of the Create Shortcut wizard.
Adding Custom Hotkeys With Third-Party Software
You can do a lot more with extra third-party software. There are a few programs available for Windows 10, and some of those are free programs. WinHotKey is one of the packages you can use to set up customized Windows 10 keyboard shortcuts. Add it to Windows 10 from the WinHotKey Softpedia page. Click the DOWNLOAD NOW button there to save the setup wizard, and then open that to add WinHotKey to windows.
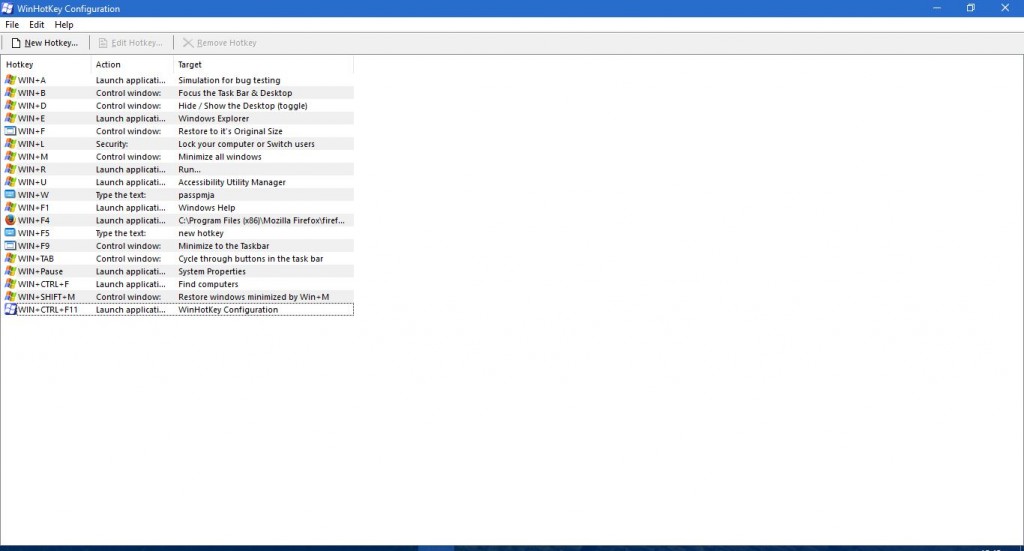
The WinHotKey window in the shot above includes a list of default Windows 10 hotkeys. Note that you can’t edit those with this package. What you can do is set up new keyboard shortcuts that open software or documents or adjust the active window.
- Press New Hotkey to open the window shown in the snapshot below.
- Click the I want WinHotKey to: drop-down list and select Launch an Application, Open a Document, or Open a Folder.
- Click Browse to select what action hotkey will open when you press it.
- Choose from a variety of keyboard combinations for the hotkeys by selecting the Alt, Shift, Ctrl, and Windows checkboxes. Then click the Along with the key: drop-down list to add a unique key to the hotkey.
- Press the OK when you’ve selected all the required options.
The new keyboard shortcut should then be listed on the WinHotKey window, along with the others. Press the hotkey to try it out. It will open the software, document, or folder you selected.
You can also set up some window hotkeys with this package.
- Select the Control the Current Window option from the I want the WinHotKey to: drop-down list.
- Click the Make the Current Window: drop-down list to expand it.
- Choose your action from the drop-down list.
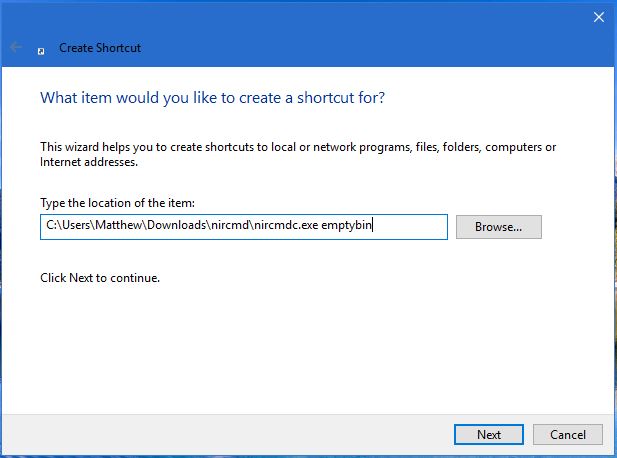
Another useful software package to set up customized hotkeys with is NirCmd, which is available for most Windows platforms. You can add the utility to Windows 10 from this NirSoft page. Scroll down to the bottom of the page and click Download NirCmd or Download NirCmd 64-bit to save the file (depending on whether or not you are running the 64-bit version of Windows).
Since NirCmd saves as a compressed zip, you’ll also need to select its compressed file in File Explorer and press the Extract all button. Choose a path to extract the folder.
Once NirCmd is extracted, you can set up Desktop shortcuts with the Command-Line Utility and turn them into hotkeys.
- Create a Desktop shortcut as before by selecting New > Shortcut from the desktop context menu.
- Press Browse and select the NirCmd executable path from there, but DO NOT click next just yet.
- Add your command lines to the path, which are all listed on the NirSoft page. For example, try adding “mutesysvolume 2” to the end of the path, as shown below.
- Click on the new NirCmd desktop shortcut. If the volume isn’t already muted, this will complete the action.
- Turn the NirCmd shortcut into a mute hotkey by right-clicking it, selecting Properties, and entering a key in the Shortcut key text box.


You can set up a variety of NirCmd hotkeys in much the same way. For example, if you add “setsysvolume 65535” to the end of the NirCmd path instead of “mutesysvolume 2“, the hotkey will maximize the volume when pressed. Alternatively, adding “emptybin” to the end of the path would set up a shortcut that empties the Recycle Bin.
As you can see, Windows 10 features both in-house hotkey customizations, as well as third-party hotkey integration. The NirCmd and WinHotKey programs offer more keyboard shortcut options than Windows 10 does by default. With these hotkeys, you can open software, shut down the pc, restart Windows 10, adjust volume settings, and much more.
How to Change Hotkeys in Windows 10?
Windows 10 provides users with an extensive range of keyboard shortcuts, also known as hotkeys, that can help increase productivity and streamline tasks. However, sometimes these default hotkeys may not be convenient or intuitive for all users. Fortunately, Windows 10 allows you to customize and change these hotkeys to suit your preferences. In this article, we will explore the process of changing hotkeys in Windows 10.
What are Hotkeys?
Before we dive into the process of changing hotkeys, it’s essential to understand what they are. Hotkeys are predefined keyboard shortcuts that perform specific actions in various applications, such as opening the Task Manager, shutting down the computer, or accessing the Start menu. By default, Windows 10 comes with a set of pre-defined hotkeys, such as:
• Windows + D: Shows the desktop
• Windows + E: Opens File Explorer
• Windows + L: Locks your computer
• Windows + Tab: Cycles through open windows
• Windows + Shift + S: Opens the Snipping Tool
Why Change Hotkeys?
Changing hotkeys can be beneficial in several ways:
• Improve Accessibility: For users with disabilities, changing hotkeys to more accessible alternatives can make it easier to use their computer.
• Increase Productivity: Changing hotkeys can help you work more efficiently by reassigning frequently used shortcuts to more convenient keys.
• Personalization: Changing hotkeys allows you to customize your Windows experience to suit your personal preferences.
How to Change Hotkeys in Windows 10?
To change hotkeys in Windows 10, follow these steps:
Step 1: Open Settings
- Click on the Start button and type «Settings» in the search bar.
- Click on the Settings icon to open the Settings app.
- In the Settings app, click on Devices.
- Click on Keyboard from the left-hand menu.
Step 2: Adjust Keyboard Settings
- In the Keyboard section, click on the Touchpad tab.
- Scroll down to the Navigation section.
- Click on the Change button next to Use the Windows key and a modifier key for Snap
Note: The exact steps may vary depending on your device and configuration.
Step 3: Reassign Hotkeys
- In the Navigation section, click on the window key + modifier key dropdown menu.
- Click on Reset to reset the hotkey to its default value.
- Alternatively, click on Customize to reassign the hotkey to a new key combination.
- Choose a new key combination from the list or create a custom combination by pressing a key and shifting the Fn key (if applicable).
Tips and Tricks:
- To reassign a hotkey, ensure you are not currently using the key combination assigned to that hotkey.
- If you’re having trouble finding the perfect hotkey combination, try using the Keyboard shortcut feature in the Devices section of Settings to explore alternative combinations.
- Changing hotkeys can be done for specific applications, such as browsers or productivity software, by using the application’s settings or configuration files.
Conclusion
In conclusion, changing hotkeys in Windows 10 is a simple process that requires a few clicks in the Settings app. By understanding what hotkeys are and why changing them can be beneficial, you can tailor your Windows experience to suit your needs and preferences. Remember to take advantage of the Touchpad settings and Customize option to reassign hotkeys to your liking. Happy typing!