
Почти на всех современные процессоры являются многоядерными. Все современные версии Windows поддерживают мультипроцессорные CPU и все ядра на них по умолчанию активны.
Содержание:
- Сколько процессоров и ядер доступно в Windows?
- Как включить все ядра процессора в Windows?
- Как запускать программу в Windows только на определенных ядрах?
- Включить все ядра Windows при загрузке
В Windows есть ограничение на максимальное поддерживаемое количество физических CPU и ядер (логических процессоров) в зависимости от версии и редакции:
- Windows 10 x86 (Enterprise Pro, Home) – до 2 CPU и 32 логических процессоров (учитываются как физические ядра, так и виртуальные ядра Hyper-Threading)
- Windows 10/11 x64 – до 2 CPU и 256 логических процессоров
- Windows Server 2019/2016/2012R2 – 640 логических процессоров
- Windows Server 2008 R2 – 256 логических ядер
Сколько процессоров и ядер доступно в Windows?
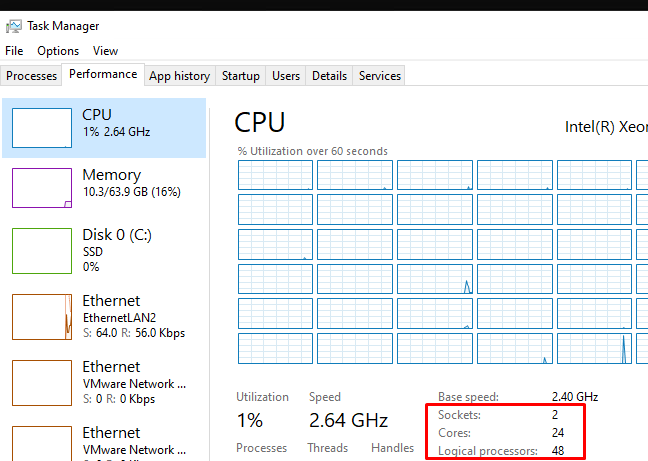
Проще всего проверить, сколько физических CPU, ядер и логических процессоров доступно в Windows с помощью Task Manager.
- Запустите
taskmgr.exe
и перейдите на вкладку Performance; - Выберите CPU;
- В правом окне указано количество доступных процессоров (sockets), физических ядер (24 cores) и логических процессоров (logical processors).
Логические процессоры показывают число доступных ядер с учетом того, что на компьютере включен HyperThreading.
В диспетчере устройств (
devmgmt.msc
) также отображается количество доступных логических ядер.
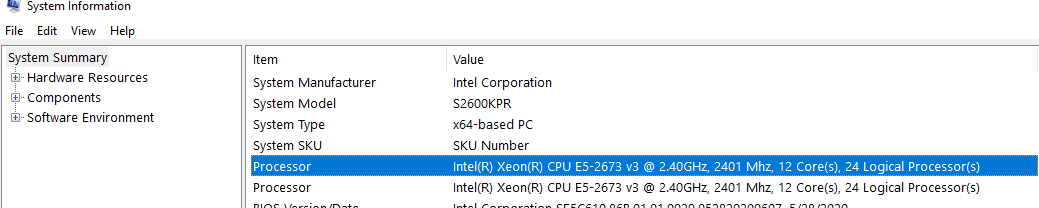
Также информация о физических CPU и количестве ядер на них отображается в разделе Processor утилиты msinfo32.exe
Processor Intel(R) Xeon(R) CPU E5-2673 v3 @ 2.40GHz, 2394 Mhz, 12 Core(s), 24 Logical Processor(s)
Processor Intel(R) Xeon(R) CPU E5-2673 v3 @ 2.40GHz, 2394 Mhz, 12 Core(s), 24 Logical Processor(s)
Вы можете получить информацию о количестве ядер и логических процессорах с помощью PowerShell:
Get-WmiObject -class Win32_processor | ft NumberOfCores,NumberOfLogicalProcessors
NumberOfCores NumberOfLogicalProcessors
------------- -------------------------
12 24
12 24

В переменной окружения Windows также есть информация о количестве логических процессоров в Windows:
echo %NUMBER_OF_PROCESSORS%
Как включить все ядра процессора в Windows?
Если в Windows недоступны все ядра CPU, проверьте включены ли они в настройках BIOS/UEFI. Здесь могут быть два параметра:
- HyperThreading – возможность использовать оба логических процессора ядра CPU
- Active Processor Cores – разрешено ли использовать все ядра процессора
Перезагрузите Windows и войдите в настройки BIOS (обычно для этого используются клавиши
F2
,
Del
,
F10
или
F1
.
Конкретные названия пунктов и их наличие зависит от версии BIOS и модели процессора. В моем случае все ядра и логические процессоры включены в разделе Processor Configuration:
- Hyper-Threading ALL:
Enabled - Active Processor Cores:
All
Эти настройки могут находится в разделах Advanced, Extreme Tweaker и называться Processor Options, AMD Core Select, Processor Core, Active Processor Cores, Core Multi-Processing, CPU Cores и т.д.
Как запускать программу в Windows только на определенных ядрах?
В Windows вы можете разрешить программе выполняться только на одном или нескольких ядрах. По-умолчанию запущенное приложение Windows может выполняться на любом ядре.
Если вам нужно привязать программу к определенным ядрам, можно воспользоваться функцией Processor Affinity. Это может понадобится, если вы хотите ограничить использование CPU программой, или запускать программу только на одном ядре (это бывает нужно для запуска старых приложений, которые некорректно работают на многоядерных компьютерах.
Вы можете изменить привязку запущенного приложения к ядрам с помощью Task Manager:
- Перейдите на вкладку Details;
- Щелкните правой кнопкой по процессу и выберите Set affinity;
- Отметьте физические ядра, на которых разрешено выполнять инструкции приложения.
Если нужно сразу запустить приложение на одном ядре, например, CPU0. Воспользуйтесь командой:
cmd.exe /c start "Acrobat DC" /affinity 1 "C:\Program Files\MyApp\yourappname.exe"
Включить все ядра Windows при загрузке
В Windows при загрузке компьютера всегда используется одно ядро. Вы можете разрешить использовать все ядра при загрузке Windows через System Configuration:
- Запустите утилиту
msconfig
; - Перейдите на вкладку Boot и выберите загрузочную запись вашей Windows;
- Нажмите Advanced options;
- Включите опцию Number of processors в окне BOOT Advanced Options;
- Выберите количество логических процессоров (потоков), которые можно использовать при загрузке .
Вы не заметите существенного ускорения загрузки Windows, если увеличите число доступных процессоров. Кроме того, в некоторых случаях эта опция может вызвать проблемы с загрузкой Windows, особенно при включении опции PCI lock (ошибка загрузки BAD SYSTEM CONFIG INFO). Поэтому в большинстве случаев не рекомендуется включать и настраивать эту опцию.
-
System requirements for installing Windows 10
Keeping Windows 10 up-to-date
More information on hard drive space requirements to install or update Windows 10
Feature-specific requirements for Windows 10
Language versions
Feature deprecations and removals
These are the basic requirements for installing Windows 10 on a PC. If your device does not meet these requirements, you may not have the great experience intended with Windows 10 and might want to consider purchasing a new PC.
There may be additional requirements over time for updates, as well as requirements to turn on specific features within the OS.
Windows 10 is designed to deliver updates for the supported lifetime of the device. Two types of updates may be provided: quality updates and feature updates. Quality updates include both security and non-security updates and are typically targeted to be released once a month. Feature updates also include security and non-security fixes as well as new features to Windows 10 and are typically provided twice a year. Ensuring that your device receives these updates and is kept up-to-date is important for your device security. Windows 10 periodically checks for updates so you don’t have to. When an update is available—and sufficient free disk space is available on your device—it will be automatically installed. So that Windows 10 continues to stay updated, it’s important to ensure your device has sufficient free space. See additional applicable details in the following notes.
Important notes about updates:
- A device might not be able to receive updates if the device hardware is incompatible, if it lacks current drivers or sufficient available hard drive space, or if it’s otherwise outside of the Original Equipment Manufacturer’s (“OEM”) support period. Visit the Windows Lifecycle Fact Sheet or the Lifecycle FAQ for Windows products to learn more about the servicing timeline for each feature update.
- Some of the disk space needed for installing updates is only temporarily required. Typically, ten days after installing an update, a disk cleanup will be automatically performed to delete copies of the older, unneeded Windows files and free up space again.
- Some of the disk space needed for installing updates is only temporarily required. Typically, ten days after installing an update, a disk cleanup will be automatically performed to delete copies of the older, unneeded Windows files and free up space again.
- Not all features in an update will work on all devices.
- An internet connection is required to perform updates and Internet access (ISP) fees might apply.
- If you need assistance installing an update, Windows 10 Update Assistant may be able to help.
The size of the Windows operating system that comes with your device and the amount of space needed to download and install Windows updates, are highly variable as they depend on a variety of factors. Visit here to learn why. The factors that impact the amount of free hard drive space needed to take an update include: the versions of Windows previously installed on the machine, the amount of disk space available to reuse from Windows files, such as the virtual memory pagefile or hibernation file, which applications are installed on your device and how those applications store data. Starting with the May 2019 Update, the system requirements for hard drive size for clean installs of Windows 10 as well as new PCs changed to a minimum of 32GB. The 32GB or larger drive requirement is set to leave space for users to install apps and to keep data on the device. Installing Windows or updating from a previous version of Windows on devices with less than 32GB storage will continue to work if the device has enough free space available. When updating, Windows will attempt to automatically free up enough hard drive space and guide you through freeing up even more if the automatic cleanup is not sufficient. You can also take steps to free up space on your own. For more information, see Free up space to install the latest Windows 10 update or visit the related FAQ.
In addition to the requirements above that are needed to run Windows, some features have additional requirements. In some cases, features included with updated versions of Windows 10 will be best experienced with newer processors. For specific hardware support please refer to your Original Equipment Manufacturer (OEM). Below are some additional details regarding requirements for key features:
- BitLocker Drive Encryption (available with Windows 10 Pro or Windows 10 Enterprise only) requires a Trusted Platform Module (TPM) 1.2 or higher and Trusted Computing Group (TCG)-compliant BIOS or UEFI. BitLocker can be used on devices without TPM, but you will need to save a startup key on a removable device such as a USB flash drive. TPM 2.0 and InstantGo support is required when you want to automatically encrypt the local drive when joining a device to Azure Active Directory (AAD). Check with your PC manufacturer to confirm if your device supports the correct TPM version and InstantGo for the scenario you want to enable.
- BitLocker To Go requires a USB flash drive (available in Windows 10 Pro and Windows 10 Enterprise only).
- Client Hyper-V requires a 64-bit system with second level address translation (SLAT) capabilities and additional 2 GB of RAM (available in Windows 10 Pro and Windows 10 Enterprise only).
- Copilot in Windows 10 requires greater than 4 GB of RAM and a minimum 720p display resolution. Copilot is currently available in preview in select global markets on compatible Windows 10 Home and unmanaged Pro devices running version 22H2 or higher. It is our intention to add additional markets and compatibility over time.
- Cortana is only currently available on Windows 10 for the United States, United Kingdom, China, France, Italy, Germany, Brazil, Mexico, Japan, Canada, Spain, Australia and India.
- Microsoft account is required for some features.
- Miracast requires a display adapter which supports Windows Display Driver Model (WDDM) 1.3, and a Wi-Fi adapter that supports Wi-Fi Direct.
- Movies & TV application is not available in all regions. For the most up-to-date list of regions, please go to the Movies & TV information page.
- Secure boot requires firmware that supports UEFI v2.3.1 Errata B and has the Microsoft Windows Certification Authority in the UEFI signature database.
- Skype is available only in select countries and regions. Calling to select countries and regions only. Excludes special, premium and non-geographic numbers. For details, visit the Office FAQ page.
- Snap: The number of applications that can be snapped will depend upon the minimum resolution for the application with a limit of two applications in Tablet mode and four applications in Desktop mode.
- Speech recognition will vary by device microphone. For a better speech experience, you will need a:
- High fidelity microphone array
- Hardware driver with microphone array geometry exposed
- Tablet mode is available on tablets and 2-in-1s with GPIO indicators or those that have a laptop and slate indicator will be able to be configured to enter «tablet mode» automatically.
- Touch: To use touch, you need a tablet or a monitor that supports multi-touch.
- Two-factor authentication requires the use of a PIN, Biometric (finger print reader or illuminated infrared camera), or a phone with Wi-Fi or Bluetooth capabilities.
- Windows Hello requires a camera configured for near infrared (IR) imaging or fingerprint reader for biometric authentication. Devices without biometric sensors can use Windows Hello with a PIN or a portable Microsoft compatible security key.
- Xbox application requires an Xbox Live account, which is not available in all regions. For the most up-to-date list of regions, please go to Xbox Live Countries and Regions website.
- Wi-Fi Direct Printing requires a Wi-Fi adapter that supports Wi-Fi Direct and a device that supports Wi-Fi Direct Printing.
Windows 10 full localization languages include: Arabic (Saudi Arabia), Bulgarian (Bulgaria), Chinese (PRC), Chinese (Taiwan), Croatian (Croatia), Czech (Czech Republic), Danish (Denmark), Dutch (Netherlands), English (United Kingdom), English (United States), Estonian (Estonia), Finnish (Finland), French (France), French (Canada), German (Germany), Greek (Greece), Hebrew (Israel), Hungarian (Hungary), Italian (Italy), Japanese (Japan), Korean (Korea), Latvian (Latvia), Lithuanian (Lithuania), Norwegian, Bokmål (Norway), Polish (Poland), Portuguese (Brazil), Portuguese (Portugal), Romanian (Romania), Russian (Russia), Serbian (Latin, Serbia), Slovak (Slovakia), Slovenian (Slovenia), Spanish (Spain), Spanish (Mexico), Swedish (Sweden), Thai (Thailand), Turkish (Turkey), Ukrainian (Ukraine).
Additional languages available as Language Interface Packs
When upgrading to Windows 10 from a previous version of Windows such as Windows 7 or Windows 8.1 as well as when installing a newer update to Windows 10, some features may be deprecated or removed. Please see below for information regarding some of the key removed features:
- Desktop Messaging App: The messaging app on Desktop has a sync feature that can be used to sync SMS text messages received from Windows Mobile and keep a copy of them on the Desktop. Starting with the May 2019 Update (Windows 10, version 1903), the sync feature has been removed from all devices. Due to this change, you will only be able to access messages from the device that received the message.
- Wi-Fi WEP and TKIP: Starting with the May 2019 Update (Windows 10, version 1903), a warning message will appear when connecting to Wi-Fi networks secured with WEP or TKIP, which are not as secure as those using WPA2 or WPA3. In a future release, any connection to a Wi-Fi network using these old ciphers will be disallowed. Wi-Fi routers should be updated to use AES ciphers, available with WPA2 or WPA3.
- Cortana: Cortana has been updated and enhanced in the Windows 10 May 2020 Update (Windows 10, version 2004). With these changes, some previously available consumer skills such as music, connected home, and third-party skills will no longer be available. Get detailed information here.
- Phone Companion: As of the October 2018 Update (Windows 10, version 1809), Phone Companion is removed from your PC. Use the Phone page in the Settings app to sync your mobile phone with your PC. It includes all the Phone Companion features.
- HomeGroup: HomeGroup was removed starting with the April 2018 Update (Windows 10, version 1803), but you still have the ability to share printers, files, and folders. When you update from an earlier version of Windows 10, you won’t see HomeGroup in File Explorer, the Control Panel, or Troubleshoot (Settings > Update & Security > Troubleshoot). Any printers, files, and folders you shared using HomeGroup will continue to be shared. Instead of using HomeGroup, you can now share printers, files, and folders by using features that are built into Windows 10:
- Share your network printers
- Share files in File Explorer
- For Xbox 360 and HomeGroup users, please see more information on streaming media
- People app: In Windows 10, the People app shows mail from Microsoft 365 contacts and contacts from your school or work organization under Conversations. Starting with the April 2018 Update (Windows 10, version 1803), in order to see new mail in the People app from these specific contacts, you need to be online, and you need to have signed in with either a Microsoft 365 account or, for work or school organization accounts, through the Mail, People, or Calendar apps. Please be aware that you’ll only see mail for work and school organization accounts and some Microsoft 365 accounts.
- Reader app: The Reader app was removed from Windows 10 starting with the Fall Creators Update (Windows 10, version 1709). For reading PDF files, Microsoft Edge is the recommended replacement app and offers similar functionality as well as additional features including improved accessibility support, improved Inking, and support for AskCortana. Similarly, Windows XPS Viewer is recommended when reading XPS files and Windows Photos app for viewing TIFF files. Note that users of earlier Windows 10 versions can continue using the Reader app.
- Windows Journal: Windows Journal was removed starting with the Windows 10 Anniversary Update (Windows 10, version 1607). After Windows Journal is removed, you will no longer be able to open or edit Journal files (with .JNT or .JTP extensions). In place of Windows Journal, we encourage you to switch to OneNote. If you need to open or edit your journal files, more information is available here.
- Windows Media Digital Rights Management (WMDRM): WMDRM is no longer supported starting with the Windows 10 Anniversary Update (Windows 10, version 1607). You are no longer able to play music or video files that were protected by this rights management technology. Click here to learn more.
The following changes impact devices that are upgrading to Windows 10 from Windows 7, Windows 8 or Windows 8.1:
- Windows Media Center: If you have Windows 7 Home Premium, Windows 7 Professional, Windows 7 Ultimate, Windows 8 Pro with Media Center, or Windows 8.1 Pro with Media Center and you install Windows 10, Windows Media Center will be removed.
- Mobile Device Management (MDM): MDM functionality will not be available in Windows 10 Home edition.
- Windows 7 desktop gadgets: These will be removed as part of installing Windows 10.
- Solitaire, Minesweeper, and Hearts Games: These games that came pre-installed on Windows 7 will be removed as part of installing the Windows 10 upgrade. Microsoft has released our version of Solitaire and Minesweeper called the «Microsoft Solitaire Collection» and «Microsoft Minesweeper».
- Floppy drives: If you have a floppy drive, you will need to download the latest driver from Windows Update or from the manufacturer’s website.
- If you have Windows Live Essentials installed on your system, the OneDrive application is removed and replaced with the inbox version of OneDrive.
- OneDrive place holder files: OneDrive placeholder files are not supported in Windows 10. Windows 8.1 displayed placeholders for files available in OneDrive but not locally on the device. In Windows 10, users can choose which folders to sync from OneDrive settings.
- Snap: Snap is limited to two applications in Tablet mode.
Официально для Windows 10 версии 2004 потребуется ПК, который соответствует следующим спецификациям:
Эти системные требования унаследованы Windows 10 версий 1909 и 2004.
- Процессор: 1 гигагерц (ГГц) или более быстрый процессор или SoC
- Оперативная память: 1 гигабайт (ГБ) для 32-разрядных или 2 ГБ для 64-разрядных
- Место на жестком диске: 32 ГБ для 64-битной и 32-битной ОС
- Видеокарта: с поддержкой DirectX 9
- Разрешение экрана: 800 x 600, минимальный размер диагонали для основного дисплея 7 дюймов или больше.
Любой, кто пытается использовать Windows 10 на таком оборудовании, может подтвердить, что эти системные требования весьма оптимистичны. 2 ГБ оперативной памяти — ничто для ОС, а обычный жесткий диск сильно влияет на ее производительность.
Кроме того, контроллеры хранилища, используемые в устройствах под управлением Windows 10 для настольных версий, должны соответствовать следующим требованиям:
- Контроллеры хранилища должны поддерживать загрузку с использованием расширяемого интерфейса микропрограмм (EFI) и реализовывать пути к устройствам, как определено в EDD-3.
- Контроллеры и адаптеры хоста хранения должны соответствовать требованиям к используемому протоколу устройства и любым требованиям, связанным с типом шины хранения устройства.
- Контроллеры, подключенные к шине, должны реализовывать правильный код класса / подкласса, как указано в спецификации PCI Codes and Assignments v1.6.
Другой официальный документ, проливает свет на то, какое оборудование Microsoft считает подходящим для своего продукта. Как видно из документа, у вас должно быть 8 ГБ ОЗУ или лучше 16 ГБ, и SSD / NVMe играет важную роль в конфигурации устройства.
В документе упоминаются эти требования с точки зрения безопасности.
«Если вы принимаете решение о приобретении новых устройств и хотите включить наилучшую возможную конфигурацию безопасности, ваше устройство должно соответствовать или превышать эти стандарты»
Другие известные требования к оборудованию включают в себя процессоры:
| Windows 10 1909 | До следующих процессоров Intel 9-го поколения (Intel Core i3 / i5 / i7 / i9-9xxxK) и Intel Xeon E-21xx [1], Intel Atom (J4xxx / J5xxx и N4xxx / N5xxx), процессоров Celeron и Pentium |
Вплоть до следующих процессоров AMD 7-го поколения (A-Series Ax-9xxx и E-Series Ex-9xxx и FX-9xxx); Процессоры AMD Athlon 2xx, AMD Ryzen 3/5/7 2xxx, AMD Opteron [2] и AMD EPYC 7xxx [2] |
Qualcomm Snapdragon 850 |
| Windows 10 2004 |
До следующих процессоров Intel 10-го поколения (Intel Core i3 / i5 / i7 / i9-10xxx) и Intel Xeon E-22xx [1], Intel Atom (J4xxx / J5xxx и N4xxx / N5xxx), процессоров Celeron и Pentium |
До следующих процессоров AMD 7-го поколения (A-Series Ax-9xxx и E-Series Ex-9xxx и FX-9xxx); Процессоры AMD Athlon 2xx, AMD Ryzen 3/5/7 4xxx, AMD Opteron [2] и AMD EPYC 7xxx [2] |
Qualcomm Snapdragon 850 и 8cx |
[1] Процессоры Intel Xeon поддерживаются только в Windows 10 Pro для рабочих станций и Windows 10 Enterprise.
[2] Процессоры AMD Opteron и AMD EPYC поддерживаются только в Windows 10 Pro для рабочих станций и Windows 10 Enterprise.
Требования к размеру жесткого диска.
Ранее было достаточного 16 Гб дискового пространства для Windows 10 32-бита и 20 ГБ для 64 -бита, теперь компания подняла его в обеих версиях до 32 ГБ оперативной памяти. Это означает, что производители оборудования (OEM), которые предварительно устанавливают настольную версию Windows 10 теперь нужно комплектовать устройство по крайней мере, жестким диском 32 Гб.
Это имеет смысл — 16 ГБ на некоторых устройствах было недостаточно и вызывало проблемы с обновлениями. Тем более, в Windows 10 1903 была добавлено «Зарезервированное хранилище». Небольшая часть дискового пространства, которая будет зарезервирована для использования обновлениями, приложениями, временными файлами, а также системным кешем.
Требования к размеру хранилища для устройств под управлением Windows 10 для настольных изданий:
| Архитектура ОС | Версия ОС | Емкость накопителя |
|---|---|---|
| Windows 10, версия 1809 и ранее | 32-бита | 16 ГБ или больше |
| 64-бита | 20 ГБ или больше | |
| Windows 10, версия 1903 / 2004 | 32-бита и 64-бита | 32 ГБ или больше |
| Windows 10 IoT Enterprise, версия 2004 и более ранние | 32-бита | 16 ГБ или больше |
| 64-бита | 20 ГБ или больше |
Оптимальная аппаратная конфигурация для Windows 10 выглядит как минимум следующим образом:
- Процессор: Intel 8-го поколения (Intel i3 / i5 / i7 / i9-7x), Core M3-7xxx, Xeon E3-xxxx и Xeon E5-xxxx, AMD 8-го поколения (A-серии Ax-9xxx, E-Series Процессоры Ex-9xxx, FX-9xxx) или ARM64 (Snapdragon SDM850 или более поздняя версия)
- Оперативная память: 4 гигабайта (ГБ) для 32-битной или 16 ГБ для 64-битной
- SSD / NVMe: не менее 128 ГБ для 64-битной и 32-битной ОС
- Видеокарта: DirectX 9 или более поздняя
- Разрешение экрана: 800 x 600, минимальный размер диагонали для основного дисплея 7 дюймов или больше.
Источник: microsoft.com
Вам может быть интересно: Cистемные требования для обновления и запуска Windows 11
If you are looking to upgrade your desktop to Windows 10 Pro, you need to know how many CPU cores the new OS can support. You can install Windows 10 Enterprise or Pro, but they all have their advantages and disadvantages. For starters, Windows 10 Enterprise is only compatible with one physical CPU core, while Windows 10 Pro supports as many as four. But this is not a big deal if you are running Linux, as Linux is completely free of the same problem.
The processor is a vital part of your PC, and pushing it to the limit can increase performance. This feature can be switched on and off in your BIOS/UEFI settings. This is a good option for laptop and desktop users who want to improve performance without spending an arm and a leg. You can also increase the number of processor cores by lowering the affinities. A good way to find out how many cores your processor has is to visit the Microsoft Developer website.
What processors does Windows 10 support? Generally, Windows 10 supports up to two physical CPU cores. Arm processors aren’t supported. So, if you have a processor with more than two cores, you can install an Intel driver to increase its support. However, if you want to run Windows 10 on your Arm-based processor, you’ll need to upgrade to a Windows Pro license.
One way to increase the processing power in your computer is to use HyperThreading. This technology lets one physical core be split into several virtual cores. This allows a single task to be processed by several cores at once. To enable HyperThreading, you need to change BIOS settings. To do this, go to System Configuration and select Advanced. Once you’ve done this, try enabling HyperThreading one by one, then repeat the process.
Windows 10 Pro can support up to four physical CPUs. You can also have up to 256 cores. The most recommended configuration for Windows 10 pro is an Intel Skylake processor with 16GB of RAM. You should also have a solid-state drive for storage to ensure smooth boot-ups. Otherwise, you can try other processors. If you need more cores, make sure to upgrade to a Windows 10 Pro version.
Does Windows 10 Pro Support Multiple Processors?
Is Windows 10 Pro compatible with a multi-core processor? A dual-core Intel processor that is 1.6 GHz or higher should be sufficient to run the latest version of Windows, although older models should be replaced with more powerful models. Dual-core processors are also more energy-efficient, consuming 65W less power than a Pentium D. While this processor is adequate for most tasks, you’ll need to consider the power consumption of your graphics card when you’re comparing a dual-core CPU with a dual-core option.
If you want to use a multi-core processor in Windows 10, you’ll have to purchase a CPU that supports multiple threads. You can determine which processor is compatible by checking the Performance tab in the Control Panel. It’s easy to check which processors your computer supports by finding its code name. If you’re unsure of the exact CPU code, look at the motherboard specification page or product website. Once you’ve found the code name, you’ll find the processor part in the Control Panel.
How Many Cores Can Windows 10 Home Support?
The answer to the question, “How Many cores can Windows 10 Pro support?” depends on the processor you have. If you have a dual-core processor, you need to run Windows NT or Windows 2000 to take advantage of this feature. The Win9X family did not support multi-core processing. If you want to improve the performance of your computer, you can upgrade the processor. However, if you’re using a laptop, you should stick to Windows 10 Pro.
It’s essential to know how many cores you need before you go shopping. This information will help you choose the best CPU for your needs, including how many programs and software can run at once. Knowing exactly how many cores you need can save you money and time. However, knowing how many cores you need can be tricky. AMD and Intel both tout the benefits of higher CPU core counts. While higher core counts are better for heavy computing workloads, they may be overkill for many users.
How Many Cores Does Windows 10 Have?
As for processors, Windows 10 pro supports up to 4 physical CPUs and 256 cores. It is important to note that this is only possible with 64-bit versions of Windows. 32-bit versions have a limit of 32 processors. To check the number of processors, open the Performance tab and look for the CPU part. For older processors, you may need to change your BIOS to enable multi-core support.
What about multi-core performance? Windows 10 Pro supports up to 128 threads and 64 cores. It runs Windows 10 for Enterprise and Pro for Workstations. The AMD Threadripper 3990x is one example of a high-end CPU with 64 cores and 128 threads. It supports NVMe RAID and has a maximum base clock of 4.3GHz. It can support up to four CPUs and up to 6TB of memory.
CPU requirements for Windows 10 Pro are not much different from those for the 32-bit version. Windows 10 requires a graphics card that supports DirectX 9 and has a Windows Display Driver Model 1.0 or later. In addition to a graphics card, Windows 10 supports rolling software updates. A reliable internet connection is essential for initial device setup as well as for applying updates. The central processing unit (CPU) is the brain of your PC. It handles the majority of calculations.
How Do I Unlock My CPU Cores?
When you want to use more than one processor core on your PC, you need to unlock it. The easiest way to do this is to access your PC’s Task Manager. Press Ctrl+Shift+Esc to open the Task Manager. Alternatively, you can use one of the following 10 methods. Once in the Task Manager, select the Performance tab and find the number of Cores and Logic processors.
First, open the Task Manager. This will give you a clear idea of how many cores your CPU has. If you see that there are two cores, then you need to unlock all of them. If you have more than one core, assign one to the task at hand. This way, the computer will use only part of the CPU, which will improve its overall performance. Windows is very good at allocating and managing resources.
Next, you need to run a tool called “CPU-Z” on your computer. This program shows you which cores are enabled on your computer. Normally, it will leave it unchecked by default. However, it’s important to know how to enable all cores to ensure optimal performance. It may not work well with certain programs or software. So, before you proceed, make sure you have the correct information on your PC.
Should I Enable All Cores in Windows 10?
To determine if your CPU is using all its cores, open the System app and look at the processor tab. To enable all cores, choose the option to Enable all processors. Make sure to restart your computer after enabling all processor cores. This option may not be right for all users. Some users have reported problems with Task Manager, claiming that it shows the wrong cores or threads. This issue usually affects dual-core or low-end PCs.
CPU core count is displayed under the performance tab of the Performance window. You can also view the performance of individual cores in the task manager. This will let you determine whether enabling all CPU cores is really necessary. Remember that running programs and using the operating system will use the number of cores needed to run the program. If you don’t need a particular core, you can always change the affinities of the CPU.
How Do I Unlock My Cores in Windows 10?
CPUs are divided into logical and physical cores. Logical cores enable single physical cores to perform multiple tasks. For example, a quad-core CPU with dual-threading supports 8 logical cores. To find out how many cores your CPU has, simply open the Task Manager and press the Ctrl, Shift, Esc, or Windows key. You’ll find the CPU, physical cores, and logical cores listed under the Performance tab.
Normally, Windows uses all cores available in the processor, but there are occasions when you may want to manually enable some or all of them. By manually enabling CPU cores, you’ll get a faster computer. To enable all cores, first open the System Configuration app from the Windows Search bar. Then, click on the Advanced tab. The Advanced tab has a drop-down menu for the CPU.
Learn More Here:
1.) Windows Help Center
2.) Windows – Wikipedia
3.) Windows Blog
4.) Windows Central
How many processors does Windows 10 support? It’s a simple question, but the correct answer is surprisingly hard to come by.
What led me to ask this question was curiosity: I wondered whether it would be possible to run Windows 10 on a Supermicro 7089P-TR4T – a single-node server with eight Intel Xeon Scalable sockets in an S8S configuration.
Windows Server licenses come with a baseline limit of 16 physical processor cores. If you want to use more cores, you have to buy additional core licenses. For example, on an 8-socket system filled with Xeon 8280 CPUs, you’ve got 8 * 28 = 224 physical cores, which would require the purchase of thirteen additional 16-core licenses. There’s one exception here: each CPU socket must be licensed for at least 8 cores. This restriction means that you couldn’t, for example, run four quad-core CPUs on a base license – you’d need an additional 16-core license for that, to make up 8 licensed cores per socket. It’s also worth noting that only physical cores count; SMT cores (or “threads”) are not included in the licensing. Those additional licenses aren’t cheap. At time of writing a Windows Server 2019 Datacenter Additional 16 Core license costs in excess of 4000 GBP.
Windows Desktop is much less restrictive. Each edition of Windows 10 has an associated maximum number of allowed CPU sockets:
- Windows 10 Home supports 1 socket
- Windows 10 Pro and Windows 10 Education support 2 sockets
- Windows 10 Pro for Workstations supports 4 sockets
(quick terminology aside: a specific version and edition of Windows is usually referred to as a SKU, and it is common to refer to groups of related versions/editions of Windows as a set of SKUs, e.g. “Windows Desktop SKUs” means any desktop edition of Windows)
But where do these numbers come from? I could not find any official Microsoft documentation that details these limits.
At time of writing, the Wikipedia article for Windows 10 editions lists the above socket count limits, plus core count limits, for each Windows 10 edition:
| Feature | Home | Pro | Education | Pro for Workstations | Enterprise |
| Maximum CPU sockets | 1 | 2 | 2 | 4 | 2 |
| Maximum CPU cores | 64 | 128 | 128 | 256 | 256 |
So, according to these numbers, we could run Windows 10 on a four socket server, but we can’t run it on an eight socket server. Of course “unsupported” just means “a challenge”, so I started looking into how I could get around the limit.
The first thing I did was throw the ntoskrnl.exe binary from my Windows 10 Pro for Workstations install into Ghidra, and started looking for query/helper functions that determine the number of CPUs or CPU sockets on the system. My plan was to find out how the kernel keeps track of this count, then look for associated code that initialises the count during boot, and use that to find where the socket count limitation is applied. After a bunch of digging, and some help from prior work by other reverse engineers, I got a good grasp of how this all works.
Just to get everyone on the same footing, it helps to understand some terminology around cores and processors:
- A physical CPU, package, or socket refers to a whole physical CPU, i.e. a physical device that you can touch.
- A physical core or physical processor refers to an actual physical core inside a CPU, not an SMT core/thread.
- A logical core, logical processor, or processor thread refers to any logical processor that code can be executed on, including SMT threads.
- A NUMA node is a concept in non-uniform memory access (NUMA) topology referring to a set of logical processors that share the same memory controller. You usually have one NUMA node per CPU socket, but some AMD CPUs have multiple NUMA nodes per socket. Memory accesses across NUMA nodes require coordination between nodes, leading to increased latency.
With that all out of the way, let’s dig in.
In the Phase1InitializationDiscard function, the maximum number of licensed sockets is read from the Kernel-RegisteredProcessors license value and written into the KeRegisteredProcessors exported variable. This happens around the same time that BCD OSLOADER variables are read. The code looks something like this:
ULONG licenseValueType = 0;
ULONG resultSize = 0;

// get the socket count limit from the license
RtlInitUnicodeString(&krpName, L"Kernel-RegisteredProcessors");
status = ZwQueryLicenseValue(
  &krpName,                  /* license value name */
  &licenseValueType,         /* value type (0=ANY, 4=DWORD) */
  &KeRegisteredProcessors,   /* buffer */
  4,                         /* buffer size */
  &resultSize                /* output size */
);
// if getting the socket limit failed, default to 1 socket max
if (status != STATUS_SUCCESS || resultSize != 4 || licenseValueType != 4)
{
  KeRegisteredProcessors = 1;
}

// handle boot args
if (bootArgs != NULL)
{
  char* bootProcStr = strstr(bootArgs, " BOOTPROC=");
  if (bootProcStr != NULL)
  {
    char* bootProcVal = strstr(bootProcStr, "=") + 1;
    KeBootprocSpecified = atol(bootProcVal);
  }

  char* numProcStr = strstr(bootArgs, " NUMPROC=");
  if (numProcStr != NULL)
  {
    char* numProcVal = strstr(numProcStr, "=") + 1;
    KeNumprocSpecified = atol(numProcVal);
  }

  char* hvNumProcStr = strstr(bootArgs, " HYPERVISORNUMPROC=");
  if (hvNumProcStr != NULL)
  {
    char* hvNumProcVal = strstr(hvNumProcStr, "=") + 1;
    KeHypervisorNumprocSpecified = atol(hvNumProcVal);
  }

  if (KeRootProcNumaNodeLpsSpecified == 0)
  {
    char* hvRootProcNodeStr = strstr(bootArgs, " HYPERVISORROOTPROCPERNODE=");
    if (hvRootProcNodeStr != NULL)
    {
      char* hvRootProcNodeVal = strstr(hvRootProcNodeStr, "=") + 1;
      KeRootProcPerNodeSpecified = atol(hvRootProcNodeVal);
    }
    char* hvRootProcCoreStr = strstr(bootArgs, " HYPERVISORROOTPROCPERCORE=");
    if (hvRootProcCoreStr != NULL)
    {
      char* hvRootProcCoreVal = strstr(hvRootProcCoreStr, "=") + 1;
      KeRootProcPerCoreSpecified = atol(hvRootProcCoreVal);
    }
  }

  // if MAXPROC is specified, KeMaximumProcessors gets set to 1280
  // this is kinda weird! it'll come up later, though.
  if (strstr(bootArgs, " MAXPROC") != NULL)
  {
    KeMaximumProcessors = 0x500;
  }
}
(Side-note: you may notice the lack of validation on KeRegisteredProcessors here. This is not due to my own simplification of the code; at this point the KeRegisteredProcessors value is taken directly from the license. It is later capped to 0x500 in the KeStartAllProcessors function, right after the boot processor IDT is allocated.)
The ZwQueryLicenseValue function is undocumented, but Geoff Chappell saves the day as always. The license values are fetched from the following binary registry value:
HKLM\System\CurrentControlSet\Control\ProductOptions\ProductPolicy
Geoff also helpfully provides a description of the ProductPolicy data format. It’s a pretty simple structure – a header followed by an array of value entries. Each entry is comprised of a header, a UTF-16 entry name, and the entry value. I wrote a C# script to dump ProductPolicy data if you want to take a look inside the contents of your own system’s ProductPolicy.
Can this policy be edited? Yes, as it turns out! The process is roughly as follows:
- Disable the
sppsvcservice. - In
HKLM\SYSTEM\Setup, change theSetupTypeREG_DWORD value to 1. - In
HKLM\SYSTEM\Setup, change theCmdLineREG_SZ value to “cmd.exe” - Reboot the system.
- Modify the
Kernel-RegisteredProcessorsentry inProductPolicy. - Revert the registry changes in
HKLM\SYSTEM\Setupfrom steps 2 and 3. - Reboot the system.
Step 5 can be done directly in the Registry Editor. The dump script I linked above will tell you the offset of each entry, its name string, and its value. In my case the Kernel-RegisteredProcessors entry header is at 0x0000269E, its name is at 0x000026AC, and the value at 0x000026E2.

Note that sppsvc (the Software Protection Service) must remain disabled for this edit to work; if the service is allowed to run, the license tamper state will be set and the system will deactivate. This also means you can’t run Windows Update or other similar operations while you’ve got this hack in place. Cracked copies of Windows that bypass the license tampering check might work, but I haven’t tried for obvious reasons.
That being said, what fun is there in hacking octa-socket support in to Windows 10 if you can’t use all the cores? Eight 28-core / 56-thread CPUs would make for a whopping 448 logical processors – way beyond the supposed 256-core maximum. Looking through the ProductPolicy entries, though, I couldn’t find anything related to cores or logical processors. This got me intrigued – Wikipedia lists different core count limits for different editions, but nothing in the license data appears to actually restrict the core count. Where do those quoted numbers come from?
First up, I decided to check the citations. The table on Wikipedia generically cites some Microsoft comparison tables that do not contain any information on CPU limits, along with a Groovypost article as a source for socket count limits. That article does not cite any sources, nor does it document any core count limit, but it does talk about socket count limits.
Looking around online, the closest thing to an official source I could find is a Microsoft Community forum post in which a Microsoft MVP (not an employee) says:
Windows 10 supports maximum memory configurations that were formerly available only in the realm of servers. Windows 10 Home supports up to 128GB of RAM on the x64 platform. Windows 10 Pro and Enterprise both support up to 512GB on the x64 platform. The x86 versions of Windows 10 support a maximum of 4GB of RAM. Windows 10 supports a maximum of two physical CPUs, but the number of logical processors or cores varies based on the processor architecture. A maximum of 32 cores is supported in 32-bit versions of Windows 8, whereas up to 256 cores are supported in the 64-bit versions.
– Andrea Da Costa (July 9th 2015)
The eagle-eyed among you might notice two things. The first is that “a maximum of two physical CPUs” doesn’t match the socket counts in the Groovypost article, nor does it match the Wikipedia page. The second is the forum poster’s name – the Groovypost article was written by the same person.
As such, it appears that the three most authoritative sources on socket and core count limitations in Windows 10 SKUs – the Wikipedia article, the article it cites as a source, and the Microsoft Community forum post that appears right at the top of search results – are all effectively sourced to one person writing in an unofficial capacity. That doesn’t necessarily mean the numbers are wrong (ominous foreshadowing heavily implied) but it does mean they’re unreliable.
I was also confused by the values given for Windows 10 Enterprise. Why would it only support two sockets, but still support 256 cores? The Groovypost article is the source of the two sockets claim, but I was able to find lots of examples online of people running Enterprise on systems with four sockets. In the end I found concrete evidence that Kernel-RegisteredProcessors is set to 4 on Windows 10 Enterprise, in a forum post where someone dumped the default product policy data from a Windows 10 Enterprise install:
<sl:policyInt attributes="override-only" name="Kernel-RegisteredProcessors">4</sl:policyInt>
So where are these core count limits coming from?
Thinking back a little, we saw that KeMaximumProcessors gets set to 1280 by the kernel when the MAXPROC directive is set in the BCD options. This BCD value is a boolean, and is also known as BcdOSLoaderBoolean_ForceMaximumProcessors (entry ID 0x26000062). It causes the system to report the maximum possible number of CPUs as existing, presumably for debug purposes. This implies that the kernel technically supports up to 1280 logical processors! But where does that number come from? The answer is processor groups.
Multiprocessor builds of Windows have the concept of affinity for threads, i.e. a set of logical processors upon which a thread can be scheduled. The kernel tracks thread affinity in the KTHREAD structure, and each process has a default affinity for new threads which is tracked in the KPROCESS structure. Prior to NT6.1, affinity was tracked using a ULONG type (via the KAFFINITY typedef), where each bit corresponded to a logical processor. A set bit meant that the thread was free to be scheduled on the corresponding processor, and a zero bit meant that the thread should not be scheduled on that processor. This is generally referred to as an affinity mask. On 32-bit builds you had a hard limit of 32 logical processors on the system, and on 64-bit builds you had a hard limit of 64, because the affinity mask was a ULONG. You simply could not have more than 64 logical processors on the machine because the affinity mask didn’t extend any further. To get around this, Microsoft introduced the concept of processor groups in the NT6.1 kernel.
A processor group is a collection of logical processors. Each group can have up to 64 logical processors assigned to it. Each thread is assigned to a processor group, and the thread’s affinity mask applies to processors in that group. The old affinity mask behaviour still applies, but the exact logical core that each bit applies to is mapped through the thread’s assigned processor group instead of just directly referring to a logical processor by index. The processor grouping is optimised based on NUMA topology. For example, if you’re running a pair of 28-core SMT-enabled CPUs (i.e. 56 threads per socket), you’ll get two processor groups with 56 logical processors in each, rather than one group with 64 logical processors and another with 48 logical processors. This prevents threads from being scheduled on different NUMA nodes, which would harm performance due to memory accesses being performed across sockets.
The KiMaximumGroups exported variable tracks the maximum number of processor groups. In NT6.1 this was 4, but as of NT6.2 it’s 20.

If you multiply 20 groups by 64 logical processors, you get 1280. That’s where the number we saw with MAXPROC in the BCD came from earlier.
This is a hard-coded limit. The reason for hard-coding it is that the KAFFINITY_EX structure used for tracking processor affinities uses a fixed-size array of KAFFINITY masks. Altering the size would alter structure offsets. You’ll notice that KiMaximumGroups is written to in three functions, which might imply that it can dynamically change to more than 20. I thought so too, but after investigation I discovered that 20 is indeed the hard limit.
Phase1InitializationDiscard first calls into KiPerformGroupConfiguration. This function sets up groups based on the NUMA proximity of nodes. When running directly on hardware, it enumerates through the NUMA topology, figures out where to assign each logical processor, tracks how many processors have been inserted into each group, and then counts how many groups have at least one processor assigned to them. KiMaximumGroups is then set to that count. When running in a hypervisor the enumeration is done differently, and in certain cases KiAssignAllNodesToGroup0 is called, which sets KiMaximumGroups to 1. After KiPerformGroupConfiguration returns, Phase1InitializationDiscard carries on, and later calls KeStartAllProcessors. If dynamic hardware partitioning is not supported, KiMaximumGroups is set to KiActiveGroups, which is necessarily no greater than 20 in the first place.
It’s possible that custom builds of Windows exist with more than 20 groups supported, for example in some of Microsoft’s clustered hypervisors, but the Windows Server and Windows Desktop builds available in general release are limited to 20 processor groups.
Taking a look at the Wikipedia numbers again, you’ll notice that (if you correct Enterprise to supporting 4 sockets) each edition’s reported maximum core count matches the maximum socket count multiplied by 64. This starts to make some sense: if each CPU socket is one NUMA node, and each NUMA node gets a processor group, and each processor group can have 64 logical processors assigned to it, then the logical processor limit would be your socket count multiplied by 64. In addition, on NT 6.1, the processor group limit was 4 anyway, which is where the older hard limit of 256 logical processors came from.
According to Microsoft’s documentation on NUMA support, the mapping between physical CPUs/sockets, NUMA nodes, and processor groups isn’t as rigid as the above paragraph might imply:
Starting with Windows 10 Build 20348, the behavior of this and other NUMA functions has been modified to better support systems with nodes containing more that 64 processors.
Creating “fake” nodes to accommodate a 1:1 mapping between groups and nodes has resulted in confusing behaviors where unexpected numbers of NUMA nodes are reported and so, starting with Windows 10 Build 20348, the OS has changed to allow multiple groups to be associated with a node, and so now the true NUMA topology of the system can be reported.
Prior to build 20348, Windows would modify its representation of the system’s NUMA topology to ensure that each processor group was associated with a NUMA node, even if that meant faking the existence of additional NUMA nodes. For example, if you installed a CPU that reported a single NUMA node consisting of 48 physical cores and 96 logical processors, Windows would represent that as two NUMA nodes since the processor group implementation required that each group was directly tied to a NUMA node. Why is this relevant? Well, if Windows went out of its way to support more than 64 logical processors per physical socket (by faking extra NUMA nodes), then that means any purported limit derived from multiplying the maximum socket count by 64 cannot possibly be correct.
Further, as of build 20348, the concepts of groups and NUMA nodes were uncoupled so that multiple processor groups can be assigned to one NUMA node. The only remaining question is “wait, there’s a Windows 10 build 20348?” – that build number seems to be associated with Windows Server 2022 and Windows 11, so it’s not clear where 20348 fits into Windows 10. The article was last updated in August 2021, before the Windows 11 announcement, so it’s possible that 20348 was planned to be a Windows 10 build release but it was pushed into Windows 11 instead.
So what does all of this mean? I’m pretty certain that it means per-edition core count limits simply don’t exist in Windows 10, and probably didn’t in previous versions either. Most likely, Windows 7 supported a maximum of 4 groups of 64 logical processors, whereas Windows 8 and later support a maximum of 20 groups of 64 logical processors.
To wrap it all up, here are the actual limits:
- Sockets:
- 1 socket on Windows 10 Home (due to ProductPolicy)
- 2 sockets on Windows 10 Pro / Education (due to ProductPolicy)
- 4 sockets on Windows 10 Pro for Workstations / Enterprise (due to ProductPolicy)
- 64 sockets on Windows Server 2016, 2019, and 2022 (due to ProductPolicy), although this is effectively capped at 20 due to the processor group limit.
- Physical Cores:
- Physical cores must be licensed on Windows Server SKUs, with a minimum of 8 cores licensed per socket, but there is no upper limit on the number of supported cores.
- There is no specific maximum physical core count on Windows 10.
- Logical Processors:
- Processor groups are unsupported on Vista and prior, meaning a hard limit of 32 logical processors on 32-bit and 64 logical processors on 64-bit is set by the affinity mask.
- 32-bit builds of Windows 7 and later are limited to 32 logical processors.
- 4 processor groups are supported on Windows 7 (NT 6.1) on 64-bit builds. Each group can contain up to 64 logical processors. Each group must be associated with a single NUMA node.
- 20 processor groups are supported on Windows 8 (NT 6.2) and later, on 64-bit builds. This leads to a theoretical limit of 1280 logical processors. Each processor group must be associated with a single NUMA node, and the kernel will create fake NUMA nodes if a single socket has more than 64 logical processors.
- As of build 20348, groups no longer require a 1:1 mapping with NUMA nodes, so fake NUMA nodes are no longer created when a socket has more than 64 logical processors. One group cannot span multiple NUMA nodes, but each NUMA node can have multiple processor groups assigned to it. This has no affect on the maximum counts.
I am unaware of any commercially available x86_64 system, at time of writing, that can get close to the 1280 logical processor limit. An S8S board with Xeon 8280 processors gets as high as 448 logical processors. Higher core count Xeon Scalable Gen2 processors are available (9 series) but they are not for general sale and only support 2S configurations. Xeon Scalable Gen3 processors are documented as only supporting 2S scaling, even on the Xeon 8380. AMD EPYC offers higher core counts per socket, but so far we haven’t seen Infinity Fabric scaling beyond 2S. One can approximate the limit using CPU overcommitting in a hypervisor (KVM supports this), which basically involves lying about how many processors you have, but that’s cheating. It’s possible that specialised hypervisors operating on top of compute clusters can host a virtual machine with 1280 logical processors actually backed by hardware, but those processors would be on physically separate compute nodes interconnected by RDMA networking, and you don’t tend to run vanilla Windows 10 installs on that kind of platform.
Thanks for reading this post! If you enjoyed it and want to say thanks, consider purchasing some of my amusing warning stickers. They’re 100% guaranteed to be tangible objects.