
Привет, друзья. Сегодня я покажу вам, как пользоваться удалённым помощником Windows, или как подключиться удалённо к чужому компьютеру под управлением Windows 10, 8.1 и 7. В каких случаях это может вам пригодиться? Например, вашему приятелю или приятельнице, а может родственнику, нужно срочно установить какую-либо программу, удалить вирус, переустановить драйвер, а может скачать фильмы, музыку и т. д. Сам он этого сделать не может и просит вас ему помочь, ну а вы, добрейшей души человек, заходите на его компьютер удалённо и решаете все вопросы. Точно таким же образом вы можете сами попросить любого человека помочь удалённо вам.
Удалённый помощник Windows
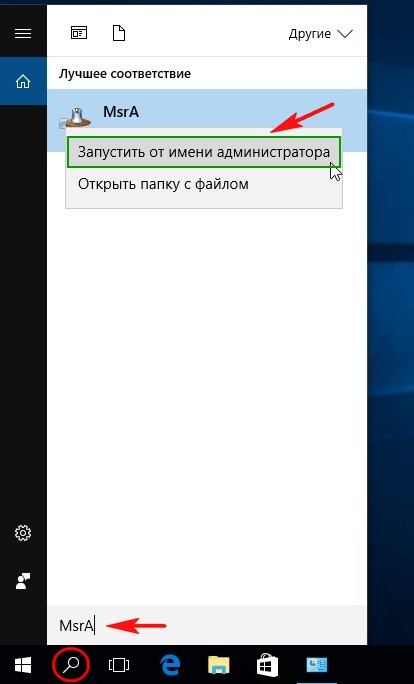
Для получения удалённой помощи также можно воспользоваться программами: TeamViewer, Ammyy Admin, LiteManager Free, RemotelyAnywhere 11 и прочими. Но если у вас установлена Windows 10, 8.1 или 7, то вы можете использовать штатную функцию этих операционных систем — встроенный в эти версии Windows специальный удалённый помощник. Например, я хочу помочь своему приятелю. На удалённом компьютере моего знакомого под управлением Windows 10 нажимаем на кнопку «Поиск Windows» и вводим команду MsrA, затем щёлкаем правой мышью и жмём «Запустить от имени администратора».
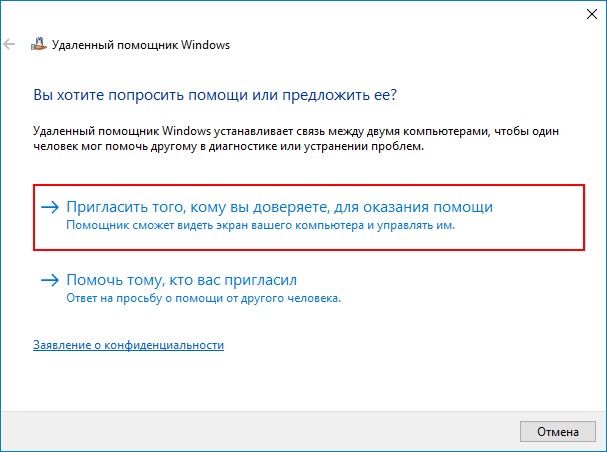
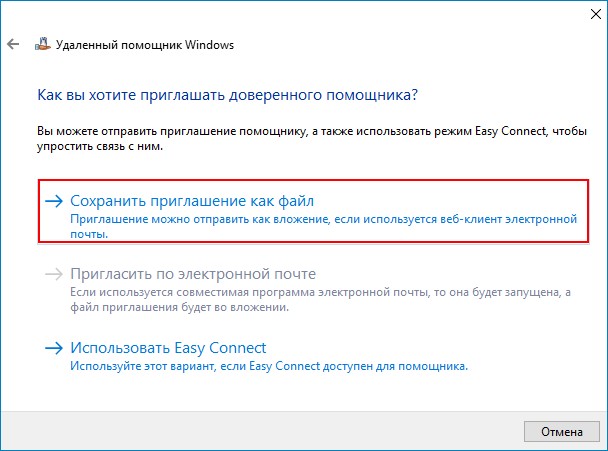
Выбираем «Пригласить того, кому вы доверяете, для оказания помощи», то есть меня.
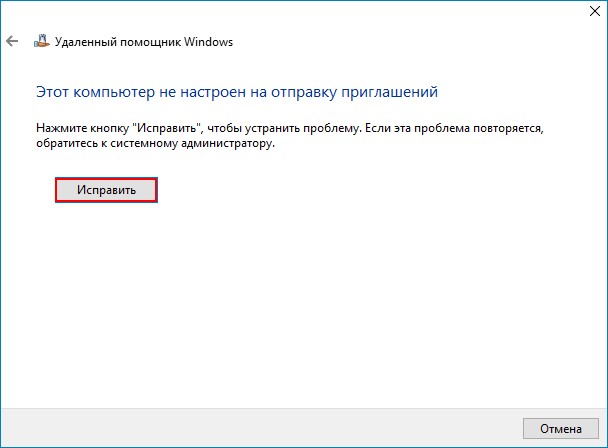
У вас может выйти ошибка «Этот компьютер не настроен на отправку приглашений». Не беда, жмём на кнопку «Исправить»
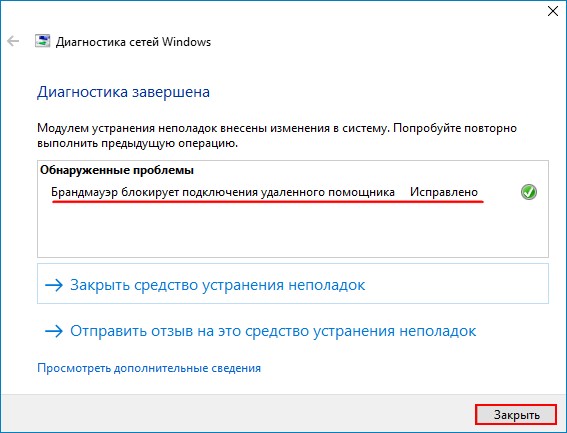
Получаем «Исправлено». Жмём «Закрыть»
Опять нажимаем кнопку «Поиск Windows» и вводим команду MsrA, затем щёлкаем правой мышью и жмём «Запустить от имени администратора». Выбираем «Пригласить того, кому вы доверяете, для оказания помощи». Далее жмём «Сохранить приложение как файл».
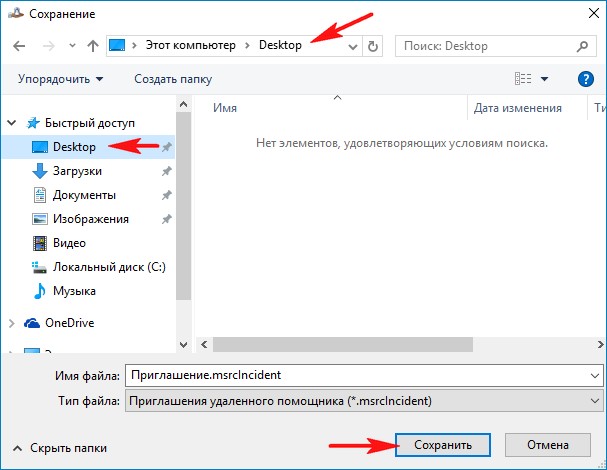
В открывшемся проводнике выбираем, куда именно сохранить файл-приглашение удалённого помощника. Я выбираю рабочий стол и жму «Сохранить».
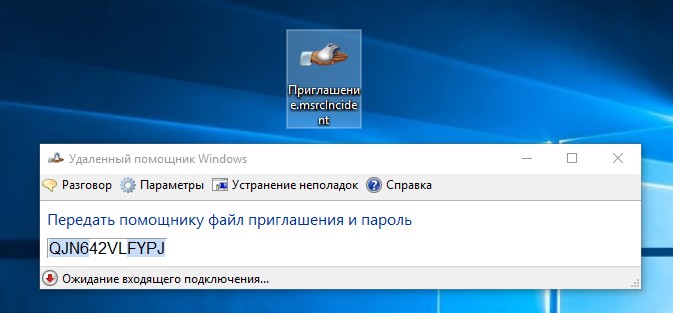
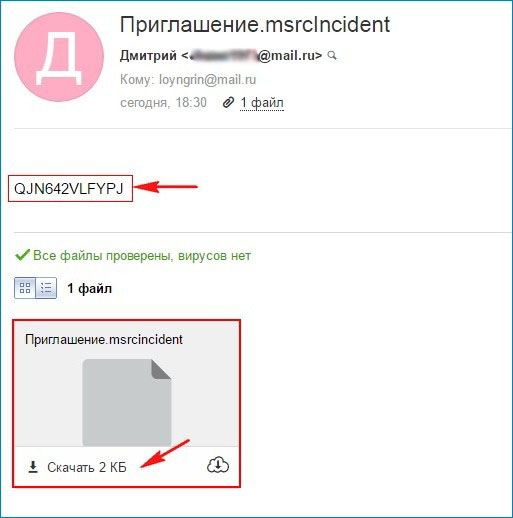
На данном этапе мне нужно передать удалённому пользователю файл-приглашение и пароль.
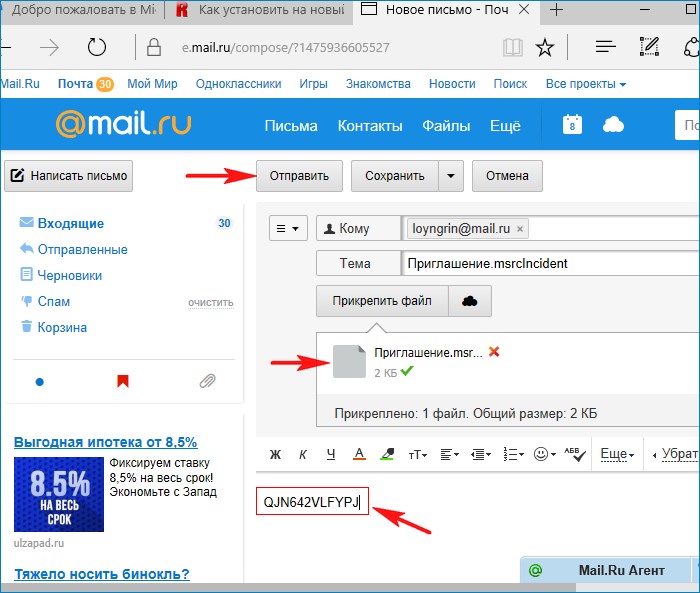
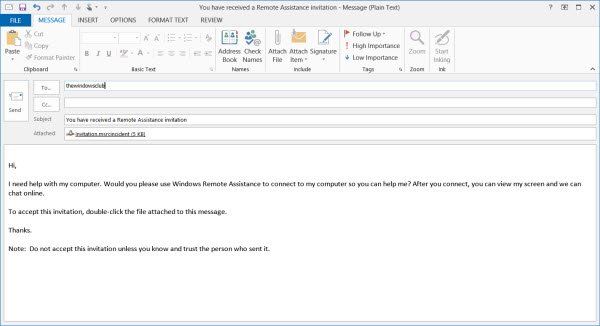
Открываем почтовый ящик и пишем письмо удалённому пользователю, к которому прикрепляем файл-приглашение.

Приглашение прикреплено к письму. Теперь пишем пароль и жмём «Отправить».
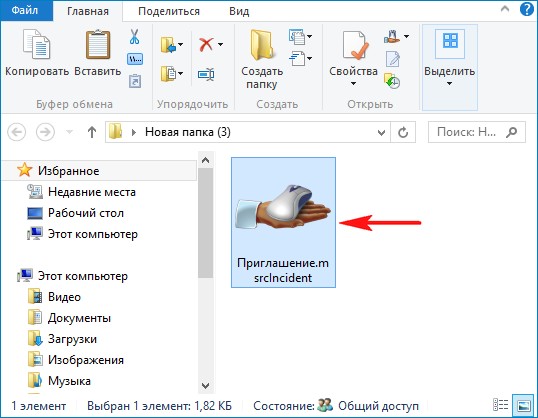
Удалённый пользователь получает письмо с файлом-приглашением и паролем. Скачивает файл-приглашение себе на компьютер, копирует пароль.
И запускает файл-приглашение.
Вводит пароль и жмёт «Ок».
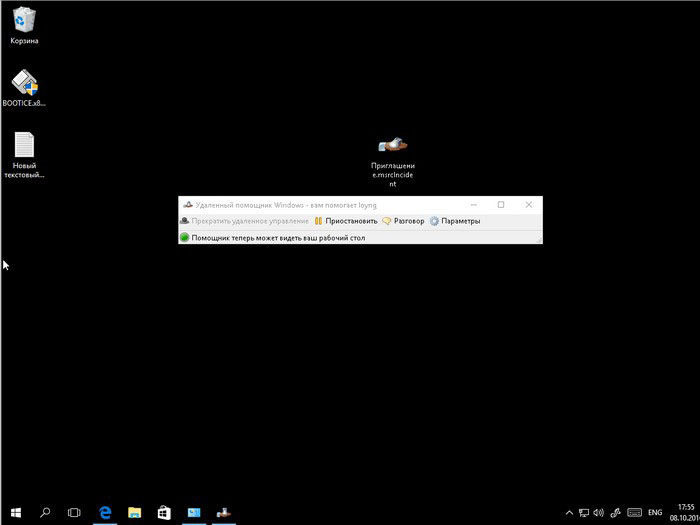
На удалённом компьютере возникает окно с запросов разрешения удалённому помощнику подключиться к компьютеру. Удалённый пользователь отвечает утвердительно «Да».

И на его рабочем столе появляется небольшое окно с информацией о том, что удалённый помощник видит его рабочий стол.

В данный момент на моём компьютере появляется рабочий стол удалённого компьютера моего приятеля, но пока я могу только наблюдать за удалённым рабочим столом.

Чтобы управлять удалённым компьютером с помощью своей клавиатуры и мыши, я должен запросить управление удалённым компьютером.
Жму кнопку «Запросить управление».

На удалённом компьютере мой приятель соглашается передать мне управление своим компьютером, нажимая в появившемся окне «Да».
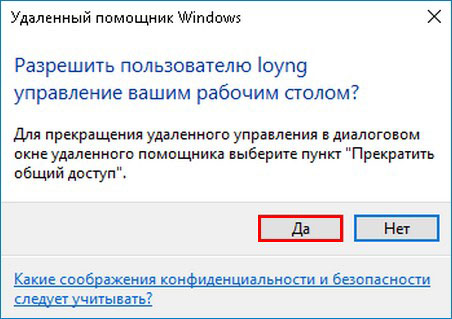
Теперь я полностью могу управлять удалённым компьютером.

Windows 10 remote assistance is an important remote control program, another one is Windows 10/11 remote desktop connection.
Unlike the desktop connection, the remote assistance mainly provide remote access and remote assistance solutions, help others to solve the computer problems over the Internet. It mainly used in two computers, and the two computers can control the computer to fix the problem. This is different with the Windows 10/11 desktop connection.
Here are the steps to setup the remote assistance on Windows 10.
Setup Remote Assistance Settings
You need to do these things at your pc and the remote pc if you want to create the remote connections between your pc to another pc.
Step 1. Right-click This PC > Properties.
Step 2. Choose Remote settings from the left side.
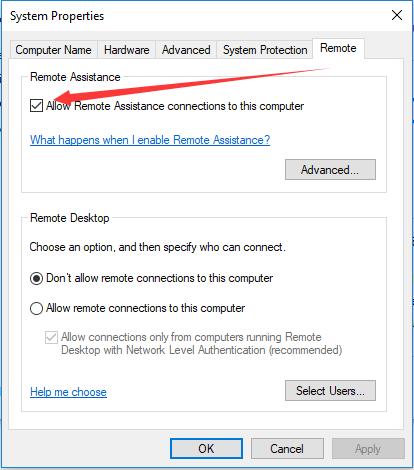
Step 3. Locate to the Remote tab, and tick Allow Remote Assistance connections to this computer. And Microsoft also provides a link to tell you what will happen after enabling remote assistance. Then click OK.
After the remote assistance settings setup, you can find someone or help someone to fix the windows 10 problem via the remote assistance function.
How to Invite Someone to Assistance You on Windows 10/11
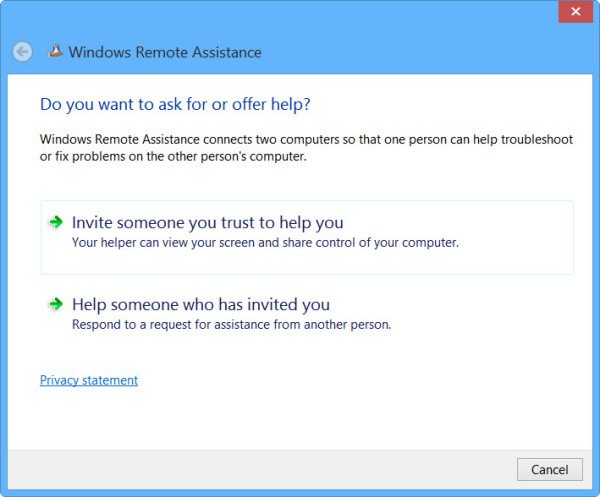
Step 1. Type remote assistance in the search box, and open this option: Invite someone to connect to your PC and help you, or offer to help someone. And you will open the Windows Remote Assistance.
Step 2. There are two options. Choosing the first option: Invite someone you trust to help you.
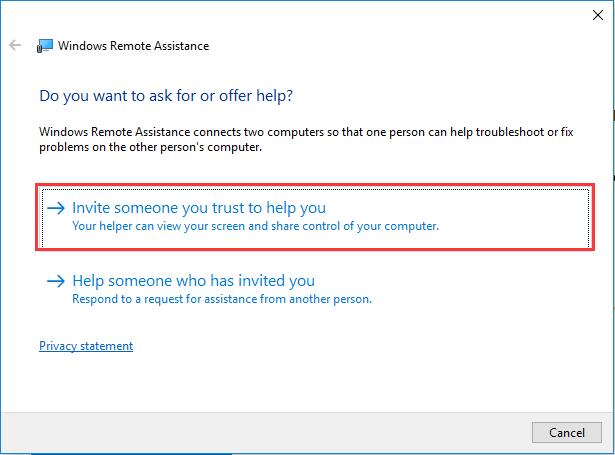
If you want someone to help you, you can choose this option. And your helper can view your screen and share control of your computer. Of course, you can also control your computer.
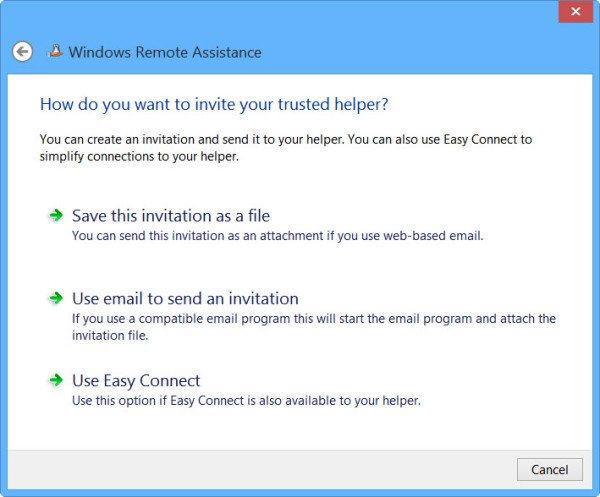
Step 3. Choose the First one Save this invitation as file.
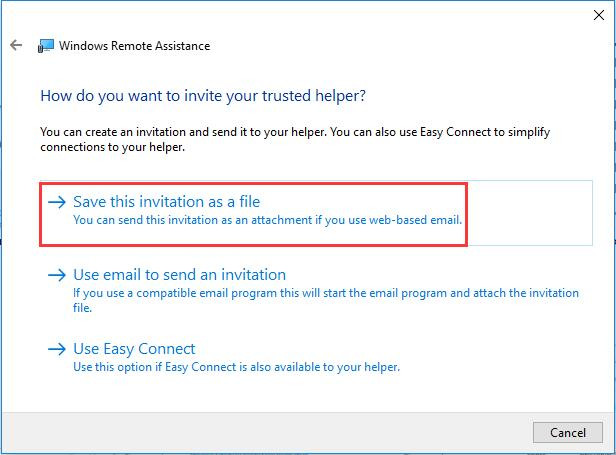
If you are using the remote assistance at the first, the third selection is gray out. You cannot use it. But if you had already created a new remote assistance before, you can choose Use Easy Connect.
Step 4. There is an important file and a password you need to manage.
1) You can store the file (msrcIncident) to your local disk.
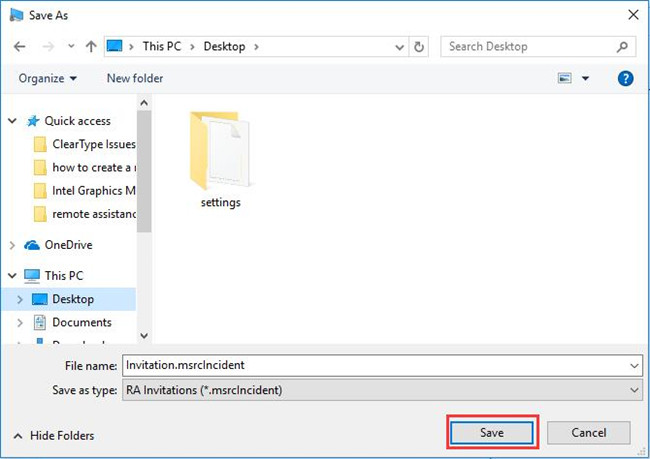
2) Remember the password.
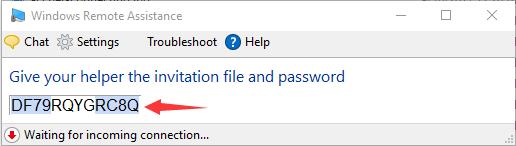
Step 5: Send the downloaded file and password to the remote computer. You can send the RA invitations file via the email, chat tool and other file transfer tools.
Step 6: In the remote computer, double click to run the Invitation.msrclncident file and type the password. Then click OK.
After that in your PC will pops up a window to confirm connection.
Step 7. Click Yes to enable remote computer to see your computer desktop.
Step 8: The remote computer can send Request to Control message to help you fix computer problem.
Of course, the remote assistance provides the chat function. You can type some words directly in the text box, whatever you send or not send, the remote computer can see the words.
Tips: If you want to help others to solve their computer problem, you can choose the second option: Help someone who has invited you.
So using the remote assistance functions on Windows 10, you can build a fast internet connection and fix your computer problems or remote computer problems easily.
More Articles:
Cannot Intall Drivers, no Intel Adapters Are Present in this Computer
Download Marvell Avaster Wireless-AC Network Controller Driver for Surface
Npcap Loopback Adapter No Internet on Windows 11, 10, 8, 7
Brian Peng
Brian Peng is a PC technician and network engineer with over 13 years of IT experience. He has worked in the IT industry for a long time, providing IT support and network service support for various companies. Currently, he has written over 1000 articles about computers, games, and mobile.
Download Windows Speedup Tool to fix errors and make PC run faster
Windows Remote Assistance is a good way to give control of your Windows computer to someone you trust. With your permission, your friend or technician can even use your mouse and keyboard to control your PC and show you how to fix a problem – or fix it themselves. In this post, we will see how to enable, set up, and use Windows Remote Assistance in Windows 11/10.
How do I fix Remote device does not support session invitation?
If you see Remote device does not support the session invitation message, then you will have to first set up the Windows REmote Assistance as mentioned in this post via the Control Panel.
Related read: Enable & use Remote Desktop Connection in Windows.
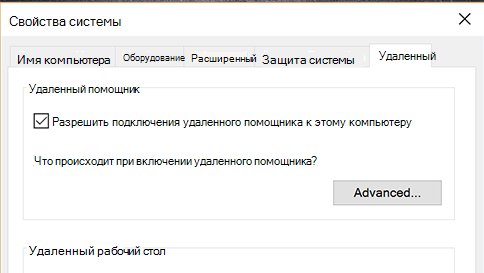
Press Win+X and from the menu, select ‘Control Panel’. Search “System.” The window will display all of the basic specifications of your computer such as model number, CPU configuration, installed memory, etc.
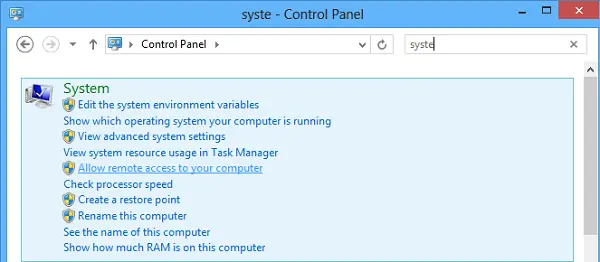
Navigate to the Remote tab in System Properties now and select the Allow remote assistance to this computer option and click hit the ‘Apply’ button. If you uncheck this option, it will disable Remote Assistance.

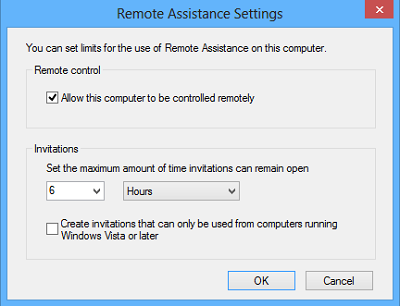
You can even configure certain settings here. For instance, you can set limits for the use of remote assistance, choose to allow the computer to be used remotely, set the maximum amount of invitations.
If you find that your Windows Firewall is blocking Remote Assistance, create a rule to allow it. To do so, open the “Run” dialog box. Type “Firewall.cpl” in the text field and click “OK.’ Windows Firewall control panel will be launched. Go to the left pane and click “Allow an App or Feature through Windows Firewall.”
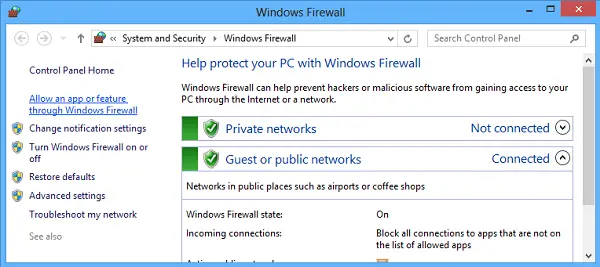
You should find a list of devices that are disabled/enabled through Windows Firewall. Click “Change Settings.”
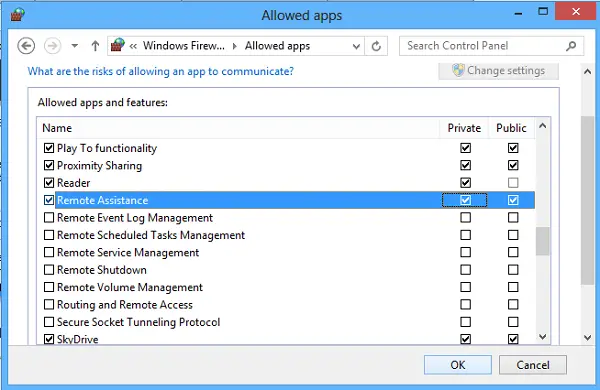
Scroll down until you find “Remote Assistance” option. When you find it, click the option to allow remote assistance.
How do I fix The Computer is not setup to send invitation for Remote Assistance?
Open an elevated command prompt, type msra.exe and hit Enter to open Windows Remote Assistance. Follow the on-screen wizard. Click on Invite someone you trust to help you or Help someone who has invited you, as the case may be.
Let’s say you want to invite someone to have a look at and operate your computer. Click on Invite someone you trust to help you.
You can generate the invitation as a file or use the email to send an invitation or use Easy Connect. I prefer the Use email to send an invitation.
The Invitation file will then be sent to your friend using your email client.
Your friend will then have to enter the code in his Remote Assistance box. After this is done successfully, the two computers will get connected. Once your work is completed, remember to disable this feature.
Read: Cannot start Remote Desktop Services in Windows
Bear in mind, Remote Desktop cannot establish a connection with the Remote Computer until remote access to the server has been enabled, the remote computer turned off, and the remote computer is not available on the network. So, make sure the remote computer is turned on, connected to the network, and the remote access is enabled.
You can now also give or take Tech Support remotely using Quick Assist in Windows 10.
Incidentally, the Microsoft Remote Desktop Assistant tool will help you make your PC ready to use Remote Desktop applications from another device to access your PC.
You might want to have a look at these posts too:
- List of Free Remote PC Access software
- Remote Access PC using Web Browser with TeamViewer Web Connector + TeamViewer.
- NeoRouter – A Zero Configuration Remote Access & VPN Solution
- Remotely access another computer using Chrome Remote Desktop.
Anand Khanse is the Admin of TheWindowsClub.com, a 10-year Microsoft MVP (2006-16) & a Windows Insider MVP (2016-2022). Please read the entire post & the comments first, create a System Restore Point before making any changes to your system & be careful about any 3rd-party offers while installing freeware.
Reader Interactions
Applies ToWindows 10
Важно: Узнайте, как защитить себя от мошенников, которые притворяются службой технической поддержки. Мошенничество под видом технической поддержки сильно распространено: мошенники используют тактику запугивания, чтобы обманом заставить вас обратиться за услугами технической поддержки, которые вам на самом деле не нужны. Разрешайте помощнику подключаться к устройству только в том случае, если вы сами инициировали взаимодействие и связались со службами поддержки Майкрософт напрямую. Если вы или кто-то из ваших знакомых пострадал от мошенничества под видом технической поддержки, используйте форму для сообщения о мошенничестве под видом технической поддержки, чтобы сообщить об этом.
Удаленный помощник Windows позволяет предоставить человеку, которому вы доверяете, доступ к вашему ПК, чтобы этот человек мог удаленно решить проблему, возникшую на вашем ПК.
Совет: Вы также можете использовать Быстрая поддержка для предоставления и получения удаленной помощи.
Прежде чем использовать его, необходимо включить доступ. В поле поиска на панели задач введите удаленный помощник и выберите Разрешить отправку приглашений удаленному помощнику с этого компьютера из списка результатов. Затем на вкладке Удаленное выберите поле Разрешить подключения удаленного помощника к этому компьютеру проверка и нажмите кнопку ОК.
Чтобы получить помощь, выполните приведенные далее действия.
-
В поле поиска на панели задач повторно введите удаленный помощник и выберите Приглашение подключиться к вашему компьютеру, чтобы помочь вам, или предложение помощи другим пользователям.
-
Выберите Пригласить того, кому вы доверяете, для оказания помощи.
-
Выполните одно из указанных ниже действий.
-
Если вы никогда ранее не использовали режим Easy Connect, выберите Использовать режим Easy Connect.
-
Если режим Easy Connect применялся ранее, выберите имя контакта человека, который будет вам помогать. Чтобы пригласить пользователя, которого нет в списке контактов, выберите Пригласить кого-то, кто поможет вам.
-
-
Следуйте инструкциям.
Чтобы предоставить помощь, если кто-то обратился к ней, выполните указанные действия.
-
Введите удаленный помощник в поле поиска и выберите Приглашение подключиться к вашему компьютеру, чтобы помочь вам, или предложение помощи другим пользователям.
-
Выберите Помочь тому, кто вас пригласил.
-
Выполните одно из следующих действий:
-
Если режим Easy Connect используется впервые, нажмите Использовать режим Easy Connect.
-
Если режим Easy Connect применялся ранее, выберите имя контакта человека, которому хотите помочь. Чтобы помочь пользователю, отсутствующему в списке, выберите Помочь новому пользователю.
-
-
Следуйте инструкциям.
Нужна дополнительная помощь?
Нужны дополнительные параметры?
Изучите преимущества подписки, просмотрите учебные курсы, узнайте, как защитить свое устройство и т. д.
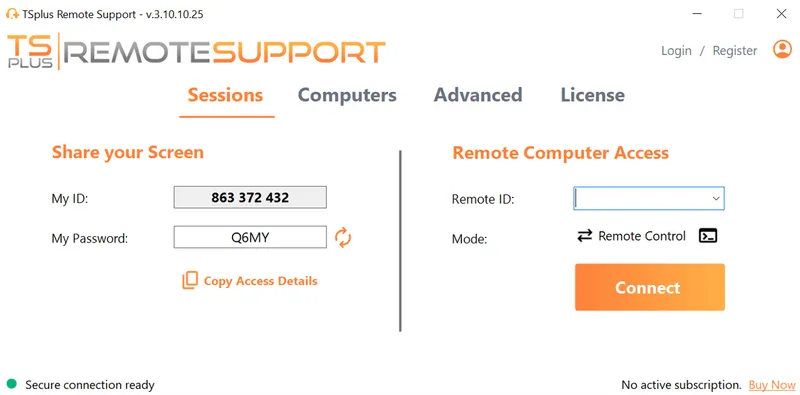
TSplus Remote Support Free Trial
Cost-effective Attended and Unattended Remote Assistance from/to macOS and Windows PCs.
Enabling Remote Assistance in Windows 10
Before initiating Remote Assistance, it is essential to enable this feature on the Windows 10 system.
Accessing System Properties
System Properties is the primary location to configure Remote Assistance settings.
Navigating to System Properties: Right-click on ‘This PC’ on your desktop or in File Explorer, and select ‘Properties’. Then click on ‘Remote settings’ on the left panel to open the System Properties dialog box. This access point allows IT administrators to adjust critical settings that influence both system performance and security measures essential for remote operations.
Enabling Remote Assistance: In the ‘Remote’ tab, check the box labeled ‘Allow Remote Assistance connections to this computer’. Ensure that the necessary firewall exceptions are also enabled to allow incoming connections. This step is crucial as it not only enables the feature but also ensures that the system’s security posture is maintained during remote sessions, protecting both the host and client systems from unauthorized access.
Using the Registry
Introduction: For advanced users, Remote Assistance can also be enabled via the Windows Registry, providing a more granular control over the settings.
Opening the Registry Editor: Press Win + R, type regedit, and hit Enter to open the Registry Editor. This tool allows direct manipulation of system configurations, offering a deeper level of customization for experienced users.
Modifying the Registry: Navigate to HKEY_LOCAL_MACHINE\SYSTEM\CurrentControlSet\Control\Remote Assistance. Double-click on fAllowToGetHelp and change its value to 1 to enable Remote Assistance. This modification is essential for environments where group policy changes are managed centrally, allowing IT professionals to deploy settings across multiple computers efficiently.
Enabling Remote Assistance through System Properties or the Registry Editor provides the foundational access needed for IT support teams to perform remote troubleshooting effectively. This setup ensures that support can be provided swiftly and securely, reflecting the needs of a dynamic workplace.
Initiating a Remote Assistance Session
Setting up a Remote Assistance session involves sending an invitation and establishing a connection.
Sending an Invitation
Initiating Remote Assistance requires sending a formal invitation to the support personnel or IT professional who will assist.
Using Windows Tools: To start, navigate to the start menu and type ‘Remote Assistance’ to find the option ‘Invite someone to connect to your PC and help you, or offer to help someone else.’ This feature is part of Windows’ built-in support tools, enabling users to request help efficiently.
Sending the Invitation: Depending on the user’s preference or organizational protocols, the invitation can be sent as a file or via email. The process involves creating the invitation, which generates a file or message containing a unique connection code. Follow the on-screen prompts to specify how the invitation should be sent and ensure all necessary information is included for the helper to connect.
Connecting to a Remote Session
The recipient of the invitation will use the provided details to establish a connection to the requester’s system.
Using the Invitation File or Code: The helper opens the received invitation file or enters the provided code from the email. This code is essential for authenticating and securing the connection between the two systems.
Starting the Remote Session: Upon entering the password, the remote session will activate, allowing the helper full or partial access to the user’s computer, depending on the permissions set. This access enables the helper to view the user’s screen, control the mouse and keyboard, and perform necessary troubleshooting tasks directly.
Streamlining the Process: For regular support activities, IT departments can streamline the process by using templates for invitation messages or automating parts of the setup through scripting, reducing the time to connect and increasing efficiency during critical support incidents.
Advanced Settings and Tips
Enhancing the efficiency and security of a Remote Assistance session is crucial for IT professionals.
Security Considerations
Maintaining high security standards during remote sessions is vital to protect both the data and the integrity of the systems involved.
Encryption: Employing end-to-end encryption ensures that all data transmitted during a remote session is protected from unauthorized access. This includes screen data, file transfers, and keystroke information, safeguarding sensitive information against potential breaches.
Password Security: Implement strong, randomly generated passwords for each session. Consider using a password manager to generate and retrieve complex passwords, enhancing security without sacrificing convenience.
Additional Measures: Enable two-factor authentication (2FA) for an added layer of security. This requires users to provide two forms of identification before access is granted, greatly reducing the risk of unauthorized entry.
Performance Optimization
Optimizing the performance of Remote Assistance is essential to ensure a smooth and responsive experience, particularly over varied network conditions.
Visual Settings: Reducing the color quality and disabling unnecessary graphical effects like background images can significantly enhance performance, especially when bandwidth is limited. These settings can be adjusted from within the Remote Assistance options, allowing for a balance between visual quality and performance efficiency.
Bandwidth Management: Prioritize critical data traffic by adjusting the Quality of Service (QoS) settings on your network. This ensures that Remote Assistance data packets are prioritized on the network, which is crucial in maintaining connection stability and responsiveness during remote sessions.
Connection Quality: Regularly monitor the connection quality during remote sessions. If lag or jitter is observed, consider reducing the screen resolution or pausing any non-essential applications that may be consuming bandwidth.
Session Efficiency Tips: Close unnecessary applications on both the host and client machines to free up resources. Also, consider using wired connections instead of wireless to reduce latency and increase connection reliability during critical support tasks.
Why TSplus Remote Support is the solution
For IT professionals managing remote support, TSplus Remote Support stands out as the premier solution. It simplifies the remote connection process by eliminating the need for complicated invitation systems, offering direct connections through secure IDs. Enhanced security features, including robust encryption and customizable user permissions, ensure that sensitive information remains protected. TSplus Remote Support’s user-friendly administration tools also allow seamless management of user roles and permissions, making it ideal for both small and large IT environments.
Conclusion
In conclusion, leveraging Windows 10 Remote Assistance can significantly improve the efficiency and effectiveness of IT support. For professionals seeking more robust solutions, TSplus Remote Support offers superior security, usability, and management features, positioning it as a top choice for those looking to enhance their remote assistance capabilities.
TSplus Remote Support Free Trial
Cost-effective Attended and Unattended Remote Assistance from/to macOS and Windows PCs.