
Время непрерывной работы Windows с момента последней перезагрузки (uptime) можно узнать разными способами.
В графическом интерфейсе общее время работы Windows можно найти в диспетчере задач.
- Запустите Task Manager (выполните команды
taskmgr.exe
или нажмите сочетание клавиш
Ctrl+Shift+Esc
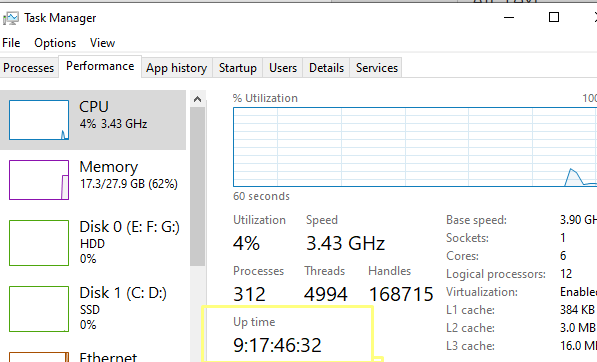
) - Перейдите на вкладку Производительность (Performance) -> вкладка ЦП (CPU)
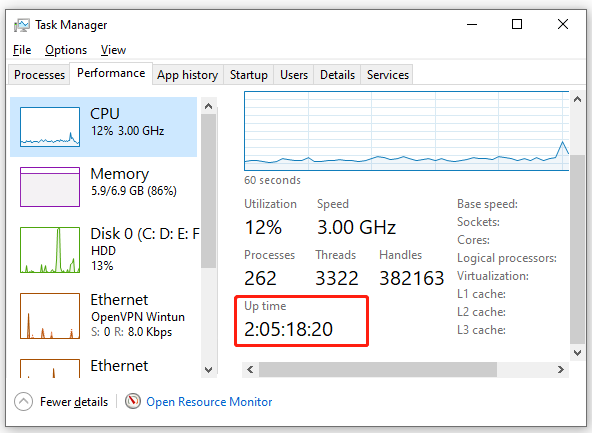
- Время непрерывной работы компьютера содержится в поле Up time
-

Также можно получить текущий uptime из командной строки. Выполните команду:
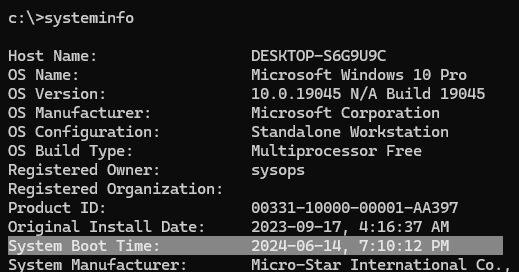
Systeminfo
Время последней загрузки (перезагрузки) Windows указано в значении System Boot Time.
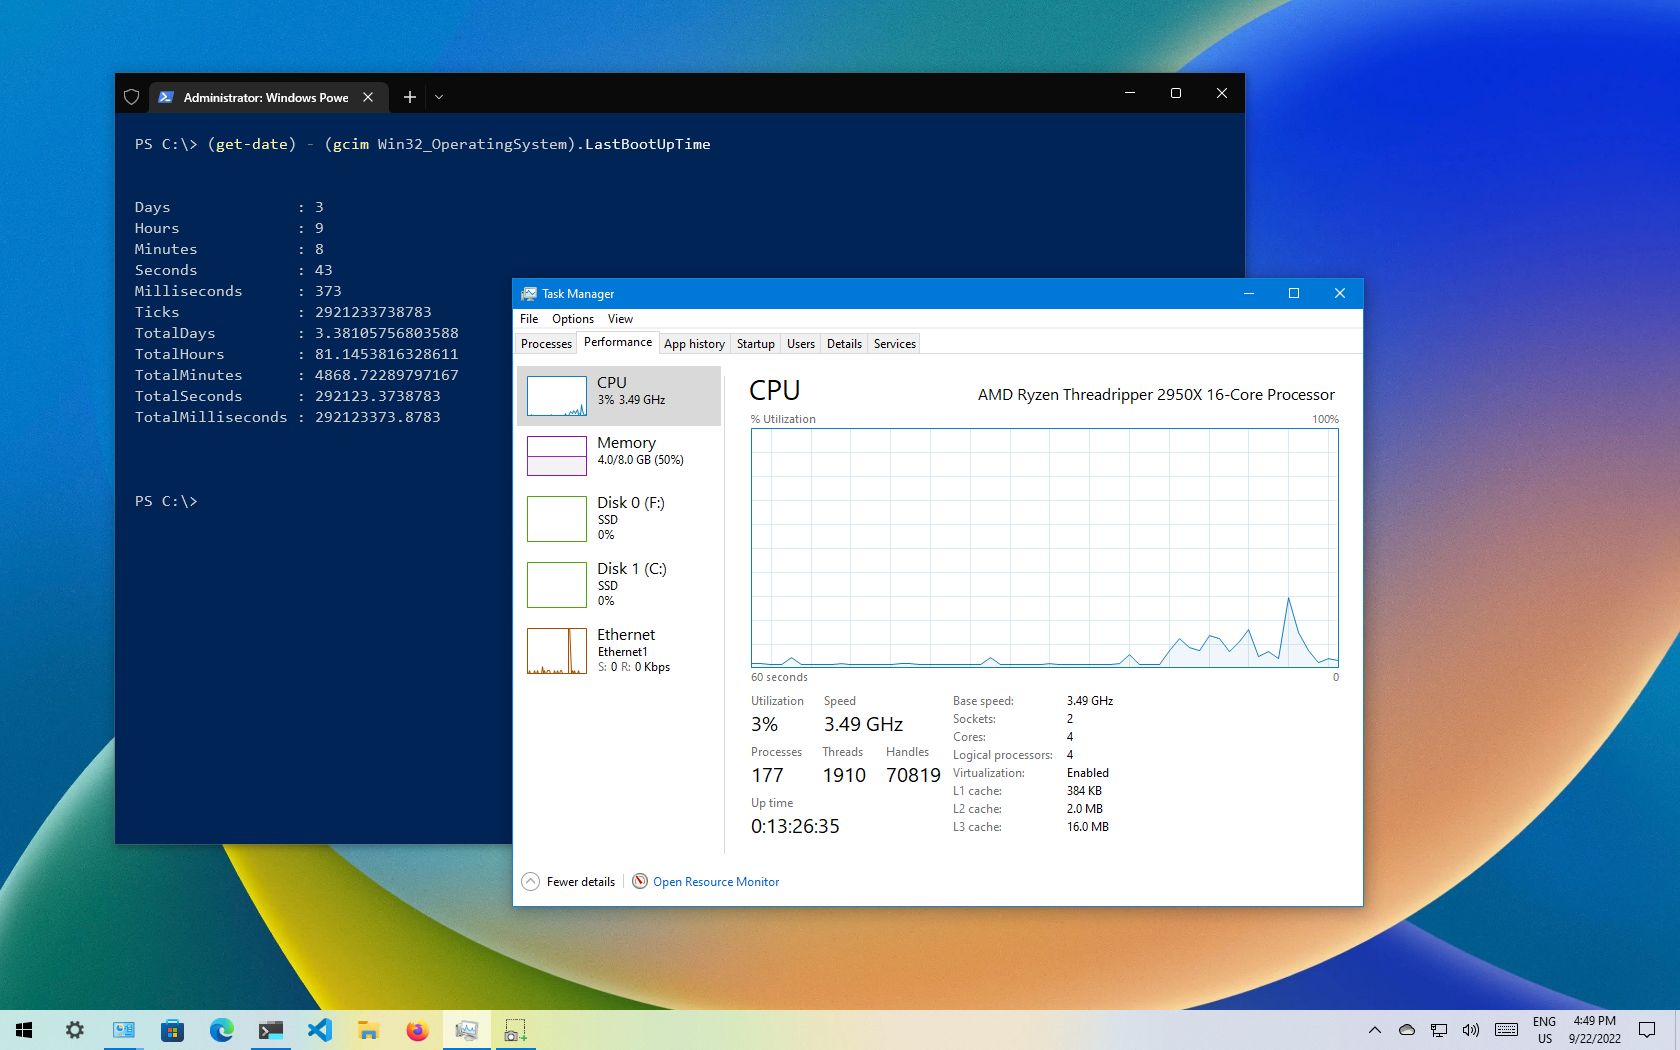
В данном случае в командной строке отобразится только время последней загрузки. Чтобы вычислить значение uptime, как разницу между текущим временем и временем загрузки Windows, воспользуйтесь PowerShell командами:
$boot_time = Get-CimInstance Win32_OperatingSystem | select LastBootUpTime
(Get-Date) - $boot_time.LastBootUpTime | SELECT Days,Hours,Minutes,Seconds
Команда вернет значение аптайма компьютера в днях и часах.
В новых версиях PowerShell Core 6.x и 7.x для получения времени работы системы можно использовать новый командлет Get-Uptime. Это командлет сразу выведет значение uptime в днях, часах, минутах (в формате TimeSpan). Или можно вывести время с последней загрузки компьютера:
Get-Uptime -Since
Можно получить значение аптайм с удаленного хоста:
$remotePC='pcbuh01'
(Get-Date) - (Get-CimInstance Win32_OperatingSystem -ComputerName $remotePC).LastBootupTime
Эту команду можно использовать для удаленного опроса uptime компьютеров в домене AD. Для получения списка компьютеров обычно используется командлет Get-ADComputer.
Обратите внимание, что на десктопных версиях Windows 10 и 11 по умолчанию включена функция гибридной загруки (Быстрый запуск, Fast Boot). В этом режиме, когда пользователь выключает компьютер, Windows фактически не выключается, а выгружает ядро и драйверы в файл гибернации. В этом случае (как и после пробуждения после режима сна и обычной гибернации) аптайм компьютера не сбрасывается при включении.
(Image credit: Future)
On Windows 10, understanding how long a device has been up and running can be useful information in many scenarios. For example, when troubleshooting problems, you may want to know if a reboot was recently applied or if your computer is acting up while working on an important project, and you suspect a restart is required.
Whatever the reason, Windows 10 doesn’t make it obvious to see your system uptime, but it’s not impossible to find either, as you can deduce this information using Task Manager, Control Panel, Command Prompt, and PowerShell.
This guide will walk you through four simple ways to check your device uptime without scripts or restarting.
How to check PC uptime using Task Manager
The easiest way to check your device uptime is using Task Manager with these steps:
- Open Start.
- Search for Task Manager and click the top result to open the experience.
- Quick tip: You can also open Task Manager using the «Ctrl + Shift + Esc» keyboard shortcut or by right-clicking the taskbar and selecting Task Manager from the menu.
- Click the More details button (if you’re using the compact view).
- Click the Performance tab.
- Select the CPU section.
Once you complete the steps, you’ll see your device uptime on the right, at the bottom of the page.
How to check PC uptime using Control Panel
Another easy way to determine your system uptime is to check your network adapter status with these steps:
- Open Start.
- Search for Control Panel and click the top result to open the experience.
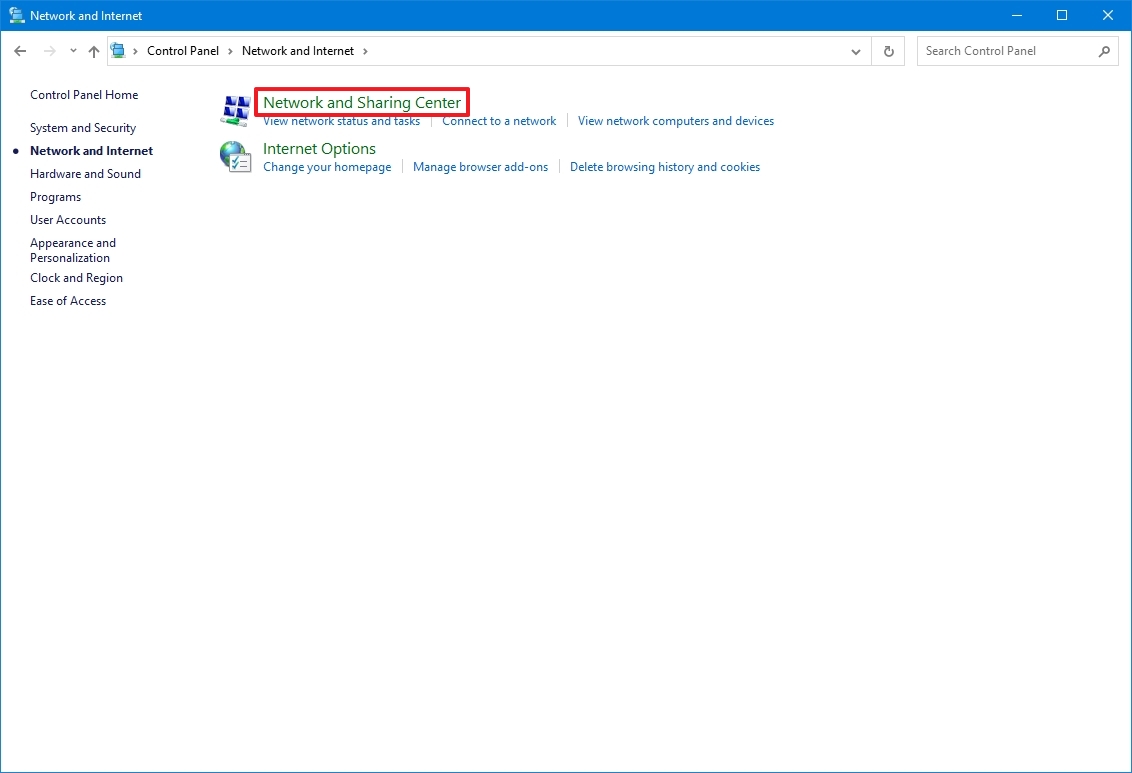
- Click on Network and Internet.
- Click on Network and Sharing Center.
- Click the «Change adapter settings» option in the left pane.
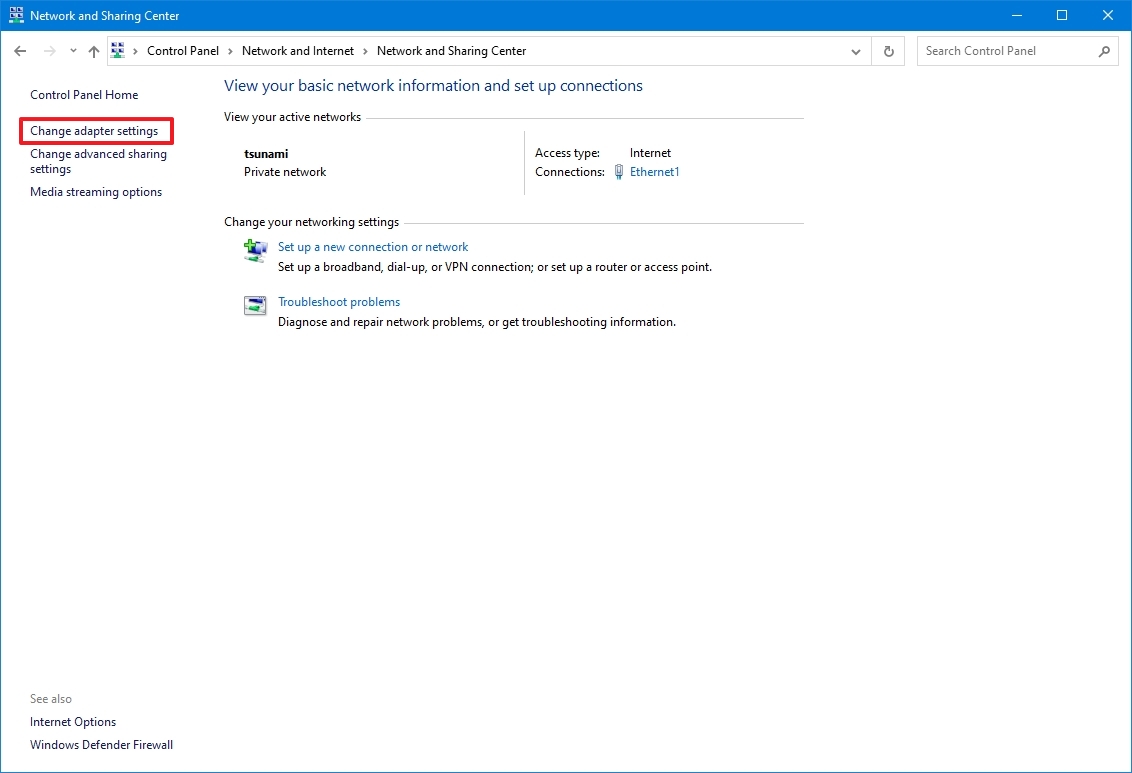
- Double-click the network adapter connected to the internet.
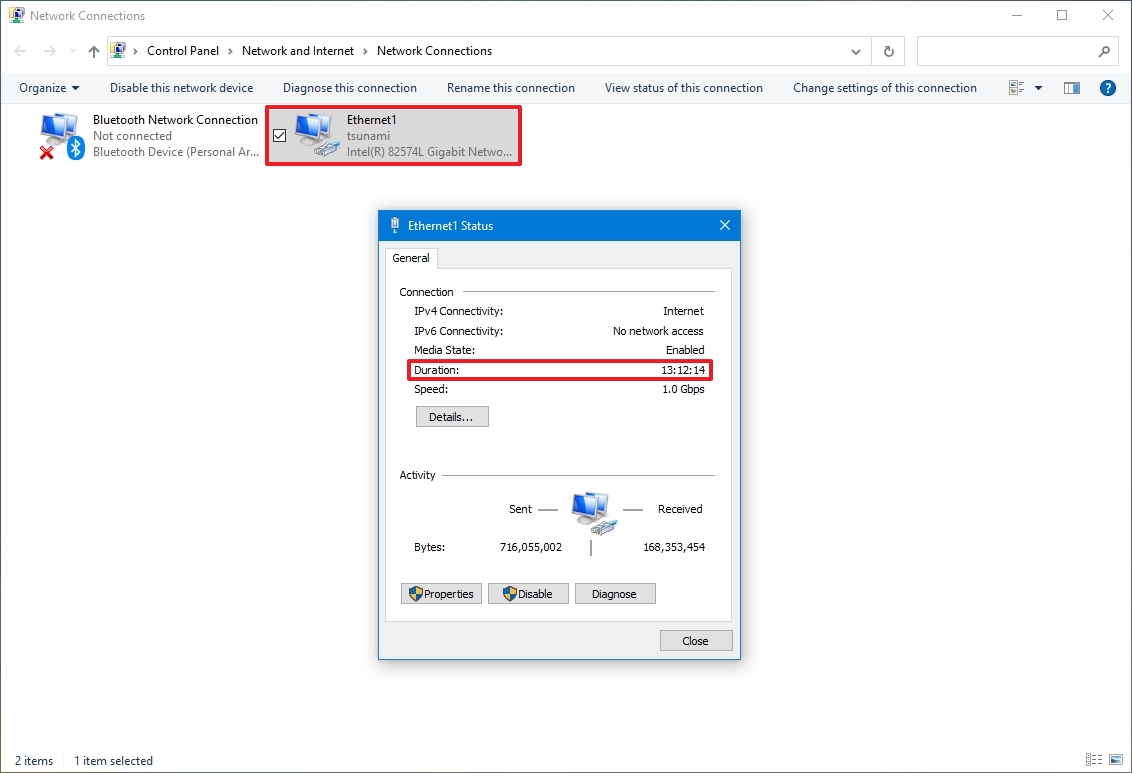
After completing the steps, you can deduce your computer uptime using the «Duration» information, which indicates the uptime from the network connection that resets every time the device starts. However, this method work as long as you didn’t reset your network connection since the last time you booted the device.
All the latest news, reviews, and guides for Windows and Xbox diehards.
How to check PC uptime using Command Prompt
If you want to use Command Prompt to check your device uptime, you have at least two ways to do it.
WMIC method
To check the device uptime with Command Prompt on Windows 10, use these steps:
- Open Start.
- Search for Command Prompt, right-click the top result and click the Run as administrator option.
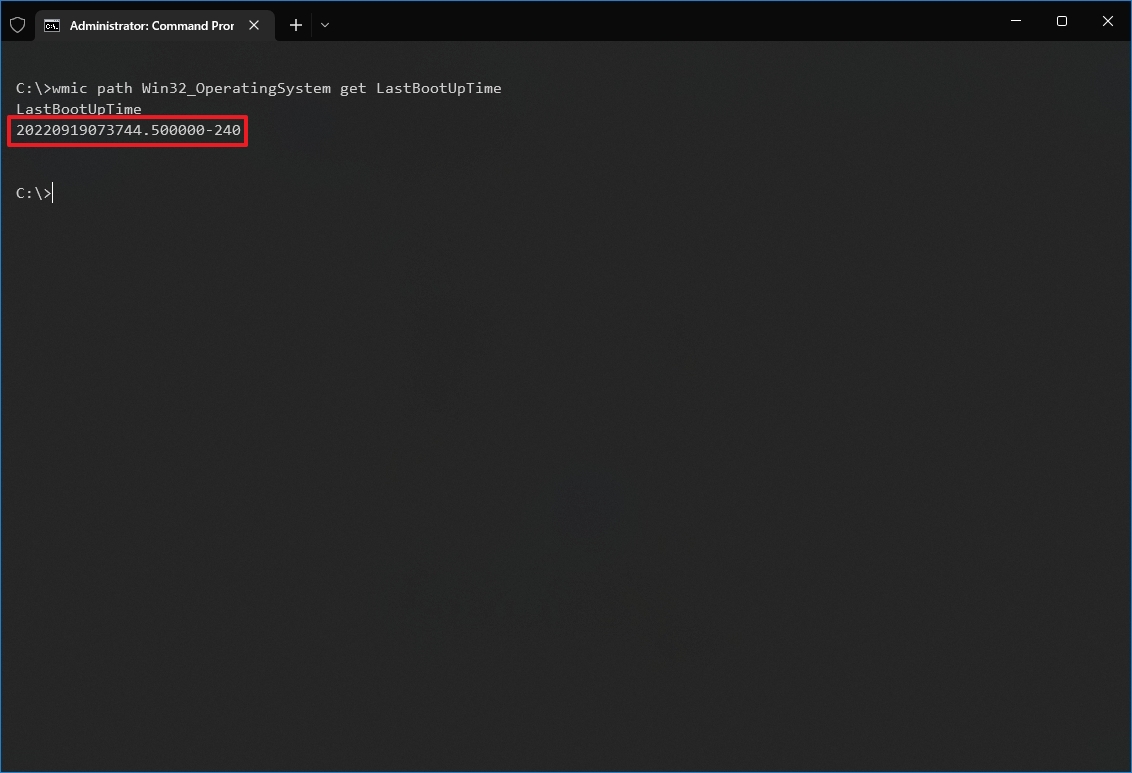
- Type the following command to query the device’s last boot time and press Enter: wmic path Win32_OperatingSystem get LastBootUpTime
Once you complete the steps, you’ll notice an output may look intimidating, but it’s not difficult to decode so you can understand your device’s uptime.
For example, the LastBootUpTime 20220919073744.500000-240 can be broken down using the info below.
- Year: 2022.
- Month: 09.
- Day: 19.
- Hour: 07.
- Minutes: 37.
- Seconds: 44.
- Milliseconds: 500000.
- GMT: -300 (5 hours ahead of GMT).
This means that the computer has been up and running since September 19, 2022, at 07:37 AM. If you want to be more specific, subtract the last boot time from the current time to deduce the number of days, hours, and minutes the device has been in operation.
System Information method
You can also see your system uptime in a more user-friendly format using the System Information tool with these steps:
- Open Start.
- Search for Command Prompt, right-click the top result and click the Run as administrator option.
- Type the following command to query the device’s last boot time and press Enter: systeminfo | find «System Boot Time»
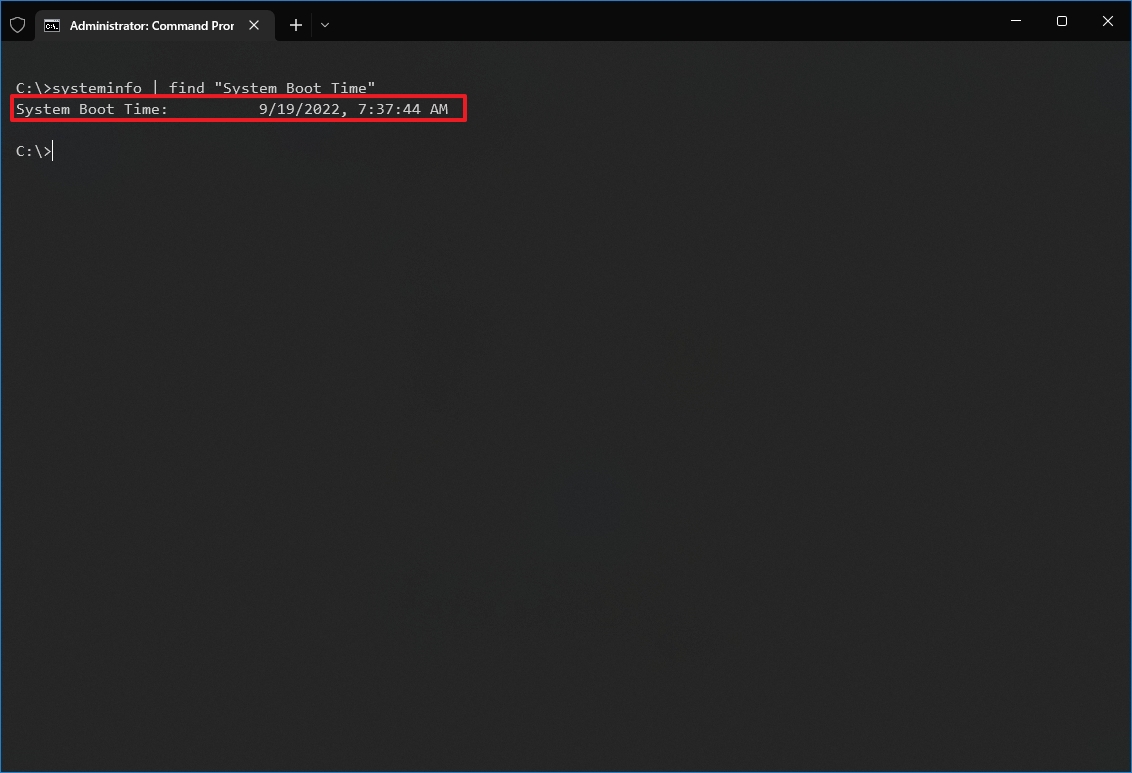
The System Information tool can quickly show the last time your system rebooted in an easy-to-read format. Also, like the wmic command, you can subtract the last boot time from the current time to determine the number of days, hours, and minutes the device has been running.
How to check PC uptime using PowerShell
It’s also possible to check your device uptime using PowerShell with these steps:
- Open Start.
- Search for Command Prompt, right-click the top result and click the Run as administrator option.
- Type the following command to query the device uptime and press Enter: (get-date) — (gcim Win32_OperatingSystem).LastBootUpTime
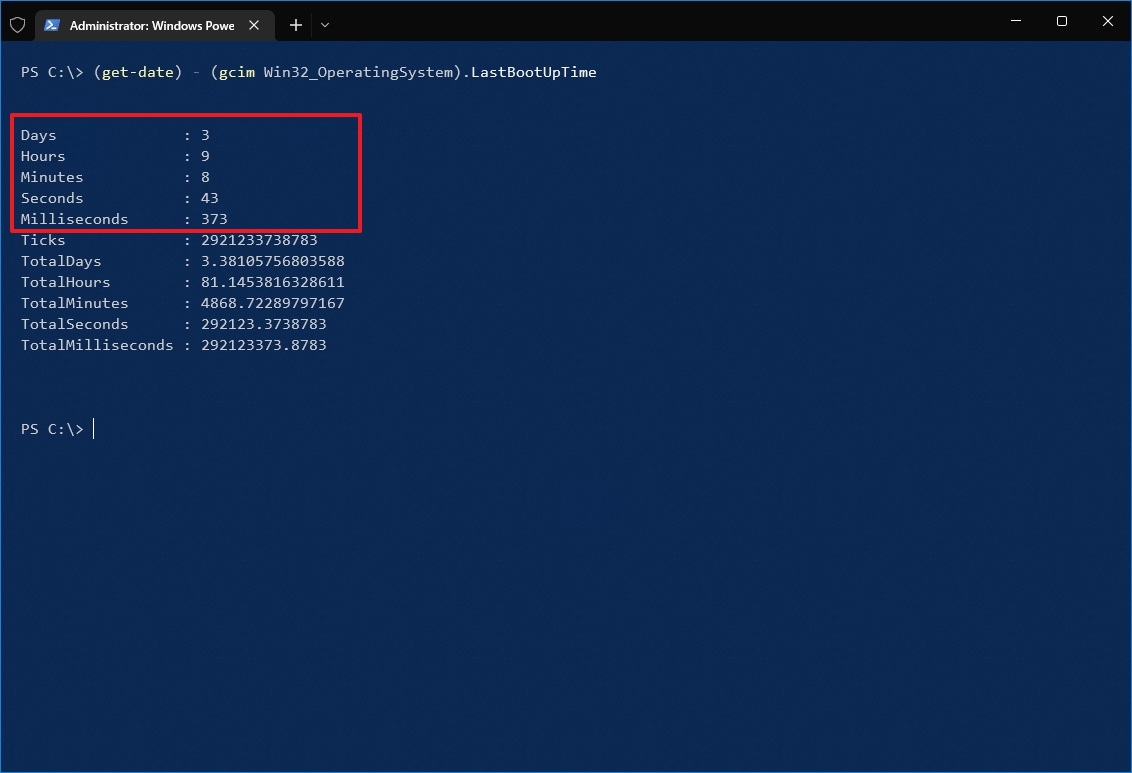
After completing the steps, you’ll get the uptime information in a list format with the days, hours, and minutes.
This guide outlines several ways to check your device uptime, but it’s important to note that there are many other methods to find the same information using Command Prompt and PowerShell scripts. However, these are the most straightforward methods.
In addition, while these instructions are focused on Windows 10, these methods have been around for a long time, which means they’ll also work on Windows 8.1 and 7.
More resources
For more helpful articles, coverage, and answers to common questions about Windows 10 and Windows 11, visit the following resources:
- Windows 11 on Windows Central — All you need to know
- Windows 10 on Windows Central — All you need to know
Mauro Huculak has been a Windows How-To Expert contributor for WindowsCentral.com for nearly a decade and has over 15 years of experience writing comprehensive guides. He also has an IT background and has achieved different professional certifications from Microsoft, Cisco, VMware, and CompTIA. He has been recognized as a Microsoft MVP for many years.
Computer uptime is the amount of time the computer has been running continuously since the last reboot, without a shutdown or restart. PC uptime is useful in troubleshooting different computer issues. This is used especially by network admins for troubleshooting purposes.
Computer uptime is synonymous with Windows uptime, as both are almost the same. You can check Windows uptime by using the network adapter stats from the task manager, a command prompt or Powershell. We will discuss each method one by one.
Table of Contents
Quick Summary
Check uptime from Task Manager
The quickest way to check uptime in Windows 10 and Windows 11 is to use the Task Manager. The biggest advantage of using the Task Manager is that it shows the uptime in real-time to the seconds precision.
-
Open Task Manager by right-clicking on the taskbar and selecting Task Manager (Ctrl + Shift + Esc).
-
Go to the Performance tab and go to the CPU section where you will see the uptime in days: hours: minutes: seconds in real-time.

Showing Up time in Task Manager

Clarification: There is one clarification here. Windows calculates the total uptime of the computer. This is like CPU uptime, the time CPU has been active. If you put the computer to sleep or hibernate mode, those times will not reset the uptime timer. When the computer returns to an active state, Windows will start calculating the uptime from the same position where it left off.
For example, if my computer was active for 2 hours and then I hibernated it for 24 hours. I started the computer again and used it for two more hours. Windows will calculate the total uptime as 4 hours.
Check uptime using the network adapter
Another way to quickly check the current system uptime is to check the active network adapter status. This only works if your network is always connected.
- Right-click on the network icon in the system tray and select “Open Network & Internet settings“.
- From the Status section, click on “Network and Sharing Center”. Or simply go to Run –> control /name microsoft.networkandsharingcenter
- Click on the active network adapter link
- The opening window will show the uptime.
Basically, this is the network uptime. This will reset if the computer goes to sleep or hibernation.
Check PC Uptime On Windows Using Command Line
You can also check the uptime using the command-line.
Systeminfo
Systeminfo is a command that lists general information about the Windows system. It lists the last boot time of Windows. We will need to manually calculate how much time has passed so far.
Open command prompt by going to Run –> cmd and run the following command:
systeminfo | find “System Boot Time”

WMIC
There is another WMIC command, which will let you know about the boot time of the computer as a string. This can be helpful for developers and DevOps.
Open the command prompt and run the following command:
wmic path Win32_OperatingSystem get LastBootUpTime
If you see the above screenshot of my computer, you will know that the boot time of my computer was:
Year: 2019 + Month: 09 + Day: 13 + Hour: 15 + Minutes: 24 + Seconds: 00 + Milliseconds: 500000.
The last +300 is the time zone. That means I’m in GMT + 3 timezone.
Net Statistics utility
Net Statistics command can be used to check the last boot time:
Open the command prompt and run the following command:
net statistics workstationThe line starting with Statistics since is your boot time.
The same command can be used to check Windows Server uptime but the command will become net statistics server.
Check system uptime using PowerShell
PowerShell gives a clearer answer using the same string as the command prompt. It will calculate the uptime instead of the last boot time. It also shows the total no. of days, hours, minutes and seconds separately.
Open PowerShell and run the following command:
(get-date) - (gcim Win32_OperatingSystem).LastBootUpTime
If you are using PowerShell 6, then you can simply use the following command to get the Windows uptime and the last startup time:
Get-Uptime -SinceDifference between uptime and availability?
Most people confuse uptime with availability. Before moving forward, we should know the difference between uptime and availability. They are not the same. According to Wikipedia:
Uptime is a measure of system reliability, expressed as the percentage of time a machine, typically a computer has been working and available.
Availability is the probability that a system will work as required when required during the period of a mission.
A computer may be up and running, but the resources required for a specific operation may not be available depending upon the system load. For example, a computer may be running, but its network card may not work properly or its bandwidth is being overused. In this case, the system has uptime, but it is not available for the specific task.
Final thoughts
Default allows Windows to start quickly on Windows 10. If enabled, Windows will not reset the LastBootUpTime value. You will not get the exact Windows uptime. To disable fast startup quickly, run the following command:
powercfg -h offIf you want to check the current Windows uptime, you will need to use the network adapter method to check the network time. But it only works if you are always connected to the Internet.
These are some ways to quickly get the last boot time or check the total uptime of the computer. Every command has its own advantages. You can use the method which suits you best. The only thing I haven’t found is the answer to how old is my computer? The systeminfo command only gives information about the Windows installation date and time. Maybe BIOS can show me something about that. Most of the methods mentioned above work with all versions of Windows, including Windows 10, Windows 8, Windows 7, Windows Vista. You can also check Windows Server uptime using the same commands.
Please tell me about how you check the uptime of your computer and for what purpose do you use this information?
If you wish to discover how long your PC has been powered on without a restart or a reboot, then all you need to do is see your Windows 10 uptime. With this uptime, one can monitor the previous restart status of your system. Uptime gives statistical data on the percentage of adequate operational time without a restart.

Table of Contents
Monitoring Windows 10 uptime will be helpful for some troubleshooting scenarios, and this article gives you a way to discover your Windows 10 uptime.
Method 1: Use Command Prompt
1. Type command prompt or cmd into Windows search then click on “Run as administrator“.

2. Now type the following command into cmd:
find “System Boot Time”
3. Once you have entered this command, hit Enter. In the following line, the Windows 10 uptime will be displayed as shown below.

Method 2: Use PowerShell
1. Launch PowerShell by searching for it using Windows search.

2. You can launch it by going to the Search Menu and typing Windows PowerShell then click on Run as administrator.
3. Feed the command in your PowerShell:
(get-date) – (gcim Win32_OperatingSystem).LastBootUpTime
4. Once your hit the Enter key, your Windows 10 uptime will be displayed as follows:
Days : 0
Hours : 14
Minutes : 45
Seconds : 51
Milliseconds : 974
Ticks : 531519745890
TotalDays : 0.615184891076389
TotalHours : 14.7644373858333
TotalMinutes : 885.86624315
TotalSeconds : 53151.974589
TotalMilliseconds : 53151974.589

Using the second method, you can see several time details like uptime in days, hours, minutes, seconds, milliseconds, etc.
Also Read: What is the Difference between Reboot and Restart?
Method 3: Use the Task Manager
1. Open Task Manager by simply holding Ctrl + Esc + Shift keys together.
2. In the Task Manager window, switch to the Performance tab.
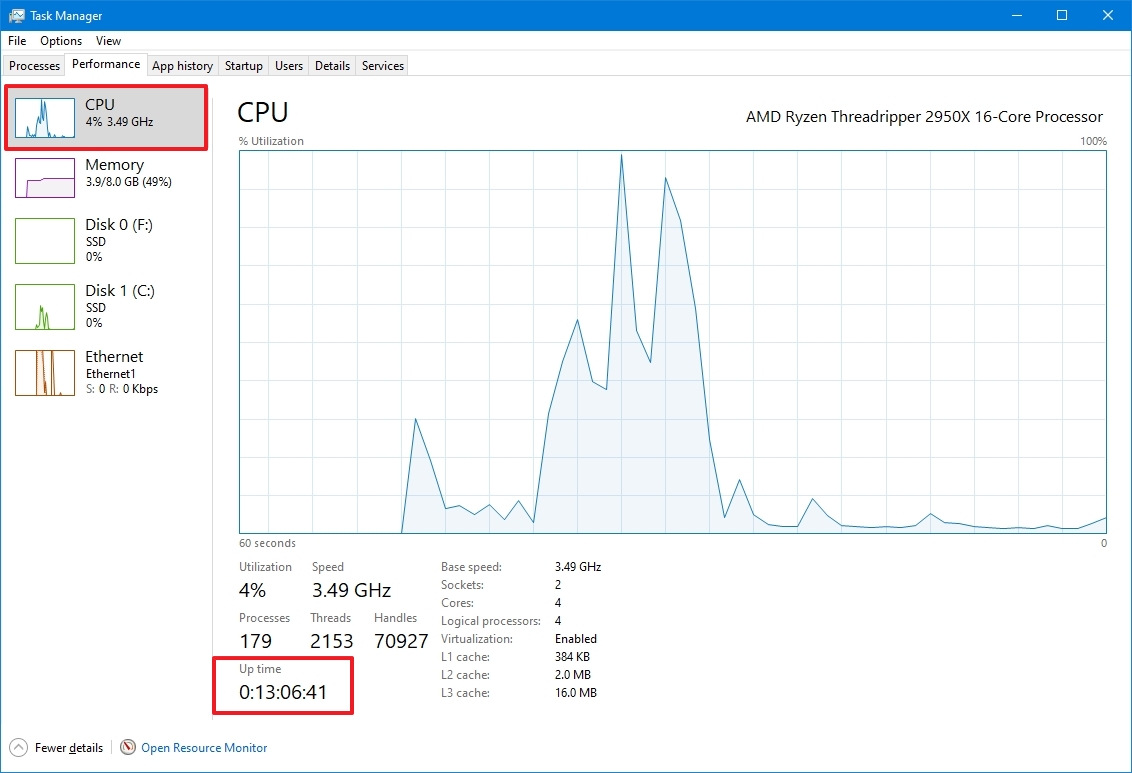
3. Select the CPU column.

4. The Windows 10 uptime will be displayed as shown in the figure.
This method is quite an easier way to see system uptime in Windows 10, and since it gives graphical data, it is easy for analysis.
Method 4: Check Network Settings
When your system is connected to the internet using an Ethernet connection, you could use your network settings to monitor the Windows 10 uptime.
1. You can launch the Run dialog box by going to the search menu and typing Run.
3. Type ncpa.cpl as follows and click OK.
4. Right-click on the Ethernet network, you’ll see the Status option as follows. Click on it.
5. Once you click on the Status option, your Windows 10 uptime will be displayed on the screen under a name called Duration.
Method 5: Use the Windows Management Interface command
1. Launch the Command Prompt using administrative privileges.
2. Enter the following command into cmd and hit Enter:
wmic path Win32_OperatingSystem get LastBootUptime.
3. Your last boot-up time will be displayed as follows.

Some may want to find the uptime with a piece of numerical information as depicted above. It is explained below:
- Year of the Last Reboot: 2021.
- The month of the Last Reboot: May (05).
- Day of the Last Reboot: 15.
- Hour of the Last Reboot: 06.
- Minutes of the Last Reboot: 57.
- Seconds of the Last Reboot: 22.
- Milliseconds of the Last Reboot: 500000.
- GMT of the Last Reboot: +330 (5 hours ahead of GMT).
This means that your system was rebooted on 15th May 2021, at 6.57 PM, accurately at 22nd second. You could simply calculate your system’s uptime by subtracting the current operational time with this last rebooted time.
You cannot view your exact last boot uptime if your Windows 10 system has the Fast start-up feature enabled. This is a default feature provided by Windows 10. To view your precise uptime, disable this Fast start-up feature by running the following command:
powercfg -h off

Method 6: Use the Net Statistics Workstation command
1. You can launch the Command Prompt by going to the search menu and typing either command prompt or cmd.
2. You are advised to launch Command Prompt as an administrator.
3. Enter the following command and hit Enter:
net statistics workstation.
4. Once you click Enter, you’ll see some data displayed on the screen, and your required Windows 10 uptime will be displayed at the top of the listed data as follows:

Method 7: Use the systeminfo command
1. Launch Command prompt using the above method.
2. Type the following command into cmd and hit Enter:
systeminfo
3. Once you hit Enter, you can see some data displayed on the screen, and your required Windows 10 uptime will be displayed along with the date you have performed during your last reboot.

All the above methods are easier to follow and they can be implemented not only for Windows 10 but also for other versions of Windows like Windows 8.1, Windows Vista, and Windows 7. The same commands are applicable in all versions.
Recommended:
- How to check RAM Speed, Size, and Type in Windows 10
- 6 Ways to Reboot or Restart a Windows 10 Computer
- 7 Ways to Fix CPU Fan Not Spinning
- Fix Fallout 4 Mods Not Working
We hope this article was helpful and you were able to see System Uptime in Windows 10. If you have any queries regarding this article, reach out to us through the comments section below.
Do you want to check Windows uptime? If you are also searching for a guide, this post of MiniTool is worth reading. It provides 4 simple ways to help you check uptime on Windows 10/11 PCs.
What Is Windows Uptime
What is Windows uptime? Generally speaking, the system uptime is the amount of time that your computer has been up and running since the last time it needs a restart. The larger the number of Windows uptime, the longer your computer has been working.
Understanding the uptime can help you monitor your system environment and find out the root cause of some issues system crashing, memory leaks, lagging applications, and more. So, it’s important to have a Windows uptime check when you need to troubleshoot these problems.
How to Check Your System Uptime in Windows 10/11
How to check uptime Windows 10/11? After investigating extensive user reports and posts, we summarize the following 4 ways to check uptime command in Windows easily and quickly without using any third-party utilities.
# 1. Check Windows Uptime via Task Manager
The first and most common way for the Windows uptime check is to use the Task Manager. Here’s a full guide:
Step 1. Press Ctrl + Shift + Esc hotkeys to open the Task Manager window.
Step 2. Click on More details and navigate to the Performance tab.
Step 3. Select CPU from the left panel and check the Up time at the bottom of the right panel.
# 2. Check Windows Uptime via Network Duration
The “Duration” number indicates the uptime of your network connection that resets every time your computer starts. It can help you deduce the Windows command uptime.
Note:
This method only works for the situation in which you didn’t reset your network connection since the last reboot.
Step 1. On Windows 10, right-click the Network connection icon at the right bottom of your screen and select Open Network & Internet settings.
Step 2. Scroll down the right sidebar and select Network and Sharing Center.
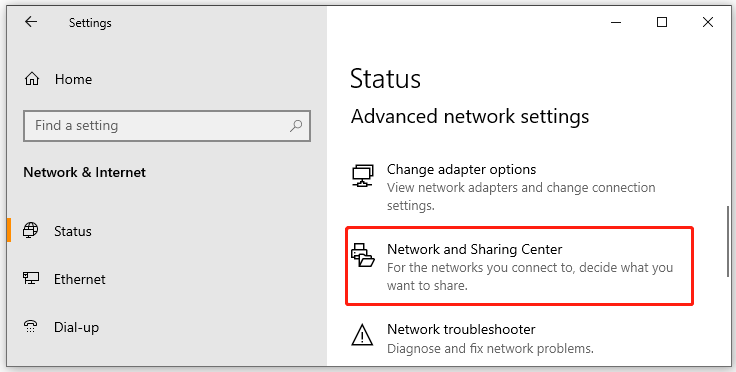
Step 3. Select Change adapter settings in the pop-up window, and then double-click the active network and check the Duration time in the Network Status window.
On Windows, you can search for Network Settings and select Advanced network settings, and expand the active network connection to check the Duration time.
# 3. Check Windows Uptime via CMD
CMD is a powerful Windows built-in command line tool that can be used to do many works, such as CMD rename files, CMD ping test, CMD list files, etc. There are different ways to check Windows uptime in Command Prompt.
Way 1. Use WMIC
1. Type cmd in the Search box, and then right-click the Command Prompt app and select Run as administrator.
2. In the elevated Command Prompt window, type the following command and hit Enter to check the uptime command in Windows.
wmic path Win32_OperatingSystem get LastBootUpTime
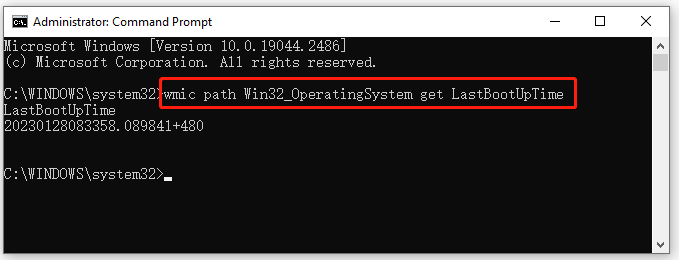
3. Now, you can check the LastBootUpTime: 089841+480. In my case, the Uptime can be broken down into the following sections. It means that my computer has been up and running since January 28, 2023, at 08:33 AM. Then you can deduce the uptime according to the information.
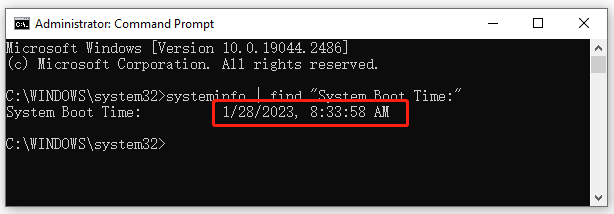
Way 2. Use System Information Utility
To check the uptime command Windows, open the Command Prompt window, type the following command, and hit Enter to get the last boot time of your computer. Then you can deduce the system uptime by subtracting the last boot time from your current time.
systeminfo | find “System Boot Time:”
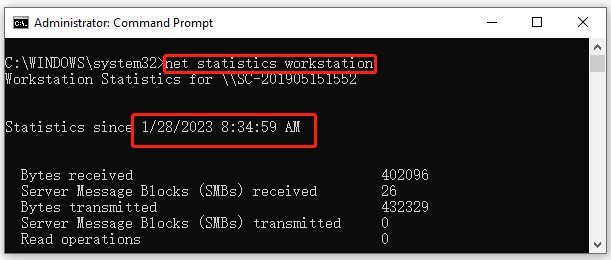
Way 3. Use Net Statistics Command
The Net Statistics command can help you get the last boot time of your computer so that you can deduce the uptime command Windows. To do so, open the Command Prompt window and type the following command, and hit Enter.
net statistics workstation
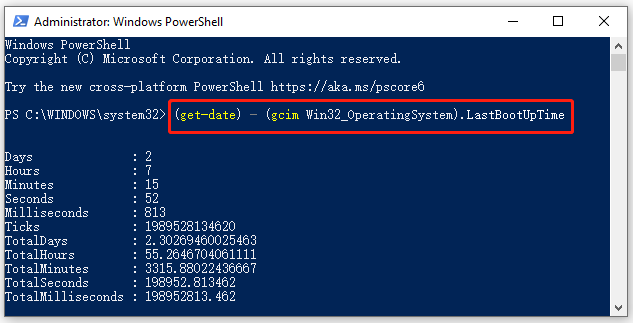
# 4. Check Windows Uptime via PowerShell
PowerShell is another powerful Windows tool like CMD that you can use to check the system uptime quickly. Here’s how to make PowerShell get uptime on Windows 10/11.
Step 1. Right-click the Start button, select Windows PowerShell (Admin) from the context menu and click on Yes to confirm it.
Step 2. In the elevated PowerShell window, type the following command and hit Enter to get the uptime of your computer. Then you will get the uptime information, including days, hours, minutes, seconds, etc.
(get-date) – (gcim Win32_OperatingSystem).LastBootUpTime
Further reading: If you enter some issues like file system corruption and low disk space on Windows 10/11, don’t worry. MiniTool Partition Wizard can help you fix them easily by checking file system errors, extending/resizing partitions, analyzing disk space, upgrading to a larger hard disk, etc.