
Некоторые предустановленные приложения Windows 11 и 10 нельзя удалить в параметрах приложений и другими очевидными способами. Одно из таких приложений — Xbox Game Bar. Оно может быть полезным, например, для записи видео с экрана, но далеко не всем пользователям оно нужно.
В этой инструкции подробно о способах удалить Xbox Game Bar как встроенными средствами системы — с помощью PowerShell, так и с помощью сторонних программ-деинсталляторов.
Удаление Xbox Game Bar в PowerShell
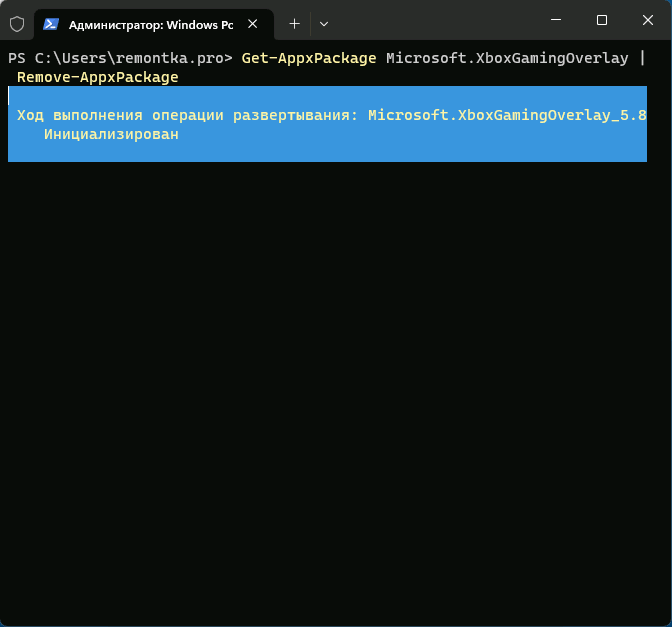
Стандартный способ удаления приложения Xbox Game Bar — использование команды Windows PowerShell. Шаги для этого будут следующими:
- Запустите Терминал Windows или Windows PowerShell от имени Администратора. В Windows 11 и 10 сделать это можно в контекстном меню кнопки «Пуск».
- Введите команду
Get-AppxPackage Microsoft.XboxGamingOverlay | Remove-AppxPackage
и нажмите Enter.

- В результате приложение Xbox Game Bar будет удалено для текущего пользователя, но сам пакет приложения останется на компьютере.
- Ещё три варианта команд, которые удаляет все приложения Xbox (не только Game Bar), также запускаем в PowerShell (первая команда оставляет хранящиеся на компьютере пакеты приложений, вторая и третья — удаляет их):
Get-AppxPackage | select-string xbox | Remove-AppxPackage
dism /Online /Get-ProvisionedAppxPackages | Select-String PackageName | Select-String xbox | ForEach-Object {$_.Line.Split(':')[1].Trim()} | ForEach-Object { dism /Online /Remove-ProvisionedAppxPackage /PackageName:$_}

Get-ProvisionedAppxPackage -Online | Where-Object { $_.PackageName -match "xbox" } | ForEach-Object { Remove-ProvisionedAppxPackage -Online -allusers -PackageName $_.PackageName }
Ещё один способ удалить Xbox Game Bar и другие, имеющие отношение к Xbox в PowerShell, указав конкретные пакеты приложений вручную (ключевое в контексте рассматриваемой темы — XboxGamingOverlay):
- Используем команду
Get-AppxPackage | Select-String xbox
чтобы получить имена пакетов.
- Используем по порядку команды
Remove-AppxPackage имя_пакета
для удаления каждого из них, имя пакета можно скопировать в буфер обмена прямо в PowerShell.
- Чтобы удалить их для всех пользователей, используем параметр -allusers
Remove-AppxPackage -allusers имя_пакета
- Для удаления не только установленного приложения, но и соответствующего пакета для всех пользователей:
Remove-ProvisionedAppxPackage -Online -allusers -PackageName имя_пакета
Обратите внимание, что после удаления Xbox Game Bar, вы можете начать получать сообщения об ошибках вида «Вам понадобится новое приложение, чтобы открыть эту ссылку ms-gamingoverlay» или «Получите приложение, чтобы открыть эту ссылку ms-gamingoverlay». Подробно про ошибки ms-gamingoverlay.
Сторонние деинсталляторы

Многие сторонние программы для удаления программ и встроенных приложений Windows позволяют, в том числе, легко удалить Xbox Game Bar. Среди рекомендуемых решений для этих целей:
- BC Uninstaller
- HiBit Uninstaller
Обе программы отлично справятся с задачей удаления Xbox Game Bar с компьютера, а делается это в простом графическом интерфейсе. Но при необходимости вы можете использовать и другие функциональные бесплатные деинсталляторы с функцией удаления встроенных приложений Windows 11 и других версий.
Download Article
Get rid of the Xbox Game Bar overlay, temporarily or for good
Download Article
- Disabling Game Bar in Windows 11
- Disabling Game Bar in Windows 10
- Deleting Xbox Game Bar Permanently
- Should I turn off Game Bar?
- Game Mode Won’t Turn Off (Quick Fix)
- Video
|
|
|
|
|
Is Game Bar popping up when you plug your controller into your PC or play certain games? If you don’t want to use the Xbox Game Bar to screen record or access Xbox social gaming features, it may be more of a nuisance than an asset. Fortunately, you can disable the Game Bar and even completely uninstall it. Read on for simple step-by-step instructions on disabling Xbox Game Bar and turning off Game Mode on Windows 10 & 11, plus troubleshooting tips.
Disabling Game Bar: Quick Steps
In Windows 10, open Settings, select Gaming, and toggle off the «Game Bar» switch. In Windows 11, go to Settings > System Components, open Game Bar’s Advanced options, and select Never from the «Background component permissions» menu.
-

You can get there quickly by pressing Windows key + i, or by clicking Settings in the Windows menu.
-
It’s at the top-left corner.
Advertisement
-
You’ll need to scroll down a little bit on the right panel to find it.
-
-
You’ll see this below the «Component permissions» section. «Power optimized (recommend)» is usually selected by default.
-
This prevents Game Bar from running in the background and responding to the Windows key + G keyboard shortcut.
-
If Game Bar still pops up when you plug in a controller, you can disable that, too. Here’s how:
- Click Gaming in the left panel of the Settings window.
- Click Game Bar.
- Toggle off the switch next to «Allow your controller to open Game Bar.»
- At this point, Game Bar features that could get in the way should now stay out of your sight. However, you may still see some annoying pop-ups when you play certain games or plug in a controller. The only fix is to delete Game Bar permanently—jump down to Deleting Xbox Game Bar Permanently to learn how.
-
If you don’t want Windows to disable background apps when you’re gaming, you can turn this feature off:
- Click the back button to return to the Gaming menu, or click the Gaming tab in the left panel.
- Click Game Mode
- Click the «Game Mode» switch to turn the feature off.
- If Game Mode won’t turn off, jump down to our quick fix.


Advertisement
-
You can get there quickly by pressing Windows key + i, or by clicking Settings in the Windows menu.
- This method will disable Game Bar and prevent it from opening when you use keyboard shortcuts or a gaming controller.
-
This option has an Xbox logo.
-
The switch is at the top of the right panel.
- Game Bar is now disabled. If you want to go a step further and permanently uninstall it, jump down to Deleting Xbox Game Bar Permanently.
- If you want Game Bar back, you can return to this screen and select Power optimized (recommended) from the menu.
-
If you don’t want Windows to disable background apps when you’re gaming, you can click the «Game Mode» switch to turn the feature off.[1]
- If Game Mode won’t turn off, jump down to our quick fix.


Advertisement
-
If you want to remove Game Bar permanently on Windows 10 or 11, you’ll first need to remove the preinstalled package in PowerShell, and then add a few registry keys if Game Bar errors still pop up. To open PowerShell as an administrator:
- Type powershell into the Windows search bar.
- Right-click Windows PowerShell.
- Select Run as administrator…
- Click Yes.
-
Paste this line into PowerShell and press Enter:[2]
- Get-AppxPackage Microsoft.XboxGamingOverlay | Remove-AppxPackage
-
If you still see notifications that say «You’ll need a new app to open this ms-gamingoverlay» when you try to play certain games, you’ll also need to add some registry keys to remove Game Bar permanently. You can do this from PowerShell by pasting these two lines, pressing Enter after each.
- reg add HKEY_CURRENT_USER\SOFTWARE\Microsoft\Windows\CurrentVersion\GameDVR /f /t REG_DWORD /v "AppCaptureEnabled" /d 0
- reg add HKEY_CURRENT_USER\System\GameConfigStore /f /t REG_DWORD /v "GameDVR_Enabled" /d 0
- The Game Bar should now be removed. If you want it back, you can reinstall it from the Microsoft Store.


Advertisement
-
Most people don’t need to turn off Game Bar, and can even benefit from features like accessing audio settings and performance stats without Alt-Tabbing out of your game.[3]
There are also plenty of Xbox social features, and the ability to screen-record gameplay with a quick keyboard shortcut.[4]
-
If your PC feels slow, disabling background apps like Game Bar can help speed things up. Also, if you have a high-end graphics card with similar software and overlays (such as NVIDIA Shadowplay or GeForce Experience), having both Game Bar and that software running could be rough on your CPU.


Advertisement
-
This notification usually pops up when you’re using a TV as a monitor. In this case, try switching to a different HDMI port on the TV. If that doesn’t work, go into your TV’s HDMI settings, look in the menus for «Game Mode,» and turn it off.

Ask a Question
200 characters left
Include your email address to get a message when this question is answered.
Submit
Advertisement
Video
Thanks for submitting a tip for review!
About This Article
Thanks to all authors for creating a page that has been read 36,821 times.
Did this article help you?
Uninstalling the Xbox Game Bar on Windows 10 is a pretty straightforward process. All you need to do is access your Windows settings, find the app, and uninstall it. In just a few clicks, you can remove this feature if it’s not adding value to your gaming experience or if you just want to free up some space on your device. Follow the steps below to complete this task quickly and efficiently.
In this tutorial, we’re going to walk you through removing the Xbox Game Bar from your Windows 10 computer. This process involves opening the settings, navigating to the right section, and uninstalling the app.
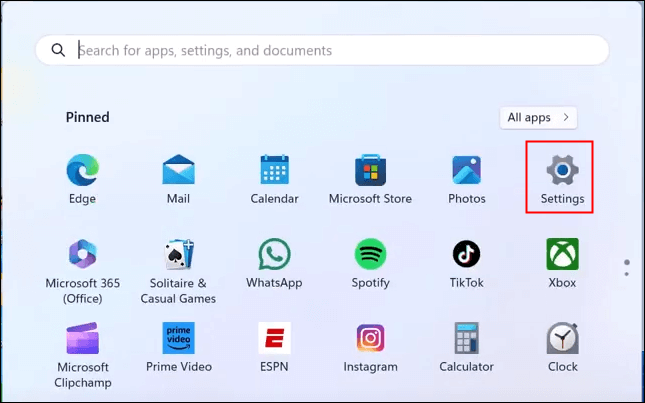
Step 1: Open Settings
Click on the Start menu and select the gear icon to open Windows Settings.
You’ll recognize the Start menu as the little Windows icon in the bottom left corner of your screen. The gear icon should be easily visible, symbolizing your settings menu.
Step 2: Go to Apps
Once in Settings, click on “Apps” to view all applications installed on your computer.
The “Apps” section is your gateway to managing everything installed on your PC. Here, you can see a full list of all the programs at your disposal.
Step 3: Search for Xbox Game Bar
In the Apps & Features section, type “Xbox Game Bar” in the search bar to locate it quickly.
This search feature is a lifesaver when you have loads of apps installed. It helps you zero in on the Xbox Game Bar without having to scroll endlessly.
Step 4: Select and Uninstall
Click on “Xbox Game Bar” and then hit the “Uninstall” button to remove it from your system.
Once you click “Uninstall,” Windows will ask you to confirm your choice. This step ensures you don’t accidentally remove something important.
Step 5: Confirm Removal
Follow the prompts to confirm you want to uninstall the Xbox Game Bar.
You’ll get a few more confirmation windows to click through. It’s Windows’ way of making sure you’re really sure about saying goodbye to the Xbox Game Bar.
After completing these steps, the Xbox Game Bar will be removed from your Windows 10 system. You’ll no longer see it among your apps, and it won’t run in the background. If you ever want it back, you can easily reinstall it through the Microsoft Store.
Tips for Uninstalling Xbox Game Bar Windows 10
- Ensure your Windows is updated to avoid any issues during uninstallation.
- Back up your system, just in case something goes awry during the process.
- Use PowerShell for a more technical approach if the Settings method doesn’t work.
- Remember, uninstalling Xbox Game Bar might disable some gaming features on your PC.
- If you change your mind, the Xbox Game Bar can be re-downloaded from the Microsoft Store.
Frequently Asked Questions
Is it safe to uninstall Xbox Game Bar?
Yes, it’s safe. Uninstalling Xbox Game Bar won’t affect your system’s performance but might disable some gaming-related features.
Can I reinstall Xbox Game Bar after uninstalling it?
Absolutely! You can easily reinstall it from the Microsoft Store if you decide you want it back.
Does Xbox Game Bar consume a lot of resources?
Typically, no. However, if your computer is low on resources, every little bit helps, so removing it might free up some memory.
Why can’t I find the uninstall option for Xbox Game Bar?
If you don’t see the uninstall option, you might need to update your system or use PowerShell as a workaround.
What happens to my game clips when I uninstall Xbox Game Bar?
Your game clips will remain safe on your computer. Uninstalling the Game Bar won’t delete any files.
Summary
- Open Settings.
- Go to Apps.
- Search for Xbox Game Bar.
- Select and Uninstall.
- Confirm Removal.
Conclusion
Uninstalling the Xbox Game Bar on Windows 10 is a simple process that can be accomplished in just a few steps. Whether you’re looking to free up space or just aren’t using it, removing the Game Bar won’t take much time. However, keep in mind that this might disable some gaming functionalities on your PC. If you ever decide you need it again, the Xbox Game Bar is available for reinstallation through the Microsoft Store.
For those who love to customize their PCs, uninstalling unnecessary apps can lead to a cleaner, more efficient system. By understanding how to manage your computer’s resources, you’re taking a step toward a smoother and more personalized user experience. If you’re interested in further optimizing your Windows 10 setup, consider exploring other built-in features that you might not be using.
Remember, technology is here to make our lives easier. Don’t hesitate to tweak and tailor your system to fit your personal needs. Feel free to explore other guides and tutorials for more tips on customizing your Windows 10 experience.
Matt Jacobs has been working as an IT consultant for small businesses since receiving his Master’s degree in 2003. While he still does some consulting work, his primary focus now is on creating technology support content for SupportYourTech.com.
His work can be found on many websites and focuses on topics such as Microsoft Office, Apple devices, Android devices, Photoshop, and more.
How to Remove the Xbox Game Bar with Powershell on Windows 10. Scroll to the end of the gist for Windows 11.
You’ve probably stumbled upon this researching how to remove the Xbox Game Bar. This gist includes a few different methods you can try. Please note that some of these first options are probably not be available unless you are running an older version of Windows 10.
EDIT: make sure to check out the comment below from @nmhung1985 which seems to be working for most folks.
Uninstalling/Removing the Game Bar (old Windows 10 build GUI options)
(this is no longer an option on any recent Windows 10 build)
- Press Windows Key or click on the Start menu.
- Start typing
XboxorGame Bar, until you get the Xbox Game Bar app to appear in the results. - Right-click on the app and pick
Uninstall. AnswerYesto the prompt, and wait for the process to finish.
Windows Build 19H1 (uninstall moved into Settings)
You might not have an Uninstall option in the right-click context menu. Try drilling into Settings and looking there.
- Press Windows Key or click on the Start menu.
- Start typing
XboxorGame Bar, until you get the Xbox Game Bar app. - Right click on
Xbox Game Barand clickSettings - Scroll down and click
Uninstall. Wait for the process to finish.
Windows Build 19H1/19H2 (uninstall button is now grayed out)
On my machine running Windows Build 10.0.18362 the uninstall button is grayed out. The button I’m referring to is here: Xbox Game Bar > Right Click > App Settings > Uninstall.
Game Bar Settings
Depending on why you’re trying to remove the Game bar, you might also try changing the Game bar settings.
Go to Search > "game bar settings".
-
For the option that says
Record game clips, screenshots, and broadcasting using Game Barmove the slider to theOffposition. This should stop the defaultWin+Gshortcut from opening the Game bar. -
If you need
Win+Gfor a different application (I ran into this), you should be able to change the shortcut, and you’re done! Go toSearch > "game bar settings" > Game bar > Keyboard shortcuts. I verified this on my Surface Pro 1903/19H1/18362.
Removing Microsoft.Xbox* AppXPackage using PowerShell or DISM (short version first, longer version below this section)
Can’t find a way to uninstall the Game Bar using the GUI? The PowerShell or the DISM tool might do the trick.
DISM is a Deployment Image Servicing and Management CLI tool from Microsoft built into Windows. You will need to interact with DISM from an elevated (admin) terminal.
1. Open your terminal as an administrator (Windows Key > Start typing «PowerShell» > CTRL + SHIFT + ENTER)
If you’re using DISM, this could be cmd.exe. If you’re using PowerShell, this needs to be Windows PowerShell. You can interact with either if you launch Windows Terminal as admin.
2. First run dism /Online /Get-ProvisionedAppxPackages | Select-String PackageName | Select-String xbox to see what xbox packages are actually on your system.
You you should be able to accomplish this with DISM or PowerShell. I’ll show both approaches, but pick one or the other.
2a. DISM version:
dism /Online /Get-ProvisionedAppxPackages | Select-String PackageName | Select-String xbox
2b. PowerShell version:
Get-ProvisionedAppxPackage -Online | Where-Object { $_.PackageName -match "xbox" }
3.
The following commands will retrieve the AppXPackages matching on xbox and attempt to remove them. There are several commands stringed together (thanks @bashenk for your help on this). Copy and paste the entire block.
3a. DISM version:
dism /Online /Get-ProvisionedAppxPackages | `
Select-String PackageName | `
Select-String xbox | `
ForEach-Object {$_.Line.Split(':')[1].Trim()} | `
ForEach-Object { dism /Online /Remove-ProvisionedAppxPackage /PackageName:$_}
3b. PowerShell cmdlet version:
Get-ProvisionedAppxPackage -Online | `
Where-Object { $_.PackageName -match "xbox" } | `
ForEach-Object { Remove-ProvisionedAppxPackage -Online -PackageName $_.PackageName }
If you want to remove packages for other users, you will need to pass in the -allusers parameter like so:
Get-ProvisionedAppxPackage -Online | `
Where-Object { $_.PackageName -match "xbox" } | `
ForEach-Object { Remove-ProvisionedAppxPackage -Online -AllUsers -PackageName $_.PackageName }
4. Verify
Ok — let’s see if the xbox packages are still there. Search for the xbox packages again. If there are no results, the respective appxpackages were removed. Run the commands from step 2 again.
You may need to reboot after.
Removing Microsoft.Xbox* AppXPackage using PowerShell and DISM (long and manual version)
This section expands on the short versions. It goes through separate commands instead of stringing commands together. Read this if you’re interested in what all the commands do.
Step 1. Remove AppxPackages from current user.
Open PowerShell as your current user (not as an administrator).
Identify user by running $env:Username:
PS C:\Users\josh> $env:Username
josh
Get list of xbox AppxPackages using Get-AppxPackage:
PS C:\Users\josh>  Get-AppxPackage | select-string xbox

Microsoft.Xbox.TCUI_1.24.10001.0_x64__8wekyb3d8bbwe
Microsoft.XboxSpeechToTextOverlay_1.21.13002.0_x64__8wekyb3d8bbwe
Microsoft.XboxGameCallableUI_1000.18362.449.0_neutral_neutral_cw5n1h2txyewy
Microsoft.XboxGameOverlay_1.47.14001.0_x64__8wekyb3d8bbwe
Microsoft.XboxGamingOverlay_3.34.15002.0_x64__8wekyb3d8bbwe
Microsoft.XboxIdentityProvider_12.58.1001.0_x64__8wekyb3d8bbwe
Step 2. Build your remove script using package names discovered in Step 1.
Which might look something like this:
Remove-AppxPackage Microsoft.Xbox.TCUI_1.24.10001.0_x64__8wekyb3d8bbwe
Remove-AppxPackage Microsoft.XboxSpeechToTextOverlay_1.21.13002.0_x64__8wekyb3d8bbwe
Remove-AppxPackage Microsoft.XboxGameCallableUI_1000.18362.449.0_neutral_neutral_cw5n1h2txyewy
Remove-AppxPackage Microsoft.XboxGameOverlay_1.47.14001.0_x64__8wekyb3d8bbwe
Remove-AppxPackage Microsoft.XboxGamingOverlay_3.34.15002.0_x64__8wekyb3d8bbwe
Remove-AppxPackage Microsoft.XboxIdentityProvider_12.58.1001.0_x64__8wekyb3d8bbwe
Run:
PS C:\Users\josh> Remove-AppxPackage Microsoft.Xbox.TCUI_1.24.10001.0_x64__8wekyb3d8bbwe
PS C:\Users\josh> Remove-AppxPackage Microsoft.XboxSpeechToTextOverlay_1.21.13002.0_x64__8wekyb3d8bbwe
PS C:\Users\josh> Remove-AppxPackage Microsoft.XboxGameCallableUI_1000.18362.449.0_neutral_neutral_cw5n1h2txyewy
Remove-AppxPackage : Deployment failed with HRESULT: 0x80073CFA, Removal failed. Please contact your software vendor.
(Exception from HRESULT: 0x80073CFA)
error 0x80070032: AppX Deployment Remove operation on package
Microsoft.XboxGameCallableUI_1000.18362.449.0_neutral_neutral_cw5n1h2txyewy from:
C:\WINDOWS\SystemApps\Microsoft.XboxGameCallableUI_cw5n1h2txyewy failed. This app is part of Windows and cannot be
uninstalled on a per-user basis. An administrator can attempt to remove the app from the computer using Turn Windows
Features on or off. However, it may not be possible to uninstall the app.
NOTE: For additional information, look for [ActivityId] 1e9e759c-9d2e-0000-74d3-a31e2e9dd501 in the Event Log or use
the command line Get-AppPackageLog -ActivityID 1e9e759c-9d2e-0000-74d3-a31e2e9dd501
At line:1 char:1
+ Remove-AppxPackage Microsoft.XboxGameCallableUI_1000.18362.449.0_neut ...
+ ~~~~~~~~~~~~~~~~~~~~~~~~~~~~~~~~~~~~~~~~~~~~~~~~~~~~~~~~~~~~~~~~~~~~~
    + CategoryInfo          : WriteError: (Microsoft.XboxG...l_cw5n1h2txyewy:String) [Remove-AppxPackage], IOException
    + FullyQualifiedErrorId : DeploymentError,Microsoft.Windows.Appx.PackageManager.Commands.RemoveAppxPackageCommand

PS C:\Users\josh> Remove-AppxPackage Microsoft.XboxGameOverlay_1.47.14001.0_x64__8wekyb3d8bbwe
PS C:\Users\josh> Remove-AppxPackage Microsoft.XboxGamingOverlay_3.34.15002.0_x64__8wekyb3d8bbwe
PS C:\Users\josh> Remove-AppxPackage Microsoft.XboxIdentityProvider_12.58.1001.0_x64__8wekyb3d8bbwe
You may notice one or more attempts to remove a package failed. We can clean that up using PowerShell as an administrator.
If your administrator account is a different account, you may need to use the -AllUsers parameter with certain commands.
Step 3. Check AppxPackage list again
PS C:\Users\josh> Get-AppxPackage | select-string xbox

Microsoft.XboxGameCallableUI_1000.18362.449.0_neutral_neutral_cw5n1h2txyewy
Step 4. Launch PowerShell as an administrator
Now that we have an elevated command prompt. Let’s look at the AppxPackage list again. We may see a few more:
PS C:\WINDOWS\system32> Get-AppxPackage | Select-String xbox

Microsoft.XboxGameCallableUI_1000.15063.0.0_neutral_neutral_cw5n1h2txyewy
Microsoft.XboxSpeechToTextOverlay_1.21.13002.0_x64__8wekyb3d8bbwe
Microsoft.XboxGameOverlay_1.47.14001.0_x64__8wekyb3d8bbwe
Microsoft.XboxIdentityProvider_12.58.1001.0_x64__8wekyb3d8bbwe
Note: if you want to remove for multiple users, you need to run with the -AllUsers parameter: Get-AppxPackage -AllUsers.
Let’s remove them:
Remove-AppxPackage Microsoft.XboxGameCallableUI_1000.15063.0.0_neutral_neutral_cw5n1h2txyewy
Remove-AppxPackage Microsoft.XboxSpeechToTextOverlay_1.21.13002.0_x64__8wekyb3d8bbwe
Remove-AppxPackage Microsoft.XboxGameOverlay_1.47.14001.0_x64__8wekyb3d8bbwe
Remove-AppxPackage Microsoft.XboxIdentityProvider_12.58.1001.0_x64__8wekyb3d8bbwe
Results:
PS C:\WINDOWS\system32> Remove-AppxPackage Microsoft.XboxGameCallableUI_1000.15063.0.0_neutral_neutral_cw5n1h2txyewy
Remove-AppxPackage : Deployment failed with HRESULT: 0x80073D19, An error occurred because a user was logged off.
error 0x80070032: AppX Deployment Remove operation on package
Microsoft.XboxGameCallableUI_1000.15063.0.0_neutral_neutral_cw5n1h2txyewy from:
C:\Windows\SystemApps\Microsoft.XboxGameCallableUI_cw5n1h2txyewy failed. This app is part of Windows and cannot be
uninstalled on a per-user basis. An administrator can attempt to remove the app from the computer using Turn Windows
Features on or off. However, it may not be possible to uninstall the app.
NOTE: For additional information, look for [ActivityId] 1e9e759c-9d2e-0001-5455-a21e2e9dd501 in the Event Log or use
the command line Get-AppPackageLog -ActivityID 1e9e759c-9d2e-0001-5455-a21e2e9dd501
At line:1 char:1
+ Remove-AppxPackage Microsoft.XboxGameCallableUI_1000.15063.0.0_neutra ...
+ ~~~~~~~~~~~~~~~~~~~~~~~~~~~~~~~~~~~~~~~~~~~~~~~~~~~~~~~~~~~~~~~~~~~~~
    + CategoryInfo          : NotSpecified: (Microsoft.XboxG...l_cw5n1h2txyewy:String) [Remove-AppxPackage], Exception
    + FullyQualifiedErrorId : DeploymentError,Microsoft.Windows.Appx.PackageManager.Commands.RemoveAppxPackageCommand

PS C:\WINDOWS\system32> Remove-AppxPackage Microsoft.XboxSpeechToTextOverlay_1.21.13002.0_x64__8wekyb3d8bbwe
PS C:\WINDOWS\system32> Remove-AppxPackage Microsoft.XboxGameOverlay_1.47.14001.0_x64__8wekyb3d8bbwe
PS C:\WINDOWS\system32> Remove-AppxPackage Microsoft.XboxIdentityProvider_12.58.1001.0_x64__8wekyb3d8bbwe
We see one failed. Let’s try to use DISM to remove them.
Step 5: Get a list of DISM packages that match on xbox
Search provisioned packages, you might see more packages than what you found via the Remove-AppxPackage cmdlet.
PS C:\WINDOWS\system32> dism /online /get-provisionedappxpackages | select-string packagename | select-string xbox | ForEach-Object {$_.Line.Split(':')[1]}
 Microsoft.XboxGameOverlay_1.47.14001.0_neutral_~_8wekyb3d8bbwe
 Microsoft.XboxGamingOverlay_3.34.15002.0_neutral_~_8wekyb3d8bbwe
 Microsoft.XboxIdentityProvider_12.58.1001.0_neutral_~_8wekyb3d8bbwe
 Microsoft.XboxSpeechToTextOverlay_1.21.13002.0_neutral_~_8wekyb3d8bbwe
Step 6: Remove the DISM packages that match on xbox
Build your script based on output found in step 5.
dism /online /remove-provisionedappxpackage /packagename:Microsoft.XboxGameOverlay_1.47.14001.0_neutral_~_8wekyb3d8bbwe
dism /online /remove-provisionedappxpackage /packagename:Microsoft.XboxGamingOverlay_3.34.15002.0_neutral_~_8wekyb3d8bbwe
dism /online /remove-provisionedappxpackage /packagename:Microsoft.XboxIdentityProvider_12.58.1001.0_neutral_~_8wekyb3d8bbwe
dism /online /remove-provisionedappxpackage /packagename:Microsoft.XboxSpeechToTextOverlay_1.21.13002.0_neutral_~_8wekyb3d8bbwe
Example Result:
PS C:\WINDOWS\system32> dism /online /remove-provisionedappxpackage /packagename:Microsoft.XboxGameOverlay_1.47.14001.0_neutral_~_8wekyb3d8bbwe

Deployment Image Servicing and Management tool
Version: 10.0.18362.1

Image Version: 10.0.18362.476

The operation completed successfully.
PS C:\WINDOWS\system32> dism /online /remove-provisionedappxpackage /packagename:Microsoft.XboxGamingOverlay_3.34.15002.0_neutral_~_8wekyb3d8bbwe

Deployment Image Servicing and Management tool
Version: 10.0.18362.1

Image Version: 10.0.18362.476

The operation completed successfully.
PS C:\WINDOWS\system32> dism /online /remove-provisionedappxpackage /packagename:Microsoft.XboxIdentityProvider_12.58.1001.0_neutral_~_8wekyb3d8bbwe

Deployment Image Servicing and Management tool
Version: 10.0.18362.1

Image Version: 10.0.18362.476

The operation completed successfully.
PS C:\WINDOWS\system32> dism /online /remove-provisionedappxpackage /packagename:Microsoft.XboxSpeechToTextOverlay_1.21.13002.0_neutral_~_8wekyb3d8bbwe

Deployment Image Servicing and Management tool
Version: 10.0.18362.1

Image Version: 10.0.18362.476

The operation completed successfully.
Step 7. Verify
Run DISM as an administrator:
PS C:\WINDOWS\system32>  dism /online /get-provisionedappxpackages | select-string packagename | select-string xbox
PS C:\WINDOWS\system32>
Run AppXPackage as a normal user:
PS C:\Users\josh> Get-AppxPackage | select-string xbox

Microsoft.XboxGameCallableUI_1000.18362.449.0_neutral_neutral_cw5n1h2txyewy
Run AppXPackage as an elevated user:
PS C:\WINDOWS\system32> Get-AppxPackage | Select-String xbox

Microsoft.XboxGameCallableUI_1000.15063.0.0_neutral_neutral_cw5n1h2txyewy
In this example, I had difficulty removing the XboxGameCallableUI package.
Want to just remove all the packages matching on xbox?
Launch PowerShell as an adminstrator.
Step 1. Verify what they are.
Get-AppxPackage | select-string xbox
Step 2. Remove any packages matching on xbox.
Get-AppxPackage | select-string xbox | Remove-AppxPackage
Struggling removing certain packages like the Microsoft.XboxGamingOverlay?
@Svenster64 commented that they had issues on build 1909 removing the XboxGamingOverlay.
Verify it is installed:
Get-AppxPackage -AllUsers Microsoft.XboxGamingOverlay
Remove it:
Get-AppxPackage -AllUsers Microsoft.XboxGamingOverlay | Remove-AppxPackage
This works on Windows 11 to get rid of the Game Bar. Verified on Windows 11 version 23H2 (22631.3880).
If you start seeing a popup around ms-gamingoverlay, try the following commands in an elevated terminal:
reg add HKEY_CURRENT_USER\SOFTWARE\Microsoft\Windows\CurrentVersion\GameDVR /f /t REG_DWORD /v "AppCaptureEnabled" /d 0
reg add HKEY_CURRENT_USER\System\GameConfigStore /f /t REG_DWORD /v "GameDVR_Enabled" /d 0
Appendix
Did something different to remove the Game bar? Please comment and let us know (except via apps like CCleaner).
I’ll try to keep this gist updated to help other folks stumbling onto this gist.
Cheers!
Is it annoying every time you want to Steam record or take screenshots with your Xbox controller, it is not Steam, but the Windows game bar does it? Do you know how to remove the Microsoft gaming service if you don’t use it? Read this article and get stepwise instructions on how to disable Xbox game bar in Windows 11 and 10.
How to Permanently Turn off Xbox Game Bar?
Game players often complain that Xbox Game Bar screen recording conflicts with Steam gameplay. Some users may find they have no need for this game bar and would like to uninstall it on their laptops and desktops.
However, when pressing the Xbox controller, some users may find that the MS-gaming overlay popup appears again even if they have already turned off the Windows game bar from Windows settings.
So, how to disable Xbox Game Bar in Windows 11 and Windows 10? Here are two ways for you:
- For Windows 11 users, there are two options: 1. Go to Settings to prevent Xbox Game Bar from running in the background. 2. Uninstall Windows Game Bar from PowerShell to permanently remove this feature from your PC.
- For Windows 10 users, turn off the game bar function from the Settings. This can prevent gaming controllers from launching the Windows 10 screen recorder.
Let’s continue to read if you want to delve into more details.
Share this post on your social media to help more users!
How to Disable Xbox Game Bar Windows 11
Users can get rid of Xbox Game Bar on Windows 11 via Settings. This will stop the game bar from running in the background. If you want to disable the MS-gaming service completely, you need to uninstall it from your PC.
Remove Xbox Game Bar via Settings
To turn off the Microsoft game bar from Settings, follow the steps below.
Step 1. Click the Windows button and tap Settings.
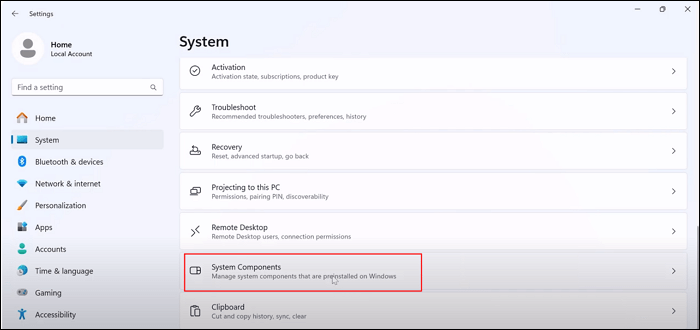
Step 2. Under Settings, go to System > System components > Game Bar.
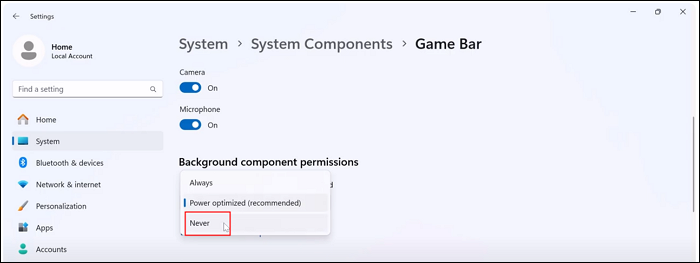
Step 3. Click the … next to Game Bar and select Advanced options.

Step 4. Go to Background apps permissions. Click the dropdown menu and select Never.
Step 5. Scroll down to find Terminate. Click the Terminate button to stop the game bar app.
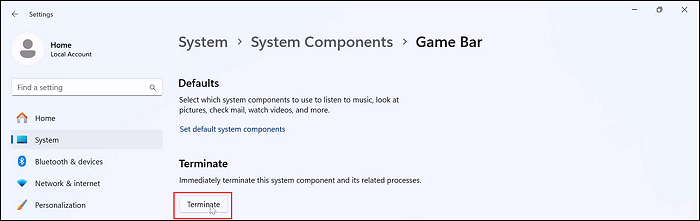
Step 6. On the left Settings panel, click Gaming. Go to Game Bar and toggle off Allow your controller to open Game Bar.
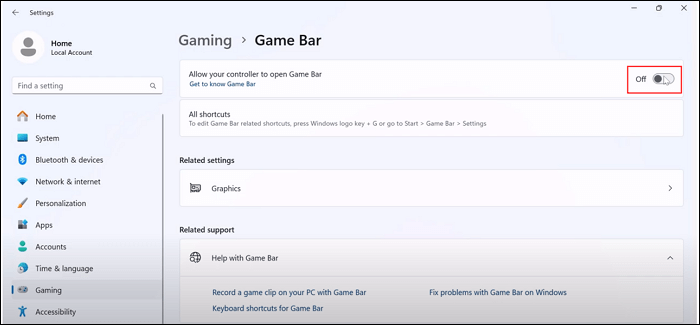
Now, the Xbox game bar is being disabled and will not run in the background. Even if you mistakenly launch the game overlay from the controller, it will not pop up.
Uninstall Game Bar Completely from PowerShell
However, you may find when you press the Win + G hotkeys, the game bar still shows up. That is because the method above only disables the Windows game bar. The default game screen recorder is still installed on your PC.
If you want to remove the game bar permanently, you need to uninstall it from the PowerShell. To uninstall Xbox game bar in Windows 11 and 10:
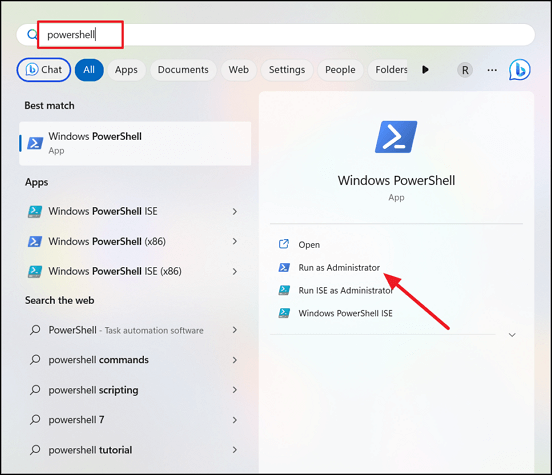
Step 1. Click the Windows button, type powershell, and select Run as administrator.
Step 2. Enter the command: Get-AppxPackage Microsoft.XboxGamingOverlay | Remove-AppxPackage. Hit Enter.

Step 3. Wait for the progress bar to finish, check if the Xbox bar is disabled, and close the PowerShell window.
- Notice: To reinstall the Xbox Game Bar, you need to download and install it from the Microsoft Store.
Share this post on your social media to help more users!
How to Disable Xbox Game Bar Windows 10
Windows 10 users can disable the service from Settings. Using PowerShell to disable Xbox Game Bar is only applicable to Windows 11.
Steps on how to remove game bar from Windows 10 are different from that of Windows 11. Check for more details:
Step 1. Press the Windows + I keys together to launch Settings.
Step 2. Under the Gaming tab, go to Xbox Game Bar and toggle off Enable Game Bar for things like….

Step 3. Toggle off Open Xbox Game Bar using this button on a controller. This prevents your Xbox Series controllers from launching the game bar.
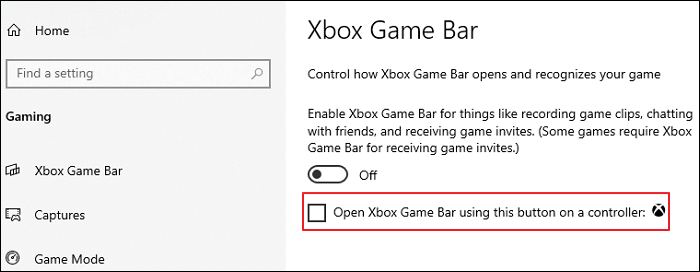
- Notice: To enable the Xbox overlay and widgets, toggle on these options.
Bonus: What Is the Best Xbox Game Bar Alternative
Although Windows Game Bar requires no installation, you can see some issues over the internet, like Xbox Game Bar can’t record and prevents Steam from recording itself. To overcome limitations such as incorrect screen ratio, screen recording without audio, and recordings that are too large, you can try its best free alternative, the Windows screen recorder EaseUS RecExperts.
⭐What makes it stand out:
- Record Xbox Series X gameplay for more than 1 hour.
- Record multiple windows without interrupting.
- Record the game with your face.
- Extract audio from Mov and transcribe audio to text.
- Trim or edit the video.
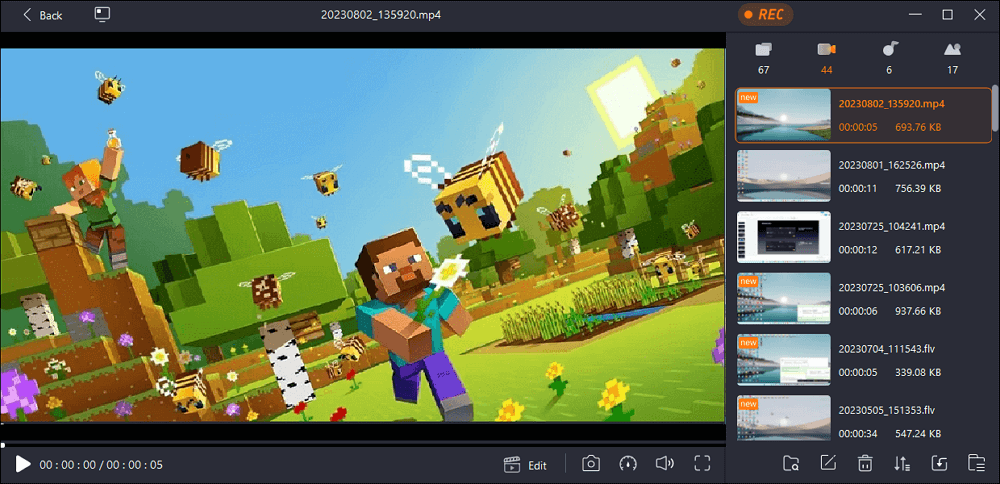
Let’s see how to record gameplay with EaseUS RecExperts.
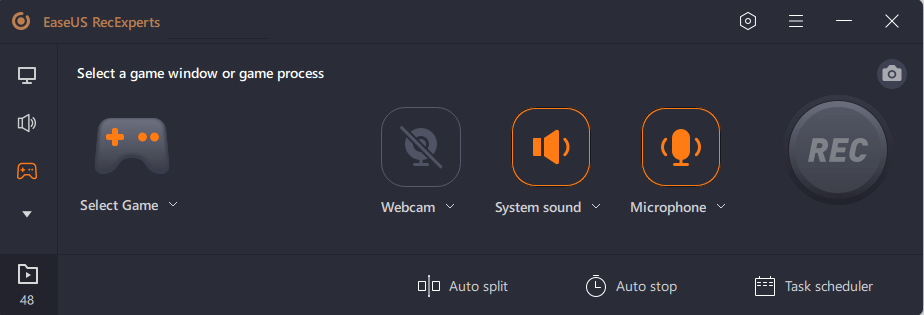
Step 1. Start the gameplay you want to record and launch EaseUS game recorder. Next, select the Game mode.
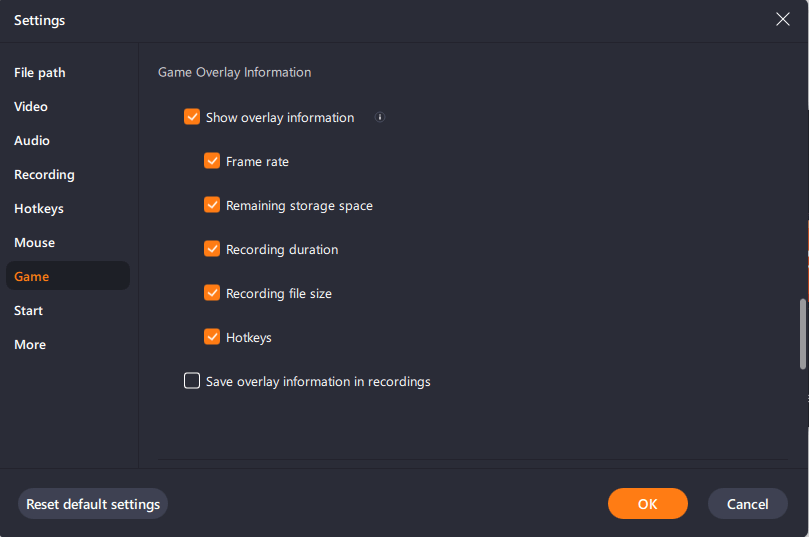
Step 2. Click the nut icon to open the Settings window, and then click on «Video» to adjust the frame rate (from 1 to 144), video quality, format, etc.
In addition, you can click on the «Game» button to change some game overlay options. Once done, click «OK».
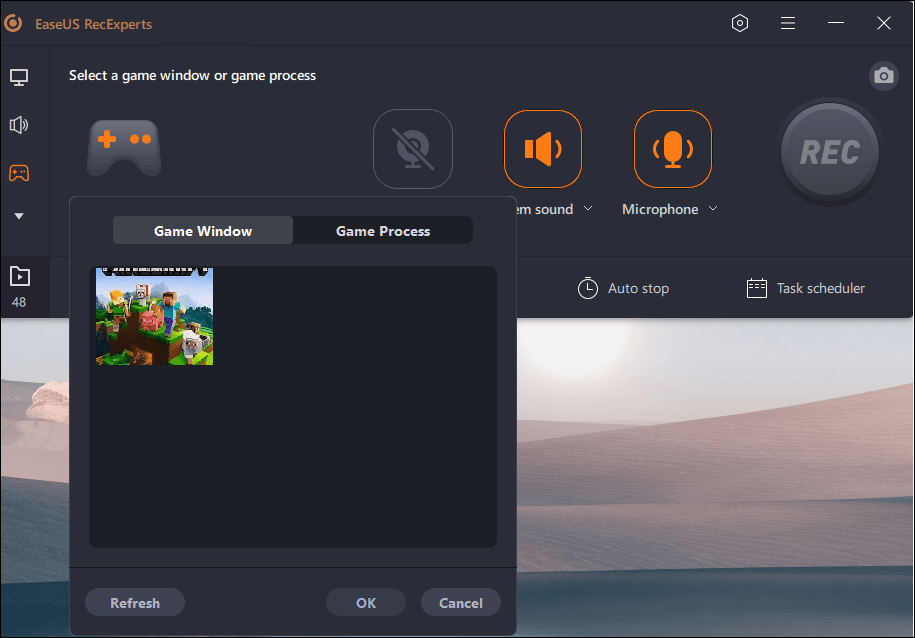
Step 3. Go back to the Game mode interface and click «Select Game» to choose the gameplay you want to capture. Next, click REC to start your game recording.
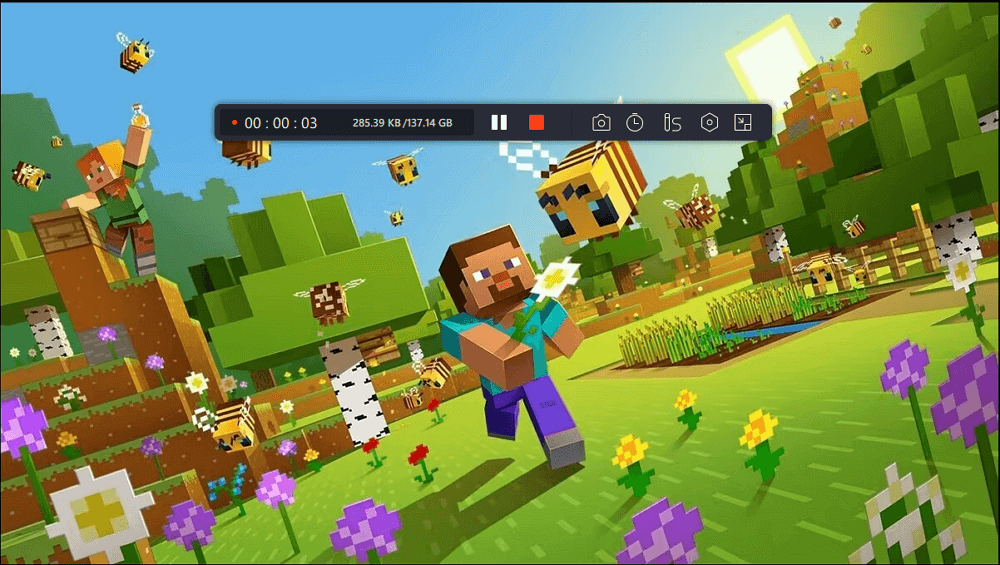
Step 4. You will see a small bar showing the time of your record. If needed, you can take screenshots in recording, or set the specific time to stop the recording by clicking the «Clock» icon on the toolbar.
Step 5. Once done, you can watch and edit the recorded footage with the built-in video editor. On the recorded video, you can trim the recordings as you want.
Final Words
Using the methods above, it can be easy to disable Xbox Game Bar on your Windows 11 and 10 computers. You can turn off the MS overlay or remove it completely.
If you are looking for a simpler screen recording utility, try EaseUS RecExperts. With several clicks, you can record single or multiple screens of your gameplay. Download and give it a shot.
Disable Xbox Game Bar Overlay FAQs
Check more frequently asked questions on how to disable the Xbox Game Bar.
1. How to turn off Game Mode?
To turn off Game Mode:
Step 1. Press the Windows + I keys together to launch Windows Settings.
Step 2. Go to Gaming > Game Mode > toggle off Game Mode.
Step 3. Close Settings.
2. Should I enable or disable Xbox game bar?
If you don’t use the Xbox game bar, we suggest turning off this feature to free up resources.
3. Does game bar slow down PC?
Windows Game Bar doesn’t slow down your PCs. Compared with other overlays like Nvidia’s Shadowplay, it has less of an effect on your PC’s performance.
4. How did Xbox game bar get on my computer?
Xbox Game Bar is a built-in screen recording tool in Windows 10 and 11. It helps you record videos and take screenshots while you are playing games or watching other videos. To initiate it, you can press the Win + G shortcut.
Share this post on your social media to help more users!